


Welcome to The First Descendant Gley Build Guide for Season 4 Episode 1.
Gley is one of The First Descendant’s most explosive and fan-favorite characters. Her unique ability to bypass reloads and unleash a non-stop hail of bullets makes her a powerhouse in any mission. In this guide, we’ll show you how to unlock Gley’s true potential by building around her signature infinite ammo window, maximizing uptime, damage output, and survivability.
Table of Contents:
- How to play Gley
- Gley Builds Overview – Modules
- Gley Trigger Module
- Gley Ancestor Modules
- Arche Tuning for Gley
- Gley Equipment Overview
- Gley Basics
- Gley’s Story
For builds on other Descendants, visit our The First Descendant Builds Database, or check out the Character Tier List or the Weapon Tier List.
TFD Wiki: We have expanded Alcasthq with tfd.gameslantern.com, a Wiki & Database for anything related to The First Descendant. Use the Character Editor or the Weapon Editor to theorycraft and create builds yourself. Browse Descendants, Weapons, Leaderboard Loadouts or use the Compare Tool. There are plenty of other features you can check out, too!
Here is a quick list of the strengths and weaknesses of the Gley Build for The First Descendant.
Gley’s Strengths
Gley Weaknesses
How to Play Gley in the First Descendant

With any Gley Build, you want to prioritize having a 100% uptime on your third skill, which allows you to get infinite ammo! This can easily be achieved with the right skill cooldown reduction and skill duration increase modules. Learn about her skills in detail in the Gley’s Skill Explanation section. Gley’s Transcendent Modules are also exceptional!
Important: Always make sure to have her first skill  Frenzy active.
Two Gley Builds
- Gley Rocket Launcher Build, which is focused on weapon-based damage infinite ammo by keeping her 3rd skill active.
- Gley Gunslinger Build, which is focused on skill-based damage with her 4th skill.
Gley’s Equipment: Make Or Break It!
To unlock Gley’s full potential, you need the right Weapons, Reactors, and External Components:
- Modules: Selecting the right Modules boosts your character’s power the most; this is very important and changes depending on what build you use.
- Ancestor Modules: Having a good Ancestor module with the right perks is key to maxing out your damage potential.
- Weapons: Gley works best with a powerful weapon. See the Best Weapons for Gley section.
- Reactors: Selecting the right reactor can drastically boost your damage. Check out the Best Reactors for Gley section.
- External Components: These are critical for survivability. Properly configured, they double or triple your HP and DEF. Learn more in the Best External Components for Gley section.
Building a top-tier The First Descendant Gley Build requires not only the right modules but also optimized weapons, reactors, and components.
Best Gley Builds Overview for The First Descendant


 Crystallization Catalysts: To unlock the necessary socket slots.
- Energy Activator: To increase overall module capacity.
- Gold & Kuiper: Best Gold Farming Method – Best Kuiper Shard Farming Method.




Equipment: I will cover Weapons, Reactors, External Components, Inversion Reinforcements, and Transcendent Modules in the Gley Equipment section. To maximize the power of any build, you must get the correct items!
| Name | Description |
|---|---|
| Rocket Launcher Gley Build | Weapon-Based Rocket Spam Build |
| Gunslinger Gley Build | Skill-Based 4th Skill Spam Build |
Gley Rocket Launcher Build
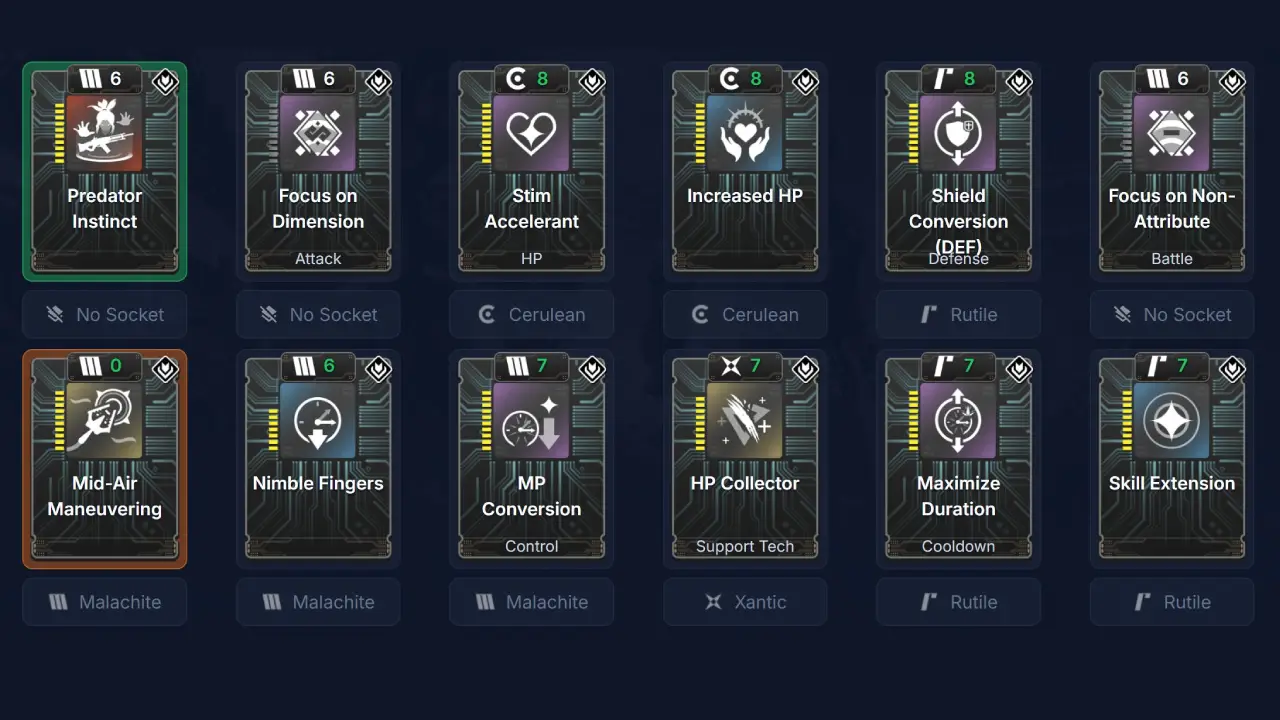
- Rocket Launcher Build Type: Works in any content, Mobbing, Dungeons, Void Erosion Purge, Bossing, etc.
- Rocket Launcher Build Focus: Optimized for insane damage and good survivability.
- Playable on: Normal Gley and Ultimate Gley.
- Requirements: Needs a maxed-out weapon to be effective!
This Rocket Launcher Gley Build works for any content in The First Descendant. Because Gley is a weapon-based Descendant, we only need to focus on skill cooldown modules and can use the rest to improve our survivability!
This setup is optimized so you get a 100% uptime on her 3rd skill  Increased Sensory. This allows you to basically have infinite ammo, which is very effective on any weapon! And because we don’t need to worry about dealing damage with skills, we can use the extra module slots for some extra survivability!
I do recommend using the Restored Relic Rocket Launcher for most content with Gley. I will recommend a few other options in the Best Gley Weapons section. Restored Relic deals both massive damage in Single-Target and AoE damage. Additionally, it has homing rockets so you don’t even really need to aim.
- Note 1: You will notice that Focus on Dimension & Non-Attribute module aren’t maxed. This is because we only slot them for the skill cooldown reduction, and that doesn’t change with leveling it up. So you can just leave it at base level and still get the full benefit of the skill cooldown reduction.
- Note 2: Two skills are marked with Flex, these can be swapped out with something else like attribute resistance vs specific enemies if you prefer that.
| Module Slot | Module Name |
|---|---|
| 0 (Trigger Module) | Kuiper Hollow Points |
| 1 (Skill Module) | Predator Instinct |
| 2 | Focus on Dimension |
| 3 | Stim Accelerant |
| 4 | Increased HP |
| 5 | Shield Conversion (DEF) |
| 6 | Focus on Non-Attribute (Flex) |
| 7 (Sub Module) | Mid-Air Maneuvering |
| 8 | Nimble Fingers |
| 9 | MP Conversion |
| 10 | HP Collector (Flex) |
| 11 | Maximize Duration |
| 12 | Skill Extension |
Gley Gunslinger Build
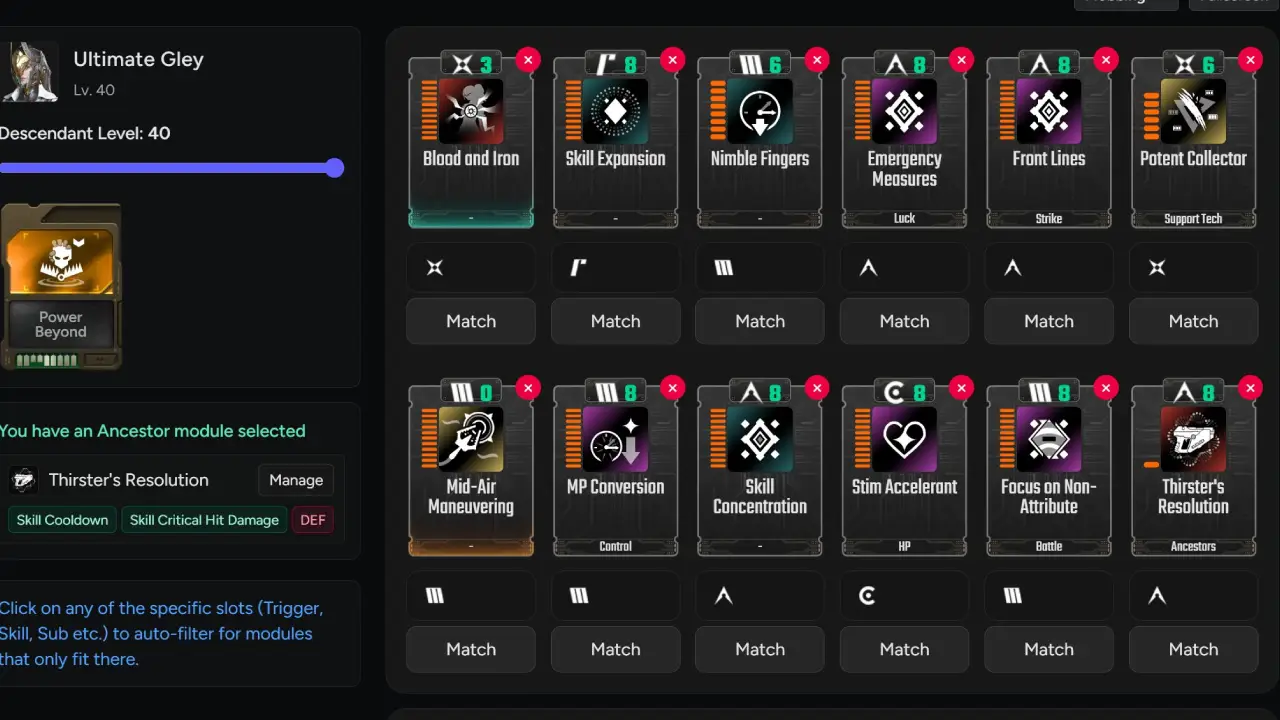
- Gunslinger Build Type: Works in any content, Mobbing, Dungeons, Void Erosion Purge, Bossing, etc.
- Gunslinger Build Focus: Optimized for insane damage and good survivability.
- Playable on: Normal Gley and Ultimate Gley.
- Requirements: Needs good positioning due to conal damage.
This Gunslinger Gley Build works for any Mobbing content, it deals massive damage and annihilates anything in its conal area.
At the beginning of an activity you must kill some enemies with a weapon first (preferably sword) to gain the custom resource to activate the 4th skill.
| Module Slot | Module Name |
|---|---|
| 0 (Trigger Module) | Power Beyond |
| 1 (Skill Module) | Blood And Iron |
| 2 | Skill Expansion |
| 3 | Nimble Fingers |
| 4 | Emergency Measures |
| 5 | Front Lines |
| 6 | Potent Collector |
| 7 (Sub Module) | Mid-Air Maneuvering |
| 8 | MP Conversion |
| 9 | Skill Concentration |
| 10 | Stim Acceleration |
| 11 | Focus on Non-Attribute |
| 12 | Thirster’s Resolution |
Ancestor Module:
- Positive: Skill Cooldown, Skill Critical Hit Damage
- Negative: Any useless perk
Arche Tuning for Gley

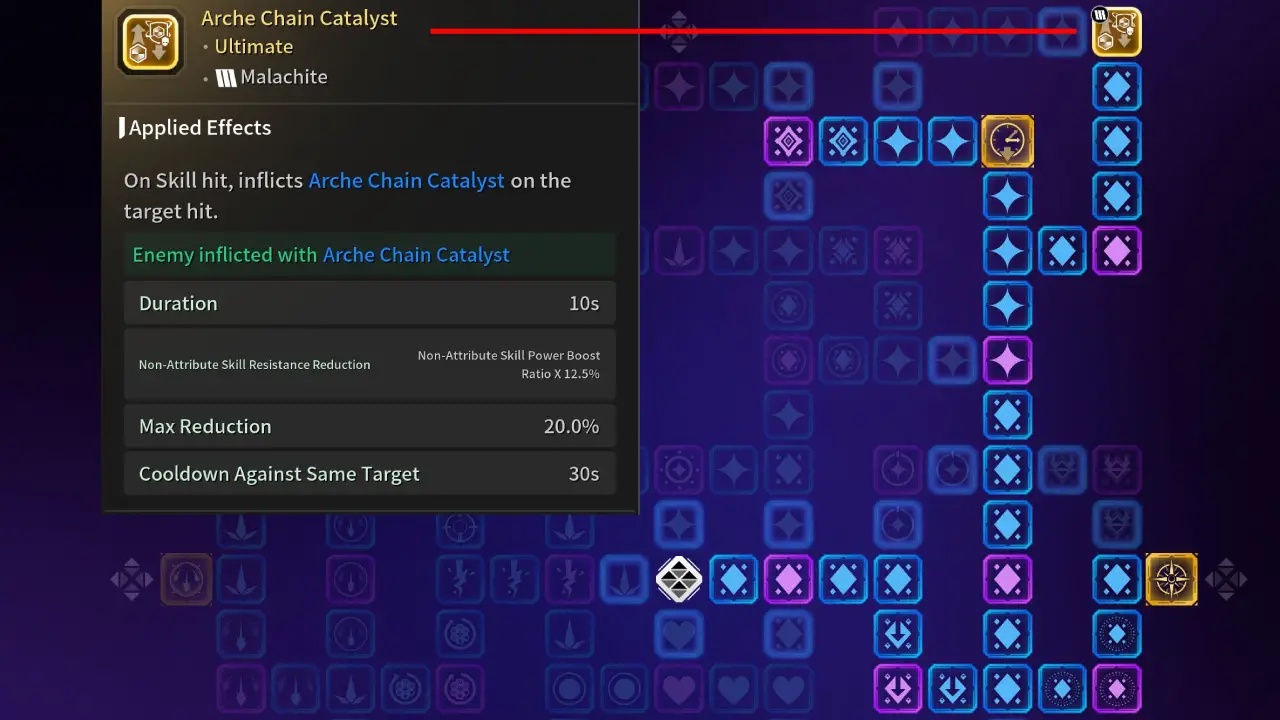
- Image Left: Rocket Launcher Build (Weapon-based)
- Right: Gunslinger Build (Skill-based)
The Arche Tuning System in The First Descendant is important for every Character; it buffs your stats by a good amount. For The First Descendant Gley, we are focusing on the left and upper left side. This setup works for all weapons, so you won’t have to change it all the time depending on what weapon you use.
You level up Arche Tuning in the Sigma Sector Dropoff Operation. Mutant Cells also drop there with a small chance.
Gley Trigger Module
Trigger Modules are a new type of Modules that can be unlocked. Learn how to unlock Trigger Modules in The First Descendant.
- Rocket Launcher Build: Kuiper Hollow Points. This gives us additional damage at the cost of extra recoil. If your recoil is not managable, you can remove it.
- Gunslinger Build: Power Beyond. Overall best dps increase for the Gunslinger Build.
Gley Ancestor Module
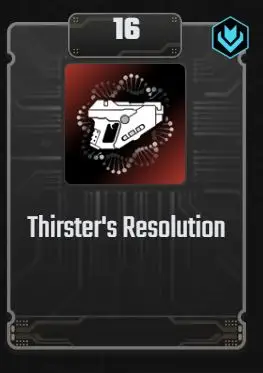
Ancestor Modules can be slotted once you have acquired them. However, they are only worth it once you have an Ancestor module with good stat rolls on them.
Gley Ancestor Module: Thirster’s Resolution
- Superconductive Cooling Units (Needed to Reroll perks): How to farm
- Must Read: How Ancestor Modules Scale & Examples
 Superconductive Cooling Units (Needed to Reroll perks):
 It is only worth slotting an Ancestor Module if you have good rolls on it; otherwise, it isn’t worth it.
Gley Rocket Launcher Build
- Ideal Positive Rolls
- Max HP
- Duration
- Cooldown
- Ideal Negative Rolls
- Skill Crit Rate
- Skill Crit Damage
- Range
Gley Gunslinger Build
- Ideal Positive Rolls
- Skill Cooldown
- Skill Critical Hit Damage
- Ideal Negative Rolls
- DEF
Ancestor Module: What to Replace and Why
To slot an Ancestor Module effectively, identify existing modules that share the same primary stat. By replacing a standard module with an Ancestor version that offers similar values, you maintain your core build while gaining its additional unique perks as a ‘free’ bonus.
- How to: Replace a standard module with an Ancestor Module that mirrors its main perk.
- The values should be close; you preferably don’t want to replace a 100% with a 30% value.
- Example 1: If your Ancestor Module provides Skill Critical Hit Rate, replace Skill Insight.
- Example 2: If your Ancestor Module provides Max HP, replace Increased HP.
- Example 3: If your Ancestor Module provides Skill Effect Range, replace Skill Expansion.
- Result: All other perks from the Ancestor Module will basically be a “freebie” and improve your build!
- Helpful Links:
As long as the Ancestor Module reaches a similar value to the one you’re removing, every additional stat on that Ancestor Module becomes a “free” bonus for your build.
Gley Equipment Overview in The First Descendant

Equipment is the cornerstone of any successful The First Descendant Build. For Gley, having the right setup can mean the difference between dominating a dungeon and falling short. This section breaks down the essential equipment types: Weapons, Reactors, External Components, and Transcendent Modules, and explains how they maximize her power.
| Equipment Type | Importance | Key Benefits |
|---|---|---|

|
|
|

|
|
|

|
|
|

|
|
|
Best Weapon for the Gley Build in The First Descendant
Depending on what content you do with Gley and what build you use, here are the weapons I recommend:
Top Weapons for Gley
| Weapon | Category | Key Features | Why It’s Great for Gley |
|---|---|---|---|

|
Assault Rifle |
|
|

|
Shotgun |
|
|

|
Launcher |
|
|

|
Scout Rifle |
|
|

|
Hand Gun |
|
|
Gunslinger Gley Build
| Weapon | Category | Key Features | Why It’s Great for Gley |
|---|---|---|---|

|
Melee Weapon |
|
|
Other Useful Weapons
| Weapon | Category | Key Features | Why It’s Great for Gley |
|---|---|---|---|

|
Rocket Launcher |
|
|

|
Submachine Gun |
|
|
Best Reactor for Gley in The First Descendant
Selecting the best reactor for Gley in The First Descendant can significantly enhance her abilities, allowing you to maximize her effectiveness in various scenarios. Not only does the reactor determine your skill damage, but it also gives additional secondary benefits through modifiers.
| Best Reactor | Specs | Key Benefits | Best Builds |
|---|---|---|---|
| Any Reactor |
|
This allows us to get max uptime on our skills. | |
| Materialized Phase Reactor |
|
Max damage and cooldown. |
How to find the Location of Reactors
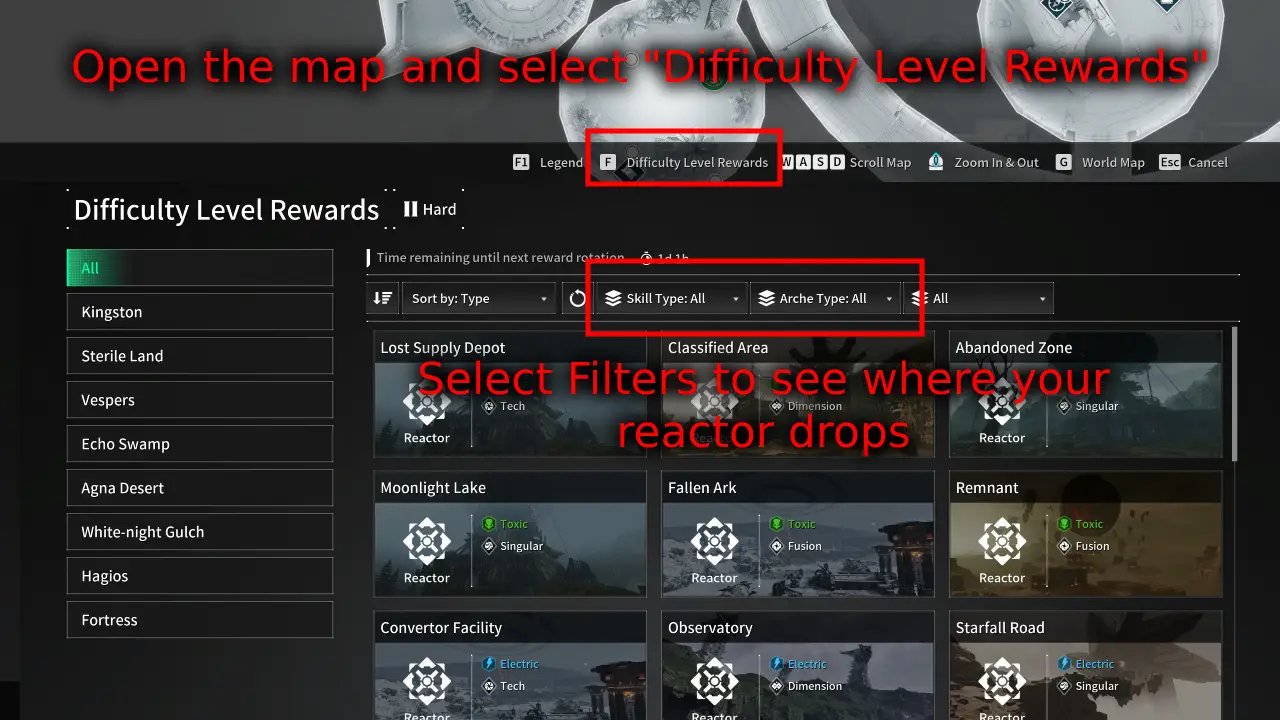
Reactor drop locations change every day. Not many players know this and get confused. Now, there is a reactor search function in-game. Go to the map and press on Difficulty Level Rewards. In here, you can see where all the reactors currently drop.
Note: It is possible that not all reactor types are currently dropping. You have to come back and recheck every day.
If your specified reactor drops in an area, you go there and farm any missions and monsters (Preferably missions with lots of monster spawns). There will be plenty of reactors dropping from monsters all over the place, any monster works. It will take a while to get a good reactor!
Best External Components for the Gley Build
External Component Cores: Always use Max HP & DEF.
- Rocket Launcher Build: 2x Fire Brand, 2x Shell Crusher
- Fire Brand Auxiliary Power: Max HP & Any Resistance
- Fire Brand Sensor: HP Recovery Modifier & Consumable Drop Rate
- Shell Crusher Memory: DEF & Any of your choice
- Shell Crusher Processor: Any of your choice
- Gunslinger Build: 4x Enlightened Mage
- Enlightened Mage Auxiliary Power: Max HP & Any Resistance
- Enlightened Mage Sensor: HP Recovery Modifier & Consumable Drop Rate
- Enlightened Mage Memory: DEF & Any of your choice
- Enlightened Mage Processor: Any of your choice
Inversion Reinforcements Setup for Gley
You can find the Inversion Reinforcements in the inventory, located on the bottom left side. This changes with every new season and needs to be leveled up again. You level up Inversion Reinforcements by doing any activity.
- Skill: Module Armor Activation.
- Weapon: Precision Shot.
- Recovery: None.
- Survival: Deployed Hardened Shell.
- Season: None.
Gley Basics in The First Descendant

If it is your first time playing Gley in The First Descendant, here are some useful things you should know.
- How to unlock Gley
- All Gley Skills
- All Gley Transcendent Modules Explained
- Best Grapple Hook for Gley
How to Get Gley in The First Descendant
Let’s take a quick look at how to unlock Gley in the First Descendant. To unlock Gley you have to purchase her from the store or research her. You need the following items to research Gley:
- 1x Gley Enhanced Cells
- Archive Shards
- 1x Gley Stabilizer
- Archive Shards
- 1x Gley Spiral Catalyst
- Archive Shards
- 1x Gley Code
- Archive Shards
- 400k Gold
When you visit Magisters Anais at the Research Institute you can hover over each item. Then click on Acquisition Info and it will tell you where this specific item drops. For a more in-depth guide, please visit the How to unlock Gley in The First Descendant and the How to unlock Ultimate Gley guide.
The First Descendant Gley Skills Explained
In this section, we are going to explain the skills available to our Gley Build in the First Descendant, how each skill works and the best ways for you to use them.
| Icon | Skill Name | Description |
|---|---|---|
|
Frenzied | Increases Firearm ATK and Penetration, but reduces HP Recovery. |
 |
Life Siphon | Damages enemies in range while recovering your HP. Grants additional effects depending on Gley’s Frenzy state. |
|
Increased Sensory | Applies different effects depending on Gley’s Frenzy state. INFINITE AMMO SKILL. |
 |
Massacre | Switches the equipped weapon to Massacre. Enemies hit by Massacre take heavy damage and are afflicted with additional effects, depending on Gley’s Frenzy state. |
 |
Thirst (Passive) | Gley cannot have Shield or MP. Defeated enemies drop a Life Sphere. Obtaining a Life Sphere restores HP and adds a stack of Power of Life. |
Frenzied
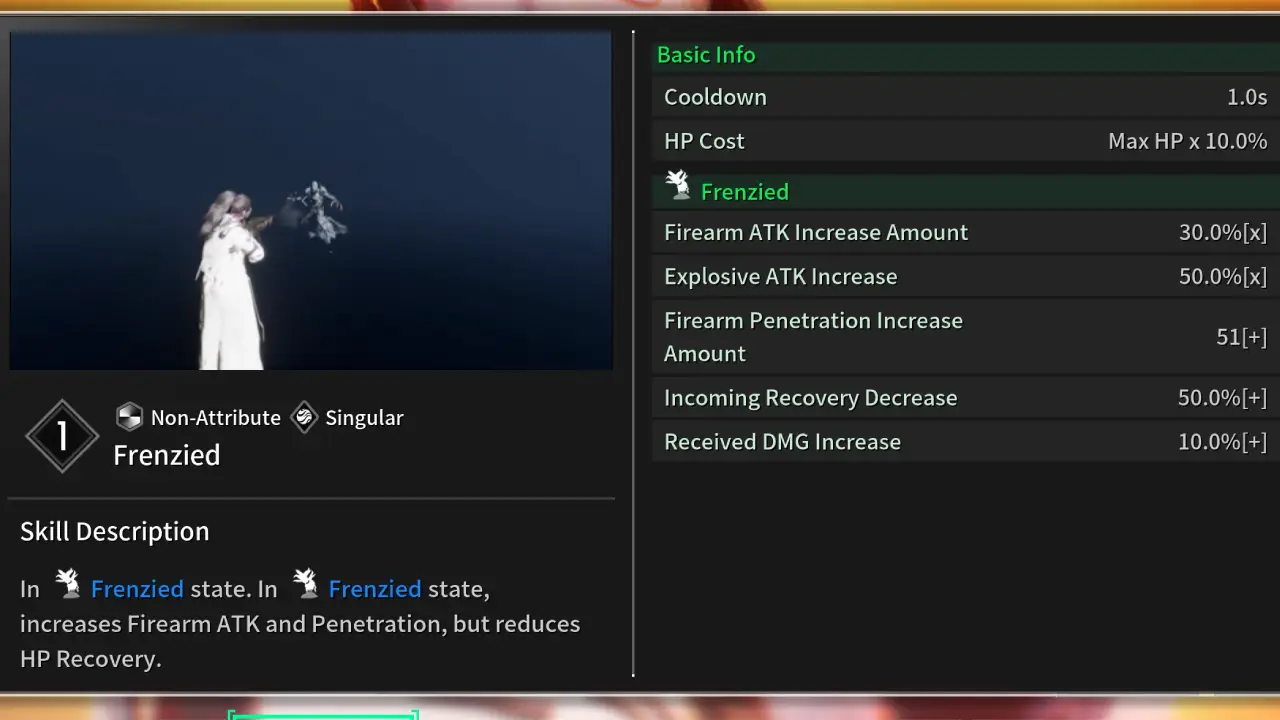
Increases Firearm ATK and Penetration, but reduces HP Recovery.
Frenzied Skill Description:
- Non-Attribute – Singular
- Enter Frenzied state.
- In Frenzied state, increases Firearm ATK and Penetration, but reduce HP Recovery.
How to use Frenzied:
Frenzied allows you to toggle Gley between her normal and Frenzied states. This determines how most of her other skills will function. When Frenzied you lose health, but can restore it by killing enemies and taking their Life Spheres, allowing you to stay in Frenzy for longer. You can leave Frenzy whenever you want by using the skill again. You can do this without worry, as the cooldown of Frenzied is only 1 second.
Life Siphon
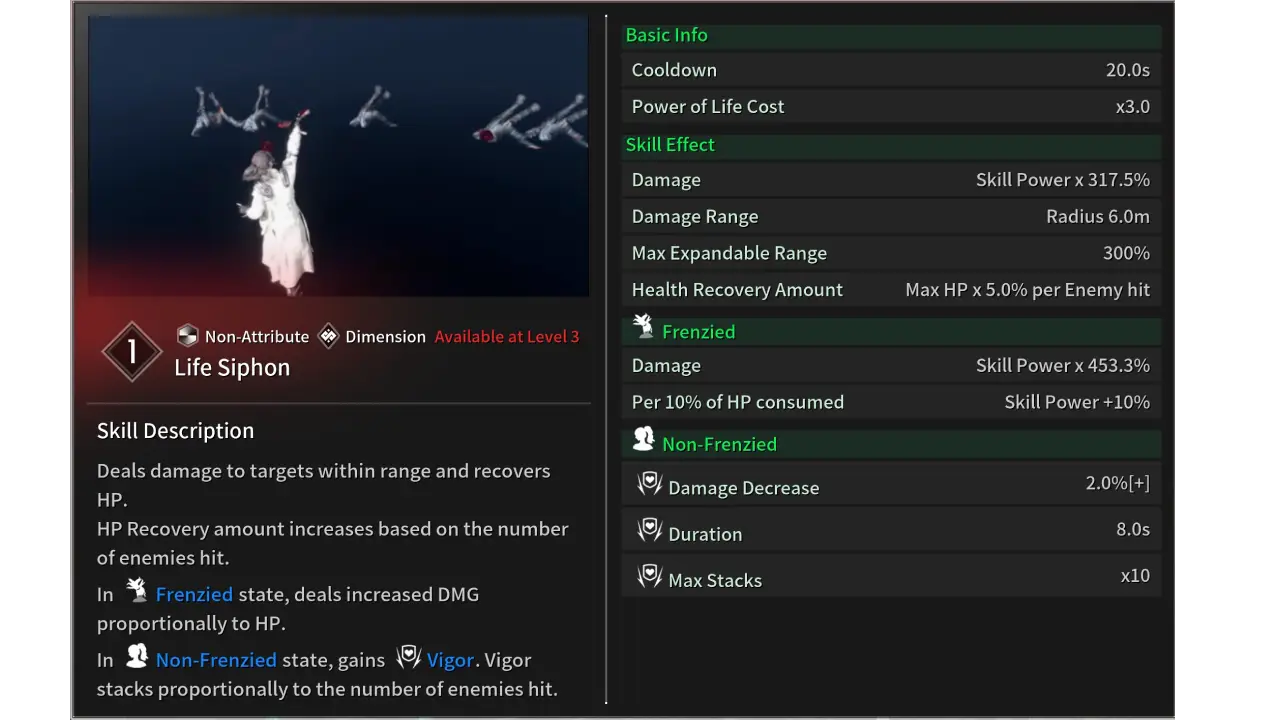
Damages enemies in range while recovering your HP. Grants additional effects depending on Gley’s Frenzy state.
Life Siphon Description:
- Non-Attribute – Dimension
- Deals Damage to enemies within range while recovering HP. HP Recovery depends on how many enemies you hit.
- Hit enemies are afflicted with additional effects depending on Gley’s state.
- When in Frenzied state, DMG increases, and increases even more if current HP is low.
- When in non-Frenzies state, gains Vigor for a certain period of time and decreases incoming DMG. Vigor stacks according to the number of enemies hit.
How to use Life Siphon:
Life Siphon grants Gley another way to heal while in Frenzy mode, so she is not completely reliant on Life Spheres. It also deals decent AOE damage and effectively drains HP from enemies.
To a certain extent, Life Siphon is a high risk high reward type of skill, since when Frenzied the damage will ramp up further if your HP is low.
Increased Sensory
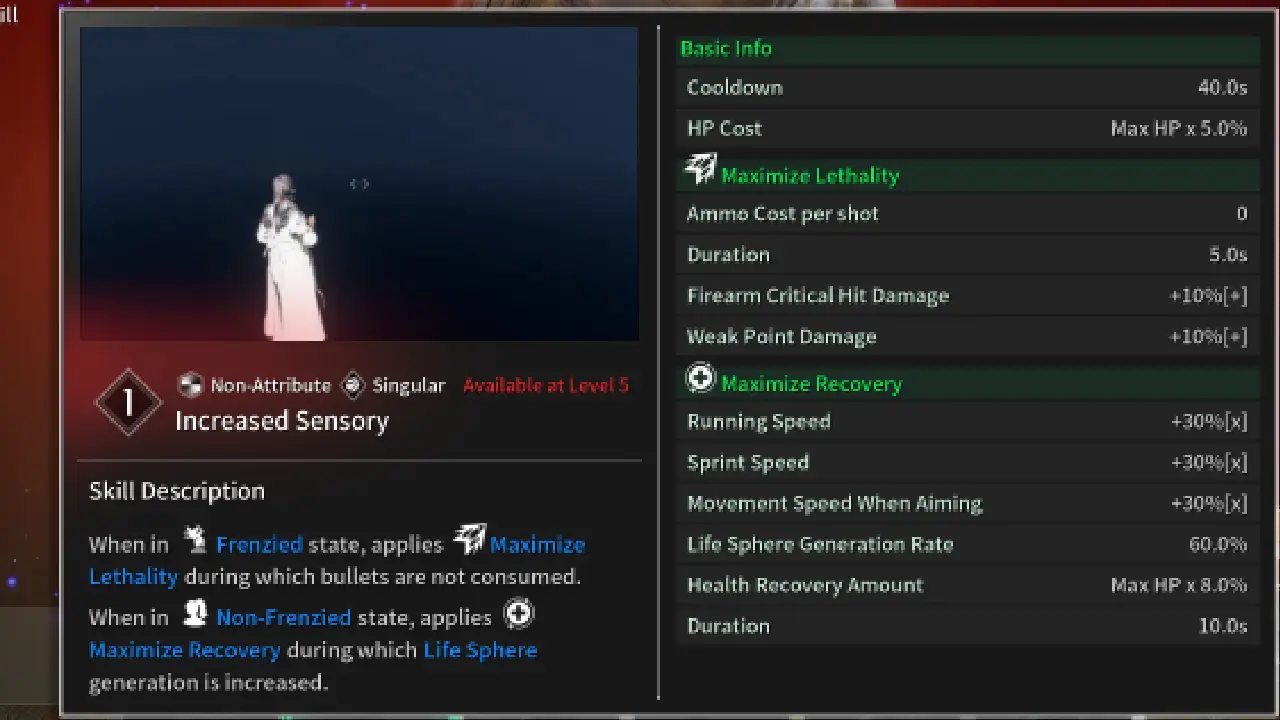
Applies different effects depending on Gley’s Frenzy state.
Increased Sensory Description:
- Non-Attribute – Singular
- Applied different effects depending on Gley’s state.
- When Frenzied, applies Maximize Lethality during which bullets are not consumed for a certain period of time, but Movement Speed decreases.
- When Non-Frenzied, applies Maximize Recovery during which the drop rate of Life Spheres and Recovery increase for a certain period of time.
How to use Increased Sensory:
For our Gley builds you will notice that we have plenty of Skill cooldown reduction and Skill duration increase modules. These are here to get this skill to a higher duration than its cooldown. That way we achieve infinite ammo!
Massacre
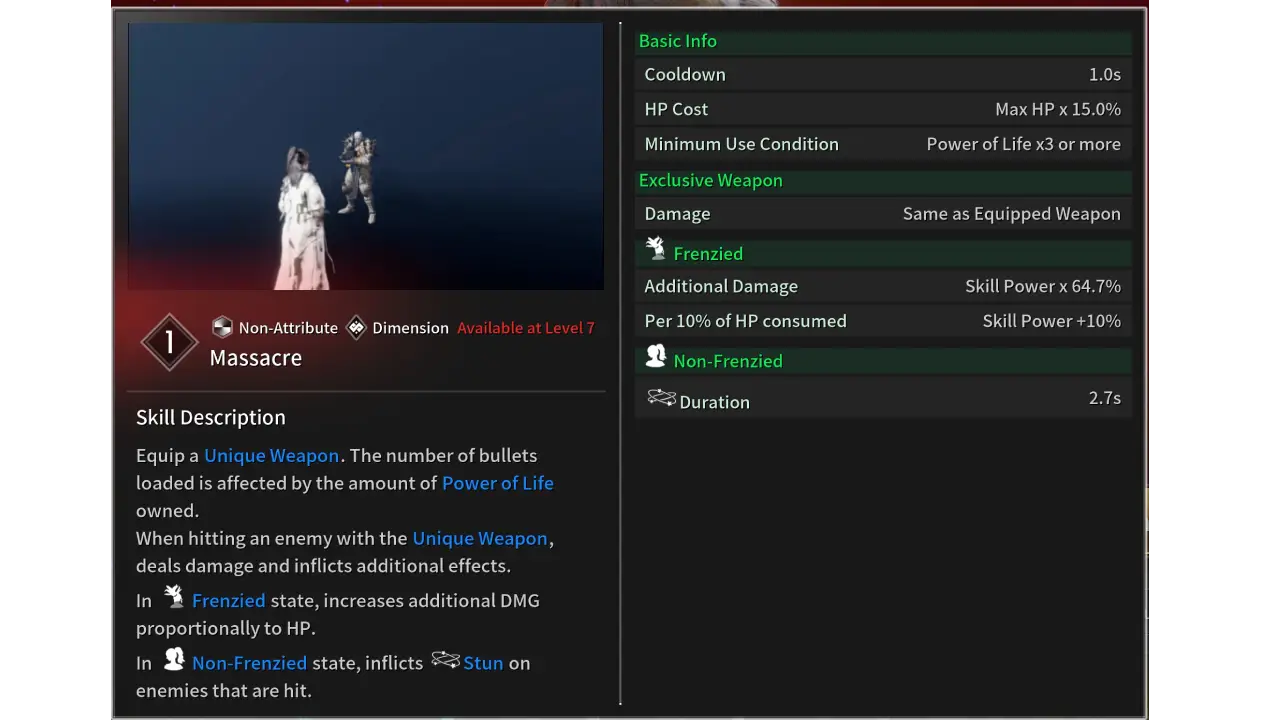
Switches the equipped weapon to Massacre. Enemies hit by Massacre take heavy damage and are afflicted with additional effects, depending on Gley’s Frenzy state.
Massacre Description:
- Non-Attribute – Dimension
- Switches the equipped weapon to Massacre. Massacre is influenced by certain stats of the equipped weapon, such as Firearm ATK power and Fire Rate (excluding Explosive ATK), and damages enemies.
- The bullets loaded are affected by the amount of Power of Life owned.
- Enemies hit by Massacre suffer damage and are inflicted with additional effects depending on Gley’s state.
- When Frenzied, deals additional damage, or deals great damage if current HP is low.
- When Non-Frenzied, the enemies hit are Stunned.
How to use Massacre:
At its baseline, Massacre deals the same amount of damage as your regular weapon. However it can deal twice as much damage per shot if you are Frenzied and about half empty on health. This is another risk/reward skill for Gley. If you want to take the risk of fighting while heavily damaged then you can get potentially awesome damage buffs from the Massacre skill.
Remember that you need to have at least three Power of Life saved to use Massacre.
Thirst (Passive)
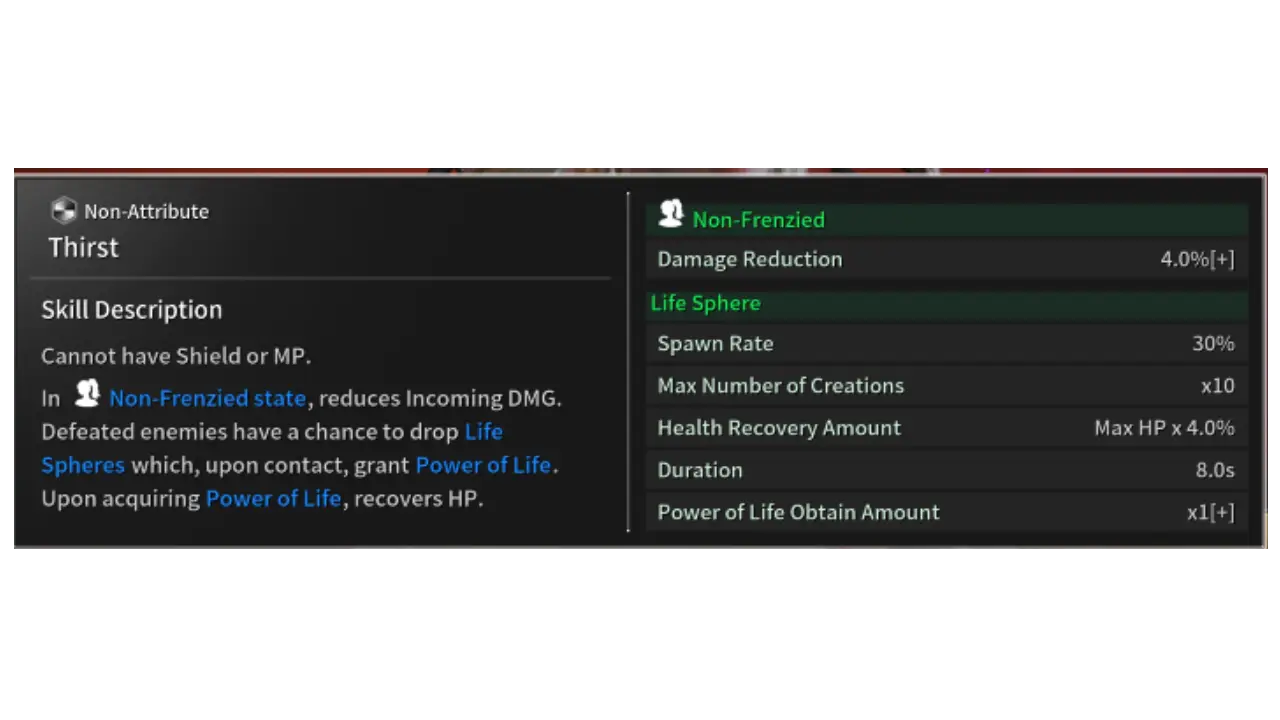
Gley cannot have Shield or MP. Defeated enemies drop a Life Sphere. Obtaining a Life Sphere restores HP and adds a stack of Power of Life.
Thirst Passive Description:
- Non-Attribute
- Gley cannot have Shield or MP.
- Instead, when in Non-Frenzied state, decreases incoming DMG.
- Enemies killed by Gley have a chance to drop Life Spheres.
- Upon acquiring a Life Sphere, recovers HP proportional to Max HP and acquires Power of Life.
How to use Thirst:
The Thirst passive is always active. Take note of the fact that Gley doesn’t have MP or a Shield. Thirst allows Gley to heal by killing enemies, and is a vital aspect of managing her abilities, many of which cost Power of Life to use, which can only be gained by picking up Life Spheres generated by Thirst. Gley’s playstyle is different to most other characters in The First Descendant – if you enjoy a strong risk/reward playstyle then Gley might be the correct class for you.
All Gley Transcendent Modules Explained
First, let us look at the full list of all Transcendent Modules for Gley in The First Descendant. It is important to note that not all of the modules will be used. Some are more effective than others!
| Module Name | Module Description | Best In Slot |
|---|---|---|
 Predator Instinct |
Using a firearm while Frenzied gradually increases Firearm ATK. | |
 Massive Sanguification |
Modifies Life Siphon to allow the absorption of Life Spheres during Non-Frenzied state. |
|
 Super Senses |
Modifies the effects of Frenzied state’s Maximize Lethality. Fire Rate becomes fixed, but Duration increases significantly. |
|
 Blood and Iron |
Life Spheres can no longer be acquired with the Thirst effect. Instead, Power of Life can be obtained when attacks land Firearm Critical Hits. |
|
 Explosive Life (Ult) |
The chance to create a Life Sphere is slightly increased. Detonates all nearby Life Spheres to deal damage instead of absorbing HP. Recovers Power of Life based on the number of Life Spheres exploded. |
|
 Demonic Modification (Ult) |
Unique Weapon has a fixed Fire Rate and consumes HP based on the duration of True Aim. Bullets deal additional damage proportional to the HP consumed, and attacking Weak Points increases the chance of HP Recovery. |
|
How the Infinite Ammo Loop Works On Gley
By activating Increased Sensory while in Frenzied state you apply Maximize Lethality. While this is active, bullets are not consumed.
Skills have cooldowns and durations. For the Gley infinite ammo loop to work, we need a 100% uptime. Therefore, it is important to get enough skill cooldown reduction and skill duration increase. This is what the build aims to achieve.
- Activate Frenzied.
- Activate Increased Sensory.
- Spam Bullets until skill runs out, reapply.
- Repeat.
Smooth Grapple Hook for your Gley Build
Using the standard Grapple Hook in The First Descendant can be a pain, and it feels kinda frustrating at times. Don’t worry, there is a way better alternative that will make it a joy to use the grappling hook!
It is called the Mid-Air Maneuvering Sub Module. I use this on all my The First Descendant Builds because it improves grappling by so much.
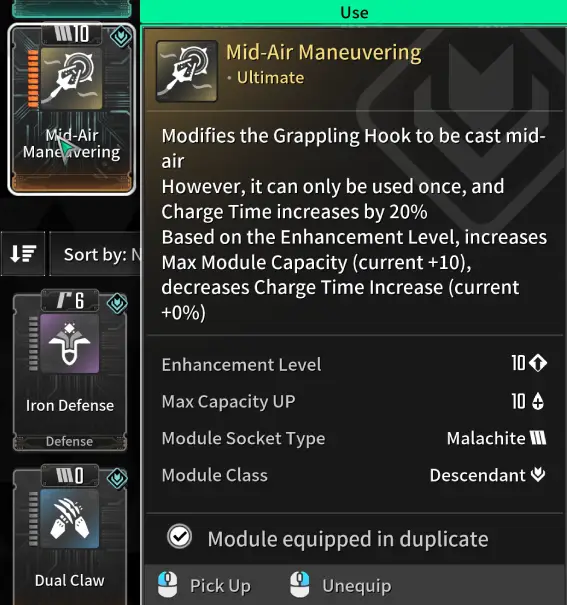
With this Module, you can attach your Grapple Hook to anything, even air! That means you can simply aim towards the sky and Hook up your grapple hook there for guaranteed fast movement!
Here is a guide on how to get the Mid-Air Maneuvering Sub Module in The First Descendant. It won’t take a lot of effort, but it will improve your build and overall gameplay in The First Descendant.
Gley’s Story in The First Descendant
A utility-type dealer who becomes stronger the more she gnaws on herself. Unleashes the rage inside her to quickly subdue her enemies.
“If you keep looking after others until the very end, who look after you, Mom?” Dia Elias asked her mother. ‘Until the very end’ was the slogan of Albion’s Medical Corps, and it was the first time that their captain, Gley, faced someone who questioned this slogan. A question that had never been asked by, not asked to, someone who had declared and lived by this slogan all her life.
Hearing this question from her own daughter brought about complicated emotions within Gley, but she could not grant her daughter’s request to allow her to protect herself. Gley, who had lost her entire family on the battlefield, was afraid. If she were to lose her daughter as well, then she would lose everything.
Undeterred by Gley’s stubbornness, Dia went to her mother’s old colleague and fellow military academy professor, Ajax, for a recommendation letter and thus enlisted in the military. Gley, feeling betrayed by Ajax, who knew of her past scars and yet still wrote the recommendation letter, refused to even speak to him.

Despite feeling much concern over her daughter, who had stubbornly become a soldier in the end, Gley decided to give Dia a chance and trust in her decision, which she would end up regretting when an incident occurred, in which all forces that had been deployed to the Vespers strike operation, excluding the Descendants squad, suffered massive casualties, with many going MIA. Among those who had gone missing were Gley and her daughter.
While Albion Headquarters frantically searched for the missing personnel, Gley and Dia were subjected to horrible experiments performed by the Order of Truth. The mother and daughter duo were used as test subjects for the Order’s experiments to create a new ‘species’ by injecting Vulgus DNA into human bodies. Gley despaired at her situation, as she could only tremble in anger helplessly as her daughter’s agonizing screams echoed around her.
When Gley, who had lost consciousness in her rage and despair, came to her senses, she was met with the sight of her adjutant cowering in a corner and a completely destroyed intensive care unit. Regaining her composure, Gley asked “Where is my daughter?”, to which nobody replied. Just as she was about to enter another frenzy in her rage, her adjutant shouted, “Her body was never found! She may still be alive, Captain! We’re the Medical Corps, remember? We shouldn’t give up hope until the very end!”.
Hearing this, she felt a warmth surround her body. Gley, who finally calmed down, felt a spark of hope. If Dia was still alive, then she could be saved. As it is the duty of the Medical Corps to never give up until the very end, Gley picked herself up. Her mission to retrieve her daughter was only beginning.
Related Guides for The First Descendant
You can also check out our Ultimate Weapons Database for The First Descendant or the Builds Database for The First Descendant.