Welcome to our Ultimate BG3 Shadowheart Build. Many players struggle with Shadowheart early in the game, finding her default setup (Trickery Domain) weak and inconsistent because she misses plenty of attacks.
By switching Shadowheart to the Light Domain subclass, we transform her into a powerful spellcaster.
This build enables her to dish out massive AoE damage and provide essential buffs, all while utilizing powerful debuffs to ensure your enemies rarely land a hit.
Table of Contents for the BG3 Shadowheart Build:
- Shadowheart Build – First Steps
- Shadowheart Build Starting Point (Level 1)
- Shadowheart Leveling Guide (2-12)
- Shadowheart Equipment
- Shadowheart Build Extra Info
- Frequently Asked Questions
For more Cleric builds, visit our BG3 Cleric Builds page or explore the complete BG3 Builds Database. You can also check out our BG3 Builds Tier List to see which builds perform best.
Strengths and Weaknesses list for the Shadowheart Light Domain Build:
Strengths
Weaknesses
BG3 Shadowheart Build – First Steps

In this section, we will cover how to recruit Shadowheart and the essential steps to respec her into our powerful Light Domain setup. If you’re an experienced player, feel free to skip ahead to the next part.
How to Recruit Shadowheart in Baldur’s Gate 3
Shadowheart is likely the first companion you will encounter. While she is easy to find, rescuing her early provides a significant boost to your initial “approval” rating with her.
Pro Tip: Rescuing her on the Nautiloid grants an immediate +10 Approval, making it easier to unlock her romance and story beats early.
How to Respec Shadowheart in BG3
To unlock the full potential of the Light Domain, you must respec Shadowheart at your camp.
Why We’re Using the Light Domain Subclass for Shadowheart

We’ll be using the Light Domain Cleric subclass for this Shadowheart Build for the following reasons:
The Light Domain Cleric has more damage potential than other Clerics. It helps to protect and heal your party, and with this build, it can easily apply crippling debuffs on multiple enemies at once, making your playthrough much easier.
Healer Build? If you want a healer build for Shadowheart, check out our BG3 Healer Build with the Light Domain Cleric.
BG3 Shadowheart Build Starting Point (Level 1)
Here, we will look at the BG3 Shadowheart Build’s status at Level 1, before we begin leveling up. This is how the build should look immediately after doing the respec to Light Domain.
Race: High Half-Elf
Shadowheart is a High Half-Elf. This race isn’t actually that great, and there are better picks for Cleric Builds generally, but it’s not possible to change Shadowheart’s race without modding the game, so it is what it is.
Starting Cantrips
We recommend choosing the following Cleric Cantrips to begin with:
Starting Spells
The following spells are a perfect fit for Shadowheart at Level 1:
You’ll also get a couple of extra Spells from the Light Domain subclass. These cannot be changed, but it’s worth giving them a mention anyway:
If you don’t know what we mean by terms like Advantage, Concentration or Attack Roll, or want to find out how systems like Stealth work, you will find our BG3 Hidden Mechanics Guide very useful.
Here is a quick image recap on how your Shadowheart respec should look like once you are done:


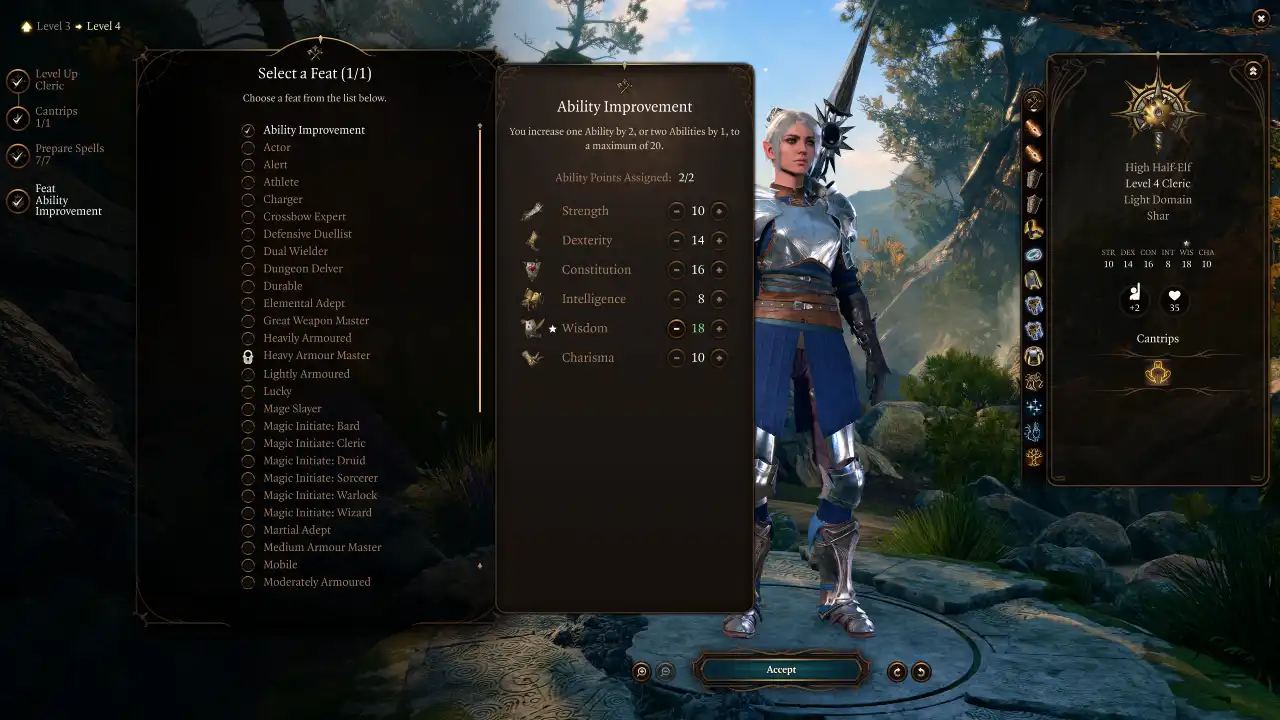
Ability Point Distribution
In Baldur’s Gate 3, Shadowheart starts the game with an ability distribution that is a little suboptimal in my opinion.
But when you respec her to the Light Domain Cleric subclass, you will also have the opportunity to fix this:
![]() Strength – 10 Points
Strength – 10 Points
- Improves jump distance and carry weight.
![]() Dexterity – 14 Points
Dexterity – 14 Points
- Boosts Armour Class (AC) and Initiative.
- Helps you act sooner in combat.
![]() Constitution – 16 Points
Constitution – 16 Points
- Increases Max HP.
- Vital for Concentration Checks to keep spells active.
![]() Intelligence – 8 Points
Intelligence – 8 Points
- Not relevant for our build.
![]() Wisdom – 16 Points
Wisdom – 16 Points
- Primary Stat.
- Powers your spell accuracy and damage.
![]() Charisma – 10 Points
Charisma – 10 Points
- Can be useful in social interactions.
| Ability | Points | Why it matters |
|---|---|---|
| 10 | Mostly for jump distance and carry weight. | |
| 14 | Important: gives you a higher Armour Class and improves initiative. | |
| 16 | Important: Increases HP and helps Concentration checks for spells. | |
| 8 | Not relevant for our build. | |
| 16 | Most Important: Main spellcasting ability for the Cleric. | |
| 10 | Can be useful in social interactions. |
BG3 Shadowheart Step-by-Step Leveling Guide (2-12)
Now that we’ve covered the foundation of the build, we can begin looking at how you should progress it as you level up.
Early-Game Leveling Process (2-4)
We’ll start with the early-game levels, 2-4, for the Shadowheart Build.
Level 2
At Level 2, you’ll gain a new Spell Slot and Channel Divinity Actions for your Shadowheart Build in Baldur’s Gate 3.
With the Shadowheart Light Domain Cleric, you’ll unlock the following Channel Divinity Actions at Level 2:
You also get one extra prepared spell slot. Select the following:


Level 3
At Level 3 for your Shadowheart Build, you unlock another First Level Spell Slot, two Second Level Spell Slots.
There are a couple of Second Level Spells that are great to prepare at this point:
You’ll also unlock a couple of new Light Domain Spells, which are spells that the Cleric will always have prepared (i.e they automatically go on your action bar without needing to choose them).
Also, keep in mind that some of the First Level Spells you already knew can now be upcasted to Second Level, improving their effects but consuming a second level spell slot instead.

Level 4
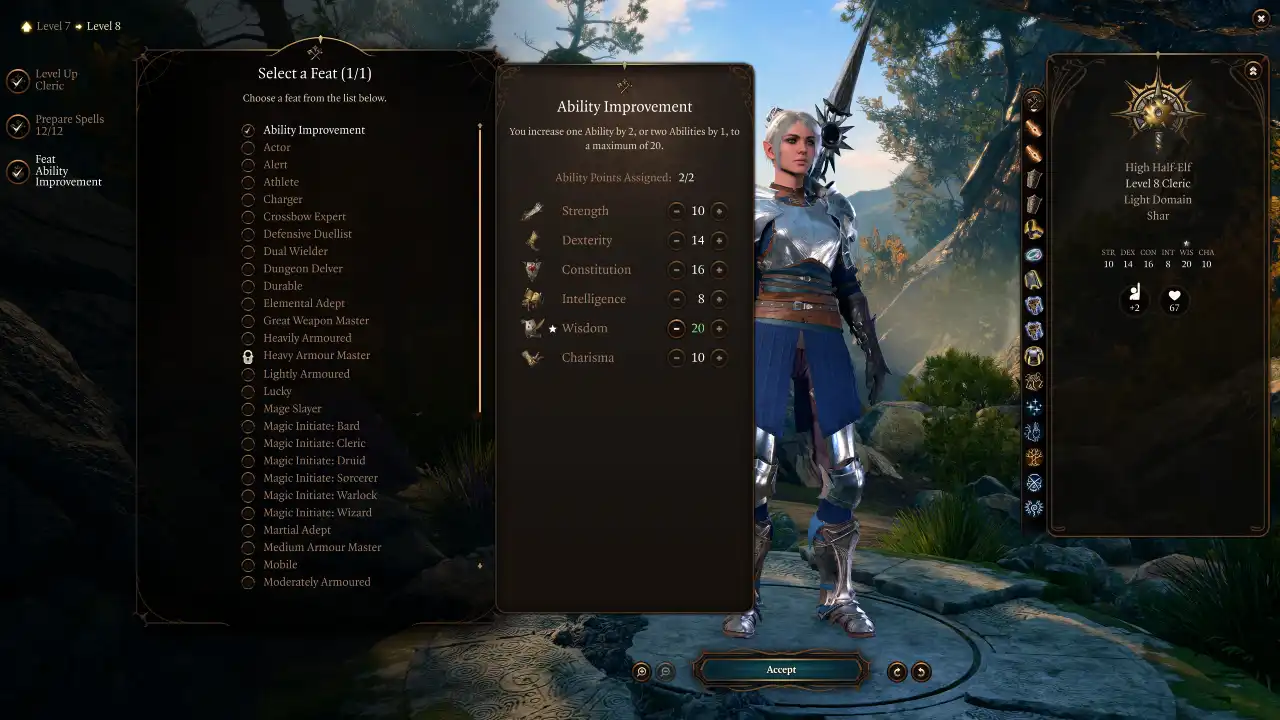
At Level 4, Shadowheart receives her first Feat, a massive boost to her spellcasting power as a Cleric.
You’ll also gain another First Level and Second Level Spell Slot, and you’ll need to choose another Cantrip.
You can slot two more spells now (one from leveling up, another from improving our Wisdom Modifier; you have to go into the spell menu to see the second slot). The following spells are great choices:

Mid-Game Leveling Process (5-8)
We’ll now go into the mid-game section of the leveling-up process for this Baldur’s Gate 3 Shadowheart Build, looking at levels 5-8.
Level 5
At Level 5, Shadowheart’s Spellcasting ability further improves.
Firstly, the ![]() Turn Undead Action is now upgraded to
Turn Undead Action is now upgraded to ![]() Destroy Undead, which will now deal
Destroy Undead, which will now deal ![]() Radiant Damage to undead who are
Radiant Damage to undead who are ![]() Turned by the Action.
Turned by the Action.
You’ll also unlock two Third Level Spell Slots. While this build is quite flexible, and it’s up to you which spells you choose here, we recommend taking a close look at the following options:
Luckily, Clerics like Shadowheart can change their prepared spells at any time (as long as they aren’t in combat) by accessing the Spells menu. So if you don’t like your choices, keep trying new spells until you find ones you like.
Finally, you’ll unlock another two Domain Spells at Level 5:

Level 6
At Level 6, Shadowheart gains a couple of new features:
That’s basically all you get at Level 6, but fortunately, there’s a lot more to come at the next level.

Level 7
At Level 7, you unlock 4th Level Spells. This level transforms Shadowheart from a support caster into a true battlefield controller.

Level 8
Level 8 is a massive milestone for this Shadowheart Build. You finally reach the maximum power for your spellcasting.
Additionally, you also can prepare two more Spells. Sadly, there aren’t many more good options for now.

Late-Game Leveling Process (9-12)
We’ll now look at the late-game section of the leveling guide for our best Shadowheart Build in BG3, covering levels 9-12.
Level 9
At Level 9, Shadowheart’s spellcasting continues to improve, as you can now access even more powerful spells. Here you’ll unlock:
- Another Fourth Level Spell Slot, giving you three in total.
- One Fifth Level Spell Slot, and the ability to prepare Fifth Level Spells.
- Two more Domain Spells from your subclass
Prepare one more spell, plus another two more to replace Death Ward and Banishment from Level 8:

Level 10
At Level 10, Shadowheart unlocks another spell and the ability to get a one-off boon from Shar or Selune. You gain:
- Another Fifth Level Spell Slot, giving you two in total.
- Choose one more Cantrip. We already picked up the most important Cantrips, so you can choose whatever you like here.
Prepare one more Spell.

Level 11
At Level 11, you don’t gain any new class abilities, but you do get access to Sixth Level Spells, the most powerful tier of magic in Baldur’s Gate 3.
You’ll gain one Sixth Level Spell Slot, and as usual, you’ll be able to prepare one more Spell.

Level 12
If you’ve reached this point, then you have finished leveling up your Shadowheart Build to the max level. Congratulations!
At Level 12, you can choose one more Feat for your Shadowheart Cleric Build.
You can also choose one more Spell to prepare.


Shadowheart Build Equipment for Baldur’s Gate 3

In this section, we will outline the best equipment recommendations for Shadowheart in BG3.
We have included both an early game and a late game section for equipment, so you can use this build no matter how far through the game you are.
Some of the items are quite expensive – you may be interested in our BG3 Infinite Gold Guide to help you afford them all.
Early-Game Gear for Shadowheart
Early-Game equipment is available in Act I and the earlier parts of Act II. It is generally less powerful than the late-game version of the build. However, there are still some really handy items you can find fairly early in your BG3 playthrough.
| Slot | Icon | Item | Effects | Location |
|---|---|---|---|---|
| Head |  |
Wapira’s Crown |
|
Reward from Zevlor for completing the Save the Refugees quest |
| Cloak |  |
Cloak of Protection |
|
Purchased from Quartermaster Talli in Last Light Inn |
| Chest |  |
Luminous Armour |
|
In an opulent chest in the Selunite Outpost. |
| Gloves |  |
Luminous Gloves |
|
Inside the Potter’s Chest in the Ruined Battlefield |
| Boots |  |
Vital Conduit Boots |
|
Sold by A’jak’nir Jeera in Crèche Y’llek |
| Necklace |  |
Pearl of Power Amulet |
|
Sold by Omeluum in the Myconid Colony |
| Ring 1 |  |
Coruscation Ring |
|
In a chest hidden in the cellar of Last Light Inn |
| Ring 2 |  |
The Whispering Promise |
|
Act I Vendors – Volo or Grat the Trader |
| Main Weapon |  |
The Blood of Lathander |
|
In the secret area in Rosymorn Monastery, accessed by solving the statue puzzle near where you meet Vlaakith’s projection. |
| Shield |  |
Shield of Devotion |
|
Sold by Quartermaster Talli in Last Light Inn |
| Second Weapon | Any with Proficiency |
|
N/A |
Pro-Tip: Radiant Orb Synergy
For Light Domain Clerics, the combination of ![]() Luminous Armour and
Luminous Armour and ![]() The Blood of Lathander is great. Since the mace emits constant light, it triggers your rings’ effects reliably, and every
The Blood of Lathander is great. Since the mace emits constant light, it triggers your rings’ effects reliably, and every ![]() Spirit Guardians or
Spirit Guardians or ![]() Radiance of the Dawn pulse will stack massive Attack Roll penalties on enemies, making your party almost untouchable.
Radiance of the Dawn pulse will stack massive Attack Roll penalties on enemies, making your party almost untouchable.
Late-Game Gear for Shadowheart
Late-Game Equipment is found in Act III and the latter parts of Act II. However, some items from the early game may also find their way onto this list if they are powerful enough to remain competitive with items found in the latter parts of the game.
At this stage of the game, we are mainly focusing on finding items that improve our Spell Save Difficulty Class. Increasing this stat means that enemies need to roll a higher number to succeed on a Saving Throw against our spells.
| Slot | Icon | Item | Effects | Location |
|---|---|---|---|---|
| Head |  |
Hood of the Weave |
|
Sold by Mystic Carrion in Philgrave’s Mansion |
| Cloak |  |
Cloak of the Weave |
|
Sold by Helsik at the Devil’s Fee, once her special stock has been unlocked. |
| Chest | |
Luminous Armour |
|
In an opulent chest in the Selunite Outpost. |
| Gloves | |
Luminous Gloves |
|
Inside the Potter’s Chest in the Ruined Battlefield |
| Boots |  |
Helldusk Boots |
|
In a locked Gilded Chest on the top floor of Wyrm’s Rock Fortress. |
| Necklace |  |
Amulet of the Devout |
|
Found in the main offering chest in the basement of Stormshore Tabernacle |
| Ring 1 | |
Coruscation Ring |
|
In a chest hidden in the cellar of Last Light Inn |
| Ring 2 |  |
Callous Glow Ring |
|
In an opulent chest in the vault room of the Gauntlet of Shar |
| Main Weapon | |
The Blood of Lathander |
|
In the secret area in Rosymorn Monastery, accessed by solving the statue puzzle near where you meet Vlaakith’s projection. |
| Shield |  |
Viconia’s Walking Fortress |
|
Looted from Viconia DeVir in the Cloister of Sombre Embrace |
| Second Weapon | Any with Proficiency |
|
N/A |
Pro-Tip: Maximizing Spell Spell Save DC
In the late game, the goal for this Shadowheart Build is to reach a Spell Save DC of 22 or higher. By combining the ![]() Hood of the Weave,
Hood of the Weave, ![]() Cloak of the Weave, and
Cloak of the Weave, and ![]() Amulet of the Devout, your Spells become almost impossible for enemies to dodge, ensuring maximum damage and crowd control in Baldur’s Gate Act 3’s hardest battles.
Amulet of the Devout, your Spells become almost impossible for enemies to dodge, ensuring maximum damage and crowd control in Baldur’s Gate Act 3’s hardest battles.
Shadowheart Build Extra Info

Below is some extra information about this BG3 Shadowheart Build, such as tips for playing the build as you progress through the game, how you can use Illithid Powers (entirely optional) and how the build changed in Patch 8, the final major update expected for Baldur’s Gate 3.
How to Play Shadowheart in BG3
Now that we’ve fully explained the process of creating this Shadowheart build for Baldur’s Gate 3, we will give you some tips about using the build.
Mirror of Loss
If you successfully acquire a buff from the Mirror of Loss during your playthrough, you should put the extra points into Wisdom. This will improve Shadowheart’s spellcasting.
If you don’t know what the Mirror of Loss is or how to use it, you may be interested in our Mirror of Loss Guide. The Mirror can give up to three additional Ability Points to all members of your party, making it very strong.
Best Party Composition for Shadowheart
The Light Domain Shadowheart Build is incredibly versatile, acting as a “Tanky Caster.” She performs best when surrounded by teammates who can capitalize on her Radiant Orb debuffs and elemental combos.
This composition focuses on maximizing AoE damage and ensuring no enemy can land a hit.
BG3 Shadowheart Build Patch 8 Changes

While BG3’s Patch 8 added a lot of new content to the game, including five powerful new spells, the changes impacting this Shadowheart Build were minimal. The ![]() Radiating Orb equipment remained unchanged, as did the actions, spells and cantrips used in this guide.
Radiating Orb equipment remained unchanged, as did the actions, spells and cantrips used in this guide.
What Patch 8 did bring to the table is two new Cantrips, which you can use on Shadowheart if you want:
That is all that changed with Patch 8, so you can rest assured that this build will still work perfectly in the latest version of BG3.
Cleric Build Illithid Powers (optional)

Illithid Powers are unlocked later in BG3 when you learn more about Mind Flayers and Tadpoles. By eating Jars of Mind Flayer Parasites you gain one point. This is another optional skill tree that you can get access to if you want. Here are some of the best Illithid Powers for the BG3 Shadowheart Build:
Frequently Asked Questions
This Shadowheart Build is mostly beginner-friendly. If you follow the recommendations in the guide, the build will make your playthrough easier by applying severe debuffs to enemies. However, the Cleric can be a tricky class to use in the early game (before level 5) because you initially don’t have many good spells and not much equipment. The good news is that Shadowheart makes for a good healer in these early levels, even though her damage output isn’t great.
Illithid Powers are not required for this build, and don’t have any especially important synergies with it. You can use them if you like, but it’s completely optional. The build is capable of finishing the game on any difficulty without using any Illithid Powers.
Yes. This build works on any difficulty, and is especially useful on Tactician and Honour difficulty because the Radiating Orb debuff makes it much harder for enemies to hit your party. On Tactician and Honour, enemies have a boost to their Attack Rolls, but with this debuff you can completely negate that.