

Welcome to the Tanking Beginners Guide for ESO. The Elder Scrolls Online can be quite an overwhelming game for beginners. The choices in classes, races and skills can be difficult to make at the start of the game. Hence why I am writing this text. We will cover various topics, from total beginners choices (like classes), to skills, gear sets, combat responsibilities and tactical thinking. It is going to be quite a read, so if you are looking for a particular topic, I’d highly suggest you scroll until you reach the topic you want to know more about. So lets start, shall we?
Table of contents
- What is tanking in the Elder Scrolls Online?
- Taunting enemies
- Classes
- Races
- Stats and Resources
- Supplies
- Armor
- Weapons
- Skills
Advanced Tanking Guide: You can also find an Advanced Tanking Guide on the website, I would recommend reading this after you finished the Beginner Tanking Guide for ESO.
What is the definition of tanking in the Elder Scrolls Online?
First and foremost, the Elder Scrolls Online goes quite a different path when it comes to the tanking role in comparison to other MMORPG games. The classic “keep the boss taunted and absorb damage” tanking role does not apply to the Elder Scrolls Online. While keeping a boss taunted and taking most of the damage is certainly one of the things you do as a tank, the role itself is vastly more complex. You should see yourself less as a meatshield and more as a “shaper of the perfect combat conditions”. What I mean by this is that the tank is responsible not only for absorbing damage, but also for making sure combat conditions are optimal. Three major tasks in this are: one, to buff your group mates.
Whether it is by wearing certain armour sets, or by using skills. And two, to debuff the enemy. There are many ways to debuff the enemy, but we will leave that for a different part of this text. The last element of creating optimal combat conditions is positioning. You don’t want to run around with a boss when your team has placed ground based damage effects on the floor, but you also want an overview of the combat situation. Positioning is key, and can sometimes make a massive difference in a fight.
Then there is of course the part where you need to lure danger away from the group. However, this game does not have a taunt that can be cast on multiple targets at once. This means that you need to pick the dangerous entities in a fight, and keep them busy. Not every enemy is an immediate danger to the group. Pick wisely, don’t overwhelm yourself or you will run out of resources pretty quickly.
So to sum up:
- Keep dangerous enemies taunted and absorb most of the damage they do
- Find and keep enemies in favorable positions for you and your group
- Buff group mates with skills and sets wherever possible
- Debuff enemies wherever possible
Taunting enemies
As a tank your main job is to grab the attention of enemies, however, in the Elder Scrolls Online it is not your job to grab every enemy. You will have to decide which heavy hitting bad guys to taunt, and let the less dangerous enemies roam, or at least leave them untaunted.
There are various ways to taunt enemies, here is a list:
- Puncture skill or morphs Pierce Armor / Ransack (One-handed and shield skill)
- Inner Fire skill or morphs Inner Beast / Inner Rage (Undaunted skill)
- Destructive Clench with a frost staff
All these taunts are available to every class. However in order to use Puncture (and morphs) you need to be wielding a one-handed weapon and shield.
Using each of these methods will focus the attention of the enemy on you for 15 seconds. After these 15 seconds the taunt effect has expired, so be sure to refresh it before then.
Taunt: Puncture (and morphs)
Puncture is the most general taunt. It comes with one-hand and shield and costs stamina. It taunts enemies for 15 seconds. the nice thing about it is that it also reduces the enemy’s physical resistance. This debuff is an essential part of the tanking toolkit. For this reason, the better morph of Puncture is Pierce Armor. Pierce Armor also applies a spell resistance debuff on the enemy. This taunt does however have a very small range, and can only be applied when you are close to an enemy. This is why you will often hear people refer to this skill as ‘melee taunt’.
Taunt: Inner Fire (and morphs)
Inner Fire is a taunt from the Undaunted skill tree. It’s major selling point is the fact that it can be casted from 28 meters away. This is why people usually refer to this skill as ‘ranged taunt’. Inner Fire and morphs do not provide any significant debuff. This taunt is usually used to engage bosses, and then as soon as the boss is close the tank switches to using Puncture (or morphs).
Morphing this skill comes down to personal preference. The main difference is that Inner Rage costs magicka, while Inner Beast costs stamina. I personally prefer Inner Rage, but feel free to use Inner Beast if you feel you don’t want to use magicka for this skill.
Overtaunting
Overtaunting happens when an enemy gets taunted too many times too fast. In ESO an overtaunt happens when an enemy receives a 3rd taunt within 15 seconds. This can happen between multiple tanks. So the third taunt within 15 seconds, no matter the casting person, will always be an overtaunt. Overtaunting makes an enemy immune to any taunts for the next 15 seconds.
Essentially this means that the enemy will stay focused on the person that did the 3rd taunt within those 15 seconds, as any other taunts on the immune enemy are now useless. This does not seem like a big deal at first, and when there is only one tank in the instance it really isn’t a big deal. However, there are instances where you will need two or even three tanks. These instances also require tanks to swap bosses around.
Of course, if a boss is overtaunted, you will be unable to swap it with the other tank as it has become immune to the taunts of the other tank. In general, just avoid overtaunting. It might not be a big deal in the easier content, but it definitely is bad practice and can really cause problems later in the game.
Classes
Pretty much the first significant choice you will make in this game. It can be hard to choose a class, especially when the combat mechanics are still vague to you. First of all, you need to make a decision on your play style. Are you here to have fun, not really interested in doing hard content in endgame per se? Then do not worry about this choice and pick whatever you think is the most fun. However, if you are interested in doing harder content later in the game, or even want to go for performance or difficult achievements, then be very careful.
Like it or not, when it comes to playing hard content the marketing statement of this game “play the way you want” is pretty much shattered in a thousand pieces. You need a certain toolbox to be an optimal tank, and some classes are simply stronger than others. I’m just going to give it to you bluntly: The Dragonknight, the Necromancer and the Warden are the most suitable classes for tanking all content in the Elder Scrolls Online. Note that this does not mean the other classes cannot be tanks. All I am simply saying is that the other classes lack a certain element from the tanking toolbox, and thus they are less wanted.
This toolbox I am talking about contains a few elements. Let me list them for you:
- Decent self-healing capabilities
- Internal options for resource sustain while blocking (This is the most important element!)
- Fast ultimate regeneration
- Sustain of resources relies on class skills, not on armor sets
Dragonknight
The Dragonknight has a very luxurious tanking toolbox and is often cited to be the best at tanking. They are very good at managing resources while maintaining a steadfast combat position. They have a passive skill called Helping Hands which lets them regenerate stamina while shielding allies and themselves. This even works while blocking. They also have a passive called Battle Roar. Battle Roar gives the Dragonknight a ton of resources back when they use an ultimate ability. This passive also works while blocking.
The Dragonknight also has very useful crowd control abilities. The most prominent one being the Unrelenting Grip skill. This skill is a gap closer, but it has the unique property that it pulls the enemy to you, instead of you to the enemy. This can be extremely useful when a tank wants to stack enemies on top of each other so that his group can burn them down easily. Usually chaining in a lot of enemies is followed by rooting them to the ground. The Dragonknight also has a very useful skill for this purpose, Choking Talons. This is a very strong combination of skills. You chain the enemies to one spot and then root them in place, making killing groups of enemies much faster and easier for your team.
When it comes to self healing, the Dragonknight is also equipped. Green Dragon Blood is a very strong and useful self healing skill. It costs a bit of magicka, but when used at the right moments it can heal for a tremendous amount.
Lastly, the Dragonknight has a fail-safe ultimate, Magma Shell. This ultimate basically gives you godmode for twelve seconds. Allowing you to cover up mistakes, or resurrect group members in nasty situations.
Warden
Wardens were introduced to the game during the Morrowind update. They make very solid tanks and are a great deal of fun to play. They excel at buffing team members and contributing to group healing while maintaining a stable combat position as a tank. Their Bull Netch skill allows them to regenerate stamina while blocking. They can also restore magicka and/or stamina by healing their allies with Green Balance abilities. Their Nature’s Gift passive restores 250 magicka or stamina when they do so (lowest pool will be restored).
The Warden also has a gap closer skill. It isn’t as fast as the Unrelenting Grip from the Dragonknight, but with practice it can definitely be used effectively. This skill is called Frozen Device, they are portals you can place on the ground. Once an enemy steps on one of these portals they will be teleported to you. You can have three of these portals active at the same time, forcing you to make some tactical decision. When it comes to rooting enemies, the Warden has skills like Gripping Shards, immobilizing enemies around you and slowing them also.
Self heals are also included in the Warden toolkit. Polar Wind is a very nice self heal that also heals a nearby ally. The Warden can also boost the resistances of itself and allies around it with a very powerful skill called Ice Fortress. This skill will also give the caster Minor Protection, reducing the damage they take by 5%.
Lastly the Warden class has three ultimates that can be considered by tanks. The first one is Northern Storm, reducing the damage taken for you and all allies around you by 10% for 8 seconds. It also increases you max magicka by 8% while slotted. Next up we have the Enchanted Forest. This ultimate can be used to burst heal allies (and yourself) in tricky situations. You also regain some ultimate if you heal low health targets. Last but not least we have Feral Guardian (and morphs). This ultimate is not used, but slotted for the passive Flourish which increases your magicka and stamina recovery by 12% for having it slotted. You will use your second bar ultimate for your real ultimate in this case.
Necromancers
Necromancers were introduced to the game during the Elsweyr update. They are very good tanks and have insane ultimate regeneration compared to any other tank out there. And if you ever wanted to be a huge Bone Goliath, you have the chance to do this with the Necromancer Tank. When you transform into a Bone Goliath, you instantly gain 30000 Health and an automatic heal absorption if you choose the Ravenous Goliath morph.
Ruinous Scythe is another great skill that heals for a lot when you hit several enemies and it can also set them off balance. Beckoning Armor gives you your major resistance buffs and automatically pulls enemies to you that hit you from range, basically functioning as an automatic chain pull.
Necrotic Potency is the best skill to produce ultimate points, on trash fights you can gain 80 ultimate points in a second if there are enough dead bodies on the ground. You also don’t share the dead bodies with other group members, so you will always get the full amount! With that you can push out a lot of Pestilent Colossus to increase the dps of your group by a huge margin!
Nightblade
Nightblades can make very interesting tanks, especially for dungeons as they can provide some extra healing and damage on the go. The only downside is that they are a bit lacking in the resource management department. This can be compensated by having a decent healer in your group providing you with extra resources via synergies of Luminous Shards or Energy Orb. Other than that the Nightblade will have to rely on Deep Thoughts from the Psijic Order skill tree.
The Nightblade has a good self heal, Dark Cloak. Dark Cloak will heal you based on your max health and it also applies Minor Protection to you. Next to that the Mirage skill of the Nightblade will give you minor resistance buffs and 20% AoE damage mitigation. Mirage has a duration of 26 seconds, so this is a very nice, long duration tanking buff.
When it come to major resistance buffs, the Nightblade is the only class that gains these buffs passively. It does this via the Shadow Barrier passive which grants Major Resolve and Major Ward upon casting a shadow ability. They last for 6 seconds, but the duration increases for each piece of heavy armor you are wearing.
For ultimate gain the Nightblade has a passive in the siphoning tree called Transfer. This passive grants you two ultimate every time you case a siphoning ability, but it has a four second cooldown.
Sorcerer
Sorcerers can sustain quite well. They can combine Spell Symmetry from the Mages Guild together with the Dark Deal skill in order to keep decent magicka and stamina reserves. And as an extra bonus the Dark Deal skill also counts as a self heal. The only downside is that this skill is a channel and thus drops your block. You can also always use Deep Thoughts from the Psijic Order skill tree.
The Boundless Storm skill gives the Sorcerer access to the major resistance buffs Major Resolve and Major Ward. The duration of this skill is 23 seconds, which is very nice as it means buffs do not have to be re-applied that often.
In the self heal department the Sorcerer also has the Summon Unstable Clannfear, this is a pet so it needs to be slotted on both bars. However, the heals it gives are really, really big.
The Power Stone passive of the Sorcerer also decreases the cost of ultimate abilities by 15%.
Templar
Templars have an interesting toolkit for support and healing, but are currently a bit lacking in the resource sustain department. That is not to say that it is completely absent, but the biggest resource sustain skills for a Templar are Repentance and Restoring Focus. However, Repentance requires corpses in the area, and those are simply not always there, making it unreliable. Of course the Templar can always fall back on Deep Thoughts from the Psijic Order skill tree.
The Restoring Focus skill grants the Templar its major resistance buffs and also increases your stamina sustain, even when you are blocking.
In terms of healing the Templar is very well equipped. The entire Restoring Light tree is based around healing and can help you and your group survive in even the most nasty situations. So if you are looking to heal/tank, the Templar is your best bet.
Lastly the Templar has a passive called Restoring Spirit which reduces the cost of all stamina, magicka and ultimate abilities by 4%.
Races
I’d like to start off with saying that for tanking in general, race choice isn’t that big of a deal. Yes, there are certain races that will give you an advantage over others, but it isn’t something crucial. So if you really want to play that one race, go for it, the effects on your character and play style will most likely be negligible.
Good, so now lets talk about it from a min-max perspective. There are some very strong racial passives in the game, and tanks can definitely benefit from them. To find out which passives are the most useful we must judge them by one important criteria, do they help me sustain my resources?
1. Argonian
In this regard the king of the hill is the Argonian. The Argonian has passives that can help a tank tremendously, the most notable one being Resourceful. This passive restores 4.6k health, magicka and stamina when you drink a potion. That is a lot. This means that while you are doing a general activity to sustain (drinking a potion) you are getting an extra sustain boost for free. Next to that the Argonian has an increased health pool, increased magicka pool and its healing done and received are increased by 5%. This applies to both incoming heals from healers and self heals. A very strong race, and at this point in time the strongest one (while also being very beginner friendly!).
2. Nord
Nords are extremely versatile as they generate ultimate passively while blocking. This is a fantastic bonus. If you are not too worried about resource management and beginner friendliness of a race, go Nord. You also get extra health and very valuable resistances.
3. Imperial
Imperials get strong health and stamina bonusses. These provide you with excellent resource pools. Imperials also get cost reduction on skills. It may be small, but on the longer fights it definitely adds up. Imperials are a very good all-round race, also good if you want to swap roles from time to time.
Stats
There are three types of stats we are interested in as tanks. The first type are resources. This means health, stamina and magicka. They are simply the hard numbers of resources you can spend on combat actions. The second type of stat we are interested in is regeneration, and mostly magicka regeneration.
The reason we are not interested in stamina regeneration so much is because your stamina regeneration gets nullified when you are blocking. The last type of stat we are interested in is resistances. These come in two types, physical resistance and spell resistance.
Resources
The main stat to aim for is health. Tanks need a decent amount of health to take the heavy hits from bosses and other enemies. A general rule of thumb is that anything above 35k health will work fine, the rest of the points you can spend in stamina (or magicka if you really want). The general approach to take is to craft all your armor and enchant it, then equip it. Then spend all your champion points (if you have them).
Then fill your skill bars, and lastly eat your food (see the next chapter). When you have done all these things, check how much health you have. Now slowly start spending points in health until you reach a comfortable amount (remember the 35k rule of thumb). As soon as you reach this point, you can freely spend the rest in magicka and stamina. However, keep in mind you want your stamina pool to be higher than your magicka pool. This is because some skills restore resources to the resource that has the highest pool, which we want to be stamina.
Regeneration
Regeneration plays an important part in resource management. There is only one problem: blocking nullifies your stamina regeneration. This mechanic makes stamina regeneration in tanking an undesirable stat. For this reason we invest in magicka regeneration. There are multiple ways to get this stat. The first one is from a set bonus (see the armour chapter), the second is champion points (see the champion point chapter), the third is jewel enchants and the last is via a mundus stone (the Atronach). So whenever you see stamina regeneration on a set, think twice if it is actually worth it.
Resistances
Resistances reduce the damage you take from certain attacks. Spell resistance affects all magic based damage, and physical resistance affects all physical based damage. Resistances are hardcapped with a maximum damage reduction of 50%. In stat numbers this equals to about 33.000 resistance.
Every armour piece will give you a certain amount of resistances, with heavy armour giving the most, and light armor giving the least. Furthermore you can gain extra resistances from set bonuses, enchants and jewelry traits.
Lets go back to the hardcap. People often ask if you need to be at the hardcap as a tank. The short answer is: no. It takes a lot of set bonuses and other factors to get to the hardcap, these are bonuses that are way more useful when invested in another stat (for instance not picking heavy resistance focussed sets, but health focused sets instead). Generally speaking anything above 27.000 (with self-buffs) should do absolutely fine. Don’t go over the top with resistances as you will make yourself less effective in other more important parts of tanking (e.g. resource management).
Supplies
Certain supplies are needed when heading into combat. These supplies are used to make your play style even more effective. These include potions, food (or drink) and having a proper mundus stone.
Potions
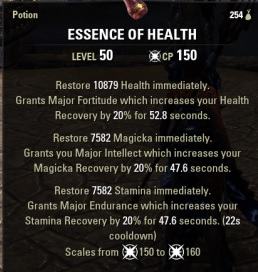
Potions can be crafted with the alchemy skill line. As a tank we are interested in potions that help us sustain. So naturally they should give us resources back. The best potions to use are called “essence of health”, but don’t be fooled by the name. Potions in ESO are named in a very confusing way. Only the main stat is used in the name (which is health in this case). Always check the tooltip of a potion to make sure it is the right one. We are interested in potions that give us health, stamina and magicka back, as well as increasing the regeneration of these stats for a certain time period. You will often hear people refer to these potions as “tri-stat potions”.
You can craft these potions by combining the following ingredients: Bugloss, Columbine and Mountain Flower. Below is a picture for reference.
Food
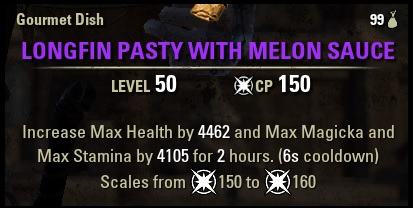
Food can be used to increase your resources (and/or regeneration) for a certain time period. Usually between one and two hours. Wherever you go, always make sure you have food active. It’s easy to acquire (and cheap) and also easy to craft (materials are everywhere).
Usually tanks will use a purple food that increases their maximum health, stamina and magicka for two hours. Below is a picture for reference.
Mundus stone
Mundus stones are objects scattered through Tamriel. You can activate them to gain a permanent buff. However, you can only have one of them active at a time. As a tank, the most useful one is the Atronach (found in Greenshade, Shadowfen, Rivenspire and Cyrodiil). The Atronach increases your magicka regeneration. This is a very nice way to get an extra static magicka regeneration boost without much effort.
Armor
The Elder Scrolls Online divides armor in three main categories. Each with their own advantages and disadvantages. These categories are light armor, medium armor and heavy armor. For us as tanks, heavy armor is the most important one. Heavy armor gives you lots of resistances and max health. These are of course stats we are looking for as a tank.
Armor sets
Armor sets are specific armor pieces that belong to “a set”. Usually they have a name that indicates they belong to a set, for instance if you have heavy armor gauntlets that belong to the Seducer set, they will be called “Gauntlets of the Seducer”. Wearing multiple pieces of the same set will give you extra stats and bonuses. It is always recommended to wear set items. Always look at how many pieces you need to wear to get a certain bonus.
Some sets give extra bonuses at pieces 2, 3, 4 and 5. Some give extra bonuses on piece 1 and 2. And some give extra bonuses on pieces 2 and 3. Just read the descriptions carefully, and you will know exactly what you are looking at. If you want to know more abouts sets in ESO, I highly recommend you check out ESO-Sets.com. This website is a fantastic resource that has information about all armor sets in the game.
The Weapon & Armor Beginner Guide shows you these unique sets in detail. If you want to take a look at the endgame sets that you should try to acquire, check out the Must Have Tank sets Article.
Mixing and matching armor sets
Mixing armor sets and types can be confusing. Let me elaborate on what factors play a role in this decision making process. First of all, we do want –ideally– one piece of light armor, one piece of medium armor and 5 pieces of heavy armor. However, sometimes this is ignored due to the fact that some sets only come in a certain armor type. Anyway, having all three armor types equipped will help you level all three skill lines.
This is useful for the passives, as well as for later in the game if you may decide to swap to another role. It is however important that you always wear at least five pieces of heavy armor. The passive abilities from the heavy armor tree are very important for tanks, and wearing less than five pieces deactivates some of these passives. Wearing all armor types also has another advantage, it activates the Undaunted Command and the Undaunted Mettle passives, which help you sustain.
Armor traits
There are various armor traits in ESO. Some of them are useful for tanks, some of them are not. Most tanks opt for the sturdy trait. The sturdy trait reduces the cost of blocking (by 4% for each golden armor piece, less if not gold). Reducing the cost of block is an effective way to contribute to your own sustain.
Jewelry traits can vary. Usually the max resource bonuses from jewelry traits will work out for everyone. You can choose between Healthy (max health), Robust (max stamina) or Triune (max health, stamina and magicka).
For a general overview of traits I recommend checking out the Traits Beginner Guide.
Armor Enchants
Enchanting is a crafting skill in the Elder Scrolls Online. Every piece of equipment can be enchanted to give them some extra stat values. Enchants can be crafted for various levels and in various qualities, with Champion Points 160 gold being the maximum.
Armor enchants for tanks usually consist of max health and max stamina enchants. However, those with a little more money will go for the Prismatic Defense enchants. These enchants give max health, magicka and stamina at the same time. They do not give as much health as a normal health enchant (or magicka or stamina), but the overall stats they give are more. These enchants can be crafted with a Hakeijo rune stone, but beware, they are expensive.
Jewelry enchants come down to personal preference. There are two solid choices here. The first one is Shield Play enchants. These reduce the cost of block. For many beginners I recommend using these. They are easy to get and help you sustain a great deal. The second enchant is magicka regeneration, these are mostly used by tanks that cast a lot of magicka support skills during a fight. However, most tanks swap back to Shield Play enchants for heavy or longer fights.
What makes a good set for beginners?
As a beginner, you are usually looking for sets that will give you room to learn. Most of these sets are what we call “selfish sets”, this has a negative tone to it, but it’s really nothing negative at all. Selfish sets are sets that only help the wearer stay alive or manage resources. These sets usually give high health bonuses, resistance bonuses or dodge bonuses. The reason they are called “selfish sets” is because they do not necessarily contribute to group support (which is a key role for a tank in the late endgame, but don’t worry about this when you are still learning).
Obtaining sets as a beginner can be a pain. If you have friends that are already playing ESO, or you are in a friendly guild, I highly suggest you ask one of your friends/guildies to craft you some armor sets. This is the easiest way to get decent gear fast. If this is not an option you can either start learning traits to craft it yourself, but farming drop sets is likely to be faster in this case. Whichever path you choose, there is tons of content to explore while farming, so it’s far from a punishment.
Here are some good beginner sets:
- Hist Bark (Crafted)
- Alessia’s Bulwark (Crafted)
- Order of Diagna (Drop, Alik’r Desert)
- Plague Doctor (Drop, Deshaan)
- Fortified Brass (Crafted, crafter will need Clockwork City DLC)
- Green Pact (Drop, Grathwood)
- Armor of the Seducer (Crafted, especially great for Wardens)
Please keep in mind, these are beginner sets and are not really used when we look at the endgame sets, but they are great to start out!
What makes a good set for advanced players?
Advanced players will worry less about their own survivability and sustain, and more about supporting the group. There are tons of armor sets that give special bonuses to team members. These are great options for tanks, as this allows them to buff their team members without really doing anything specific besides wearing the sets.
What is usually sought after by progression groups are tanks that are skilled in keeping up resistance debuffs on enemies. The lower the enemy’s resistance, the more damage output your team members will do. A great example of such a set is Roar of Alkosh. Next to that group survivability is also a key aspect of armor sets, you as a tank can contribute to this by for instance wearing a set like Ebon Armory. Lastly, ultimate regeneration or ultimate cost reduction are also important. Tanks usually use ultimate abilities that buff their team members, such as Aggressive Horn. A set like Akaviri Dragonguard can greatly contribute to group effectiveness.
Here are some good sets for advanced players:
- Roar of Alkosh (Drop, Maw of Lorkhaj, requires Thieves Guild DLC)
- Ebon Armory (Drop, Crypt of Hearts I & II)
- Akaviri Dragonguard (Drop, Eastmarch)
- Lord Warden (Drop, Imperial City Prison + Undaunted chest, requires Imperial City DLC)
- Bloodspawn (Drop, Spindleclutch II + Undaunted chest)
If you want a better look at the advanced sets, make sure to check out the Advanced Tanking Guide for ESO.
Weapons
There are many weapon types in The Elder Scrolls Online, each with their own advantages, disadvantages and purposes. For tanking there are a selection of weapons that are ideal. We will discuss them here.
One-handed weapon and shield
The classic tanking weapon choice is a one-handed weapon and a shield. This is the most common choice, and is usable for all content in the game. If you are a total beginner I highly recommend you start out using this.
There are four types of one-handed weapons in the game: swords, daggers, hammers and axes. Which one you use is irrelevant, as a tank they will all do exactly the same, so feel free to pick your favourite or simply the one that is easiest to acquire. Shields only come in one type, just a regular shield. All one-handed weapons are blacksmithing items, while shields are woodworking items.
The one-handed and shield skill tree brings some excellent active and passives skills to the table for tanks. The Heroic Slash skill makes sure enemies do less damage and also gives you a nice ultimate regeneration bonus. Pierce Armor lowers the resistances of the enemy and is a very effective taunt skill. Defensive Posture increases your block mitigation even further.
Next to that there are some great passives. Fortress reduces the cost of one-hand and shield abilities. It also reduces your block cost by 36%. Sword and Board increases the damage you can block (mitigation) by 20%. Deflect Bolts increases the amount of damage you can block from ranged attacks and projectiles by 15%. And finally, Battlefield Mobility increases your movement speed while blocking by 60% (very handy!).
One-hand and shield is a very solid all-round choice as a tanking weapon. It is preferred by many, and you will see most tanks running around with this. Starting out, this is definitely your go-to weapon.
Ice staff
Ice staves are alternative weapons to one-hand and shield. Though mostly used as an off-bar (second bar) alternative. Ice staves can taunt enemies by hitting them with a fully charged heavy attack, though this feature is not widely used as casting a heavy attack drops your block. Many ice staff wielders still prefer to swap to their one-hand and shield bar or use Inner Fire to taunt enemies. Ice staves also can change your block resource from stamina to magicka if you prefer.
Though there is some debate on this. Personally I don’t like this, as magicka is widely used to cast support skills. Making magicka also your block resource means you are using the same resource for two things, draining it twice as fast. If you want to use an ice staff, but not use magicka as your block resource, simply do not unlock the Tri Focus passive.
The reason ice staves are nice is because you can use the Elemental Blockade skill. This is a ground area of effect skill. Using this skill you can trigger your weapon enchant more reliably (as it can trigger your enchant with every tick of the blockade). With an infused weapon your enchant cooldown is 5 seconds and the duration is also 5 seconds, meaning that with a well placed blockade you can get very high uptimes on your enchant.
Lightning staff (advanced players)
A warning up front: do not use this if you are not an experienced player. Lightning staves have no tanking passives, and while you are on a lightning bar you can take serious damage and die easily.
There is only one reason some tanks use lightning staves, and this is to keep a debuff called ‘off-balance’ up. Blockade of lightning can do this together with the destruction staff passives. Because of this, this weapon is only used on the second bar. I highly discourage new players to use this weapon. Make sure you master the tanking playstyle before you try playing with such a weapon.
Weapon enchants
Tanks usually use two types of weapon enchants. One for the first bar, and one for the second bar. The first bar is usually enchanted with a Glyph of Crushing. This enchant reduces the resistances of your enemy for 5 seconds when it triggers. Initially it has a 10 second cooldown, but we can reduce this cooldown by using the infused trait on our weapon. We will talk about that in the next section.
On the second bar tanks usually use a Glyph of Weakening. This enchant reduces the weapon damage of the enemy, making their attacks weaker. This is very nice in group instances, because this enchant reduces all the damage an enemy does to all players in your group. It has a duration of 5 seconds. Initially it has a 10 second cooldown, but we can reduce this cooldown by using the infused trait on our weapon. We will talk about that in the next section.
Weapon traits
At this point tanks only use one trait on their weapons. This trait is infused. Infused reduces your enchant cooldown by 50%. This means that our crusher and weakening enchants no longer have a 10 seconds cooldown, but a 5 seconds cooldown. Their duration is also 5 seconds, meaning that theoretically with an infused weapon you can get 100% uptime. This is of course unrealistic in practice, but the infused trait does help a great deal in keeping your enchantment uptimes very high.
Infused also increases the enchantment effect by 30%. This means that your crusher enchant will reduce the enemy’s resistances by 30% more, and your weakening enchant will reduce the enemy’s weapon damage by 30% more.
As a side-note, some users of the lightning staff prefer to use the charged trait. This trait increases the chance to apply a status effect, which helps in keeping up off-balance. However, again, this is only for very experienced users.
Skills
Active skills are skills you can put on your skill bar and cast. As tanks we classify skills by what they do in combat. You could call this a “skill role”. There are certain types of skills that are handy to use as a tank. I will talk about them below, creating your bars should become a lot easier knowing what kind of skills you should use.
Taunts
Of course the taunt is the most important skill in the tanking toolkit. The two main ones are Pierce Armor from the one-hand and shield skill tree, and Inner Fire from the Undaunted skill tree. Make sure that you have one taunt on each of your bars. Usually Pierce Armor on the first bar and Inner Fire on the second bar. This is simply to make sure that you always have a taunt available. There can always be issues when swapping bars. There are even mechanics that prevent you from swapping bars. So make sure that a taunt is always available, no matter what.
Self heals
Another important skill to have around is a self heal. This heal does not need to be on the front bar, you can also have it on your second bar. Though if you are not comfortable with it on the second bar, feel free to move it around. Self heals are only used in situations that are undesired. For instance, if your healer is dead, or if your healer is slacking. Usually with a decent healer you should not need this skill per se, but it is always handy to have it just in case. Below I will list the skills you can use when playing different classes:
- Dragonknigh: Green Dragon Blood
- Warden: Polar Wind
- Nightblade: Dark Cloak
- Templar: Breath of Life (or Honor the Dead)
- Sorcerer: Dark Deal, Unstable Clannfear
- Necromancer: Ruinous Scythe
Resistance (self) buffs
Buffing up is one of the things that a tank should constantly be doing during fights. The most important resistance buff to keep up are is the Major Resolve. I’ll list them for you below:
- Dragonknight: Hardened Armor
- Warden: Ice Fortress
- Nightblade: Shadow Barrier (passive)
- Templar: Restoring Focus
- Sorcerer: Boundless Storm
- Necromancer: Bone Armor
Resource sustain
Resource sustain skills can take many forms in this game. These abilities vary widely between classes. This means that the way of restoring resources is also the main part that differentiates classes in the tanking role. Let me explain their use per class:
- Dragonknight: The main sustain skill for the Dragonknight is Igneous Shield. However, it is not this skill alone. It is this skill in combination with the Helping Hands passive. This combination allows you to spam shields for your allies, and in the mean time turning your magicka into stamina. This is the main way to sustain stamina for a Dragonknight and it is possibly the most effective one in the game. To sustain magicka the Dragonknight can do two things, either heavily invest in magicka regeneration (via set bonuses or enchants) or using the Balance skill from the Mages Guild tree.
- Warden: The Warden has a couple of ways to sustain stamina. The most obvious one is the Bull Netch skill. This skill restores stamina at a given rate, even when you are blocking. This means you can’t burst your stamina up, like a Dragonknight can, but you have a consistent stamina income over time. Next to that the Warden has the Nature’s Gift passive. This passive restores 250 of your lowest resource pool every time you heal an ally with a Green Balance ability. This passive has a one second cooldown. All in all these two ways of sustaining resources are –though based on timing– very effective.
- Nightblade: The Nightblade class itself does not provide a reliable form of sustain. You will mostly have to rely on external factors, like spears and orbs from your healer. However, with the Psijic Order (requires Summerset chapter) skill line, you can use Deep Thoughts to get resources back. If you time it well you can also drop your block and do a heavy attack to get stamina back. However, a combination of Deep Thoughts and healer support should keep you well fed on resources.
- Sorcerer: The Sorcerer can use Dark Deal to restore stamina. This skill costs magicka. So it is basically a resource trade. Be careful though, as Dark Deal is a channel and thus drops block for a short duration. Make sure to use this skill with caution. Next to that you could use Deep Thoughts from the Psijic Order skill line (requires Summerset chapter). Overall the sustain of a Sorcerer depends highly on well timed Dark Deals.
- Templar: Repentance and Restoring Focus. Restoring Focus can really keep you going and also increases your resistances for the full duration. Repentance restores stamina to you when there are corpses of enemies around you (however, each corpse can only be used once). Some well timed repentance casts can keep you up and running, but beware that in some fights there might not be any corpses around. In this case make sure you have shard and orb support from your healer, as well as Deep Thoughts slotted.
Debuffing enemies
There are a couple of debuffs a tank can put on enemies. It should always be the goal of a tank to apply as many of these debuffs as possible. I will list them below together with the skills that can apply this debuff to an enemy. Note that I am not listing all sources of these debuffs, just the ones that make sense for tanks to use.
- Minor Maim (reduces the damage an enemy does by 5%): Heroic Slash (one-hand and shield), Summon Shade (Nightblade), Choking Talons (Dragonknight)
- Major Fracture (reduces enemy’s physical resistance by 5948): Pierce Armor (one-hand and shield)
- Major Breach (reduces the enemy’s spell resistance by 5948): Pierce Armor (one-hand and shield)
- Engulfing flames (enemy take up to 10% more flame damage): Engulfing Flames (Dragonknight exclusive)
Ultimates
Usually a good tank is expected to use an ultimate which buffs the team in one way or another. The most common and best option here is the Aggressive Horn from the Assault skill line. You will need to do a little bit of PVP to get it, but it is an absolute must for any tank to have. This ultimate increases the resource pools of all your allies (and you) by 10% for 30 seconds, and increases the critical damage of your allies by 15% for 9.5 seconds. These buffs are so good (especially in trials) that Aggressive Horn easily outshines any other ultimate in the game. However, if you are still learning, there are other ultimates you can use. Here is a list of the ones that make sense for a tank to use:
- Dragonknight: Magma Shell: Basically 10 seconds godmode. It makes you take almost no damage for the duration of the ultimate. Handy to get out of tricky situations or to resurrect a group member.
- Warden: Northern Storm: A strong defensive ultimate that protects your allies and you from 30% of all incoming damage for the duration. Also gives you 8% max magicka for slotting it.
- Warden: Enchanted Forest: A massive group heal that gives you ultimate back on healing low health targets. It’s cheap and effective, especially if your group is struggling, this can help a lot.
- Nightblade: Bolstering Darkness: A big protection area for your group members and you, reducing damage taken by 30%. Has a long duration, handy in stacked fights.
- Sorcerer: Absorption Field: Very handy in big groups of mobs. Stuns all mobs in the area and heals all allies in the globe, as well as yourself.
- Templar: Solar Prison: Applies Major Maim to enemies, making them do 30% less damage. Also grants a very powerful damage synergy called “Gravity Crush” to your allies.
- Necromancer: Colossus: Applies Major Vulnerability, increasing the damage on enemies by 30% for a short duration.
As a side-note I want to leave the fact that most tanks run what is called an “inactive ultimate” on their front bar. They slot this ultimate to gain a passive buff, but never actually use this ultimate. They swap to their second bar instead and cast whatever ultimate is slotted there. For instance, you can slot Barrier from the Support tree, which will grant you 10% extra magicka recovery because of the Magicka Aid passive. This way you have 10% extra magicka recovery on your front bar, and whenever your ultimate is ready you swap to your second bar and cast your ultimate. This makes sense for all classes except the Warden, the Warden can gain 12% extra magicka and stamina recovery by slotting the Feral Guardian (and morphs) ultimate due to the Flourish passive.
Passive skills
It is usually a good idea to unlock all of the passive skills in your class tree. They will always give you an unique benefit one way or another. This section is more to explain what other passives you should unlock next to your class passives. Below I will list the ones I find crucial for a tank to have. I will also list a few optional ones that can be beneficial to tanks as well, but aren’t 100% necessary.
- One Hand and Shield: Fortress
- One Hand and Shield: Sword and Board
- One Hand and Shield: Deadly Bash
- One Hand and Shield: Deflect Bolts
- One Hand and Shield: Battle Mobility
- Light Armor: Evocation
- Light Armor: Recovery
- Light Armor: Spell Warding
- Medium Armor: Wind Walker
- Medium Armor: Athletics
- Heavy Armor: Resolve
- Heavy Armor: Constitution
- Heavy Armor: Juggernaut
- Heavy Armor: Revitalize
- Heavy Armor: Rapid Mending
- Fighters Guild: Banish the Wicked
- Undaunted: Undaunted Command
- Undaunted: Undaunted Mettle
- Support: Magicka Aid
- Alchemy: Medicinal Use
- Racial: All
These passives are not essential, but can be beneficial to you as a tank:
- Vampirism: Supernatural Recovery
- Vampirism: Undeath
- Vampirism: Unnatural Resistance
- Psijic Order: Concentrated Barrier (requires Summerset chapter)
- Psijic Order: Deliberation (requires Summerset chapter)