
Type: Dungeon, Solo Dungeons, Overland, and Maelstrom & Vateshran Arena
Buildname: Solo Stamina Sorcerer
Table of Contents
- Solo Stamina Sorcerer Setup
- Resource Management
- Rotation
- Bad Habits
- Vateshran Hollows & Maelstrom Arena Setup
- Infinite Archive Setup
- Sorcerer Subclassing
- Build Video
- Gameplay
- Update Log
The Solo Stamina Sorcerer Build for ESO (Elder Scrolls Online, the build is optimized for solo play. You will find three different gear setups, the first one is best in slot, the second one advanced, and a very easily obtainable beginner setup. However, understanding the mechanics of the build is more important than the gear itself. By mechanics I mean the abilities that we use and what functions they have and how to sustain this setup and most importantly, how to stay alive with timed dodge rolls, blocks, and heals.
Sorcerers have a very unique ability called Critical Surge, it provides us with the Major Brutality buff (20% Weapon Damage) and also gives us constant healing, which is very powerful.
Another key ability is the Dark Deal ability which gives us the possibility to transfer Magicka into Stamina and Health. These two skills are the most important ones in our setup, but obviously, there is more, you can find an explanation of all the skills below.
The most important set to this build is Briarheart, because this will give you so much overall extra healing that you barely have to worry about your health anymore. It also boosts your Weapon Damage by a huge margin.
- Two Hander & Bow setup
- Optional Dual Wield & Bow Setup
- Superb Damage
- Crazy Good Sustain
- Powerful Healing
- Big Shields
- Solo Dungeons, Overland
- Maelstrom & Vateshran Arena
Other Stamina Sorcerer Guides:
If you are new to the game I would also recommend checking out a few other guides:
- Stamina Sorcerer Beginner Guide (Read first if you are a new player)
- Stamina Sorcerer Beginner 160CP Build (Made for new players)
- Stamina Sorcerer Dual Wield Build
- Stamina Sorcerer Two Hander Build
ESO Solo Stamina Sorcerer Build

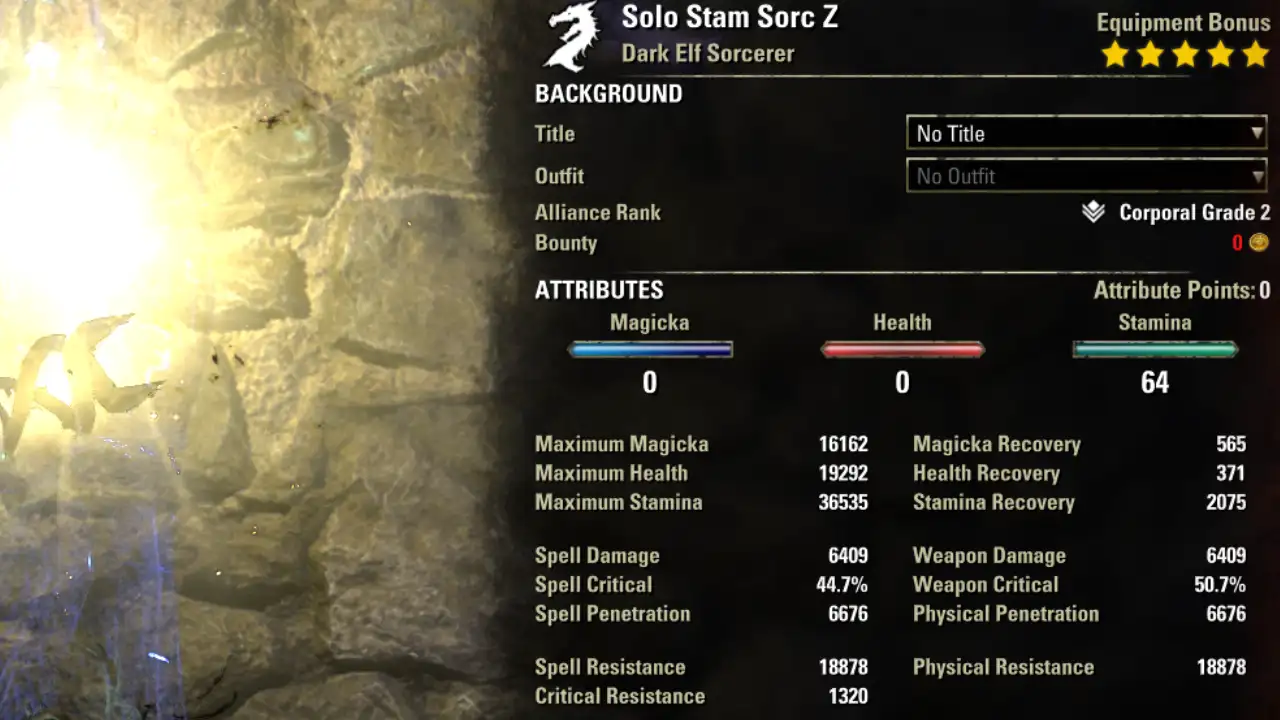
5x Tzogvin, 5x Briarheart, 1x Bloodspawn, 1x Pale Order on a Dark Elf with Lava Foot Soup and Saltrice buff food.
- Unbuffed: Out of combat, buff food active.
- Buffed: In combat, Buff food, Briarheart, Tzogvin, Critical Surge, Hurricane, Weapon Damage Enchantment and Potion active.
Gear Solo Stamina Sorcerer
You will find 3 different setups here. Setup 1 is the preferred setup. People who do not have all the gear yet can use the Setup 2 which is easier to obtain and beginners can use Setup 3.
- Setup 1 – Best Setup
- Setup 2 – Advanced Gear
- Setup 3 – Beginner Gear
Gear Setup 1
- Which sets you put in which slot is not that important, the only thing that matters is that you get two full five-piece sets and a Monster Set.
| Gear | Set | Weight | Trait | Enchantment |
|---|---|---|---|---|
| Chest | Tzogvin’s Warband | Medium | Divine | Health |
| Belt | Tzogvin’s Warband | Medium | Divine | Stamina |
| Shoes | Tzogvin’s Warband | Medium | Divine | Stamina |
| Pants | Tzogvin’s Warband | Medium | Divine | Stamina |
| Hands | Tzogvin’s Warband | Medium | Divine | Stamina |
| Head | Bloodspawn | Medium | Divine | Health |
| Shoulder | Briarheart | Medium | Divine | Stamina |
| Necklace | Briarheart | Jewelry | Robust | Weapon Damage |
| Ring | Briarheart | Jewelry | Robust | Weapon Damage |
| Ring | Ring of the Pale Order | Jewelry | Bloodthirsty | Weapon Damage |
| Weapon 1 | Briarheart | 2H Sword | Precise | Damage Health Poisons IX |
| Weapon 2 | Thunderous Volley | Bow | Infused | Weapon Damage Enchantment |
Gear Setup 2
| Gear | Set | Weight | Trait | Enchantment |
|---|---|---|---|---|
| Chest | Hunding’s Rage | Medium | Divine | Health |
| Belt | Hunding’s Rage | Medium | Divine | Stamina |
| Shoes | Hunding’s Rage | Medium | Divine | Stamina |
| Pants | Hunding’s Rage | Medium | Divine | Stamina |
| Hands | Hunding’s Rage | Medium | Divine | Stamina |
| Head | Bloodspawn | Medium | Divine | Health |
| Shoulder | Bloodspawn | Medium | Divine | Stamina |
| Necklace | Briarheart | Jewelry | Robust | Weapon Damage |
| Ring | Briarheart | Jewelry | Robust | Weapon Damage |
| Ring | Briarheart | Jewelry | Robust | Weapon Damage |
| Weapon 1 | Briarheart | 2H Sword | Precise | Damage Health Poisons IX |
| Weapon 2 | Thunderous Volley or Briarheart | Bow | Infused | Weapon Damage Enchant |
Gear Setup 3 Beginner
| Gear | Set | Weight | Trait | Enchantment |
|---|---|---|---|---|
| Chest | Hunding’s Rage | Medium | Divine | Health |
| Belt | Hunding’s Rage | Medium | Divine | Stamina |
| Shoes | Hunding’s Rage | Medium | Divine | Stamina |
| Pants | Hunding’s Rage | Medium | Divine | Stamina |
| Hands | Hunding’s Rage | Medium | Divine | Stamina |
| Head | Monster Set of your choice | Medium | Divine | Health |
| Shoulder | Monster Set of your choice | Medium | Divine | Stamina |
| Necklace | Ancient Dragonguard | Jewelry | Robust | Weapon Damage |
| Ring | Ancient Dragonguard | Jewelry | Robust | Weapon Damage |
| Ring | Ancient Dragonguard | Jewelry | Robust | Weapon Damage |
| Weapon 1 | Ancient Dragonguard | 2H Sword | Precise | Absorb Stamina Enchant |
| Weapon 2 | Ancient Dragonguard | Bow | Infused | Weapon Damage Enchant |
Where can I get the gear?
Briarheart: Wrothgar, Guildstores
Tzogvin’s Warband: Frostvault
Ancient Dragonguard: Craftable
Bloodspawn: vSpindleclutch II, Maj Undaunted Chest
Hunding’s Rage: Craftable
Selene: vSelene’s Web, Glirion Undaunted Chest
Thunderous Volley: Maelstrom Arena
Ring of the Pale Order: Antiquities System
Vicious Serpent: Aetherian Archive, Sanctum Ophidia, Hel Ra Citadel
Skills for the Solo Stamina Sorcerer Build
Now lets take a look at the skills setup for the Solo Stam Sorc setup, you can always adjust and change out skills.


| Two Hander Mainbar | Bow-second bar |
|---|---|
| Slot 1: Brawler | Slot 1: Endless Hail |
| Slot 2: Reverse Slice | Slot 2: Hurricane |
| Slot 3: Wrecking Blow | Slot 3: Razor Caltrops |
| Slot 4: Echoing Vigor | Slot 4: Critical Surge |
| Slot 5: Bound Armaments | Slot 5: Dark Deal |
| Ultimate: Flawless Dawnbreaker | Ultimate: Greater Storm Atronach |
Skills explanation:
- Brawler: Your most important survival ability. Use this on a single or several enemies to gain a huge shield that will bolster your health on top of the nice damage it does.
- Reverse Slice: Your execute ability that also deals nice splash damage.
- Wrecking Blow: Your main spammable, when all your DoTs are up you want to use this to deal high impact direct damage on the enemy.
- Echoing Vigor: Strong heal over time that lasts for a long time. We prefer this morph because the heal is already strong enough and the longer duration is better, more time to deal damage! Compared to the other morph which only lasts for a very short duration. If you drop low on health make sure to activate this and also use Brawler to gain a shield to bolster your health.
- Bound Armaments: This is here to passively gain 8% Max Stamina and 10% extra Light Attack damage. You can also use the ability once you have 4 daggers activated.
- Flawless Dawnbreaker: Your main ultimate, both powerful for AoE and Single Target. In addition, it also boosts your Weapon Damage once activated.
- Endless Hail: This is your DoT that you need to constantly keep up on the enemies. Very powerful both in Single Target and AoE.
- Hurricane: This ability gives you Major Resolve (Extra Resistance) and Minor Expedition (15% Speedbuff). In addition, it also deals good damage, you must keep this up all the time!
- Razor Caltrops: Razor Caltrops is another Single Target and AoE Dot that you need to keep up all the time because it debuffs the enemies with Major Fracture, reducing their Physical Resistance, resulting in us dealing way more damage!
- Critical Surge: This is another key ability that needs to be up all the time. The reason for that is because it gives us a lot of extra heals constantly and also boosts our Weapon Damage by 20%.
- Dark Deal: When you drop low on Stamina you can activate this ability to transfer Magicka into Health and Stamina. Once activated, it will immediately give you 3600 Stamina and additionally restore 2400 Stamina over 20 seconds.
- Greater Storm Atronach: You can use this Ultimate on Single Target or just slot it passively to gain benefits from the Daerdric Protection passive on the backbar.
Class Mastery
Class Mastery is a new system in ESO that allows pure class builds to get two additional powerful passives to better compete against Subclass builds. Activating subclassing will deactivate Class Mastery passives.
All Sorcerer Class Mastery Passives
For our Solo Stamina Sorcerer Build, we are going to use the following:
 Static Reverberation – Deals extra damage.
- Calculated Defense – Defensive shield and damage buff.
Scribing Skills
The ESO Scribing System offers plenty of adjustable skills to add to our build. The Scribing Skills aren’t a must have, but I will present you two viable options that would fit into the build. We have access to Smash from the Two Hander skill line and Vault from the Bow skill line.
Important: Please read here how to get Grimoires, Focus Scripts, Signature Scripts and Affix Scripts for the ESO Scribing system.
Base Scribing Skill:


To unlock the Smash skill, you need to reach level 25 in the Two Handed skill line. To unlock the Vault skill you need to reach level 25 in the Bow skill line.
Smash (Bloody Smash)
Smash is the Two Handed Scribing skill. It drags your weapon along the ground to smash a cone in front of you. To maximize damage, we want to use the following scripts: Bleed Damage (Focus), Lingering Toment (Signature), and Berserk (Affix). This will turn the skill into Bloody Smash and deal Bleed AoE damage and also Bleed damage over time to all enemies hit. We also gain Minor Berserk for 20 seconds, giving us 5% more damage done.
- Grimoire
- Focus Script
- Signature Script
- Lingering Torment (Bleed Damage over time)
- Affix Script
- Berserk (Applies Minor Bersewrk buff, increasing damage done by 5%)
If you want to use this Scribing Skill, you can replace it with Brawler. However, please note that you trade damage for survivability. Brawler applies a huge damage shield to you that often absorbs all the hits, choose wisely!
Vault (Venomous Vault)
Vault is the Bow Scribing skill. It fires a burst at your feet while flipping backward 15 meters. You want to use the following scripts: Poison Damage (Focus), Lingering Toment (Signature), and Vulnerability (Affix). This will turn the scribing skill into Venomous Vault and deal Poison Damage to all enemies around you as well as Poison damage over time. We also apply Minor Vulnerability to enemies, increasing their damage taken by 5%.
- Grimoire
- Focus Script
- Signature Script
- Lingering Torment (Poison Damage over time)
- Affix Script
- Vulnerability (Applies Minor Vulnerability, increasing damage taken by 5%)
If you want to use this Scribing Skill, replace it with Consuming Trap. However, be careful using this skill because flipping backward 15 meters can mess up your positioning.
Champion Points
Below you can find the Champion Points setup for this build. Work your way from top to bottom in your allocation. For more information on Champion Points, please visit the Champion Points Overview Page on ESO-Hub.com.
Hovering over each perk will give you insights on what it does. Presets are also provided for each of the allocations below.
Click the tab below to open the allocation.
Important Info for Solo Sorc Build
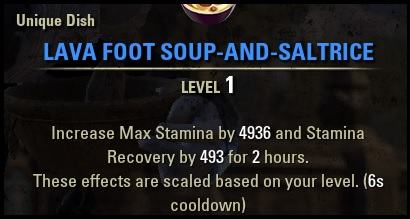
Buff-food
It is very important that you use the Lava Foot Soup-and-Saltrice Buff-food. This will enhance our Max Stamina and Stamina Recovery by a huge margin. You can buy the food in the guild stores for a very cheap price, or craft it yourself if you have the recipe. For more information on all buff food and drinks I recommend visiting the Buff Food and Drink Overview Page.
Lava Foot Soup-and-Saltrice
(Max Stamina, Stamina Recovery)
Mundus Stone
The Lover Mundus Stone provides us with extra penetration, which increases our damage. For more information on Mundus Stones please visit the Mundus Stone Overview Page.
The Lover Mundus Stone (Increased Penetration)
Race
All stamina based races work with this setup. More about each race can be found on the racial overview page.
Dark Elf
Khajiit
Orc
Redguard
Imperial
Wood Elf
Nord
Argonian
High Elf
Potions
Important: On our Stamina Sorcerer Build, we already get Major Brutality from Critical Surge. And Major Savagery is also included via Bound Armaments. Make sure you have the alchemy passive ![]() Medicinal Use active to get a 100% uptime on potions.
Medicinal Use active to get a 100% uptime on potions.
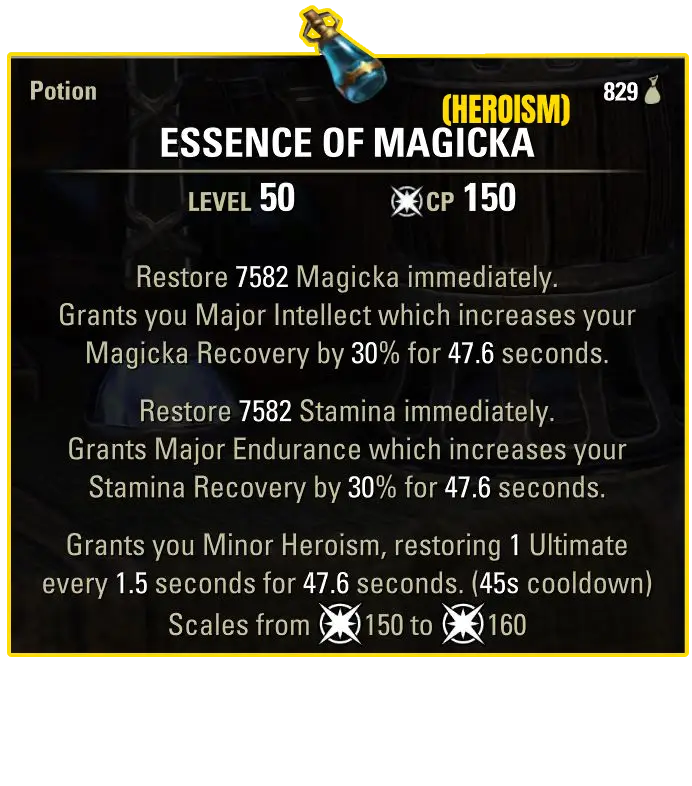
Now this gives us a few options on what to use. The best one would be the potion with the minor Heroism buff (Essence of Magicka, yes confusing name) but these potions are incredibly expensive. Therefore I recommend using Crown Tri-Stat Potions or just normal green ones for the stamina recovery.
Best Potion, but very expensive
- Essence of Magicka (Heroism)
- Check Price: scroll down, it needs to say Restore Magicka, Restore Stamina, Heroism
- Combine Columbine, Dragon’s Blood, and Dragon Rheum.
- Note: Incredibly expensive just to get the extra Minor Heroism buff.
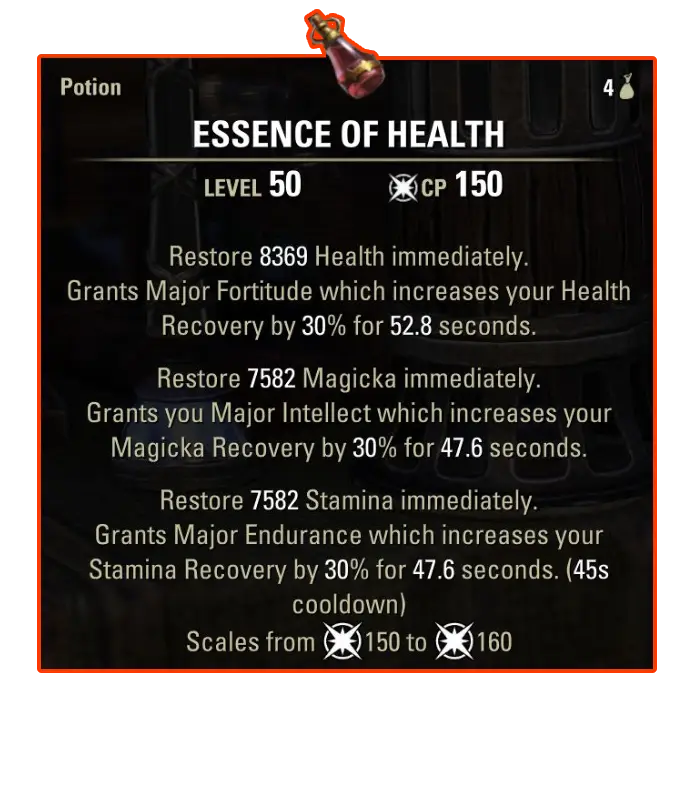
Tri-Stat Potion
- Essence of Health “Tri-Stat”
- Check Price: scroll down, it needs to say Restore Health, Restore Magicka, Restore Stamina
- Combine Columbine, Bugloss, and Mountain Flower.
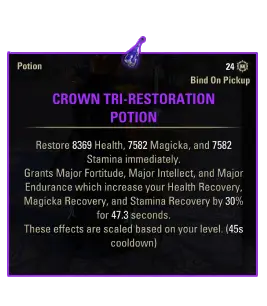
Tri-Stat Potion from Crown Store/ Login Rewards
- Crown Tri-Restoration Potion
- This is the same potion as Essence of Health “Tri-Stat”.
- You get these from daily login rewards and crown crates.
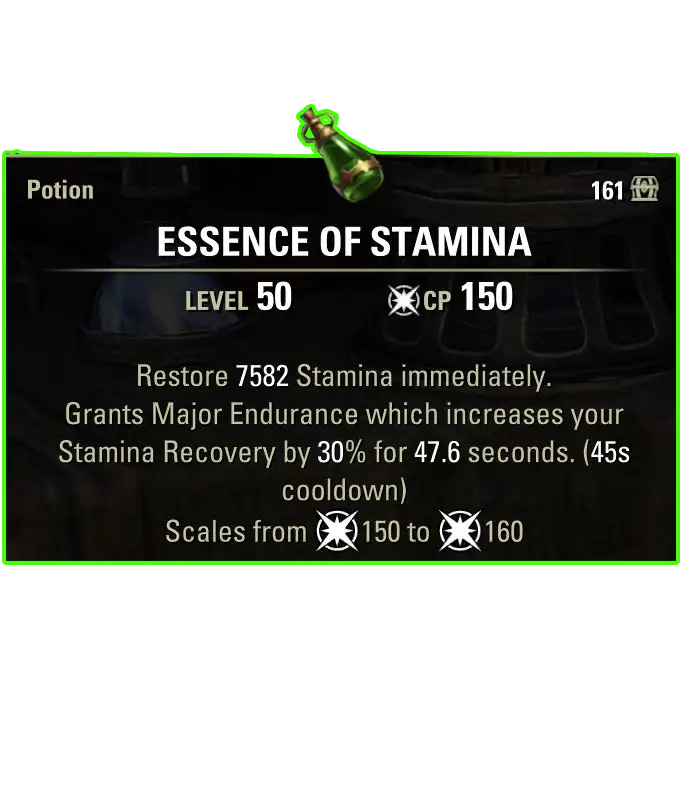
Cheap Alternative 2
- Essence of Stamina
- Often found on defeated enemies.
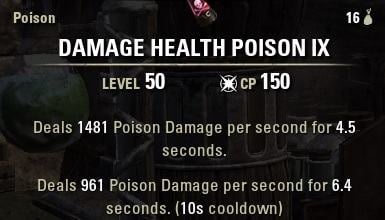
Poisons
We are using Poisons to increase our overall damage output. If you don’t have poisons, you can just use another enchantment on your weapon.
Damage Health Poison
(Damage Poison, Damage Poison)
(Fleshfly Larva, Nightshade, Nirnroot)
Passives
- Dark Magic: Unholy Knowledge, Persistence
- Daedric Summoning: Power Stone, Daedric Protection
- Storm Calling: Energized, Amplitude, Expert Mage
- Two Handed: Forceful, Heavy Weapons, Balanced Blade, Follow Up, Battle Rush
- Bow: Long Shots, Accuracy, Ranger, Hawk Eye, Hasty Retreat
- Medium Armor: Dexterity, Wind Walker, Improved Sneak, Agility, Athletics
- Fighters Guild: Banish the Wicked
- Undaunted: Undaunted Mettle
- Racial: All
- Alchemy: Medicinal Use
- Assault: (Optional, mount speed buff) Continuous Attack
Attributes
0 Health, 64 Stamina, 0 Magicka
Resource Management for the Solo Stamina Sorcerer Build
Our setup has a lot of resource management options, some already directly built in via Stamina Recovery and some more options that you can use whenever you need it.
Stamina Recovery
Lava Foot Soup-and-Saltrice buff-food is key to our sustain. The buff-food gives you Max Stamina and Stamina Recovery, a lot of it. You have to make sure to use this specific buff-food. You can buy it in the guild stores for a very cheap price or craft it yourself, if you have the recipe.
The Sorcerer Daedric Protection passive gives us another 20% Stamina Recovery boost, as long as we have a Daedric Summoning ability slotted, in our case on the frontbar Bound Armaments and on the backbar Greater Storm Atronach.
The Battle Rush passive from the Two Hander skill-line gives you another 30% Stamina Recovery for 10 seconds while you have a Two Handed weapon slotted.
Potions are another very important part of resource management. We are preferably using Essence of Weapon Crit potions to gain another 30% Stamina Recovery boost, 12% Weapon Critical and a Health boost. This both increases our sustain and also damage, I highly recommend using these potions. The ingredients are listed in the potion section of the build.
Skills
The Dark Deal skill is our main resource management tool that we activate ourselves. When you drop low on Stamina you can activate this ability to transfer Magicka into Health and Stamina. Once activated, it will immediately give you 3600 Stamina and additionally restore 2400 Stamina over 20 seconds. So you could spam this ability till you are back to full Stamina. The nice thing about this skill is, that you also get 8090 Health every time you activate the ability, functioning as a nice heal while you are restoring your resources!
Heavy Attacks are another way to restore resources. You can do Heavy Attacks from time to time to also regain resources.
Rotation
Before we start with the rotation, you always have to make sure to weave Light Attacks between each ability. This is important because the Light Attacks deal very good damage and proc your Weapon Enchantments and Poisons. You can find a guide here on that subject: “Weaving Beginner Guide”.
Your first priority has to always be to stay alive. Therefore healing, shielding and dodging has to be prioritized over damage.
- Critical Surge has to be up ALL THE TIME. Without this, you have no passive heals and you will also lose out on power.
- Constantly rotate your damage over time effects every 14 seconds: Endless Hail, Hurricane and Razor Caltrops.
- Once that is taken care of, you want to use your spammable on the front bar such as: Wrecking Blow, Brawler and Reverse Slice.
When you need sustain activate Dark Deal and when you need a burst heal activate Echoing Vigor.
Bad Habits
- Not keeping up your healing abilities such as Critical Surge and defense abilities such as Hurricane is the main reason why you die on this setup.
- Not keeping up your damage over time effects on the backbar will result in a huge loss in overall damage.
- Not using Brawler enough to bolster your health with the huge shield that the skill gives. Always before you swap to the backbar you should use Brawler first to gain a shield that will help you while you are on the backbar.
- Not using the right buff-food as listed will also result in sustain issues.
Vateshran Hollows & Maelstrom Arena Setup
In this section we are going to take a look at the Vateshran Hollows and Maelstrom Arena setup. This setup is a bit different from the main setup, but not by much.
- For specific tips and tricks please check out the Vateshran Hollows Guide or the Maelstrom Arena Guide which explains everything in detail.
- Ring of the Pale Order provides a lot of extra healing, I recommend getting this Mythic item, it makes the arena a lot easier.
- If you don’t have access to Mythic items, please use the gear setups above.
Gear
| Gear | Set | Weight | Trait | Enchantment |
|---|---|---|---|---|
| Chest | Vicious Serpent | Medium | Divine | Health |
| Belt | Vicious Serpent | Medium | Divine | Stamina |
| Shoes | Vicious Serpent | Medium | Divine | Stamina |
| Pants | Vicious Serpent | Medium | Divine | Stamina |
| Hands | Vicious Serpent | Medium | Divine | Stamina |
| Head | Bloodspawn | Medium | Divine | Health |
| Shoulder | Briarheart | Medium | Divine | Stamina |
| Necklace | Briarheart | Jewelry | Bloodthirsty | Weapon Damage |
| Ring | Briarheart | Jewelry | Bloodthirsty | Weapon Damage |
| Ring | Ring of the Pale Order | Jewelry | Bloodthirsty | Weapon Damage |
| Weapon 1 | Briarheart | 2H Sword | Precise | Damage Health Poisons IX |
| Weapon 2 | Thunderous Volley | Bow | Infused | Weapon Damage Enchantment |
Skills
Buff-Food
I recommend using the Artaeum Takeaway Broth or Dubious Camoran Throne buff-food if you have too much sustain with Lava Foot Soup and Saltrice.
Endless Archive Setup for Solo Stamina Sorcerer
Here you can find a setup that works well inside ESO’s Endless Archive when you play solo with the Solo Stamina Sorcerer Build. Make sure to read the ESO Endless Archive Guide to understand what is going on inside the archive.
- Endless Archive gets progressively harder
- You need to know boss mechanics, otherwise one-shots will occur often.
- Understanding how the Endless Archive works is important
- If you get stuck, change gear or skills and try again.
Gear
Of course you can also try the Endless Archive with any of the above setups and see how they perform. We like to go in with Briarheart on the front bar and Pillar of Nirn on the back bar. These are both sets that have a simple proc condition and they work automatically. Additionally, we also have the Stormfist set that also deals proc damage. Basically, all sets do work without you having to think about how to activate them.
For the Endless Archive, it is recommended to go with 1x Ring of the Pale Order, 2x Stormfist, 5x Briarheart (frontbar), 5x Pillar of Nirn (backbar) and 1x Druid’s Braid. This setup will provide us with enough healing and damage. You can also use any other Monster Set if you don’t like Stormfist.
| Gear | Set | Weight | Trait | Enchantment |
|---|---|---|---|---|
| Chest | Druid’s Braid | Medium | Divine | Health |
| Belt | Pillar of Nirn | Medium | Divine | Stamina |
| Shoes | Pillar of Nirn | Medium | Divine | Stamina |
| Pants | Pillar of Nirn | Medium | Divine | Stamina |
| Hands | Briarheart | Medium | Divine | Stamina |
| Head | Stormfist | Medium | Divine | Health |
| Shoulder | Stormfist | Medium | Divine | Stamina |
| Necklace | Briarheart | Jewelry | Bloodthirsty | Weapon Damage |
| Ring | Briarheart | Jewelry | Bloodthirsty | Weapon Damage |
| Ring | Ring of the Pale Order | Jewelry | Bloodthirsty | Weapon Damage |
| Weapon 1 | Briarheart | 2H Sword | Precise | Damage Health Poisons IX |
| Weapon 2 | Pillar of Nirn | Bow | Infused | Weapon Damage Enchantment |
Note: Two-handed weapons count as two pieces for a set.
Where can I get the gear?
Briarheart: Wrothgar, Guildstores
Pillar of Nirn: nFalkreath Hold Dungeon
Ring of the Pale Order: Antiquities System
Stormfist: vTempest Island Dungeon
Druids Braid: Guildstores, Craftable set in the High Isle and Amenos zone
Skills

Buff-Food
If you are having sustain issues it is recommended to use the Lava Foot Soup and Saltrice buff food, just keep in mind your health will be lower. If you have enough sustain you can use the Artaeum Takeaway Broth or Dubious Camoran Throne buff-food that gives good sustain and extra health.
ESO Sorcerer Subclassing Build Options
ESO’s Subclassing offers a lot of variety, allowing you to swap, mix, and match different skill lines of various classes all on one character. Read our How does Subclassing work in ESO guide to get an understanding of how the subclass system works. We also have plenty of ESO Builds optimized for Subclassing.
Take a look at our ESO Sorcerer Subclassing Build if you are interested in what you can all mix and match on a Sorcerer build!
Build Video Solo Stamina Sorcerer
This is an older build video, it won’t be a 100% up to date but it still holds value and has good information about how the build works.
Gameplay Solo Stamina Sorcerer
Solo City of Ash veteran hardmode
Here is an example video from the Solo Stam Sorc Build. Soloed City of Ash 2 veteran with Hardmode on the last boss. I was still experimenting on this run, so I might have swapped some stuff out etc.
Vateshran Hollows Full Run
Full run in the veteran Vateshran Hollows solo arena. If you want to learn more about the Vateshran Hollows arena, you can check out the Vateshran Hollows overview page.
Update Log for the Solo Stamina Sorcerer Build
05.03.2020 Added the Solo Stamina Sorcerer build for the Harrowstorm DLC.
18.05.2020 Updated the Build for the GREYMOOR CHAPTER.
17.08.2020 Updated the Build for the STONETHORN DLC, Greymoor Chapter.
24.10.2020 Updated the Build for the MARKARTH DLC, Greymoor Chapter.
05.03.2021 Updated the Build for the FLAMES OF AMBITION DLC, Blackwood Chapter.
30.03.2021 Made several optimizations for the build.
25.05.2021 Updated the build for the BLACKWOOD CHAPTER.
09.08.2021 Updated the build for the WAKING FLAME DLC, Blackwood Chapter.
03.09.2021 Updated the Champion Points link and added tooltips to the buff food section, WAKING FLAME DLC, Blackwood Chapter.
14.10.2021 Updated the build for the Deadlands DLC, Blackwood Chapter.
04.03.2022 Updated the Build for the ASCENDING TIDE DLC, High Isle Chapter.
13.05.2022 Updated the Build for the HIGH ISLE CHAPTER.
08.08.2022 Updated the Build for the LOST DEPTHS DLC, High Isle Chapter.
24.10.2022 Updated the Build for the FIRESONG DLC, High Isle Chapter.
08.03.2023 Updated the Build for the SCRIBES OF FATE DLC, Necrom Chapter.
01.06.2023 Updated the Build for the ESO NECROM CHAPTER.
16.10.2023 Updated the Build for Update 40.
08.03.2024 Updated the Build for the Scions of Ithelia DLC Update 41, Gold Road Chapter.
22.05.2024 Updated the Build for the Gold Road Chapter U42.
20.08.2024 Updated the Build for Update 43, Gold Road Chapter.
28.10.2024 Updated the Build for Update 44, Gold Road Chapter.
11.03.2025 Updated the Build for Update 45, Fallen Banners.
28.05.2025 Updated the Build for Update 46, Seasons of the Worm Cult Part 1.
18.08.2025 Updated the Build for Update 47 Feast of Shadows DLC, Seasons of the Worm Cult.
27.10.2025 Updated the Build for Update 48 Seasons of the Worm Cult Part 2.
02.03.2026 Updated the Build for Update 49, Season 0.
03.06.2026 Updated the Build for Update 50, Season 0 + 1.
Tags: Solo Stamina Sorcerer Build, Solo Stam Sorc Build ESO.
Other Solo Builds:
- ESO Stamina Dragonkight Solo Build
- ESO Stamina Templar Solo Build
- ESO Stamina Warden Solo Build
- ESO Stamina Nightblade Solo Build
- ESO Stamina Necromancer Solo Build
- ESO Stamina Arcanist Solo Build
Related Guides: