


Type: Grinding for Champion Points & EXP
Class: All Classes (Nightblade, Sorcerer, Templar, Dragonknight, Necromancer, Warden, Arcanist)
- Grind Setup
- Gear
- Skills
- Champion Points
- Important Info (Food, Mundus, Race, Potions, Passives, Attributes)
- Grind Example Millions of EXP/hour
- Grind Tips
- Build Video
Welcome to the Grind Build for Magicka Setups. Below you will find a universal grind setup for gear as well as a skill layout for each individual class in ESO. The gear, buff-food, attributes, potions for the build are always the same. The only difference between the classes is the skill layout.
Please also make sure to check out the ESO Grind Guide for the top 10 grind spots as well as very useful tips on how to increase your EXP gains (up to 358% extra EXP).
- All Classes (Nightblade, Sorcerer, Templar, Dragonknight, Necromancer, Warden)
- Up to 358% extra EXP gains
- Best Grind Setup
- Great Damage
- Great Sustain
Grind Setup for Magicka Builds
Below you can see two screenshots, the first picture is unbuffed out of combat and the second picture is buffed in combat. That should give you a good idea on what stats you can reach. The stats may slightly vary depending on class. Gear used in the screenshot: 5x P. False God’s Devotion, 5x Mother’s Sorrow, 2x Grothdarr.
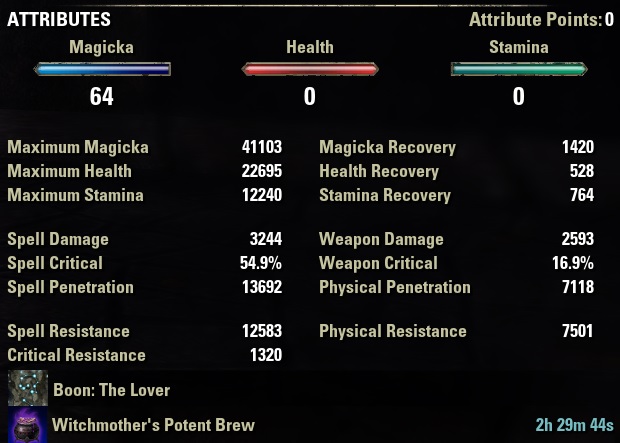
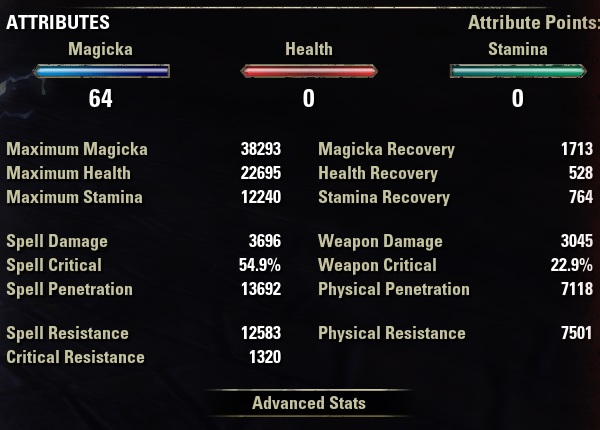
- Unbuffed: Out of Combat, Buff-food active.
- Buffed: In Combat, Buff-food active, Weapon Damage Glyph & Potion active.
You will see three different gear grind setups below. Most important is that you use gear with the Training trait to increase your overall EXP gain. You can pretty much use any set to grind, the gear below is not necessary, but recommended.
- Setup 1 Most Optimal Setup
- Setup 2 Easy to get Gear
- Setup 3 Beginner Setup
Gear Quality
- Armor: Try to get to at least epic quality (purple) for the 10% exp bonus per armor piece. Which will result in a total of 70% extra EXP from your armor.
- Jewelry: Your jewelry can be green quality, it doesn’t matter whether you use fine, superior, epic or legendary quality. Green jewelry is also a lot cheaper to buy in the guild stores!
- Weapon: Try to get either epic or legendary quality (purple or gold). This is important because you will deal a lot more damage as well as an extra 7-8% extra EXP gain.
Pale Order Mythic Item
The Pale Order Mythic item is also a very good option, it basically takes care of all the healing that you need.
Gear Setup 1
The optimal gear setup for grinding that we use is 5x Mother’s Sorrow, 5x False God’s Devotion, 2x Grothdarr and the Crushing Wall staff. However, if you don’t have the Crushing Wall staff you can just use a second Mother’s Sorrow staff on the backbar.
- Monster Set: Grothdarr is a great set that deals good AoE damage and is easy to obtain. Iceheart would be another good option in case you want some extra shields.
| Gear | Set | Weight | Trait | Enchantment |
|---|---|---|---|---|
| Chest | False God’s Devotion | Light | Training | Magicka |
| Belt | False God’s Devotion | Light | Training | Magicka |
| Shoes | False God’s Devotion | Light | Training | Magicka |
| Pants | False God’s Devotion | Light | Training | Magicka |
| Hands | False God’s Devotion | Light | Training | Magicka |
| Head | Grothdarr | Light | Training | Health |
| Shoulder | Grothdarr | Light | Training | Magicka |
| Necklace | Mother’s Sorrow | Jewelry | Arcane | Spell Damage |
| Ring | Mother’s Sorrow | Jewelry | Arcane | Spell Damage |
| Ring | Mother’s Sorrow | Jewelry | Arcane | Spell Damage |
| Weapon 1 | Mother’s Sorrow | Shock | Training | Absorb Magicka |
| Weapon 2 | Crushing Wall (or Mother’s Sorrow) | Shock | Infused | Weapon Damage |
Where can I get the gear?
Mother’s Sorrow: Deshaan Overland
False God’s Devotion: Sunspire
Perfected False God’s Devotion: vet Sunspire
Grothdarr: vet Vaults of Madness
Iceheart: vet Direfrost keep
Crushing Wall: Maelstrom Arena
IMPORTANT: You can get a Shock Mother’s Sorrow Staff by doing a simple quest (video instructions), that way you don’t have to buy any expensive staff! You will receive the “Argonian Muck Minder of Mother’s Sorrow” from the Quest in Silent Mire, Deshaan.
Gear Setup 2
Instead of the False God’s Devotion set (which can be difficult to obtain because you need 12 players to do the normal trial) we are going to use Julianos as a replacement. This set is easy to get as it can be crafted.
| Gear | Set | Weight | Trait | Enchantment |
|---|---|---|---|---|
| Chest | Julianos | Light | Training | Magicka |
| Belt | Julianos | Light | Training | Magicka |
| Shoes | Julianos | Light | Training | Magicka |
| Pants | Julianos | Light | Training | Magicka |
| Hands | Julianos | Light | Training | Magicka |
| Head | Grothdarr | Light | Training | Health |
| Shoulder | Grothdarr | Light | Training | Magicka |
| Necklace | Mother’s Sorrow | Jewelry | Arcane | Spell Damage |
| Ring | Mother’s Sorrow | Jewelry | Arcane | Spell Damage |
| Ring | Mother’s Sorrow | Jewelry | Arcane | Spell Damage |
| Weapon 1 | Mother’s Sorrow | Shock | Training | Absorb Magicka |
| Weapon 2 | Crushing Wall (or Mother’s Sorrow) | Shock | Infused | Weapon Damage |
Where can I get the gear?
Mother’s Sorrow: Deshaan Overland
Julianos: Craftable
Grothdarr: vet Vaults of Madness
IMPORTANT: You can get a Shock Mother’s Sorrow Staff by doing a simple quest (video instructions), that way you earn the staff! You will receive the “Argonian Muck Minder of Mother’s Sorrow” from the Quest in Silent Mire, Deshaan.
Gear Setup 3 Beginner
Join a guild and ask someone to craft you Julianos with the Training trait. The Willpower jewelry can be bought in the guildstores for a cheap price. And the Trainee set can also be bought in the guildstores for a cheap price, it also drops in several starter locations such as. Bal Foyen, Betnikh, Bleakrock Isle, Khenarthi’s Roost, Stros M’Kai.
| Gear | Set | Weight | Trait | Enchantment |
|---|---|---|---|---|
| Chest | Julianos | Light | Training | Magicka |
| Belt | Julianos | Light | Training | Magicka |
| Shoes | Julianos | Light | Training | Magicka |
| Pants | Julianos | Light | Training | Magicka |
| Hands | Julianos | Light | Training | Magicka |
| Head | Free Slot for random gear | Light | Training | Health |
| Shoulder | Trainee | Light | Training | Magicka |
| Necklace | Willpower | Jewelry | Any Trait | Spell Damage |
| Ring | Willpower | Jewelry | Any Trait | Spell Damage |
| Ring | Willpower | Jewelry | Any Trait | Spell Damage |
| Weapon 1 Frontbar | Trainee | Shock | Training | Absorb Magicka |
| Weapon 2 Backbar | Trainee | Shock | Infused | Weapon Damage |
Where can I get the gear?
Julianos: Craftable
Willpower: Guildstores
Trainee: Guildstores or Starter Zones (Bal Foyen, Betnikh, Bleakrock Isle, Khenarthi’s Roost, Stros M’Kai)
Skill Layout Classes
In this section of the build we are going to take a look at the skill layout for each class. In general we want to use a very strong AoE (Area of Effect) setup to kill multiple enemies at the same time.
Nightblade Skills
Your main damage abilities are focused at AoE damage. Unstable Wall of Elements, Twisting Path and Dark Shade are DoTs (Damage over Time) and your main spammable is Sap Essence which also heals you at the same time. Merciless Resolve can be used to kill of the last target for pure single target damage.
Siphoning Attacks heals you a bit and also helps with sustain. Harness Magicka is your shield to bolster incoming damage and Channeled Acceleration gives you Minor Force, but you can also use another ability there in case you don’t have that skill.
The Soul Harvest Ultimate is only used to actually increase our ultimate regeneration (10 Ultimate per kill), we always want to use the Elemental Rage Ultimate for AoE damage. We can also use normal potions on this setup because we get Major Sorcery from Sap Essence and Major Prophecy from Inner Light.


| Destruction Staff Frontbar | Destruction Staff Backbar |
|---|---|
| Slot 1: Merciless Resolve | Slot 1: Unstable Wall of Elements |
| Slot 2: Dark Shade | Slot 2: Twisting Path (or Mystic Orb) |
| Slot 3: Sap Essence | Slot 3: Harness Magicka |
| Slot 4: Siphoning Attacks | Slot 4: Channeled Acceleration (Flex Spot) |
| Slot 5: Inner Light | Slot 5: Inner Light |
| Ultimate: Soul Harvest | Ultimate: Elemental Rage |
Sorcerer Skills
Your main damage abilities are focused at AoE damage. Unstable Wall of Elements, Boundless Storm and Volatile Familiar are DoTs (Damage over Time) and your main spammable is Elemental Ring. Critical Surge is your main heal that you should always keep up and in case you drop low on health you can also use your shield Hardened Ward.
We always want to use the Elemental Rage Ultimate for AoE damage. We can also use normal potions on this setup because we get Major Sorcery from Critical Surge and Major Prophecy from Inner Light.


| Destruction Staff Frontbar | Destruction Staff Backbar |
|---|---|
| Slot 1: Hardened Ward | Slot 1: Unstable Wall of Elements |
| Slot 2: Critical Surge | Slot 2: Boundless Storm |
| Slot 3: Elemental Ring | Slot 3: Channeled Acceleration (Flex Spot) |
| Slot 4: Volatile Familiar | Slot 4: Volatile Familiar |
| Slot 5: Inner Light | Slot 5: Inner Light |
| Ultimate: Greater Storm Atronach | Ultimate: Elemental Rage |
Templar Skills
Your main damage abilities are focused at AoE damage. Unstable Wall of Elements and Blazing Spear are DoTs (Damage over Time) and your main spammable is Puncturing Sweeps which also heals you at the same time.
We can also use normal potions on this setup because we get Major Sorcery from Degeneration and Major Prophecy from Inner Light.


| Destruction Staff Frontbar | Destruction Staff Backbar |
|---|---|
| Slot 1: Repentance | Slot 1: Unstable Wall of Elements |
| Slot 2: Degeneration | Slot 2: Blazing Spear (or Mystic Orb) |
| Slot 3: Puncturing Sweeps | Slot 3: Harness Magicka |
| Slot 4: Channeled Focus | Slot 4: Channeled Acceleration (Flex Spot) |
| Slot 5: Inner Light | Slot 5: Inner Light |
| Ultimate: Crescent Sweep | Ultimate: Elemental Rage |
Dragonknight Skills
Your main damage abilities are focused at AoE damage. Unstable Wall of Elements, Disintegrating Dragonfire and Incinerate are DoTs (Damage over Time) and your main spammable is Elemental Ring. If you need heals, activate Draw Essence.
We can also use normal potions on this setup because we get Major Sorcery from Igneous Weapons and Major Prophecy from Inner Light.


| Destruction Staff Frontbar | Destruction Staff Backbar |
|---|---|
| Slot 1: Disintegrating Dragonfire | Slot 1: Unstable Wall of Elements |
| Slot 2: Draw Essence | Slot 2: Igneous Weapons |
| Slot 3: Elemental Ring | Slot 3: Harness Magicka |
| Slot 4: Incinerate | Slot 4: Channeled Acceleration (Flex Spot) |
| Slot 5: Inner Light | Slot 5: Inner Light |
| Ultimate: Ferocious Leap | Ultimate: Elemental Rage |
Necromancer Skills
Your main damage abilities are focused at AoE damage. Unstable Wall of Elements and Skeletal Mage are DoTs (Damage over Time) and your main spammable is Hungry Scythe (which also heals) in combination with Grave Lord’s Sacrifice.
We can also use normal potions on this setup because we get Major Sorcery from Degeneration and Major Prophecy from Inner Light.


| Destruction Staff Frontbar | Destruction Staff Backbar |
|---|---|
| Slot 1: Skeletal Mage | Slot 1: Unstable Wall of Elements |
| Slot 2: Grave Lord’s Sacrifice | Slot 2: Necrotic Potency |
| Slot 3: Hungry Scythe (or Elemental Ring) | Slot 3: Harness Magicka |
| Slot 4: Degeneration | Slot 4: Channeled Acceleration (Flex Spot) |
| Slot 5: Inner Light | Slot 5: Inner Light |
| Ultimate: Glacial Colossus | Ultimate: Elemental Rage |
Warden Skills
Your main damage abilities are focused at AoE damage. Unstable Wall of Elements is your main DoT (Damage over Time) and your main spammable is Elemental Ring in combination with Deep Fissure. If you need heals activate Living Trellis.
We can also use normal potions on this setup because we get Major Sorcery from Blue Betty and Major Prophecy from Inner Light.


| Destruction Staff Frontbar | Destruction Staff Backbar |
|---|---|
| Slot 1: Bird of Prey | Slot 1: Unstable Wall of Elements |
| Slot 2: Deep Fissure | Slot 2: Living Trellis |
| Slot 3: Elemental Ring | Slot 3: Harness Magicka |
| Slot 4: Blue Betty | Slot 4: Channeled Acceleration (Flex Spot) |
| Slot 5: Inner Light | Slot 5: Inner Light |
| Ultimate: Permafrost | Ultimate: Elemental Rage |
Arcanist Skills
Your main damage abilities are focused on AoE damage. Unstable Wall of Elements is your main DoT (Damage over Time) and your main spammable is Elemental Ring.
We can also use normal potions on this setup because we get Major Sorcery from Inspired Scholarship and Major Prophecy from Inner Light.


| Destruction Staff Frontbar | Destruction Staff Backbar |
|---|---|
| Slot 1: Evolving Runemend | Slot 1: Unstable Wall of Elements |
| Slot 2: Tentacular dread | Slot 2: Inspired Scholarship |
| Slot 3: Elemental Ring | Slot 3: Harness Magicka |
| Slot 4: Fulminating Rune | Slot 4: Channeled Acceleration (Flex Spot) |
| Slot 5: Inner Light | Slot 5: Inner Light |
| Ultimate: Elemental Rage | Ultimate: Elemental Rage |
Champion Points for the Magicka Grind Setup
Below you can find the Champion Points setup for this build. Work your way from top to bottom in your allocation. For more information on Champion Points, please visit the Champion Points Overview Page on ESO-Hub.com.
Hovering over each perk will give you insights on what it does. Presets are also provided for each of the allocations below.
Click the tab below to open the allocation.
Important Info for the Magicka Grind Build
Below you can find some of the important information such as Buff-food, Potions, Mundus Stones, Passives, Attributes and Race.
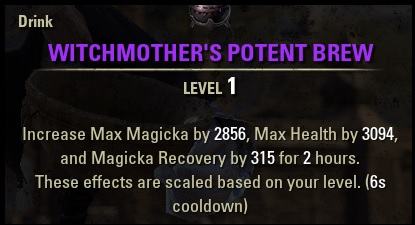
Buff-food
We use the Witchmother’s Potent Brew drink which can be bought in the Guildstores for a cheap price. This gives us a good mix of max stats as well as extra magicka recovery to increase our sustain.
Mundus Stone
The extra Spell Penetration will increase our damage output by a lot, therefore we want to pick the Lover Mundus Stone.
The Lover Mundus (Increased Penetration)
Race
All Magicka based races work with this setup. More about each race can be found on the racial overview page.
High Elf
Breton
Dark Elf
Argonian
Khajiit
Orc
Potions
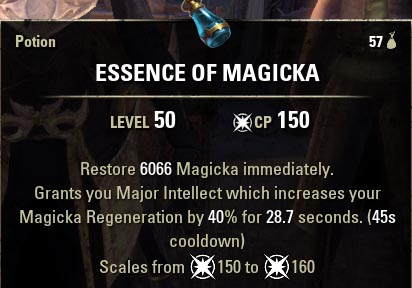
All classes already have Major Sorcery and Major Prophecy, therefore we can simply use normal Essence of Magicka potions that are very cheap in the Guildstores, I would recommend stacking as many as possible so you can constantly drink them to regain magicka and increase magicka recovery. It is also recommended to have the Medicinal Use passive active, to increase the duration of the potion.
Essence of Magicka Potion
(Magicka)
(Bought in Guild Stores, fairly cheap)
Important: Make sure to get alchemy to level 50 to unlock the Medicinal Use passive. That way you can keep up the buffs of potions a 100% of the time.
Passives
- Class Passives: All
- Destruction Staff: Tri Focus, Penetrating Magic, Elemental Force, Ancient Knowledge, Destruction Expert
- Light Armor: Grace, Evocation, Spell Warding, Prodigy, Concentration
- Fighters Guild: Banish the Wicked
- Racial: All
- Alchemy: Medicinal Use
Attributes
64 Magicka, 0 Health, 0 Stamina
Magicka Grind Example for ESO
To showcase you an example of the Magicka Nightblade version of the build, here I was in the Forgotten Wastes Public Dungeon which is showcased in the Grind Spots Guide and managed to get around 3-4 Million experience per hour. This was with approximately 346% exp boost active.

- 150% EXP Scroll/Potion
- 100% Event Buff
- 86% from Gear & Weapon
- 10% 2 Player Group
I didn’t have the 10% Ring of Mara and ESO Plus buff. With these two buffs we could have made another extra 20% boost.
Magicka Grind Video Example
Grind Tips for Magicka Grind Builds
Here are a few tips that can help you increase your efficiency while grinding experience for Champion Points. For a full overview of grind tips, please check out the ESO Grind Guide which explains all the grinding tips in detail.
Time spent Grinding
Killing monsters results in experience gain. That means whenever you don’t kill monsters, you lose experience. Looting monsters, or going back to the town to sell loot to make money means you will generate less experience but you will gain gold. Therefore, you have to decide whether you want to just ignore all the loot to make more experience, or actually go sell the items.
Preparation
Before you start grinding, buy Repair Kits, EXP Potions/Scrolls, Magicka Potions and Buff-food. Your gear will constantly break because it breaks due to experience gained and when the gear is broken, you won’t benefit from the training trait anymore. Therefore, buy as many Repair Kits as you can afford. You also want to make sure to not run out of EXP Potions/Scrolls while grinding. And make sure to have enough Potions and Buff-food ready to keep going for multiple hours.
ESO Grind Spots
Thanks to scaling in ESO, you can grind pretty much anywhere. Places where you can pull multiple enemies together usually work best. Even better if you have enemies that are Undead or Daedra to increase Ultimate regen thanks to the Banish The Wicked passive. You can find plenty of grind spots in the ESO Grind Guide, which has around 10 different grind spots listed.
Build Video for the ESO Grind Build
Here you can find the build video for the Grind Build for Magicka Setups, All Classes.