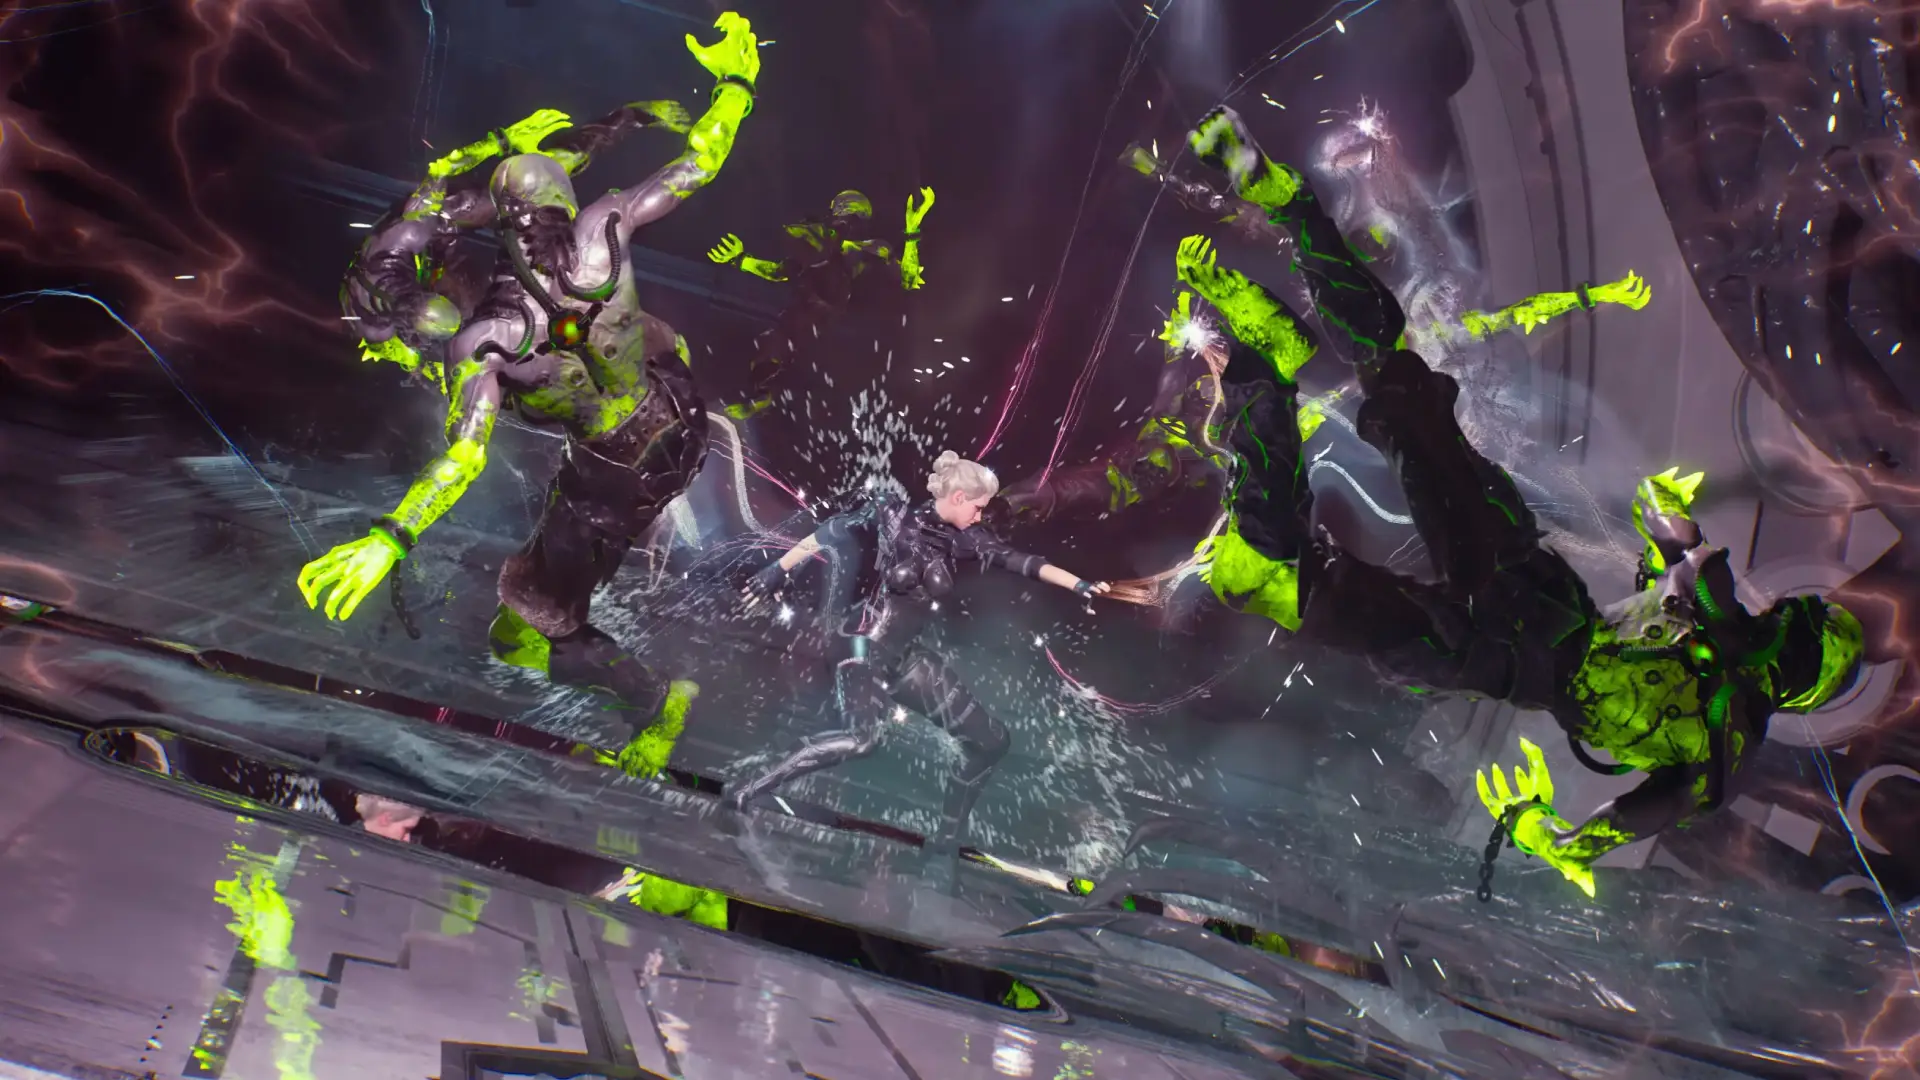
Welcome to The First Descendant Ines Build Guide for Season 3 Episode 3. Ines Raya is an electric-focused Descendant specializing in AoE Crit Damage. Ines is a very popular Descendant due to her sheer AoE damage power.
Table of Contents for the Ines Raya Build:
- How to play Ines: A Deep Dive
- Ines Builds Overview – Modules
- Trigger & Ancestor Modules
- Arche Tuning for Ines
- Ines Equipment Overview
- Ines Basics
- Ines’s Story
In this guide, we’ll show you how to unleash the full potential of Ines, a member of the H.O.U.N.D team specializing in Void Vessel operations. From mastering her unique electric-based abilities to selecting the perfect weapons, stats, and modules, this guide covers everything you need to create a truly devastating build for Ines Raya. Whether you’re looking to dominate enemies in AoE farming, boss fights, or with a budget-friendly setup, we’ve got you covered.
For builds on other Descendants, visit our The First Descendant Builds Database, or check out the Character Tier List or the Weapon Tier List.
TFD Wiki: We have expanded Alcasthq with tfd.gameslantern.com, a Wiki & Database for anything related to The First Descendant. Use the Character Editor or the Weapon Editor to theorycraft and create builds yourself. Browse Descendants, Weapons, Leaderboard Loadouts or use the Compare Tool. There are plenty of other features you can check out, too!
Here is a quick list of the strengths and weaknesses of the Ines Build for The First Descendant.
Ines’s Strengths
Ines Weaknesses
How to Play Ines in the First Descendant
In this section we are going to take a look at how Ines works in The First Descendant. Ines is an AoE focused character with a high crit rating! Learn about her skills in detail in Ines’s Skill Explanation section. Ines’s Transcendent Modules are also usable, especially Hunting Hounds!
Ines’s AoE Capabilities: Chain Lightning!
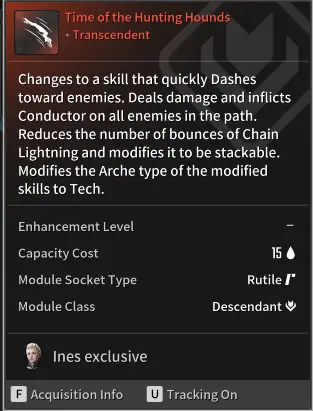
Ines role is described as an AoE damage dealer and she does an amazing job at that. With Ines’s exclusive Transcendent module Time of the Hunting Hounds all her skills change to Tech.This allows her to use one reactor for all her skills to deal massive damage. With the right build, you can destroy hordes of enemies at once due to her chain reaction electricity damage.
Additionally, it is important to get the Secret Garden Ultimate Weapon to fight against hordes of enemies. Because all her abilities change to Tech with the Transcendent Module we benefit from the Pest Control unique abilities of Secret Garden that boosts our damage even further!
– Check out the Ines Mobbing Build for maximizing damage and range against easy foes.
– For more challenging dungeons or content, the Ines Dungeon/Void Erosion Purge Build balances AoE damage power with survivability.
Ines’s Single Target Damage: Spam your Skills.
While Ines isn’t really a single-target focused character, you can still setup a good build for it if you combine it with the correct weapons. However, there are obviously better picks for single-target damage than her. Ines truly shines with AoE damage builds.
Ines can deal good damage with her skills by bouncing her DoTs back and forth between you and the boss by adding two range mods to her build.
- The Ines Bossing Build offers solid survivability, sustain and great damage with a short cooldown on Ines’s skills.
Ines’s Equipment: Make Or Break It!
To unlock Ines’s full potential, you need the right Weapons, Reactors, and External Components:
- Weapons: Focus on two general damage-dealing weapons and one weapon tailored to whatever you need for utility or special mechanics. See the Best Weapons for Ines section.
- Reactors: Selecting the right reactor can drastically boost your damage. Check out the Best Reactors for Ines section.
- External Components: These are critical for survivability. Properly configured, they double or tripple your HP or DEF. Learn more in the Best External Components for Ines section.
Building a top-tier The First Descendant Ines Build requires not only the right modules but also optimized weapons, reactors, and components.
Best Ines Builds Overview for The First Descendant
In this section, we are going to look at the different best Ines Build Setups for The First Descendant. For an optimized build, you must make sure to have enough:
Crystallization Catalysts: To unlock the necessary socket slots.
Energy Activator: To increase overall module capacity.
- Gold & Kuiper:
Best Gold Farming Method –
Best Kuiper Shard Farming Method.
Equipment: I will cover Weapons, Reactors, External Components, Inversion Reinforcements, and Transcendent Modules in the Ines Equipment section. To maximize the power of any build, you must get the correct items!
| Name | Description |
|---|---|
| Ines Mobbing Build | Used for maximum efficiency farming. |
| Ines Dungeon/Void Erosion Purge Build | Used in 250-400% difficulty Dungeons, Void Erosion Purge or generally harder content. |
| Ines Bossing Build | Used against Colossus fights. |
| N/A | N/A |
| Ultimate Ines Bossing Build | Not yet released |
Note: These Ines Builds are built with each other in mind to save you Crystallization Catalysts. Only in a few slots it may require you to have two different Crystallization types.
Ines Mobbing Build for The First Descendant
- Farming Build Type: Easy content for farming EXP or items.
- Farming Build Focus: Maximize infection range, damage and provide unlimited sustain.
Ines is obliterating anything with her Electric AoE damage in The First Descendant. This setup is built for farming EXP, Modules, Components, etc. Basically, easy content where you won’t take that much damage. All you need is range on your AoE skills and good damage.
Of course, we still have some HP built-in, so we don’t easily get defeated.
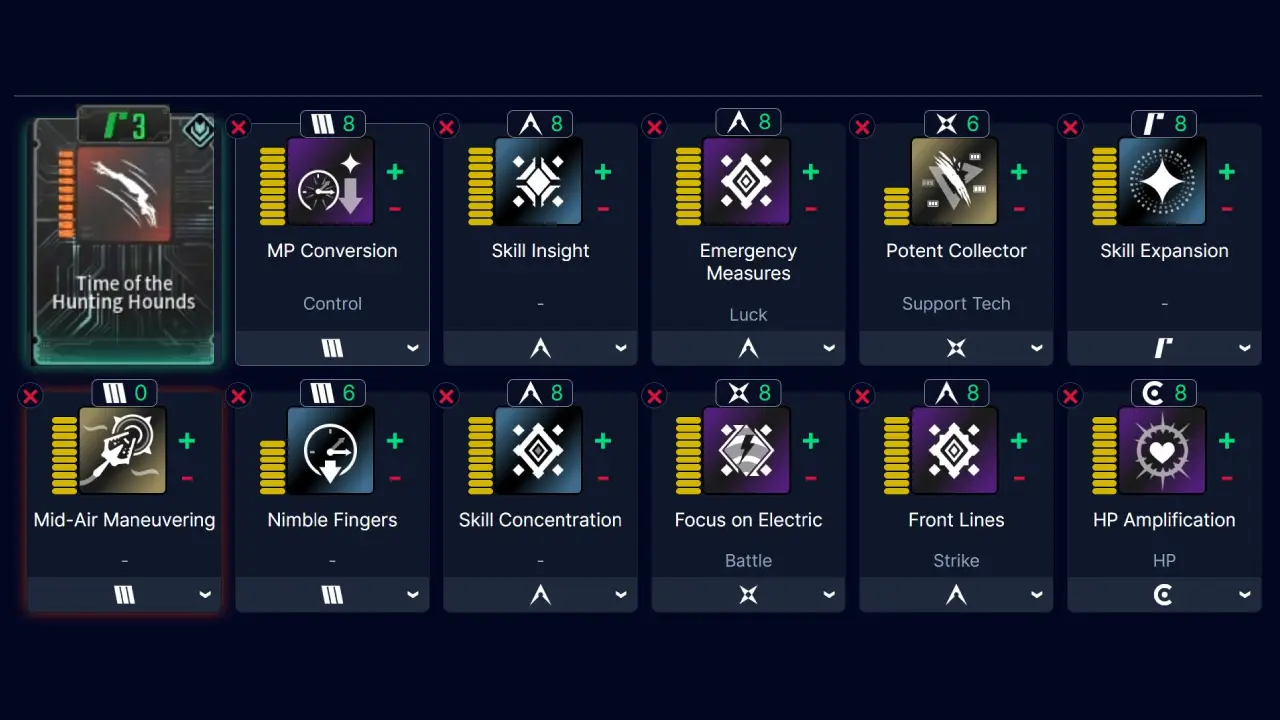
Ines Farming Build Modules Explanation:
- Time of the Hunting Hounds: Changes all skills to Tech and allows her to jump forward and deal massive AoE damage.
- MP Conversion: – Skill Cooldown, – Max MP
- Skill Insight: + Skill Critical Hit Rate
- Emergency Measures: + Skill Critical Hit Rate, + Skill Critical Hit Damage
- Potent Collector: When you defeat an enemy, recover Custom Resource
- Skill Expansion: + Skill Effect Range
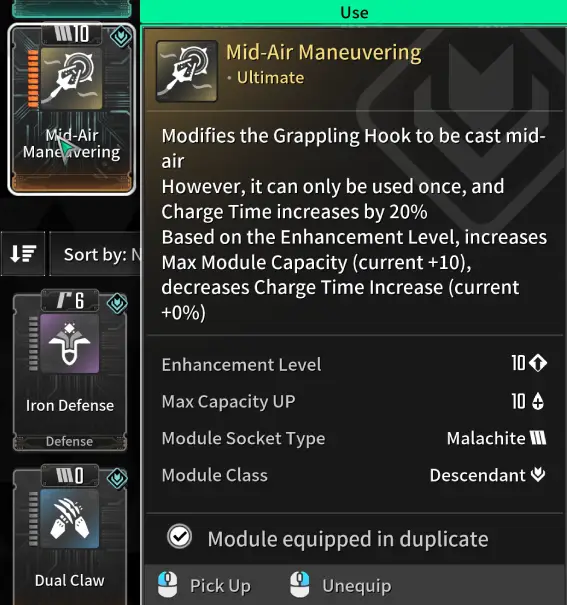
- Mid-Air Maneuvering: Allows you to use the Grapple Hook anywhere, even air!
- Nimble Fingers: – Skill Cooldown
- Skill Concentration: + Skill Critical Hit Damage
- Focus on Electric: + + Electric Skill Power, – Skill Cooldown
- Maximize Range: + Skill Effect Range
- HP Amplification: + Max HP
| Module Slot | Module Name | Mod Level | Socket Type | Crystallized |
|---|---|---|---|---|
| 0 (Trigger Module) | Power Beyond | N/A | N/A | N/A |
| 1 (Skill Module) | Time of the Hunting Hounds | Max | No | |
| 2 | MP Conversion | Max | Yes | |
| 3 | Skill Insight | Max | Yes | |
| 4 | Emergency Measures | Max | Yes | |
| 5 | Potent Collector | Max | Yes | |
| 6 | Skill Expansion | Max | Yes | |
| 7 (Sub Module) | Mid-Air Maneuvering | Max | Yes | |
| 8 | Nimble Fingers | Max | Yes | |
| 9 | Skill Concentration | Max | Yes | |
| 10 | Focus on Electric | Max | Yes | |
| 11 | Maximize Range | Max | Yes | |
| 12 | HP Amplification | Max | Yes |
Ines Dungeon Build (250-400% Dungeons, Void Erosion Purge, Void Vessel etc.)
- Dungeon Build Type: 400% Dungeons, Void Erosion Purge, Void Vessel, Disrupt Invasions, anything with hard difficulty.
- Dungeon Build Focus: High survivability, great range, damage and sustain.
The purpose of this Ines Dungeon Build for The First Descendant is to clear hard content like 400% dungeons, Void Erosion Purge, Void Vessel or Invasions on hard. It is almost identical to the Ines Mobbing Build, except having a bit more damage but slightly reduced range. If you want even more survivability, you can always remove more damage modules and add more HP or DEF mods. But generally, if you want more survivability, it is better to get more of it through Components for Ines.
Ines Dungeon Build Modules Explanation:
- Time of the Hunting Hounds: Changes all skills to Tech and allows her to jump forward and deal massive AoE damage.
- MP Conversion: – Skill Cooldown, – Max MP
- Skill Insight: + Skill Critical Hit Rate
- Emergency Measures: + Skill Critical Hit Rate, + Skill Critical Hit Damage
- Potent Collector: When you defeat an enemy, recover Custom Resource
- Skill Expansion: + Skill Effect Range
- Mid-Air Maneuvering: Allows you to use the Grapple Hook anywhere, even air!
- Nimble Fingers: – Skill Cooldown
- Skill Concentration: + Skill Critical Hit Damage
- Focus on Electric: + + Electric Skill Power, – Skill Cooldown
- Front Lines: + Skill Critical Hit Damage, + Skill Critical Hit Rate
- HP Amplification: + Max HP
| Module Slot | Module Name | Mod Level | Socket Type | Crystallized |
|---|---|---|---|---|
| 0 (Trigger Module) | Power Beyond | N/A | N/A | N/A |
| 1 (Skill Module) | Time of the Hunting Hounds | Max | No | |
| 2 | MP Conversion | Max | Yes | |
| 3 | Skill Insight | Max | Yes | |
| 4 | Emergency Measures | Max | Yes | |
| 5 | Potent Collector | Max | Yes | |
| 6 | Skill Expansion | Max | Yes | |
| 7 (Sub Module) | Mid-Air Maneuvering | Max | Yes | |
| 8 | Nimble Fingers | Max | Yes | |
| 9 | Skill Concentration | Max | Yes | |
| 10 | Focus on Electric | Max | Yes | |
| 11 | Front Lines | Max | Yes | |
| 12 | HP Amplification | Max | Yes |
Ines Bossing Build for The First Descendant
- Bossing Build Type: Colossus fights on hard difficulty.
- Bossing Build Focus: High survivability, low cooldown on our 4th skill to maximize single-target damage.
This is the standard Ines Bossing Build that you can use against Colossus on hard difficulty. It has a high survivability rate so you won’t easily go down when you take damage from the Colossus. Ines isn’t the best Bossing character because all her skills focus on AoE damage. However, her DoTs can actually bounce back and forth quite a bit and deal massive damage. Skill Range expansion mods actually increase the amount of times the DoTs can bounce between you and the boss.
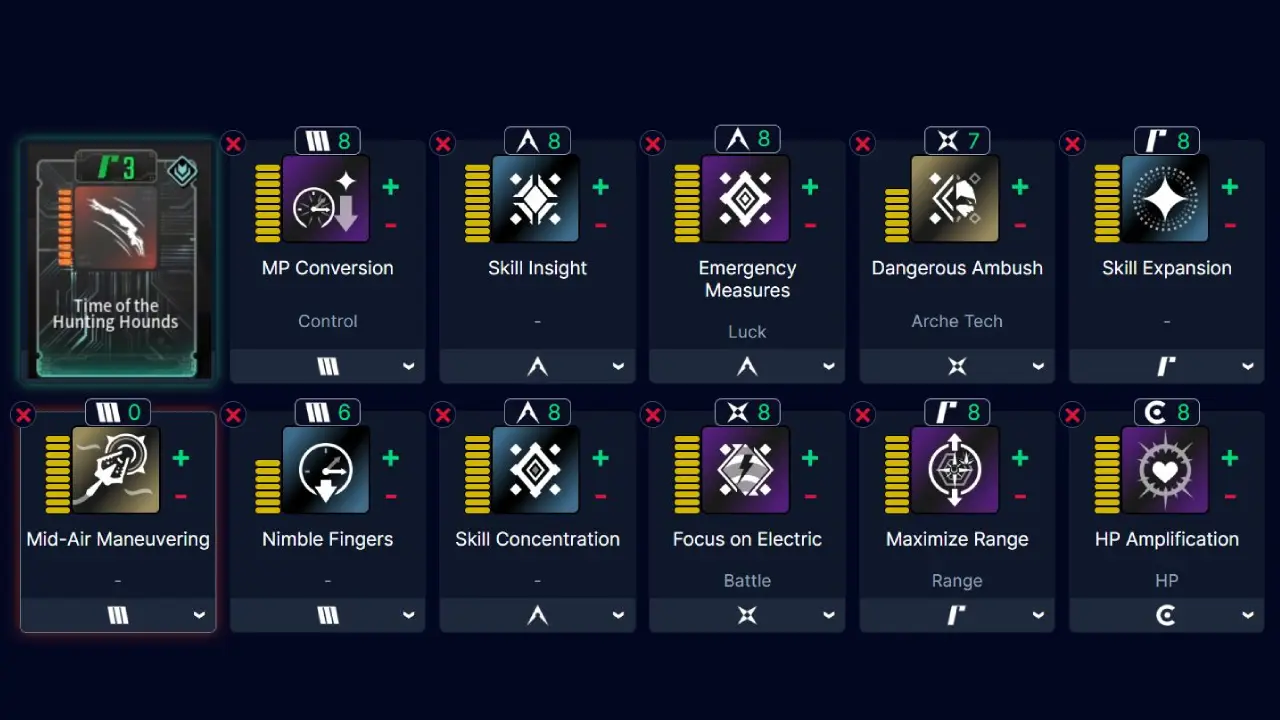
Ines Bossing Build Modules Explanation:
- Time of the Hunting Hounds: Changes all skills to Tech and allows her to jump forward and deal massive AoE damage.
- MP Conversion: – Skill Cooldown, – Max MP
- Skill Insight: + Skill Critical Hit Rate
- Emergency Measures: + Skill Critical Hit Rate, + Skill Critical Hit Damage
- Dangerous Ambush: More Skill Damage when Colossus is immobilized
- Skill Expansion: + Skill Effect Range
- Mid-Air Maneuvering: Allows you to use the Grapple Hook anywhere, even air!
- Nimble Fingers: – Skill Cooldown
- Skill Concentration: + Skill Critical Hit Damage
- Focus on Electric: + + Electric Skill Power, – Skill Cooldown
- Maximize Range: + Skill Effect Range
- HP Amplification: + Max HP
You can replace HP Amplification with the Front Lines Module if you want to go max damage. But your HP will drop dangerously low.
| Module Slot | Module Name | Mod Level | Socket Type | Crystallized |
|---|---|---|---|---|
| 0 (Trigger Module) | Power Beyond | N/A | N/A | N/A |
| 1 (Skill Module) | Time of the Hunting Hounds | Max | No | |
| 2 | MP Conversion | Max | Yes | |
| 3 | Skill Insight | Max | Yes | |
| 4 | Emergency Measures | Max | Yes | |
| 5 | Dangerous Ambush | Max | Yes | |
| 6 | Skill Expansion | Max | Yes | |
| 7 (Sub Module) | Mid-Air Maneuvering | Max | Yes | |
| 8 | Nimble Fingers | Max | Yes | |
| 9 | Skill Concentration | Max | Yes | |
| 10 | Focus on Electric | Max | Yes | |
| 11 | Maximize Range | Max | Yes | |
| 12 | HP Amplification | Max | Yes |
Best Ultimate Ines Build – The First Descendant
- Ultimate Bossing Build Type: N/A
- Ultimate Bossing Build Focus: N/A
Note: Ultimate Ines has not been released yet. Once Ultimate Ines is available, I will update this section of the guide.
Trigger and Ancestor Modules for the Ines Build
Trigger and Ancestor Modules are also part of the module category, but they are a special type of module that are harder to unlock and acquire.
- Trigger Modules: Go into a special slot. Unlock special buffs and unique effects.
- Ancestor Modules: Go into a normal module slot. Enhance the build by adding additional stats.
Ines Trigger Modules
You need to first unlock the trigger module slot for each character. Learn how to unlock Trigger Modules in The First Descendant.
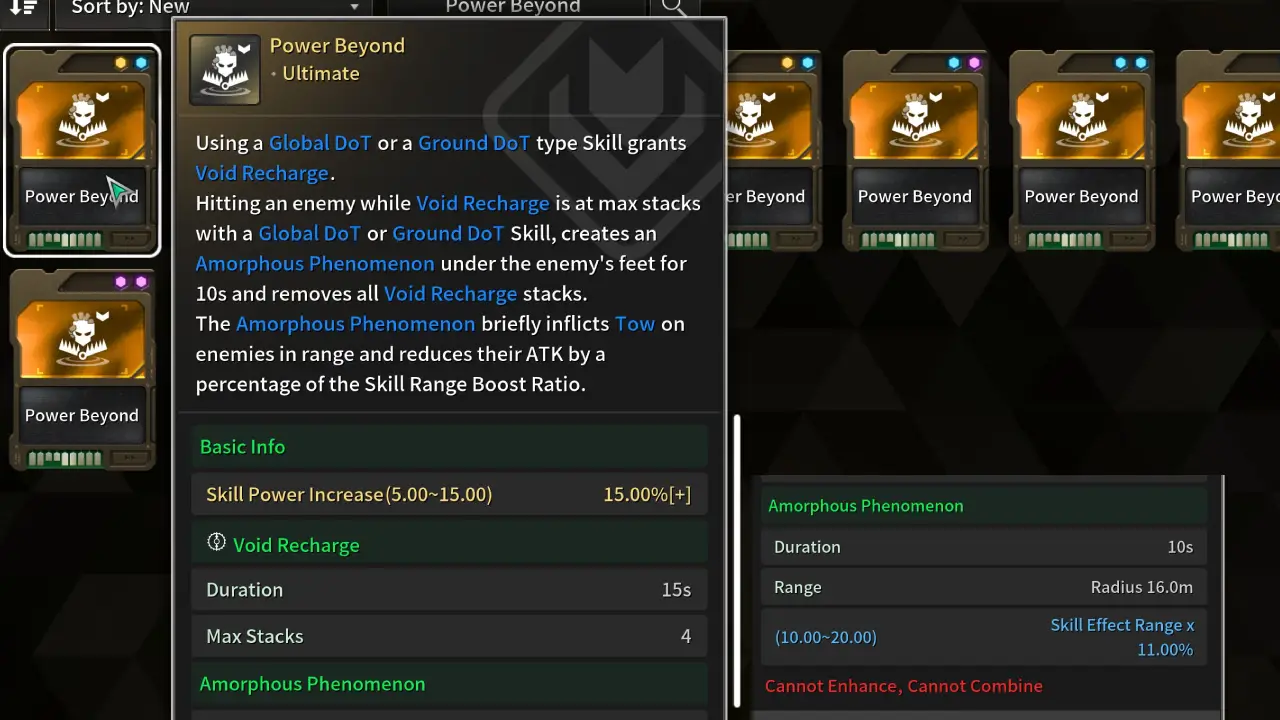
For our The First Descendant Ines Build, you always want to use the Power Beyond trigger module. This gives us a flat 15% Skill Power Increase to all our damage, which is very powerful.
- Mobbing: Power Beyond
- Bossing: Power Beyond
Ines Ancestor Module
Ancestor Modules can be slotted once you have acquired them. However, they are only worth it once you have an Ancestor module with good stat rolls on them.
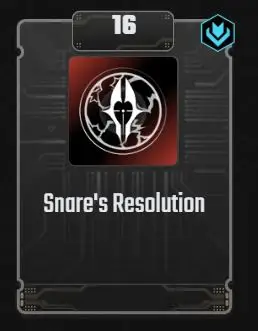
- Ines Ancestor Module: Snare’s Resolution
Superconductive Cooling Units (Needed to Reroll perks): How to farm
- Must Read: How Ancestor Modules Scale & Examples
It is only worth slotting an Ancestor Module if you have good rolls on it; otherwise, it isn’t worth it.
- Ideal Positive Rolls
- Electric
- Tech
- Crit Damage
- Cooldown
- Ideal Negative Rolls
- Max Shield
- DEF
Ancestor Module: What to Replace and Why
To slot an Ancestor Module effectively, identify existing modules that share the same primary stat. By replacing a standard module with an Ancestor version that offers similar values, you maintain your core build while gaining its additional unique perks as a ‘free’ bonus.
- How to: Replace a standard module with an Ancestor Module that mirrors its main perk.
- The values should be close; you preferably don’t want to replace a 100% with a 30% value.
- Example 1: If your Ancestor Module provides Skill Critical Hit Rate, replace Skill Insight.
- Example 2: If your Ancestor Module provides Max HP, replace Increased HP.
- Example 3: If your Ancestor Module provides Skill Effect Range, replace Skill Expansion.
- Result: All other perks from the Ancestor Module will basically be a “freebie” and improve your build!
- Helpful Links:
As long as the Ancestor Module reaches a similar value to the one you’re removing, every additional stat on that Ancestor Module becomes a “free” bonus for your build.
Arche Tuning for Ines
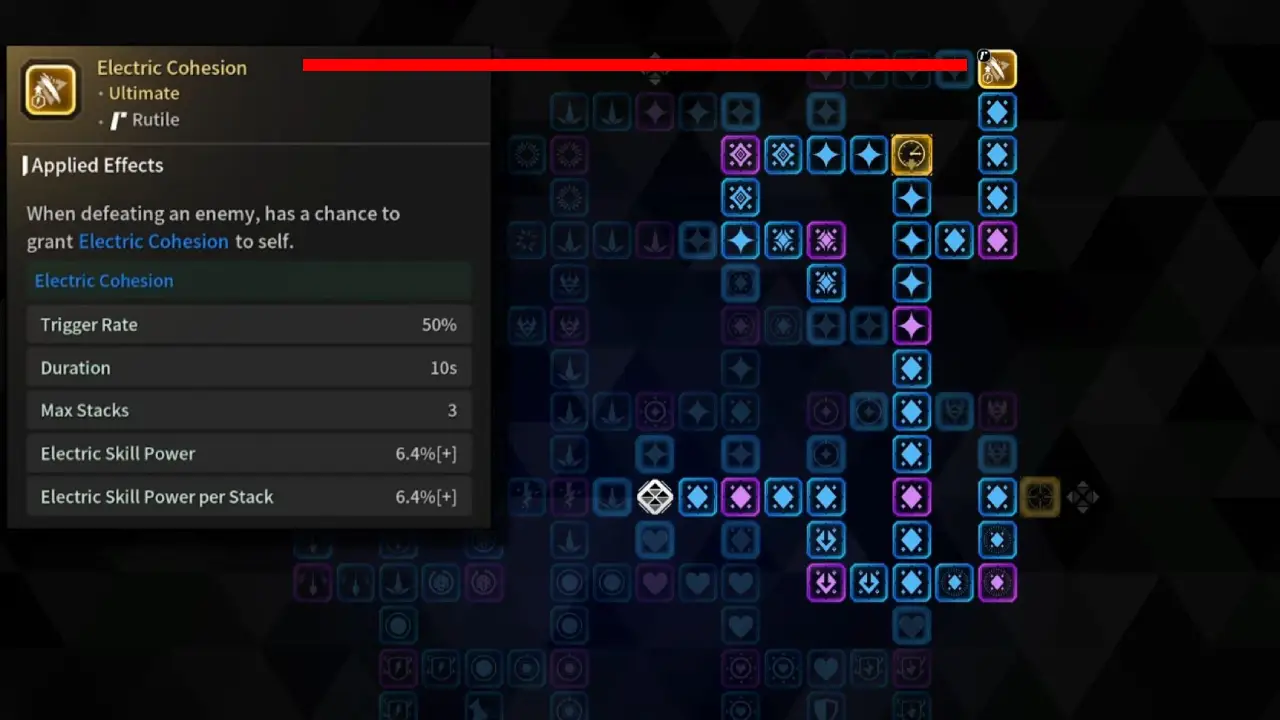
The Arche Tuning System in The First Descendant is important for every Character; it buffs your stats by a good amount. For The First Descendant Ines, we are focusing on the right and upper right section. We won’t be picking the yellow icon on the right side but rather spend more points to get more crit-related perks!
You level up Arche Tuning in the Sigma Sector Dropoff Operation. Mutant Cells also drop there with a small chance.
We use the Electric Cohesion Mutant Cell. This allows us to boost our Electric Skill Power even further.
- Mutant Cell: Electric Cohesion
Ines Equipment Overview in The First Descendant
Equipment is the cornerstone of any successful The First Descendant Build. For Ines, having the right setup can mean the difference between dominating a dungeon and falling short. This section breaks down the essential equipment types—Weapons, Reactors, External Components, and Transcendent Modules—and explains how they maximize her power.
| Equipment Type | Importance | Key Benefits |
|---|---|---|
|
|
|
|
|
|
|
|
|
|
|
|
|
|
Best Weapon for the Ines Build in The First Descendant
Here you will find the Top 3 Weapons for Ines in The First Descendant that I love to run among some alternative weapons that you can also test out if you want.
Don’t forget to have the needed Reactor Optimization Condition with the correct weapon types, otherwise, your skills will deal much less damage!
Other Useful Weapons
Best Reactor for Ines in The First Descendant
Selecting the best reactor for Ines in The First Descendant can significantly enhance her abilities, allowing you to maximize her effectiveness in various scenarios. Not only does the reactor determine your skill damage, but it also gives additional secondary benefits through modifiers. These are often hard to get and take time to grind out!
All of Ines’s skills are Electric. Her first and third skill are Singular based and her second and fourth are Tech based. If you use the Time of the Hunting Hounds transcendent mod all her skills change to Tech type.
It is hard to get a Reactor with two best in-slot specs. However, you should be able to get a Reactor with at least one good spec. I will highlight the more important spec in bold in the table below.
| Best Reactor | Specs | Key Benefits | Best Builds |
|---|---|---|---|
| Electric Mechanics Reactor |
|
Maximizing Colossus Damage. | |
| Electric Mechanics Reactor |
|
Overall best damage for Mobbing due to fast cooldown and our isanely high crit rate. |
How to find the Location of Reactors
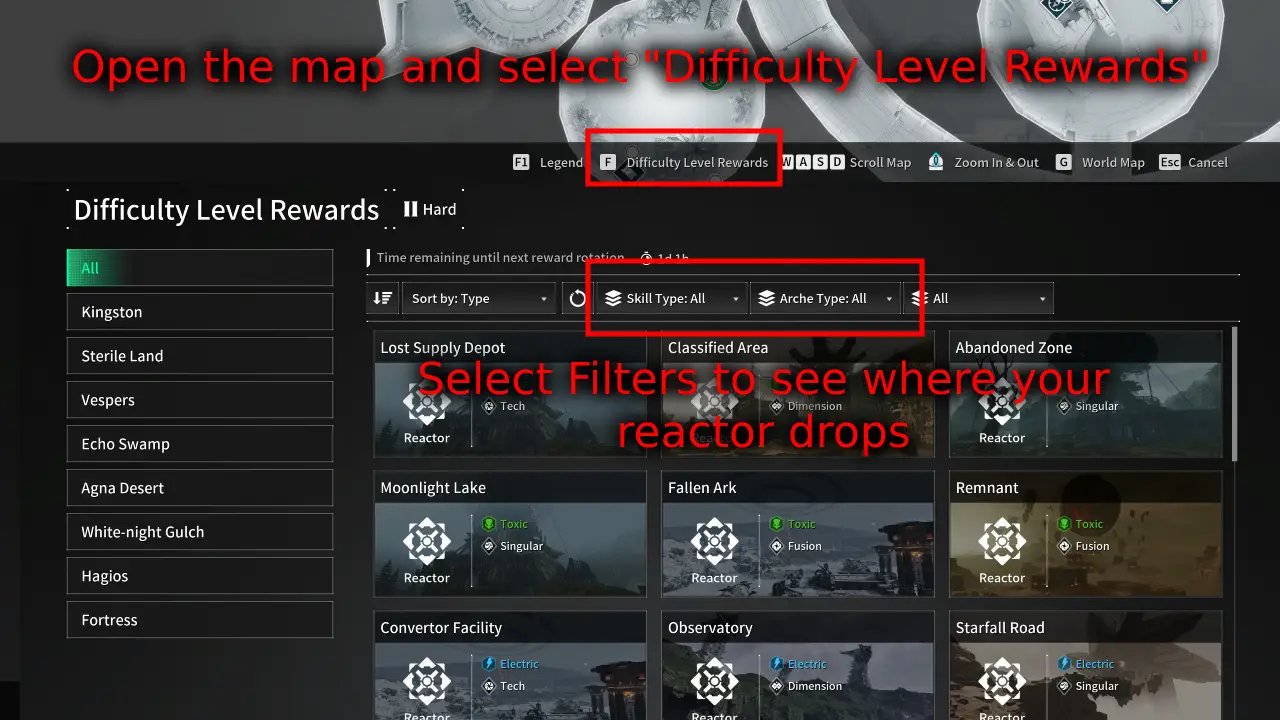
Reactor drop locations change every day. Not many players know this and get confused. Now, there is a reactor search function in-game. Go to the map and press on Difficulty Level Rewards. In here, you can see where all the reactors currently drop.
Note: It is possible that not all reactor types are currently dropping. You have to come back and recheck every day.
If your specified reactor drops in an area, you go there and farm any missions and monsters (Preferably missions with lots of monster spawns). There will be plenty of reactors dropping from monsters all over the place, any monster works. It will take a while to get a good reactor!
Best External Components for the Ines Build
Ines has a few good External Component sets to choose from. I love to use the 4x Bravery set that allows us to have a way shorter cooldown on our fourth skill. If I want to play it safe, though, I prefer 2x Plague and 2x Hunter because this combo allows us to get four HP-based components to boost our Max HP tremendously.
For Bossing, I would go with the 4x Slayer set to nuke bosses with max damage.
| External Components Set | Set Effect | Why It’s Good | Recommended Build |
|---|---|---|---|
| 4x Bravery Set |
|
|
|
| 2x Plague Set 2x Hunter Set |
|
|
|
| 4x Slayer Set
|
|
|
Bravery Set External Components Setup
The Bravery set allows us to spam our fourth skill the most. This is great when you need to place the AoE in a different area.
- 2 Set:
- Max Shield +11.8%
- 4 Set:
- Skill Cost -5.7%.
- 20% chance to reduce a random skill’s cooldown by 1s each time an enemy is defeated.
| External Component Part | Base Stats | Selective Best Stats | Cores |
|---|---|---|---|
| Max Shield |
|
|
|
| DEF |
|
|
|
| DEF |
|
|
|
| Max Shield |
|
|
2x Plague and 2x Hunter Set External Components Setup
This is the safest setup because it allows us to stack three HP-based and one DEF-based components and still get good bonuses out of it.
- 2 Plague Set:
- Tech Skill Power +5%
- 4 Hunter Set:
- Skill Cooldown -4%.
| External Component Part | Base Stats | Selective Best Stats | Cores |
|---|---|---|---|

|
Max HP |
|
|
| DEF |
|
|
|

|
Max HP |
|
|
| Max HP |
|
|
Slayer External Components Setup
If you want to maximize damage then use the Slayer set. Just remember that this also increases the cost of your skills.
| External Component Part | Base Stats | Selective Best Stats | Cores |
|---|---|---|---|
| DEF |
|
|
|
| Max Shield |
|
|
|
| Max Shield |
|
|
|
| Max HP |
|
|
Inversion Reinforcements Setup for Ines
You can find the Inversion Reinforcements in the inventory, located on the bottom left side. This changes with every new season and needs to be leveled up again. You level up Inversion Reinforcements by doing any activity. However, the fastest way to advance it is by completing Disrupt Invasion (max 4 daily) in the dungeon terminal with the red dungeons.
At max level, you have unlocked everything. While the last perk is always active in each row, you can only slot three additional perks at the bottom. Here is what you want to prioritize:
- Hunting: Arche Circulation Tactic.
- Elemental: None.
- Recovery: Selective Neurostimulation.
- Survival: Deploy Hardened Shell.
- Season: None.
All Ines Transcendent Modules Explained
First, let us look at the full list of all Transcendent Modules for Ines in The First Descendant. It is important to note that not all of the modules will be used. Some are more effective than others!
| Module Name | Module Description | Best In Slot |
|---|---|---|
| Plasma Ball | Changes passive into a defense passive, shielding yourself from enemy attacks. | N/A |
| Time of the Hunting Hounds | Chain Lightning (Skill 1) turns into Fludical Lighting, hitting fewer enemies but having shorter cooldown. Discharge now dashes forward and deals AoE damage. Longer dash travel time means bigger explosion. |
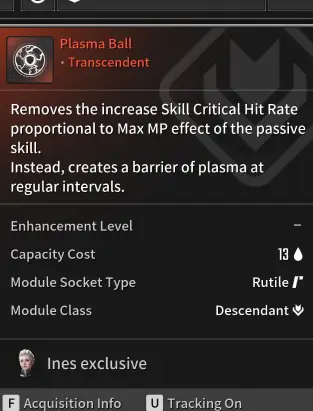
Plasma Ball Transcendent Module
- Unlike the existing passive skill “Plasma Oscillation,” it does not boost Skill Critical Hit Rate but generates Plasma Ball that defends incoming attacks from enemies for a better stability.
- The durability of Plasma Ball increases in relation to the Max MP.
- It additionally allows the character hits enemies that have conductors with a skill to deal Dark Current even without Critical Hit.
- Inflict Conductor Status Effect to enemies hit by the skill and deal additional damages to enemies that are already in Conductor state.
- You can acquire it from Kingston: Slumber Valley Hard difficulty, Obstructer Hard difficulty, and Combine Module.
- Plasma Bolt is an Ines-exclusive Transcendent Module.
How to get Ines’s Plasma Ball Module:
- Kingston: Slumber Valley (Hard Difficulty)
- Obstructor (Hard Difficulty)
- Module Combine.
Time of the Hunting Hounds Transcendent Module
- Active Skill 1: Floating Lightning: Unlike Chain Lightning, it hits a small number of enemies but changes to stacking skill with a reduced Cooldown
- Active Skill 3: Snare Acrobatics: Gather lightning in both hands and charge forward with force. Deal damage to all targets in the path of the charge and cause a powerful explosion at the end of the path to deal damage to nearby targets. Unlike the existing Discharge Skill, its Damage, Move Distance, and Explosion Range at the final point increase with the charging stack.
Hunting Hounds is an Ines-exclusive Transcendent Module.
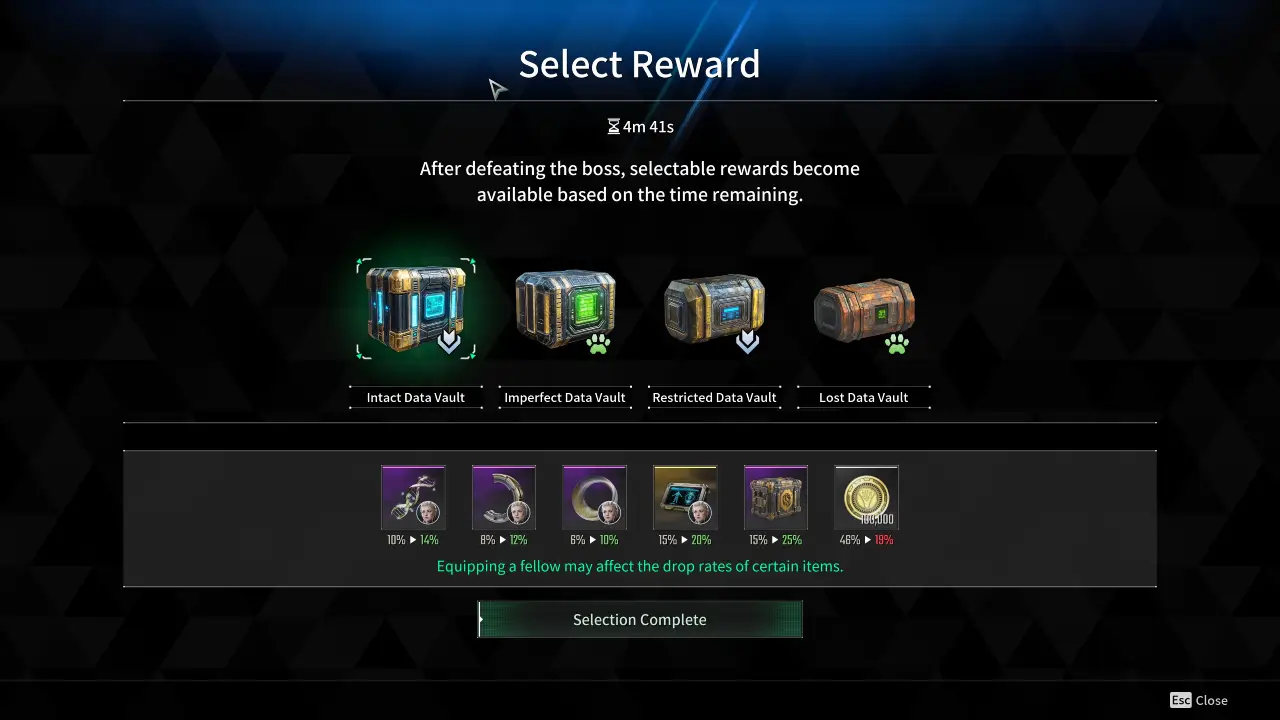
How to get Ines’s Time of the Hunting Hounds Module:
- Hagios: The Haven (Hard Difficulty)
- Frost Walker (Hard Difficulty)
- Module Combine
Ines Basics in The First Descendant
If it is your first time playing Ines in The First Descendant, here are some useful things you should know.
- How to unlock Ines
- Skills Explanation – Master Ines’s Abilities
- Module Basics Explained!
- Best Grapple Hook for Ines
How to Unlock Ines in The First Descendant
Let’s take a quick look at how to unlock Ines in the First Descendant. To unlock Ines, you have to purchase her from the store, or research her. You need the following items to research Ines:
- 1x Ines Enhanced Cells
- Location: Void Vessel on hard difficulty.
- 1x Ines Stabilizer
- Location: Void Vessel on hard difficulty.
- 1x Ines Spiral Catalyst
- Location: Void Vessel on hard difficulty.
- 1x Ines Code
- Location: Void Vessel on hard difficulty.
- 400k Credits
- Neuromorphic Chip: Open Material Storage Boxes
When you visit Magisters Anais at the Research Institute you can hover over each item. Then click on Acquisition Info and it will tell you where this specific item drops. You can view our in-depth guide on How to unlock Ines in The First Descendant.
The First Descendant Ines Skills Explained
In this section, we will explain the skills available to our Ines Build in the First Descendant, how each skill works, and the best ways for you to use them.
Ines’s skill loadout is themed around electric, applying electric damage to many enemies at once in a big radius.
| Skill Name | Type | Effect | Best Use Case |
|---|---|---|---|
 Chain Lightning Chain Lightning |
AoE | Places Lighting Orbs on the enemies. Applies the Conductor state. | AoE Damage |
 Lightning Conductor Lightning Conductor |
AoE | Deals AOE damage to nearby monsters. | AoE Damage |
 Discharge Discharge |
AoE | Gathers and releases electricity to the front. Longer charging means more damage. | AoE Damage |
 Snare Hunter Snare Hunter |
AoE, Snare | Throw a Plasma Acceleration Coil forward to snare enemies and deal AoE damage over time. | Snare & AoE Damage |
 Plasma Oscillation (Passive) Plasma Oscillation (Passive) |
Passive | Increases Skill Critical Hit Rate with higher Max MP. Critical Hits on enemies create Dark Currents causing cascading damage to nearby mobs. | Is always active |
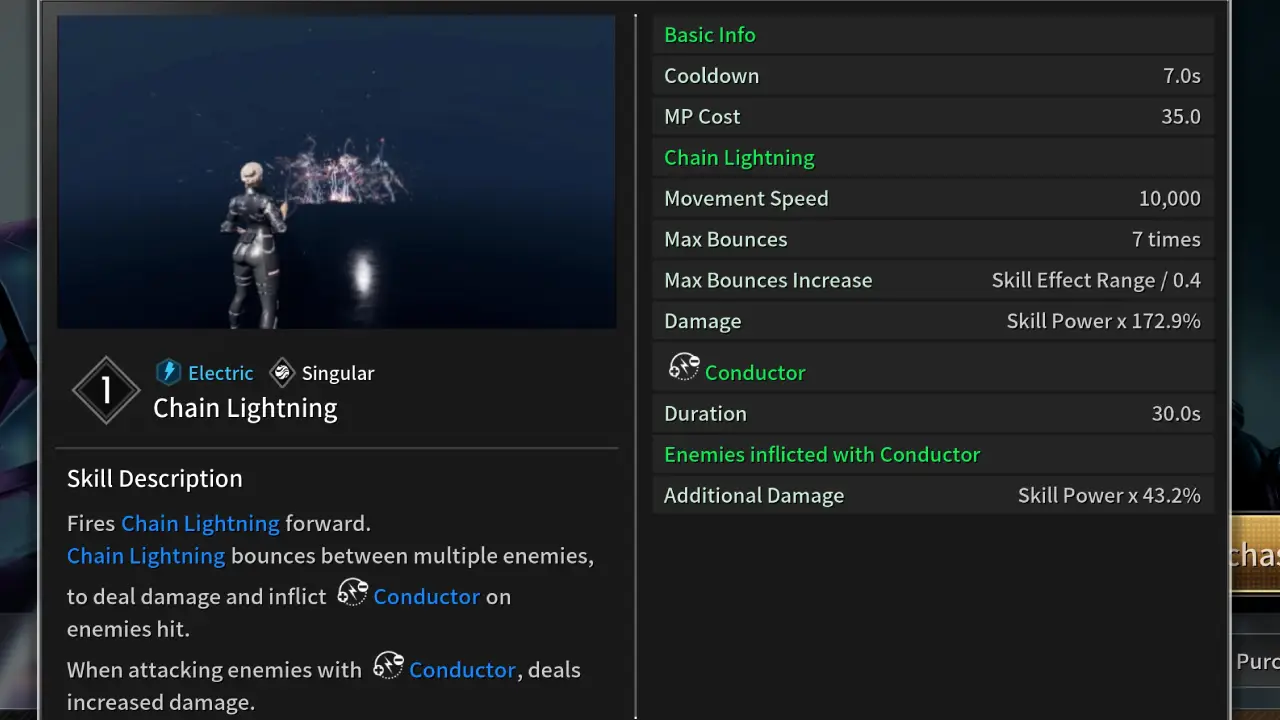
Chain Lightning Skill 1
Strikes enemies with a chain of lightning. The lightning bolts bounce between enemies and deal damage before returning to Ines.
Chain Lightning Skill Description:
- Fires Chain Lightning forward.
- Chain Lightning bounces between multiple enemies, to deal damage and inflict Conductor on enemies hit.
- When attacking enemies with Conductor, deals increased damage.
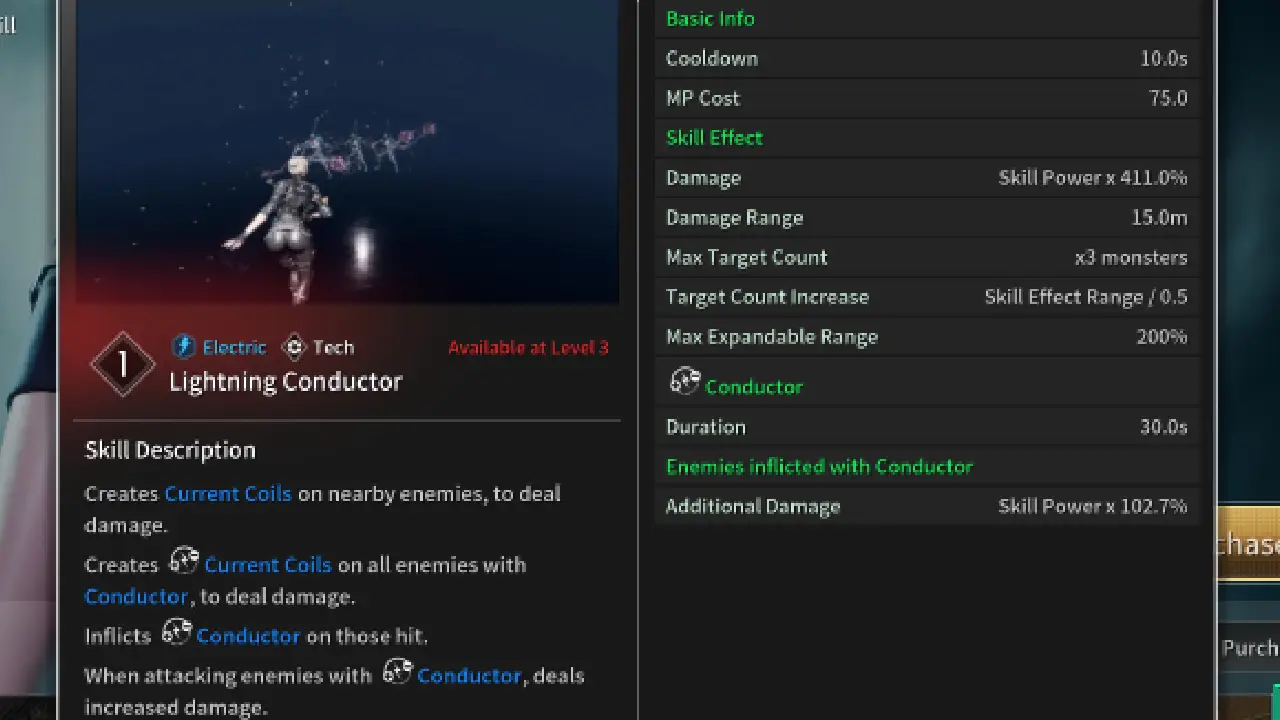
Lightning Conductor Skill 2
Inflicts an electric shock through current coils on enemies within range. The more enemies inflicted with Conductor within range, the more targets the current coils will attach to and the more damage it deals.
Lightning Conductor Description:
- Creates Current Coils on nearby enemies, to deal damage.
- Creates Current Coils on all enemies with Conductor, to deal damage.
- Inflicts Conductor on those hit.
- When attacking enemies with Conductor, deals increased damage.
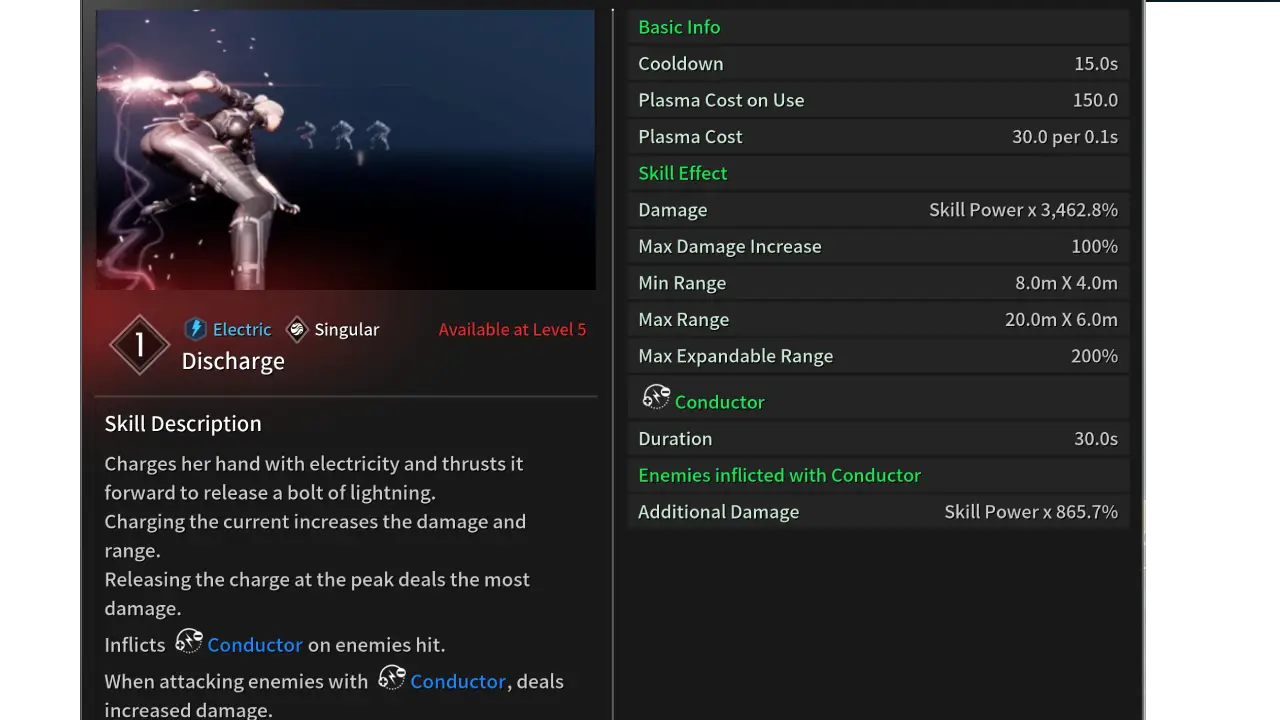
Discharge Skill 3
Ines consumes plasma and gathers the converted electrical current in her fist, releasing it powerfully in front of her. The more current she gathers, the greater the area and the more powerful the attack.
Discharge Description:
- Charges her hand with electricity and thrusts it forward to release a bolt of lightning.
- Charging the current increases damage and range.
- Releasing the charge at the peak deals the most damage.
- Inflicts Conductor on enemies hit.
- When attacking enemies with Conductor, deals increased damage.
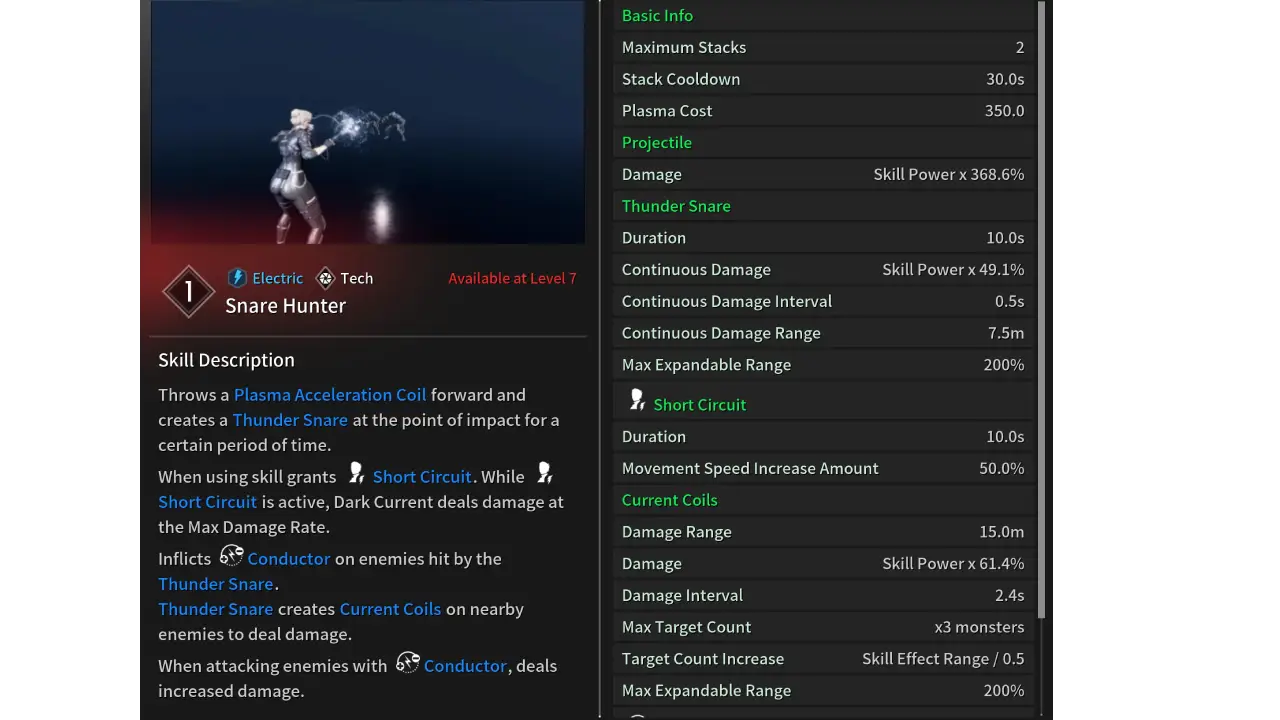
Snare Hunter Skill 4
Throws a plasma acceleration coil forward. The plasma acceleration coil creates a Thunder Snare at the location it hits, dealing damage to nearby enemies for a certain period and inflicting an electric shock through current coils on enemies within range at regular intervals. The more enemies inflicted with Conductor within range, the more targets the current coils will attach to and the more damage it deals.
Description:
- Throws a Plasma Acceleration Coil forward and creates a Thunder Snare at the point of impact for a certain period of time.
- When using skill grants Short Circuit. While Short Circuit is active, Dark Current deals damage at the Max Damage Rate.
- Inflicts Conductor on enemies hit by the Thunder Snare.
- Thunder Snare creates Current Coils on nearby enemies to deal damage.
- When attacking enemies with Conductor, deals increased damage.
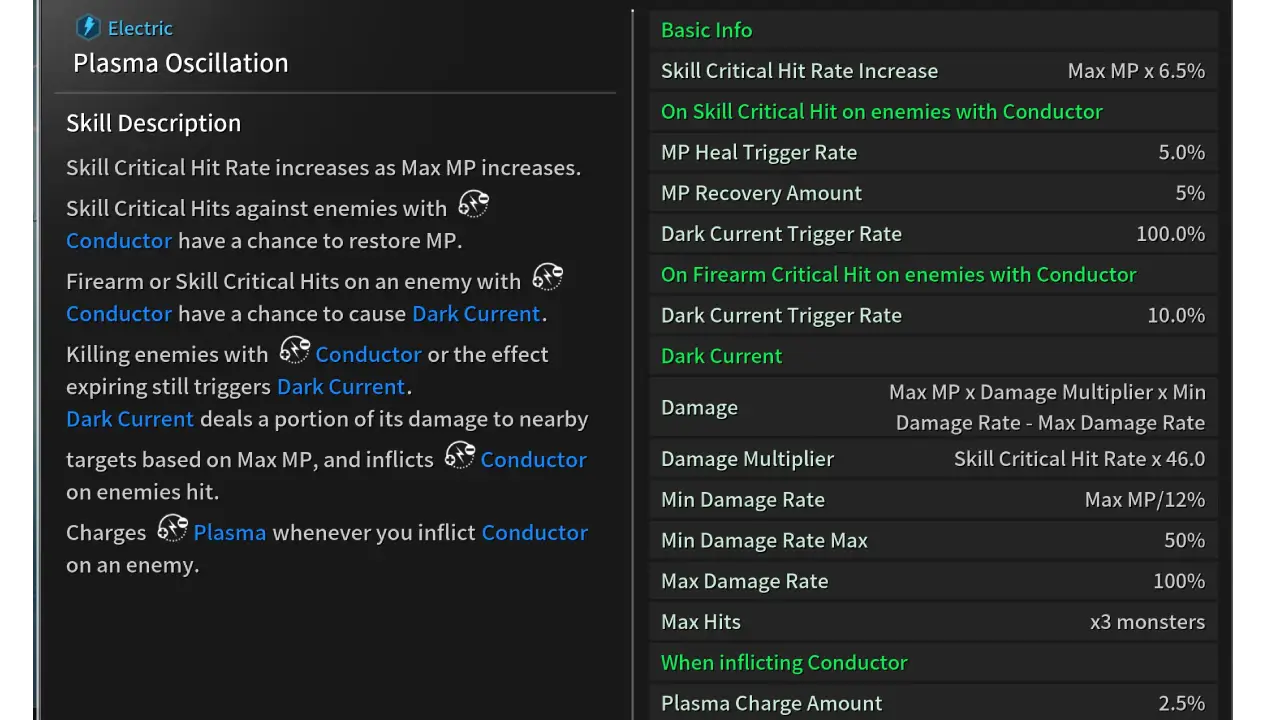
Plasma Oscillation (Passive)
Deals greater damage to enemies inflicted with Conductor. Landing a Firearm or Skill Critical Hit on an enemy inflicted with Conductor deals further damage to nearby enemies.
Plasma Oscillation Passive Description:
- Skill Critical Hit Rate increases as Max MP increases.
- Skill Critical Hits against enemies with Conductor have a chance to restore MP.
- Firearm or Skill Critical Hits on an enemy with Conductor have a chance to cause Dark Current.
- Killing enemies with Conductor or the effect expiring still triggers Dark Current.
- Dark Current deals a portion of its damage to nearby targets based on Max MP, and inflicts Conductor on enemies hit.
- Charges Plasma whenever you inflict Conductor on an enemy.
How Modules Work in The First Descendant
Modules are the bread and butter of all The First Descendant Builds. There are a few important things to remember about modules. This is for both Descendant and Weapon Modules.
While most builds require you to increase Module Capacity with an Energy Activator (you get two for free), they won’t require you to reduce the Module cost with Crystallization Catalyst. However, if you want to truly min-max a build, you will need plenty of these Catalysts.
- How to increase your Module Capacity
- Module Levels and Cost
- Reduce the cost of Modules
- How to farm Modules
How to Increase Module Capacity
You get a base of 45 Modules for every Descendant character. And you can increase this up to 85 currently. First off, always slot a Sub Attack Module (Slot 7). When you increase this to the max level you will get an additional 10 Module Capacity. if you use a Crystallization Catalyst on the Sub Attack Module, you even get 15 extra slots. You will see this in the setup below.
Additionally, you can use an Energy Activator to increase your Module Capacity by another 20. However, these are fairly hard to farm, only use them on your best Descendants.
Lastly, increasing your Mastery Rank will also increase Module Capacity. Rank 1 gives you 25 Module Capacity, Rank 20 gives you 50 Module Capacity. That is how we reach the 80 Module Capacity that you see on most builds.
- Slot a Sub Attack Module (and max it out to get +10 capacity, crystallize it for +15)
- Use an Energy Activator (2o extra capacity)
- Increase Mastery Rank (25 base capacity, max 50)
Weapons: Basically the same, but because you don’t have Subattack Modules, the Energy Activator gives you 30 instead of just 20 extra capacity.
You can also read my in-depth guide on how to increase Module Capacity in The First Descendant if you need more information. Or my Best Energy Activator Farm Spots and our Best Crystallization Catalyst Farm Spots. I tested all of the grind spots by myself and have already farmed plenty of these items with this method.
Module Levels and Cost
Modules can be enhanced (leveled up) with Kuiper Shards in The First Descendant. Enhancing Modules increases their power. At higher levels, the power will increase way more than at lower levels. Therefore it is always recommended to max out the most important Module first.
Here is an example of a must-have Module called Increased HP for our Descendant. You will notice that we start at 22%, but at the max level, we get a whopping 218.5% increase in health!
| Level | Capacity Cost | Power |
|---|---|---|
| 0 – Base | 6 | 22% |
| 1 | 7 | 31.2% |
| 2 | 8 | 41.4% |
| 3 | 9 | 54.4% |
| 4 | 10 | 69.8% |
| 5 | 11 | 87.2% |
| 6 | 12 | 108.2% |
| 7 | 13 | 130.2% |
| 8 | 14 | 155.2% |
| 9 | 15 | 184.5% |
| 10 | 16 | 218.5% |
Transcendent Modules are the exception; they decrease Capacity Cost with higher levels!
For an in-depth overview, please visit our How to Level Up Modules in The First Descendant guide.
How to Farm Kuiper Shards
Kuiper Shards are used to level up Modules. We have a guide on the Top 3 Kuiper Shard Farming Locations in the First Descendant. We explain how to most efficiently farm Kuiper Shards (300-500k/hour) and show the amount you need to level up mods. As a summary, to max out a Module you need:
- Normal Modules: 103’100 Kuiper Shards
- Rare Modules: 206’200 Kuiper Shards
- Ultimate Modules: 309’300 Kuiper Shards
- Transcendent Modules: 515’500 Kuiper Shards
Always max out the most important Modules first, we will showcase the order below.
How to Reduce the Cost of Modules
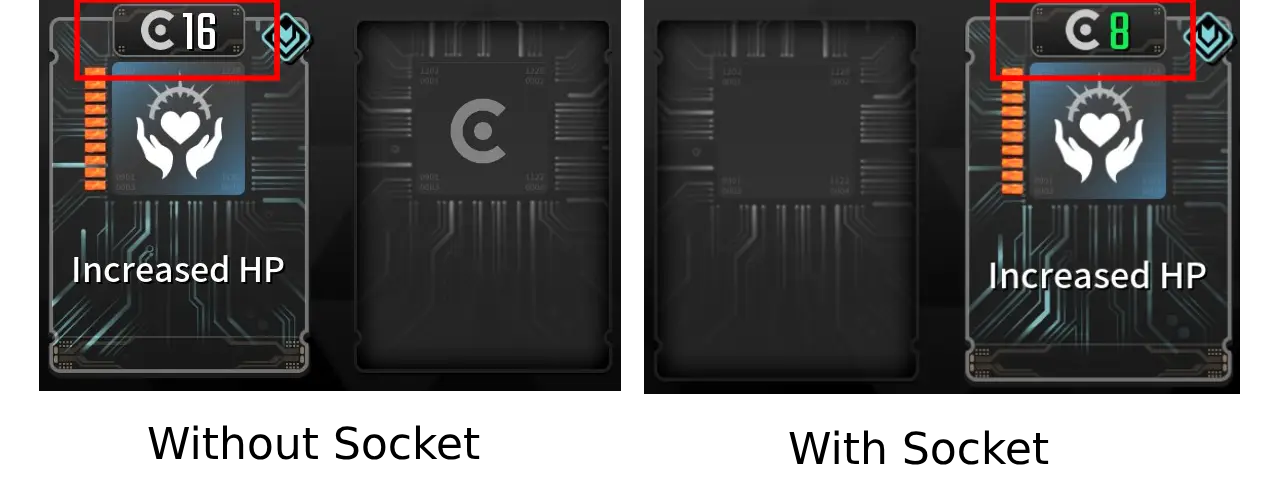
To reduce the cost of Modules you need Crystallization Catalysts in The First Descendant. These require a lot of time investment, most builds won’t require you to get many if any at all (Budget Setup). But if you want to completely min-max you need to get plenty of them as technically, every slot can have a specific socket type to half the cost.
Modules have Socket Types. Our Increased HP Module has the Cerulean Socket Type.
- Module: Increased HP
- Socket Type: Cerulean
This is important because if we place our Increased HP Module in the fitting Socket Type, it will half the cost of the Module!
How to farm Modules in The First Descendant
Most The First Descendant Modules can be acquired fairly easily, but the higher-quality ones (Ultimate, Transcendent) are more tedious to obtain. Here is the easiest process to farm Modules quickly.
Open Map > Swap to Access Info > Select Modules
Here, you can find all Modules and their drop locations. If a module drops from several locations, it is recommended to select drop locations with higher drop chances.
There isn’t really much more to this. Simply check the location and go farm. Normal and Rare quality Modules have 30-50% drop chances in most cases. Ultimate ones range around the 5% mark and Transcendent ones can be a tough cookie with around 2% drop chance.
We will list the best farming location of modules in the next step of the guide.
Smooth Grapple Hook for your Ines Build
Using the standard Grapple Hook in The First Descendant can be a pain, and it feels kinda frustrating at times. Don’t worry, there is a way better alternative that will make it a joy to use the grappling hook!
It is called the Mid-Air Maneuvering Sub Module. I use this on all my The First Descendant Builds because it improves grappling by so much.
With this Module, you can attach your Grapple Hook to anything, even air! That means you can simply aim towards the sky and Hook up your grapple hook there for guaranteed fast movement!
Here is a guide on how to get the Mid-Air Maneuvering Sub Module in The First Descendant. It won’t take a lot of effort, but it will improve your build and overall gameplay in The First Descendant.
Ines’s Story in The First Descendant – Ines Raya
Ines, like her Mother Carmen, had incredible agility, intelligence, and a noble sense of self-sacrifice.
When it was discovered that she had also inherited her thunderous arche, she decided to enlist just as quickly and with as much intensity as her mother.
Her grades at thee Descendant military academy were unsurprisingly top-notch, and when given the right to choose her unit, Ines followed her Mother’s lead and joined the Void Hunting H.O.U.N.D.S.
She brought along with her the two guns Carmen left her, the ominous Hound and hungry Hound.
Void Vessels.
The wreckage of Vulgus battleships destroyed while crossing dimensions…
Thought to be trapped forever in the blackness of space, the wreckage would occasionally fall to Ingris along with the Colossi humanity failed to intercept. Of course, in the early days of the Apocalypse, humanity mistook these cursed fragments for parts of the Colossi, and since even with all their military might they were unable to stop the Colossi… The black, ominous debris that littered the skies was not considered a real threat. However, the fall of VV001, the first to be classified a Void Vessel, was perhaps a predestined tragedy for Albion.
At the time of the incident, humanity realized in the final stages that the extreme heat source that had triggered the proximity alert on the Void Radar was not just a Colossus; it was the bow of a massive Vulgus battleship, and Void Energy that was being detected was the corpse of a Colossus hanging from the bow. What’s more, the barely functioning battleship systems were moving toward the Ingris dimension, and the projected collision course of this lost mass was not far from Albion. The problem was, Albion Headquarters had no operational procedure for this type of situation.
It was hard to believe that the Descendants, who could intercept Colossi, were unable to deal with a lump of scrap metal. But the Descendants’ abilities and equipment were geared toward short battles to kill Colossi, and humanity’s space shaping technology could only hold the Void for so long. Humanity’s only remaining option was to send the Descendants inside the Vulgus battleship to disable its engines.
It would have been a difficult decision for any Descendant to embark on such a suicidal mission, but the Descendant who was monitoring the situation, had already made up her mind, and with the speed and intensity of her lightning Arche, she advanced into Void Space. Leaving behind only her rifle and handgun, which she called the Hunting Hounds…
A while later, with an explosion that could be heard across dimensions, the extreme heat source proximity alert was silenced. The Descendant was agile enough to outrun the falling Vulgus battleship, clever enough to find the engine bay in a single glance, and selfless enough to overload the reactor with her Arche abilities and self-destruct along with the Vulgus battleship. This noble mission was later codified into the doctrine of the Void Vessel Operations, and the wreckage of the Vulgus battleship destroyed on that day was officially named VV001. The name of the very first honorary H.O.U.N.D. member was Carmen Raya, mother of the siblings Ines and Emilio.
Ines, like her mother Carmen, had incredible agility, intelligence, and a noble sense of self-sacrifice. When it was discovered that she had also inherited her thunderous Arche, she decided to enlist just as quickly and with as much intensity as her mother.
Her grades at the Descendant Military Academy were unsurprisingly top-notch, and when given the right to choose her unit, Ines followed her mother’s lead and joined the Void Hunting Hounds. She brought along with her the two guns Carmen left her, the Ominous Hound and Hungry Hound…
Ines’s Exclusive Equipment – Highly Conductive Energy Plasma
– Keelan Ayodele
Related Content


