
Welcome to The First Descendant Serena Build Guide for Season 3 Episode 4. Serena Antonietta is a weapon-focused Descendant and the first character who is able to fly. She is currently one of the most powerful Descendants.
Table of Contents for the Serena Build:
- How to play Serena: A Deep Dive
- Serena Builds Overview
- Serena Trigger Module
- Serena Ancestor Modules
- Arche Tuning for Serena
- Serena Equipment Overview
- Serena Basics
- More Serena Builds
- Serena’s Story
In this guide, we’ll show you how to unleash the full potential of Serena, the first flying character in The First Descendant. The build will include the perfect weapons, stats, and modules. This guide covers everything you need to create a truly devastating build for Serena Antonietta.
For builds on other Descendants, visit our The First Descendant Builds Database, or check out the Character Tier List or the Weapon Tier List.
TFD Wiki: We have expanded Alcasthq with tfd.gameslantern.com, a Wiki & Database for anything related to The First Descendant. Use the Character Editor or the Weapon Editor to theorycraft and create builds yourself. Browse Descendants, Weapons, Leaderboard Loadouts or use the Compare Tool. There are plenty of other features you can check out, too!
Here is a quick list of the strengths and weaknesses of the Serena Build for The First Descendant.
Serena’s Strengths
Serena Weaknesses
How to Play Serena in the First Descendant

In this section, we are going to take a look at how Serena works in The First Descendant. Serena works best as a weapon-based character. Her fourth skill Redemption boosts weapon damage to insanity. Learn about her skills in detail in Serena’s Skill Explanation section. Serena’s Transcendent Modules are also great and offer unique playstyles.
Serena’s most important ability is the fourth skill ![]() Redemption that boosts your weapon’s damage tremendously. With the correct mods you can have a 100% uptime on Redemption!
Redemption that boosts your weapon’s damage tremendously. With the correct mods you can have a 100% uptime on Redemption!
Having high HP is crucial for Serena, as her fourth skill, ![]() Redemption, scales with her maximum health, providing a significant boost to her damage output.
Redemption, scales with her maximum health, providing a significant boost to her damage output.
Serena’s AoE Capabilities: Maximum Damage!
Serena offers two very different AoE damage playstyles. You can play her as Weapon-based Mobbing Build (preferred) with any strong AoE weapon or as Skill-based Dungeon Build (External Build) with her Divine Surge Transcendent Module that allows her to function as an AoE carpet bomber.
Therefore, for any challenging mobbing conten,t I can recommend the following two builds:
- Serena Mobbing Build (Weapon-based) – Needs a maxed Weapon (Most Common Build)
- (External Build) Serena Dungeon Build (Skill-based) – With Divine Surge Transcendent Module
Serena’s Single Target Damage: One-Shot Wonder!
With the correct weapons Serena can deal insane damage. Her fourth skill ![]() Redemption scales of HP. By having a higher HP build we get higher damage and therefore can massively increase her damage. This is so strong that you can nuke pretty much any boss currently.
Redemption scales of HP. By having a higher HP build we get higher damage and therefore can massively increase her damage. This is so strong that you can nuke pretty much any boss currently.
- The Serena Bossing Build offers solid survivability, group buffs, sustain, and great damage.
Serena’s Equipment: Make Or Break It!
To unlock Serena’s full potential, you need the right Weapons, Reactors, and External Components:
- Weapons: Serena works best with a strong weapon. See the Best Weapons for Serena section.
- Reactors: Selecting the right reactor can drastically boost your power. Check out the Best Reactors for Serena section.
- External Components: These are critical for survivability. Properly configured, they double or triple your HP or DEF. Learn more in the Best External Components for Serena section.
Building a top-tier The First Descendant Serena Build requires not only the right modules but also optimized weapons, reactors, and components.
Best Serena Builds Overview for The First Descendant
In this section, we are going to look at the best Serena Build Setups for The First Descendant. For an optimized build, you must make sure to have enough:
 Crystallization Catalysts: To unlock the necessary socket slots.
- Energy Activator: To increase overall module capacity.
- Gold & Kuiper: Best Gold Farming Method – Best Kuiper Shard Farming Method.
Equipment: I will cover Weapons, Reactors, External Components, Inversion Reinforcements, and Transcendent Modules in the Serena Equipment section. To maximize the power of any build, you must get the correct items!
| Name | Description |
|---|---|
| Serena Mobbing Build (Weapon-based) | Used in 250-400% difficulty Dungeons, Void Erosion Purge or generally harder content. |
| Serena Bossing Build & Wall Crasher (Weapon-based) | Used on Colossus fights & Wall Crasher. |
Serena Mobbing Build (Weapon-Based)
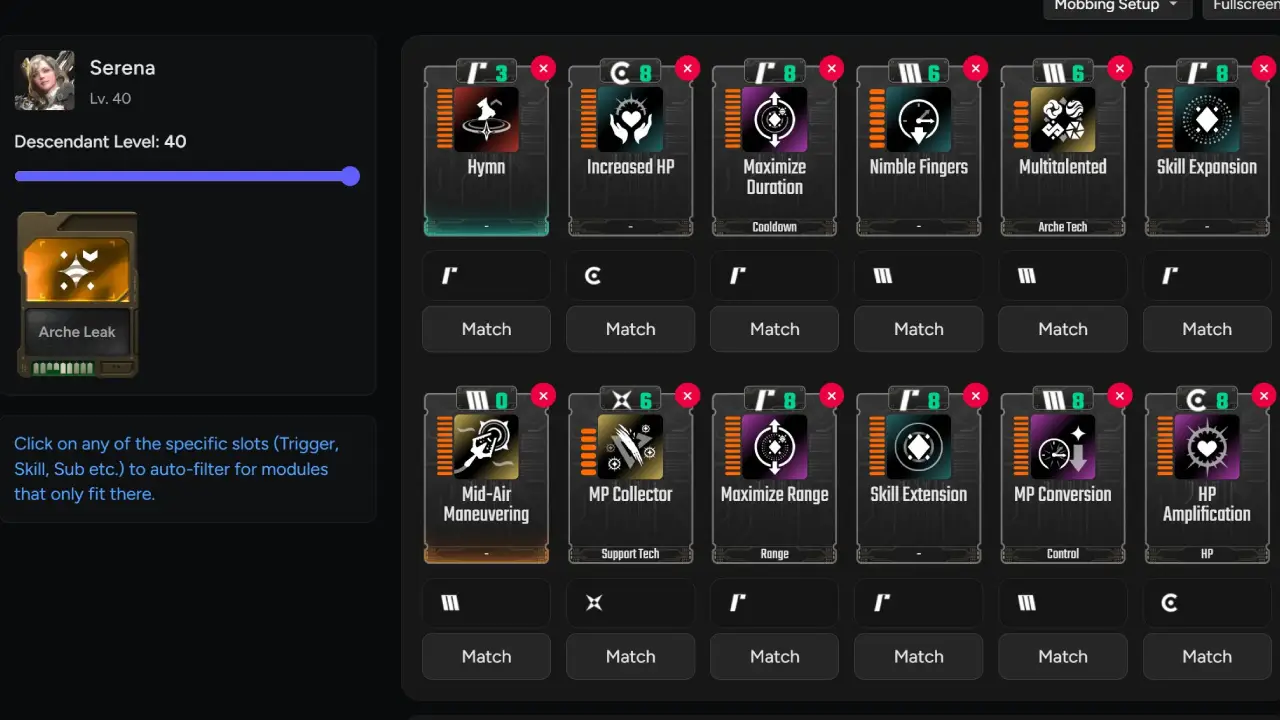
This Weapon-based Mobbing Build for Serena deals insane damage with a maxed-out weapon. Because Serena’s fourth skill scales of Max HP, the setup is focused on getting as much max HP as possible to increase our overall damage output of our weapons. With the extra skill duration modules, we can achieve a 100% uptime on the fourth skill ![]() Redemption.
Redemption.
How the ![]() Redemption skill works:
Redemption skill works:
- When used on ground: Removes all debuffs on self and allies and grants damage reduction and extra recovery.
- When used in midair: Grants Redemption’s Judgment to self which boosts Serena’s damage massively.
We always activate the skill mid-air to get the damage buff!
Why Skill Effect Range Modules? Lastly, you might wonder why we use Skill Effect Range modules. When you activate ![]() Redemption you get the Redemption’s Judgment buff. The “Additional AoE Damage Range on Firearm Attack” range can be increased by Skill Effect Range modules. This is important to maximize damage.
Redemption you get the Redemption’s Judgment buff. The “Additional AoE Damage Range on Firearm Attack” range can be increased by Skill Effect Range modules. This is important to maximize damage.
| Module Slot | Module Name | Mod Level | Socket Type | Crystallized |
|---|---|---|---|---|
| 0 (Trigger Module) | Arche Leak | N/A | N/A | N/A |
| 1 (Skill Module) | Hymn | Max | No | |
| 2 | Increased HP | Max | Yes | |
| 3 | Maximize Duration | Max | Yes | |
| 4 | Nimble Fingers | Max | Yes | |
| 5 | Multitalented | Max | Yes | |
| 6 | Skill Expansion | Max | Yes | |
| 7 (Sub Module) | Mid-Air Maneuvering | Max | Yes | |
| 8 | MP Collector | Max | Yes | |
| 9 | Maximize Range | Max | Yes | |
| 10 | Skill Extension | Max | Yes | |
| 11 | MP Conversion | Max | Yes | |
| 12 | HP Amplification | Max | Yes |
Serena Bossing Build & Wall Crasher for The First Descendant

- Bossing Build Type: Colossus fights on hard difficulty & Wall Crasher in Axion Plains.
- Bossing Build Focus: Maximium Damage, Survivability and endless MP.
This Serena Bossing Build can be used to fight Colossuses and Wall Crasher.
I do recommend the Albion Cavalry Gun with this bossing setup. It is by far the best weapon if you solo queue, and you don’t need to hit weak points constantly to get good damage. There are other good weapons, such as Ancient Knight and Excava, but these require premade groups to really push more DPS than Albion Cavalry Gun.
Important: With this setup, we can have a 100% uptime on our ![]() 4th skill Redemption and fly in the air without touching the ground for several minutes! This is achieved by a lot of skill cost and cooldown reduction. Activating our
4th skill Redemption and fly in the air without touching the ground for several minutes! This is achieved by a lot of skill cost and cooldown reduction. Activating our ![]() 1st skill Sacred Flame also allows us to restore Ammo mid-air, giving us infinite ammo.
1st skill Sacred Flame also allows us to restore Ammo mid-air, giving us infinite ammo.
- External Components: 2x Ascending Armory 2x Shell Crusher or 4x Ascending Armory. Make sure to have the correct optional MP-related perks.
- Trigger Module: Arche Leak reduces skill cost for 15 seconds after using our first skill.
- Why do I run out of MP? The Sensor needs Max MP and MP Recovery in Combat. Memory needs MP Recovery Modifier.
- Why do I run out of Ammo? Use your first skill Sacred Flame from time to time, it will refill your Ammo!
Note: Focus on Singular and Fire Modules are only slotted to get the extra cooldown reduction!
| Module Slot | Module Name | Mod Level | Socket Type | Crystallized |
|---|---|---|---|---|
| 0 (Trigger Module) | Arche Leak | N/A | N/A | N/A |
| 1 (Skill Module) | Hymn | N/A | N/A | N/A |
| 2 | Skill Extension | Max | Yes | |
| 3 | Increased HP | Max | Yes | |
| 4 | MP Conversion | Max | Yes | |
| 5 | HP Amplification | Max | Yes | |
| 6 | Maximize Duration | Max | Yes | |
| 7 (Sub Module) | Mid-Air Maneuvering | Max | Yes | |
| 8 | Focus on Singular | Max | Yes | |
| 9 | Final Wish | Max | Yes | |
| 10 | Focus on Fire | Max | Yes | |
| 11 | Nimble Fingers | Max | Yes | |
| 12 | Maximize Conservation | Max | Yes |
Best Ultimate Serena Build – The First Descendant
- Ultimate Bossing Build Type: N/A
- Ultimate Bossing Build Focus: N/A
Note: Ultimate Serena has not been released yet. Once Ultimate Serena is available, I will update this section of the guide.
Serena Trigger Module
Trigger Modules need to be unlocked first. Learn how to unlock Trigger Modules in The First Descendant. Trigger Modules go into a special slot. Unlock special buffs and unique effects.
- Mobbing: Arche Leak
- Bossing: Arche Leak
For our The First Descendant Serena Build, you always want to use the Arche Leak trigger module. This is activated with the first skill and reduces our skill cost further.
Serena Ancestor Module
Ancestor Modules can be slotted once you have acquired them. However, they are only worth it once you have an Ancestor module with good stat rolls on them.
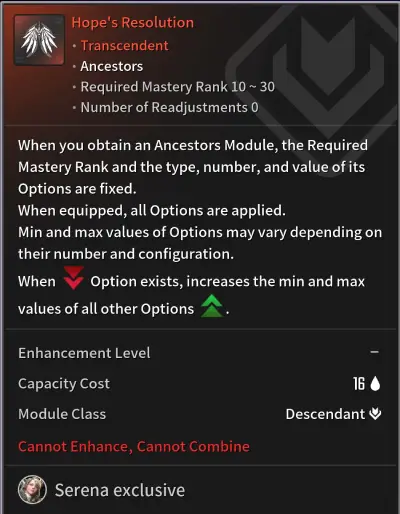
- Serena Ancestor Module: Hope’s Resolution
- Superconductive Cooling Units (Needed to Reroll perks): How to farm
- Must Read: How Ancestor Modules Scale & Examples
It is only worth slotting an Ancestor Module if you have good rolls on it; otherwise, it isn’t worth it.
Mobbing Build
You have to swap out Multitalented for the Hope’s Resolution. To do this, you must have an Ancestor Module with at least a Skill Cooldown perk of 0.09. Otherwise, you won’t be able to maintain 100% uptime for your 4th skill anymore.
- Ideal Positive Rolls
- Max HP
- Cooldown (Must be at least 0.09)
- Duration
- Ideal Negative Rolls
- Max Shield
- Any harmless perk
Bossing Build
It is currently not worth using an Ancestor Module for the bossing build.
Ancestor Module: What to Replace and Why
To slot an Ancestor Module effectively, identify existing modules that share the same primary stat. By replacing a standard module with an Ancestor version that offers similar values, you maintain your core build while gaining its additional unique perks as a ‘free’ bonus.
- How to: Replace a standard module with an Ancestor Module that mirrors its main perk.
- The values should be close; you preferably don’t want to replace a 100% with a 30% value.
- Example 1: If your Ancestor Module provides Skill Critical Hit Rate, replace Skill Insight.
- Example 2: If your Ancestor Module provides Max HP, replace Increased HP.
- Example 3: If your Ancestor Module provides Skill Effect Range, replace Skill Expansion.
- Result: All other perks from the Ancestor Module will basically be a “freebie” and improve your build!
- Helpful Links:
As long as the Ancestor Module reaches a similar value to the one you’re removing, every additional stat on that Ancestor Module becomes a “free” bonus for your build.
Arche Tuning for the Serena Build

The Arche Tuning System in The First Descendant is important for every Character; it buffs your stats by a good amount. For The First Descendant Serena, we are focusing on the left and upper left area.
You level up Arche Tuning in the Sigma Sector Dropoff Operation. Mutant Cells also drop there with a small chance.
We use the Defense Neutralization Mutant Cell. This allows us to weaken high HP enemies or bosses and deal increased damage for a while.
- Mutant Cell: Defense Neutralization
Serena Equipment Overview in The First Descendant

Equipment is the cornerstone of any successful The First Descendant Build. For Serena, having the right setup can mean the difference between dominating a dungeon and falling short. This section breaks down the essential equipment types: Weapons, Reactors, External Components, and Transcendent Modules, and explains how they maximize her power.
| Equipment Type | Importance | Key Benefits |
|---|---|---|
|
|
|
|
|
|
|
|
|
|
|
|
|
|
Best Weapon for the Serena Build in The First Descendant
Depending on what content you do with Serena, you will need different weapons. Below you can find the Top 3 Weapons for Serena in The First Descendant for Mobbing and Bossing, as well as some extra weapon choices.
- Important 1: Serena doesn’t need to reload weapons because of her third skill Soar. By activating the skill she instantly reloads the magazine. That means we won’t need any extended magazine-size modules.
- Important 2: Serena’s fourth skill Redemption needs to be active for the weapons to deal massive damage. Make sure you activate it in the air while flying/jumping to get the damage buff!
- Important 3: To optimize damage, always change the elemental damage to whatever the current enemy is weak to for massive DPS gains.
Top 3 Mobbing Weapons for Serena
| Weapon | Category | Key Features | Why It’s Great for Serena |
|---|---|---|---|

|
Machine Gun |
|
|
| Beam Rifle |
|
|
|
|
Launcher |
|
|
Top 3 Bossing Weapons for Serena
| Weapon | Category | Key Features | Why It’s Great for Serena |
|---|---|---|---|

|
Hand Gun |
|
|
|
Shotgun |
|
|
|
Sniper Rifle |
|
|
Other Useful Weapons
| Weapon | Category | Key Features | Why It’s Great for Serena |
|---|---|---|---|
| Submachine Gun |
|
|
Best Reactor for Serena in The First Descendant
Selecting the best reactor for Serena in The First Descendant can significantly enhance her abilities, allowing you to maximize her effectiveness in various scenarios. Not only does the reactor determine your skill damage, but it also gives additional secondary benefits through modifiers. These are often hard to get and take time to grind out!
Luckily, Serena only needs one reactor, a Burning Singularity Reactor with Skill Duration and Skill Cost or Cooldown. This helps increase the cooldown and duration of our 4th skill!
Tip: You can actually pick any reactor if you want as long as it has Skill Duration and Skill Cooldown on it. This is because her 4th skill weapon damage isn’t afected by skill dps.
| Best Reactor | Specs | Key Benefits | Best Builds |
|---|---|---|---|
| Burning Singularity Reactor |
|
This allows us to get max uptime on our fourth skill and reduce its cooldown too. |
How to Find the Location of Reactors
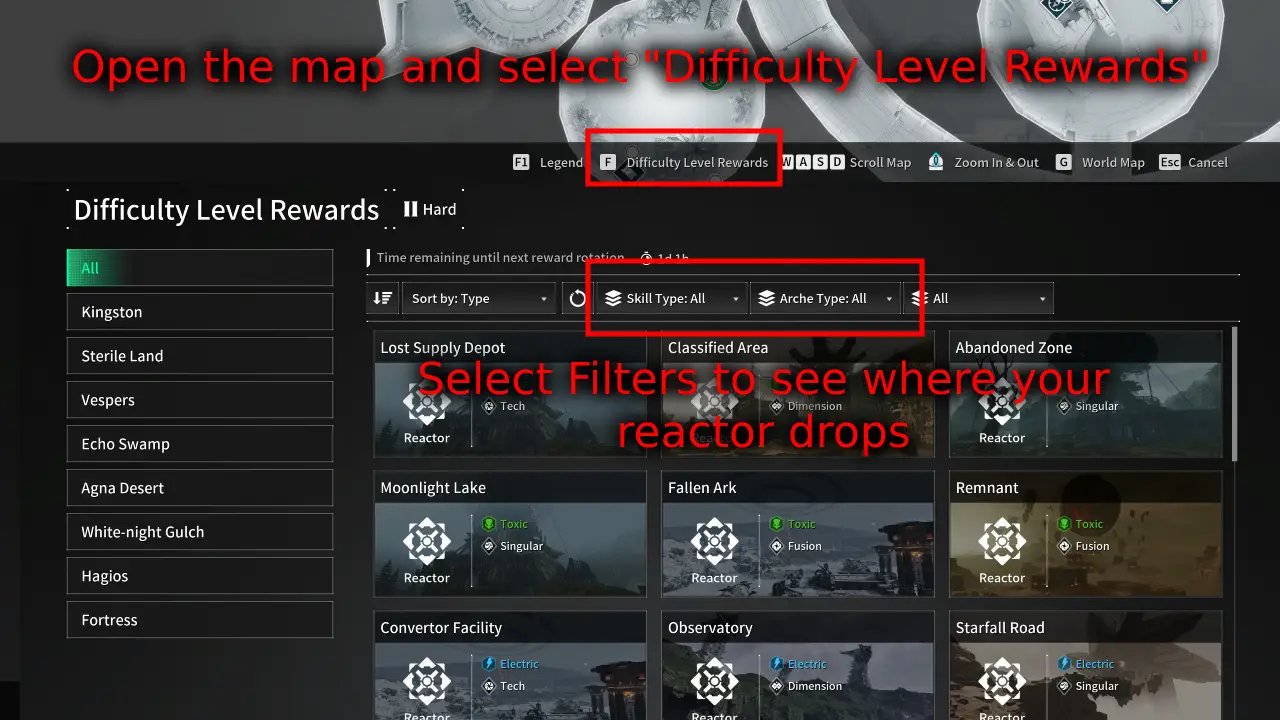
Reactor drop locations change every day. Not many players know this and get confused. Now, there is a reactor search function in-game. Go to the map and press on Difficulty Level Rewards. In here, you can see where all the reactors currently drop.
Note: It is possible that not all reactor types are currently dropping. You have to come back and recheck every day.
If your specified reactor drops in an area, you go there and farm any missions and monsters (Preferably missions with lots of monster spawns). There will be plenty of reactors dropping from monsters all over the place, any monster works. It will take a while to get a good reactor!
Best External Components for the Serena Build
Here are the best External Components for Serena. Depending on your playstyle and what weapon you use you must select different components.
External Component Cores: Always use Max HP & DEF.
Mobbing with Rocket Launcher: 4 x Ascending Armory
 Ascending Armory Auxiliary Power: Max HP & MP Recovery Out of Combat
- Ascending Armory Sensor: Max MP & MP Recovery in Combat
- Ascending Armory Memory: MP Recovery Modifier & DEF
- Ascending Armory Processor: Max Shield & Shield Recovery Modifier
Mobbing with any other weapon: 2x Ascending, 2x Shell Crusher
- Ascending Armory Auxiliary Power: Max HP & MP Recovery Out of Combat
- Ascending Armory Sensor: Max MP & MP Recovery in Combat
- Shell Crusher Memory: MP Recovery Modifier & DEF
- Shell Crusher Processor: Max Shield & Shield Recovery Modifier
Bossing: 2x Ascending, 2x Shell Crusher
- Ascending Armory Auxiliary Power: Max HP & MP Recovery Out of Combat
- Ascending Armory Sensor: Max MP & MP Recovery in Combat
- Shell Crusher Memory: MP Recovery Modifier & DEF
- Shell Crusher Processor: Max Shield & Shield Recovery Modifier
Inversion Reinforcements Setup for Serena
You can find the Inversion Reinforcements in the inventory, located on the bottom left side. This changes with every new season and needs to be leveled up again. You level up Inversion Reinforcements by doing any activity. However, the fastest way to advance it is by completing Disrupt Invasion (max 4 daily) in the dungeon terminal with the red dungeons.
At max level, you have unlocked everything. While the last perk is always active in each row, you can only slot three additional perks at the bottom. Here is what you want to prioritize:
- Hunting: Arche Circulation Tactic.
- Elemental: Strike Point Amplification.
- Recovery: None.
- Survival: Deploy Hardened Shell.
- Season: None.
All Serena Transcendent Modules Explained
First, let us look at the full list of all Transcendent Modules for Serena in The First Descendant. It is important to note that not all of the modules will be used. Some are more effective than others!
| Module Name | Module Description | Best In Slot |
|---|---|---|
 Divine Surge Divine Surge |
Flies forward, inflicting Knockback on enemies in the path and deals large amounts of damage on landing. Additionally, creates a path of fire in her wake that deals continuous damage to enemies within range. | |
 Hymn Hymn |
When used on the ground, creates a zone that increases the Jump of allies. When used in midair, temporarily increases the Movement Speed of nearby allies and increases maximum movement distance. |
Divine Surge Transcendent Module
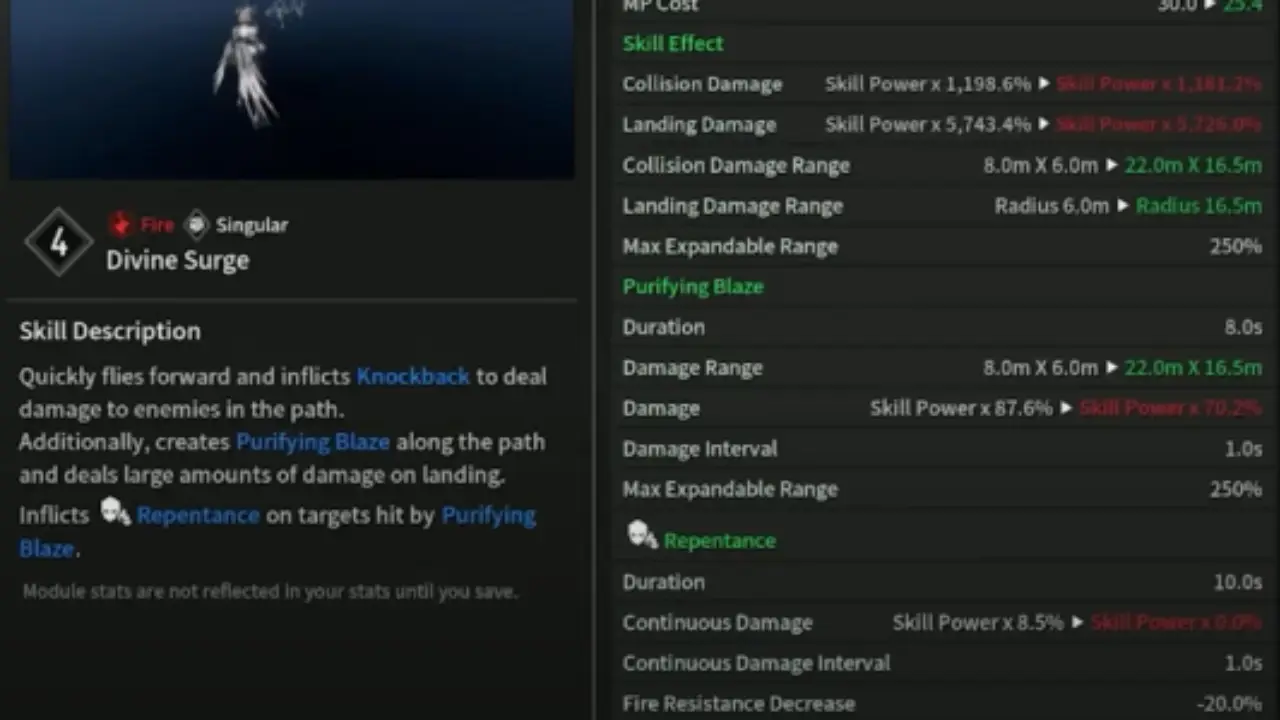
- Description: Flies forward, inflicting Knockback on enemies in the path and deals large amounts of damage on landing. Additionally, creates a path of fire in her wake that deals continuous damage to enemies within range.
- Divine Surge is an Serena-exclusive Transcendent Module.
How to get Serena’s Divine Surge Module:
- Intercept Battle: [Hard] [Pyromaniac]
- [ Albion ] [ Hard ] – [ Broken Boundary: Landing Zone Ast ] Mission Monster
- [ Albion ] [ Hard ] – [ Broken Boundary: Landing Zone Beatrix ] Mission Monster
- [ Albion ] [ Hard ] – [ Broken Boundary: Landing Zone Cassian ] Mission Monster
- [ Albion ] [ Hard ] – [ Broken Boundary: Landing Zone Darius ] Mission Monster
- [ Albion ] [ Normal ] – [ Broken Boundary: Landing Zone Ast ] Mission Monster
- [ Albion ] [ Normal ] – [ Broken Boundary: Landing Zone Beatrix ] Mission Monster
- [ Albion ] [ Normal ] – [ Broken Boundary: Landing Zone Cassian ] Mission Monster
- [ Albion ] [ Normal ] – [ Broken Boundary: Landing Zone Darius ] Mission Monster
- Available by combining modules
Hymn Transcendent Module
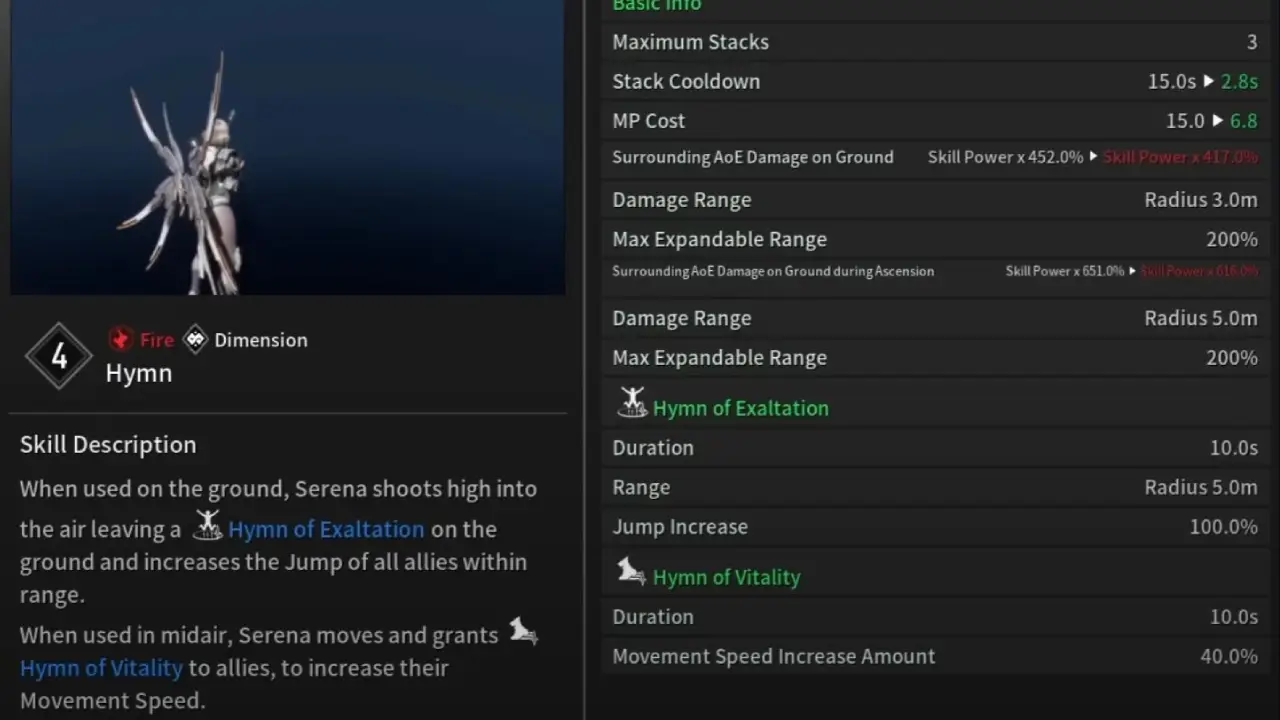
- Description: When used on the ground, creates a zone that increases the Jump of allies. When used in midair, temporarily increases the Movement Speed of nearby allies and increases maximum movement distance.
- Hymn is a Serena-exclusive Transcendent Module.
How to get Serena’s Hymn Module:
- Intercept Battle: [Hard] [Swamp Walker]
- [ Albion ] [ Hard ] – [ Isolated Desert: Landing Zone Gideon ] Mission Monster
- [ Albion ] [ Hard ] – [ Isolated Desert: Landing Zone Helix ] Mission Monster
- [ Albion ] [ Hard ] – [ Isolated Desert: Landing Zone Indigo ] Mission Monster
- [ Albion ] [ Hard ] – [ Isolated Desert: Landing Zone Juno ] Mission Monster
- [ Albion ] [ Normal ] – [ Isolated Desert: Landing Zone Gideon ] Mission Monster
- [ Albion ] [ Normal ] – [ Isolated Desert: Landing Zone Helix ] Mission Monster
- [ Albion ] [ Normal ] – [ Isolated Desert: Landing Zone Indigo ] Mission Monster
- [ Albion ] [ Normal ] – [ Isolated Desert: Landing Zone Juno ] Mission Monster
- Available by combining modules
Serena Basics in The First Descendant

If it is your first time playing Serena in The First Descendant, here are some useful things you should know.
- How to unlock Serena
- Skills Explanation – Master Serena’s Abilities
- Module Basics Explained!
- Best Grapple Hook for Serena
How to Get Serena in The First Descendant
Let’s take a quick look at how to get Serena in the First Descendant. To unlock Serena, you have to purchase her from the store, or research her. You need the following items to research Serena:
- 1x Serena Enhanced Cells
- Location: Sigma Sector Dropoff Operation
- 1x Serena Stabilizer
- Location: Sigma Sector Dropoff Operation
- 1x Serena Spiral Catalyst
- Location: Sigma Sector Dropoff Operation
- 1x Serena Code
- Location: Sigma Sector Dropoff Operation
- 400k Credits
When you visit Magisters Anais at the Research Institute you can hover over each item. Then click on Acquisition Info and it will tell you where this specific item drops. You can also read our in-depth guide on How to get Serena in The First Descendant.
The First Descendant Serena Skills Explained
In this section, we will explain the skills available to our Serena Build in the First Descendant, how each skill works, and the best ways for you to use them.
Serena’s skill loadout is themed around fire, applying fire damage with her Sacred Flame skill and buffing allies while flying.
| Skill Name | Type | Effect | Best Use Case |
|---|---|---|---|
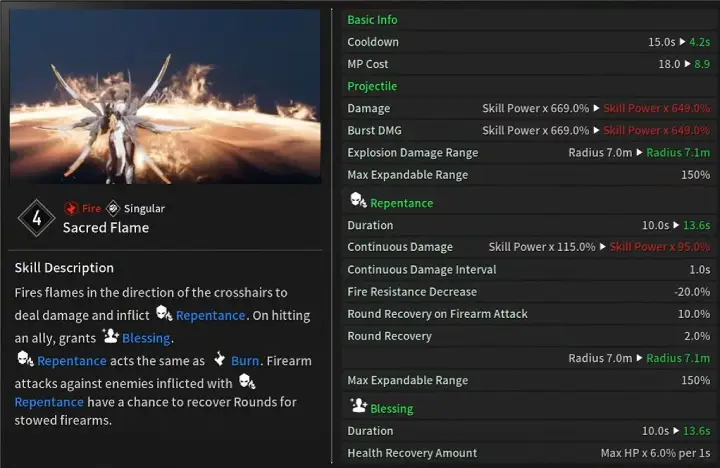
 Sacred Flame Sacred Flame |
AoE | Fires flames in the direction of the crosshairs to deal damage and inflict Repentance. On hitting an ally, grants Blessing. Repentance acts the same as Burn. Firearm attacks against enemies inflicted with Repentance have a chance to recover Rounds for the firearm in use. Additionally, when an enemy with Repentance is killed, inflicts Repentance on nearby enemies. Flames pierce terrain when used on the ground and explode when colliding with terrain when fired in midair. | AoE Damage |
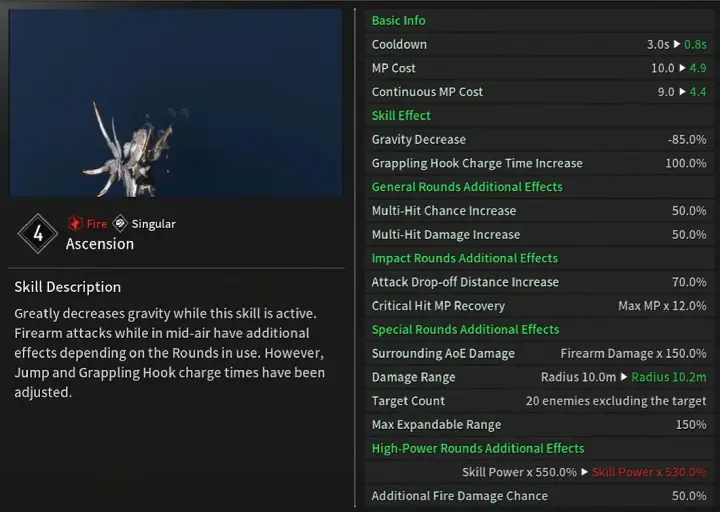
 Ascension Ascension |
AoE | Greatly decreases gravity while this skill is active. Firearm attacks while in mid-air have additional effects depending on the Rounds in use. However, Jump and Grappling Hook charge times have been adjusted. | Utility |
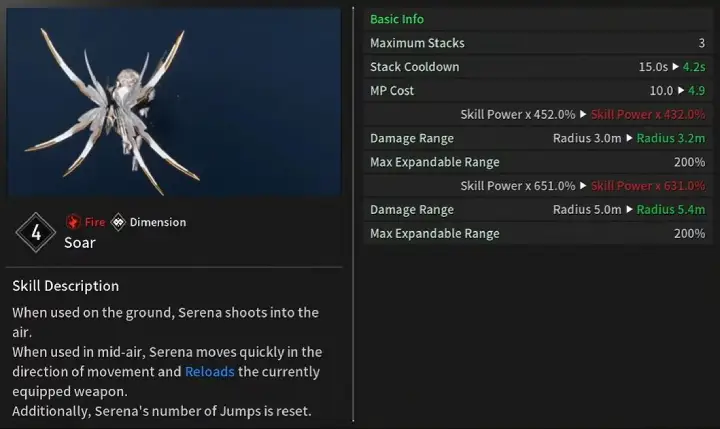
 Soar Soar |
AoE | When used on the ground, Serena shoots into the air. When used in midair, Serena moves quickly in the direction of movement and Reloads the currently equipped weapon. Additionally, Serena’s number of Jumps is reset and holding down the skill key increases the distance traveled. | Utility |
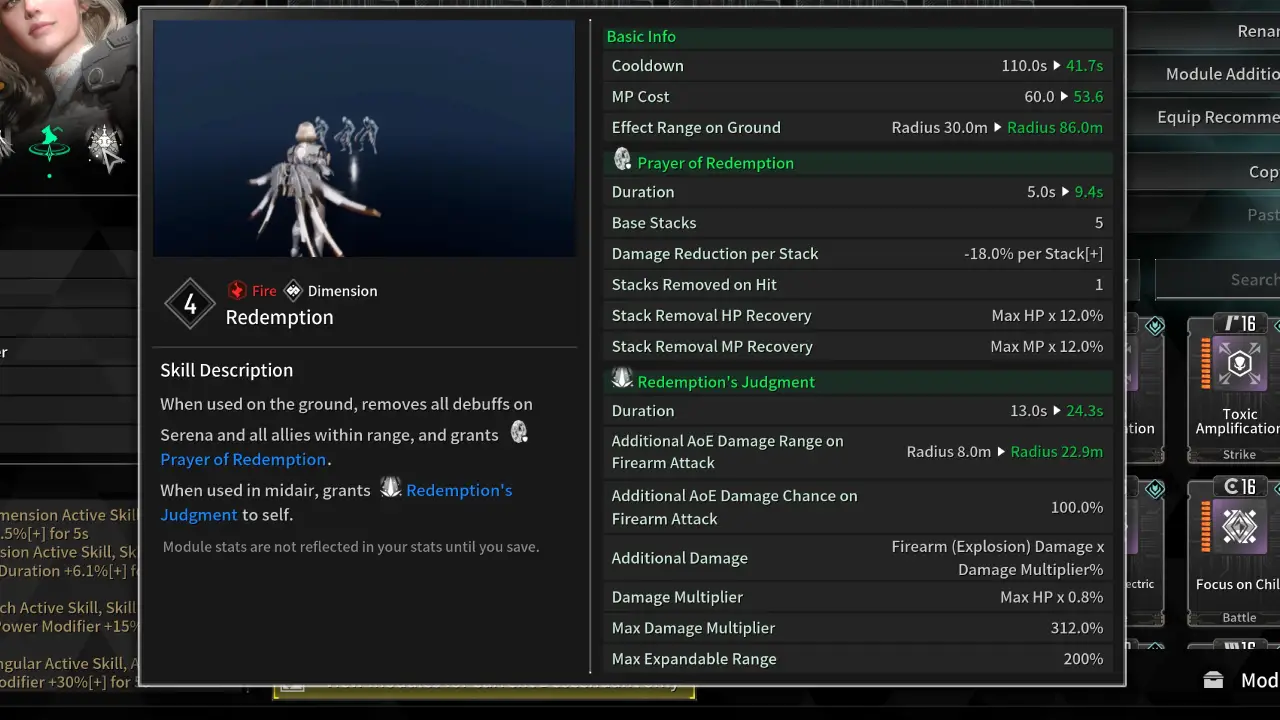
 Redemption Redemption |
AoE, Snare | When used on the ground, removes all debuffs on Serena and all allies within range, and grants Prayer of Redemption. When used in midair, grants Redemption’s Judgment to self. | Buff |
 Divinity (Passive) Divinity (Passive) |
Passive | When used on the ground, removes all debuffs on Serena and all allies within range, and grants Prayer of Redemption. When used in midair, grants Redemption’s Judgment to self. | Is always active |
Sacred Flame Skill 1
Fires flames in the direction of the crosshairs to deal damage and inflict Repentance.
Sacred Flame Skill Description:
- Fires flames in the direction of the crosshairs to deal damage and inflict Repentance.
- On hitting an ally, grants Blessing.
- Repentance acts the same as Burn.
- Firearm attacks against enemies inflicted with Repentance have a chance to recover Rounds for the firearm in use.
- Additionally, when an enemy with Repentance is killed, inflicts Repentance on nearby enemies.
- Flames pierce terrain when used on the ground and explode when colliding with terrain when fired in midair.
Ascension Skill 2
Greatly decreases gravity.
Ascension Description:
- Greatly decreases gravity while this skill is active.
- Firearm attacks while in mid-air have additional effects depending on the Rounds in use.
- However, Jump and Grappling Hook charge times have been adjusted.
Soar Skill 3
When used on the ground, Serena shoots into the air.
Soar Description:
- When used on the ground, Serena shoots into the air.
- When used in midair, Serena moves quickly in the direction of movement and Reloads the currently equipped weapon.
- Additionally, Serena’s number of Jumps is reset and holding down the skill key increases the distance traveled.
Redemption Skill 4
When used on the ground, removes all debuffs on Serena and allies.
Redemption Description:
- When used on the ground, removes all debuffs on Serena and all allies within range, and grants Prayer of Redemption.
- When used in midair, grants Redemption’s Judgment to self.
Note: Redemption’s Judgement range can be buffed by skill range modules!
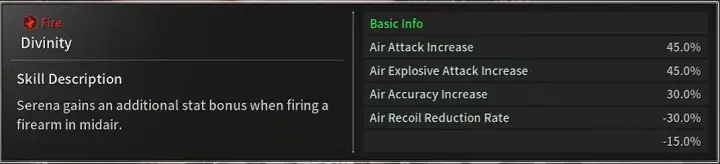
Divinity (Passive)
Serena gains an additional stat bonus when firing a firearm midair.
Divinity Passive Description:
- Air Attack increase
- Air Explosive Attack increase
- Air Accuracy Increase
- Air Recoil Reduction Rate
Serena’s Redemption’s Judgment Buff Explained

This buff is from the fourth skill Redemption.
Players often ask why Skill Effect Range modules are used on Serena even when you have a weapon-based build. The answer can be found with the Redemption’s Judgment buff.
“Additional AoE Damage Range on Firearm Attack” gets an increased radius from Skill Effect Range modules. This is important because it allows you to spread your damage in a bigger area, hitting more enemies. With our weapon-based Serena Build we get a 22.9m range, which is bad news for our opponents.
If you don’t use any skill range modules, you will notice that monsters don’t get hit by the damage quite often in bigger rooms.
Serena’s Ascension Skill Explained
There is an important aspect that many players overlook about the ![]() Ascension skill. Depending on what weapon you use while
Ascension skill. Depending on what weapon you use while ![]() Ascension is active, you get different bonuses.
Ascension is active, you get different bonuses.
General Rounds Additional Effects
- Multi-Hit Chance Increase
- Multi-Hit Damage Increase
Impact Rounds Additional Effects
- Attack Drop-off Distance Increase
- Critical Hit MP Recovery
Special Rounds Additional Effects
- Surrounding AoE Damage
- Damage Range
- Target Count
- Max Expandable Range
High-Power Rounds Additional Effects
- Skill Power
- Additional Fire Damage Chance
How Modules Work in The First Descendant
Modules are the bread and butter of all The First Descendant Builds. There are a few important things to remember about modules. This is for both Descendant and Weapon Modules.
While most builds require you to increase Module Capacity with an Energy Activator (you get two for free), they won’t require you to reduce the Module cost with Crystallization Catalyst. However, if you want to truly min-max a build, you will need plenty of these Catalysts.
- How to increase your Module Capacity
- Module Levels and Cost
- Reduce the cost of Modules
- How to farm Modules
How to Increase Module Capacity
You get a base of 45 Modules for every Descendant character. And you can increase this up to 85 currently. First off, always slot a Sub Attack Module (Slot 7). When you increase this to the max level you will get an additional 10 Module Capacity. if you use a Crystallization Catalyst on the Sub Attack Module, you even get 15 extra slots. You will see this in the setup below.
Additionally, you can use an Energy Activator to increase your Module Capacity by another 20. However, these are fairly hard to farm, only use them on your best Descendants.
Lastly, increasing your Mastery Rank will also increase Module Capacity. Rank 1 gives you 25 Module Capacity, Rank 20 gives you 50 Module Capacity. That is how we reach the 80 Module Capacity that you see on most builds.
- Slot a Sub Attack Module (and max it out to get +10 capacity, crystallize it for +15)
- Use an Energy Activator (2o extra capacity)
- Increase Mastery Rank (25 base capacity, max 50)
Weapons: Basically the same, but because you don’t have Subattack Modules, the Energy Activator gives you 30 instead of just 20 extra capacity.
You can also read my in-depth guide on how to increase Module Capacity in The First Descendant if you need more information. Or my Best Energy Activator Farm Spots and our Best Crystallization Catalyst Farm Spots. I tested all of the grind spots by myself and have already farmed plenty of these items with this method.
Module Levels and Cost
Modules can be enhanced (leveled up) with Kuiper Shards in The First Descendant. Enhancing Modules increases their power. At higher levels, the power will increase way more than at lower levels. Therefore it is always recommended to max out the most important Module first.
Here is an example of a must-have Module called Increased HP for our Descendant. You will notice that we start at 22%, but at the max level, we get a whopping 218.5% increase in health!
| Level | Capacity Cost | Power |
|---|---|---|
| 0 – Base | 6 | 22% |
| 1 | 7 | 31.2% |
| 2 | 8 | 41.4% |
| 3 | 9 | 54.4% |
| 4 | 10 | 69.8% |
| 5 | 11 | 87.2% |
| 6 | 12 | 108.2% |
| 7 | 13 | 130.2% |
| 8 | 14 | 155.2% |
| 9 | 15 | 184.5% |
| 10 | 16 | 218.5% |
Transcendent Modules are the exception; they decrease Capacity Cost with higher levels!
For an in-depth overview, please visit our How to Level Up Modules in The First Descendant guide.
How to Farm Kuiper Shards
Kuiper Shards are used to level up Modules. We have a guide on the Top 3 Kuiper Shard Farming Locations in the First Descendant. We explain how to most efficiently farm Kuiper Shards (300-500k/hour) and show the amount you need to level up mods. As a summary, to max out a Module you need:
- Normal Modules: 103’100 Kuiper Shards
- Rare Modules: 206’200 Kuiper Shards
- Ultimate Modules: 309’300 Kuiper Shards
- Transcendent Modules: 515’500 Kuiper Shards
Always max out the most important Modules first, we will showcase the order below.
How to Reduce the Cost of Modules
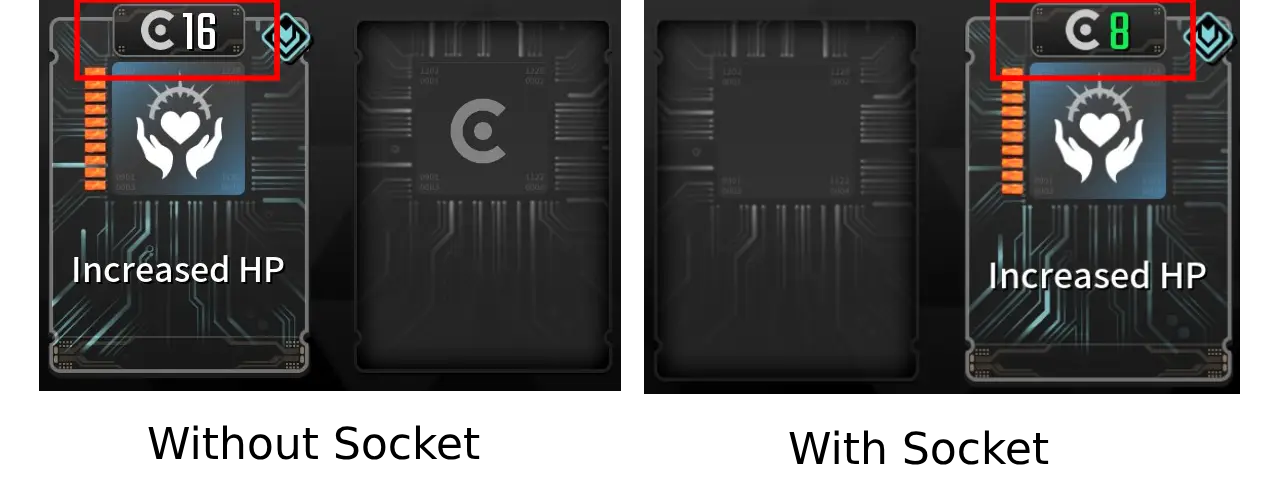
To reduce the cost of Modules you need Crystallization Catalysts in The First Descendant. These require a lot of time investment. If you want to completely min-max you need to get plenty of them as technically, every slot can have a specific socket type to half the cost.
Modules have Socket Types. Our Increased HP Module has the Cerulean Socket Type.
- Module: Increased HP
- Socket Type: Cerulean
This is important because if we place our Increased HP Module in the fitting Socket Type, it will half the cost of the Module!
How to farm Modules in The First Descendant
Most The First Descendant Modules can be acquired fairly easily, but the higher-quality ones (Ultimate, Transcendent) are more tedious to obtain. Here is the easiest process to farm Modules quickly.
Open Map > Swap to Access Info > Select Modules
Here, you can find all Modules and their drop locations. If a module drops from several locations, it is recommended to select drop locations with higher drop chances.
There isn’t really much more to this. Simply check the location and go farm. Normal and Rare quality Modules have 30-50% drop chances in most cases. Ultimate ones range around the 5% mark and Transcendent ones can be a tough cookie with around 2% drop chance.
Smooth Grapple Hook for your Serena Build
Using the standard Grapple Hook in The First Descendant can be a pain, and it feels kinda frustrating at times. Don’t worry, there is a way better alternative that will make it a joy to use the grappling hook!
It is called the Mid-Air Maneuvering Sub Module. I use this on all my The First Descendant Builds because it improves grappling by so much.
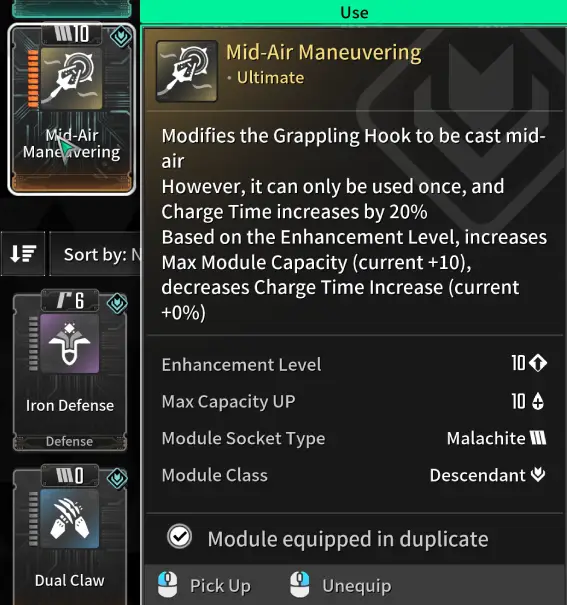
With this Module, you can attach your Grapple Hook to anything, even air! That means you can simply aim towards the sky and Hook up your grapple hook there for guaranteed fast movement!
Here is a guide on how to get the Mid-Air Maneuvering Sub Module in The First Descendant. It won’t take a lot of effort, but it will improve your build and overall gameplay in The First Descendant.
More Serena Builds
While Serena’s weapon-based kit remains the standard for most encounters, the Divine Surge Serena Build offers a devastating alternative for those who prefer skill-driven power. I’ve kept it as a separate build to avoid cluttering her primary setup.
This Serena Divine Surge Build cycling through vertical rotations, launching into the air only to come screaming back down with enough force to shatter the ground. It’s a relentless ‘carpet-bombing’ loop kind of playstyle.
Serena’s Story in The First Descendant – Serena Antonietta
The Generation of Despair refers to the first wartime generation, born on the brink of the Apocalypse and forced to grow up in a crumbling world. Trapped in a world that was collapsing around them, with evacuation and hunger as their only companions, the Generation of Despair grew up brighter than most people that were forced to live in such times. Since their lives began with war, there was never peace to be taken away from them.
Maybe that is why the Generation of Despair, contrary to its name, symbolizes the hope of the surviving members of humanity. When the Magisters joined humanity and conducted a census for the Arche Factor, this generation had the highest rate of Arche manifestation. Later records would reveal that out of the “Firsts,” including the very first Descendant, Raley, nearly half were from the Generation of Despair. Included among them was the Military Chaplain, Serena Antonietta, the holy fire spewing “Sister of Light”.
The First Descendant Serena was devoted enough to join the antiquated Order of Knights while hundreds of knights were dying daily at the hands of the Vulgus and the Colossi.
Serena’s rise to prominence came when the Magisters, who had defected to humanity, awakened Arche in human DNA. Serena was also tested for Arche at this time and was determined to be a new kind of soldier, called a “Descendant.” Among these “Descendants,” she had the easiest time adapting to modern firepower, and was particularly adept at using it to develop her Arche abilities.
Serena’s abilities manifested in the form of emitted Arche light particles. Serena’s abilities became known as “Holy Fire” and were powerful enough to rival beam weapons, but could also be used to target Vulgus DNA. Using an extremely high concentration of radiation, she could burn out the Vulgus mutations. Applying these properties, Serena used her Arche to cure the Vulgus infection. Her light was a beacon of hope for her people and of dread for her enemies. Another unexpected benefit of her Arche was that she was able to spend time with her crush, fellow Descendant Raley, while healing him.
But the shy feelings faded as the Descendants were deployed to the frontlines. Serena’s mission at the time was to investigate the epicenter of the Apocalypse in order to prove the Magisters’ Dimension Isolation Theory. Serena promised her family of Knights, her comrades-in-arms, and her crush, Raley, that she would return soon…
But, no one knew it would be the last time they’d see her. The epicenter of the Apocalypse was the most heavily polluted area, now called Sigma Sector, and it contained not only Void Contamination, but also a darker plot than anyone could have ever imagined. As the last light was extinguished, Serena faced despair for the first time. Death seemed so far away, but there also seemed to be no hope of waking again. There was only pitch-black darkness enveloping her body… as all her senses began to shut down.
Serena prayed with all her might, until her consciousness faded. If only I could wake once again, I would burn with a light that would never be extinguished. I will restore hope to all, I will be a ray of sunshine for Raley…
After the echoes of her wish reverberated for a century, Serena’s prayers were finally answered. She opened her eyes once again, still in Sigma Sector, but, with unfamiliar Descendants standing over her, surprised. Serena realized instinctively, that The Age of Despair had not ended yet. As she promised herself in her hundred years of prayer, she joined the new generation with an unquenchable radiance.
This time, with a new prayer, to never again have to feel such despair…
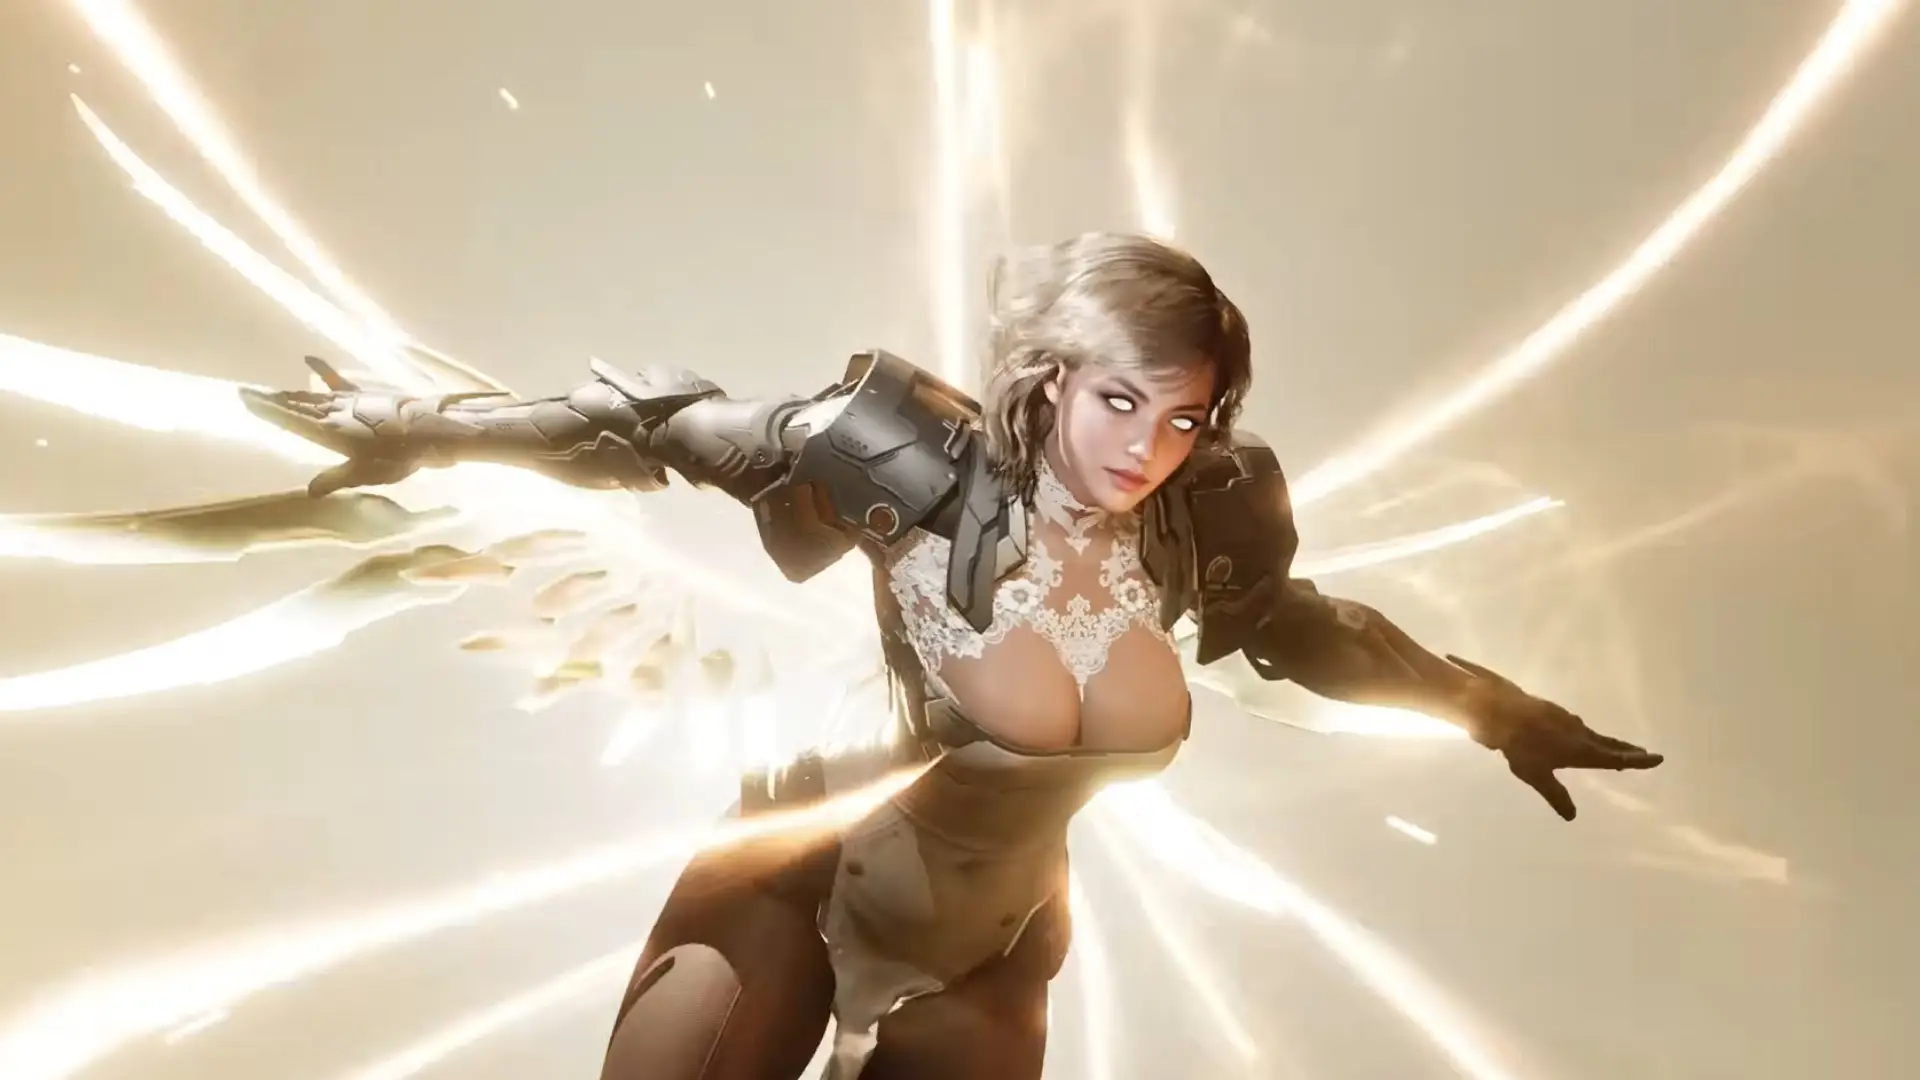
Serena’s Exclusive Equipment – Photon Emitting Battlesuit Exorcister
The Magisters’ warfare technology was at its peak before they lost most of their equipment to frequent retreats. The Photon Emitting Battlesuit Exorcister is one piece of such equipment. This powerful exoskeleton is the ultimate assault weapon, amplifying Arche particles emitted outside the body, ionizing the user’s Arche, and granting them the ability to maneuver in the air.
Specifically, the Arche sorbent stabilizers can read micro-muscular signals to adjust the direction of movement, giving the user the movement of an angel from ancient Ingris mythology. The problem is, Serena is the only one who can wield it with any level of sophistication. So, it is practically Exclusive Equipment for her at this point. Not to mention, that the core technology was lost in its entirety and has yet to be fully restored even to this day.
“Uhh… so… it seems to operate… using electricity.”
– Serena Antonietta, explaining the battlesuit to Raley…
Related Guides for The First Descendant
You can also check out our Ultimate Weapons Database for The First Descendant or the Builds Database for The First Descendant.