Type: Dungeon, Trial, Arena & Overland
Buildname: Summoner
Table of Contents
Welcome to the Magicka Sorcerer Pet Heavy Attack Build “Summoner” for ESO (Elder Scrolls Online). Make sure to bookmark the link as I will keep updating the build for each new Update of ESO. The “Summoner” build is made for PvE Trials, Dungeons & Arenas. Please also check out:
- Magicka Sorcerer Beginners Guide
- Magicka Sorcerer Beginner 160CP Build
- Magicka Sorcerer META Build
- Solo Magicka Sorcerer Build
Magicka Sorcerers are very efficient both ranged and melee and work great with a heavy attack build, plus they have good shields which makes survival a lot easier. The Destruction Staff passives make Lightning Staves a powerful tool for Magicka Sorcerers. Lightning Heavy Attacks have very strong Area of Effect (AoE) damage. They don’t cost anything and also restore Magicka! You will never have any problems with resource management during fights with this build. The most difficult thing with this build, is that you need to be able to command your pets correctly! Remember, when you do a Heavy Attack on a enemy the Pet will directly attack it.
- Heavy Attack Weaving
- High Single Target (ST) damage
- Insane ranged & melee damage
- High Area of Effect (AoE) Damage
- Pet Build
- Easy survivability due to Magicka Shield
- Trials, Dungeons & Arenas
Trials & Dungeons Setup for the ESO Pet Sorcerer uild
Lets take a look at the setup for the ESO Heavy Attack Sorcerer Build.
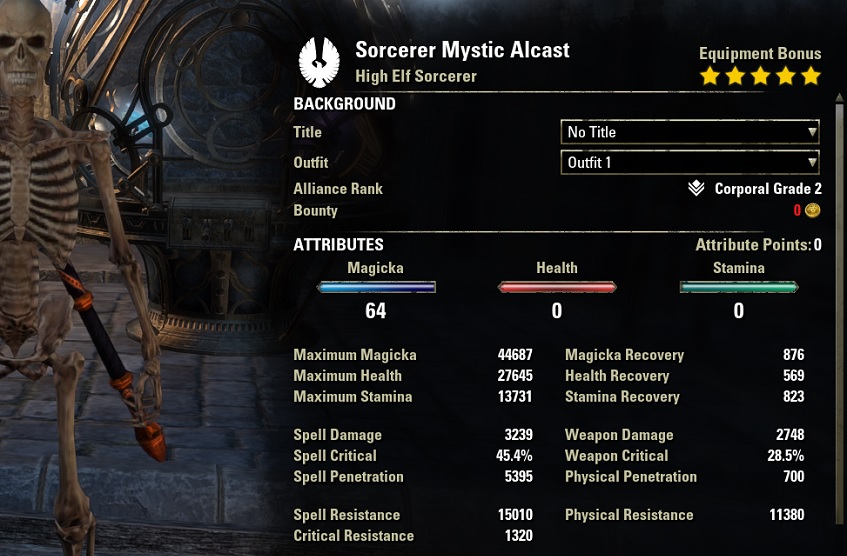
5x Necropotence, 5x Mother’s Sorrow, 2x Maw of the Infernal on a High Elf with Artaeum Pickled Fish Bowl buff food
- Unbuffed: Out of combat, buff food and pets active
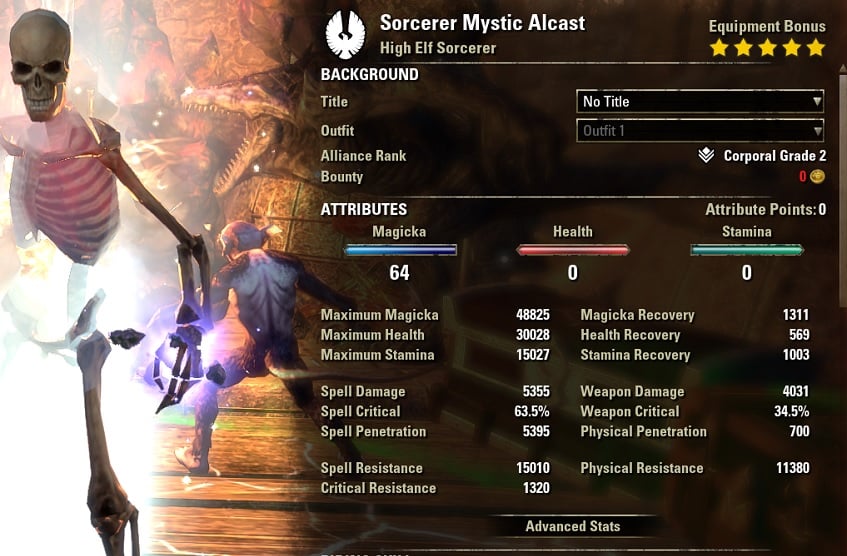
- Buffed: In combat, buff food, pets, Spell Power Potion, Weapon Damage Enchantment, Raid Target Dummy buffs active
Gear
Gear Setup 1
| Gear | Set | Weight | Trait | Enchantment |
|---|---|---|---|---|
| Chest | Necropotence | Light | Divine | Magicka |
| Belt | Necropotence | Light | Divine | Magicka |
| Shoes | Necropotence | Light | Divine | Magicka |
| Pants | Necropotence | Light | Divine | Magicka |
| Hands | Necropotence | Light | Divine | Magicka |
| Head | Maw of the Infernal | Heavy | Divine | Magicka |
| Shoulder | Maw of the Infernal | Medium | Divine | Magicka |
| Necklace | Mother’s Sorrow | Jewelry | Arcane | Spell Damage |
| Ring | Mother’s Sorrow | Jewelry | Arcane | Spell Damage |
| Ring | Mother’s Sorrow | Jewelry | Arcane | Spell Damage |
| Weapon 1 | Mother’s Sorrow | Shock | Precise | Fire Enchant |
| Weapon 2 | Crushing Wall | Shock | Infused | Weapon Damage Enchant |
Gear Setup 2
You can also use Destruction Mastery or Law of Julianos as a second set.
| Gear | Set | Weight | Trait | Enchantment |
|---|---|---|---|---|
| Chest | Law of Julianos | Light | Divine | Magicka |
| Belt | Law of Julianos | Light | Divine | Magicka |
| Shoes | Necropotence | Light | Divine | Magicka |
| Pants | Law of Julianos | Light | Divine | Magicka |
| Hands | Necropotence | Light | Divine | Magicka |
| Head | Maw of the Infernal | Heavy | Divine | Magicka |
| Shoulder | Maw of the Infernal | Medium | Divine | Magicka |
| Necklace | Necropotence | Jewelry | Arcane | Spell Damage |
| Ring | Necropotence | Jewelry | Arcane | Spell Damage |
| Ring | Necropotence | Jewelry | Arcane | Spell Damage |
| Weapon 1 | Law of Julianos | Shock | Precise | Fire Enchant |
| Weapon 2 | Crushing Wall | Shock | Infused | Weapon Damage Enchant |
Beginner Setup
| Gear | Set | Weight | Trait | Enchantment |
|---|---|---|---|---|
| Chest | Law of Julianos | Heavy | Divine | Magicka |
| Belt | Law of Julianos | Light | Divine | Magicka |
| Shoes | Spinner’s Garments | Light | Divine | Magicka |
| Pants | Law of Julianos | Light | Divine | Magicka |
| Hands | Spinner’s Garments | Light | Divine | Magicka |
| Head | Monster Set of your choice | Medium | Divine | Magicka |
| Shoulder | Monster Set of your choice | Light | Divine | Magicka |
| Necklace | Spinner’s Garments | Jewelry | Arcane | Spell Damage |
| Ring | Spinner’s Garments | Jewelry | Arcane | Spell Damage |
| Ring | Spinner’s Garments | Jewelry | Arcane | Spell Damage |
| Weapon 1 | Law of Julianos | Shock | Precise | Fire Enchant |
| Weapon 2 | Law of Julianos | Shock | Infused | Weapon Damage Enchant |
Where can I get the gear?
Necropotence: Rivenspire
Maw of the Infernal: Banished Cells 2
Mother’s Sorrow: Deshaan Overland
Crushing Wall: Maelstrom Arena
Ilambris: Crypts of Hearts 1
Destruction Mastery: Dragonstar Arena
Moondancer: Maw of Lorkhaj
Law of Julianos: Craftable
Spinner’s Garments: Malabal Tor
Zaan: Scalecaller Peak
Willpower: Guildstore
Skills
- Storm Atronach: For Single Target fights make sure to use the Atronach as it will give you more dps, group members can also activate a powerful synergy that gives them Major Berserk, applying a 10% damage boost for 8 seconds to themselves and the Atronach.
- One Pet: If you prefer one Pet only you can always change one of the pets so you can have Inner light or Bound Armaments on both bars.


| Shock Staff Mainbar | Shock Staff bar |
|---|---|
| Slot 1: Structured Entropy | Slot 1: Unstable Wall of Elements |
| Slot 2: Daedric Prey | Slot 2: Lightning Flood |
| Slot 3: Crystal Fragments | Slot 3: Regenerative Ward |
| Slot 4: Volatile Familiar | Slot 4: Volatile Familiar |
| Slot 5: Twilight Tormentor | Slot 5: Twilight Tormentor |
| Ultimate: Shooting Star | Ultimate: Greater Storm Atronach/ Shock Rage |
Skills explanation:
- Structured Entropy: Great Single Target damage and also heals. Also activates the passive Might of the Guild, giving you Empower buff, increasing Heavy Attack damage.
- Deadric Prey: This ability deals damage on its own and it boosts our summoned monsters damage by 45%, must be up at all times.
- Crystal Fragments: Deals a lot of damage and also gives us access to the Exploitation passive to increase our Spell Crit.
- Volatile Familiar: This pet can tank enemies and if you active its ability it activates a strong AoE damage pulse that hits everything in a 5 meter range. And because those pets scale of max magicka and spell damage, it will deal an insane amount of damage.
- Twilight Tormentor: Strong single target damage pet. Activate the skill till 50% of health, then stop using it. You can also use the other morph if you need heals Twilight Matriach.
- Shooting Star: Can be used for AoE damage on trash packs, gives also ultimate back depending on how many enemies you hit.
- Unstable Wall of Elements: This ability is an AoE damage effect that covers a huge area in a shock field and also explodes at the end.
- Lightning Flood: Small shock AoE damage effect that deals a good amount of damage. Friendly group members also can active a synergy that deals good damage.
- Regenerative Ward: This ability is one of the most important ones for your build. It gives you an insanely huge shield that protects you from any incoming damage. That is the reason why Sorcerers usually survive longer than other classes, because they have a huge shield available. Also gives Minor Intellect to you and group members, increasing Magicka Recovery. (Useful Guides: How do Shields Work?, How do Shields Scale?)
- Storm Atronach: Strongest Single Target Ultimate for the Sorc, make sure to keep Daedric Prey on the enemy to benefit from the damage boost.
What about:
- Critical Surge: If you play alone you can also use Critical Surge instead of Crystal Fragments, it will help you stay alive because it heals you.
Class Mastery
Class Mastery is a new system in ESO that allows pure class builds to get two additional powerful passives to better compete against Subclass builds. Activating subclassing will deactivate Class Mastery passives.
All Sorcerer Class Mastery Passives
For our Heavy Attack Sorcerer Build, we are going to use the following:
 Static Reverberation – Deals extra damage.
- Calculated Defense – Defensive shield and damage buff.
Champion Points
Below you can find the Champion Points setup for this build. Work your way from top to bottom in your allocation. For more information on Champion Points, please visit the Champion Points Overview Page on ESO-Hub.com.
Hovering over each perk will give you insights on what it does. Presets are also provided for each of the allocations below.
Click the tab below to open the allocation.
Important Info for Magicka Sorcerer Pet Build PvE
Buff-food
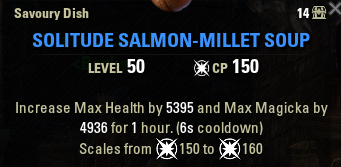
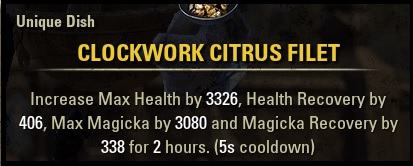
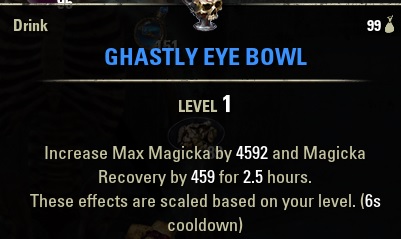
The Solitude Salmon-Millet Soup gives you the highest max stats. If you have sustain issues then I do recommend using Clockwork Citrus Filet or the way cheaper version Witchmother’s Potent Brew. You can also use the Ghastly Eye Bowl if you want the highest max magicka and magicka recovery boost, keep in mind your health will be a lot lower though. For more detailed info and price data of each of the consumables below and click on the link of the consumable. All buff foods and drinks can also be found on the Buff Food and Drink Overview Page.
Solitude Salmon-Millet Soup
(Max Health, Max Magicka)
Clockwork Citrus Filet
(Max Health, Max Magicka, Magicka Recovery)
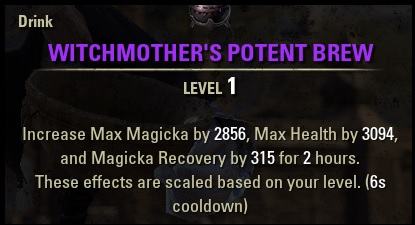
Witchmother’s Potent Brew
If you can’t afford Clockwork Citrus Filet, then I recommend getting the way cheaper Witchmother’s Potent Brew which has similar effects.
Ghastly Eye Bowl
(Max Magicka, Magicka Recover)
Mundus Stone
The Thief Mundus Stone increases our overall Spell Critical Rating which boosts our damage. You can learn more about all the other Mundus Stones on the Mundus Stone Overview Page.
Thief Mundus (Increased Spell Critical)
Race
All Magicka based races work with this setup. More about each race can be found on the racial overview page.
High Elf
Breton
Dark Elf
Argonian
Khajiit
Orc
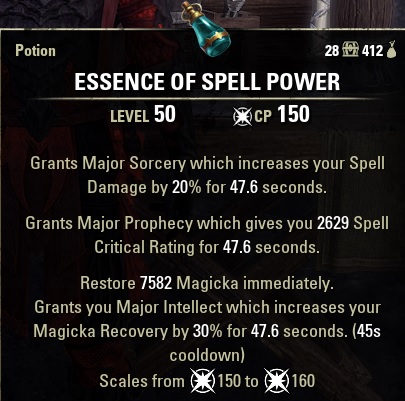
Potions
Spell-Power Potions
(Spell-crit, Spell Damage, Magicka)
(Cornflower, Ladys Smock, Water Hyacinth)
Passives
- Dark Magic: Unholy Knowledge, Blood Magic, Persistence, Exploitation
- Daedric Summoning: Rebate, Power Stone, Daedric Protection, Expert Summoner
- Storm Calling: Capacitor, Energized, Amplitude, Expert Mage
- Destruction Staff: Tri Focus, Penetrating Magic, Elemental Force, Ancient Knowledge, Destruction Expert
- Light Armor: Grace, Evocation, Spell Warding, Prodigy, Concentration
- Heavy Armor: Resolve, Constitution, Juggernaut
- Mages Guild: Mage Adept, Everlasting Magic, Magicka Controller, Might of the Guild
- Undaunted: Undaunted Command, Undaunted Mettle
- Racial: All
- Alchemy: Medicinal Use
Resource Management
This build uses one Heavy Attack per rotation and thus should not really need any other means to be able to sustain. In case you still have issues you could use the Witchmother’s Potent Brew instead of the normal food. Activate your potions on cooldown to benefit from the extra magicka.
- Heavy Attacks
- Witchmother’s Potent Brew (Optional)
- Potions
Rotation Heavy Attack Build for ESO Sorcerer
In case you don’t know what what weaving light attacks is, make sure to check out the “Weaving Beginner Guide” which explains how to weave light attacks between abilities, aka animation canceling.
Make sure to drop your Ultimate ability on cooldown. The Atronach should be used as a Single Target Ultimate whereas the other Ultimate is used for AoE damage on trash packs.
- You can activate Crystal Fragments whenever it procs so you can instant cast it.
With One Pet
Lightning Flood > Light Attack > Unstable Wall of Elements > Weapon Swap
Light Attack > Pet > Light Attack > Daedric Prey > Heavy Attack > Structured Entropy > Weapon Swap
Restart
With Two Pets
Only use the Twilight Tormentor Ability when the enemy is above 50%, otherwise just let the mob Light Attack by itself so you can focus on other stuff, it will still do a lot of damage.
Lightning Flood > Light Attack > Unstable Wall of Elements > Weapon Swap
Light Attack > Pet1 > Light Attack > Pet2 > Light Attack > Daedric Prey > Heavy Attack > Structured Entropy > Weapon Swap
Restart
ESO Sorcerer Subclassing Build Options
ESO’s Subclassing offers a lot of variety, allowing you to swap, mix, and match different skill lines of various classes all on one character. Read our How does Subclassing work in ESO guide to get an understanding of how the subclass system works. We also have plenty of ESO Builds optimized for Subclassing.
Take a look at our ESO Sorcerer Subclassing Build if you are interested in what you can all mix and match on a Sorcerer build!
Related Guides: