


Welcome to the ESO Solo Tips & Tricks Guide. In this guide we are going to look at the most important points of what makes a good solo build viable and why it is important to understand the mechanics of the game and the build.
By understanding the whole concept of solo builds and its mechanics, you will be able to create a complete character that will manage to solo clear Overland content, Public Dungeons, Story-lines, Solo Arenas (Maelstrom & Vateshran) and even normal/veteran 4 man ESO Dungeons. Yes, you can solo most of the 4-player Dungeons both on normal and veteran mode (Example: City of Ash 2 veteran Hardmode), but that really requires in-depth knowledge of the game mechanics. Lets get you there!
Reminder: Most of these tips here are also very important if you play in a group.
Table of Contents:
- Buff Food and Potions
- Healing, Shielding & Damage Mitigation
- Resource management – How to Sustain
- Single Target (ST) vs Area of Effect (AoE)
- Base Mechanics & Movement
- Solo Gameplay
- Solo Builds
Other Useful Content:
- Full list of all Solo Builds: Overview Page Solo Builds.
- New players please check the Beginner Section of the website!
Buff Food and Potions in ESO
Let’s start with the two things that most people underestimate in ESO, buff food and potions. Many players underestimate the power of buff food and potions, they can increase your combat effectiveness by a huge margin.
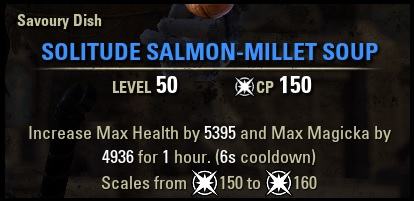
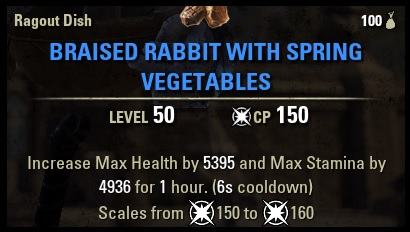
Just to look at one example, by eating a buff food such as the Braised Rabbit with Spring Vegetables (5395 Health & 4936 Stamina) your Health can go from 13k to 18k and your Stamina jumps from 25k to around 30k by just having the buff food enabled. You have to get into the habit to always have a buff food active, most of them last over 2 hours so it is easy to track them.
Buff-Food for Solo Builds
Under Buff food we understand two things, a dish or a drink. Most of the times it doesn’t matter whether you are using a food or a drink, unless you use sets like Bright’-Throat’s Boast or Bone Pirate’s Tatters where you have to use a drink to get the extra bonus.
The important question is how to choose your buff food, what do you need? Do you simply want to boost max resource stats, do you want extra recovery or a mix of both? Very common types that are used are the Dubious Camoran Throne and the Witchmother’s Potent Brew. You can find both of these in the guild stores for a very cheap price, go get some!
Why are they so often used? Dubious Camoran Throne is a Stamina based buff food that provides you with max Health, max Stamina and Stamina Recovery, whereas the Witchmother’s Potent Brew is a Magicka based buff food that provides you with max Health, max Magicka and Magicka Recovery. So they are kind of an all-rounder buff food type that provide a good increase in max resources and recovery.
Many players forget about buff food in combat, get into a habit of having buff food active all the time!
All of the builds on alcasthq.com have a specific buff food that you should use for the build you are looking at. If the buff food is super expensive I also give you a secondary cheaper option.
Common buff food examples (click to enlarge):
I will show you very common Magicka based buff foods that are used by damage dealers and healers.
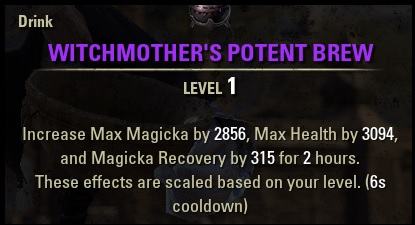
Witchmother’s Potent Brew
One of the most commonly used buff food drinks as a Magicka character at low level and maxed out. The buff food barely costs anything in the guild stores so you can immediately get a handful of it without wasting a lot of gold. This buff food also scales, so you can use it from level 1 to max level. I always use this buff food when I level up a new Magicka character.
The reason why this buff food is so popular is; it has max Health which is important so you can more easily reach around 17k health on your character, it has max Magicka to boost your overall Magicka resource which also increases damage and it has a lot of extra Magicka Recovery attached to it, which will increase your sustain tremendously.
This buff food is always a good trade off between max stats and increased recovery. This is the buff food that players usually use on Solo Builds if they don’t have a sustain set active.
Solitude Salmon-Millet Soup & Artaeum Picked Fish Bowl
The Soltiude Salmon-Millet Soup is also very commonly used and super cheap to acquire in the guild stores. The Artaeum Picked Fish Bowl is also very popular but a bit more expensive. The only difference is that the Artaeum Picked Fish Bowl has a bit better stats as you can see, so you need to decide for yourself whether you want to spend the extra money or not.
These buff foods are used to max out your two primary stats on a Magicka character, max Health and max Magicka. When you compare the stats to Witchmother’s Potent Brew, you will see that the maximum Health & Magicka are way higher, that is because they don’t also have to provide you with the Magicka Recovery, unlike Witchmother’s Potent Brew.
If your sustain is already good, then these two buff foods will be more helpful.

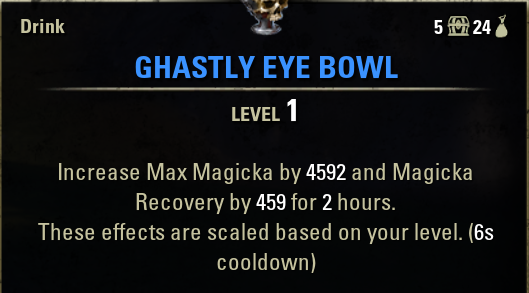
Ghastly Eye Bowl
This is also called the “Target Dummy Humper Cheese Food” because it only provides you with max Magicka and Magicka Recovery. On a target dummy it doesn’t matter how much Health you have, so with this buff food you might sit at around 13k health, which is way too low to actually do content, but for a Target Dummy it will do just fine because they don’t attack you.
The reason why this is so good, is because it gives a lot of max Magicka, and even more importantly, the sustain you need via the huge amount of Magicka Recovery. You could use this buff food in combat as well, but you would have to get your Health up through something else like allocating points in the Health attribute.
Longfin pasty With Melon Sauce
The Longfin Pasty with Melon Sauce is one of my favourite Solo Build buff foods. As a Solo player you will need all three stats such as Health, Magicka and Stamina, therefore this buff food is literally perfect for the job. Now you might wonder why do I need Stamina as a Magicka toon? Blocking, dodge rolling, bashing and sprinting all require Stamina. As a Solo player you will need to block strong enemy heavy attacks or dodge roll powerful enemy area of effect attacks to avoid the incoming damage.
With a sustain set such as the False God’s Devotion you will already have enough sustain, therefore we can focus on extending all our stats with this buff food.

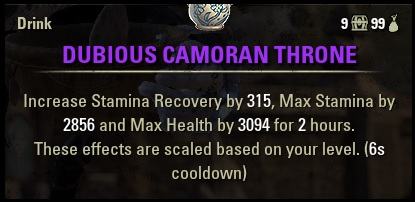
Dubious Camoran Throne
One of the most commonly used buff food drinks as a Stamina character at low level and maxed out. The buff food barely costs anything in the guild stores so you can immediately get a handful of it without wasting a lot of gold. This buff food also scales, so you can use it from level 1 to max level. I always use this buff food when I level up a new Stamina character.
The reason why this buff food is so popular is, it has max Health which is important so you can more easily reach around 17k health on your character, it has max Stamina to boost your overall Stamina resource which also increases damage and it has a lot of extra Stamina Recovery attached to it, which will increase your sustain tremendously.
This buff food is always a good trade off between max stats and increased recovery. This is the buff food that I usually use on Solo Builds if you don’t have a sustain set active.
Braised Rabbit With Spring Vegetables
The Braised Rabbit with Spring Vegetables is also a good buff food and super cheap to acquire in the guild stores. It doesn’t have the Stamina Recovery attached to it, so players that play Redguard or Woodelf (Bosmer) usually choose this buff food because they already have built in extra sustain through their racial passives.
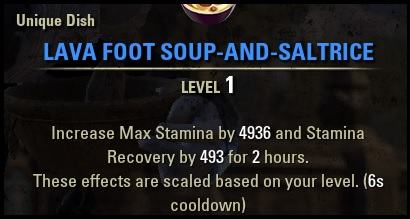
Lava Foot Soup and Saltrice
This is my personal favourite buff food on Solo Stamina Builds. All of my Solo Stamina Builds invest points into the Health attribute to get decent Health stats, therefore we can use a more optimized buff food that boosts our max Stamina and Stamina Recovery by a huge margin! This will allow us to have way better sustain than most other builds. So we can keep dealing damage, dodge rolling, blocking and so on without ever having to worry about running out of resources.
Potions for your build in ESO
As an endgame player it is completely normal to have the Medicinal Use passive active and use a potion every 45 seconds. It is mandatory to level up your Alchemy on every character to get that extra 30% time on your potions, which will make it so you can have your potions active a 100% of the time. If you are a new player I recommend leveling up Alchemy on the go, if you are already playing for a while it only takes about 15 minutes to get Alchemy from level 1 to max level with this Alchemy Guide.
Why are potions so strong?
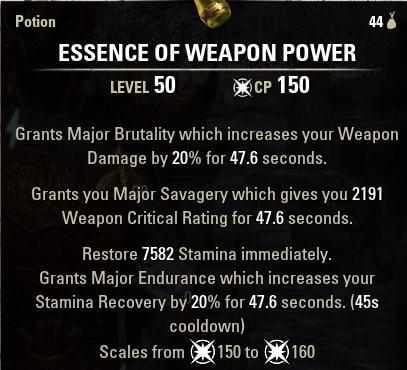
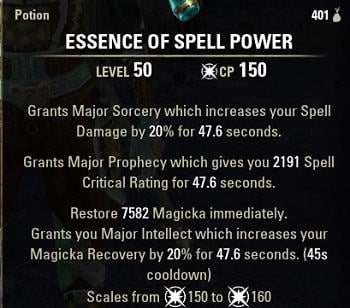
Looking at two examples, one for Stamina based and one for Magicka based characters. These are the potions most commonly used in endgame PvE, they are super expensive and therefore not many players are using these. Most endgame builds expect you to use these potions on cooldown every 45 seconds, because they provide you with:
- 20% Weapon/Spell Damage Boost
- 12% Weapon/Spell Critical Boost
- 7582 Stamina/Magicka restore.
- 40% Stamina/Magicka Recovery
And yes, these buffs are active a 100% of the time as long as you have the previously mentioned Medicinal Use passive. A player that uses these potions has plenty of extra sustain and damage opposed to a player that doesn’t use these potions or doesn’t use potions at all.
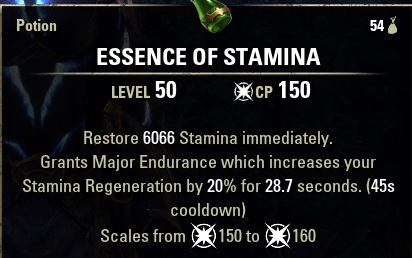
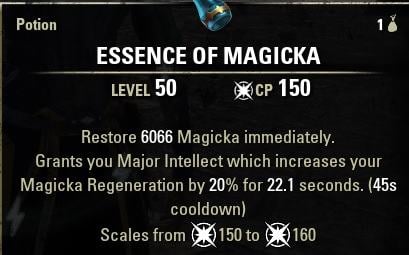
Essence of Stamina and Magicka
When you are killing monsters in the Overland zones or Dungeons, you get these normal potions that are called Essence of Stamina and Essence of Magicka. If you can’t afford any expensive potions make at least sure to use these constantly. You can also buy them in the guild stores for a very cheap price.
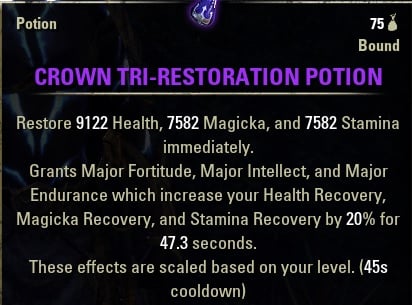
Crown Store Potions
You occasionally also get Crown Store Potions from the daily login rewards or you can also buy them. They are also very powerful as you can see, this particular example here restores:
- 9122 Health
- 7582 Magicka
- 7582 Stamina
when you activate the potion on top of the 20% Health, Stamina and Magicka Recovery it provides for over 47 seconds.
How can I get potions?
Farming flowers is the best way to get potions, that way you can craft them yourself. Many players have optimized farming characters so they can farm flowers or other materials faster. I highly recommend figuring out how you want to supply yourself with potions, the sooner you get used to using potions, the better you will perform!
Healing, Shielding & Damage Mitigation in ESO
As a Solo player in ESO healing, shielding and damage mitigation are very important because you can’t rely on your healer for heals and you can’t rely on your tank to take aggro of all the monsters, that is all your job now! In this section of the How to Play Solo Guide I will explain these three very important mechanics, that way you can understand how to set up your character properly.
I often see that players have healing, shielding and damage mitigation abilities slotted and they activate them before the fight which is nice, but after players are in combat they often forget to reapply these helpful skills and then the result is death.
Healing as a Solo Player in ESO
Without healing death is inevitable, that is why we are going to take a look at what you can use to heal yourself on both Magicka and Stamina setups. Some classes have it a bit easier than others in terms of healing abilities, I will showcase a few examples of healing skills that you can use on both Magicka and Stamina setups.
I once again want to emphasize that proactive heals (such as heal over times) are almost always better than reactive heals. Best case scenario you would want to have both if possible.
Ring of The Pale Order (Mythic Item)
Ring of the Pale Order is your best friend if you want to have an easy option for healing. Players often forget to use their healing ability and then die, this ring will help with that, because when you deal damage you will get healing too.
Magicka Setups in General
Magicka setups have plenty of ways to gain heals from their class abilities, therefore there isn’t really a need to slot a Restoration Staff just to get some extra heals.
Magicka Sorcerer
Magicka Sorcerers have plenty of healing abilities to their disposal.
The Critical Surge ability is one of the most used skills on a Magicka Sorcerer. It allows you to have constant healing ticks available and it also provides them with the very powerful Major Sorcery buff that increase your Spell Damage by 20%, it also has a super long duration, therefore it is easy to keep it up.
The Summon Twilight Matriach ability is another good option, the Matriarch has a super powerful burst heal that you can utilize when you need it.
The Dark Conversion ability is also a very powerful tool that returns plenty of Magicka on top of the extremely powerful burst heal. However, be careful as it drains your Stamina that you might need to block or dodge roll.
Magicka Templar
Magicka Templars have an own specific healing tree and therefore it is pretty easy to find good healing abilities.
The Puncturing Sweeps ability is your most important tool. It deals an insane amount of damage (and also procs the Burning Light passive) and heals for a huge amount. As long as you spam Puncturing Sweeps on a Templar it is impossible to die unless you get one shot.
The Breath of Life ability is another powerful burst heal that you can utilize which will almost immediately push you back to full health.
Magicka Nightblade
Magicka Nightblades have nice healing abilities that deal damage at the same time.
We have the Swallow Soul ability that deals damage and also heals you for 35% of the damage caused.
The Sap Essence is a power area of effect damage ability and heal at the same time, it also provides you with the powerful Major Sorcery buff that increases your damage by 20%.
The Siphoning Attacks ability is a powerful sustain tool and also increases your healing output a little bit every time you do a Light or Heavy Attack.
Merciless Resolve gives you a huge burst heal when you hit the enemy and you are close to him in melee range.
Magicka Warden
Magicka Wardens also a lot of healing abilities they can make use of and most of them also have nice secondary effects.
The Lotus Blossom ability heals you every time you do a Light Attack and it also applies Major Prophecy to you, increasing your Spell Critical by 10% which will boost your damage like crazy.
The Arctic Blast ability has an instant heal on activation and a follow up heal over time. In addition the ability also deals damage and can even stun enemies after they get hit by it multiple times.
The Leeching Vines ability is another powerful heal over time that you apply to yourself. Every time you get hit by an enemy you gain health, it also applies Minor Lifesteal on the enemy, draining additional health and giving it to you.
Lastly, the Enchanted Growth ability, which is a powerful burst heal that you can activate. Once activated, you will also gain Minor Intellect and Endurance, increasing your Magicka and Stamina Recovery by 10%.
Magicka Necromancer
Magicka Necromancer have a few nice healing abilities that also have secondary effects.
The Spirit Guardian ability summons a ghost that heals you constantly for a big amount and on top of that you also gain a total 10% damage mitigation, that is huge! In addition, while having the summon up you also benefit from the Undead Confederate passive that boosts your Magicka Recovery by a lot.
The Hungry Scythe ability deals plenty of area of effect damage, heals you and applies a heal over time on top of that, very powerful.
The Resistant Flesh ability is a powerful burst heal that also applies a huge resistance boost to yourself. It has a small downside to it, because it applies Minor Defile on yourself which reduces your healing by 15%. However, because of how things scale this is irrelevant because of the Curative Curse passive.
You can also use the Mortal Coil ability that is a heal over time and it also returns Stamina to you if you need it.
Magicka Dragonknight
Magicka Dragonknights also have plenty of healing tools available to them.
The Cauterize ability instantly heals you when you activate the ability and it also has a powerful heal over time that ticks every few seconds. Once again, even if you have the ability active, you can already press it again to get an instant burst heal. In addition, it also provides you with the Major Prophecy buff, increasing your Spell Critical by 10%, which is huge!
The Burning Embers ability is another powerful burst heal, you will gain a huge heal once the damage over time effect is finished. You can already reapply the damage ability sooner before it runs out to gain an instant burst heal if needed.
The Coagulating Blood is another good healing ability that you have at your disposal and is another strong burst heal that you can use.
Stamina Builds in General
Stamina setups have less options in terms of heals, therefore the Vigor ability is almost a must have from the Alliance War skill line. Depending on how much heals are available, you can either choose from the Echoing Vigor or the other morph Resolving Vigor.
Both of these two abilities are heal over times, Resolving Vigor lasts for 4 seconds and Echoing Vigor lasts for 10 seconds. In most builds I use Echoing Vigor because the heal you get is more than enough anyway, but it lasts 10 seconds so you can focus on doing other stuff such as dealing damage or resource management. Whereas with Resolving Vigor that only lasts 4 seconds, you have to be very careful not to forget to reapply the heal if you need it.
Once again, I want to emphasize that the Echoing Vigor heal is more than enough already with the additional benefit of it lasting 10 seconds.
Because we use the Two Hander skill-line, you could also use Rally as a heal, if you don’t have access to Vigor.
Stamina Sorcerer
The Critical Surge ability is one of the most used skills on a Stamina Sorcerer. It allows you to have constant healing ticks available and it also provides them with the very powerful Major Brutality buff that increase your Weapon Damage by 20%, it also has a super long duration, therefore it is easy to keep it up.
Dark Deal is another powerful ability, it drains Magicka and transfers it into Stamina and a huge amount of Health. That way it functions both as a resource management tool and a strong heal.
Your most reliable heal will be Echoing Vigor.
Stamina Templar
Stamina Templar falls fairly short in terms of self healing, therefore you are almost required to run Echoing Vigor from the Alliance War skill-line.
Your most reliable heal will be Echoing Vigor.
Stamina Nightblade
Leeching Strikes is a decent heal and sustain tool. Every time you Light or Heavy Attack you get a bit of health back.
Your most reliable heal will be Echoing Vigor.
Stamina Warden
Green Lotus is a decent heal that you get every time you do a Light or Heavy Attack. The ability also gives you Major Savagery, increasing your Critical Damage by a total of 10%.
The Leeching Vines ability is another heal over time that you can apply to yourself. Every time you get hit by an enemy you gain health, it also applies Minor Lifesteal on the enemy, draining additional health and giving it to you.
Your most reliable heal will be Echoing Vigor.
Stamina Necromancer
Spirit Guardian summons a ghost that heals you constantly for a tiny amount and you also gain a total 10% damage mitigation, that is huge! In addition, while having the summon up you also benefit from the Undead Confederate passive that boosts your Stamina Recovery.
Mortal Coil applies a heal over time to you and it also returns Stamina.
Your most reliable heal will be Echoing Vigor.
Stamina Dragonknight
Cauterize scales of your highest stats and is therefore also very viable heal over time on a Stamina Dragonknight. Once again, even if you have the ability active, you can already press it again to get an instant burst heal.
Your most reliable heal will be Echoing Vigor.
Shielding as a Solo Player in ESO
One of the most important aspects when playing Solo, using your shield to soak up incoming damage. That way the enemy will never touch your actual health. Look at it like an extension of your health bar. In case you ever drop low on health you can also use your shield to soak up the incoming damage. While the enemy is eating up your shield you have time to heal back up without pressure. That is why it is always nice to have proactive heal over times active, so once you press a shield the heal over time effects will do the job and restore your health to the maximum.
Both Magicka and Stamina have options in terms of shields.
Magicka setups have an easy time due to the Light Armor skill-line providing them with the Harness Magicka ability that places a huge shield on your character and also returns Magicka on top of that.
Stamina setups also have access to shields. However, to be effective you are mostly bound to the Two Hander skill-line. The Brawler ability gives you huge shields when you hit enemies. The more enemies you hit, the higher the shield goes. You can use this both on a single enemy or on several enemies. The nice thing about this ability is that it also deals a lot of damage at the same time. So you don’t waste time to just cast the shield, but you also dish out some damage!
Another option that you can use that works with all skill lines is from the Undaunted Guild. The Spiked Bone Shield skill applies a shield to yourself, it scales off Health but even if at low Health the shield size will be decent.
No matter what you do, you should have a shield at your disposal to play Solo, it will make the game a walk in the park!
Damage Mitigation as a Solo Player in ESO
Damage mitigation often gets underestimated in ESO. People don’t really understand how important damage mitigation is because it is hard to grasp what the numbers mean. Every 660 resistance is about a 1% damage reduction gain. There are also other ways than resistance to get damage reduction.
Most commonly used is the Major Resolve buff, which boosts your physical and spell resistance by 5948, these skills that apply that buff also often have other beneficial effects attached to them. Here a quick list on easy ways to boost your damage mitigation.
Magicka Sorcerer
Boundless Storm applies Major Resolve (5948 resistance), deals damage and gives you the Major Expedition speed buff.
Magicka Templar
Channeled Focus applies Major Resolve (5948 resistance), if you stand in it you get another 50% boost to your resistances. In addition, you also gain a huge amount of Magicka Recovery while having this ability on the ground.
Magicka Nightblade
Mirage adds Major Evasion and Minor Resolve, reducing incoming area of effect damage by 20% and increasing your resistances by 2974 for 26 seconds.
Dark Shade applies Minor Maim on the enemy, reducing their damage done by a total of 5%.
Shadowy Disguise is not directly a damage mitigation ability, but you can use it to go invisible to the enemy, therefore making it almost impossible to hit you.
Magicka Warden
The Expansive Frost Cloak skill applies Major Resolve (5948 resistance) and also gives you Minor Protection, increasing damage mitigation by another 5%.
The Shimmering Shield is another powerful way to mitigate incoming damage, the shield will absorb projectiles and apply Major Heroism to yourself, boosting your ultimate regeneration by a huge margin!
Magicka Necromancer
Beckoning Steel applies Major Resolve (5948 resistance) and also lets you pull in ranged enemies automatically. You could also use the other morph if you want.
Spirit Guardian already mentioned earlier, gives you a total of 10% extra damage mitigation on top of powerful heals!
Magicka Dragonknight
Volatile Armor applies Major Resolve (5948 resistance) and also deals good area of effect damage. While this is active you also gain the Burning Heart passive, increasing your received by 12%.
Stamina Sorcerer
Hurricane applies Major Resolve (5948 resistance), deals powerful damage and applies Minor Expedition to yourself, increasing speed by 15%.
Stamina Templer
Restoring Focus applies Major Resolve (5948 resistance) and if you stand in the rune you gain another 50% resistances. It and also increases your overall Stamina sustain by a lot.
Stamina Nightblade
Mirage adds Major Evasion and Minor Resolve, reducing incoming area of effect damage by 20% and increasing your resistances by 2974 for 26 seconds.
Dark Shade applies Minor Maim on the enemy, reducing their damage done by a total of 5%.
Shadowy Disguise is not directly a damage mitigation ability, but you can use it to go invisible to the enemy, therefore making it almost impossible to hit you.
Stamina Warden
The Expansive Frost Cloak skill applies Major Resolve (5948 resistance) and also gives you Minor Protection, increasing damage mitigation by another 5%.
The Shimmering Shield is another powerful way to mitigate incoming damage, the shield will absorb projectiles and apply Major Heroism to yourself, boosting your ultimate regeneration by a huge margin!
Stamina Necromancer
Beckoning Steel applies Major Resolve (5948 resistance) and also lets you pull in ranged enemies automatically. You could also use the other morph if you want.
Spirit Guardian already mentioned earlier, gives you a total of 10% extra damage mitigation on top of powerful heals!
Stamina Dragonknight
Volatile Armor applies Major Resolve (5948 resistance) and also deals good area of effect damage. While this is active you also gain the Burning Heart passive, increasing your received by 12%.
Non Class Specific Damage Mitigation
The Psijic Order gives you plenty of options in terms of damage mitigation. By just having a skill slotted you gain the Concentrated Barrier passive. Every time you block you will get a shield that absorbs 5000 damage. If you choose to run a channeled ability, you can also benefit from the Deliberation passive, giving you Major Protection which is 10% damage mitigation. For example you get the Major Protection when you channel Deep Thoughts.
You can also slot the Ultimate Temporal Guard just for the constant 5% free damage mitigation through Minor Protection if you want and still run another damage Ultimate on the other bar.
In the Mages Guild you have access to the Balance ability, it drains Health and returns Magicka. On top of that you will gain Major Resolve, increasing your resistances by 5948 for 25 seconds.
If you are planning on using Dual Wield you can benefit from the Blade Cloak skill, that gives you Major Evasion reducing incoming area of effect damage by 20%.
You need to decide for yourself whether you need the extra damage mitigation or not.
Resource Management – How to Sustain in ESO
Resource management is a difficult topic in The Elder Scrolls Online. New and even veteran players often struggle to build for decent sustain. In an organized dungeon or trial group sustain is generally easier because you have the healer or tank that will support you to increase sustain. When you are playing Solo or in a random group you can’t rely on someone else, you have to understand how to manage your resources yourself. Let’s take a look at some of the best ways to increase your sustain.
Heavy Attacks restore Resources!
In ESO the Heavy Attacks restore resources, this might sound weird if you are coming from another game, but is pretty normal in The Elder Scrolls Online. Every time you do a Heavy Attack you restore a big amount of Stamina or Magicka, good players often do Heavy Attacks when they see a window of opportunity, whereas others might not do that and therefore sustain will be way worse.
When you are running to the enemy and you can’t use your melee attacks yet, good players will start a Heavy Attack so it lands once they are in range, good players will also combo a Heavy Attack with a damage ability to gain more burst damage. When you are waiting for a monster to spawn, instead of just waiting you should start off with a Heavy Attack.
How much resources do Heavy Attacks Restore?
Depending on what weapon type that you use, you will restore between 2000-4000 resources. For example Dual Wield has a super fast Heavy Attack whereas a Fire Staff has a very long charge time. The Fire Staff will recover more resources compared to the Dual Wield Heavy Attack because it is just longer by nature.
Off Balance & Heavy Attack
Off balance also plays a big role in resource management. If you Heavy Attack an off balanced target, you regain TWICE the amount of resources, so instead of 3000 you will regain 6000, that is huge! For example the Two Hander skill Dizzying Swing can set enemies off balance. Or the Wall of Elements ability also sets enemy off balance when you are using a Shock Staff and they get Concussed. Concussion comes from shock abilities or a shock glyph, so once that procs then off balance will also go off. There are plenty more ways, these are just two examples of how you can get off balance.
Magicka & Stamina Recovery
On a Solo build Magicka and Stamina Recovery is the most important stat to properly sustain. Most players that have sustain issues usually have too low Magicka or Stamina Recovery, now what can you do against this? The easiest way to increase this stat is via buff food, some examples:
- 315 Magicka Recovery, 2856 max Magicka, 3094 max Health – Witchmother’s Potent Brew
- 315 Stamina Recovery, 2856 max Stamina, 3094 max Health – Dubious Camoran Throne
- 459 Magicka Recovery, 4592 max Magicka – Ghastly Eye Bowl
- 459 Stamina Recovery, 4592 max Stamina – Lava Foot Soup-and-Saltrice
You will notice that depending on the build most of the times I use Witchmother’s Potent Brew on Magicka setups, because the recovery from there are enough in combination with Elemental Drain. Whereas on Stamina builds I use Lava Foot Soup-and-Saltrice to give me way more Stamina Recovery, but no health so I invest points into the Health Attribute.
In addition, you can also choose a Monster Set that has a one piece Magicka or Stamina Recovery bonus. For example:
- Bloodspawn – Stamina Build
- Shadowrend – Magicka Build
Sustain Sets in ESO
There are some very powerful sets that help with sustain. Most commonly used are the Magicka based False God’s Devotion set and the Stamina based Vicious Serpent set. They reduce ability cost by a whopping 8% and give you 2150 Magicka or Stamina on every killed enemy!
There are other options such as the Magicka based Bright-Throat’s Boast set and the Stamina based Bone Pirate’s Tatters set. They require you to run a buff food “drink” such as the Witchmother’s Potent Brew or the Dubious Camoran Throne which already have sustain included, thus boosting your Magicka and Stamina Recovery even more.
There are a few other sets but the ones I mentioned here are the most commonly used ones.
Elemental Drain (Magicka)
Magicka setups have a very powerful tool to help with sustain and damage. If you aren’t using this skill on a Magicka based solo build you are missing out! In a group the Healer usually applies this debuff on the enemy, but when you are playing Solo, you don’t have that luxury.
All my Magicka based Solo builds have that skill slotted, always apply it on big monsters because it also apples Major Breach, decreasing the enemies spell resistance by 5948. So you gain damage and increase your sustain!
Single Target (ST) vs Area of Effect (AoE) Damage in ESO
It is always important that you have a mixture between Single Target and Area of Effect damage in ESO (Elder Scrolls Online). Most of the times AoE abilities also deal very decent ST damage. Therefore a combination with AoE and ST abilities on your bar will always suit you best, the Solo builds always take that into consideration.
For example on a Magicka build you will almost always see the AoE skill Unstable Wall of Elements on the backbar that also does really nice ST damage. On Stamina builds you will always see the AoE skill Endless Hail on the backbar that also does really nice ST damage.
In general, players “lay a carpet” aka AoE abilities on the ground kinda like a hot zone where you expect the enemies to stand in and then focus the big monsters that have more health with your ST ability. Some classes also have sticky AoE abilities that can be used, these have their own benefit because if you are moving around then some abilities might not be as useful if they are placed on the ground.
Base Mechanics & Movement in ESO
In this section of the How to Play Solo Guide for ESO we are going to take a look at basic but very important mechanics such as blocking, dodging, interrupting, kiting, positioning and movement patterns. These mechanics are important because you can avoid or reduce incoming damage by a lot.
Blocking, Dodging and Interrupting are important in ESO!
Blocking, dodging and interrupting are basic game mechanics that you have to understand, especially for veteran content. Powerful attacks can usually be interrupted or dodge rolled to completely avoid the damage.
Interrupting
Enemies often charge Heavy Attacks that you can interrupt. After successfully interrupting an enemy they will get stunned for a brief moment. If you follow up with your own Heavy Attack you will also knock them down.
Dodging
When an enemy performs an attack and you dodge roll it, you completely avoid the damage, basically giving you 100% damage mitigation. However, keep in mind that not all abilities can be dodge rolled. For example enemy AoE effects can’t be dodge rolled.
Good players will always dodge roll incoming attacks. This will come with time, because to be able to dodge roll hard hitting attacks, you first need to know what sort of attacks enemies have. So memorizing enemies and their attack patterns will always give you a huge advantage!
Blocking
Blocking enemy attacks can prevent a one shot. Blocking costs less Stamina than dodge rolling and some attacks that can’t be dodge rolled can be blocked. This knowledge will come over time, once you understand the attack patterns of enemies you will know when to block or dodge roll.
Blocking is very responsive, therefore most of the times you only need to block for a very short time to mitigation most of the enemies damage. Another neat trick with blocking is, if you have access to the Psijic order skill-line, you can for example slot the Temporal Guard Ultimate on the front or backbar (also you gain 5% damage mitigation because of Minor Protection) and then when you block the Concentrated Barrier passive will activate and give you an additional 5000 shield that absorbs damage!
Often when you observe other players you see a small shield pop up, that is due to the Champion Points Perk “Reinforced” in The Steed tree “When you begin blocking, you gain a damage shield that absorbs 1254 damage for 3 seconds, 10s cooldown.” When you watch footage of a good player, this shield will often pop up so you know oh he blocked for a second there! Because often it looks like they just don’t get much damage and when you try to do the same you die, but that is because the other player actually blocked for a split second.
Positioning and Movement in ESO
Positioning and movement are very important in The Elder Scrolls Online. Often people “stand in stupid”, the meaning of that phrase comes from players standing in avoidable damage. If there is an enemy fire AoE on the ground, it might not be wise to stand in it. That sounds easy, but most of the deaths in this game come from stuff like that.
It can be hard to manage your skills, rotation, healing, shielding etc and also pay attention to what the enemy is doing. After enough practice most stuff regarding your character will become automated, then you have more time to actually notice what happens around you, that is usually called situational awareness, many players, even endgame players lack that!
Combat Cues! In the New Player Beginner Guide I explain how to get the enemies AoE colors some more brightness which will result in seeing them better. You can find the setting under Gameplay > Combat > Custom Colors like you see in the picture here. I recommend turning it up to the maximum amount.

Kiting in ESO
Kiting in ESO (Elder Scrolls Online) can be understood as running away from the enemy and still dealing damage. An enemy melee monster is trying to attack you, you walk backwards and still deal damage and the monster might die before it can even hit you. Another player that just stands there will take all the damage from a melee monster, avoidable damage.
Kiting can be difficult at the start, but you really should learn how to play with it because you can avoid so much damage this way!
ESO Solo Gameplay
In this section you can find some video examples of how you can solo play in arenas or dungeons in ESO.
ESO Solo Dungeon – City of Ash 2 Veteran Hardmode
This is a great example showing how strong stamina builds can be if their are built correctly. In this example I used the Solo Stamina Necromancer build to clear City of Ash 2 in veteran with hardmode enabled. I did this test on all my Solo Stamina setups and managed to clear it, this isn’t exclusive to Necromancer.
ESO Solo Dungeon – Cradle of Shadows Veteran Hardmode
This is another great example of how you can solo even harder dungeons alone. Here we are playing the Solo Magicka Sorcerer build in Cradle of Shadows veteran hardmode. This is supposed to be a 4 player group dungeon, but if you have the skills, can be soloed.
ESO Solo Dungeon – Icereach
Another example that is easier to do is, solo a dungeon on normal mode, like I did here with the Solo Magicka Necromancer build in Icereach normal mode.
Solo Builds for ESO
Here, you can find the list of the Solo Builds on alcasthq.com. All of the builds have been tested in overland content, dungeons and arenas.
Magicka Solo Setups
Stamina Solo Setups
I hope you enjoyed the How to Solo in ESO Guide. For more content please visit the ESO Builds category for all available builds.