

Welcome to the Stamina Warden Beginner Guide for ESO (Elder Scrolls Online). Stamina Wardens are good damage dealers in the game with their fast and challenging rotation. The skills that I chose here are the priority. You can pick up any skill along the way that you like, but this will be the ideal route for survival, damage and support.
If you don’t understand something and it isn’t covered here you might find it in the general New Player Beginner Guide, otherwise join the Discord where you will find a helpful community!
Table of Contents
- The Start
- Level 2 (Attributes & Skills)
- Level 3 (Gear & Skills)
- Level 5 (First Milestone, Skills, Weapons & Gear)
- Level 6 (New Skill Line)
- Level 7 (First Passive)
- Level 8 (Morph & Lorebooks)
- Level 9 (Skill Morph & Reward)
- Level 10
- Level 11 & 12 (Ultimate Ability)
- Level 13 (Skill)
- Level 15
- The Road to Level 50
- What’s next?
The Start
This Stamina Warden Beginner Guide is here to help you with understanding how the class works and getting used to playing with both bars which is essential for all classes. I will help you guide through the first 15 levels and then help you reach level 50 and what to do once you hit it.
We will utilize the Dual Wield weapon tree in this guide, but alternatively you can also use a Two Handed weapon.
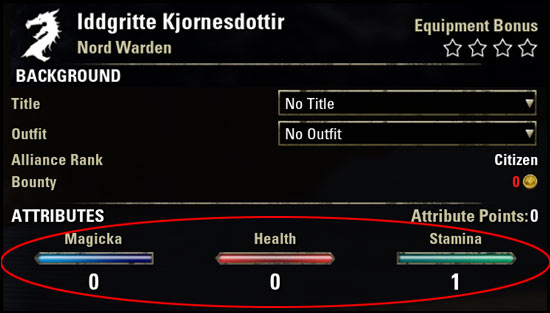
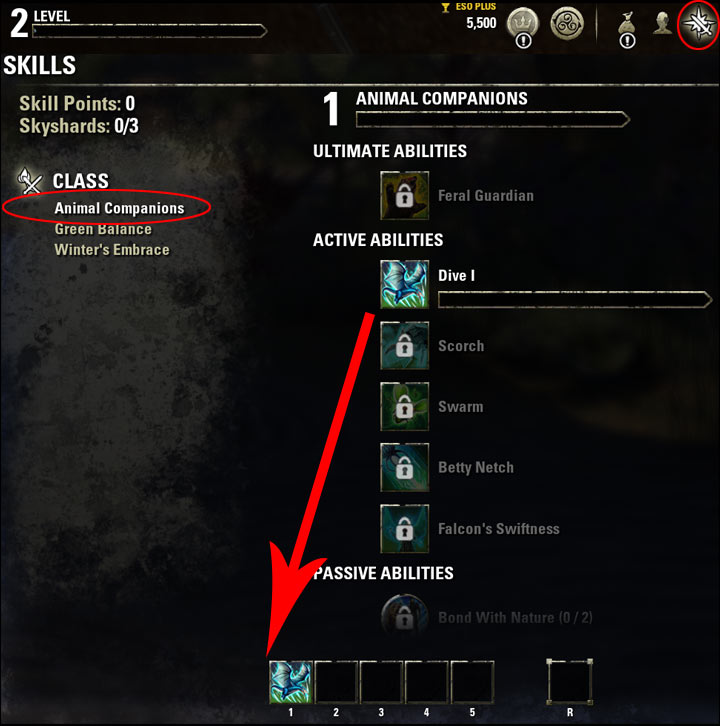
Level 2 (Attributes & Skill)
- The first attribute point is assigned at level 2 and goes into Stamina. All other points will go into this attribute as well, as you don’t have to worry about Health or Magicka. You might be tempted to put them into Magicka because your first skills will be Magicka based, but you will soon be able to change them into Stamina based abilities.
- The first skill point should go into Dive in the Animal Companions tree in your Class skill line and will be your first “spammable”, meaning that you can use this skill repeatedly in any rotation. It’s a Single Target ability, so always read the tooltip carefully how many targets are actually afflicted.
Don’t worry about the passive abilities yet. They are nice to have while you are leveling, but you want to maintain a good balance between skills you are using, and passive abilities that help you with resource management, survival or damage.
- You will also most likely not be able to constantly cast a skill and will use a lot of light attacks. That is perfectly fine.
- Try making a Light Attack and then a skill. You might find that this is a good way to inflict damage, and it will help you in the long run (a lot!).
- If you run out of Stamina use a Heavy Attack, as this will restore your resources.
Level 3 (Gear & Skills)
In the tutorial you can already find lots of random gear and other items by looking into urns, cupboards, chests and any container you can find. You want two One Handed weapons which you can both wield, as these are your main weapon, but you can use your class skills even without the ideal weapons.
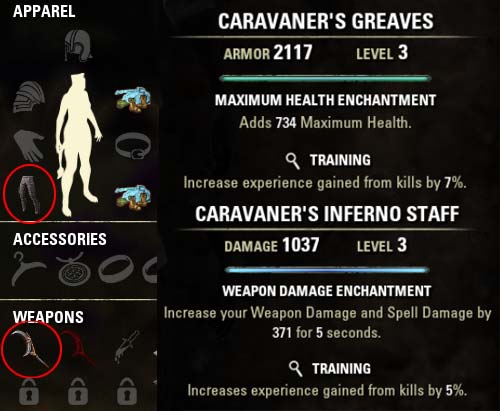
With level 3 you will receive a reward box that contains gear and other goodies which we can utilize for this Stamina Warden Beginner Guide.
- You will receive buff food for the first time. It will increase your primary stats and is an essential part of the game as an always available buff. Double click on it, or hover with your mouse over the item and press E.
- You will also receive some training gear and weapon. It increases the experience you gain per enemy killed. You can find more information on how to increase experience gain in the Power Leveling Grind Guide.
- Upon reaching level 3 you can claim your level up reward and you will gain 1 additional skill point. In addition, after completing the tutorial/quest you will get a reward which includes another skill points like shown in the tutorial video here. 1 should go into Fungal Growth in the Green Balance tree and 1 into Frost Cloak into your Class skill line Winter’s Embrace. You should now have the following skills on your first skill bar:
- Dive
- Fungal Growth
- Frost Cloak
For every ability slotted you will receive experience in their respective skill lines/trees. Which means it is imperative to have an ability for every skill line on your skill bar that you intend to level. The more skills, the faster the skill line levels, but that just as a side note. There is no reason to rush any first.
Fungal Growth will be your go-to healing skill for you and your group. Be advised though that it only heals targets in front of you, so that you actually need to have the players in target that you want to heal.
Buff Food in the Reward Box

Gear in the Reward Box
Level 5 (First Milestone, Skills, Weapons & Gear)
You want to morph your first skill now, which is going to be Dive into Cutting Dive (Animal Companions skill line).
Morphing is the further stage of a skill and changes the way it is being used. You don’t have to morph a skill because we only need the base skill in order to level the skill lines, but usually you morph a skill to get the more advanced version. You can also check the Morphing Beginner Guide if you want to know more about it!
Now you probably see why it is important to have a skill on your bar, as you need to reach and fill Rank 4 of each skill in order to be able to morph it.
Simply select the icon next to the skill and choose between two options. This will make you consume a skill point.
- Dive (Animal Companion) into Cutting Dive. It will automatically replace the skill on the action bar
- Spend 1 more skill point into morphing Frost Cloak into Ice Fortress
- 1 skill point should also go into Flurry (or Uppercut if you are using a Two Handed weapon)
With level 5 you should have found two One Handed weapons (or one Two Handed) by now, or, if you didn’t find one, buy them from a Weaponsmith. You can find them in towns and villages, and they will sell you a One Handed weapon for 300 (480). I recommend the Iron Daggers and an Iron Greatsword, as they provide the best Passive bonuses.
You will also need a Bow for later use. You can buy a Maple Bow from a Woodworker for 480 gold if you haven’t found any in the tutorial, but it is also a quest reward for completing the tutorial.
Don’t forget to equip it and kill an enemy with it either, as that will unlock the skill line.
You can also ask in zone chat if someone has the time to quickly craft you both (type /z in the chat and hit enter to write in zone chat). It isn’t guaranteed that you will find someone that has the time or knowledge to craft you one, but that is at least an option.
If you have unlocked the Bow skill line don’t be tempted to put a skill point in it yet. You would be leveling the skill line faster, but at this point it isn’t necessary. Keeping the weapon equipped will level the skill line, too. Just kill a few enemies until you have reached Level 2 in the skill line. We will need that later. After that you can swap back to your One or Two Handed weapons.
Buff Food & Drinks
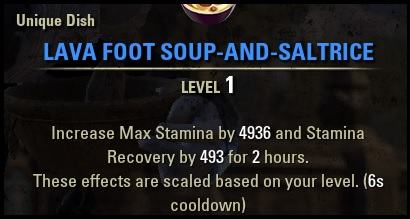
I do recommend saving some money to buy the “Lava Foot Soup-and-Saltrice” food in a Guild store, or ask a guild member if they can craft/give you some (if you are in a guild already). This will increase your character stats by a lot and this will also help you better with regenerating stamina (which is called “sustaining”).
- Lava Foot Soup-and-Saltrice
- Increase Stamina and Stamina Recovery
- Can be used at any level
- Not that expensive in the guild store
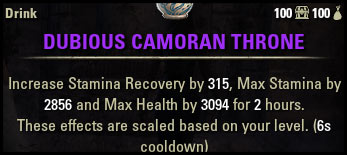
If you also want more Health, I recommend “Dubious Camoran Throne”. It is a bit more expensive, but will also grant you more stats.
- Dubious Camoran Throne
- Increases Max Stamina, Stamina Recovery and Health
- Can be used at any level
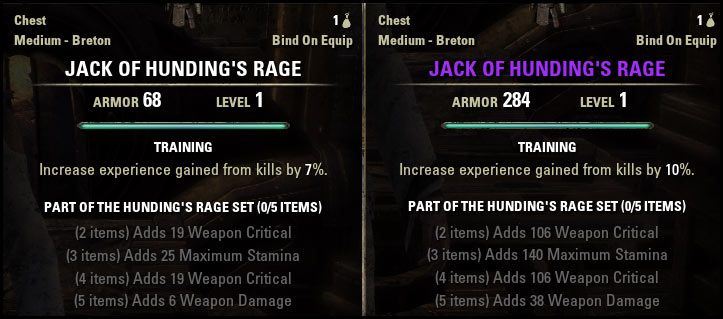
Training Gear
If you want to level up as fast as possible, you would want gear that has the trait Training (or so called “training gear”). If you want to check out all the experience boost options available I recommend checking out the Power Leveling Grind Guide.
If you are already in a guild, ask a guild member of yours to craft you some training gear. You can get it crafted at any level, but the higher the quality, the less often you need it crafted:
- 5 Medium Armor with training trait
- 1 Heavy Armor with training trait
- 1 Light Armor with training trait
- 2 Daggers with training trait (or 1 Greatsword)
- 1 Bow with training trait (will be used later)
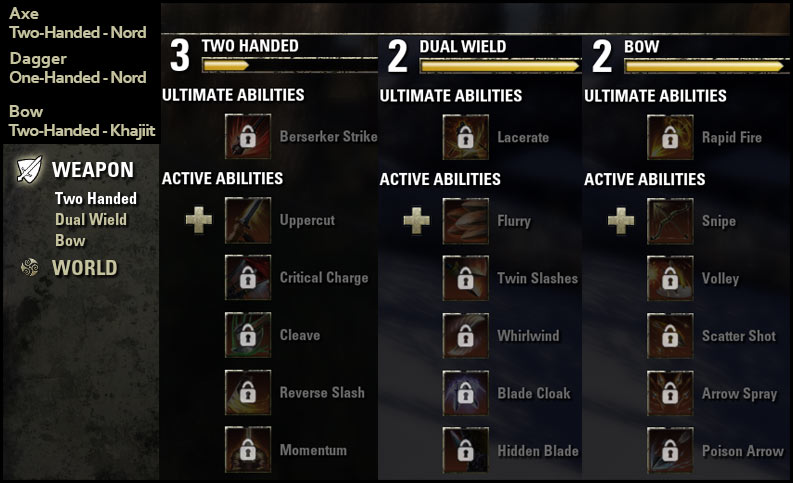
Level 6 (Weapon Skill Line Leveling)
- 1 skill point goes into Snipe (Bow) in the Weapon tree
We have five skills now on the bar. You will notice that you can’t use Snipe with your two One Handed weapons, or Flurry with a Bow. These skills are weapon bound and can be utilized fully when we get two weapon bars with Level 15 and you follow this Stamina Warden Beginner Guide.
Regardless of this, having these skills on your bar will still level these abilities and that tree.
Level 7 (Passives)
- 1 skill point goes into your first Passive ability called Bond with Nature in the Animal Companions skill line.
Passive Abilities are secondary to skills in the beginning. You want to acquire a skill in order to level that tree and the skill itself first. The more you play the game though, the more you want to look into helping you inflict more damage, survive longer or help you control your resources.
Try to always prioritize an active skill over a passive while leveling.
Level 8 (Skill)
- 1 skill point into Twin Slashes (Dual Wield)
Ignore Flurry now and concentrate on the next skill as soon as possible, namely Twin Slashes. This is your go-to Dual Wield skill and will even be used at later levels. Also replace Flurry with Twin Slashes on your weapon bar.
Level 9 ( Skill morph & Reward)
- 1 point into morphing Fungal Growth into Soothing Spores (Green Balance)
Also choose the Prophet’s Dagger from the rewards and continue choosing this reward, unless you find something better, of course, or get something crafted/craft something yourself.
Level 10
Congratulations, you have reached your first game changing milestone with the Stamina Warden Beginner Guide! We have to cover some ground now, so read carefully.
These are the things you will receive and get access to:
- 3 Skill Points
- 3 Attribute Points
- Horse
- Dungeon Finder that also includes Player versus Player (PvP), namely Battlegrounds (arena) and Cyrodiil (open world)
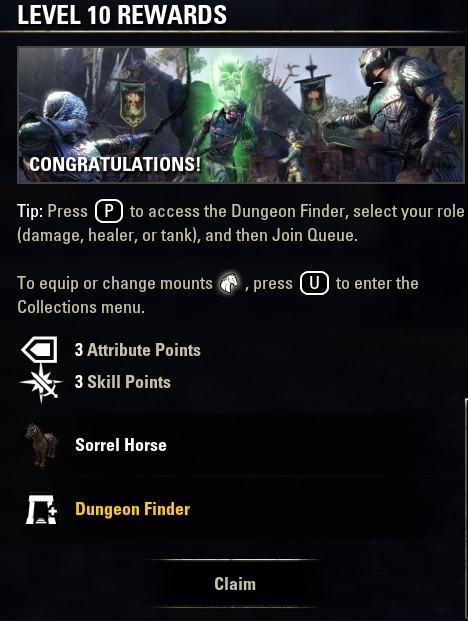
First off, the skill points:
- Choose the Passive Ability Dexterity in the Medium Armor skill line
- 1 into Glacial Presence Passive in the Winter’s Embrace skill tree
- 1 point morphing Twin Slashes into Rending Slashes (Dual Wield tree)
Your bar should look like something like this now:

Horse:
You will probably want to assign a hotkey to the horse. Mine is H (default). You can do so in the keybindings. You also have to activate it from your mount collection under U (default). Now, every day you are able to, feed the horse at the stable master. This increases either the speed, stamina or weight capacity. My recommendation is speed first.
Dungeon Finder:
The Dungeon Finder (default key is P to open it) is a tool to help you find a group regardless of whether you ask around, or have a guild or friends to ask. It will queue you randomly with other people that are looking to run the same dungeon. The first random dungeon of the day will reward you with a lot of EXP upon completion and I recommend you do that every day.
Player versus Player:
Battlegrounds and Cyrodiil will let you best yourself against other players, and the first successful Battleground of the day will award you with a lot of EXP, too. You can do it, but you don’t have to. It is a good way to get a lot of experience points, but it is not guaranteed that you can get either first or second place with your group in order to complete the quest.
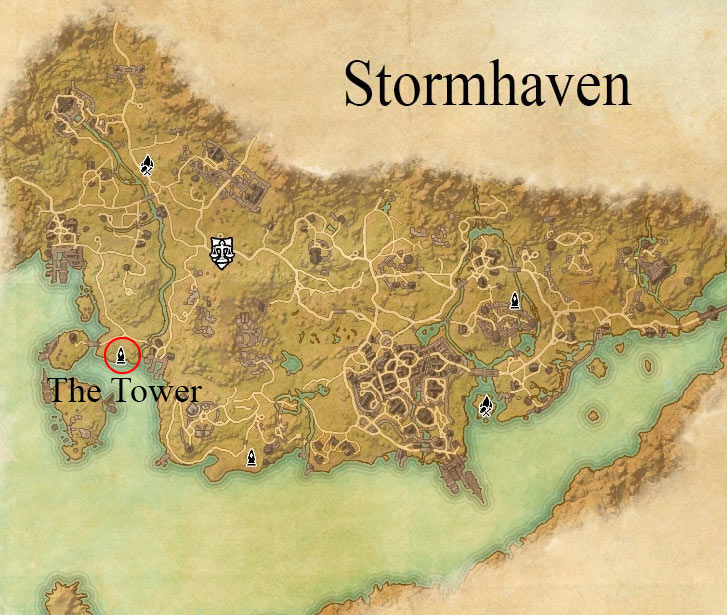
Another important mechanic of the game are Mundus Stones and Guilds.
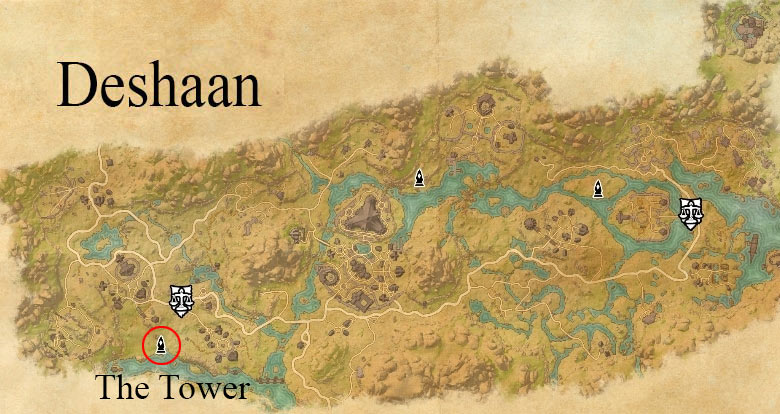
Mundus Stones:
A Mundus Stone will increase your stats by a lot. I recommend to get this as early as possible, as you will notice the difference. They are spread all over the world and you can decide between 13 different Mundus Stones.
I recommend either The Lover or The Tower. The first increases your Physical and Spell Penetration and makes you inflict more damage, whereas the second increases your Maximum Stamina so that you can use more abilities.
Daggerfall Covenant
Glenumbra – The Lover


Stormhaven – The Tower

Aldmeri Dominion
Auridon – The Lover

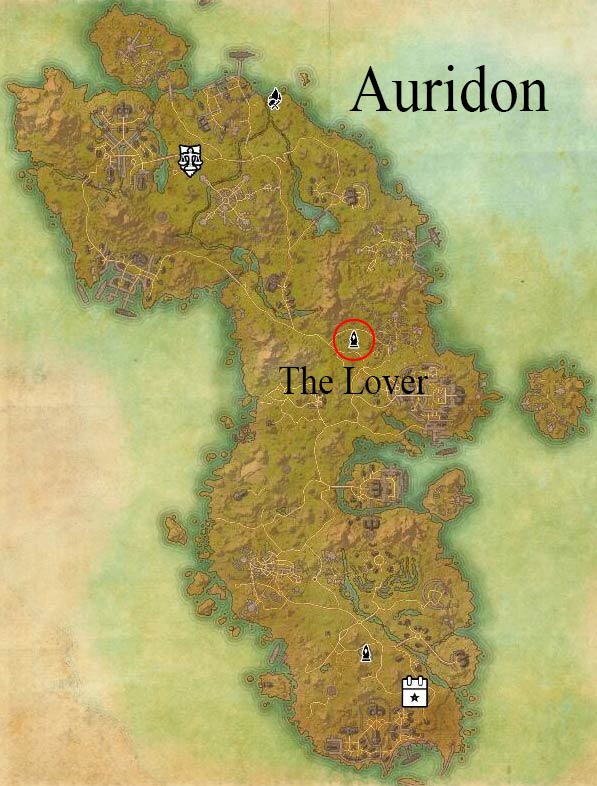
Grahtwood – The Tower

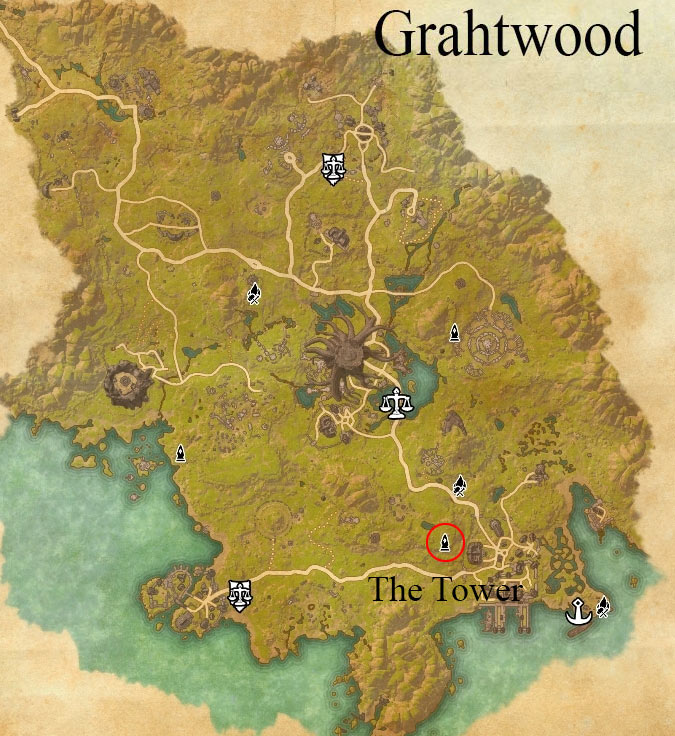
Ebonheart Pact
Stonefalls – The Lover

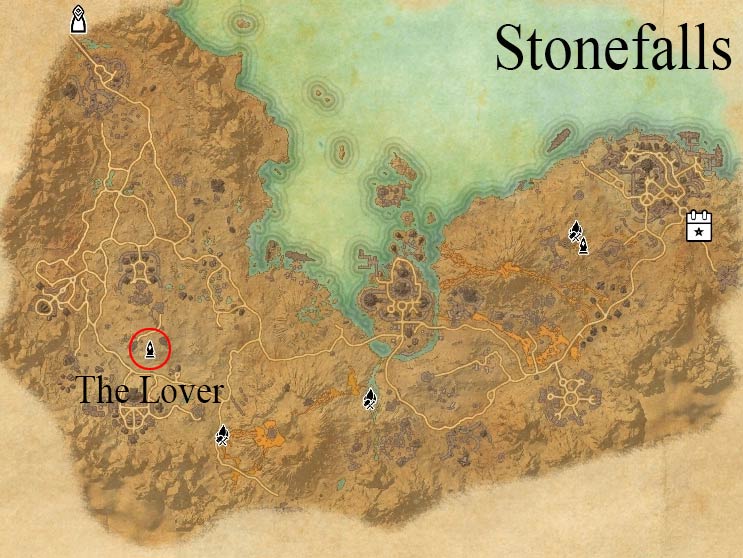
Deshaan – The Tower

Guilds:
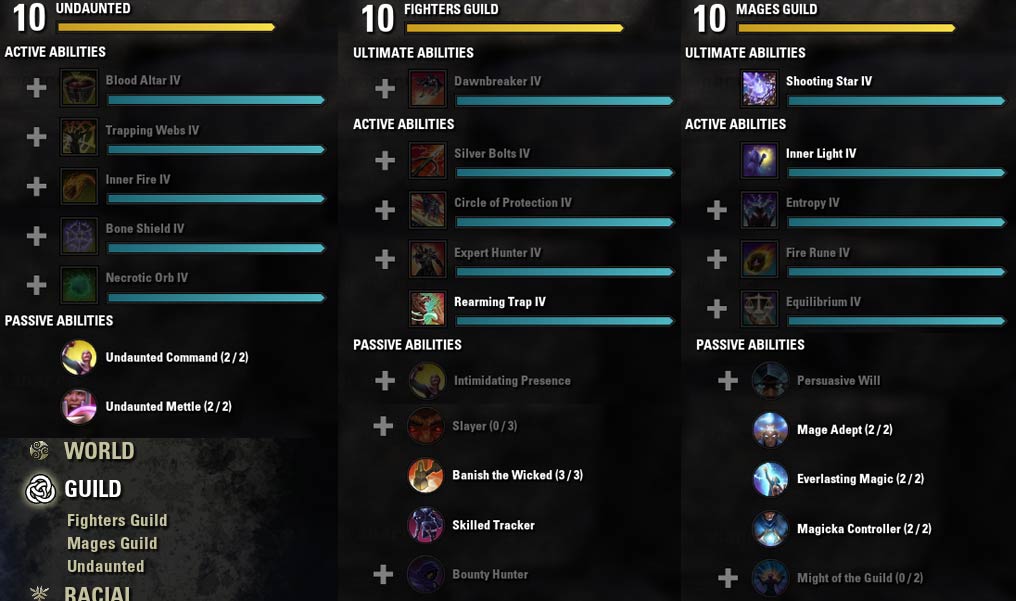
There are three important guilds in the game, the Fighters Guild, Mages Guild and Undaunted. It is imperative to start with all three of them early on, especially Fighters Guild as you will need a couple of skills from there, so start with running dungeons early on or kill Undead and Daedra. In the Fighters Guild, Mages Guild, Undaunted Video it is showcased how to get those skill lines.
Fighters and Mages Guild will let you sign up after talking to a specific NPC, for Undaunted you will have to do a little quest.
Each skill line is leveled up in a different way.
- Fighters Guild: Kill Undead and Daedra or complete a daily quest
- Mages Guild: Collect lore books or complete a daily quest
- Undaunted: Complete Undaunted Daily Pledges
You will not need any Mages Guild skills with this guide, but if you, for whatever reason, want to change to a Magicka build later on, it will be more of a pain collecting lore books instead of collecting them while you level.
These are just examples:
Level 11 & 12 (Ultimate Ability)
- 1 skill point into Feral Guardian (Animal Companions) and with Level 12 put 1 skill point into the passive Savage Beast (Animal Companion)
Ultimate Abilities require a special resource called Ultimate before they can be used and isn’t available immediately. You gain Ultimate by engaging in combat over time. Once you have enough Ultimate, you can use it, but don’t have to. Sometimes it is worth waiting until you either engage against a strong enemy, or have multiple enemies to use it against.
Many other classes want two different kinds of Ultimates on their bars, but since your bear Ultimate is a permanent pet, it will vanish when you switch bars and it isn’t on the other bar. Hence why we only use the bear in this Stamina Warden Guide.
Also, don’t be afraid to use your Ultimate. It is a rarer resource than a skill, but using your Ultimate will also grant your pet an additional damage ability.
With all things, always read the tooltip carefully!
Level 13 (Skill)
- 1 skill point into Volley (Bow)
As soon as it becomes available, put a skill point into Volley and replace it for Snipe.
Level 15 (Passives, Skills, Weapon Swapping & Skill Setup)
- 1 skill point into the Passive Accelerated Growth under Green Balance (Class) and 1 into Wind Walker under Medium Armor
Weapon Swapping will now become available with Level 15.
It is something that not many new players like, but it is incredibly important and an essential gameplay mechanic and I can’t stress this enough. I recommend you to have your two One Handed weapons equipped on your first bar and your Bow on your second bar. Just open your inventory and drag and drop the second weapon onto the second weapon slot.
You will notice that on the second bar with your Bow you won’t be able to use Rending Slashes, just as you can’t use Volley on your One Handed bar.
So, if you want to use your bow skill, you have to switch to your so called backbar, or second bar.
In theory you could equip two different Ultimates now, but as explained earlier, you need the bear on both bars, which is why we are going to slot Feral Guardian on your frontbar, or first bar, and Feral Guardian on your backbar.
Keep in mind though that you will only gather experience on the bar that is active at the moment you receive experience.
Level 15 Skill Setup
Frontbar (One Handed)
1. Cutting Dive
2. Rending Slashes (or Cleave)
3. Soothing Spores
4. Ice Fortress
5. Volley
6. Ultimate: Feral Guardian


Backbar (Bow)
1. Volley
2. Cutting Dive
3. Soothing Spores
4. Ice Fortress
5. Rending Slashes (or Cleave)
6. Ultimate: Feral Guardian
The Road to Level 50
From now on I will not guide you through levels anymore, but what you have to do upon reaching skill line rank, as everyone progresses slightly differently, depending on how strict they follow this guide, what you might have already noticed.
I will nonetheless list the ranks that you already unlocked for the sake of completeness.
The passives unlock at specific ranks, but won’t be fully available yet. Insert the next skill point as soon as you can and continue leveling the passives that you already unlocked. To make sure you won’t miss them, I will include the rank they unlock at again.
You can always take other skills, of course, as long as you remember to put one of each skill line unto your bar. You will most likely not have reached Rank 50 in all skill lines upon reaching Level 50. That is normal and on the road to Champion Points 160 you have plenty of time to get them to max rank.
Also, you can reset your skills or morphs at any given time in either the major cities of the alliances, or in Vivec City, Alinor or Rimmen at the Shrines, and if you don’t need a skill anymore, especially when you have unlocked all the skills you need for the Minimum or Ideal setup.
The following is a list of the must haves for the Ideal setup. You can neglect the Fighters Guild ranks if you just want to go with the Minimum setup for now.
Class
Animal Companions
- Rank 1 – Dive (Morph: Cutting Dive)
- Rank 4 – Scorch (Morph: Subterranean Assault)
- Rank 8 – Bond with Nature (Passive)
- Rank 14- Savage Beast (Passive)
- Rank 22 – Flourish (Passive)
- Rank 30 – Betty Netch (Morph: Bull Netch)
- Rank 39 – Advanced Species (Passive)
- Rank 42 – Falcon’s Swiftness (Morph: Bird of Prey)


Winter’s Embrace
- Rank 1 – Frost Cloak (Morph: Ice Fortress)
- Rank 8 – Glacial Presence (Passive)
- Rank 14 – Frozen Armor (Passive)
- Rank 22 – Icy Aura (Passive)
- Rank 39 – Piercing Cold (Passive)


Green Balance
- Rank 1 – Fungal Growth (Morph: Soothing Spores)
- Rank 8 – Accelerated Growth (Passive)
- Rank 14 – Nature’s Gift (Passive)
- Rank 39 – Maturation (Passive)


Weapon
Dual Wield
- Rank 4 – Twin Slashes (Morph: Rending Slashes)
- Rank 5 – Slaughter (Passive)
- Rank 10 – Dual Wield Expert (Passive)
- Rank 25 – Controlled Fury (Passive)
- Rank 28 – Ruffian (Passive)
- Rank 41 – Twin Blade and Blunt (Passive)


OR
Two Handed
- Rank 5 – Forceful (Passive)
- Rank 10 – Heavy Weapons (Passive)
- Rank 14 – Cleave (Morph: Carve)
- Rank 17 – Balanced Blade (Passive)
- Rank 30 – Follow Up (Passive)
- Rank 41 – Battle Rush (Passive)


Bow
- Rank 4 – Volley (Morph: Endless Hail)
- Rank 5 – Long Shots (Passive)
- Rank 10 – Accuracy (Passive)
- Rank 17 – Ranger (Passive)
- Rank 30 – Hawk Eye (Passive)
- Rank 38 – Poison Arrow (Morph: Poison Injection)
- Rank 50 – Rapid Fire (Morph: Ballista)


Armor
Light Armor
- Rank 6 – Evocation (Passive)
- Rank 14 – Spell Warding (Passive)


Medium Armor
- Rank 2 – Dexterity (Passive)
- Rank 6 – Wind Walker (Passive)
- Rank 38 – Agility (Passive)
- Rank 42 – Athletics (Passive)


Heavy Armor
- Rank 2 – Resolve (Passive)
- Rank 6 – Constitution (Passive)
- Rank 14 – Juggernaut (Passive)


World
Soul Magic
- Rank 1 – Soul Trap (Morph: Soul Splitting Trap)
- Rank 4 – Soul Shatter (Passive)


Guild
Fighters Guild
- Rank 3 – Slayer (Passive)
- Rank 5 – Banish the Wicked (Passive)
- Rank 7 – Skilled Tracker (Passive)
- Rank 8 – Trap Beast (Morph: Rearming Trap)
- Rank 10 – Dawnbreaker (Morph: Flawless Dawnbreaker)


Undaunted
- Rank 6 – Undaunted Command (Passive)
- Rank 7 – Undaunted Mettle (Passive)


Racial
All racial passives.
Craft
Alchemy
- Rank 8 – Medicinal Use (Passive)

Provisioning
- Rank 3 – Gourmand (Passive)
- Rank 5 – Connoisseur (Passive)


Minimum Skill Setup (98 Skill Points)
Frontbar (Dual Wield)
- Bull Netch
- Rending Slashes
- Cutting Dive
- Subterranean Assault
- Soul Splitting Trap
- Ultimate: Wild Guardian


Backbar (Bow)
- Arrow Barrage
- Ice Fortress
- Soothing Spores
- Poison Injection
- Bird of Prey
- Ultimate: Wild Guardian


Ideal Skill Setup (101 Skill Points)
Frontbar (Dual Wield)
- Bull Netch
- Rending Slashes
- Cutting Dive
- Subterranean Assault
- Soul Splitting Trap
- Ultimate: Wild Guardian
Backbar (Bow)
- Arrow Barrage
- Barbed Trap
- Soothing Spores
- Poison Injection
- Bird of Prey
- Ultimate: Wild Guardian

What’s next?
By now you should have learned that weapon swapping is one of the most essential game mechanics. In a lot of build videos, you will see that pretty much all classes barswap a lot to reapply their buffs and debuffs, and to get the maximum out of their DPS.
You will also have noticed that light attacking has a lot of benefits. It will help you regenerate Ultimate, increase your DPS, work with your skills and more. The Elder Scrolls Online has a specific game mechanic which is called Light Attack Weaving. It means that you are cancelling the animation of a light attack with a skill in order to be faster in your rotation and therefore put out more damage. It is one way to cancel an animation, there are others, going to be explained in a future guide.
For now, the most important thing to learn about it is that you will have to learn to use a Light Attack in between each Skill. Don’t worry about the animation cancelling yet.
You might also want to respec (reset your skills) and get rid of excessive skills when you are short on skill points to use either the Minimal or Ideal Skill Setup, if you haven’t done it already.
Also, don’t worry about a specific gear setup yet.
If you have found a guild or friends that offer to help you out with gear, then you can ask them to craft you gear suggested in other guides, but it isn’t necessary and usually a waste of resources/money.
The next big and last milestone gear wise will be Champion Points 160. This is when you can start with collecting the gear you want or need, upgrade it and grind trials, dungeons or overland activities. It might seem like a big step, but you will get Enlightenment for being logged out of the game, which will give you a bonus to the Experience Points that you earn. That way you can earn Champion Points at an accelerated pace.
I will also not get into a rotation yet, that will be covered in a different guide. Just get to know your skills for now and concentrate on the things you will need to learn with this guide.
Related Topics: