

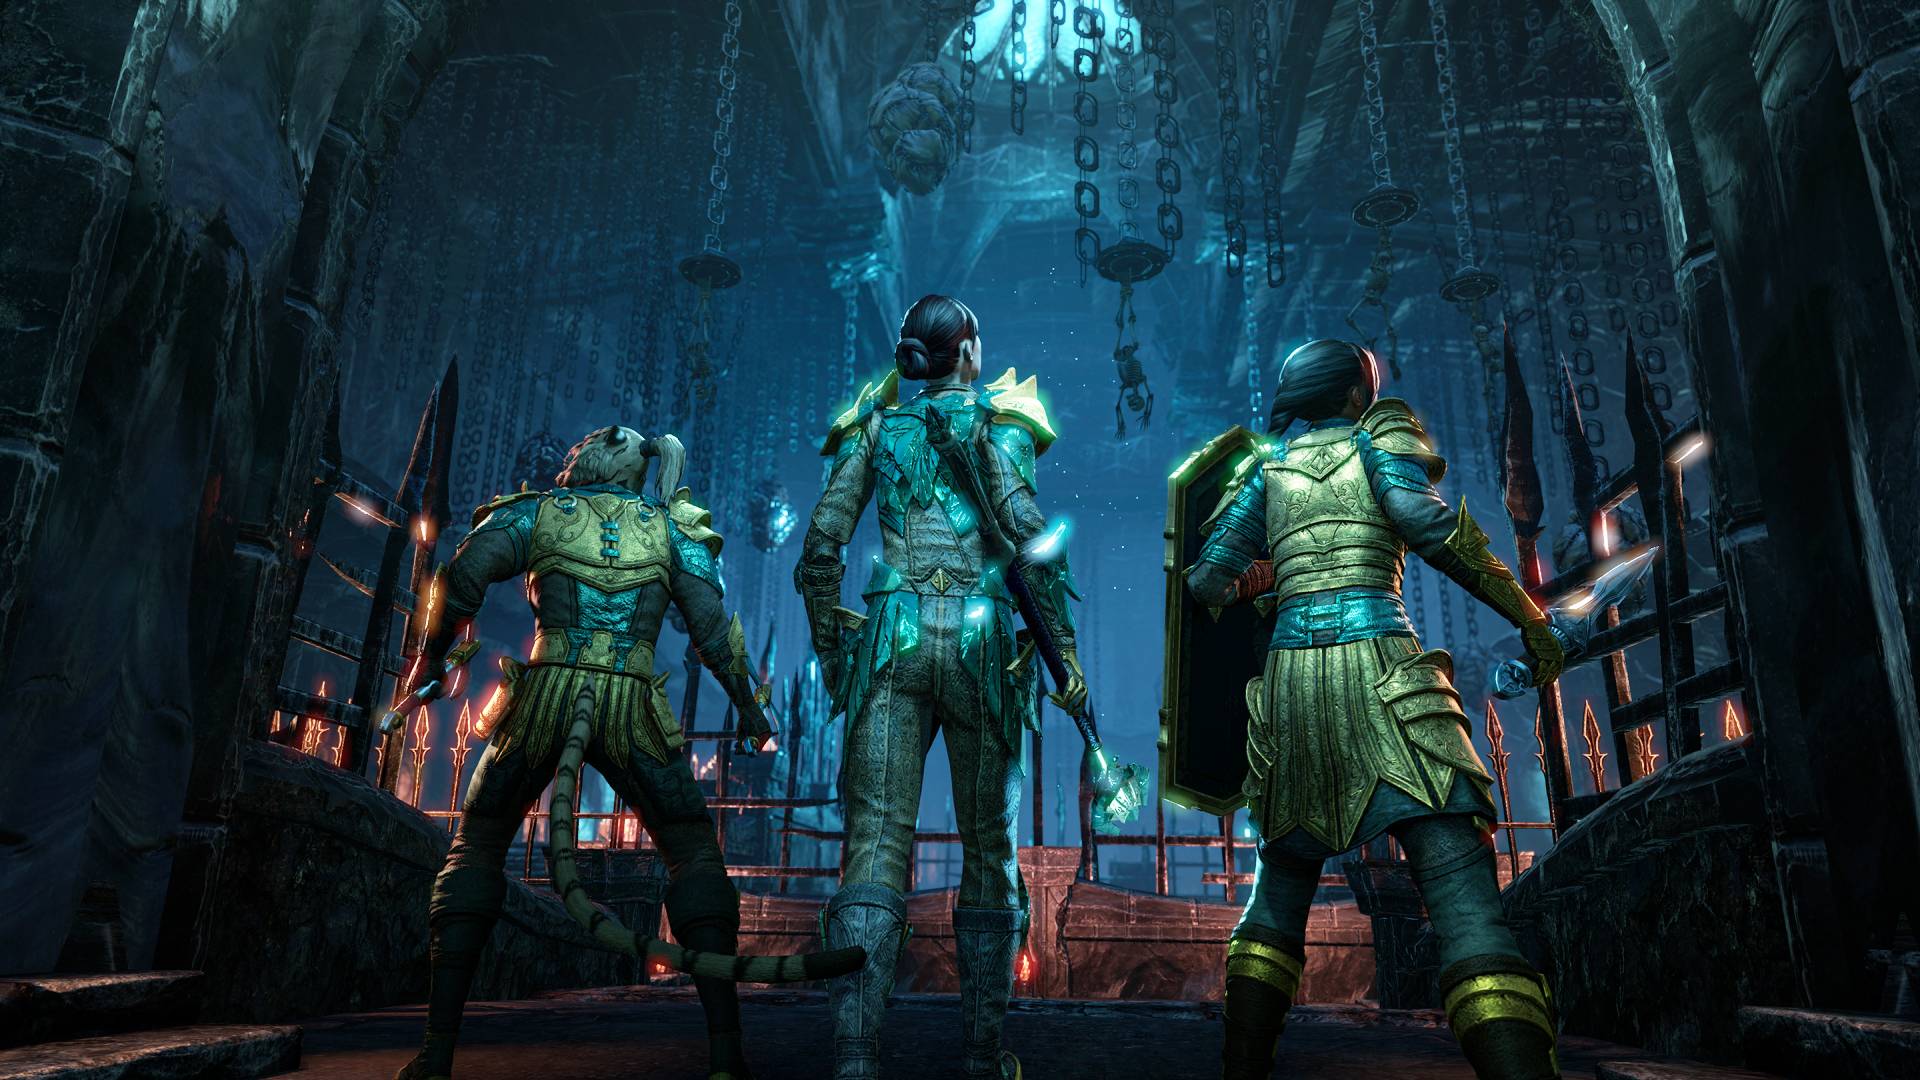
Welcome to the ESO Lucent Citadel Guide. The Lucent Citadel Trial is located in the West Weald zone (requires access to the Gold Road chapter) and can be played in normal and veteran mode. I will walk you through with this guide and explain all the mechanics in detail. The Lucent Citadel Trial has three main bosses (and several smaller encounters) with the final boss being a part of a multiphase encounter.
During the final encounter the players have to make a trek back to the start of the Lucent Citadel Trial. In said encounter players will face new enemies, mini-bosses and the final boss. The main two boss encounters have their own individual hard modes (previous boss encounter must be completed in hard mode in order to activate the next boss’ hard mode). The third and final hard mode changes the whole run back to the start of the Trial. The Lucent Citadel trial is also often referred to as LC while the added ‘v’ indicates veteran difficulty.
Guide written by SGTsanttu.
Table of Contents
- Loot & Rewards
- Quick Tips
- Group Setup
- Trash Fights
- Boss 1 Count Ryelaz and Zilyesset
- Mini-Boss: Cavot Agnan
- Ghost Lights / Wisp Puzzle
- Boss 2 Orphic Shattered Shard & Xoryn
- Carrying the Arcane Knot
- Boss 3 – Xoryn
Loot & Rewards – ESO Lucent Citadel Guide
There are several sets and achievements that you can complete in this trial.
New Sets in Lucent Citadel
In the ESO Lucent Citadel trial you can find a perfected and an imperfected version of each set.
- Perfected Lucent Echoes & Lucent Echoes
- Perfected Mora Scribe’s Thesis & Mora Scribe’s Thesis
- Perfected Slivers of the Null Arca & Slivers of the Null Arca
- Perfected Xoryn’s Masterpiece & Xoryn’s Masterpiece
Rewards in Lucent Citadel
- New Title
- Luminous – obtained by completing the Lucent Citadel Vanquisher achievement.
- Crystal Sharp – obtained by completing the Lucent Citadel Conqueror achievement.
- the Unshattered – obtained by completing the Retrieval Specialist achievement.
- the Unstoppable – obtained by completing the Arcane Stabilizer achievement.
- Arcane Stabilizer – obtained by completing the Knot Worthy achievement.
- New Face Marking
- Threads of Mirrormoor Face Art – obtained by completing the Retrieval Specialist achievement.
- New Body Marking
- Threads of Mirrormoor Body Art – obtained by completing the Lucent Citadel Conqueror achievement.
- New Mount
- Refulgent Mirrormoor Steed – obtained by completing the Knot Worthy achievement.
- New Skill Style
- Expert Hunter, Carmine Red – obtained by completing the Lucent Citadel Vanquisher achievement.
Quick Tips for Lucent Citadel
Here are a few quick tips that you can use in the ESO Lucent Citadel trial. These should help you to survive.
-
Mechanics
- Timer Based Mechanics – All of the three main bosses have a lot of mechanics that trigger on a timer. It is advisable to shortly go through the main mechanics before the encounter so that the group is ready for them when they happen.
- Communication – All three main bosses have mechanics that are easier to handle with voice communication:
- Count Ryelaz & Zilyesset
- Call the correct platform to stand on when the bosses begin casting Brilliant- & Bleak Annihilation.
- If non-tank players have taunts for adds, calling out the enemy spawns might help to deal with them faster.
- Orphic Shattered Shard
- Call to flip mirrors to correct sides.
- Call major minion spawns.
- Call out dangerous mechanics to avoid unnecessary damage.
- Xoryn
- Call the taunt switches.
- Call the Arcane Knot switches.
- Call the Fluctuating Current switches.
- Count Ryelaz & Zilyesset
Helpful Addons
Here you can find a list of some helpful addons for ESO Lucent Citadel Trial.
- Code’s Combat Alerts – Alerts the user of various mechanics and threats.
- Combat Metrics – Addon for tracking damage, debuffs and buffs of the fight encounters.
- CrutchAlerts – Addon for various different alerts for most of the content in ESO.
- Hodor Reflexes – Addon for sharing ultimate and DPS data between players.
- Lucent Citadel Helper – Displays and alerts the user of different ESO Lucent Citadel trial mechanics.
Lucent Citadel Boss List
Here you can find the full list of bosses and their health in the Lucent Citadel Trial in ESO.
| Boss | Health | Adds |
|---|---|---|
|
Count Ryelaz and Zilyesset |
Normal: 10.2M Veteran: 27.9M Hard Mode: 48.9MNormal: 10.2M Veteran: 27.9M Hard Mode: 48.9M |
Gloomy Blackguard, Gloomy Infernium, Mirrormoor Bone Flayer, Shardborn Lightweaver. |
| Cavot Agnan* | Normal: 10.2M Veteran: 40.7M Hard Mode: N/A |
Crystal Atronach, Skeletal Necrotic, Skeletal Ravager, Skeletal Shadowcaster, Skeletal Stormfront. |
| Orphic Shattered Shard
and Xoryn** |
Normal: 21.8M Veteran: 65.2M Hard Mode: 23.8MNormal: 2.2M Veteran: 9.3M Hard Mode: 14.0M |
Crystal Atronach, Crystal Hollow Sentinel, Gloom Shaper, Ruinach. |
| Dariel Lemonds (Miniboss)
Baron Rize (Miniboss) Jresazzel (Miniboss) and Xynizata (Miniboss) Xoryn
|
Normal: 1.7M Veteran: 5.8M Hard Mode: 9.9MNormal: 4.1M Veteran: 14.0M Hard Mode: 160.7MNormal: 3.7M Veteran: 12.8M Hard Mode: 21.8MNormal: 3.7M Veteran: 12.8M Hard Mode: 21.8MNormal: 20.4M Veteran: 69.9M Hard Mode: 118.8M |
Defense Prism, Crystal Atronach, Darkcaster Firestorm, Darkcaster Skirmisher, Darkcaster Slasher,
Dremora Battlemage, Dremora Icereaver, Dremora Lurker, Dremora Sparkcaster, House Guard, Lightbringer Acolyte, Lightbringer Iridescent, Lightbringer Radiant, Lucent Sentry Mirrormoor Mantikora, Mirrorworm, Necromancer, Skeletal Necrotic, Skeletal Ravager, Skeletal Shadowcaster, Skeletal Stormfront, Skeleton. |
*Cavot Agnan encounter does not have a Hard Mode variant.
** Xoryn can only be subdued temporarily.
Group Setup Tips for Lucent Citadel Trial
Here are some useful sets to use in Lucent Citadel. Some sets are placed in the lower tier based on their general usefulness in the trial. Lower tier doesn’t automatically mean the sets aren’t that useful and in fact they are quite often used in very optimized raid compositions where sets are switched between every combat encounter.
In short:
S-tier = Sets that players can wear throughout the raid without any issue. These sets might not be the meta for every encounter, but they will serve the wearer well enough.
A-tier = Sets that excel in specific encounters. These sets will beat the S-tier in parts of the raid but lose out in others.
B-tier and lower = These sets are usually used in min-maxing the encounters. These sets are usually equipped for one specific encounter and then quickly switched to something else.
Useful Arena, Monster and Mythic Sets = Good Arena, Monster and Mythics set that you can use in Lucent Citadel Trial.
Tank Tips Useful Sets – ESO Lucent Citadel Guide
Here are good tank sets that you can use.
S-tier 5 Piece Sets
- Lucent Echoes – Increases the group’s critical damage and healing by 11% by having more than 50% health. Similar set to Lucent Echoes is Elemental Catalyst. Lucent Echoes has in many setups replaced Elemental Catalyst.
- Master Architect & War Machine – Provides Major Slayer to 6 closest players to the wearer. 6 player limit means the trial group needs to have two players wearing these sets and the players needs to group up in two separate stacks for even application of the buff.
- Pearlescent Ward – Passive damage boost for the whole group. Passive damage reduction for the whole group when things don’t go according to the plan.
- Powerful Assault – A stable damage boosting set for a support role to use. Used by Tanks and Healers alike.
- Roar of Alkosh – One of the most used support sets in ESO. Quite often used by the Tank or Support Damage Dealer roles.
- Saxhleel Champion – A set that provides Major Force when the group needs to use some other ultimate e.g. Colossus or Barrier.
- Turning Tide – A set that provides Major Vulnerability.
A-tier 5 Piece Sets
- Claw of Yolnahkriin – Has been one of the most used Tank sets in ESO. With the release of the Arcanist class this set can be replaced by Arcanist(s) using Arcanist’s Domain skill and its morphs. Provides Minor Courage.
- Crimson Oath’s Rive – Easy to use set for reducing the armor of enemies.
- Elemental Catalyst – Mostly used by the Necromancer class. Quite often used by Necromancer Support Damage Dealers.
- Pillager’s Profit – Provides the trial group (excluding the wearer) a way to gain ultimate. Often used by the Healer role.
- Way of Martial Knowledge – Increases the damage enemies take by 8 %. This set is often used by the Healer or Support Damage Dealer roles.
B- and Lower Tier 5 Piece Sets
- Arkasis’s Genius – Provides more ultimate for 4 players including the wearer. Can be used in very optimized situations but for general use it is not worth it.
- Drake’s Rush – Provides more ultimate for 4 players including the wearer. Can be used in very optimized situations but for general use it is not worth it.
- Jorvuld’s Guidance – A set that increases the duration of Major buffs, Minor buffs and damage shields. Quite often used by the Healer role paired with the set Roaring Opportunist. Jorvuld’s is used in some optimized situations.
- The Morag Tong – Dealing direct damage to enemies causes them to take 10 % more damage from Poison and Disease attacks. Requires constant upkeep as the duration of the set is short.
- Vestment of Olorime – Quite often used by a Healer in the trial. However, Tanks can make quite good use of it in dungeons where the group consists of three Damage Dealers and the Tank. In Trials Tanks can use Olorime if there are mechanics that force Healers to be away from the group for a long duration.
Useful Arena, Monster and Mythic Sets
- Archdruid Devyric – A monster set that provides Major Vulnerability.
- Baron Zaudrus – Monster set that provides ultimate gain. Elemental Susceptibility skill provides easy uptime for the set effect when applied to several enemies.
- Bloodlord’s Embrace – A useful set when using double ice staves.
- Crushing Wall – A stable set for increasing the wearer’s damage.
- Cryptcanon Vestments – Provides more ultimate for the group at the cost of the wearer’s ultimate ability. Wearing the Cryptcanon prevents the activation of ultimate based sets and passive such as Dragonknight’s Battle Roar passive.
- Destructive Impact – Provides an easy way to increase your Weapon and Spell damage by 600.
- Encratis’s Behemoth – Enemies inside the Encratis’s aura take 5 % more Flame Damage while group members inside the aura take 5 % less Flame Damage.
- Magma Incarnate – Quite often used as one piece monster set for the recovery it provides.
- Nazaray – Extends all Major debuffs and Minor Debuffs applied to the enemies.
- Nunatak– Only source of Major Brittle in The Elder Scrolls: Online as of the launch of Lucent Citadel.
- Puncturing Remedy – Provides a cheap and easy way for the Tank to gain self healing.
- Ring of the Wild Hunt – An easy way to increase movement speed.
- Spaulder of Ruin – Provides damage buff for up to 6 players with the cost of resource recovery for the wearer. Quite often used by Tanks, Healers and Support Damage Dealers.
- Tremorscale – Easy to use Monster set for reducing the Armor of enemies.
Healer Tips Useful Sets – ESO Lucent Citadel Guide
Here are good healer sets that you can use.
S-tier 5 Piece Sets
- Master Architect & War Machine – Provides Major Slayer to 6 closest players to the wearer. 6 player limit means the trial group needs to have two players wearing these sets and the players needs to group up in two separate stacks for even application of the buff.
- Pillager’s Profit – Provides the trial group (excluding the wearer) a way to gain ultimate. Often used by the Healer role.
- Powerful Assault – A stable damage boosting set for a support role to use. Used by Tanks and Healers alike.
- Spell Power Cure – A stable Healer set for proving Major Courage for the group.
A-tier 5 Piece Sets
- Elemental Catalyst – Mostly used by the Necromancer class. Quite often used by Necromancer Support Damage Dealers. Worn by Damage Dealer Healer during trash fights where the group only runs with one Healer. With the introduction of the set Lucent Echoes, the usage of Elemental Catalyst has lessened.
- Jorvuld’s Guidance – A set that increases the duration of Major buffs, Minor buffs and damage shields. Quite often used by the Healer role paired with the set Roaring Opportunist. Jorvuld’s is used in some optimized situations.
- Roaring Opportunist – Provides Major Slayer. Usually paired with Jorvuld’s Guidance.
- Saxhleel Champion – A set that provides Major Force when the group needs to use some other ultimate e.g. Colossus or Barrier.
- Vestment of Olorime – Provides Major Courage. In Lucent Citadel Spell Power Cure is used in most encounters. However, Olorime can enable the Healer to be quite flexible with setups as Olorime can easily be “one barred” aka having the set be active in only one action bar.
- Way of Martial Knowledge – Increases the damage enemies take by 8 %. This set is often used by the Healer or Support Damage Dealer roles.
B- and Lower Tier 5 Piece Sets
- Arkasis’s Genius – Provides more ultimate for 4 players including the wearer. Can be used in very optimized situations but for general use it is not worth it. Usually slotted during trash fights for increased ultimate recovery.
- Drake’s Rush – Provides more ultimate for 4 players including the wearer. Can be used in very optimized situations but for general use it is not worth it.
- The Morag Tong – Dealing direct damage to enemies causes them to take 10 % more damage from Poison and Disease attacks. Requires constant upkeep as the duration of the set is short.
Useful Arena, Monster and Mythic Sets
- Archdruid Devyric – A monster set that provides Major Vulnerability.
- Cryptcanon Vestments – Provides more ultimate for the group at the cost of the wearer’s ultimate ability. Wearing the Cryptcanon prevents the activation of ultimate based sets and passive such as Dragonknight’s Battle Roar passive.
- Encratis’s Behemoth – Enemies inside the Encratis’s aura take 5 % more Flame Damage while group members inside the aura take 5 % less Flame Damage.
- Grand Rejuvenation – Provides the group resource gain.
- Nazaray – Extends all Major debuffs and Minor Debuffs applied to the enemies.
- Nunatak– Only source of Major Brittle in The Elder Scrolls: Online as of the launch of Lucent Citadel.
- Pearls of Ehlnofey – Increases ultimate gain of the wearer at the cost of resource management.
- Spaulder of Ruin – Provides damage buff for up to 6 players with the cost of resource recovery for the wearer. Quite often used by Tanks, Healers and Support Damage Dealers. The most used Support Damage Dealer class to pair this Mythic set with is the Necromancer class.
- Symphony of Blades – Provides the group resource gain.
Support Damage Dealer Tips Useful Sets – ESO Lucent Citadel Guide
Here are good support damage dealer sets that you can use.
S-tier 5 Piece Sets
- Elemental Catalyst – Mostly used by the Necromancer class. Quite often used by Necromancer Support Damage Dealers. Worn by Damage Dealer Healer during trash fights where the group only runs with one Healer.
- Master Architect & War Machine – Provides Major Slayer to 6 closest players to the wearer. 6 player limit means the trial group needs to have two players wearing these sets and the players needs to group up in two separate stacks for even application of the buff.
- Roar of Alkosh – One of the most used support sets in ESO. Quite often used by the Tank or Support Damage Dealer roles. Roar of Alkosh is often paired with Z’en’s Redress and these sets are mostly used by Dragonknight Support Damage Dealers.
- Way of Martial Knowledge – Increases the damage enemies take by 8 %. This set is often used by the Healer or Support Damage Dealer roles. The most used class to use this set with is the Sorcerer class. Way of Martial Knowledge is sometimes paired with Elemental Catalyst and in these cases the most used class to pair these sets with is the Necromancer class.
- Z’en’s Redress – Easy to use support set that is quite often used by a Dragonknight Support Damage Dealer. Z’en’s Redress is often paired with Roar of Alkosh in a combination known as “Zenkosh DK ”.
A-tier 5 Piece Sets
- The Morag Tong – Dealing direct damage to enemies causes them to take 10 % more damage from Poison and Disease attacks. Requires constant upkeep as the duration of the set is short.
B- and Lower Tier 5 Piece Sets
- Arkasis’s Genius – Provides more ultimate for 4 players including the wearer. Can be used in very optimized situations but for general use it is not worth it. Usually slotted during trash fights for increased ultimate recovery.
Useful Arena, Monster and Mythic Sets
- Archdruid Devyric – A monster set that provides Major Vulnerability.
- Cryptcanon Vestments – Provides more ultimate for the group at the cost of the wearer’s ultimate ability. Wearing the Cryptcanon prevents the activation of ultimate based sets and passive such as Dragonknight’s Battle Roar passive.
- Encratis’s Behemoth – Enemies inside the Encratis’s aura take 5 % more Flame Damage while group members inside the aura take 5 % less Flame Damage.
- Spaulder of Ruin – Provides damage buff for up to 6 players with the cost of resource recovery for the wearer. Quite often used by Tanks, Healers and Support Damage Dealers. The most used Support Damage Dealer class to pair this Mythic set with is the Necromancer class.
Damage Dealer Tips Useful Sets – ESO Lucent Citadel Guide
Here are good damage dealer sets that you can use.
S-tier 5 Piece Sets
- Azureblight Reaper – One of the strongest Damage Dealer sets in The Elder Scrolls: Online. However, it requires an enemy encounter where there are multiple targets that last long enough for the set to activate. This set shines in Dreadsail Reef’s Reef Guardian encounter and in Rockgrove’s Flame-Herald Bahsei encounter when burning the boss down and not playing safe. In veteran Lucent Citadel Azureblight Reaper is very effective in most of the boss encounters and in trash encounters. These encounters are: Zilyesset, Orphic Shattered Shard, Arcane Knot / Xoryn.
- Ansuul’s Torment – Strong set that passively increases the wearer’s damage. Activating the secondary effect provides a significant boost in damage. Ansuul’s is an easy set to recommend for newer players and the only hurdle for using the set is obtaining it. In Lucent Citadel this set pairs well with Azureblight Reaper. Together these sets provide massive amounts of damage in a very easy to use manner.
- Coral Riptide – Increases the wearer’s Weapon and Spell damage up to 740 based on their missing Stamina. Coral Riptide is a widely used, strong set that pairs well with Stamina Arcanist Damage Dealer. The Sorcerer wearing Way of Martial Knowledge benefits from Coral Riptide as Martial Knowledge requires the wearer to be low on Stamina.
- Deadly Strike – Strong set often used by the Arcanist and the Templar classes. Deadly Strike is a tradeable set which makes it relatively easy to acquire.
- Whorl of the Depths – Easy to use, strong and versatile Damage Dealer set.
A-tier 5 Piece Sets
- Aegis Caller – A strong and relatively versatile Area of Effect set. The biggest downside to this set are encounters where the target might move away from the set’s Lesser Aegis. The set functions well against single target and multiple target fights alike.
- Briarheart – A good back bar Trash encounter set. Burning Spellweave is a similar set that is used in Trash encounters.
- Burning Spellweave – A good back bar Trash encounter set. Briarheart is a similar set that is used in Trash encounters.
- Pillar of Nirn – A good and versatile Damage Over Time (DoT) set.
- Sul-Xan’s Torment – One of the most used Trash encounter sets in The Elder Scrolls: Online. Sul-Xan’s is a strong set in Boss encounters where there are enough minions to activate the set from. However, during Boss encounters searching for the Vengeful Soul effect can get annoying or can cause the player to lose concentration and take unnecessary damage.
B- and Lower Tier 5 Piece Sets
- Berserking Warrior– Also known as Advancing Yokeda. A stable set for increasing Critical Chance. Despite the set’s age, Advancing Yokeda is still used in some boss encounters. A set worthy to add to your collection if you aren’t playing as Arcanist. However, Advancing Yokeda sees little to no use in the Lucent Citadel.
- Elf Bane – Set used for extending the duration of Fiery Rage ultimate. Elf Bane is usually paired with Balorgh and Mechanical Acuity.
- Mantle of Siroria – A strong set but with a drawback of having to stand in a small ring for the set effect. In encounters where players move a lot, Siroria will struggle against more versatile sets.
- Mechanical Acuity – Set used when trying to maximize damage per second in a short encounter. Usually paired with Balorgh and Elf Bane.
Useful Arena, Monster and Mythic Sets
- Balorgh – Usually paired with sets like Mechanical Acuity and/or Elf Bane for quick and strong burn. Elf Bane is used to extend the duration of Fiery Rage ultimate.
- Caustic Arrow – Strong Arena set used in single target encounters. Caustic Arrow is often used against Archwizard Twelvane and the Chimera in the Sanity’s Edge. Caustic Arrow, Crushing Wall and Merciless Charge are all very popular back bar Arena Weapons. In some setups Caustic Arrow is wielded in the front bar while wearing Thunderous Volley in the back bar.
- Chaotic Whirlwind – A good front bar Trash encounter Arena Weapon set.
- Crushing Wall – Also known as the Maelstrom’s Destruction Staff set. A stable set that is still used in many encounters even after the rework for the set’s effect. Caustic Arrow, Crushing Wall and Merciless Charge are all very popular back bar Arena Weapons.
- Harpooner’s Wading Kilt – A strong Mythic set option to use. Nowadays Velothi Ur-Mage’s Amulet has taken a significant amount of spotlight from the Kilt. This is mostly caused by the Arcanist class greatly benefiting from the Velothi Ur-Mage’s Amulet Mythic set.
- Maw of the Infernal – A strong Monster set that pairs well with the Sorcerer class.
- Merciless Charge – While Crushing Wall is the set that has seen the most use as the back bar Arena Weapon, Merciless Charge is often seen as the go to set for Target Dummy parsing. The great benefit of Merciless Charge is the Two-Handed skill-line. Stampede, Carve and Executioner are all strong skills to use in a Trial encounter.
- Prior Thierric – A good Monster set for Trash encounters.
- Selene – A strong Monster set that thematically fits the Warden Class. While Selene is not the most used Monster set, it still packs a punch.
- Slimecraw – One of the best one piece Monster sets in The Elder Scrolls: Online. The first item set effect provides more Critical Chance than a normal set piece would (771 vs. 657 Critical Chance).
- Spectral Cloak – A good and easy to use Arena set.
- Stormfist– A strong and versatile Monster set that can be used in Trash encounters and Boss encounters. However, it can lose out to some other Monster sets if the targeted enemy moves a lot, causing Stormfist to miss the final damage portion of the set effect.
- Thunderous Volley – Bow version of the Crushing Wall. Also commonly referred to as the Maelstrom’s Bow.
- Velothi Ur-Mage’s Amulet – Strong and versatile Mythic set for the amulet slot. Can be used by any class but fits particularly well for the Arcanist class.
Trash Fights in Lucent Citadel
Here is a list and a short description of all the notable enemies in Trash encounters in the Lucent Citadel trial. This section doesn’t cover the run with the Arcane Knot as it has its own section in the guide.
Useful Tips
Trash encounters in Lucent Citadel are generally harder than in Sanity’s Edge or in Dreadsail Reef. The difficulty in Lucent Citadel trash encounters come from light/dark immunity management and the massive damage group can take if jumping straight into the middle of the fight. Below are a few notable enemies and mechanics to learn for the trash packs of Lucent Citadel.
First Trash Pack Quick Tip – First pack of enemies can be taunted and gathered in the middle of the room where the group burns the enemies down before they can do anything dangerous. While this is happening the other tank can run ahead and gather the enemies in the next room. The second room is split in two sides with both sides having elite enemies. To deal with this encounter faster, the other tank can taunt the enemies and pull them in the middle of the entrance to said room. In veteran difficulty the tank might require a healer to follow and help them until the rest of the group catches up.
★ Acolyte – Acolytes are Elite enemies that appear throughout the Lucent Citadel trial. Acolytes have an important ability mechanic that they can cast in two ways: Glimmer and Radiance. Both of these abilities act in the same manner with the main difference being how and where they appear. Both abilities leave a glowing beam of light on the ground that does damage that ramps up quickly and can catch players off guard. The main purpose of the glowing light is to shield enemies from the damage caused by players. Therefore, it is advised not to stack dark and light enemies in a small ball and instead stack them in a line formation. This mechanic can’t be skipped with high damage as Acolytes leave behind this protective light when slain.
★ Darkcaster Firestorm – A very dangerous Elite enemy that will rapidly inflict stacks of Darkness with its very damaging abilities. Firestorm should be prioritized or stacked to the side because of the massive damage it can cause to the whole group. Darkness can be cleansed by touching Acolyte’s Glimmer or Radiance or by finding a Crystal emanating an area of Light.
Elite Enemies
Elite enemies appear throughout the Trial’s Trash encounters. Elite enemies are one the main sources of Light and Darkness mechanics in trash encounters and learning how these statuses work is important in keeping the group alive.
★ Acolyte
Acolytes are one of the main sources of Radiance, a glowing beam of light that can be used to cleanse darkness.
Attacks:
- Glimmer – Acolyte casts a beam of light at a random target. This attack acts similarly to Radiance but unlike Radiance, it does not have a red circle around it indicating its area of effect.
- Radiance – When Acolyte is slain it leaves behind a glowing beam of light. Radiance is surrounded by a red circle indicating its area of effect. The glowing area of light protects enemies from damage. Therefore, enemies shouldn’t be stacked on top of the Acolyte. If enemies are in the radius of the Radiance, they need to be pulled away from the protective glow. The damage from Radiance ramps up very quickly. Radiance alongside with the very similar Glimmer will most likely be the first loss of vitality for new groups attempting the raid.
- Smite – Acolyte’s heavy attack. Blocking the attack won’t inflict Hindered or Rattled.
- Spark – Basic ranged light attack.
- Sunburst – Acolyte targets a random player with Sunburst. A hollow area of effect appears around the player that quickly fills up. Once the circle has filled up completely a Sunburst falls from the sky on the player. On impact Sunburst stuns the player and leaves a burning crater on the ground that spits out smaller moving flaming circles for 10 seconds. The player with Sunburst is advised to quickly run away from the group and drop the Sunburst on a safe location.
- Quick Strike – Basic melee light attack.
Crystal Atronach
A crystalline atronach that shares the model of the more common Frost Atronach.
Attacks:
- Batter – Crystal Atronach’s heavy attack. Blocking the attack applies the status effects Hindered and Rattled. Roll dodging the attack enrages the atronach.
- Crunch – A strong melee attack.
- Crystal Spear – A melee based light attack.
- Shard Eruption – Crystal Atronach leans back and begins to shoot out small shards of crystal at every player.
- Slivered Glass – A range based light attack.
- Unwritten Shift – The Crystal Atronach teleports closer to its target.
★ Darkcaster Firestorm
A melee Elite enemy that should be a priority target for damage dealers. Attacks from Darkcaster Firestorm apply stacks of Darkness.
Attacks:
- Darkness – Darkness is a debuff enemies of the darkness can inflict upon the players when dealing damage. Once a player reaches 3 stacks of Darkness a dark circle will appear under them. This area will hit anybody touching it and it also will inflict stacks of Darkness. This area will slowly drain the player of their resources. Darkness lasts 60 seconds if not cleansed. Darkness can be cleansed by touching sources of Light like Radiance, Glimmer or light Crystals.
- Incineration – The most important mechanic to be aware of. Firestorm creates a big burning area of effect around themselves while spinning their weapon around. This burning circle deals heavy damage and in veteran difficulty it will kill players in a few seconds. However, if the tank is able to stay alive in the circle with the help of the healers, it is still not a good idea to do so as the circle will rapidly inflict stacks of Darkness to the tank.
- Slash – Basic melee light attack that inflicts burn on the target.
- Tectonic Fissure – A powerful stomp that creates three lines of burning areas of effect in front of the Firestorm. It is advised to turn the Firestorm away from the group so that the Fissures will appear in a safe location. The damage from the burning Fissures ramps up quickly.
- Uppercut – Firestorm’s heavy attack. Blocking the attack won’t inflict Hindered or Rattled.
Darkcaster Skirmisher
A staff wielding melee Elite enemy that attacks with abilities similar to that of the Templar class.
Attacks:
- Exploding Spear – An area of effect (AoE) attack that targets a random player. When the Spear hits the ground it stuns players hit by it. While on the ground the Spear has a radius of flames around it causing constant damage to anybody touching it. Resembles Templar’s Blazing Spear ability.
- Spear Throw – Single target attack that Skirmisher targets a random player with. Resembles Templar’s javelin ability
- Spear Thrust – Basic attack that applies bleed to players hit by it. Resembles Templar’s “jabs” ability.
Darkcaster Slasher
Dual wielding melee Elite enemy. While dangerous for squishy players, Slasher shouldn’t pose a significant threat to tanks.
Attacks:
- Butcher – The Slasher’s heavy attack. Blocking the attack won’t inflict Hindered or Rattled.
- Weeping Slash – The Slasher’s basic light attack. Inflicts bleed upon hitting the target.
Lightbringer Iridescent
Lightbringer Iridescent shares most of its skills with the Acolyte. Notable difference is the Lightbringer Iridescent’s ability to summon small but dangerous skeletal minions.
Attacks:
- Radiance – When Lightbringer Iridescent is slain it leaves behind a glowing beam of light. Radiance is surrounded by a red circle indicating its area of effect. The glowing area of light protects enemies from damage. Therefore, enemies shouldn’t be stacked on top of the Lightbringer Iridescent. If enemies are in the radius of the Radiance, they need to be pulled away from the protective glow. The damage from Radiance ramps up very quickly.
- Return – Lightbringer Iridescent resurrects fallen skeletal minions to aid it in battle. There are four different types of skeletal minions:
- Skeletal Necrotic – Necrotic skeletal minion whose attacks apply stacks of Darkness. Shares abilities with other similar skeletal enemies like the Reanimated Convict of Black Rose Prison.
- Attacks:
- Entropic Flare – A range based light attack.
- Void – Necrotic channels an attack where it launches eight bolts of magic all around it. Once these bolts hit the ground, they split into three moving areas. This ability can quickly apply stacks of Darkness to the group which in turn makes this small minion a priority target to deal with.
- Skeletal Ravager – Melee based skeletal minion whose attacks apply stacks of Darkness.
- Attacks:
- Cleave – A conal melee cleave attack.
- Quick Strike – A basic melee light attack.
- Uppercut – A basic melee heavy attack.
- Skeletal Shadowcaster – Shadow magic based skeletal minion whose attacks apply stacks of Darkness.
- Attacks:
- Magic Dagger – A basic ranged light attack.
- Shadow Slice – Shadowcaster uses an ability similar to Nightblade’s Teleport Strike ability where the Shadowcaster jumps to a target and slices them with a dagger.
- Slice – A melee light attack.
- Skeletal Stormfront – Shock based skeletal minion whose attacks apply stacks of Darkness.
- Attacks:
- Shock – A basic ranged light attack.
- Thunder Thrall – Stormfront uses an ability similar to Sorcerer’s Bolt Escape ability to close the distance to a player. Right after closing the gap with the target the Stormfront casts an expanding area around it which quickly gets followed by a strike of lightning.
- Skeletal Necrotic – Necrotic skeletal minion whose attacks apply stacks of Darkness. Shares abilities with other similar skeletal enemies like the Reanimated Convict of Black Rose Prison.
- Smite – Lightbringer Iridescent’s heavy attack. Blocking the attack won’t inflict Hindered or Rattled.
- Spark – Basic ranged light attack.
- Quick Strike – Basic melee light attack.
Lightbringer Radiant
Lightbringer Radiant shares most of its skills with the Acolyte and Lightbringer Iridescent. Lightbringer Radiant spawn from the glowing yellow crystals that players find throughout the Lucent Citadel after defeating Cavot Agnan. These glowing crystals can be used to cleanse stacks of Darkness.
Attacks:
- Glimmer – Lightbringer Radiant casts a beam of light at a random target. This attack acts similarly to Radiance, being a glowing yellow aura which protects enemies from harm.
- Radiance – Lightbringer Radiant’s Radiance mimics that of the Cavot Agnan’s Radiance. Lightbringer Radiant casts a big glowing Radiance around themselves while launching small circles of Sunburst.
- Return – Lightbringer Radiant resurrects fallen skeletal minions to aid it in battle. There are four different types of skeletal minions: Skeletal Necrotic, -Ravager, -Shadowcaster, and -Stormfront.
- Smite – Lightbringer Radiant’s heavy attack. Blocking the attack won’t inflict Hindered or Rattled.
- Spark – Basic ranged light attack.
- Quick Strike – Basic melee light attack.
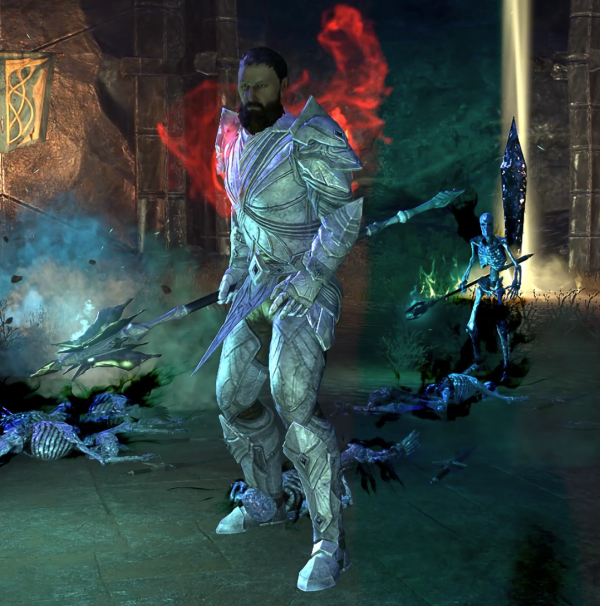
Boss 1 – Count Ryelaz and Zilyesset
Count Ryelaz and Zilyesset.
Boss Mechanics
The main mechanic of the first boss encounter is the long mirror (or window) that divides the room into two sections. Both sections of the encounter room house one of the bosses. Count Ryelaz is a darkness affiliated boss while Zilyesset is a light affiliated boss. The group has to be split in two for the encounter which forces the group to decide how to divide support sets and buffs for the two separate groups. Buffs applied in one room won’t apply to the group in the other room.
Count Ryelaz
Count Ryelaz is a powerful Grievous Twilight who possesses a few of the notable mechanics of other grievous twilights but in slightly different forms (a couple other notable unique Grievous Twilights are Rakkhat of Maw of Lorkhaj trial and Lord Warden Dusk of Imperial City Prison dungeon). Count Ryelaz is a darkness affiliated boss
Attacks:
- Bleak Annihilation – The dark affiliated Annihilation mechanic cast by Count Ryelaz around every 60 seconds. Count Ryelaz alongside with its light counterpart Zilyesset will begin casting Annihilation, ending with wiping out their section of the encounter room. Players have to switch sides by looking through the room dividing mirror (or window), finding which one of the three platforms is glowing red (yellow for Zilyesset’s side players) in the mirror and go stand on it before Count Ryelaz finishes casting Annihilation. Players standing on the correct platform will get teleported to the opposite side of the encounter room at the end of Annihilation.
- Bleak Rejuvenation – When Count Ryelaz is killed a 20 second timer will begin (10 seconds in veteran and hardmode difficulties). If Zilyesset isn’t killed during this time, Count Ryelaz will be resurrected with 30 % health remaining.
- Shear – Count Ryelaz’s heavy attack. Blocking the attack won’t inflict Hindered or Rattled. After the heavy attack meteors (Gloomy Impact) will drop on every player in Count Ryelaz’s section of the encounter room. The meteor damage can stack and players should avoid stacking with each other while meteors are falling from the sky.
- Slash – One of Count Ryelaz’s light attacks.
- Rend – One of Count Ryelaz’s light attacks.
- Twinstrike Sunder – Count Ryelaz’s hits the tank with a quick swipe followed by a blue magical orb range attack. Every player behind the tank will be hit by the magical orb portion of the attack. While the attack itself isn’t strong enough to pose a significant threat to players, it can cause enough damage to combo out players with other mechanics happening in Count Ryelaz’s section of the room.
Zilyesset
Zilyesset is a powerful Shardborn Fractured Remnant who is often referred as “the Scorpion boss” by the players. The nickname comes from the fractured remnant’s tail resembling a scorpion’s “tail”. Zilyesset is a light affiliated boss.
Attacks:
- Brilliant Annihilation – The light affiliated Annihilation mechanic cast by Zilesset around every 60 seconds. Zilyesset alongside with its darkness counterpart Count Ryelaz will begin casting Annihilation, ending with wiping out their section of the encounter room. Players have to switch sides by looking through the room dividing mirror (or window), finding which one of the three platforms is glowing yellow (red for Count Ryelaz’s side players) in the mirror and go stand on it before Zilyesset finishes casting Annihilation. Players standing on the correct platform will get teleported to the opposite side of the encounter room at the end of Annihilation.
- Brilliant Rejuvenation – When Zilyesset is killed, a 20 second timer will begin (10 seconds in veteran and hardmode difficulties). If Count Ryelaz isn’t killed during this time, Zilyesset will be resurrected with 30 % health remaining.
- Focused Ray – A long and thin conal attack. While the attack itself isn’t strong enough to pose a significant threat to players, it can cause enough damage to combo out players with other mechanics happening in Zilyesset’s section of the room.
- Heavy Strike – A heavy attack where Zilyesset hits the player three times, each blow dealing more damage than the previous one. First hit is Heavy Slash, second Heavy Smash and the final hit is Heavy Strike. Blocking the attack won’t inflict Hindered or Rattled.
- Sting – One of Zilyesset’s basic light attacks. Sting is the tail’s light attack.
- Twin Jab – One of Zylyesset’s basic light attacks. Zilyesset hits the player with both of its arms while spinning its upper torso like a drill.
Other Enemies in the Encounter
Glass Orb
Glass Orbs spawn around Zilyesset’s side of the encounter room. Glass Orbs can’t be damaged by players.
Attacks:
- Brilliant Ray – A beam of light that the Glass Orb targets a random player with. This attack doesn’t deal much damage. However, Glass Orbs spawn in packs and all of them can target the same player, posing a significant threat to the targeted player.
Gloomy Blackguard
Gloomy Blackguard is a mini-boss that spawns in Count Ryelaz’s side of the encounter room. Gloomy Blackguard spawns in the back corners of the room, opposite of the mirror wall.
Attacks:
- Bleak Lusterbeam – Darkness affiliated beam attack where Gloomy Blackguard targets two players and attaches a dark beam of darkness on them. The beam of darkness emits an aura called Bleak Veil around the players which damages anyone standing in it. This aura is used for removing the Brilliant Protection from the Mirrormoor Bone Flayers (Brilliant Protection is a golden shield around the Mirrormoor Bone Flayers).
- Slash – Gloomy Blackguard has two different light attacks both named Slash with no difference in damage.
- Rake – A cleave attack where the Gloomy Blackguard swipes with both of its claws in quick succession. This cleave attack happens quickly and is the main reason why Gloomy Blackguard should be facing away from the group.
Gloomy Infernium
Gloomy Inferniums are small inferniums who spawn with Bleak Protection around them (a red aura). Players can remove the protection with Brilliant Zone aura provided by the Shardborn Lightweaver. Gloomy Inferniums spawn at around every 20 seconds (except during Brilliant Annihilation) in hard mode difficulty and once per Annihilation on normal and veteran difficulty.
Attacks:
- Claw – One of the three Gloomy Infernium’s melee light attacks.
- Cut – One of the three Gloomy Infernium’s melee light attacks.
- Melt – A fiery beam that attaches to a random player for 40 seconds. The beam inflicts stacks of Heat Blast on the player, increasing the damage the player takes from Melt. Other players touching the beam will also be damaged by it.
- Scorching Spit – Gloomy Infernium’s basic ranged light attack.
- Slash – One of the three Gloomy Infernium’s melee light attacks.
Mirrormoor Bone Flayer
Mirrormoor Bone Flayers are skeletal creatures who spawn with Brilliant Protection around them (a golden aura). Players can remove the protection with Bleak Veil aura provided by the Gloomy Blackguard. Mirrormoor Bone Flayers spawn at around every 20 seconds (except during Bleak Annihilation) in hardmode difficulty and once per Annihilation on normal and veteran difficulty.
Attacks:
- Rending Slash – Mirrormoor Bone Flayer swipes with both arms in quick succession.
- Slash – Mirrormoor Bone Flayer’s basic melee light attack.
- Spike – Mirrormoor Bone Flayer’s basic ranged light attack.
- Trauma Totem – Mirrormoor Bone Flayer enrages and grows in size while summoning a boney totem under a player. The summoned Trauma Totem radiates a non-damaging aura around them, afflicting anybody standing in the aura with a Trauma Totem debuff. While enraged, the Mirrormoor Bone Flayers become immune to taunts. While the grown Mirrormoor Bone Flayers look dangerous, they alone pose no significant threat to players. However, in hardmode Mirrormoor Bone Flayers spawn at around every 20 seconds which can cause the group to get overwhelmed with Mirrormoor Bone Flayers if ignored.
Shardborn Lightweaver
Shardborn Lightweaver is a mini-boss that spawns on Zilyesset’s side of the encounter room. Shardborn Lightweaver spawns in the back corners of the room, opposite of the mirror wall.
Attacks:
- Blood Frenzy – A channeled conal attack where the Shardborn Lightweaver strikes the player with both of its swords in rapid succession for 10 seconds. Each hit from the swords inflicts a stack of Blood Frenzy on the target (a stack lasts around 2 seconds), increasing the damage taken from the mechanic. With the rapid pace of the strikes, the player blocking the attacks will rapidly be drained from the resource used for blocking. In harder difficulties this attack poses a significant threat to tanks. The stacks of Blood Frenzy can be reset by avoiding the hits with two consecutive roll-dodges. However, depending on the build, just blocking the hits could be the better option.
- Brilliant Lusterbeam – Light affiliated beam attack where Shardborn Lightweaver targets two players and attaches a beam of light on them. The beam of light emits an aura called Brilliant Zone around the players which damages anyone standing in it. This aura is used for removing the Gloomy Protection from the Gloomy Infernium (Gloomy Protection is a red shield around the Gloomy Inferniums).
- Slash – Shardborn Lightweaver’s light attack.
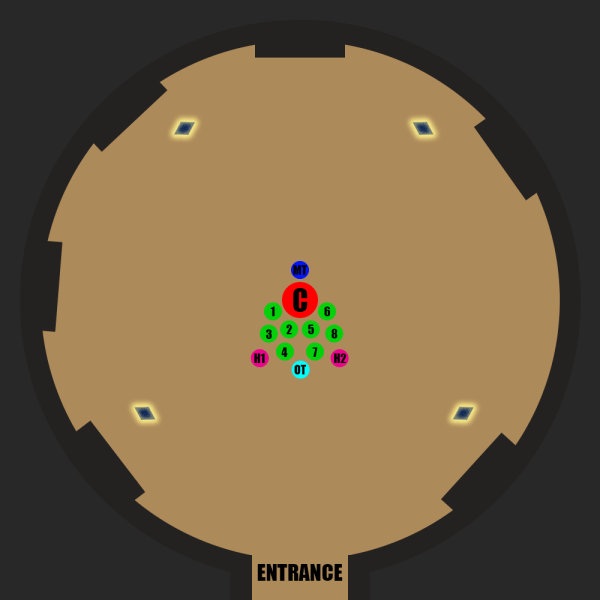
Overview of the Encounter
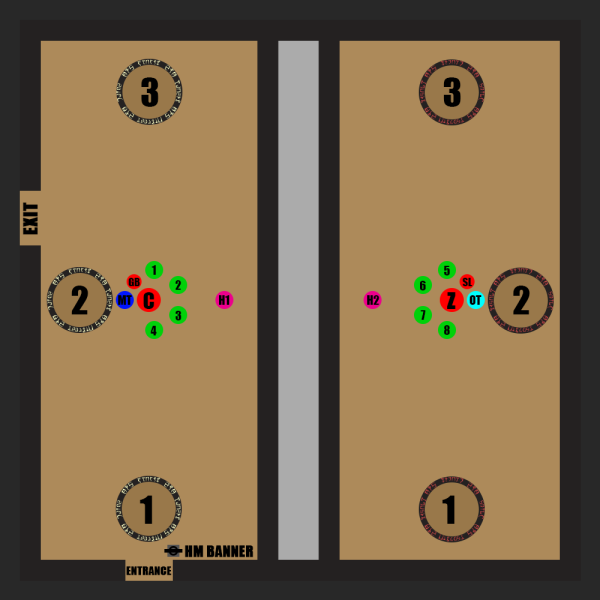
Example positions for the group where the bosses are facing towards the back walls.
The first boss encounter continues the theme of dark and light affiliated mechanics seen in the previous trash encounters. Count Ryelaz and its minions are affiliated with darkness while Zilyesset and its minions are light affiliated. In this encounter players generally don’t need to go out of their way to learn or memorize these affiliations.
Before starting the boss encounter the players have to decide how to split the group in two. Both sides of the encounter room should have one tank, one healer and rest damage dealers. Do note that the buffs cast on one side of the room won’t apply to the other side. A common tactic is to have similar buff and debuff sets on both sides. This means support damage dealer sets like Roar of Alkosh and Elemental Catalyst are usually seen worn on both sides of the room. Matching sets aren’t a requirement for this encounter but having an even distribution of damage on both sides will make dealing with the mechanics easier.
Both sides of the encounter room have three evenly placed platforms. The group should agree on a specific way to call out the correct platform during the Annihilation mechanic.
Most common ways to call out out the platforms are:
- Entrance, Middle and Exit
- 1, 2 and 3
- Right, Middle and Left.
The positioning of the boss and the main tank dictates the positioning for the rest of the group.
There are two main ways to tank the bosses:
- Boss will face the back wall where the tank is between the middle platform and the boss. The rest of the group is between the boss and the mirror.
- Boss will face the mirror where the tank is between the mirror and the boss. The rest of the group is between the boss and the middle platform.
This guide uses the first setup where the tank is between the middle platform and the boss.
When the encounter starts the players should immediately go to their respective positions and try to avoid stacking on top of each other. The encounter has many mechanics that do damage in a radius around the players which can stack. There are also sources of damage like Brilliant Ray and Melt that can do dangerous amounts of damage in quick succession. Staying in position helps the groups’ healers to heal through these mechanics. On Count Ryelaz’s side players should be prepared for the meteors (Gloomy Impact) as the Count begins to drop them shortly after starting the encounter.
On Count Ryelaz’s side it can be helpful for the tank to call out the Count’s heavy attacks with a quick “heavy” or “meteors” call as with every heavy attack two sets of meteors will fall from the sky on every player on the Count’s side.
On Zilyesset’s side it can be helpful for the tank to call out the mini-boss’ Blood Frenzy attack as this attack is very draining on the resources. The healer can help the tank out by giving them synergies to restore their resources with.
On Count Ryelaz’s side Mirrormoor Bone Flayers will begin to spawn with a glowing yellow protection around them while on Zilyesset’s side Gloomy Inferniums spawn with a glowing red protection around them. These protections are one of the dark and light affiliated mechanics in this encounter. In order to remove said protections the minions need to be hit by the Lusterbeam mechanics or they need to be dragged to the opposite room. Minions can only be dragged to the opposite side by the players switching sides with the portals while having the minions taunted. Enemies in the encounter are able to walk through the mirror in the middle unlike the players. The main way to remove the protection is via the Lusterbeams cast by the two mini-bosses; Shardborn Lightweaver and Gloomy Blackguard.
For example, on Zilyesset’s side a Shardborn Lightweaver mini-boss will spawn. Shardborn Lightweaver is a light affiliated enemy and it will cast Brilliant Lusterbeam to two random players. This causes a beam of light to attach to said players and inflict an aura on the players called Brilliant Zone. When a player with said aura goes close to a Gloomy Infernium with a red aura, the protective red aura gets removed and therefore making the Gloomy Inferniums killable.
A player with Bleak Veil aura on them removing the Brilliant Protection from the Mirrormoor Bone Flayer.
A common tactic is to have the healers range taunt the Gloomy Inferniums and Mirrormoor Bone Flayers and drag them under the boss by running away from them. The damage from the minions should be manageable for the healers. The mini-bosses are taunted by the tanks as the Shardborn Lightweaver mini-boss especially is a serious threat to even the tanks. While the minions aren’t generally a big threat, they can easily overwhelm the players by sheer numbers if ignored. The small minions spawn around every 20 seconds except during the Annihilation mechanic which happens around every 60 seconds.
The spawning of the mini-boss and the smaller minions can and will happen at different times during the fight. If the mini-boss has cast Lusterbeam on the players and the minions are just about to spawn, it might be necessary for the players to run to the protected minions before the Lusterbeam runs out. If the mini-boss dies while there are still protected minions left, the minions will stay alive until the next mini-boss is spawned in or if they are dragged to the other side.
After around 60 seconds both bosses will begin to cast their own version of Annihilation. Players will now have to look at the mirror dividing the room and see which of the three platforms is glowing on the opposite side. The platform is glowing either red or yellow depending which side the players are currently at. Once the glowing platform has been spotted players can call this with a call like: “scorpion, exit” and “count, middle”. Players then have to go stand on the correct platform before the Annihilation finishes. If players are standing on the correct platform, they will be teleported to the other side. If players are standing on the wrong platform, they will instantly perish. During Annihilation bosses nor minions are able to cast cleave abilities. Therefore, the mini-bosses can be safely kept on the platform while waiting for the teleportation to the other side.
The two bosses have to be killed at the same time or the players risk a chance of the killed boss being rejuvenated. When a boss is killed, a 20 second timer will begin (10 seconds in veteran and hardmode difficulties). If the other boss isn’t killed during this time, the killed boss will be rejuvenated with 30 % health remaining.
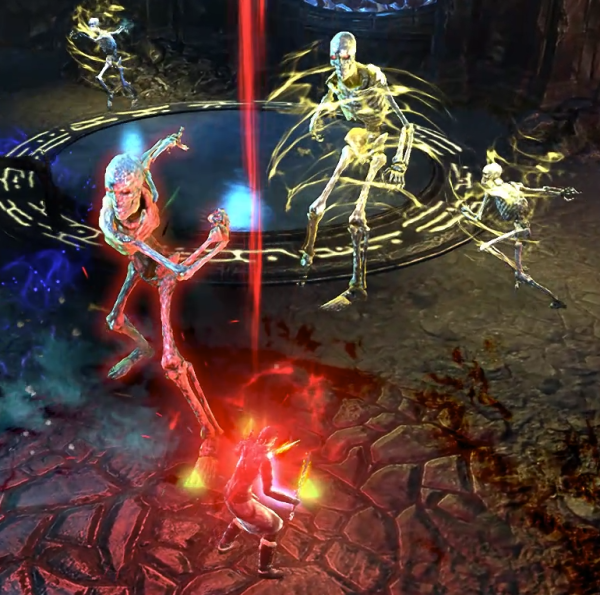
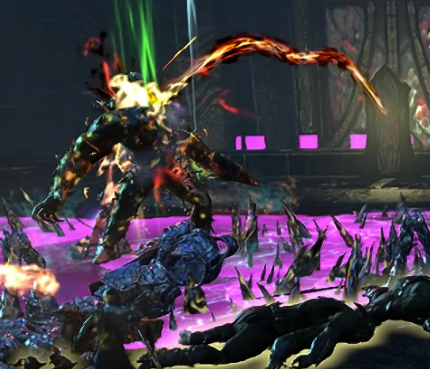
Boss Encounter – Cavot Agnan
Cavot Agnan with his skeletal minions.
Boss Mechanics
Cavot Agnan is the first mini-boss encounter of Lucent Citadel. The encounter area is a big empty cavern surrounded by slowly moving crystals. These crystals are emitting a glowing yellow aura used to cleanse the Darkness. Before starting the encounter the area has a bunch of skeletal minions and a crystal atronach waiting for the players while the mini-boss itself is overlooking the arena from a stand above.
The skeletal minions are able to inflict stacks of Darkness. As there are a bunch of skeletal minions right at the start of the fight, it is very likely some of the players might reach full stacks of Darkness and have to cleanse themselves. This is where the glowing crystals come into play. Like Radiance and Brilliant Lusterbeam, the crystals are used to cleanse the stacks of Darkness from players.
Cavot Agnan
Cavot Agnan is a powerful necromancer who controls a small army of skeletal minions. While Cavot Agnan has melee based attacks, the mini-boss won’t move around and stays in the middle of the encounter arena. This means that the tank with the taunt is able to move around the arena without dragging the mini-boss.
Attacks:
- Bleakquake – Cavot Agnan slams their staff on the ground, launching small circles of Bleakquake. This mechanic isn’t too noteworthy unless a squishier player is hugging Cavot Agnan and gets hit by multiple Bleakquakes at the same time.
- Radiance – Cavot Agnan begins to cast a glowing aura of Radiance around themselves making every enemy in it, including Cavot Agnan, immune to damage. Players touching the aura will take damage that quickly ramps up. While the Radiance is active, Cavot Agnan also summons small circles of Sunburst which Cavot Agnan launches at all directions continuously while Radiance is active.
- Smite – Cavot Agnan’s heavy attack. This heavy attack has a dangerous mechanic to it that the player with the taunt should be aware of. Whenever Cavot Agnan casts Smite, the player has to block the attack. If the player roll dodges the attack, everybody else has to roll dodge as well or they will get hit by it. In higher difficulties this attack will one shot anybody who is unable to roll dodge it. Additionally, if the player blocking the attack dies to the attack, everybody else will be hit by the attack just like with when the player roll dodges it.
- Spark – A basic range based light attack.
- Quick Strike – A basic melee based light attack.
Other Enemies in the Encounter
The fight against Cavot Agnan includes several skeletal enemies and Crystal Atronachs.
Crystal Atronach
A crystalline atronach that shares the model of the more common Frost Atronach.
Attacks:
- Batter – Crystal Atronach’s heavy attack. Blocking the attack applies the status effects Hindered and Rattled. Roll dodging the attack enrages the atronach.
- Shard Eruption – Crystal Atronach leans back and begins to shoot out small shards of crystal at every player.
- Slivered Glass – A range based light attack.
Skeletal Necrotic
Necrotic skeletal minion whose attacks apply stacks of Darkness. Shares abilities with other similar skeletal enemies like the Reanimated Convict of Black Rose Prison.
Attacks:
- Entropic Flare – A range based light attack.
- Void – Necrotic channels an attack where it launches eight bolts of magic all around it. Once these bolts hit the ground, they split into three moving areas. This ability can quickly apply stacks of Darkness to the group which in turn makes this small minion a priority target to deal with.
Skeletal Ravager
Melee based skeletal minion whose attacks apply stacks of Darkness.
Attacks:
- Cleave – A conal melee cleave attack.
- Quick Strike – A basic melee light attack.
- Uppercut – A basic melee heavy attack.
Skeletal Ravager
Shadow magic based skeletal minion whose attacks apply stacks of Darkness.
Attacks:
- Magic Dagger – A basic ranged light attack.
- Shadow Slice – Shadowcaster uses an ability similar to Nightblade’s Teleport Strike ability where the Shadowcaster jumps to a target and slices them with a dagger.
- Slice – A melee light attack.
Skeletal Stormfront
Shock based skeletal minion whose attacks apply stacks of Darkness.
Attacks:
- Run Away! – Stormfront runs away from players at melee distance.
- Shock – A basic ranged light attack.
- Thunder Thrall – Stormfront uses an ability similar to Sorcerer’s Bolt Escape ability to close the distance to a player. Right after closing the gap with the target the Stormfront casts an expanding area around it which quickly gets followed by a strike of lightning.
Overview of the Encounter
Cavot Agnan encounter doesn’t require much movement or positioning.
The encounter arena has one crystal atronach and a bunch of Cavot Agnan’s skeletal minions. Cavot Agnan themself is overlooking the arena on a stand above. Cavot Agnan joins the fight once all of their minions are dealt with.
All the skeletal minions in the encounter are able to inflict stacks of Darkness on players. As there are many of said minions at the start of the encounter, it is recommended to keep a safe distance from the enemies in order to avoid taking unnecessary stacks of Darkness. If players gain full stacks of Darkness, they can cleanse themselves by touching the glowing aura of the crystals floating at the edges of the arena.
The tanks chaining and controlling Cavot Agnan’s skeletal minions should stack them near the middle of the arena, but not in the exact spot where Cavot Agnan will join in the fight. Once the skeletal minions die, they will get resurrected from the corpses. Cavot Agnan casts protective Radiance around every 30 seconds and therefore if the skeletal minions get resurrected in the Radiance, they will be immune to damage and have to be pulled aside. To maximize damage to skeletal minions, try to keep them as close to the middle as possible, while not being in the area of the Radiance.
Cavot Agnan while possessing melee based attacks will not move from the position they first appeared at. This means that the tank taunting said mini-boss is able to move around the arena without dragging the mini-boss with them.
Once Cavot Agnan joins the battle after all of their skeletal minions have died, they will soon after cast Radiance, making them and their minions immune to damage. It is advised to start the fight at a safe distance from Cavot Agnan as the Radiance aura and the small Sunbursts launching from it can deal dangerous amounts of damage in quick succession. The safest way to deal with the boss is to never be at a touching distance to them. While Cavot Agnan is casting Radiance, this is the time to focus down any minions still alive. Cavot Agnan is immune to damage during Radiance.
This fight doesn’t necessarily require two tanks and as such, the off-tank can switch to damage dealer gear and skills, or switch to a healer role.
The tank taunting Cavot Agnan should never roll dodge the heavy attack called Smite. Roll dodging the attack means that everybody else will get hit by the attack unless they roll dodge it as well. In higher difficulties Smite will one shot everybody who didn’t roll dodge it with the tank. Furthermore, if the tank dies to Smite, the attack will hit everybody else just like if the tank would have dodged the attack.
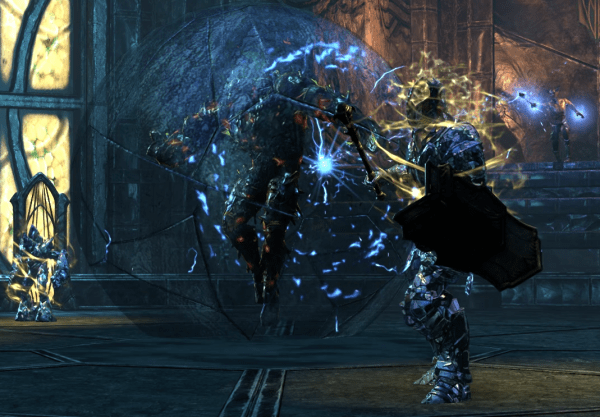
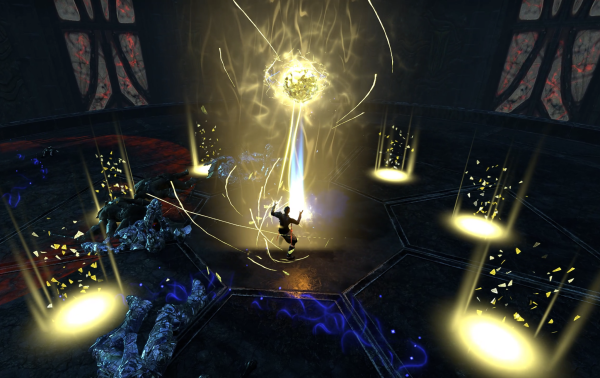
Encounter – Ghost Lights / Wisp Puzzle
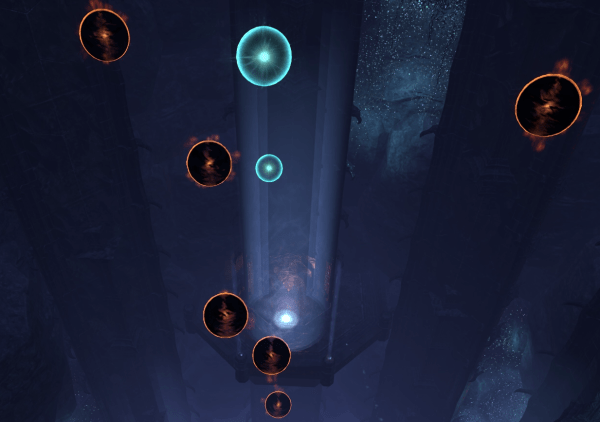
Orange orbs damage stamina while blue orbs restore stamina. Blue platform fully restores stamina.
After dealing with Cavot Agnan, players are faced with a puzzle section of the Lucent Citadel. Looking up players are able to see blue glowing orbs and orange/black glowing orbs. The blue glowing orbs above restore stamina to players who touch it. The orange orbs above depletes the stamina of players who touch it.
In the middle of the arena a blue glowing aura has appeared with a synergy prompt for Ghost Lights. This glowing area has the ability to transform players into wisps. While transformed, players are able to fly around as long as their stamina hasn’t fully depleted (stamina depletes while flying). Furthermore, players also gain two new abilities. In the first ability slot is an icon of a wing. This ability boosts the flying speed of the player for five seconds. The second ability, an icon of a shield, stops the stamina drain of flying for five seconds.
There are also platforms along the way where players can land if their stamina gets depleted. These platforms also have the glowing blue aura which transforms players into wisps.
Players are tasked to fly up to the highest platform which has a door and a way to advance through the trial. Players are able to fly all the way up only touching the blue orbs but this can be quite difficult and may result in a loss of vitality if the player drops down. Once the players reach the platform, they will be turned back to their normal selves and their ultimate points will also be fully restored.
Quick Method for the Puzzle
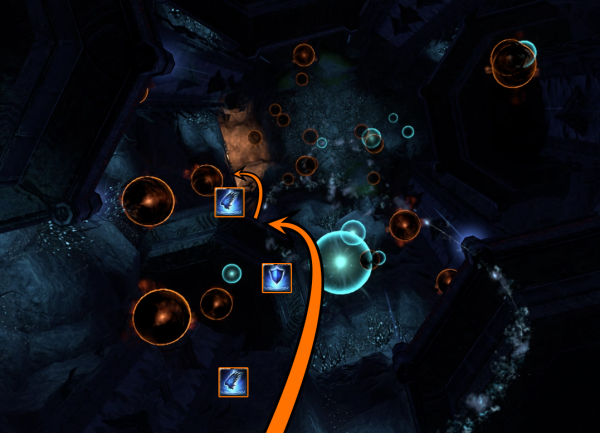
Player standing on the synergy prompt and looking directly up.
Looking directly up, players are able to see the well-lit destination platform. Said platform is lit by several torches creating a distinct orange glow to the destination. On the right, a bit below the destination platform is a glowing blue platform where players will refill their stamina. Keep in mind these two destinations and prepare to activate the synergy to turn into a Ghost Light.
Quick solution:
- Activate Ghost Lights synergy.
- Use the speedup skill with the wing icon (Ghost Light Speed) and head directly to the blue platform (below the final platform, slightly right).
- Use the stamina lock skill with the shield icon (Ghost Light Shield) just before your stamina runs out.
- Quickly restore your stamina at the blue platform and then head directly to the destination.
- Use the speedup skill with the wing icon again.
- Your ultimate is fully restored and the puzzle is solved!
Boss 2 – Orphic Shattered Shard & Xoryn
Orphic Shattered Shard and Xoryn with Crystal Hollow Sentinel and Crystal Atronach.
Boss Mechanics
The Light and Dark mechanics players have faced several times up to this point are now the main focus of the fight itself. The encounter room is a wide circular arena where four massive windows adorn the walls. When players first enter the encounter arena, all four windows are glowing yellow which means that the arena is under Light status. In the arena itself four smaller mirrors are also glowing yellow. These mirrors act as a switch to flip the room between Light and Dark. When a player stands near a mirror, a synergy simply named “Mirror” will appear. Using this synergy applies a damage over time effect on the player while also switching the mirror to the opposite status. When all of the mirrors are switched, the windows turn from yellow to bright red before the whole room and the windows go dark.
The boss encounter contains enemies from both affinities. If the room has enemies with Light affinity, the room has to be switched to Dark as Light enemies are immune to damage under Light status. In the encounter the final boss himself, Xoryn, will assist Orphic Shattered Shard dealing with the intruding players. While Xoryn can be damaged, the fight ends when Orphic Shattered Shard is defeated.
Orphic Shattered Shard
Orphic is a powerful Shattered Shard Daedra who uses both Light and Dark powers in its fight against the invading players.
Attacks:
- Color Change – At 90, 60, 40 and 15 % health thresholds Orphic Shattered Shard begins to channel energies at every mirror in the room. If the color of the room isn’t changed before the channel completes, the players get hit by Incandescent Destruction, wiping the group. If the color of the room gets successfully changed, the players will be hit by Lesser Incandescent Destruction which deals small amounts of damage. On Normal difficulty both of these attacks only deal small amounts of damage.
- The 15 % health threshold Color Change mechanic can be bypassed even in Hard Mode if the group leaves the last Fate Pillar alive and burns the boss down before the Fate Pillar’s Fate Sealer wipes the group. However, this requires very high damage per second from the group and as such, it is not a recommended strategy for no death or clear attempts.
- Heavy Strike – Orphic Shattered Shard’s heavy attack. Blocking the attack applies the status effects Hindered and Rattled. Roll dodging the attack enrages the boss.
- Quick Strike – A basic melee light attack.
- Shard Volley – Orphic Shattered Shard throws a volley of nine shards at the players, preferring the players the furthest away from the boss. These shards fall on the ground creating crystalline spiked areas that deal a significant amount of damage if stood on.
- Shield Charge – At 90, 60, 40 and 15 % health thresholds the Orphic Shattered Shard charges at the center of the room if it isn’t there already.
- Shield Formation – When Orphic Shattered Shard uses Shield Charge, it creates three shields in front of it. The boss itself stops at the middle of the room while the shields continue down in the straight path.
- Shockwave – Orphic Shattered Shard creates a big mace which it uses to slam the ground at its target.The slam causes a sizable shockwave from the point of impact. The shockwave can be rolldodged or blocked.
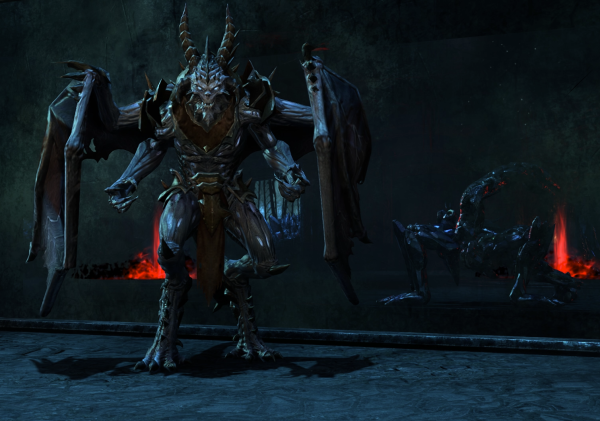
Xoryn
Xoryn is a powerful dremora who assists Orphic Shattered Shard in its fight against the players. Xoryn is also the final boss of the Lucent Citadel trial and therefore, the fight against Orphic isn’t the last time players will come face-to-face with them.
Attacks:
- Heavy Shock – A Lightning Staff channeled heavy attack that ends with an explosion called Lightning Burst.
- Lightning Burst – Explosion part of Xoryn’s Heavy Shock channeled attack. Deals significant amounts of damage.
- Lightning Flood – A big conal attack where Xoryn swipes the air with his staff, creating a burst of lightning. Deals significant amounts of damage. The Lightning Flood can be rolldodged. Xoryn can cast Lightning Flood after around 3 seconds from the encounter start and then every 21 seconds thereafter.
- Shock – A basic ranged light attack.
- Thunder Thrall – Xoryn uses an ability similar to Sorcerer’s Bolt Escape ability to close the distance to the furthest player from Xoryn. Right after closing the gap with the target Xoryn casts an expanding area around it which quickly gets followed by a strike of lightning. After the strike of lightning, four balls of Lightning Arc launch from the explosion. Lightning Arcs deal significant amounts of damage. Xoryn can cast Thunder Thrall after around 8 seconds from the encounter start and around every 25 seconds thereafter.
Other Enemies in the Encounter
Crystal Atronach
A crystalline atronach that shares the model of the more common Frost Atronach.
Attacks:
- Shard Eruption – Crystal Atronach leans back and begins to shoot out small shards of crystal at every player. Can be interrupted with a pull abilities like Silver Leash or Unrelenting Grip.
- Splintered Glass – A range based light attack.
Crystal Hollow Sentinel
A crystalline humanoid sentinel wielding a mace and a shield.
Attacks:
- Heavy Attack – Sentinel’s heavy attack. Blocking the attack applies the status effects Hindered and Rattled. Roll dodging the attack enrages the Sentinel.
- Quick Strike – A basic melee light attack.
- Shield Throw – Sentinel throws its shield in a long straight path dealing significant amounts of damage and stuns players if not blocked. The shield returns to the Sentinel following the same path. This can lead to a nasty combo of getting stunned by the first hit and then getting killed by the second hit from the returning shield.
Fate Pillar
A big crystalline orb that can only be damaged by the Orphic Shattered Shard’s Shockwave ability.
Attacks:
- Fate Sealer – Fate Pillar attaches glowing beams of light at the players. If the Fate Sealer isn’t destroyed in time by the Orphic Shattered Shard’s Shockwave attack, the Fate Sealer’s beam charges up, killing the players.
Gloom Shaper
Gloomy humanoid caster.
Attacks:
- Flare – A basic ranged light attack.
- Infero – Interruptible channeling attack where Gloom Shaper lifts its staff up in the air and begins to shoot small fire balls at random players.
Ruinach
Dangerous four-armed Daedra.
Attacks:
- Bouncing Flames – Ruinach throws its weapons at the player. After the weapon hits the player, it drops on the ground creating a small fiery explosion. Ruinach only uses this attack if its target is not at melee distance.
- Dancing Flames – Ruinach slams its blades into the ground and creates two fiery tornadoes that circle around the spot. This ability deals a significant amount of damage and should be avoided.
- Frenzy – Ruinach’s heavy attack. Blocking the attack applies the status effects Hindered and Rattled. Roll dodging the attack enrages the Ruinach.
- Slice – A basic light attack
- Whirlwind Dash – Ruinach dashes forward in a straight path while spinning its blades, dealing significant amounts of damage and stuns players if not blocked.
Overview of the Encounter
Default positions with second healer kiting Xoryn’s upcoming Thunder Thrall mechanic.
The second boss encounter embodies the theme of dark and light affiliations. In the first boss encounter against Count Ryelaz and Zilyesset players had to fight the bosses in two separate rooms, one light and one dark. Here against the Orphic Shattered Shard and Xoryn players have only one room to deal with. As seen in the previous encounter, light and darkness affiliations can cause enemies to become immune to damage or vulnerable to damage. The immunity buffs enemies have are called “Light IMM” and “Dark IMM” internally. When players first arrive in the boss arena, the arena is lit by massive glowing mirrors/windows. This indicates that the arena is under light status and therefore light affiliated enemies are immune to damage. In the circular arena itself are four smaller mirrors also glowing yellow. When a player approaches said mirrors a synergy called “Mirror” pops up. Using the synergy swaps the light status of the mirror to the dark status. When all the mirrors in the arena have been swapped to dark, the whole room switches to the dark status. Do note that interacting with a mirror starts the boss encounter and inflicts the player with a 30 second bleed that stacks with every mirror swapped.
Light Affiliated Enemies
- Crystal Hollow Sentinel
- Crystal Atronach
- Orphic Shattered Shard*
Dark Affiliated Enemies
- Ruinach
- Gloom Shaper
- Orphic Shattered Shard*
Before starting the fight specific mirrors should be assigned to players. While at the start of the encounter the arena has only four mirrors, by the end there are eight mirrors in total. In normal difficulty one player is able to swap all the mirrors on their own but it is not recommended for being a slow method to execute. In harder difficulties the bleed from mirror swapping stacks high enough where even a tank isn’t able to swap all of them on their own. The two main ways to assign mirrors to players are to either number the mirrors or use compass points. In this guide the mirrors are referred to as points in the compass as the numbering convention can differ from one group to another.
Quick way to see if Mirror needs to be swapped during Color Change is to check for the red/orange line connecting the Orphic Shattered Shard to the Mirror.
Mirror spawns:
- Start: North East, North West, South East, and South West.
- After 90 % Color Change: East and West.
- After 60 % Color Change: North and South.
The encounter arena houses contained Orphic Shattered Shard and Xoryn at the back. Neither of these bosses can be attacked before the waves of lesser enemies are defeated. In the arena there are two Crystal Hollow Sentinels and four Crystal Atronachs. These enemies are light affiliated and are therefore immune to damage until players swap the four mirrors in the arena into dark status. For these waves tanks commonly split the room in two and taunt the enemies from their side of the room and take them in front of the Orphic Shattered Shard.
Waves:
- 2x Crystal Hollow Sentinels and 4x Crystal Atronachs.
- 2x Ruinachs and 4x Gloom Shapers.
- 1x Crystal Hollow Sentinel, 1x Ruinach, 2x Crystal Atronachs and 2x Gloom Shapers.
Once all three waves of enemies are defeated, Orphic Shattered Shard bursts out from the sphere holding him, knocking back all the players too close to it. It is recommended to step outside the inner circle in the arena to avoid the stun from the explosion. With Orphic Shattered Shard being free to engage the players, Xoryn also joins the encounter.
Xoryn
Dealing with Xoryn usually requires two players; the off-tank and a healer. Off-tank’s duty is to keep Xoryn taunted and make him face away from the group. Off-tank should also keep Xoryn somewhere near the group but not directly in the group itself. This ensures that the off-tank gets healed and the off-tank buffs reach the group. Xoryn also has a Lightning Staff channeled heavy attack ability that ends with an explosion called Lightning Burst which deals a significant amount of damage to players in the explosion radius.
Depending on the group, some strategies have the main tank tanking all of the minions that spawn while in some strategies the off-tank helps tanking some of the enemies to help reduce the damage taken by the main tank. The heavy attacks from the elite enemies apply status effects Hindered and Rattled which makes tanking everything alone quite a dangerous task. A common strategy for the off-tank is to taunt the last two ruinachs that spawn and keep them away from the group (comically can be done by just running around the arena, avoiding their hits). These ruinachs then get ignored by the group who focus on burning the boss down.
One of the healers should assist the off-tank with dealing with Xoryn. Xoryn casts an ability called Thunder Thrall at around every 25 seconds (around 8 seconds from the encounter start) which targets the player furthest from Xoryn. Do note that this ability has maximum range and therefore if the off-tank is against a wall with Xoryn and the healer is at the opposite side of the room, this can out range the ability and Xoryn jumps to the next furthest player. The healer helping the off-tank should always be mindful of Xoryn’s position and try to get Xoryn to jump to a safe location.
Xoryn doesn’t need to be focused by the group and Xoryn doesn’t have to be subdued. The encounter ends when the Orphic Shattered Shard is defeated.
Orphic Shattered Shard and Color Change
The fight against Orphic Shattered Shard can be segmented by the boss health thresholds. All but one segment indicate Color Change mechanic. At 25 % boss health threshold Xoryn leaves the arena, leaving the Orphic Shattered Shard to fight the players alone with its minions. In hard mode 15 % boss health threshold has one more spawn of enemies. If the group has high damage, the arena will very likely contain 25 % and 15 % Ruinach spawns at the same time. Here it is quite common for the off-tank to taunt 15 % Ruinachs and kite them around while the group finishes off the Orphic Shattered Shard.
Boss Health Thresholds:
- 90 % – Color Change. 4x Mirrors. 1x Crystal Hollow Sentinel and 4x Crystal Atronachs.
- 60 % – Color Change. 6x Mirrors. 1x Ruinach and 4x Gloom Shapers.
- 40 % – Color Change. 8x Mirrors. 1x Crystal Hollow Sentinel and 4x Crystal Atronachs.
- 25 % – 2x Ruinachs and 4x Gloom Shapers (Xoryn leaves the arena)
- 15 % – Color Change. 8x Mirrors. 2x Ruinachs and 4x Gloom Shapers (hard mode only).
The 15 % Color Change mechanic and the minion spawns that come from it can be bypassed by leaving the last Fate Pillar alive and killing the Orphic Shattered Shard before Fate Pillar uses its Fate Sealer ability. While Fate Pillar is alive, the Orphic Shattered Shard can’t cast Color Change. In normal and veteran difficulties the Orphic Shattered Shard casts two Shockwaves before Fate Pillar casts Fate Sealer. In hard mode the group only gets one Shockwave before the Fate Sealer.
One of the Orphic Shattered Shard’s main abilities is called Shockwave. Visually Shockwave ability starts with the Orphic Shattered Shard conjuring a mace, lifting it up above its head. This creates a red circle under the player it is targeting, indicating the spot where the Orphic Shattered Shard will slam its mace onto. The Orphic Shattered Shard holds the Shockwave cast for around 3 seconds before slamming the mace on the ground. The main tank can just block the slam as it isn’t too threatening to the tank itself. After the slam, however, the Shockwave portion of the attack appears. An expanding circle originates from the point of the slam, dealing a significant amount of damage to non-tank players if unblocked.
The Fate Pillar can only be destroyed by the Orphic Shattered Shard’s Shockwave ability. When Fate Sealer spawns, the main tank should take the Orphic Shattered Shard to the Fate Pillar and wait for the Shockwave cast. The Shockwave slam destroys the Fate Pillar, which ends the Fate Sealer cast. At this point the main tank can either keep the boss where it is or take it back to the middle. One tactic is to keep the boss where it is and turn the boss to face towards the middle of the room where it will Shield Charge back into at Color Change thresholds. While turned to face the middle, the group changes their positioning to be behind the boss aka the group will have their backs against the arena wall.
The Fight in a Nutshell:
- Designate mirrors to players.
- Swap mirrors to change the arena’s status from light to dark and vice versa (enemies are immune to damage if the arena is in their affiliated status).
- During Color Change the arena’s status must be changed or the group wipes.
- Off-tank and Healer kites Xoryn’s Thunder Thrall casts.
- Main tank destroys Fate Pillars by taking the Orphic Shattered Shard to them and waiting for the boss to cast Shockwave.
Carrying the Arcane Knot
A player activating the Arcane Knot which creates 6 glowing circles that players need to activate with a synergy prompt.
After the Orphic Shattered Shard has been defeated, a new hard mode banner has appeared in the encounter arena with the Arcane Knot glowing in the middle of the room. Players are tasked with carrying the Arcane Knot back to the starting point of the trial, backtracking most of the path the players took to get this far. For this collection of encounters players have to decide what gear they will be using for the rest of the trial as players will stay in combat until the Arcane Knot has been delivered to its destination.
WARNING! Group wipe while carrying the Arcane Knot (all players dead) means that the group goes back to the start of the encounter, even at the final boss.
To start the final encounter gauntlet a player needs to press an activation key under the Arcane Knot. After the activation, 6 glowing circles appear around the Arcane Knot. Players need to stand on these circles and activate the synergy prompt at the same time. If players manage to press all of the synergies in time, the player who activated the Arcane Knot gets to carry it first.
Grabbing the Arcane Knot will apply an Arcane Knot debuff with a duration of 2 minutes on normal difficulty, 1 minute on veteran and 45 seconds on hard mode. This is the duration a player gets to carry the Arcane Knot before it drops on the ground.
Once the Arcane Knot is in the possession of the players, the group will be teleported just outside the encounter room and the journey back begins.
Enemies in the Encounter
Carrying the Arcane Knot back to the trial start is a tough process and there are several enemies and encounters trying to prevent this from happening.
The Arcane Knot
The Arcane Knot is a powerful object the players were tasked to retrieve from the Lucent Citadel. The Arcane Knot has few different ways it can damage the player carrying it and everybody nearby. While the Arcane Knot can only be carried by one player at a time, more than one player is needed inside the glowing aura of the Arcane Knot. The glowing aura around the player carrying the Arcane Knot applies a strong slow effect that can only be fully mitigated if 6 players are inside the glowing aura.
Mechanics:
- Arcane Knot – Grabbing the Arcane Knot will apply an Arcane Knot debuff with a duration of 2 minutes on normal difficulty, 1 minute on veteran and 45 seconds on hard mode. This is the duration a player gets to carry the Arcane Knot before it drops on the ground. This debuff applies a glowing aura around the player carrying the Arcane Knot which inflicts a strong slow effect that can only be fully mitigated by having 6 players in the aura.This debuff ends with Arcane Collapsing where the Arcane Knot fractures and drops on the ground, applying Splintered Passage debuff on players inside the effect radius which lasts 3 minutes on veteran difficulty and 8 minutes on hard mode. If a player with Splintered Passage debuff tries to carry the Arcane Knot again, they will be instantly killed.
- Arcane Swarm – When the Arcane Knot is not carried by any player for 5 seconds, the Arcane Knot will start damaging the players with Arcane Swarm. This is a very dangerous mechanic that players need to be aware of. The Arcane Knot should always be carried by somebody to prevent a swift group wipe.
- Temporal Splinters – A damage overtime effect that applies to the player carrying the Arcane Knot. The damage increases over time.
Arcane Sentry
A floating orb that guards the Lucent Citadel. Arcane Sentries can’t be killed.
Attacks:
- Piercing Gaze – A beam attack that targets a player. Targeted players will have a red symbol floating above them. The targeted players should kite the beam out of the group.
Baron Rize
A Grievous Twilight blocking the path forwards. Baron Rize uses the same attacks as Count Ryelaz.
Attacks:
- Shear – Baron Rize’s heavy attack. Blocking the attack won’t inflict Hindered or Rattled. After the heavy attack meteors (Gloomy Impact) will drop on 11 closest players to Baron Rize. The meteor damage can stack and players should avoid stacking with each other while meteors are falling from the sky.
- Slash – One of Baron Rize’s light attacks.
- Swipe – One of Baron Rize’s light attacks.
- Rend – One of Baron Rize’s light attacks.
- Twinstrike Sunder – Baron Rize hits the tank with a quick swipe followed by a blue magical orb range attack. Every player behind the tank will be hit by the magical orb portion of the attack. While the attack itself isn’t strong enough to pose a significant threat to players, it can cause enough damage to combo out players with the damage from the Arcane Knot.
Crystal Atronach
A Crystal Atronach spawns when the Arcane Knot fractures. Crystal Atronachs deal a lot of damage to the player they are targeting and are therefore a dangerous enemy. However, because Crystal Atronachs spawn with the Arcane Knot timer, stopping to focus on the Atronachs is not advisable.
Attacks:
- Atronach Growth – The Crystal Atronach grows in size, becoming more dangerous.
- Crushing Shards – Strong melee heavy attack.
- Crunch – A strong melee attack.
- Crystal Spear – A melee based light attack.
- Splintered Burst – Crystal Atronach raises its leg followed by a red hollow circle appearing under its target which rapidly fills up. Once the red circle has become solid, the atronach stomps its leg and an eruption of crystalline shards strike from under the target. This crystalline area stays on the ground for over 30 seconds. The targeted player should take the eruption away from the group to a safe location. This attack can be roll-dodged.
- Unwritten Shift – The Crystal Atronach teleports closer to its target.
Dariel Lemonds
A dangerous humanoid mini-boss trying to stop the players from taking the Arcane Knot.
Attacks:
- Arcane Conveyance – Dariel Lemonds tethers the Arcane Knot carrier and the player furthest away from the Arcane Knot with a golden beam. The targeted players’ screen will turn blue for a few seconds before the tether activates. This tether will kill any non-tethered player who touches it.
- Powerful Throw – Dariel Lemonds throws his weapon at the targeted player while Dariel themself disappears. When the weapon hits the ground, the ground explodes dealing a significant amount of damage to players in the radius. After the explosion Dariel Lemonds appears in the spot the weapon hit the ground at.
- Quick Strike – A melee based light attack.
- Shard Shield – A damage shield which Dariel Lemonds casts on themself.
- Uppercut – A melee based heavy attack. Blocking the attack applies the status effects Hindered and Rattled. Roll dodging the attack enrages the atronach.
Defense Prism
Defence Prisms are large levitating crystals that guard the path forward. While a Defense Prism is alive, the path forward is blocked by a wall of crystals. The Defense Prisms have a similar rejuvenation ability to that of Count Ryelaz and Zilyesset. In hard mode players have only 10 seconds to kill the Defense Prisms before they rejuvenate.
Attacks:
- Detonation – Defense Prism targets a player and drops 6 small glowing orbs under the player which explode after a few seconds.
Jresazzel
A dremora mini-boss who carries a mace and a shield.
Attacks:
- Low Slash – A melee based attack that deals a significant amount of damage to non-tanks.
- Power Bash – A melee based heavy attack.
- Quick Strike – A melee based light attack.
- Shield Throw – Jressazzel throws their shield in a long straight path dealing significant amounts of damage and stuns players if not blocked. The shield returns to Jresazzel following the same path. This can lead to a nasty combo of getting stunned by the first hit and then getting killed by the second hit from the returning shield.
Mzrelnir
A massive skeletal colossus hanging out in the background. While the Necromancers are alive, Mzrelnir is assisting them in the encounter.
Attacks:
- Necrotic Barrage – A hard mode only mechanic. Mzrelnir throws a giant skull at the player carrying the Arcane Knot. When the skull hits the ground, it creates a damaging rune on the ground. The hit from the skull does a significant amount of damage and should be avoided.
- Necrotic Rain – Mzrelnir rains down small blue areas of effect to all players. Damage from the Necrotic Rain can stack, so it is advised to stay slightly separated from other players.
Mirrormoor Mantikora
A deceptively dangerous foe guarding the steps. When players see that the Mirrormoor Mantikora is about to throw its javelin, everybody should roll-dodge to avoid being killed in higher difficulties. Mirrormoor Mantikora will throw the javelin immediately when a player gets close enough down the steps.
Attacks:
- Glazed Backhand – Mirrormoor Mantikora’s basic melee attack.
- Lustrous Javelin – Mirrormoor Mantikora throws a javelin at a player, dealing a significant amount of damage.
Necromancer
Necromancers have summoned Mzrelnir to aid them in battle and only when all of the Necromancers are dealt with, will Mzrelnir be defeated. There are 8 Necromancers in veteran and hard mode difficulties and 4 in normal difficulty.
Attacks:
- Induce Horror – Necromancer targets a player with a ghost that fears players who get touched by it.
- Necrotic Ritual – A small circle that the Necromancer will cast under a player. By itself not a dangerous mechanic, but damage can stack with other mechanics.
- Necrotic Spear – A range based light attack.
Skeleton
A weak enemy that spawns throughout the encounter. Notable for applying Hamstrung with its attacks.
Attacks:
- Rending Slash – A melee attack.
- Slash – A basic light melee attack.
Xynizata
A dremora mini-boss who carries a staff.
Attacks:
- Crystal Bolt – A ranged light attack.
- Crystal Burst – Xynizata casts 4 bursting crystals under targeted players.
- Piercing Beam – A big beam of light that deals a significant amount of damage to any player touching it.
- Vitrify – A channelled attack that quickly slows down the targeted player’s movement speed. This attack can be interrupted.
Overview of the Encounter
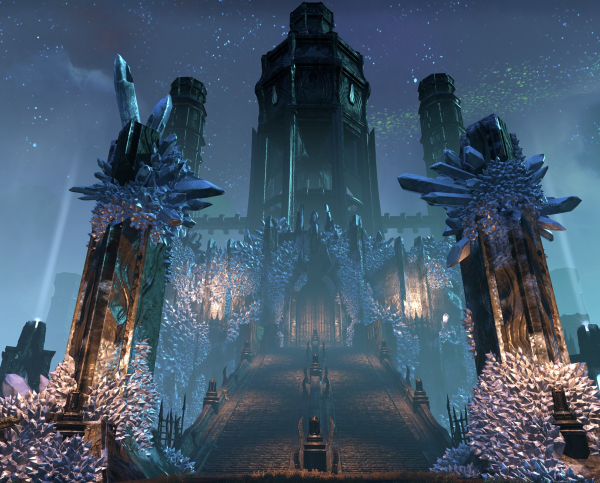
The building where the Arcane Knot is housed in.
Grabbing the Arcane Knot will apply an Arcane Knot debuff with a duration of 2 minutes on normal difficulty, 1 minute on veteran and 45 seconds on hard mode. This is the duration a player gets to carry the Arcane Knot before it drops on the ground.
The group needs to decide in which order the Arcane Knot will be carried because in veteran and in hard mode difficulties Arcane Knot carriers will be inflicted with a Splintered Passage debuff that prevents them from safely carrying the Arcane Knot for 3 minutes on veteran difficulty and 8 minutes on hard mode.
While the Arcane Knot can only be carried by one player at a time, more than one player is needed inside the glowing aura of the Arcane Knot. The glowing aura around the player carrying the Arcane Knot applies a strong slow effect that can only be fully mitigated if 6 players are inside the glowing aura.
Once the Arcane Knot is in the possession of the players, the group will be teleported just outside the encounter room and the journey back begins.
Players will find themselves on top of the stairs they took to reach the Orphic Shattered Shard. At the bottom of the stairs a Mirrormoor Mantikora awaits the players. It is important to note that the Mirrormoor Mantikora will throw a javelin at a player when the players get close enough to it. This javelin throw will kill any non-tank players in veteran and hard mode difficulties. In normal difficulty the javelin is unlikely to be enough to one shot, but it will do a significant amount of damage to the player.
There are two main methods to deal with this starting javelin throw:
- Players all dodge roll the moment they see the Mirrormoor Mantikora throwing its javelin.
- Players let a tank go first, grabbing the taunt before Mirrormoor Mantikora can attack anybody else.
After the Mirrormoor Mantikora has been taunted, the group shouldn’t stay put and focus on the Mirrormoor Mantikora. Instead, players should keep damaging it while running to the first Defense Prism. Defense Prisms are floating crystals that block the way forward with crystalline walls. The Mirrormoor Mantikora should be taken to the Defense Prism, while the players focus the Defense Prism down. At this point the Mirrormoor Mantikora will most likely die in normal difficulty. In veteran and hard mode difficulties players still shouldn’t focus on the Mirrormoor Mantikora and the groups should just continue forward once the Defense Prism has been destroyed.
The next area will also have one Defense Prism that can spawn in 4 different locations. The spot where the Defense Prism is, will be the path forward once it has been destroyed. This area also houses Arcane Sentries which are floating orbs that target random players with their beam attack. Arcane Sentry can’t be killed and the player targeted with the beam attack should just kite the beam away from the group. In veteran difficulty the Mirrormoor Mantikora will most likely die at this point.
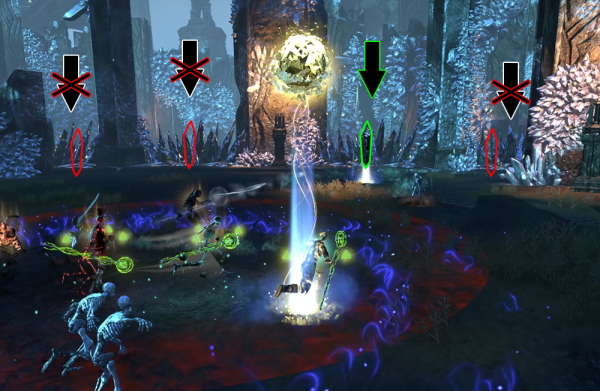
Defense Prism can spawn in one of the 4 spots. Crystal wall behind the Defense Prism is the one to open after the Defense Prism has been dealt with.
The next area houses 2 Defense Prisms, Arcane Sentries and a mini-boss called Dariel Lemonds. At this point in hard mode difficulty with good dps the group will most likely have their first Arcane Knot fracture, where the Arcane Knot drops on the ground and somebody else needs to carry it. Everytime the Arcane Knot fractures and drops on the ground, a Crystal Atronach will spawn (excluding normal difficulty). Crystal Atronachs deal a significant amount of damage with their attacks and in hard mode will most likely one shot any non-tank players. Players should try to do as much damage as possible to the Crystal Atronachs without specifically targeting them, just like with Mirrormoor Mantikora.
Dariel Lemonds has two notable mechanics players need to know about:
- Arcane Conveyance – Dariel Lemonds tethers the Arcane Knot carrier and the player furthest away from the Arcane Knot with a golden beam. The targeted players’ screen will turn blue for a few seconds before the tether activates. This tether will kill any non-tethered player who touches it.
- Powerful Throw – Dariel Lemonds throws his weapon at the targeted player while Dariel themself disappears. When the weapon hits the ground, the ground explodes dealing a significant amount of damage to players in the radius. After the explosion Dariel Lemonds appears in the spot the weapon hit the ground at.
In this guide a healer is carrying the Arcane Knot and therefore they will be targeted by Dariel Lemonds with the Arcane Conveyance. In this guide the other healer stays behind the group which means they will be the furthest away player and therefore Dariel Lemonds will target the other healer with the Arcane Conveyance as well. Once the Arcane Conveyance turns the targeted players’ screen blue, they will go down the stairs and stay there. The rest of the group stays up the stairs in order to not accidentally touch the deadly tether created by Dariel Lemonds. The tethered players can be close together at the edge of the stairs near the group. In the encounter picture the healers are wide apart for demonstration purposes.
A common tactic here is to quickly destroy the closest Defense Prism and then move to the next Defense Prism where Dariel Lemons and the Mirrormoor Mantikora will be defeated.
Two Defense Prisms and Dariel Lemonds. The Top Defense Prism has been destroyed. Picture has both healers tethered by the Arcane Conveyance with H1 being the Arcane Knot carrier.
After destroying the Defense Prisms and defeating Dariel Lemonds the path forward opens. The next encounter area houses yet another mini-boss; Baron Rize. Baron Rize is a powerful Grievous Twilight that possesses most of the same mechanics as Count Ryelaz.
Things to note with Baron Rize:
- The meteor strikes (Gloomy Impact) will only target 11 players. The furthest away player won’t be targeted by it.
- Because 1 player won’t be targeted by meteors, this player should be the Arcane Knot carrier.
In this guide one of the healers is carrying the Arcane Knot which will most likely fracture during the fight against Baron Rize. After the Arcane Knot drops on the ground, a damage dealer could be the one to pick it up next.
As Baron Rize is very mechanically similar to Count Ryelaz, the fight should be pretty simple to deal with. Once Baron Rize is defeated, the middle platform begins to glow. This platform is the only way forward and it teleports the group to the other side of the room.
Baron Rize formation where a healer is carrying the Arcane Knot. Meteors won’t drop to the player furthest away from Baron Rize, in this case the Arcane Knot carrier.
Next corridor houses three Lucent Sentries. Their beam attacks do a significant amount of damage. The glowing yellow beams can be dodge rolled through, so the group doesn’t have to wait for the beaming to stop.
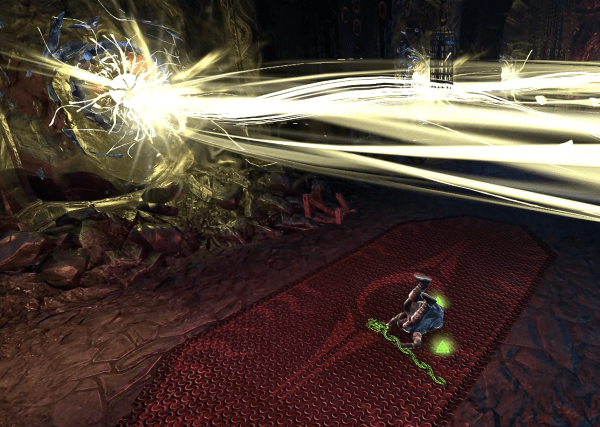
Player dodge rolling through the Lucent Sentry’s beam.
The next area is most likely the hardest part to get through without deaths in hard mode difficulty. The first platform houses one Defense Prism that is slowly levitating around the platform. Behind the crystalline wall players can see a massive bone colossus called Mzrelnir in the background with Necromancers blocking the way forward. As long as even one of the Necromancers is alive, Mzrelnir will be there attacking the group. Mzrelnir can’t be attacked or damaged and it will only leave the battle once all of the Necromancers are dealt with. There are 8 Necromancers in veteran and hard mode difficulties and 4 in normal difficulty.
Mzrelnir has two main mechanics:
- Necrotic Barrage – A hard mode only mechanic. Mzrelnir throws a giant skull at the player carrying the Arcane Knot. When the skull hits the ground, it creates a damaging rune on the ground. The hit from the skull does a significant amount of damage and should be avoided.
- Necrotic Rain – Mzrelnir rains down small blue areas of effect to all players. Damage from the Necrotic Rain can stack, so it is advised to stay slightly separated from other players.
This guide shows two different ways to deal with the Necromancers:
- [A] Group stacks against the wall with the first Defense Prism and waits for the Necromancers to walk up the stairs. This method is very simple and easy, but it is slow. Note that in hard mode difficulty Mzrelnir throws giant skulls at the Arcane Knot carrier and therefore the carrier should stand slightly away from the group.
- [B] Group stacks against the wall like in the method A but in this version Off-Tank runs ahead and taunts all of the Necromancers. After the Off-Tank has taunted the Necromancers, Off-Tank runs against a pillar and begins to Line of Sight (LoS) the Necromancers. Breaking Line of Sight forces the Necromancers to walk to the Off-Tank, which creates a tight grouping. Once the Necromancers are stacked, the group will run to the Off-Tank to swiftly deal with the Necromancers. Do note that if Mzrelnir’s Necrotic Rain is about to happen, it is best to wait it out before moving forward.
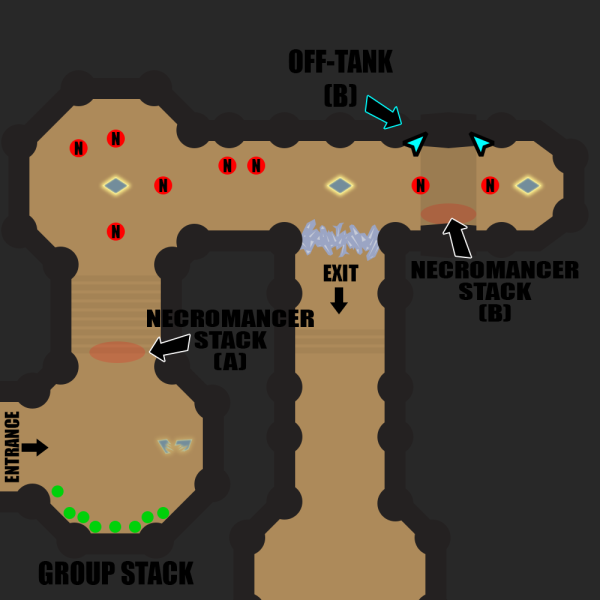
Two different Necromancer stacking methods: A and B.
After Necromancers are defeated and Mzrelnir has disappeared, the players have to destroy the 3 Defense Prisms almost at the same time for the path forward to open.
Off-tank stacks the Necromancers by using line of sight (LoS) against the Necromancers by hiding behind the sides of the pillar.
The next corridor houses 3 more Lucent Sentries. Dodge roll through these and keep going forward.
The next encounter room houses 4 Defense Prisms and two mini-bosses; Jresazzel and Xynizata. Just like with method B at the Necromancers, the Off-Tank can use Line of Sight (LoS) to force Xynizata to walk closer to the Defense Prism. In this guide the two mini-bosses are burned down at the first Defense Prism. While this is happening the group should also destroy the other Defense Prism nearby. Once the mini-bosses are defeated, the group will destroy the other two Defense Prisms to open the path forward to the final boss of the raid; Xoryn.
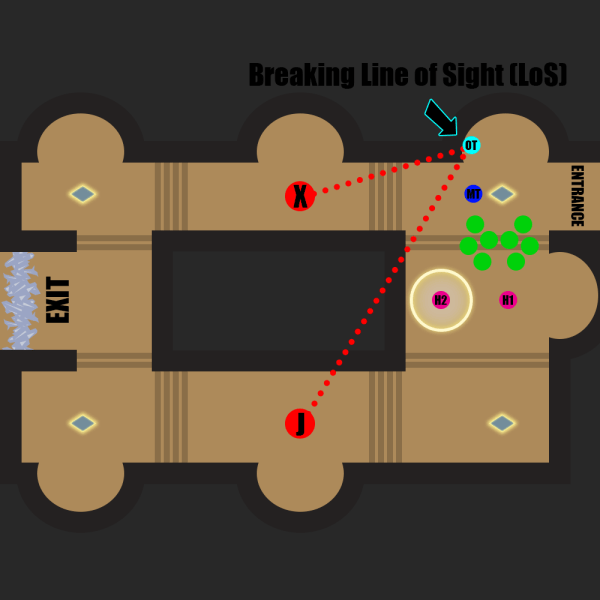
Off-Tank taunts Jresazzel and Xynizata and breaks the Line of Sight by going behind a wall, forcing the enemies to walk next to the Defense Prism.
Boss 3 – Xoryn

Xoryn appears with a flash of lightning and stops the players from taking the Arcane Knot out of the Lucent Citadel.
Boss Mechanics
The Arcane Knot encounter has just one more obstacle for players to deal with; Xoryn. While Xoryn has their own section in the guide, Xoryn is still a part of the whole Arcane Knot encounter and as such, group wipe at Xoryn sends the group back to the start of the Arcane Knot encounter.
Do note that in normal and in veteran difficulty, recovering from player deaths is not too difficult as long as the Arcane Knot is always carried by someone. In hard mode this fight can prove to be an entirely different beast altogether, or at least while still learning it.
Xoryn
Xoryn is a powerful dremora who the players have faced before at the fight against the Orphic Shattered Shard. In this final fight Xoryn doesn’t use Thunder Thrall anymore, but their lightning staff heavy attack has seen a massive upgrade to its function.
Attacks
- Accelerating Charge – Xoryn’s channeled heavy attack that ends with the targeted player receiving a debuff called Weakening Charge and Chain Lighting jumping from player to player.
- Weakening Charge – This debuff is only applied in veteran and hard mode difficulties and lasts for 20 seconds. A player with Weakening Charge debuff can’t take another Accelerating Charge attack or they will be one shot from the damage. This means the tanks have to swap taunts after every Accelerating Charge.
- Chain Lightning – Jumps from the player targeted by Accelerating Charge and it will hit every player in the encounter. In hard mode players have to block the Chain Lightning or risk being one shot by it. In veteran and normal difficulties players should also block the attack as it will do a significant amount of damage. What makes this mechanic dangerous is the fact that it can take a while for it to jump through every player. This means that the last player hit by the Chain Lightning might have dropped their block before they get hit by it and in hard mode they risk being one shot by it.
- Fluctuating Current – A blue lightning circle that gets applied to the player furthest away from Xoryn. This mechanic happens in all difficulties but only poses a significant threat in hard mode. In normal and in veteran difficulties Fluctuating Current can be held by one player (usually the healer) the whole time it is active. It will do a significant amount of damage in veteran, but it is possible to outheal it. A player can pass the Fluctuating Current to another player by making them touch the circle.
- Hard mode: Fluctuating Current lasts for 60 seconds. One player can hold the Fluctuating Current for only 15 seconds before the damage from it will one shot the player, even the tanks. This timer forces players to swap who is holding the Current every 10-15 seconds. The player who had the Fluctuating Current before passing it to another player receives a debuff called Overloaded Current for 90 seconds. In hard mode players with this debuff active will be one shot by Fluctuating Current if they touch it.
- In a Nutshell:
- Player holds the Fluctuating Current for 10-15 seconds before another player takes it by touching it.
- Same player can’t take Fluctuating Current again for 90 seconds (Overloaded Current debuff).
- In a Nutshell:
- Hard mode: Fluctuating Current lasts for 60 seconds. One player can hold the Fluctuating Current for only 15 seconds before the damage from it will one shot the player, even the tanks. This timer forces players to swap who is holding the Current every 10-15 seconds. The player who had the Fluctuating Current before passing it to another player receives a debuff called Overloaded Current for 90 seconds. In hard mode players with this debuff active will be one shot by Fluctuating Current if they touch it.
- Shock – Xoryn’s ranged light attack.
- Tempest Assault – Xoryn summons 6 Mirrors in normal and veteran difficulties while in hard mode Xoryn will summon 12 Mirrors. These mirrors appear in the alcoves at the edges of the encounter arena. The Mirrors will target players with a beam-like attack which players have few seconds to prepare for. Players have to position themselves so that they won’t be hit by more than 1 Mirror. In normal and veteran difficulties this doesn’t require special positioning and the 6 players who are targeted by the Mirrors can quickly position themselves so that they won’t be hit by more than one of them.
- Hard mode: All 12 players will get targeted by the Tempest Mirrors at around every 30 seconds. At the time of writing this guide there have been two common ways to position players for this mechanic:
- A line of players going from the entrance to the exit.
- A circle of players around the arena.
- Hard mode: All 12 players will get targeted by the Tempest Mirrors at around every 30 seconds. At the time of writing this guide there have been two common ways to position players for this mechanic:
This guide uses the circle formation.
Overview of the Encounter
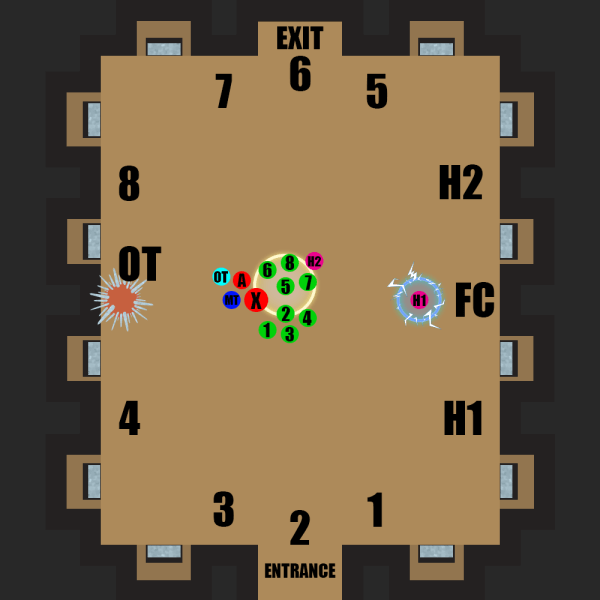
Positions for the Xoryn fight. The Fluctuating Current holder is behind the group. The Arcane Knot is carried by a damage dealer and Crystal Atronach’s Splintered Burst has been placed against the wall behind the tanks. The numbers indicate spots for the Tempest Mirrors mechanic.
The final boss fight against Xoryn is relatively simple in nature but very dangerous in hard mode difficulty. In normal and veteran difficulties recovering from deaths should be doable as long as the Arcane Knot is being carried by somebody. This guide uses the circle formation for the Tempest Mirrors as the basis for player positioning.
The final encounter is mainly timer based which means that players don’t have to hold back damage for certain health threshold mechanics. This is also the reason for the fight being relatively simple in nature but quite punishing in hard mode.
The group should go into the boss room with a fresh timer on the Arcane Knot. If the Arcane Knot carrying timer still has a few seconds left before the boss fight, the group should wait outside of the room for the Arcane Knot to drop on the ground first.
- The first timer based mechanic the group is faced with is the Chain Lightning. Xoryn will heavy attack the tank which in turn applies a Weakening Charge debuff to the tank. While this debuff is active, the tank can’t take another heavy attack or they will be one shot in hard mode. This means that the two tanks have to switch taunts after every heavy attack. Once the heavy attack finishes, a Chain Lightning jumps from player to player, hitting all the players once in the encounter room. In hard mode Chain Lightning must be blocked or risk being one shot by it.
- The next timer based mechanic is the Fluctuating Current. The player furthest away from Xoryn will get a Fluctuating Current circle applied to them. In the encounter positioning picture this player is H1 aka one of the healers. The player with Fluctuating Current has to stay away from the group as touching the circle will transfer it to the player who touched it. In hard mode, the player can only hold the Fluctuating Current for 15 seconds before being one shot by it. This means that the group has to determine an order for players to hold the Fluctuating Current. While deciding the order, keep in mind that the Arcane Knot has to be carried by one player and these duties shouldn’t be done at the same time.
- The third timer based mechanic is the Tempest Assault aka the Mirrors. The Mirrors appear at around every 30 seconds. Before the Mirrors appear, the players should already start moving to their designated positions. The Fluctuating Current holder stays in the spot where the Fluctuating Current is being held at and the same goes for the Arcane Knot and one of the tanks tanking Xoryn. When players are at their own positions, the players should only do slow movements to move the Mirror’s beam. Quick movements combined with latency can cause a domino effect where several players will also quickly adjust which in turn can cause overlapping Mirror beams.
While the timer based mechanics are going on the Arcane Knot has its own mechanics still in play. In veteran and hard mode difficulties the Arcane Knot fracturing will cause a Crystal Atronach to spawn. The Crystal Atronach should be taunted by the tank currently not tanking Xoryn. This is because the Crystal Atronach has a mechanic called Splintered Burst which will create a big damaging circle of crystals. The tank taunting Crystal Atronach should quickly run against the wall when Splintered Burst is about to happen so that the AoE won’t drop on the other tank or the group. The Crystal Atronach should always be positioned as close to Xoryn as possible for optimal cleave damage.
In Trials/Raids it’s quite common to have the group split into two groups of 6 players. This helps with buff and healing applications, most notably things like Master Architect & War Machine. With the Arcane Knot we can use this setup as a way to move the group while the Arcane Knot is fracturing. Let’s say that the Arcane Knot is being held by a damage dealer on the right side group. In this case said player should take a few steps more towards the back right when the Arcane Knot is fracturing while the other players from this group quickly move to the left group. This ensures that the Arcane Knot carrier stays in the range of healing while the Arcane Knot fractures. When the Arcane Knot is fracturing it is dealing a significant amount of damage to the carrier and if the player runs away from the group while this is happening, they may succumb to the damage if the healers don’t react to it fast enough. The player carrying the Arcane Knot should always try to move as little as possible.
The Fight in a Nutshell:
- Block Chain Lightning and tanks switch taunts on Xoryn and Crystal Atronach.
- Swap Fluctuating Current holder every 10-15 seconds. Determine the player order before the fight.
- Players position themselves for the Tempest Mirrors. Fluctuating Current Holder stays still in the Fluctuating Current spot, the same with the tank taunting Xoryn and the Arcane Knot carrier.
- Drop the Arcane Knot next to the group, avoid moving too much. Determine the Arcane Knot carrying order before the fight.
- Tank with Crystal Atronach should quickly take Splintered Burst away from the group.
Once Xoryn has been defeated, the encounter still isn’t over yet! The Arcane Knot must be taken to the Null Arca for safe keeping. The doors to outside have been opened and the NPCs are eagerly waiting for the players to turn in the powerful magical artifact.
The shining Knot of the Arcane variety stored safely in the Null Arca. A job well done!