
Type: Solo Dungeons, Overland, Maelstrom and Vateshran Arena
Buildname: Solo Magicka Warden
- Solo Setup
- Resource Management
- Rotation
- Bad Habits
- Vateshran Hollows & Maelstrom Arena Setup
- Infinite Archive Setup
- Warden Subclassing
- Gameplay
- Update Log
Welcome to the “SOLO MagWarden” Magicka Warden Build for PvE in ESO (Elder Scrolls Online). This build is optimized for solo play. Make sure to bookmark the link as I will keep updating the build for each new Update of ESO. If you are new I recommend checking out the Magicka Warden Beginner Guide and the Magicka Warden Beginner 160CP Build before you tackle this setup. You can also find a META Magicka Warden Group Build that is made for dungeons and trials.
Other Magicka Warden Guides:
- Magicka Warden Beginner Guide (Read first if you are a new player)
- Magicka Warden Beginner 160CP Build (Made for new players, after you finished the Beginner Guide)
- META Magicka Warden Group Build (Endgame META build)
This build here is specifically designed for SOLO play. You can play this build in Overland or Dungeons (normal and veteran). I also made sure to give you a few gear choices below because it is not always easy to get the right gear in the Elder Scrolls Online. Magicka Wardens are very powerful in a Solo environment both in dealing damage and staying alive because they have a variety of powerful abilities that can be very helpful if you play solo.
- Solo Build for Normal & Veteran Dungeons
- Solo Build for Maelstrom and Vateshran Hollows
- Solo Build for Overland
- Easy to get Gear & Advanced Setups
- Big Shield
- Good Self Healing
- Good Damage
Solo Setup Magicka Warden

5x Perf. False God, 5x Tzogvin’s Warband, 1x Pale Order, 1x Swarm Mother on a High Elf with Clockwork Citrus Filet.
- Unbuffed: Out of combat, and buff food active.
- Buffed: In combat, buff food, Minor Toughness, Major Sorcery, Major Prophecy, Tzogvin’s Warband full and Weapon Damage enchantment active.
Gear Solo Magicka Warden
If you want to see more viable gear options I recommend reading the Magicka DPS Gear Sets Article which explains all of the sets in detail.
- Setup 1 Most Optimal Setup
- Setup 2 Easy to get Gear
- Setup 3 Beginner Setup
Gear Setup 1 – Solo Magicka Warden
- Monster Set: We are only using a one-piece Monster Set because we have the Ring of the Pale Order Mythic item equipped. The reason we use Swarm Mother is simple, it provides us with extra stats for both Magicka and Stamina. It has a double bonus compared to most other one-piece monster sets.
- False God’s Devotion: False God’s Devotion is very powerful in both the imperfect and perfect versions, I can highly recommend this set. You can farm it fairly easily in normal mode Sunspire.
- Ring of the Pale Order: The Mythic item Ring of the Pale Order provides us with a lot of extra passive healing as long as we deal damage.
- No Ring of the Pale Order? You can also keep using 2x Iceheart like before.
| Gear | Set | Weight | Trait | Enchantment |
|---|---|---|---|---|
| Chest | False God’s Devotion | Light | Divine | Magicka |
| Belt | False God’s Devotion | Light | Divine | Magicka |
| Shoes | False God’s Devotion | Light | Divine | Magicka |
| Pants | False God’s Devotion | Light | Divine | Magicka |
| Hands | False God’s Devotion | Light | Divine | Magicka |
| Head | Swarm Mother | Light | Divine | Magicka |
| Shoulder | Tzogvin’s Warband (or Mother’s Sorrow) |
Medium (or Light) | Divine | Magicka |
| Necklace | Tzogvin’s Warband (or Mother’s Sorrow) |
Jewelry | Bloodthirsty | Spell Damage |
| Ring | Tzogvin’s Warband (or Mother’s Sorrow) |
Jewelry | Bloodthirsty | Spell Damage |
| Ring | Ring of the Pale Order | Jewelry | Bloodthirsty | Spell Damage |
| Weapon 1 | Tzogvin’s Warband (or Mother’s Sorrow) |
Lightning | Precise | Absorb Magicka Enchant |
| Weapon 2 | Tzogvin’s Warband (or Mother’s Sorrow) |
Lightning | Infused | Weapon Damage Enchant |
Gear Setup 2 – Solo Magicka Warden
This setup is easier to acquire and also has more defensive stats compared to the first one, which means it’s safer to play. Once again, make sure to use the Iceheart Monster Set, it really makes a huge difference in terms of defense, it procs very easily and gives you a huge shield that absorbs a lot of damage.
Julianos can be crafted and Mother’s Sorrow can be farmed in the Deshaan Overland zone or you can also buy them via the Guild Store. It would be preferable if you get the gear with the divine trait, but you can also use any other trait, you will not lose that much power. And non-divine gear pieces are usually very cheap to buy.
| Gear | Set | Weight | Trait | Enchantment |
|---|---|---|---|---|
| Chest | Julianos | Light | Divine | Magicka |
| Belt | Julianos | Light | Divine | Magicka |
| Shoes | Julianos | Light | Divine | Magicka |
| Pants | Julianos | Light | Divine | Magicka |
| Hands | Julianos | Light | Divine | Magicka |
| Head | Iceheart | Light | Divine | Health |
| Shoulder | Iceheart | Light | Divine | Magicka |
| Necklace | Tzogvin’s Warband (or Mother’s Sorrow) |
Jewelry | Arcane | Spell Damage |
| Ring | Tzogvin’s Warband (or Mother’s Sorrow) |
Jewelry | Arcane | Spell Damage |
| Ring | Tzogvin’s Warband (or Mother’s Sorrow) |
Jewelry | Arcane | Spell Damage |
| Weapon 1 | Tzogvin’s Warband (or Mother’s Sorrow) |
Lightning | Precise | Shock Enchant |
| Weapon 2 | Tzogvin’s Warband (or Mother’s Sorrow) |
Lightning | Infused | Weapon Damage Enchant |
Setup 3 Beginner – Solo Magicka Warden
Ask a guildmate to craft you Julianos. Mother’s Sorrow can be obtained for a pretty cheap price in the guildstores if you do not pick the best in-slot trait. More important is that you just get the full sets together as fast as possible, even if you do not have the best traits.
| Gear | Set | Weight | Trait | Enchantment |
|---|---|---|---|---|
| Chest | Julianos | Light | Divine | Magicka |
| Belt | Julianos | Light | Divine | Magicka |
| Shoes | Julianos | Light | Divine | Magicka |
| Pants | Julianos | Light | Divine | Magicka |
| Hands | Julianos | Light | Divine | Magicka |
| Head | Magnus’ Gift or Monster Set | Heavy | Divine | Health |
| Shoulder | Magnus’ Gift or Monster Set | Medium | Divine | Magicka |
| Necklace | Tzogvin’s Warband (or Mother’s Sorrow) |
Jewelry | Arcane | Spell Damage |
| Ring | Tzogvin’s Warband (or Mother’s Sorrow) |
Jewelry | Arcane | Spell Damage |
| Ring | Tzogvin’s Warband (or Mother’s Sorrow) |
Jewelry | Arcane | Spell Damage |
| Weapon 1 | Tzogvin’s Warband (or Mother’s Sorrow) |
Lightning | Precise | Shock Enchant |
| Weapon 2 | Tzogvin’s Warband (or Mother’s Sorrow) |
Lightning | Infused | Weapon Damage Enchant |
Where can I get the gear?
False God’s Devotion: Sunspire
Perfected False God’s Devotion: vet Sunspire
Ring of the Pale Order Antiquities
Mother’s Sorrow: Deshaan Overland, Guildtrader
Tzogvin’s Warband: Frostvault Dungeon
Julianos: Craftable
Swarm Mother: vSpindleclutch 1
Iceheart: Head: Direfrost Keep, Shoulder: Glirion Undaunted Chest
Magnus’ Gift: Craftable in Rivenspire, Greenshade, Shadowfen
IMPORTANT: You can get a Lightning Mother’s Sorrow Staff by doing a simple quest, that way you earn the staff! You will receive the “Argonian Muck Minder of Mother’s Sorrow” from the Quest in Silent Mire, Deshaan.
Skills Solo Magicka Warden
- Remember, you can change out some of the abilities if you want or never use them. And you can also adjust the bars.


| Destruction Staff Mainbar | Destruction Staff bar |
|---|---|
| Slot 1: Bird of Prey | Slot 1: Unstable Wall of Elements |
| Slot 2: Harness Magicka | Slot 2: Winter’s Revenge |
| Slot 3: Screaming Cliff Racer | Slot 3: Elemental Susceptibility |
| Slot 4: Living Trellis | Slot 4: Blue Betty |
| Slot 5: Fetcher Infection | Slot 5: Mystic Orb |
| Ultimate: Eternal Guardian | Ultimate: Wild Guardian |
Skill explanation for the Solo Magicka Warden:
- Bird of Prey: Gives you 5% extra damage via Minor Berserk for just slotting it, if you activate the skill you also gain a speed boost. You could swap this out with any other ability that you think is useful.
- Harness Magicka: Activate this if you are expecting to get a huge punch in the face (Boss Heavy Attack for example). This will bolster your health.
- Screaming Cliff Racer: Your main single-target spammable.
- Living Trellis: This is your main heal, it only lasts for 10 seconds, so make sure to always keep this up!
- Fetcher Infection: Deals good damage and applies Minor Vulnerability, increasing your damage on the enemy.
- Wild Guardian: Your Ultimate which should be activated as much as possible, can also take aggro from mobs sometimes.
- Unstable Wall of Elements: Your main AoE ability, has to be on the ground all the time.
- Winter’s Revenge: Powerful AoE damage over time effect.
- Elemental Susceptibility: Apply this on big monsters and bosses, applies debuff to enemies increasing your damage and also applies status effects.
- Blue Betty: This is one of your main resource pools and also applies Major Sorcery, giving you 20% increased Spell Damage.
- Mystic Orb: Powerful AoE damage over time effect.
Class Mastery
Class Mastery is a new system in ESO that allows pure class builds to get two additional powerful passives to better compete against Subclass builds. Activating subclassing will deactivate Class Mastery passives.
All Warden Class Mastery Passives
For our Solo Magicka Warden Build, we are going to use the following:
 Glacial Obstinance – Extra Weapon/Spell Damage.
- Wild Adaptation – Extra Weapon/Spell damage per status effect.
Scribing Skills
The ESO Scribing System offers plenty of adjustable skills to add to our build. The Scribing Skills aren’t a must have, but I will present you two viable options that would fit into the build. The Elemental Explosion is a good AoE skill but it takes two seconds to cast, that is why I still prefer our standard damage skills. However, I actually prefer the Wield Soul (Warding Soul) skill instead of Harness Magicka. It provides us with a slightly bigger shield, costs less, and also applies Major Vitality, increasing our healing and damage shield strength by 12%.
Important: Please read here how to get Grimoires, Focus Scripts, Signature Scripts and Affix Scripts for the ESO Scribing system.
Base Scribing Skill:
- Destruction Staff: Elemental Explosion (Fiery Explosion)
- World: Wield Soul (Warding Soul)


To unlock the Elemental Explosion skill, you need to reach level 25 in the Destruction Staff skill line. To unlock the Wield Soul skill you need to complete the Tutorial Quest in the Scribing questline.
If you want to use either of those Scribing Skills for your Solo Magicka Warden Build I recommend swapping out Mystic Orb for Elemental Explosion (Fiery Explosion). And swap out Harness Magicka for the Wield Soul (Warding Soul) skill.
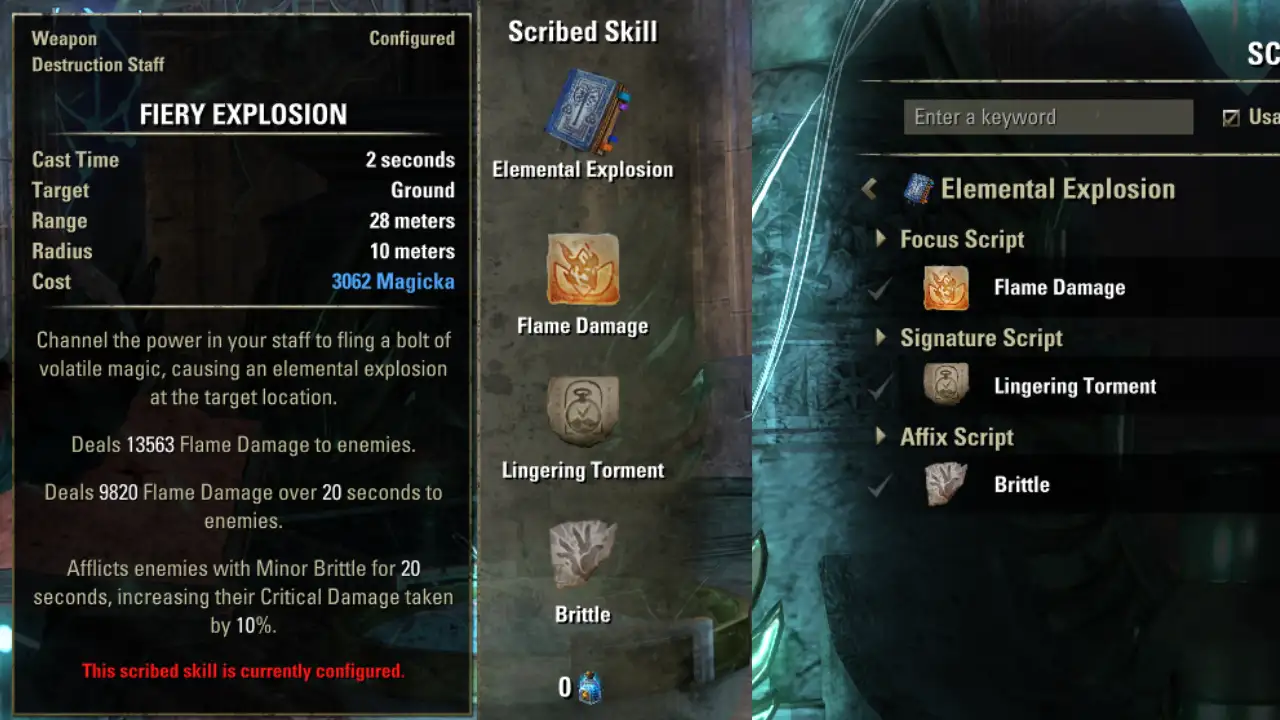
Elemental Explosion
Elemental Explosion is the base skill and deals AoE damage where you place it. If we add Flame Damage, Lingering Torment and Brittle we get Fiery Explosion. The skill now deals AoE Fire Damage and also adds fire damage over time. Additionally, it applies Minor Brittle for 20 seconds to all enemies, increasing their Critical Damage taken.
- Focus Script
- Signature Script
- Lingering Torment (Flame Damage over time)
- Affix Script
- Brittle (Applies Brittle to the enemy, increasing their Crit Damage taken)
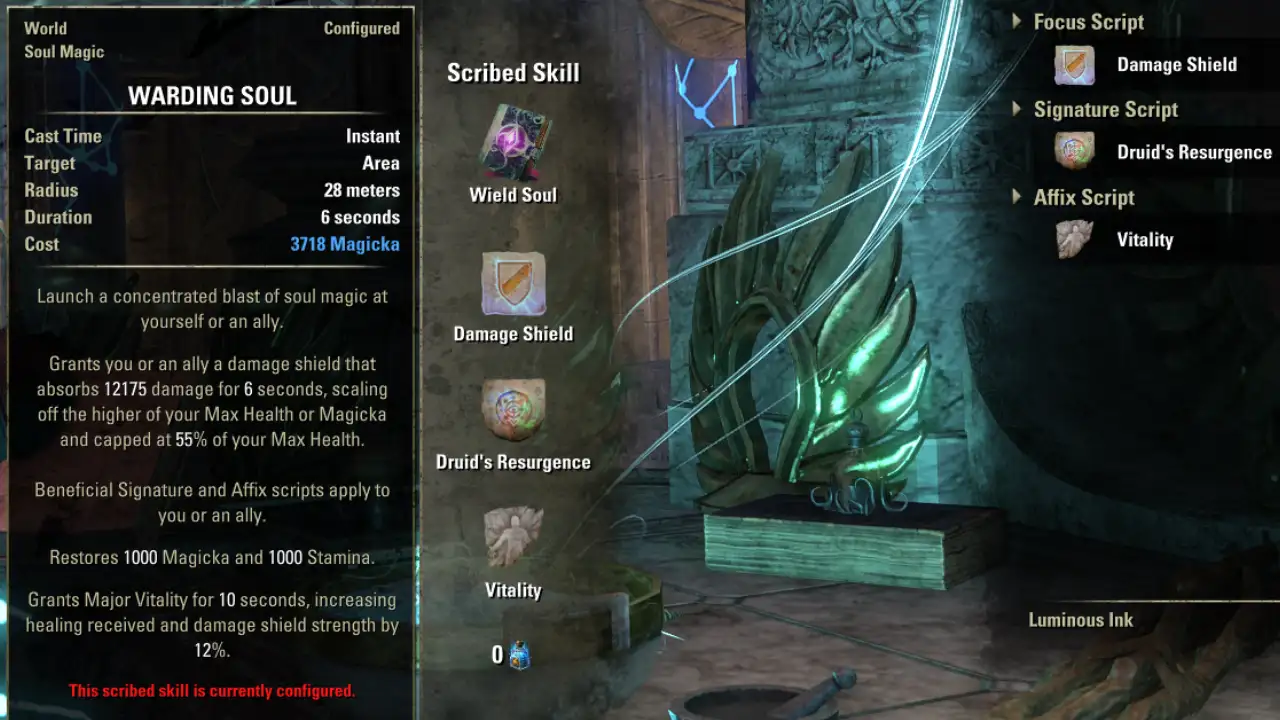
Wield Soul
Wield Soul would be the second skill that you could add to the build. If we add Damage Shield, Druid’s Resurgence and Vitality we get Warding Soul. This replaces Harness Magicka as our damage shield. It is slightly bigger, costs less and also gives us Major Vitality, increasing our healing and shield strength by 12%.
- Focus Script
- Damage Shield (12k Damage Shield)
- Signature Script
- Druid’s Resurgence (Restore 1000 Magicka and Stamina)
- Affix Script
- Vitality (Major Vitality, 12% more healing and shield strength)
Champion Points for Solo Magicka Warden
Below you can find the Champion Points setup for this build. Work your way from top to bottom in your allocation. For more information on Champion Points, please visit the Champion Points Overview Page on ESO-Hub.com.
Hovering over each perk will give you insights into what it does. Presets are also provided for each of the allocations below.
Click the tab below to open the allocation.
Important Info for Solo Mag Warden
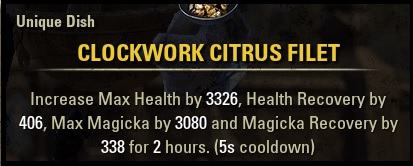
Buff-food
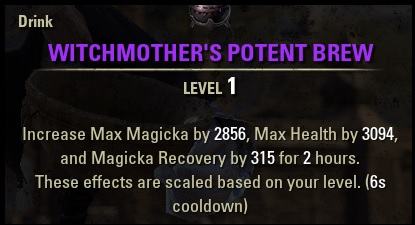
You have the option between two different buff foods/drinks for this build. It is crucial that you use either one of these because they give very important stats, health, magick and magicka recovery. You can use the more expensive Clockwork Citrus Filet or the less expensive version Witchmother’s Potent Brew. The difference between both is very small, I only use the expensive one for very difficult content to get a tiny bit more stats. Otherwise I always use the less expensive version to save money.
Info: If you click on the URL you will get directed to a detailed page of the buff food/drink where you can see the prices too.
Clockwork Citrus Filet
(Max Health, Max Magicka, Magicka Recovery, Health Recovery)
Witchmother’s Potent Brew
(Max Health, Max Magicka, Magicka Recovery)
Mundus Stone
The Lover Mundus Stone is the best choice for this setup, it increases our overall spell penetration, which boosts our damage. You can also visit the Mundus Stone Overview Page for additional information regarding all the Mundus Stones.
The Lover Mundus Stone (Increased Spell Penetration)
Race
All Magicka-based races work with this setup. More about each race can be found on the racial overview page.
High Elf
Breton
Dark Elf
Argonian
Khajiit
Orc
Potions
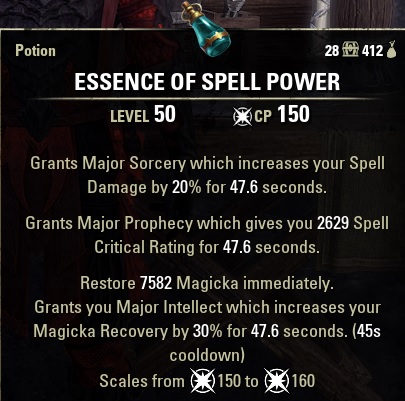
A Warden already has access to Major Sorcery and Prophecy via the Blue Betty skill and the Inner Light skill on the fronbar. You can use simple Magicka potions or if you prefer the more expensive ones that also give you the buffs in case you don’t use one of the above skills.
Spell-Power Potions
(Spell-crit, Spell Damage, Magicka)
(Cornflower, Ladys Smock, Water Hyacinth)
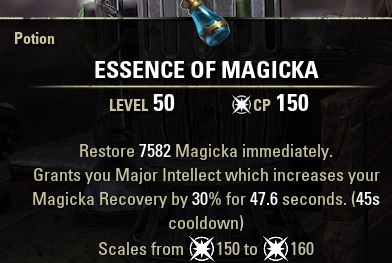
Essence of Magicka Potion
(Magicka)
(Bought in Guild Stores, fairly cheap)
Important: Make sure to get alchemy to level 50 to unlock the Medicinal Use passive. That way you can keep up the buffs of potions a 100% of the time.
Passives
- Animal Companion: Bond with Nature, Savage Beast, Flourish, Advanced Species
- Green Balance: Accelerated Growth, Nature’s Gift, Emerald Moss, Maturation
- Winter’s Embrace: Glacial Presence, Frozen Armor, Icy Aura, Piercing Cold
- Destruction Staff: Tri Focus, Penetrating Magic, Elemental Force, Ancient Knowledge, Destruction Expert
- Light Armor: Grace, Evocation, Spell Warding, Prodigy, Concentration
- Undaunted: Undaunted Command, Undaunted Mettle
- Racial: All
- Alchemy: Medicinal Use
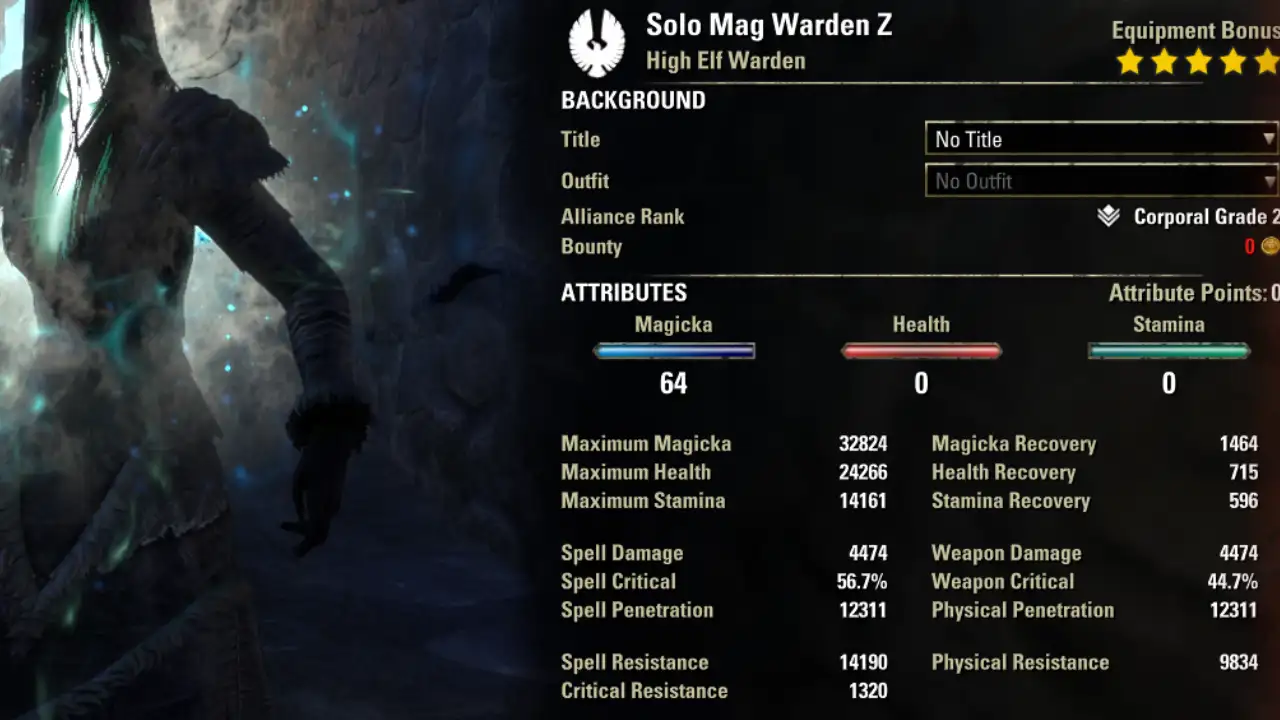
Attributes
All points into Magicka. I recommend having around 18-20k health for your character.
64 Magicka, 0 Stamina, 0 Health
Resource Management
Resource management with a solo build is slightly different compared to a group setup because you can’t really rely on your healer to give you resources back. Now that doesn’t really matter because we have other means of restoring resources. Your main tool of restoring resources is your heavy attacks, they are pretty slow but you will regain a lot of resources.
You can also use your potions on cooldown which will return a lot of extra resources. Also keep up Blue Betty all the time to gain even more sustain and damage, preferably activate the Blue Betty before the fight starts.
- Heavy Attacks
- Potions
- Blue Betty
Rotation
If you want to learn more about weaving light attacks, you can check out this guide: “Weaving Beginner Guide”.
For this kind of setup, there isn’t a fixed rotation at all, your main goal should always be to stay alive and you do that by keeping up your shield and healing abilities.
- ALWAYS keep up Blue Betty and Living Trellis to gain damage, sustain and healing.
- Harness Magicka is your shield, use it often to bolster your health.
- Elemental Susceptibility should always be applied on the enemy, it increases your damage and also adds status effects to the enemy.
- Once all that is taken care of, you can use your DoTs to apply more pressure: Mystic Orb, Unstable Wall of Elements and Winter’s Revenge.
- And now you can use your spammable Screaming Cliff Racer
Bad Habits
- A lot of people have a bad habit of forgetting their back bar abilities, you should really focus on always weapon swapping enough to re-apply the DoTs and buffs on your back bar.
- Keeping your shield up with the Harness Magicka skill is key in this build, if you lose health or drop low you want to make sure to keep the shield up while you are healing yourself.
- Always keep moving your character around, if you just stand on the ground you take unnecessary damage from melee monsters, that damage can easily be avoided by kiting (running away backward from the enemy and still dealing damage to him.
- Not keeping Blue Betty and Living Trellis up will have devastating effects as they are both important for sustain and healing.
Vateshran Hollows & Maelstrom Arena Setup
Magicka Warden Vateshran Hollows & Maelstrom Arena Build Setup.
- For specific tips and tricks please check out the Vateshran Hollows Guide and the Maelstrom Arena Guide which explains everything in detail.
- Ring of the Pale Order provides a lot of extra healing, I recommend getting this Mythic item, it makes the arena a lot easier.
- If you don’t have access to Mythic items, please use the gear setups above.
Gear Setup
| Gear | Set | Weight | Trait | Enchantment |
|---|---|---|---|---|
| Chest | False God’s Devotion | Light | Divine | Magicka |
| Belt | False God’s Devotion | Light | Divine | Magicka |
| Shoes | False God’s Devotion | Light | Divine | Magicka |
| Pants | False God’s Devotion | Light | Divine | Magicka |
| Hands | False God’s Devotion | Light | Divine | Magicka |
| Head | Swarm Mother | Light | Divine | Health |
| Shoulder | Tzogvin’s Warband (or Mother’s Sorrow) |
Medium (or Light) | Divine | Magicka |
| Necklace | Tzogvin’s Warband (or Mother’s Sorrow) |
Jewelry | Bloodthirsty | Spell Damage |
| Ring | Tzogvin’s Warband (or Mother’s Sorrow) |
Jewelry | Bloodthirsty | Spell Damage |
| Ring | Ring of the Pale Order | Jewelry | Bloodthirsty | Spell Damage |
| Weapon 1 | Tzogvin’s Warband (or Mother’s Sorrow) |
Lightning | Precise | Shock |
| Weapon 2 | Tzogvin’s Warband (or Mother’s Sorrow) |
Lightning | Infused | Weapon Damage Enchant |
Skills
Temporal Guard ultimate on the frontbar is only used for the free 5% damage mitigation, you can also use other ultimates there if you want.


Infinite Archive Setup for Solo Magicka Warden Build
Here you can find a setup that works well inside ESO’s Infinite Archive when you play solo with the Solo Magicka Warden Build. Make sure to read the ESO Infinite Archive Guide to understand what is going on inside the archive.
- Infinite Archive gets progressively harder
- You need to know boss mechanics, otherwise one-shots will occur often.
- Understanding how the Infinite Archive works is important
- If you get stuck, change gear or skills and try again.
Gear Setup
Inside the Infinite Archive, we recommend running the following setup for our Solo Magicka Warden Build: 5x Whorl of Depths (Frontbar), 5x Pillar of Nirn (Backbar), 1x Ring of Pale Order, 2x Iceheart. All the sets are procing automatically, therefore you won’t have to worry about keeping track of any of them. This is great, that way we can focus more on the combat and our abilities.
| Gear | Set | Weight | Trait | Enchantment |
|---|---|---|---|---|
| Chest | Pillar of Nirn | Medium | Divine | Magicka |
| Belt | Whorl of the Depths | Light | Divine | Magicka |
| Shoes | Whorl of the Depths | Light | Divine | Magicka |
| Pants | Whorl of the Depths | Light | Divine | Magicka |
| Hands | Druid’s Braid | Light | Divine | Magicka |
| Head | Iceheart | Light | Divine | Health |
| Shoulder | Iceheart | Light | Divine | Magicka |
| Necklace | Pillar of Nirn | Jewelry | Bloodthirsty | Spell Damage |
| Ring | Pillar of Nirn | Jewelry | Bloodthirsty | Spell Damage |
| Ring | Ring of the Pale Order | Jewelry | Bloodthirsty | Spell Damage |
| Weapon 1 | Whorl of the Depths | Fire | Precise | Shock |
| Weapon 2 | Pillar of Nirn | Fire | Infused | Weapon Damage Enchant |
Where can I get the gear?
- Whorl of the Depths: Dreadsail Reef
- Pillar of Nirn: Falkreath Hold Dungeon
- Druid’s Braid: Guildstores, Craftable in High Isle and Amenos zone
- Ring of the Pale Order Antiquities
- Iceheart: Head: Direfrost Keep, Shoulder: Glirion Undaunted Chest
Skills
Temporal Guard ultimate on the frontbar is only used for the free 5% damage mitigation, you can also use other ultimates there if you want.
If you need more healing replace Bird of Prey with Resolving Vigor.
Buff-Food
If you have sustain issues then it is recommended to use the Ghastly Eye Bowl buff food because it gives us a huge amount of Magicka Recovery and Max Magicka, but your Health will be lower. If you don’t have sustain issues, then it is recommended to use the Clockwork Citrus Filet or the less expensive version Witchmother’s Potent Brew.
ESO Warden Subclassing Build Options
ESO’s Subclassing offers a lot of variety, allowing you to swap, mix, and match different skill lines of various classes all on one character. Read our How does Subclassing work in ESO guide to get an understanding of how the subclass system works. We also have plenty of ESO Builds optimized for Subclassing.
Take a look at our ESO Warden Subclassing Build if you are interested in what you can all mix and match on a Warden build!
Gameplay – Solo Magicka Warden
Vateshran Hollows Solo Arena Full Run
If you want to learn more about the Vateshran Hollows arena, you can check out the Vateshran Hollows overview page.
Update Log – ESO Solo Magicka Warden Build
05.02.2020 Added the Solo Magicka Warden Build for the Harrowstorm DLC.
17.05.2020 Updated the Build for the GREYMOOR CHAPTER.
22.10.2020 Updated the Build for the MARKARTH DLC, Greymoor chapter.
05.03.2021 Updated the Build for the FLAMES OF AMBITION DLC, Blackwood Chapter.
25.05.2021 Updated the Build for the BLACKWOOD CHAPTER.
09.08.2021 Updated the Build for the WAKING FLAME DLC, Blackwood Chapter.
13.10.2021 Updated the Build for the DEADLANDS DLC, Blackwood Chapter.
04.03.2022 Updated the Build for the ASCENDING TIDE DLC, High Isle Chapter.
13.05.2022 Updated the Build for the HIGH ISLE CHAPTER.
03.08.2022 Updated the Build for the LOST DEPTHS DLC, High Isle Chapter.
24.10.2022 Updated the Build for the FIRESONG DLC, High Isle Chapter.
08.03.2023 Updated the Build for the SCRIBES OF FATE DLC, Necrom Chapter.
01.06.2023 Updated the Build for the ESO NECROM CHAPTER.
23.10.2023 Updated the Build for Update 40.
08.03.2024 Updated the Build for the Scions of Ithelia DLC Update 41, Gold Road Chapter.
21.05.2024 Updated the Build for the GOLD ROAD CHAPTER U42.
20.08.2024 Updated the Build for Update 43, Gold Road Chapter.
28.10.2024 Updated the Build for Update 44, Gold Road Chapter.
11.03.2025 Updated the Build for Update 45, Fallen Banners.
28.05.2025 Updated the Build for Update 46, Seasons of the Worm Cult Part 1.
18.08.2025 Updated the Build for Update 47 Feast of Shadows DLC, Seasons of the Worm Cult.
27.10.2025 Updated the Build for Update 48, Seasons of the Worm Cult Part 2.
02.03.2026 Updated the Build for Update 49, Season 0.
03.06.2026 Updated the Build for Update 50, Season 0 and 1.
Other Solo Builds for ESO:
- ESO Solo Magicka Arcanist
- ESO Solo Magicka Nightblade
- ESO Solo Magicka Necromancer
- ESO Solo Magicka Sorcerer
- ESO Solo Magicka Dragonknight
- ESO Solo Magicka Templar
Related Guides: