Welcome to the Ultimate BG3 Astarion Build. For this Astarion companion build, we’ll be using the Thief subclass, which gives an extra Bonus Action each turn along with Resistance to Falling Damage. This BG3 Astarion Build works for both PC and Console (PS5 and Xbox Series X/S).
Please visit our Best BG3 Builds overview page for more builds. You can also check out our BG3 Rogue Build for a custom player character. To get an overview of all classes please visit the BG3 Classes overview page.
The Rogue is quite a linear class – there are fewer choices to make when creating and levelling up your character compared to most other classes. However, the Rogue can still make a very skilled (and slippery) damage dealer and is also great at non-combat Ability Checks.
Table of Contents for the BG3 Astarion Build:
- Introduction to the Rogue Class
- Rogue Build Leveling Progression
- Rogue Equipment
- Rogue Build Extras and Tips & Tricks
BG3 Astarion Rogue Class Guide
Rogues are the main “stealth” class in Baldur’s Gate 3. While other classes can stealth, none encourage and reward this playstyle as much as the Rogue.
Once per turn, Rogues can perform a special Sneak Attack, which grants you bonus damage if you are undetected when you make the attack. This bonus damage increases as you level up.
The Rogue is the only class that can use Dash, Hide and Disengage as a Bonus Action (from Level 2 onwards) which allows you to attack and then hide on the same turn (or vice versa), as well as affording you greater mobility in general. Used correctly, this can make the Rogue slippery and especially dangerous.
While you can play the Rogue without using stealth, you won’t get the most out of the class without a stealthy playstyle, therefore I do recommend trying to get familiar with stealth in BG3 if you have a Rogue in your party.
Why We’re Using the Thief Subclass
The Thief is the simplest subclass in the game in terms of the bonuses added to your character, however, that doesn’t mean that this is a weak subclass – actually it’s arguably the strongest variant of the Rogue.
The Thief has two Bonus Actions per turn instead of one, which synergises perfectly with the Rogue’s ability to use actions like Hide and Dash with a Bonus Action. You can now perform Hide or Dash without losing your ability to perform a dual-wield attack on the same turn. Alternatively, you can Dash twice in the same turn to cover great distances. This makes the Thief highly mobile and highly adaptable.
At Level 9, Astarion will be able to become Invisible for 10 turns, once per Short Rest. This makes stealth easier and allows you to sneak up on enemies in exposed positions that would otherwise be too difficult to approach with stealth.
You also get a 50% Resistance to Falling Damage as soon as you become a Thief, which is a nice extra bonus.
Perhaps this doesn’t sound like a lot, and you may be wondering why we’re using the Thief rather than Arcane Trickster or Assassin, which seem to offer more bonuses. The answer is that the extra Bonus Action is a very useful thing to have, especially in combination with the Rogue’s ability to Dash, Disengage and Hide with a Bonus Action. You have so much more flexibility with the Thief, which can either be used in attack, in defence, or to sneak away back into stealth every turn after making your move.
How to unlock Astarion in BG3
BG3 Astarion can be recruited very early in the game. Almost immediately after you crash with the Nautiloid ship at the beach. You can find Astarion here on the map. All you really need to do is head north west of where you start on the Ravaged Beach.
When you approach Astarion you have three options.
- Easily. Stand back.
- Kill it yourself – you look capable enough.
- Leave.
When you select the second or the third option he will try to ambush you and slit your throat. Don’t worry it won’t come to that. The first option will also lead Astarion to attack you. However, you won’t have to deal with some checks to get his knife away from your throat.
Either way, the tadpole will connect you two and clear up things. After all the talking you can decide to recruit Astarion into your group.
Why (and How to) Respec Astarion in BG3
When recruited to your party as a companion, Astarion will start off with a sub-optimal Ability and Skill distribution, and I highly recommend fixing this as soon as possible. To do this, you need to respec Astarion. Before you can respec, you must find Withers, a special NPC who is recruited to your camp. (If you chose Astarion in Character Creation then you can set his Abilities and Skills immediately and don’t need to respec him, but you should still go and recruit Withers anyway).
To find Withers, recruit a full party, then head to the Refectory Ruins, roughly north of where you washed up on the beach. Enter the ruins either by brute force, stealth or sweet-talking the bandits outside. Then fight your way through and find the Skull Lever to open the secret door to gain access to the Dank Crypt. If you can’t find the Skull Lever, you can instead go back outside and head to the side-entrance mentioned above. You’ll need to Lockpick your way through if you go this way.
Once inside the Dank Crypt, head to the room with the skeletons and open a second secret door. This will cause several skeletons to attack you. Defeat them and head into the small room you opened. Interact with the big coffin and you will meet a friendly but mysterious skeleton called Withers. After you leave the Dank Crypt, he will make his way to your camp. If he’s not there immediately, be patient, he will show up sooner or later.
Once he is in your camp, speak to him as Astarion and ask him to change your class. This costs 100 gold. Then proceed with the build guide below, starting at Level 1 and working your way through any level-ups you did while finding Withers.
We’ll now proceed with explaining this BG3 Astarion Rogue build, including the background info, how the build works and how you can create and use it.
BG3 Astarion Build At Level 1
In this section, we will explain the starting situation of the Astarion Build in BG3.
Race
Astarion is a High Elf, which gives him access to some extra bonuses:
- Proficiency with Longswords, Shortswords, Longbows and Shortbows
- Darkvision – Lets you see in the dark, removing combat penalties that would normally apply in dark areas
- Fey Ancestry – You have Advantage on Saving Throws against being Charmed, and are immune to being put to sleep by magic.
- Keen Senses – You are Proficient in the Perception skill.
- You can choose one Cantrip from the Wizard list to learn, regardless of your class. The Cantrip is cast with Intelligence.
- You can use Fire Bolt for an extra source of early-game damage. However, cantrips that deal damage will have a low hit chance because they use Intelligence, whereas a Rogue like Astarion mainly focuses on having high Dexterity. Therefore you may want a utility cantrip like Mage Hand instead.
Abilities
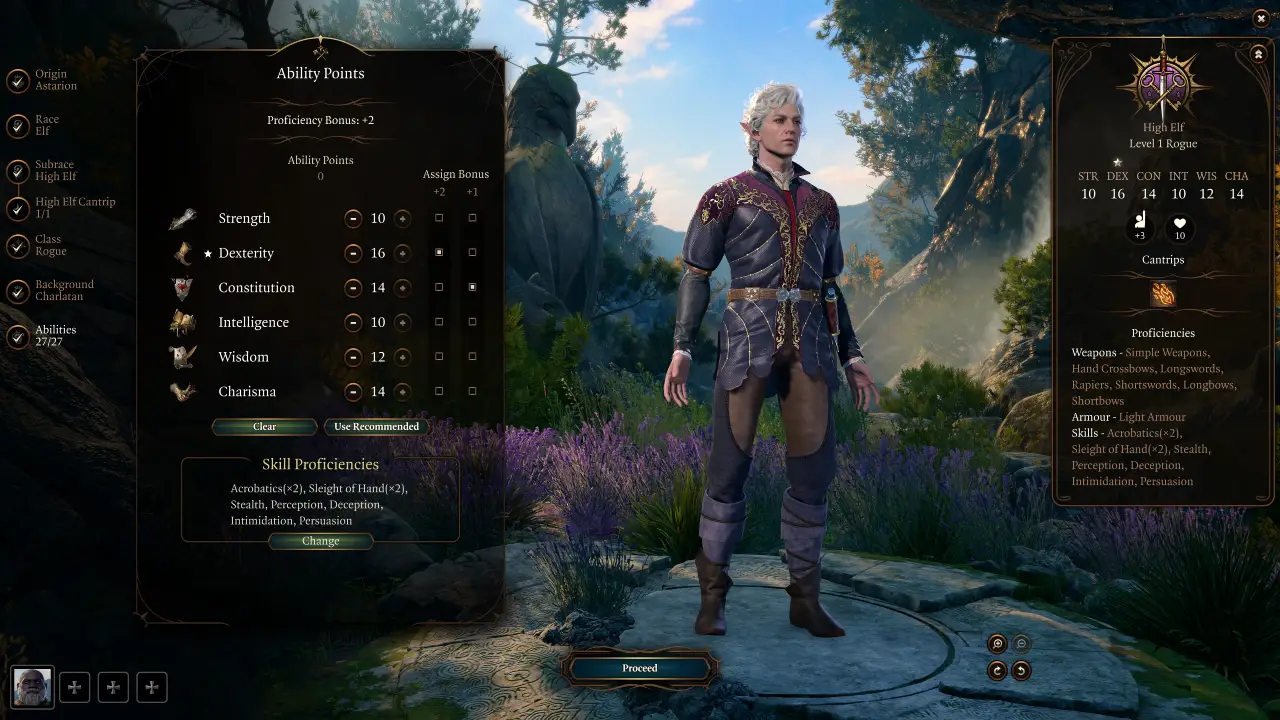
As explained above, when recruited to your party as a Companion, Astarion begins with his own ability distribution. To make this build more optimal I recommend doing a quick respec at some point. You can do this by speaking to Withers with Astarion selected, and then asking to change your class. You don’t actually need to change your class, but doing this will also allow you to change the ability point distribution of Astarion as though he was a new character. Set them to the recommended Abilities and Skills below during the Respec, then continue with the guide as normal for subsequent levels. If you chose Astarion in character creation, you can follow the guide from that point without needing to do a respec.
The only important Abilities for Astarion in BG3 are Dexterity which is used to improve your Weapon Attacks, Armour Class and Dexterity-based skills (including Stealth which makes hiding easier, and Sleight of Hand which governs things like lockpicking) and Constitution which improves your HP and should always be at least 14. This leaves us with quite a few spare points to allocate. There are several options – you can put them into Strength to boost your carrying capacity, put extra points into Constitution to make Astarion more tanky, or distribute them evenly between all skills to minimise Astarion’s weaknesses. Whatever you decide to do, try to finish up with as few odd numbers as possible, since Abilities generally only give a benefit for every second point (10, 12, 14, 16, etc).
We favoured the increased Carrying Capacity, and so went with the following setup (bold Abilities are essential, others can be tweaked if you wish):
- 14 Strength
- 17 Dexterity
- 14 Constitution
- 10 Intelligence
- 10 Wisdom
- 10 Charisma
We have our Dexterity on an odd number for now, but we’ll be fixing that later on with Feats.
Skills
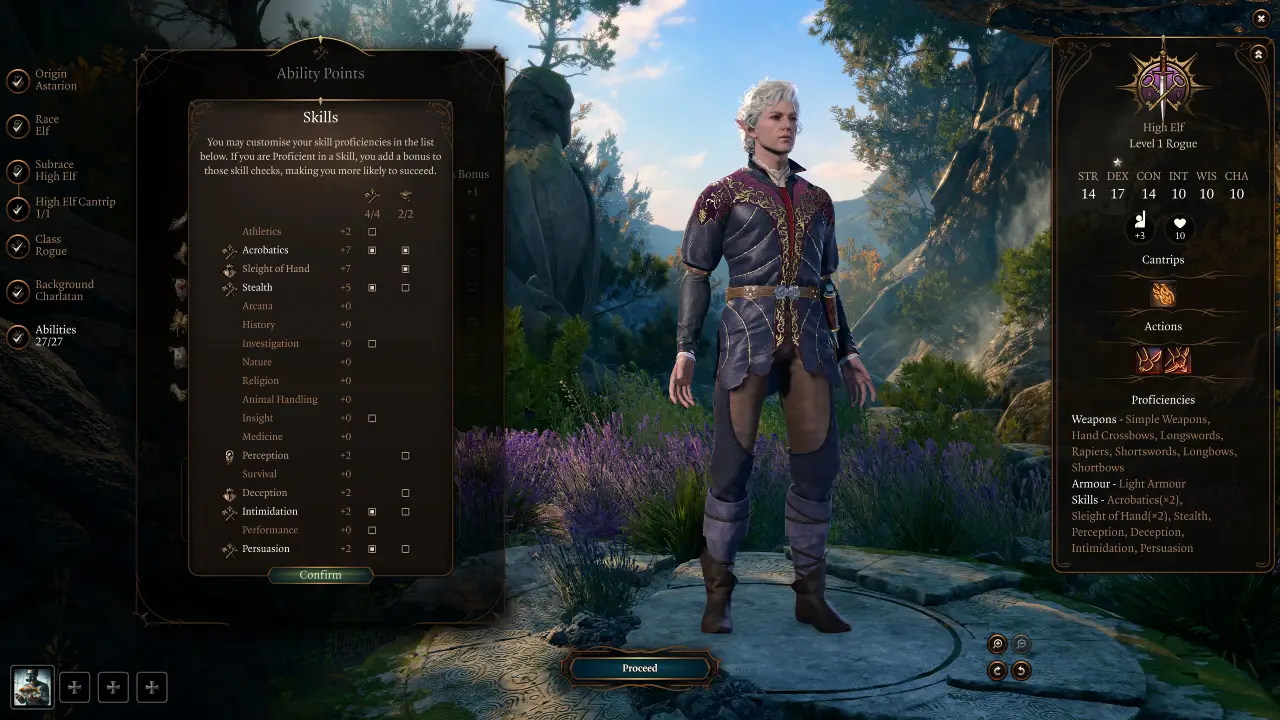
Astarion is locked into the Charlatan Background, which gives automatic Proficiency with the Deception and Sleight of Hand Skills.
However, you can still manually assign his other Skill Proficiencies. You get to choose four Proficiencies (in addition to those from the Background), which will add Astarion’s Proficiency Bonus to the Skill (currently +2, will increase more when you level up). You can also add 2 Expertises, which can only be assigned to Skills you are Proficient with, and will double your Proficiency Bonus for that Skill.
Astarion has good Dexterity, so we’ll mostly want to focus on Skills that use Dexterity, to ensure we are playing to his strengths.
We chose the following Proficiencies:
- Acrobatics – Dexterity-based Skill that makes Astarion more resistant to being pushed and shoved around by enemies, and also reduces Falling Damage. There’s no point in choosing both this and Athletics, because it basically does the same thing but is Strength-based, so will be weaker.
- Stealth – Dexterity-based Skill that makes Hiding easier. Whenever an enemy looks at you while you’re sneaking, you must roll a Stealth Check to determine if you are detected. Higher Stealth makes these checks easier to pass.
- Intimidation – Charisma-based skill that makes it easier to pass Intimidation checks in dialogue. If you’re not using Astarion for dialogue, change this to Insight.
- Persuasion – Charisma-based skill that makes it easier to pass Persuasion checks in dialogue. If you’re not using Astarion for dialogue, change this to Investigation.
We’ll also choose the following Expertise:
- Acrobatics – This will make Astarion even more resistant to being pushed around, which can be a lifesaver.
- Sleight of Hand – This will make tasks like lockpicking and pickpocketing easier.
Now that we’ve explained the starting point of the BG3 Astarion build, we will move onto a step-by-step levelling guide.
Early-Game Step-by-Step Levelling Guide – Astarion BG3
In this section, we will summarise what you gain at each level up on the Astarion Thief build, as well as any recommendations for choices to make when levelling up. This section will be a bit shorter than many of our other builds, because the Thief is an extremely linear class and there aren’t many choices to make when leveling up. Usually you are just given some new stuff and that’s it. We will start with the early-game levels 2-4.
Level 2
At Level 2 we gain three very important new Bonus Actions:
- Cunning Action: Dash – Double your Movement Speed this turn. Uses a Bonus Action instead of an Action.
- Cunning Action: Disengage – Focus on retreating safely. Moving won’t provoke Attack of Opportunity. Uses a Bonus Action.
- Cunning Action: Hide – You can Hide using a Bonus Action instead of an Action.
While other classes can perform these abilities, doing so consumes a normal Action rather than a Bonus Action. This effectively means that the Rogue can Dash or Disengage on the same turn that they attack, while other classes cannot.
Level 3
At Level 3 Astarion gains an additional 1d6 for Sneak Attack Bonus Damage, meaning Sneak Attacks will now do between 2 and 12 bonus damage (instead of 1-6), depending on the damage roll.
You also need to choose the subclass for your Rogue Build. We recommend going with the Thief Class for this build.
The Thief Class gets an extra Bonus Action each turn (which is especially nice in combination with the Cunning Actions above). This lets you safely get in and out of melee range, or in and out of stealth mode, all within the same turn if needed, and without losing out on the opportunity to perform an attack. Alternatively, you can perform your normal attack and then do 2x Offhand Melee Attack, to maximise your Melee damage in a turn.
The Thief also gets a 50% Resistance to Falling Damage, which isn’t especially important but can occasionally be useful.
Level 4
At Level 4 we have to choose a Feat for the BG3 Astarion Build. Feats are strong passive effects that can enable a certain build idea or give a stat buff to increase damage or survivability.
We recommend choosing Ability Improvement, and putting the points into Dexterity. This should improve your Dexterity stat to 19 and will also improve your Dexterity Modifier from +3 to +4.
Mid-Game Astarion Levelling Guide – BG3
We’ll now look at the mid-game levels for our Astarion Build, covering levels 5-8.
Level 5
When he reaches Level 5, Astarion gains a few extra features to strengthen him.
Firstly, your Proficiency Bonus is increased from +2 to +3, meaning you’ll now get a +3 bonus when rolling for skills that you’re Proficient with.
You also get another Sneak Attack Die, so your Sneak Bonus Damage can now roll up to 18.
Lastly, you get the Uncanny Dodge passive feature. This is a Reaction, meaning it cannot be performed manually. Your character will perform it when they are attacked by an enemy, up to once per round. Uncanny Dodge will cause you to take half damage from the incoming attack.
Level 6
At Level 6, there aren’t many choices to make.
All you need to do is choose two additional Skills to gain Expertise with. If you followed the recommendations earlier in the guide, you’ll already have Expertise in Acrobatics and Sleight of Hand. Of the remaining options, the most obvious choice is Stealth, which makes it easier to stay hidden while sneaking.
For your other choice, you can get anything you like really. Consider a Charisma skill such as Persuasion or Intimidation, to give you an easier time in dialogue options in Baldur’s Gate 3. Or, if you’re not using Astarion for dialogue, go with Perception, which makes him better at detecting hidden details and ambushes.
Level 7
At Level 7, Astarion will gain an additional sneak attack damage die, meaning your bonus damage potential from stealth will now be 4-24.
You also gain the Evasion passive, which gives you extra resistance to spells and effects that normally deal half damage on a Saving Throw. Now they’ll do no damage if you succeed the Saving Throw, and half damage if you fail it.
Level 8
At Level 8 you’ll get to choose another Feat for your Astarion Build.
Get the Athlete Feat and use it to increase your Dexterity to 20. This Feat also increases your Jump distance by 50% and reduces the amount of Movement Speed needed to get up when you are knocked Prone. There’s no point in using Resilient: Dexterity, because the Rogue is already Proficient in Dexterity Saving Throws.
Late-Game Levelling Guide for BG3 Astarion Build
Finally, let’s look at the end-game levelling up, covering levels 9-12. After that, we’ll look into the best Equipment options for this Baldur’s Gate 3 Astarion Thief Build.
Level 9
At Level 9, Astarion’s Proficiency Bonus is improved to +4. This means you now have a +4 bonus added to rolls for any skills you are Proficient at (or Attack Rolls using weapons you’re Proficient with). This bonus always applies unless you roll a 1 (Critical Fail/Miss).
You gain another Sneak Attack Die here too, meaning your attacks from stealth will now deal 5-30 bonus damage.
Finally, you gain the Supreme Sneak ability from your Thief subclass, which lets you spend an Action to become Invisible for up to 10 turns.
Level 10
Unlike other classes, the Rogue gets to choose an extra Feat at Level 10.
We recommend choosing the Savage Attacker Feat, which causes you to roll your damage dice twice whenever you make a melee attack and use the highest of the two results. This will considerably improve your average damage output with melee attacks.
Level 11
At Level 11, you’ll gain another Sneak Attack Die, giving your attacks from stealth a possible 6-36 bonus damage. If you aren’t already, you should do your best to use the Thief’s extra Bonus Action and Cunning Actions to sneak as much as possible in combat, as the potential damage bonuses from stealth are getting really strong, and if you’re not utilizing it then you’re missing out!
You also gain the Reliable Talent passive, which guarantees that rolls with any of your Proficient Skills will be at least 10. If you roll below a 10, the value is increased to 10. This means you can no longer Critically Fail when rolling for skills that you have Proficiency with.
Note that this only applies to Skills, not weapons, so you can still roll below 10 when attacking with a weapon you’re Proficient with.
Level 12
If you’ve reached this point, then you have finished levelling up your Rogue build. Congratulations!
At Level 12, you’ll get to choose one more Feat for your character.
We recommend using the Mobile Feat, which gives a couple of new bonuses:
- Your Movement Speed is improved by 3 metres per turn.
- When you Dash, difficult terrain will not slow you down.
- If you move after making a melee attack, you will not provoke an Opportunity Attack from the target.
This makes it easier to stay one step ahead of enemies and dive in and out of close combat as needed, which are righteous traits for a Rogue.
BG3 Astarion Thief Build Equipment
Below is the recommended Equipment setup for this Astarion Thief Build. We have split the equipment into an early-game and late-game section, to ensure you can make use of this build regardless of how far into the game you are.
In each section, there is a table with an overview of the recommended equipment. Below the table, there is more detailed information about each item, including how to obtain it.
Don’t worry if your equipment doesn’t exactly match what is listed here – the build still works fine if some pieces of equipment are different. Don’t be afraid of experimenting and trying different combinations, too.
Early-Game
Early-game equipment can be obtained in Act I and the earlier parts of Act II.
Slot | Icon | Item | Effects | Location |
---|---|---|---|---|
Head | Haste Helm |
|
In a wooden chest next to a cart, by the Blighted Village Waypoint | |
Cloak | Cloak of Protection |
|
Purchased from Quartermaster Talli in Last Light Inn | |
Chest | Spidersilk Armour |
|
Dropped by Minthara in the Shattered Sanctum | |
Gloves | Gloves of Thievery |
|
Sold by Brem in the Zhentarim Hideout | |
Boots | Disintegrating Night Walkers |
|
Looted from True Soul Nere in the Grymforge | |
Necklace | Amulet of Misty Step |
|
Found in a chest in the Defiled Temple | |
Ring 1 | Fetish of Callarduran Smoothhands |
|
Loot from the dead deep gnomes being thrown into the water in Grymforge. | |
Ring 2 | Smuggler’s Ring |
|
Looted from a skeleton hidden in the bush, at Risen road in Act I. | |
Melee Mainhand | Shortsword of First Blood |
|
Looted from an executed Deep Gnome in the Underdark | |
Melee Offhand | Hunter’s Dagger |
|
Sold by Roah Moonglow in Shattered Sanctum | |
Ranged | Hand Crossbow +1 (Dual Wield) |
|
Sold by Derryth Bonecloak in the Myconid Colony. |
Haste Helm
The Haste Helm gives you Momentum for 3 turns at the start of every combat. The Haste Helm is found inside a locked chest near the Blighted Village Waypoint.
Cloak of Protection
The Cloak of Protection increases your Amour Class by 1, and gives a +1 bonus to all of your Saving Throws. This is a good defensive buff that makes Astarion more resistant to damage and enemy effects. It is sold by Quartermaster Talli in Last Light Inn in Act II.
Spidersilk Armour
The Spidersilk Armour is good early game Light Armour for Astarion. It gives you a +1 bonus to Stealth checks, and Advantage on Constitution Saving Throws. makes it a little easier for you to sneak around, and makes you considerably more resistant to hostile effects that involve a Constitution Save. The armour is dropped by Minthara in the Shattered Sanctum. If you want to leave Minthara alive in your playthrough then you can use any other piece of Light Armour for now.
Gloves of Thievery
The Gloves of Thievery give you Advantage on Sleight of Hand checks, which mainly covers actions such as Lockpicking and Pickpocketing. When you have Advantage on a dice roll, it means you roll two dices and choose the one that rolls the highest, making success considerably more likely. With its high focus on Dexterity (and as its name suggests), Astarion is likely to be the most suited character to Thieving in your party, and these gloves will allow you to make the most of that. They are sold by Brem in the Zhentarim Hideout in Act I.
Disintegrating Nightwalkers
The Disintegrating Nightwalkers are arguably the strongest boots available in Act I of BG3, and they’re a perfect fit for Astarion. They give you access to the Misty Step spell, allowing you to teleport in or out of trouble. They also give you Immunity to Entangled, Ensnared and Enwebbed, and they prevent you from slipping over on Grease and Ice surfaces. All of this helps your mobility quite a lot, and makes you harder for enemies to pin down.
The boots are worn by Nere, found in the Grymforge section of the Underdark. You must use Smokepowder bombs or barrels to clear the rockfall to access the chamber that Nere is trapped in, then loot the boots from him. He may be alive or dead when you find him, depending on how long you take to clear the blockage.
Amulet of Misty Step
The Amulet of Misty Step grants you the Misty Step spell, allowing you to teleport to a visible location within 18 metres. This is great for rapidly closing the gap to distant enemies, escaping from a bad combat situation, or jumping to an area that is otherwise unreachable. The Amulet of Misty Step is found in a chest in the Defiled Temple, near the Ogre called Polma.
You could give this to someone else and replace it with another amulet once you get the Disintegrating Nightwalkers, since they also grant the Misty Step spell.
Fetish of Callarduran Smoothhands
The Fetish of Callarduran Smoothhands grants you the Invisibility spell, which you can use once per Long Rest. This is great for sneaking around. Invisbility lasts for up to 10 turns, but attacking an enemy will break the effect. Found by looting one of the dead deep gnomes being thrown into the water in Grymforge.
Smuggler’s Ring
Another great item for stealthy characters, the Smuggler’s Ring gives a +2 buff to Stealth and Sleight of Hand, while reducing your Charisma ability by -1. This makes you considerably better at sneaking around, lockpicking and pickpocketing, which is definitely worth losing 1 Charisma for, as we barely use Charisma for anything except the occasional dialogue check. Looted from a skeleton hidden in the bush, on the lower path by the river, at Risen road in Act I.
Shortsword of First Blood
Deals 1d8 extra Piercing Damage to enemies who are still at full health. Dual wield this weapon with the Hunter’s Dagger. The Shortsword of First Blood can be looted from an executed Deep Gnome in the Underdark, near the entrance to the Decrepit Village (the entrance closest to the Myconid Colony)
Hunter’s Dagger
The Hunter’s Dagger allows you to Rupture enemies hit by the dagger. Ruptured enemies take 1d4 Piercing damage when they move. The Condition lasts for 3 turns. Sold by Roah Moonglow in Shattered Sanctum. If the item is not there, try Long Resting to reset the vendor’s wares. You do not need to spend any Camping Supplies on a Long Rest for this purpose.
Hand Crossbow +1
Astarion doesn’t usually have Proficiency with larger ranged weapons such as the Longbow. However, the Rogue can use Hand Crossbows. The Hand Crossbow +1 is a slightly upgraded version of the standard Hand Crossbow, with a +1 bonus to Attack and Damage Rolls. It is usually sold by Derryth Bonecloak in the Myconid Colony. Use a Long Rest to reset the vendor’s wares if it is not there.
Unlike most other ranged weapons in BG3, Hand Crossbows can be dual-wielded. Use another Hand Crossbow alongside it to increase your ranged damage potential.
Late-Game
Late-game equipment is available in Act III and the latter parts of Act II, however sometimes items from the early-game section remain powerful enough to be carried into late-game.
Slot | Icon | Item | Effects | Location |
---|---|---|---|---|
Head | Mask of Soul Perception |
|
In a locked Gilded Chest in Helsik’s room | |
Cloak | Shade-Slayer Cloak |
|
Sold by Sticky Dondo in the Guildhall, Lower City Sewers. | |
Chest | Bhaalist Armour |
|
Sold by Echo of Abazigal in the Murder Tribunal, if you become an Unholy Assassin | |
Gloves | Gloves of Thievery |
|
Sold by Brem in the Zhentarim Hideout | |
Boots | Helldusk Boots |
|
Found in a locked gilded chest on the top floor of Wyrm’s Rock Fortress. | |
Necklace | Fey Semblence Amulet |
|
Complete the Avenge the Hag Survivors quest in Act III. | |
Ring 1 | Ring of Regeneration |
|
Multiple locations are possible – see below | |
Ring 2 | Killer’s Sweetheart |
|
Found on the top level of the stone structure in the Self-Same Trial in the Gauntlet of Shar, Act II. | |
Melee Mainhand | Crimson Mischief |
|
Looted from Orin, during Get Orin’s Netherstone. | |
Melee Offhand | Bloodthirst |
|
Looted from Orin, during Get Orin’s Netherstone. | |
Ranged | Hellfire Hand Crossbow + another Hand Crossbow |
|
Dropped by Yurgir in the Gauntlet of Shar. |
Mask of Soul Perception
The Mask of Soul Perception gives a +2 bonus to your Attack Rolls, making your attacks more accurate. You also gain the same bonus to Initiative Rolls, making it more likely that you take your turn before other Creatures. This mask can be found in a locked Gilded Chest in Helsik’s room, upstairs in the Devil’s Fee in Lower City.
Shade-Slayer Cloak
When you are hiding, the Shade-Slayer Cloak reduces the number you need to hit with your Attack Roll to crit by 1. Make sure to attack from stealth when possible to benefit from this bonus, as well as the extra sneak damage that the Rogue gets. Sold by Sticky Dondo in the Guildhall, Lower City Sewers.
Bhaalist Armour
Grants a +2 bonus to Initiative Rolls, which can stack with the bonus from the Mask of Soul Perception. You also give out an aura that causes enemies within 2 metres of you to take 50% more Piercing Damage, which acts as a massive buff to your own attacks. Enemies who are Resistant or Immune to Piercing damage won’t get this effect, however. The Bhaalist Armour is sold by Echo of Abazigal in the Murder Tribunal, after you accept Bhaal and become an Unholy Assassin.
Elegant Studded Leather (Alternative)
An alternative to the Bhaalist Armour. The Elegant Studded Leather still grants the Initiative Bonus, but lacks the Piercing Damage aura. However, you do instead get Advantage on Stealth checks, making it considerably easier to sneak around. The Bhaalist Armour is more powerful than this item, however if you are on a “good” playthrough you might not want to get that item at all, so this is a good alternative for such cases. Found inside High Security Vault Number 9 in the Counting House in the Lower City. A key for the vault can be obtained by completing the Return Rakath’s Gold quest.
Helldusk Boots
The Helldusk Boots prevent you from being forcibly moved against your will, allow you to ignore the effects of Difficult Terrain, and allow you to use your Reaction to succeed a Saving Throw that you otherwise would have failed. You can also use the Hellcrawler action to teleport, dealing fire damage in the location where you land. Found in a locked gilded chest on the top floor of Wyrm’s Rock Fortress.
Fey Semblance Amulet
The Fey Semblance Amulet gives you Advantage on Intelligence, Wisdom and Charisma Saving Throws. Astarion doesn’t usually have much focus on these Abilities, making it difficult to succeed Saving Throws of these types. However, this amulet gives you a much better chance by allowing you to roll twice for each attempt, making you more resistant to a wide variety of hostile effects. This item is a reward for completing the Avenge the Hag Survivors quest in Act III.
Killer’s Sweetheart
When wearing the Killer’s Sweetheart Ring, the first time you kill a creature (per Long Rest), your next attack will be a guaranteed Critical Hit. Found on the top level of the stone structure in the Self-Same Trial in the Gauntlet of Shar, Act II.
Ring of Regeneration
A powerful but simple ring, the Ring of Regeneration heals you by 1d4 HP at the start of every turn. There are three possible ways to obtain it, depending on the status of specific characters in your playthrough:
- If Rolan is dead – Sold by Lorroakan’s Projection in Sorcerous Sundries
- If Rolan and Lorroakan are both alive – Sold by Rolan in Sorcerous Sundries
- If Rolan is alive but Lorroakan is dead – Can be pickpocketed from Rolan in Ramazith’s Tower
Crimson Mischief
A legendary Shortsword, Crimson Mischief makes for the perfect dual-wield pairing with Bloodthirst. You’ll gain all of the following bonuses from Crimson Mischief:
- 1d4 bonus Necrotic Damage on attacks with this weapon
- 1d4 bonus Piercing Damage on attack against targets with less than 50% HP remaining.
- Attacking with Advantage will add 7 bonus Piercing Damage to the attack, no matter what the reason for the Advantage is.
- Your Ability Modifier is added to the weapon’s attack damage, only when wielded in your Off-Hand. With 20 Dexterity, this gives you 5 bonus damage.
Crimson Mischief is also looted from Orin – You should prioritize dealing with Orin as soon as you’re able to, as the weapons she drops will make Astation much more powerful.
Bloodthirst
The strongest dagger in the game, Bloodthirst reduces the Attack Roll needed to crit by 1. This can stack with the effect from the Shade-Slayer Cloak, meaning you only need to roll 18 instead of the usual 20 to crit, when attacking from stealth. Bloodthirst also causes enemies hit with the weapon to be 50% weaker to Piercing Damage (does not stack with the effect from the Bhaalist Armour – you only need one or the other). It’s also classed as a Bound Weapon, which means you cannot be disarmed of the weapon, and if you throw it, it will automatically return to you.
Bloodthirst is looted from Orin, during Get Orin’s Netherstone.
IMPORTANT: The slot that Orin’s weapons are used in changes their functionality. If you are using the Bhaalist Armour, we recommend slotting Crimson Mischief in the main hand and Bloodthirst in the off hand, and keep looking out for ways to make attacks with Advantage to get the 7 bonus damage. If you are not using Bhaalist Armour, slot them the other way around, with Bloodthirst in main-hand, as this will allow you to still make enemies Vulnerable to Piercing Damage, but you’ll need to hit them to activate this. We think the first configuration is strongest overall, but you need to ally with Bhaal to get the armour.
Hellfire Hand Crossbow
Attacking from stealth with the Hellfire Hand Crossbow has a chance to set the target alight. You can also cast Scorching Ray at Level 3 once per Short Rest. Dropped by Yurgir in the Gauntlet of Shar in Act II. You can dual-wield this with any other Hand Crossbow of your choice.
Best BG3 Astarion Build Tips & Tricks
While the Rogue Class is among the simplest and easiest to build, it takes a careful hand to get the most out of the class in combat. While positioning is important for all classes, this applies even more to the Rogue.
We get huge amounts of bonus damage from Sneak Attacks, either melee or ranged, so do your best to create scenarios where you can easily disengage and get back into Stealth each turn. Remember to make use of your extra Bonus Action and Cunning Actions when needed.
If sneaking around in close quarters, be very careful about enemy Opportunist Attacks – they will always attempt one if they can see you, you are in melee range and you do not have Disengage active. The Mobile Feat can partially counteract this problem. Rogues like Astarion are tricky to play, but reward players who put in the time and thought to preplan their moves.
Strongest Potions for the BG3 Astarion Thief Build
Two potions are especially well-suited for this Rogue BG3 Astarion Build with the Thief subclass.
Potion of Speed
The Potion of Speed is very strong in BG3, especially for builds with high damage output. It works by giving the drinker an extra Action each turn for 3 turns, as well as +2 Armour Class, Advantage on Dexterity Saving Throws and increased Movement Speed. This is great for situations with many enemies or one especially strong enemy – you can dish out damage very quickly for a few turns, or perform other actions such as casting spells and healing.
The downside of the Potion of Speed is that after the effect expires, you will be Lethargic for 1 turn, preventing you from taking an Action. As long as you account for this downtime and don’t leave your character in too dangerous of a position when it occurs, the Potion of Speed is a great boost that I highly recommend making plentiful use of.
You can craft a Potion of Speed by combining Ashes of Hyena Ear with any Salt.
Elixir of Bloodlust
The Elixir of Bloodlust is another powerful potion in BG3. When drunk, it lasts until your next Long Rest (unless you drink another Elixir, as you can only have one Elixir active at a time). Whenever you kill an enemy while under the effects of this potion, you will gain 5 Temporary Health and an extra Action on your current turn. You can combine this with the Potion of Speed, or another source of the Hastened effect, to potentially gain 3 Actions on your turn if you manage to kill an enemy on that turn.
You can craft an Elixir of Bloodlust by combining Ashes of Worg Fang with any Salt.
Rogue Build Illithid Powers (optional)
Illithid Powers are unlocked later in BG3 when you learn more about Mind Flayers and Tadpoles. By eating Jars of Mind Flayer Parasites you gain one point. This is another optional skill tree that you can get access to if you want. Astarion seems by far the most keen of any of the companions to make use of Tadpole powers, so you might want to go down this route – but it is ultimately entirely optional and you can finish the game without unlocking them. If you do want to go down that route, then here are some of the best Illithid Powers for the BG3 Astarion Build:
- Mind Blast: A conal blast of Psychic Damage that can also stun several targets at once. If Astarion is outnumbered by several advancing enemies, then Mind Blast can help to swing things back in your favour.
- Cull the Weak: When you reduce a creature’s hit points below a certain threshold, this power instantly kills it and deals 1-4 psychic damage to nearby enemies. This is particularly effective when engaging groups of weaker foes, enabling you to thin their numbers rapidly.
- Fly: This can be used to reach hard to get to places or change positions in combat.
- Mind Sanctuary: This creates an area that allows all within to use Actions and Bonus Actions interchangeably. This typically means you can deal more damage, since you can use your Bonus Action as a normal Action. However, enemies who are inside the area will also enjoy its benefits. Be careful with your placement so that your party gets buffed by the Mind Sanctuary and not the enemies! This is an especially good fit for the Thief subclass, because it has an extra Bonus Action, meaning you can suddenly perform three standard attacks in one turn.
- Psionic Backlash: This is a top tier reaction from the Illithid Powers skill tree in BG3. This allows you to deal psychic damage when a nearby enemy casts a spell. This is especially useful if the target is casting a Concentration Spell. The damage from Psionic Backlash can immediately break their Concentration, ending the spell’s effects.