Welcome to the Ultimate BG3 Halsin Build Guide. In this guide, we will explain how to create a powerful Druid build for Halsin in Baldur’s Gate 3. We’ll be using the Circle of the Moon subclass, which places the greatest emphasis on Wild Shape transformations while retaining an excellent spellcasting ability.
Please visit our Best BG3 Builds overview page for more builds. For more Druid Builds, check our Druid Builds category page. The BG3 Halsin Build is very similar to our Best BG3 Druid Build, which also utilizes the Circle of the Moon subclass. If you are interested in builds for the other members of your party, check our BG3 Origin & Companion Builds category page. To get an overview of all classes, please visit the BG3 Classes overview page.
Table of Contents for the BG3 Halsin Build:
- Introduction to the Halsin Build
- Halsin Build Character Creation
- Halsin Levelling Progression
- Halsin Equipment
- Halsin Build Extra Info
BG3 Hasin Build Overview
Here is a quick overview of the Druid Class and the Circle of the Moon subclass, which we’ll be using for the Halsin build. We will also explain how to recruit Halsin and how to respec him (highly recommended for optimising the build). If you’re already familiar with this info, you may want to skip this section.
Druid Class Summary
These are the most important aspects of the Druid Class in Baldur’s Gate 3:
Wild Shape (Level 2) – You can use a Wild Shape Charge to transform into a beast. When your beast form reaches 0 HP, you return to human form with the HP you had before you transformed. As you level up, you’ll unlock more Wild Shapes. Some Wild Shapes are unique to specific Druid subclasses.
Wild Shape Improvement (Levels 4, 8 and 12) – Wild Shape Attack Damage is increased.
Wild Strike (Level 5) – You can attack twice per Action while in Wild Shape form.
Improved Wild Strike (Level 10) – You can attack three times per Action in Wild Shape form.
In addition to these class features, the Druid gains access to a fairly wide range of spells, with a high portion of Concentration Spells. They are particularly good at channelling AoE damage, buffs and debuffs. They also possess several healing spells. This combination of features makes the Druid quite versatile. On the other hand, the Druid can be tricky to play because you cannot cast spells while in animal form, and you don’t have many non-Concentration Spells or strong Cantrips.
Circle of the Moon Subclass Summary
Now, let’s look at the most important features of the Circle of the Moon subclass.
-
Lunar Mend (Level 2) – While Wild Shaped, you can spend a Spell Slot to recover HP by 1d8 per Spell Slot Level.
Combat Wild Shape (Level 2) – You can transform with a Bonus Action instead of a full Action.
Wild Shape: Bear (Level 2) – You can transform into a Bear with high HP and good attack damage. The bear can taunt nearby enemies, encouraging them to attack it.
Wild Shape: Dire Raven (Level 4) – You can transform into a raven that can fly and
Blind enemies.
Primal Strike (Level 6) – Your attacks in Wild Shape forms count as magical, bypassing Physical Resistance.
Wild Shape: Sabre-Toothed Tiger (Level 8) – Transform into a tiger that can shred armour and heal itself.
Wild Shape: Myrmidon (Level 10) – Transform into an elemental Myrmidon, with high HP and magical abilities. You can choose between air, earth, fire and water Myrmidons.
How to Unlock Halsin in BG3
First, let’s take a look at how to unlock BG3 Halsin Companion. This section contains some plot spoilers for Acts I and II. Halsin is only unlockable once you reach Act 2 and complete a major quest for him. However, you will already meet him early in Act 1 of Baldur’s Gate 3. Here is a quick rundown of what you all need to do to get him unlocked for your party.
Steps one to four must be completed during Act 1. All other steps are completed during early and mid Act 2.
- 1 Get to the Emerald Grove and learn about Halsin.
- Infiltrate the Goblin Camp and Rescue Halsin.
- Kill the True Soul Leaders in the Goblin Camp and rescue the Emerald Grove.
- Leave the Emerald Grove with Halsin, he will then hang out at your camp as advisor.
- Get to Act 2 of Baldur’s Gate 3.
- You must get to the Last Light Inn in Act 2. Once you have visited it, go back to the camp and talk to Halsin.
- Find Art Cullagh, a cursed and sleeping man in the Last Light Inn upstairs.
- Go back to Halsin again and tell him that Arth Cullagh mentioned Thaniel.
- Now talk to Art Cullagh again with Halsin being there with you.
- Read Art’s Last Orders letter to get the needed quest.
- Follow the quest to the House of Healing.
- Defeat the evil doctor Malus Thorn and take the Art’s Battered Lute off the body.
- Return to the Last Light Inn and play Art Cullagh a song with his lute.
- Aid Halsin by defending him on the beach while he travels in the portal. You might want to save before doing this, as it’s easy to get overwhelmed. If the portal is destroyed, Halsin will be trapped inside, and there’s no way to get him back.
- After all that is done, you can talk to Halsin at your camp, and he will offer you to join your group.
You will do these steps in most cases anyway, unless you miss Art Cullagh on the first floor of the Last Light Inn. Still, there are a few important checks that you can’t miss, like actually rescuing Halsin and saving the Emerald Grove. If you manage to complete all these steps then you can unlock BG3 Halsin for your party.
How (and Why) to Respec Halsin in BG3
When recruited to your party, Halsin will start with a sub-optimal Ability and Skill distribution, making him a little weaker. I highly recommend fixing this as soon as possible. To do this, you need to respec him.
Select Halsin and go and speak to Withers in your camp. Ask “Can you help me change my class” to open the respec menu. This costs 100 gold.
Then proceed with the build guide below, starting at Level 1 and working your way through any level-ups you have done so far in your playthrough.
Starting Point (Level 1) for BG3 Halsin Build
As described above in the Respec section, it is advisable to respec Halsin immediately after recruiting him. Use this section as a guide for what to choose in the respec menu, then proceed to level up Halsin to your party’s current level using the Levelling Guide below. After that, you can refer to this guide on future level-ups, and for information about the best Equipment to use for Halsin.
Race
Halsin is a Wood Elf. We find that Wood Elves are one of the most useful races in BG3 due to their increased Movement Speed, something which should not be underestimated. Halsin gets the following passive bonuses at all times due to being a Wood Elf:
- Proficiency in
Stealth and
Perception
- Extra Weapon Proficiencies:
Shortswords
Longswords
Shortbows
Longbows
Fey Ancestry
Advantage against
Charmed
- Immune to
Magical Sleep
Darkvision – See through non-magical darkness up to a distance of 12 metres.
Fleet of Foot – 1.5 metres of extra Movement Speed.
Background & Skills
Halsin is locked into the Outlander Background, which gives him Proficiency with the following two Skills:
Athletics (STR) – Not an ideal fit for Halsin, because we won’t be focusing much on the Strength Ability. But it will help him to resist being pushed around by enemies.
Survival (WIS) – Helps Halsin to find hidden supplies and treasure when exploring. They are typically buried and need to be dug up with a shovel once found. Halsin has high Wisdom, so this skill is an ideal fit.
Halsin can also choose two other Skills (from a limited selection of Druid Skills) to be Proficient with. We went with the following two options:
Insight (WIS) – Helps Halsin to spot hidden details in the world, and in the behaviour of others. A good fit, since it is a Wisdom Skill.
Medicine (WIS) – Another Wisdom Skill, so it’s another good fit. Medicine is usually used in dialogue options to diagnose illness or injuries, and can sometimes be used to treat or heal NPCs who are sick or hurt.
You can deviate from these choices if you want; it’s not a big deal. But sticking with Wisdom Skills will allow you to make the best out of Halsin’s talents.
Abilities
For the Druid, Wisdomis the most important ability (improves spellcasting), followed by Constitution (increased HP) and Dexterity (increased Armour Class).
We’ve found that the following distribution works best for Halsin:
10 Strength
14 Dexterity
16 Constitution
8 Intelligence
16 Wisdom
10 Charisma
Bolded Abilities are essential for the build. The others can be tweaked if you want.
Cantrips
You can choose two Cantrips to start the game with. We recommend the following options:
Thorn Whip – Does a modest amount of piercing damage, but its most useful application is its ability to control the position of enemies on the battlefield. If an enemy is entrenched in a strong position and giving you a hard time, you can use Thorn Whip to pull them towards you. This is especially useful on enemies who have an elevation advantage over you. Thorn Whip can pull them down to your level. Depending on how high they are, they may receive additional falling damage.
Shillelagh – Shillelagh imbues your staff or club with magical energy for the next 10 turns, causing it to deal extra bludgeoning damage. It also causes your melee attacks to use your Wisdom instead of your Strength, significantly improving your melee weapon attack rolls if you distribute Halsin’s ability points as recommended below. This is also a
Bonus Action, meaning you can cast it and then perform an attack on the same turn. It still isn’t ideal to fight in melee in Halsin’s humanoid form, but it’s more viable with Shillelagh active.
Spells
With Halsin, you can Prepare four Spells at level 1. All Spells in the normal Druid Spell List are automatically learned when you reach their required level, but your spells need to be Prepared to use them. You can have a limited number of spells Prepared at a time, but you can swap your Prepared Spells at any time, provided you aren’t in combat.
Ice Knife – Throw a shard of ice that deals 1d10
Piercing Damage. It explodes and deals 2d6
Cold Damage to anyone nearby. It leaves an Ice Surface. On miss, the shard of ice still explodes. This spell can be cast while you are
Silenced.
Thunderwave – Thunderwave produces a large directional wave originating from your character, knocking back all characters and objects in its path. It also deals some
Thunder Damage. Not only is this a decent AOE damage spell, it’s also great for creating space, and you can knock enemies off ledges or cliffs, subjecting them to additional fall damage or even an immediate demise.
Faerie Fire – Faerie Fire is an AOE debuff spell that reveals hidden enemies and improves attack rolls against them. It requires Concentration to maintain the spell, but you’re generally going to have considerably better results from attack rolls as long as you can maintain this on your targets. Just be careful not to place it on your allies by accident. This also reveals any invisible enemies in the area who fail the Saving Throw.
Healing Word – Healing Word is a nice healing spell that can be used at long range. At first glance, you might think that Cure Wounds is better, due to its higher potential healing roll. However, Cure Wounds can only be cast at Melee Range, which gives it a major disadvantage versus Healing Word, and Healing Word is also a
Bonus Action, meaning you can still attack or cast another cantrip or spell on the same turn.
Note that the number of Prepared Spells we can have depends on our Character Level and our Wisdom. Each Level will give another slot, and increasing our Wisdom Modifier further will also add to this. Your Wisdom Modifier increases by +1 for every 2 points of Wisdom above 10, for example:
- 12 Wisdom = +1 Wisdom Modifier
- 14 Wisdom = +2 Wisdom Modifier
- Etc.
The same applies in reverse if your Wisdom is below 10, but that won’t concern us here because we’ll be increasing Halsin’s Wisdom as much as we can.
Concentration
The concentration mechanic is important for any spellcaster to understand. Many spells that leave a lingering effect on an enemy or an area require Concentration to maintain. You can see if a spell requires Concentration on its tooltip.
This means that whenever the caster takes damage, they must go through a Concentration Check. Failing the check will break Concentration and put an end to any ongoing Concentration spells that they were maintaining. Having a higher Constitution score improves your chances of passing Concentration Checks.
You can only have one Concentration Spell active at a time per character. Casting another will break the effects of the previous one. Make sure you check the tooltip of a spell before casting it!
Halsin Build Levelling Guide
We will now walk you through the full levelling up process for our BG3 Halsin Build.
Early-Game Levelling 2-4 for your BG3 Halsin Build
Now, let us take a look at the levelling progression for Halsin in Baldur’s Gate 3. Subclass selection happens at level 2; make sure to select the Circle of the Moon subclass.
We’ll be starting with the early-game levels, 2-4. You’ll probably be long past this point by the time you can recruit Halsin to your party, so assign these levels after doing the Respec, then proceed onto the mid-game levels and so on.
Level 2 & Subclass
For Halsin, we’ll be using the Circle of the Moon subclass, which gives us greater options with animal transformations, something that makes your character more versatile both inside and outside of combat.
With the Circle of the Moon subclass, Halsin can transform into a Bear, a very tanky animal that also hits quite hard, and has the ability to Goad enemies, effectively turning your character into a tank. The great thing about transforming into an animal is that being “killed” in this form just ends the transformation, turning you back into your normal form. Making good use of the BG3 Wild Shape mechanic, therefore, makes the Druid arguably the most enduring class in the game.
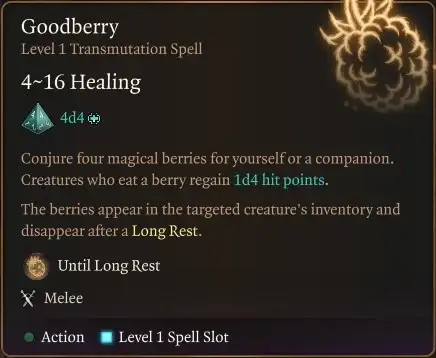
Besides choosing your subclass, you can also unlock a new spell. You may want to get the Goodberry Spell, which lets you conjure consumable berries that heal whoever eats them for up to 16 hitpoints. This is great for keeping your party healthy. Another option is
Speak with Animals, which allows you to talk to animals as though they were humans, unlocking hidden interactions.
Level 3
At Level 3, Halsin will gain access to second level spells for the first time (this can be a bit confusing at first, but just try to think of spell levels as a completely separate system from character levels).
You’ll also receive at least one more spot for a Prepared Spell. It’s a good idea to begin adding Level 2 Spells to your arsenal here. Make sure to have a good mix between Level 1 and Level 2 spells on your Prepared Spells. Some good Level 2 options are:
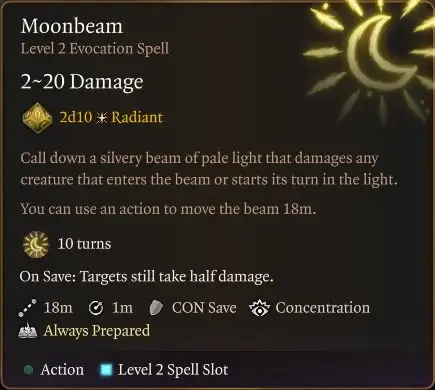
Moonbeam – Moonbeam summons a beam of
Radiant Damage on a small area of the ground, dealing up to 20 damage per turn to all within while it is maintained. Maintaining the beam requires Concentration. A particularly useful thing about this spell is that you can use a Bonus Action each turn to relocate the beam, allowing you to keep moving it to the new location of enemies without needing to cast the spell again, provided you maintained your Concentration.
Heat Metal – Heat Metal is a damage and debuff spell that can be targeted on an enemy using any metal weapon or armour. The target takes some
Fire Damage and must either drop the weapon or receive a
Disadvantage on their Attack Rolls and Ability Checks. If you maintain Concentration, you can apply the effects again on subsequent turns by spending a Bonus Action.
Spike Growth – Spike Growth covers an AOE (6 metre radius) with spikes, dealing
Piercing Damage to enemies who walk through it, every 1.5 metres they move. It also halves their movement speed in the area. Enemies cannot perform Saving Throws to resist this damage, making it particularly useful. You can also maintain the effect for multiple turns, as long as you can keep Concentration.
Level 4 – Dire Raven and Deep Rothe Transformation Unlocks
When you reach Level 4 in Baldur’s Gate 3 with your Halsin Build, you must choose a Feat.
For this build, we use the Ability Improvement Feat, which gives you an extra 2 points to allocate to abilities of your choice. Put the points in Wisdom, to further improve Spellcasting. This should give you 18 Wisdom in total.
You’ll also need to choose another Spell and another Cantrip.
For the Spell, the one you choose depends on how many of the second-level spells from the previous section you decided to use. If you didn’t get all of them, then it’s time to add one of the ones you missed. If you already slotted all of them, then get Flaming Sphere. This is a long-range AOE spell that deals
Fire Damage to enemies within and acts as a light source. If you spot a group of tightly packed enemies who haven’t noticed you yet, then you can use this spell to initiate combat and get an immediate edge, as you’ll already have damaged them quite a bit.
For the Cantrip, it’s always a good idea to get the Guidance Cantrip sooner or later in your playthrough, as this gives a +4 bonus in Ability Checks that can apply to both you and your allies. You can choose to activate it in non-combat checks by simply choosing it in the dice roll screen.
Additionally, you also get access to two new Wild Shape forms for Halsin at level 4:
The Dire Raven Wild Shape form is great for scouting ahead and reaching faraway places that you can’t jump to normally.
BG3 Halsin Build Mid-Game Levelling
We’ll now guide you through the mid-game levelling-up process for Halsin in BG3, covering levels 5-8.
Level 5
When you reach Level 5, you’ll gain access to Third Level spells. The following two spells are great options to slot at this point:
Call Lightning – This is a lightning AOE spell. What’s great about the spell is that you can call lightning again for free on subsequent turns, as long as you keep concentration. This is one of the best Druid spells in BG3 and gives you huge damage potential per Spell Slot if you can maintain Concentration for a few turns.
Sleet Storm – Sleet Storm has a large radius of 9 metres and creates an ice surface within that AOE, which can be really bothersome for enemies within, slowing down their movement and possibly making them slip over. It also breaks the concentration of spellcasters, so it’s a good counter for enemy mages. You can keep the Sleet Storm going for several turns, as long as you maintain your own Concentration.
Your Wild Shapes become more powerful as you unlock the Wild Strike passive. Whenever you make a successful unarmed attack in animal form, you get an extra attack on the same turn.
Level 6 – Owlbear Transformation finally unlocks
At Level 6, Halsin gains more buffs and options for its Wild Shapes:
Primal Strike – While in beast form, your attacks count as magical for the purpose of overcoming Resistance and Immunity to non-magical damage.
Wild Shape: Panther – Take the shape of a panther that can prowl around invisibly.
Wild Shape: Owlbear – Take the shape of an Owlbear that can rupture the ground and become Enraged.
You also gain an additional Third Level Spell Slot for your Halsin Build.
You’ll be able to choose another Spell to Prepare, too. We recommend choosing whichever spell from Level 5 that you didn’t get already.
At this point, you might want to consider using the Owlbear rather than the Bear as your main Wild Shape for combat. It has very powerful attacks and can damage or Frighten enemies in an AOE around your character. Make sure to give it a try and see which one you like best.
Level 7
At Level 7, you unlock your first Fourth Level Spell Slot and can begin using these Spells in combat. You’ll be able to prepare one more spell.
We recommend choosing the Conjure Woodland Being spell. This summons a dryad which can in turn summon a wood woad, giving you 2 summons in one. This is great for dealing a bit of extra damage to enemies, and dividing their attention between multiple targets. We like to use the summons on the Circle of the Moon build because it effectively means that your spells can keep doing damage and hindering enemies, even while you are transformed.
Once you’ve picked up a new spell, there’s not much else to do at Level 7 for the Halsin build.
Level 8
At Level 8, you can choose another Feat. We recommend choosing Ability Improvement and putting both points into Wisdom, increasing it to 20. Once again, this will increase your Wisdom Modifier, this time to +5.
You unlock a new Wild Shape for Halsin- the Sabre Toothed Tiger. It can shred armour and regenerate HP. Be sure to give it a try! (We still prefer the Owlbear though).
Additionally, you will be able to prepare two more Spells We recommend grabbing the following:
Conjure Minor Elemental – Another summonable creature that you can have active at the same time as your Woodland Being.
- Any of the following three spells, depending on your needs (you can unslot an older spell that you’re not using much, if you want to pick more than one of these):
-
Blight – Deals a big chunk of
Necrotic Damage to a single target. The damage is halved if they perform a Saving Throw, so the spell is never completely wasted. The Druid doesn’t have many spells that can deal high single-target damage without relying on the Concentration mechanic; Blight is a remedy for that issue.
Ice Storm – Deals
Bludgeoning and
Cold Damage to enemies in a 6 metre radius, creating ice surfaces. Good spell to choose if you need more AoE damage.
Freedom of Movement – Snap an ally out of a Stun. Prevent Difficult Terrain from slowing them down, and prevents them from being Paralysed or Restrained by magical means. The latter effects require Concentration to maintain. This pairs well with an aggressive melee-hitter who relies on mobility, like the Barbarian or the Fighter.
-
Late-Game Levelling Guide for Halsin
Now for the late-game levelling-up process for Halsin (Levels 9-12).
Level 9
At Level 9, the most notable new feature for the Halsin Build is the addition of Fifth Level Spells, starting with one Spell Slot of this Level. As usual, you’ll be able to Prepare one or two more spells too, so you can immediately start trying out the new and more powerful magic at your disposal.
I recommend picking up the Insect Plague spell right away because this is one of the best spells in the game. It is a little similar to Spike Growth, except much more deadly. It slows its victims down, deals up to 40
Piercing Damage per enemy per turn, and imposes
Disadvantage on
Perception checks (makes it easier for your allies to use stealth). You can set up some terrific chokepoints with this spell, and even if you just drop it on a cluster of enemies in an open area, it can cause them all sorts of issues. Chokepoint tactics tend to work quite well in Act III, since a lot of it it set in the city of Baldur’s Gate with its narrow streets, sewers and indoor areas.
Level 10
At Level 10 with your Halsin Build, you can Prepare another Spell as usual, we recommend selecting Conjure Elemental, which allows you to summon a more powerful creature to help you in combat.
Cantrip selection is up to you; pick the one you think is the most useful.
The Halsin Build also gains access to several new Wild Shapes at Level 10. These are the final Wild Shapes unlocked by Halsin:
Wild Shape: Dilophosaurus – Take the shape of a Dilophosaurus whose Corrosive Spit can dissolve a target’s Armour.
Wild Shape: Myrmidon – Choose from four variants to transform into; Air, Earth, Fire or Water Myrmidon.
You’ll also gain an additional Fifth Level Spell Slot, allowing you to cast two of these spells per Long Rest.
Level 11
Pretty much the only feature you unlock at Level 11 is access to Sixth tier Spells, the highest tier of magic in Baldur’s Gate 3. These very powerful spells can only be cast once per Long Rest.
A great spell to pick up here is Sunbeam, which conjures a beam of sunlight that deals 6-48
Radiant Damage to all creatures in its path and
Blinds them. Targets who Save will still take half of the damage. While you maintain concentration on the spell, you can recast the effect again each turn.
This is especially good in chokepoints and will be absolutely devastating to undead and unholy targets, who normally take double Radiant damage.
Level 12
At Level 12, you can choose one final Feat for your BG3 Halsin Build. I recommend choosing the War Caster Feat, which gives you Advantage on all Concentration Saving Throws. We now have lots of powerful Concentration spells unlocked, and this feat helps to make these spells more forgiving and less frustrating to use.
You can unlock one more Prepared Spell. If nobody else in your party has it already, get the Heroes’ Feast spell, a powerful party-wide buff that gives everyone an extra 12HP until the next Long Rest. It also gives you a chest full of Camp Supplies when you cast it.
Otherwise, choose the Heal spell. This is a powerful healing spell that gives a guaranteed heal of 70 HP to a single target.
And if you reached this point, then congratulations, you have finished levelling Halsin in Baldur’s Gate 3!
Equipment for the BG3 Halsin Build
Now, let us take a look at some of the equipment choices you can make for Halsin. Don’t worry if you can’t find certain gear; the build works just fine if you’re missing some pieces. It’s best to treat this as a wishlist rather than a precise blueprint. If you prioritise any items on the list, then go for those that improve your Spell Save DC.
Usually, we provide an early-game and late-game version of our Equipment recommendations for our BG3 builds. However, since you’re unlikely to recruit Halsin until some way into Act II, we’ll jump straight to the late-game gear this time.
| Slot | Icon | Item | Location | Benefits |
|---|---|---|---|---|
| Head |  |
Hood of the Weave | Sold by Mystic Carrion in Philgrave’s Mansion | • +2 to Spell Save DC |
| Cloak |  |
Cloak of the Weave | Sold by Helsik at the Devil’s Fee (After Special Stock unlock). | • +1 to Spell Save DC and Spell Attack Rolls |
| Chest | Armour of Moonbasking | Sold by Barcus Wroot at Last Light Inn | • Advantage on Constitution Saving Throws • Can cast Plant Growth for free • +1 to Spell Save DC • Starting your turn on Vines or Plant Growth heals you 1d4 |
|
| Gloves | Gloves of the Automaton | Dropped by Haarlep in the House of Hope. | • Access to Circuitry Interface, giving Advantage on Attack Rolls for 10 turns • +1 to Strength Saving Throws. |
|
| Boots |  |
Helldusk Boots | Looted from a locked gilded chest on the top floor of Wyrm’s Rock Fortress | • You cannot be forcefully moved by enemy spells or actions • Immunity to being slowed by Difficult Terrain • You can use your Reaction to succeed a Saving Throw you were about to fail. |
| Necklace | Amulet of Greater Health | House of Hope Archive. | • Boosts Constitution to 23. | |
| Ring | Ring of Regeneration | Sold inside Sorcerous Sundries. | • Restores 1-4 HP beginning of every turn. | |
| Ring | Shapeshifter’s Boon Ring | Dropped by the Strange Ox in Act II | • Gives a 1d4 bonus to all checks while you are transformed or disguised | |
| Melee Weapon |  |
Markoheshkir | In a Globe of Invulnerability inside Ramazith’s Tower. | • +1 Spell Save DC • Cast a spell for free, once per Long Rest • Use Kereska’s Favour to get special elemental buffs |
| Ranged Weapon | Any Longbow | • We won’t use this very often, so it can be any Longbow to fill the slot |
Hood of the Weave
The Hood of the Weave improves your Spell Save DC by +2, meaning enemies will have to roll 2 more points in any given Saving Throw to succeed it. This makes many of your spell effects harder to resist.
It is sold by Mystic Carrion in Philgrave’s Mansion, Act III.
Shapeshifter Hat (Alternative Hat)
If you’re using your Wild Shape more than you are casting spells that impose Saving Throws, then the Hood of the Weave might not be a great option for you. In that case, you can use the Shapeshifter Hat instead. It gives you +1 Nature and one additional Wild Shape Charge.
The item is sold by Helsik at the Devil’s Fee. You need to unlock her “special stock” to be able to see the hat.
Cloak of the Weave
The Cloak of the Weave adds a +1 bonus to your Spell Difficulty Class and Spell Attack Rolls. This makes it harder for enemies to resist or dodge your spells.
The cloak is sold by Helsik at the Devil’s Fee, after unlocking her special stock.
Armour of Moonbasking
The Armour of Moonbasking applies extra 22 temporary Hit Points to you when you transform. While you have the THP active, you also take 1 less damage from all attacks. You also get +2 Armour Class (when transformed) and have Advantage on Saving Throws against spells. This is a lot of buffs, but most of them are only active when you’re transformed into a Wild Shape, and the base Armour Class of 11 is quite low, which makes you a bit more vulnerable when in your normal form.
The armour can be bought from Voiceless Penitent Bareki in Lower City Sewers.
Armour of Landfall (Alternative Armour)
The Armour of Landfall boosts your spellcasting prowess further, by adding another +1 bonus to your Spell Save Difficulty Class. It also gives you Advantage on Constitution Saving Throws. As an additional (but fairly minor) bonus, it allows you to cast the Plant Growth spell for free, and heals you for 1d4 HP when you are standing on a Plant Growth or Vines surface.
If you’re not using your Wild Shape too often, you should switch to the Armour of Landfall instead. It buffs your spellcasting and has a higher Armour Class.
The Armour of Landfall is sold inside Sorcerous Sundries.
Gloves of the Automaton
The Gloves of the Automaton give you a special Bonus Action called Circuitry Interface, which causes you to become a Construct for 10 turns, giving you Advantage on all Attack Rolls as well as Resistance to Lightning Damage. Beware that you also gain other quirks that are unique to Constructs – for example, healing spells won’t work on you for the duration of Circuitry Interface, although you can still use healing potions.
Activate the Gloves of the Automaton the turn before you transform into your Wild Shape. You can then enjoy very high hit chance for the duration of the effect, since all of your Attack Rolls have Advantage. You can do this once per Short Rest.
The Gloves of the Automaton are sold by Barcus Wroot at his workshop at Last Light Inn, Act II.
Helldusk Gloves (Alternative)
The Helldusk Gloves give a +1 bonus to Halsin’s Strength Saving Throws and infuse his weapon attacks with 1d6 bonus Fire Damage. More importantly, they give a +1 bonus to spell Attack Rolls and Spell Save DC, making all of your spells more likely to have the desired effect against enemy targets. These gloves are a good alternative to use if you’re not using your Wild Shape much and prefer to stay in human form and cast spells.
The gloves are dropped by Haarlep in the House of Hope.
Helldusk Boots
The Helldusk Boots prevent Halsin from being forcefully moved by an enemy’s spells or actions, and give him immunity to the effects of Difficult Terrain. You can also use a Reaction to succeed a Saving Throw that you would have failed, making these extremely good defensive boots. As another added bonus, you get access to the Hellcrawler action, which allows you to teleport and deals fire damage to anyone at the destination.
These boots can be looted from a locked gilded chest on the top floor of Wyrm’s Rock Fortress. Take them before Gortash’s coronation to avoid making NPCs in the area hostile.
Amulet of Greater Health
The Amulet of Greater Health is another item that is immensely powerful for our BG3 Halsin Build. It will boost your Constitution score to 23, increasing your health tremendously. Like the Gauntlets of Hill Giant Strength and Orphic Hammer it can also be found inside the Archive in the House of Hope that you reach via Devil’s Fee.
You can also read our in-depth guide on How to get the Amulet of Greater Health in BG3.
Ring of Regeneration
The Ring of Regeneration lets you restore 1-4 Hit Points at the beginning of your turn. The ring synergizes well with The Reviving Hands, Hellrider’s Pride, The Whispering Promise and Boots of Aid and Comfort. You could sort of create a chain reaction with all these items if you want to.
Shapeshifter’s Boon Ring
The Shapeshifter’s Boon Ring adds 1d4 bonus to all checks you do while transformed or disguised. This item is dropped by the Strange Ox in the Last Light Inn at the start of Act 2. You can use another ring here, too, if you don’t want to hurt the Strange Ox for the quest later.
Markoheshkir
You won’t be using your weapon much for melee attacks, since we have Wild Shapes for that. It’s therefore worth choosing a weapon that gives a good passive buff, and one of our best bets is Markoheshkir, the most powerful Quarterstaff in the game. This staff gives you another +1 bonus to your Spell Save DC, lets you cast one spell of any level without a Spell Slot per Long Rest, and gives you access to Kereska’s Favour, a unique spell that gives you special elemental buffs and temporary access to additional spells.
This doesn’t do anything for us in Wild Shape form, but none of the weapons do, really. When you are in human form however, Markoheshkir helps to make your spellcasting much better.
Markoheshkir can be found in a Globe of Invulnerability inside Ramazith’s Tower.
Halsin Build Extra Info
Below you will find some extra information and tips to help you get the most out of this Halsin Build for Baldur’s Gate 3.
BG3 Halsin Build Tips & Tricks
In the very early game you will have pretty limited options for Spellcasting, and at Level 1 you don’t have Wild Shape unlocked yet either. At these early stages, you can get by with the Shillelagh Cantrip, which will let you roll melee attacks based on Wisdom instead of Strength, resulting in good early melee capabilities. As you level up, this will start to become a little redundant, however.
Transforming into the Bear is the best early-game combat option for this build, for a couple of reasons:
- It allows us to Goad (taunt) enemies, gaining breathing room for the rest of the party. If your health is reduced to zero while tanking in Bear form, you simply revert back to your normal form rather than dying.
- The Bear has a good Constitution Score, so you can cast spells before transforming, and have a good chance of passing Concentration Checks on those spells when you take damage in Bear form.
- The Bear also has strong melee attacks, making for a formidable melee combatant along with the other benefits.
When you reach Level 6, you can replace the Bear with the Owlbear. Don’t take our word for it, though. The Circle of the Moon Druid has loads of Wild Shapes to choose from, so give them all a try and see which ones you like best.
Lastly, it helps to stay mindful of how your abilities interact with Wild Shapes. Your Strength, Dexterity and Constitution will be replaced by that of the animal you transform into, but your Wisdom, Charisma and Intelligence will remain the same. This may impact how you perform in Saving Throws for example.
As you progress, you may want to spend more time in human form, due to the more powerful spells you unlock. Many of these are Concentration Spells. When Concentrating on a spell, try to keep Halsin away from enemy attacks as much as possible, as you’ll need to roll a Concentration Saving Throw every time he takes damage. Use distance and obstacles to block enemy line of sight to Halsin as much as possible.
Best Party Composition for Halsin
Halsin has a neutral good alignment, taking it upon himself to cleanse evil and corruption from the land. Halsin fits in naturally with any good-aligned characters in BG3.
While you can use any party composition with Gale, you’ll have an easier time with characters who match up with his alignment. This leaves the following four options as the most obvious choices:
Gale (Neutral Good) – Halsin shares Gale’s neutral good alignment, and they both have an affinity for magic, so they work quite well together.
Wyll (Lawful Good) – Despite his otherworldly pact, Wyll typically maintains a lawful good alignment throughout the game. This goes down well with Halsin, and you shouldn’t have any problems keeping a positive rapport with both characters by simply being kind.
Karlach (Chaotic Good) – While Karlach’s emotional nature can make her chaotic and unpredictable at times, her obvious good nature leaves her with few reasons to conflict with Halsin in general.
Shadowheart (Neutral Evil or True Neutral) – Shadowheart starts the game with a very neutral alignment, and can be influenced towards a good or evil alignment based on the player’s choices. If you choose Shadowheart’s good path, then there won’t be any conflict between her and Halsin.
BG3 Halsin Build Illithid Powers
Unlike the Origin characters in BG3, Halsin is not infected with the Mind Flayer Tadpole. Therefore, he cannot access any of the BG3 Illithid Powers. There’s no known way to change this in an unmodded playthrough.
Top 5 Halsin Build Spells in Baldur’s Gate 3
1. Moonbeam Spell
Moonbeam is available at level 3, so Halsin can use it from the moment you recruit her. It is a tier 2 spell. The spell summons a pillar of radiant light that inflicts damage to creatures within its area. You can cast Moonbeam before using your Wild Shape, allowing you to maintain its effect while in beast form.
2. Spike Growth Spell
Spike Growth is also available at level 3. It is also a tier 2 spell. The spell places spikes all over the floor, dealing piercing damage to enemies. Additionally, it also halves their movement speed in the spiked area. Spike Growth can be used strategically to hinder enemies from moving fast in certain areas. You can also cast this before you transform into a Wild Shape form!
3. Freedom of Movement Spell
Unlocked at Level 7, Freedom of Movement is an excellent support spell that Halsin can use. It is a Concentration Spell that gives the target immunity to most stuns and immobilising effects. Additionally, it immediately snaps the target out of any such effect. Freedom of Movement is great for giving a powerful melee-focused ally almost unstoppable mobility.
4. Insect Plague Spell
Insect Plague is unlocked at level 9. It is a tier 5 spell. This powerful endgame ability summons a swarm of locusts within a designated area, damaging all creatures inside. Additionally, it transforms the terrain into difficult ground, hindering movement and imposing disadvantage on Perception checks for those affected. Insect Plague excels in strategic applications, particularly when deployed at choke points to obstruct enemy advances and control the battlefield.
5. Sunbeam Spell
Sunbeam is unlocked at level 11. It is a tier 6 spell. Sunbeam is an exceptional endgame spell that unleashes a devastating beam of radiant energy, dealing significant damage to all enemies in its path. In addition to its raw power, it blinds affected enemies. Sunbeam is particularly effective in chokepoint scenarios, where it can target multiple foes that are lined up simultaneously, maximizing its destructive potential. It is particularly destructive against undead enemies.
More BG3 Companion Builds:


