Type: Dungeon, Trials & Overland
Buildname: Scourge
Table of Contents
Welcome to the Necromancer Healer Build PvE “Scourge” for ESO (Elder Scrolls Online). Make sure to bookmark the link as I will keep updating the build for each new Update of ESO. The Scourge Necromancer build is created for Trials & Dungeons. If you are new to ESO, please make sure to also check out:
- New Player Beginners Guide
- Magicka Necromancer Beginners Guide
- Healer Beginner Guide
- Endgame Healer Sets
The ESO Necromancer Healer Build functions similar to the other healer specs. Like always healers have to adjust depending on the situation and the group they play with. There are a few very viable set combos that you can choose from, so the one you see below is just one possible option.
- Necromancer Class
- Dungeon, Arena & Trial Build
- Insane Healing
- Insane Sustain
- Light Armor
- Group Support
Trials & Dungeons Setup Necro Healer
In this section, we are going to take a look at the Necromancer Healer Build setup for ESO (The Elder Scrolls Online).
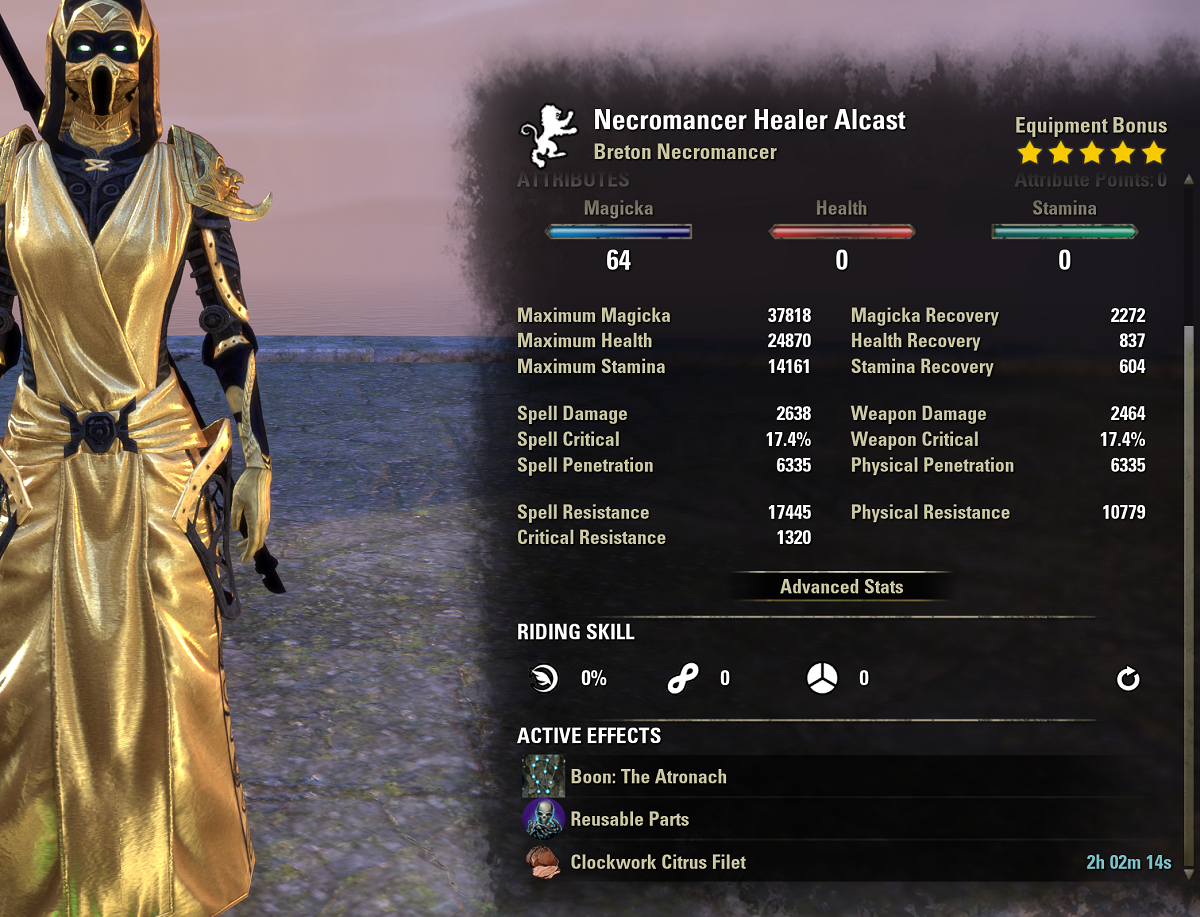
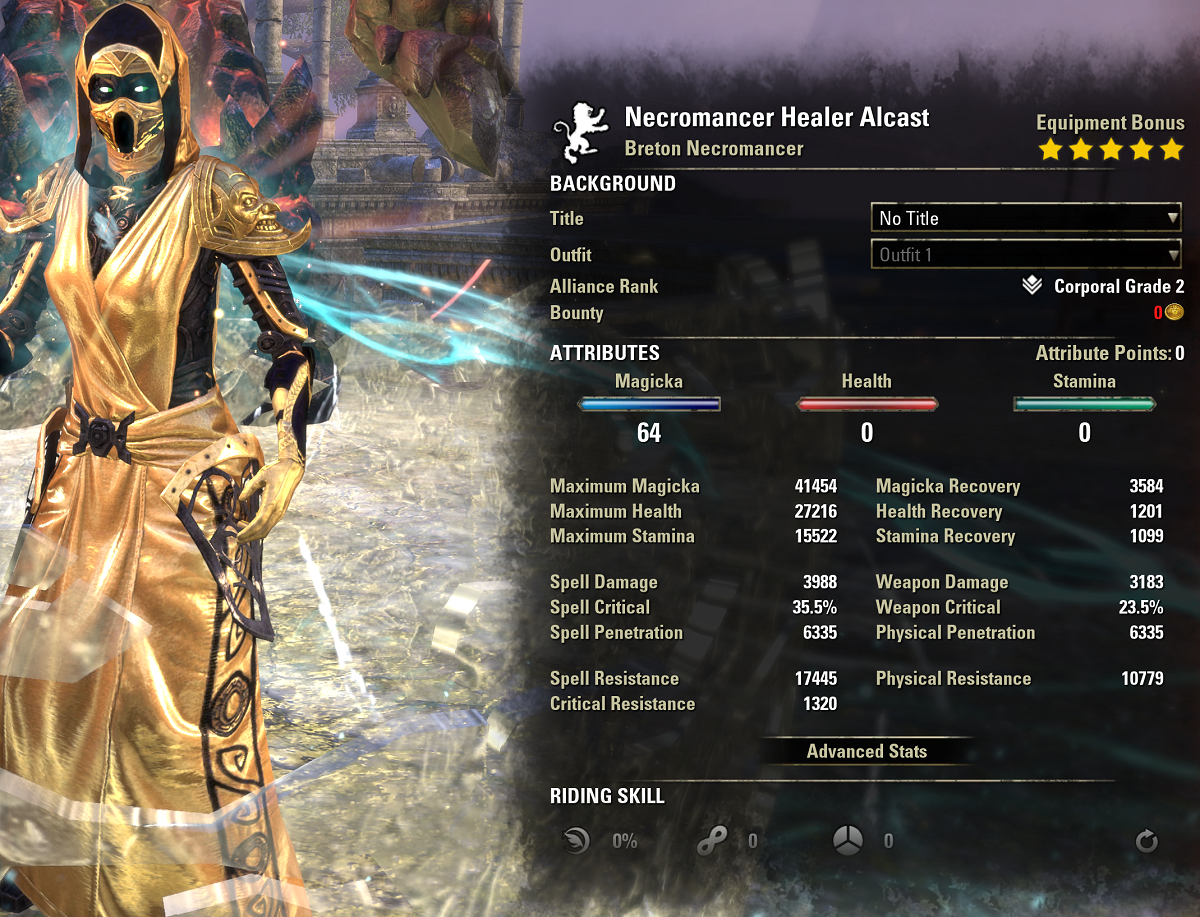
5x Spell Power Cure, 5x Powerful Assault, 2x Symphony of Blades, 1x Perfected Grand Rejuvenation on a Breton with Clockwork Citrus Filet buff food.
- Unbuffed: Out of combat, buff food active.
- Buffed: In combat, buff food, Raid Target Dummy buffs, Spell Power Potion, Powerful Assault, Spell Power Cure active.
Gear Necro Healer
You can find more good sets for healing in the “Must Have Healer Sets” Article. To be fully ready I recommend trying to get most of these sets and confirm with your raid leader what combinations you need them in.
Gear Setup 1
- We are using a frost staff with a frost glyph on the back bar to keep procing Minor Maim and Minor Brittle as well as providing a shield to allies.
- Make sure to use Powerful Assault on Jewelry and the backbar weapon. This is a medium armor set and therefore we need to use jewelry and weapon, otherwise we can’t run light armor on the other pieces.
| Gear | Set | Weight | Trait | Enchantment |
|---|---|---|---|---|
| Chest | Spell Power Cure (Or Transformative Hope) |
Light | Infused | Magicka |
| Belt | Spell Power Cure (Or Transformative Hope) |
Light | Divine | Magicka |
| Shoes | Spell Power Cure (Or Transformative Hope) |
Light | Divine | Magicka |
| Pants | Spell Power Cure (Or Transformative Hope) |
Light | Infused | Magicka |
| Hands | Spell Power Cure (Or Transformative Hope) |
Light | Divine | Magicka |
| Head | Symphony of Blades | Heavy | Infused | Magicka |
| Shoulder | Symphony of Blades | Light | Divine | Magicka |
| Necklace | Powerful Assault | Jewelry | Arcane | Magicka Recovery |
| Ring | Powerful Assault | Jewelry | Arcane | Magicka Recovery |
| Ring | Powerful Assault | Jewelry | Arcane | Spell Damage |
| Weapon 1 | Perfected Grand Rejuvenation | Resto Staff | Powered | Magicka Drain Enchant |
| Weapon 2 | Powerful Assault | Frost Staff | Charged | Frost Damage Enchant |
Gear Setup 2 Beginner
For the beginner setup, any trait of the sets works, if you want the perfect traits follow the main gear setup. Most important is that you get the sets complete to benefit from the bonus of each set.
| Gear | Set | Weight | Trait | Enchantment |
|---|---|---|---|---|
| Chest | Kagrenac’s Hope | Heavy | Any Trait | Health |
| Belt | Seducer | Light | Any Trait | Magicka |
| Shoes | Seducer | Light | Any Trait | Magicka |
| Pants | Kagrenac’s Hope | Light | Any Trait | Magicka |
| Hands | Kagrenac’s Hope | Light | Any Trait | Magicka |
| Head | Monster Set or Random | Light | Any Trait | Magicka |
| Shoulder | Monster Set or Random | Light | Any Trait | Magicka |
| Necklace | Seducer | Jewelry | Arcane | Magicka Recovery |
| Ring | Seducer | Jewelry | Arcane | Magicka Recovery |
| Ring | Seducer | Jewelry | Arcane | Spell Damage |
| Weapon 1 | Kagrenac’s Hope | Resto Staff | Powered | Absorb Magic Enchant |
| Weapon 2 | Kagrenac’s Hope | Frost Staff | Any Trait | Frost Damage |
Where can I get the gear?
Spell Power Cure: White-Gold Tower
Powerful Assault: Tel Var Merchant Imperial City or Guild Stores
Symphony of Blades: vDepths of Malatar Dungeon, Undaunted Vendor
Sentinel of Rkguamz: vDarkshade Caverns I, Maj Undaunted Chest
Perfected Grand Rejuvenation (Master Resto): vDragonstar Arena
Grand Rejuvenation (Master Resto): Dragonstar Arena
Transformative Hope: nSanity’s Edge Trial
Perfected Transformative Hope: vSanity’s Edge Trial
Seducer: Craftable
Kagrenac’s Hope: Craftable In the Earth Forge
Spaulder of Ruin: Antiquity
Skills Necro Healer
Remember, Healers often need to change a few skills out during runs. So this setup is not maced into stone, adjust it to your needs.
- Echoing Vigor must be on the back bar, because the Powerful Assault set is only active on the back bar.


| Restoration Staff Mainbar | Shock Staff bar |
|---|---|
| Slot 1: Resistant Flesh | Slot 1: Elemental Blockade |
| Slot 2: Combat Prayer | Slot 2: Empowering Grasp |
| Slot 3: Illustrious Healing | Slot 3: Echoing Vigor |
| Slot 4: Radiating Regeneration | Slot 4: Spirit Guardian |
| Slot 5: Energy Orb | Slot 5: Braided Tether |
| Ultimate: Renewing Animation | Ultimate: Aggressive Warhorn |
If you don’t have Vigor unlocked yet, check out the How to unlock the Vigor Skill Guide, it doens’t take long.
Skill explanation:
- Resistant Flesh: This ability is your burst heal, it also gives resistance to the player that receives the heal.
- Combat Prayer: This is your main spammable as a healer, it needs to be on the group members all the time to heal them and increase their damage by 5%.
- Illustrious Healing: Very strong heal over time.
- Radiating Regeneration: Very strong heal over time that you have to keep up all the time.
- Braided Tether: Strong heal over time and also increases your healing done by a small %.
- Renewing Animation: This is one of the strongest ultimates, if you are the last standing member, make sure to activate this to resurrect them all at the same time!
- Elemental Blockade: Blockade of Frost grants a damage shields (Frost Safeguard) to protect you and allies from projectiles and immobilizes Chilled enemies.
- Empowering Grasp: Applies Empower to allies, snares enemies and boost healing of the Spirit Guardian.
- Echoing Vigor: Strong area of effect heal over time and also activates the Powerful Assault set in combat.
- Spirit Guardian: Keep this up at all times, this heals for a lot and also activates the passive so you gain 200 Magica Recovery all the time.
- Energy Orb: Always make sure that one orb floats around, that way your group members can synergize the bubble and get resources back.
- Aggressive Warhorn: This is your main Ultimate, it buffs the groups resources and increases the critical damage modifier for 10 seconds.
Class Mastery
Class Mastery is a new system in ESO that allows pure class builds to get two additional powerful passives to better compete against Subclass builds. Activating subclassing will deactivate Class Mastery passives.
All Necromancer Class Mastery Passives
For our Necromancer Healer Build, we are going to use the following:
Scribing Skills
The ESO Scribing System offers plenty of adjustable skills to add to our build. The Scribing Skills aren’t a must have. There are some viable options that you can use in certain situations.
Important: Please read here how to get Grimoires, Focus Scripts, Signature Scripts and Affix Scripts for the ESO Scribing system.
Base Scribing Skill useful to our build:
- Restoration Staff: Mender’s Bond
- Destruction Staff: Elemental Explosion (Dazing Explosion)


To unlock the Mender’s Bond skill you need to reach level 25 in the Restoration Staff skill line. To unlock the Elemental Explosion skill, you need to reach level 25 in the Destruction Staff skill line.
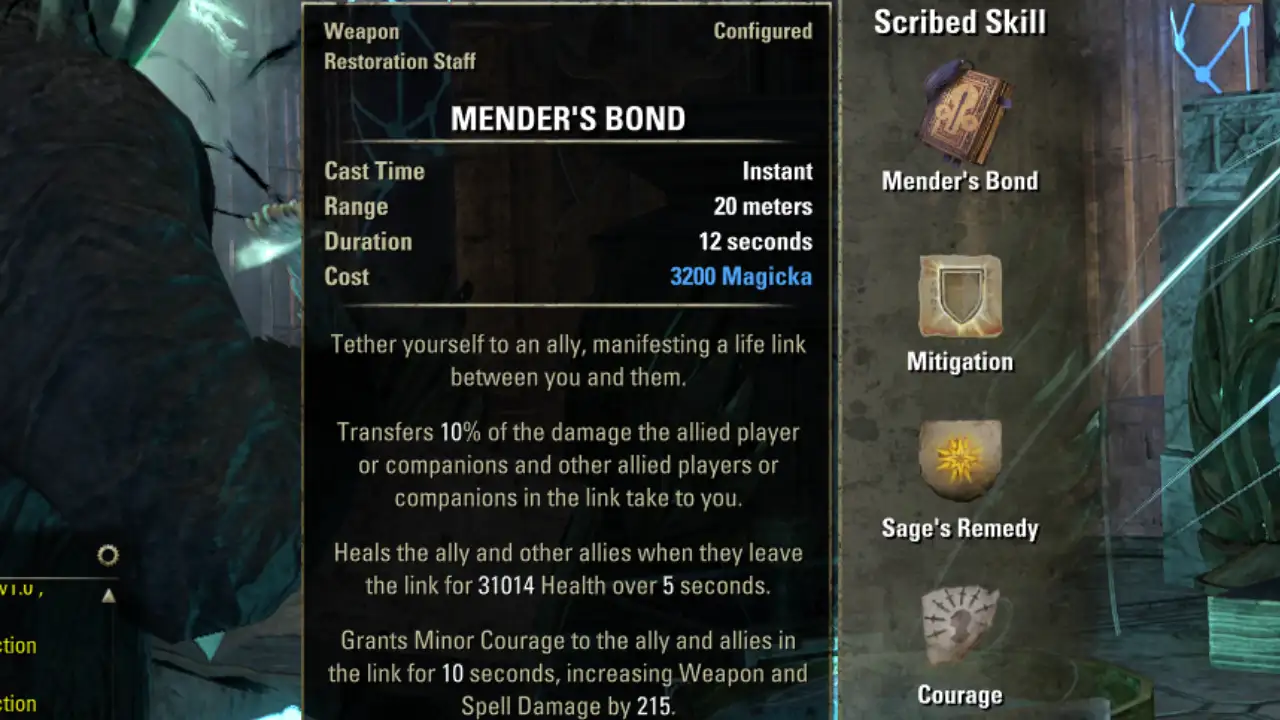

Mender’s Bond
Our Mender’s Bond version tethers yourself to an ally and transfers 10% of the damage the allied player or companions take to you. Heals the ally and other allies when they leave the beam for a huge amount. Additonally, also grants Minor Courage increasing Weapon and Spell Damage by 215. Spell Power Cure already provides us with Major Courage (430 Weap/Spell Damage) and Powerful Assault has a unique buff to give even more Weapon and Spell Damage. This way we fully maximize group support!
Mender’s Bond is a great choice because with our spec it heals for such an insane amount and only requires your allies to touch the beam once.
- Focus Script
- Mitigation (Transfers 10% of damage)
- Signature Script
- Sage’s Remedy (30k Health over 5 seconds)
- Affix Script
- Courage (Minor Courage, 215 Weap/Spell Damage)
Elemental Explosion (Dazing Explosion)
Elemental Explosion turns into Dazing Explosion when we add the scripts below, it is an AoE skill. It allows us to stun enemies for 5 seconds and restores 441 Magicka per enemy hit, basically giving back the cost of the spell when you hit 6 enemies. Most importantly, it applies Minor Brittle to all enemies, increasing their Critical Damage taken by 10%. This debuff is often hard to get. The Stun and Minor Brittle are great effects when you throw the AOE into trash mobs!
- Focus Script
- Stun (Stuns enemies)
- Signature Script
- Druid’s Resurgence (Restore Magicka)
- Affix Script
- Brittle (Applies Brittle to the enemy, increasing their Crit Damage taken)
Champion Points for the Necromancer Healer Build
Below you can find the Champion Points setup for this build. Work your way from top to bottom in your allocation. For more information on Champion Points, please visit the Champion Points Overview Page on ESO-Hub.com.
Important:
- Warfare Tree: This tree gives you a mix between damage, healing and damage mitigation.
- Fitness Tree: This tree gives you extra health, sustain and defensive buffs.
- Craft Tree: This tree is mostly optional, nothing really “impacts” combat, therefore you can pick whatever you prefer, or use the preset below.
- Perks: Hovering over each perk will give you insights on what it does. Presets are also provided for each of the allocations below.
Click the tab below to open the allocation.
Important Info for Magicka Necromancer Healer Build PvE
Buff-food
Ideally you want to use the Clockwork Citrus Filet as it provides you with a little bit extra Magicka and Health. However, that food is quite expensive, the other option is Witchmother’s Potent Brew that has similar stats.
Clockwork Citrus Filet (Max Health, Max Magicka, Magicka Recovery, Health Recovery)
or
Witchmothers Potent Brew (Max Health, Max Magicka, Magicka Recovery)
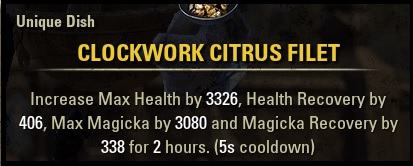
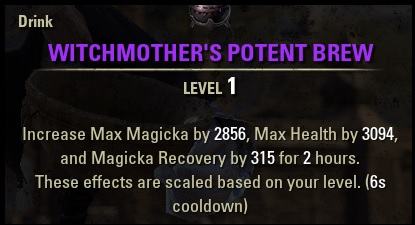
For more information on how to obtain the consumable and what the current prices are for it please visit the Clockwork Citrus Filet and Witchmothers Potent Brew page.
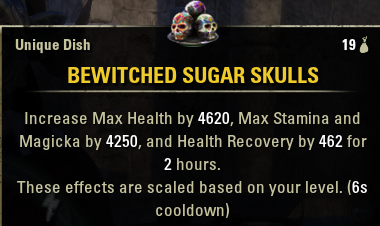
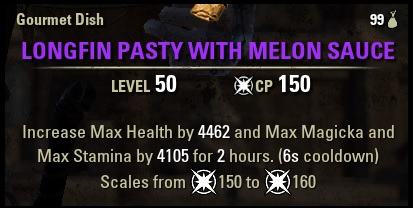
Alternatively you can also use Tri Stat Buff food if you need the extra stamina resources, good buff foods are Bewitched Sugar Skulls or Longfin Pasty with Melon Sauce.
You can find a full list of all buff food and drinks on the Food and Drinks Overview Page.
Mundus Stone
The Atronach gives us a lot of extra Magicka Recovery which we need to keep using abilities, make sure to get it! You can find a full list of all Mundus Stones on the Mundus Stone Overview Page.
The Atronach Mundus Stone ( Increased Magicka Recovery)
Race
Any race that has magicka based passives will work with this build. You can find more information about racial passives in the ESO Race Overview page.
Breton
High Elf
Argonian
Dark Elf
Khajiit
Orc
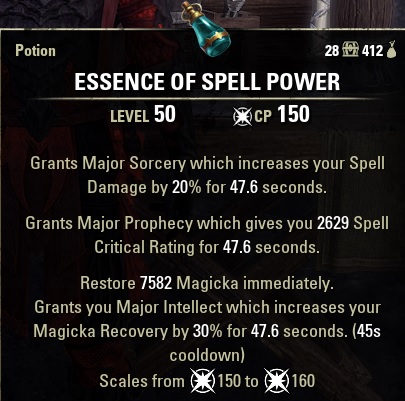
Potions
Spell-Crit Potions
(Spell-crit, Spell Damage, Magicka)
(Cornflower, Ladys Smock, Water Hyacinth)
Passives
- Grave Lord: Reusable Parts, Rapid Rot
- Bone Tyrant: Death Gleaning, Disdain Harm, Last Gasp, Health Avarice
- Living Death: Curative Curse, Near-Death Experience, Corpse Consumption, Undead Confederate
- Destruction Staff: Penetrating Magic, Elemental Force, Ancient Knowledge, Destruction Expert
- Restoration Staff: Essence Drain, Restoration Expert, Cycle of Life, Absorb, Restoration Master
- Light Armor: Grace, Evocation, Spell Warding, Prodigy, Concentration
- Heavy Armor: All if you have enough skill points.
- Undaunted: Undaunted Command, Undaunted Mettle
- Racial: All
- Alchemy: Medicinal Use
Optional:
If you are planning to use skills from the Mages Guild and Psijic Order, just make sure to not forget to activate the passives.
Attributes
64 Magicka, 0 Health, 0 Stamina
Resource Management Necro Healer Build
This setup has a lot of built in sustain through the Atronach Mundus Stone which gives Magicka Recovery, two Magicka Recovery Glyphs and we also run the Clockwork Citrus Filet (or Witchmothers Potent Brew) which also increases our Magicka Recovery.
You want to make sure to keep up your Spirit Guardian because of your Undead Confederate passive. The Spirit Guardian has a 16 seconds duration, so it should be fairly easy to keep up.
ESO Necromancer Subclassing Build Options
ESO’s Subclassing offers a lot of variety, allowing you to swap, mix, and match different skill lines of various classes all on one character. Read our How does Subclassing work in ESO guide to get an understanding of how the subclass system works. We also have plenty of ESO Builds optimized for Subclassing.
Take a look at our ESO Necromancer Subclassing Build if you are interested in what you can all mix and match on a Necromancer build!
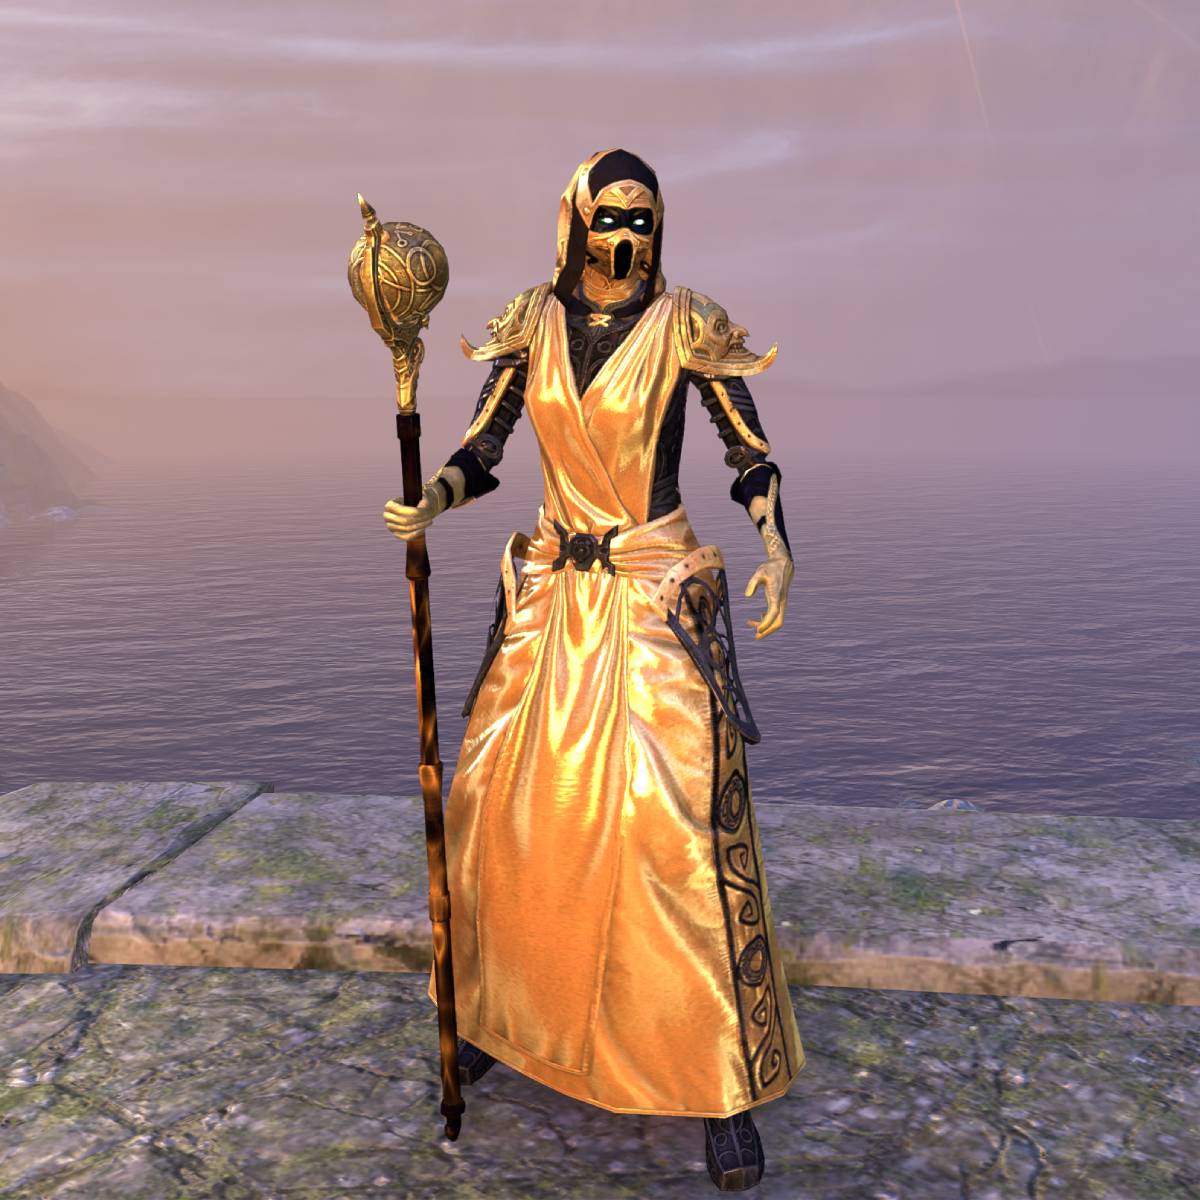
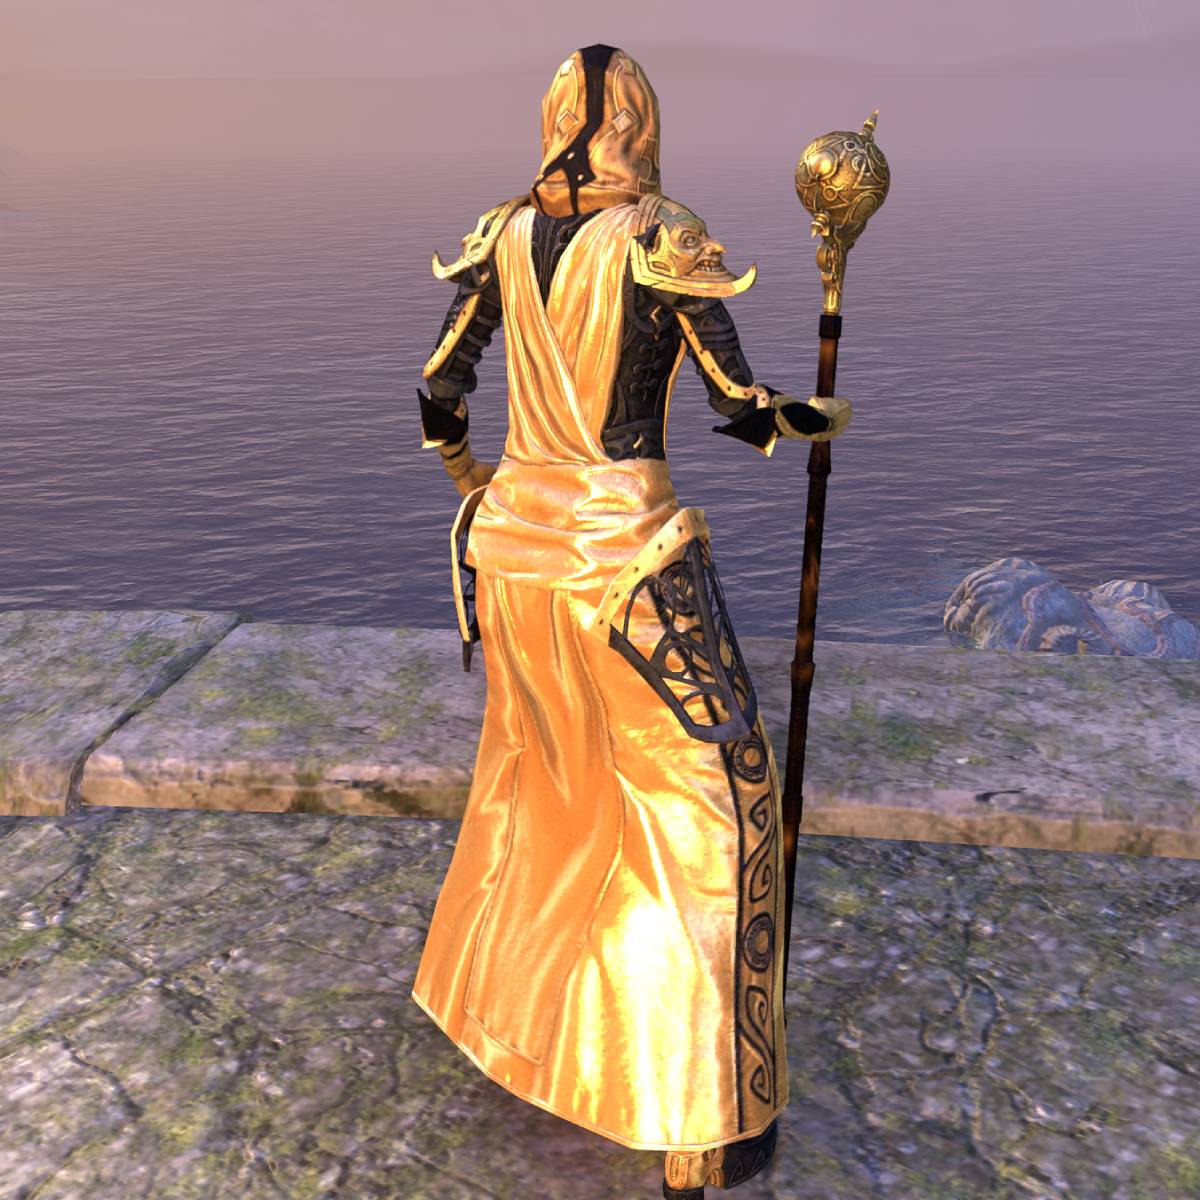
Outfit Style Showcase of the Necromancer Healer Build for ESO
Lets take a look at the outfit style of the Templar Healer Build for ESO. You can find a few images here and an image of the outfit editor dye station below.
- Dark Brotherhood: Hat
- Grim Harlequin: Shoulders
- Silken Ring: Gloves
- Apostle: Breeches, Robe, Sash, Shoes, Staff
- Dyes: Patron’s Gold, Void Pitch
- Skin: Void Pathosis
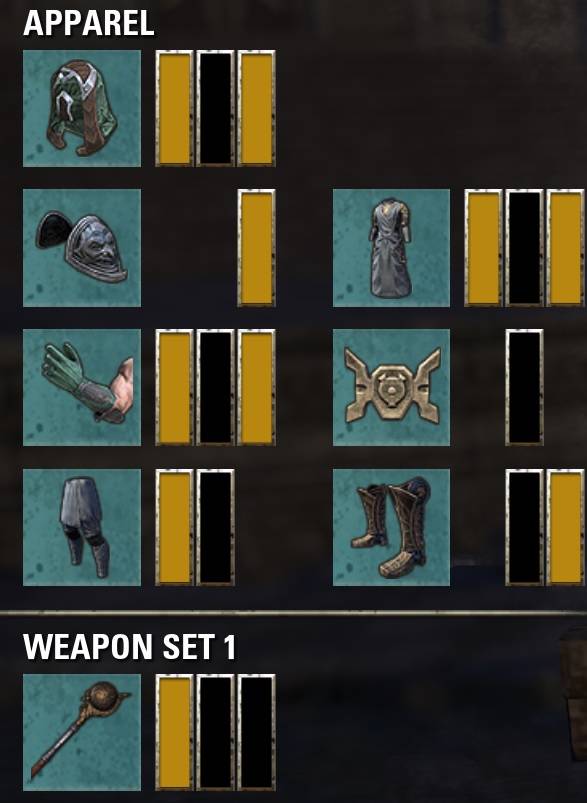
| Slot | Name |
|---|---|
| Head | Dark Brotherhood Motif |
| Shoulder | Grim Harlequin Motif |
| Chest | Apostle Motif |
| Hands | Apostle Motif |
| Waist | Apostle Motif |
| Legs | Apostle Motif |
| Feet | Apostle Motif |
| Weapon | Apostle Motif |
| Dyes | Patron’s Gold, Void Pitch |
| Skin | Void Pathosis |
Update Log for the ESO Necro Healer Build
11.08.2019 Updated the Necromancer Healer Build for the SCALEBREAKER DLC, Elsweyr Chapter.
20.10.2019 Updated the Build for the DRAGONHOLD DLC.
20.02.2020 Updated the Build for the HARROWSTORM DLC.
21.05.2020 Updated the Build for the GREYMOOR CHAPTER.
20.08.2020 Updated the Build for the STONETHORN DLC, Greymoor Chapter.
29.10.2020 Updated the Build for the MARKARTH DLC, Greymoor Chapter.
04.03.2021 Updated the Build for the FLAMES OF AMBITION DLC, Blackwood Chapter.
27.05.2021 Updated the Build for the BLACKWOOD CHAPTER.
11.08.2021 Updated the Build for the WAKING FLAMES DLC, Blackwood Chapter.
01.09.2021 Updated the Champion Points & Buff Food links, WAKING FLAME DLC, Blackwood Chapter.
18.10.2021 Updated the Build for the DEADLANDS DLC, Blackwood Chapter.
03.03.2022 Updated the Build for the ASCENDING TIDE DLC, High Isle Chapter.
10.05.2022 Updated the Build for the HIGH ISLE CHAPTER.
09.08.2022 Updated the Build for the LOST DEPTHS DLC.
24.10.2022 Updated the Build for the FIRESONG DLC, High Isle Chapter.
09.03.2023 Updated the Build for the SCRIBES OF FATE DLC, Necrom Chapter.
30.05.2023 Updated the Build for the ESO NECROM CHAPTER.
26.10.2023 Updated the Build for the Necrom Update 40.
06.03.2024 Updated the Build for the Scions of Ithelia DLC Update 41, Gold Road Chapter
22.05.2024 Updated the Build for the Gold Road Chapter U42.
20.08.2024 Updated the Build for Update 43, Gold Road Chapter.
28.10.2024 Updated the Build for Update 44, Gold Road Chapter.
11.03.2025 Updated the Build for Update 45, Fallen Banners.
27.05.2025 Updated the Build for Update 46, Seasons of the Worm Cult Part 1.
18.08.2025 Updated the Build for Update 47 Feast of Shadows DLC, Seasons of the Worm Cult.
27.10.2025 Updated the Build for Update 48, Seasons of the Worm Cult Part 2.
03.03.2026 Updated the Build for Update 49, Season 0.
03.06.2026 Updated the Build for Update 50, Season 0 and 1.
Tags: Necro Healer, Necromancer Healer, Magicka Necromancer Healer Build, MagNecro Healer Build PvE.
Related ESO Healer Builds:
- ESO Templar Healer Build
- ESO Warden Healer Build
- ESO Arcanist Healer Build
- ESO Nightblade Healer Build
- ESO Sorcerer Healer Build
- ESO Dragonknight Healer Build
Related Guides: