Here we will be looking at a powerful Witcher 3 build that is focused on the Aard and Yrden Signs. This build is great for dishing out loads of AOE damage to many enemies at once, and can basically perma-stun most non-boss enemies. It will work fine on any difficulty, including Death March.
This is a late game build – you’ll need to be fairly high level to get everything you need to complete it, and you also need access to both the Hearts of Stone and Blood and Wine DLCs to replicate this build, however if you don’t have Hearts of Stone you can still make it work.
This also makes the build perfect for New Game Plus, as you can then have everything you need for the build from the start of a new playthrough.
Table of Contents:
We’ll now look at the basics of how this build works, and how it is played.
How to Use This Witcher 3 Aard Build
This Witcher 3 Aard build is focused on high Sign Intensity, and the main tools we use are the Aard and Yrden signs, which combine to give us very powerful crowd control abilities and high AOE damage against most enemy types in the game.
We made use of the Gryphon School Armour set to further enhance our sign-casting abilities, and to empower our Yrden sign.
The alternate version of Aard lets us cast the sign in a 360 degree area around Geralt, knocking back and damaging everything close to us, and we’re using the Piercing Cold Mutation to further enhance the damage, and also add a chance to freeze enemies who are hit by the Aard.
When playing the build in combat situations, it’s normally good to start by putting down an alternate Yrden sign if you have time to cast it, or a normal Yrden if not. We can then switch to Aard and cast it as often as possible to deal huge AOE damage to enemies. Just remember to refresh the Yrden if it runs out, that way we don’t miss out on any of our buffs.

Witcher 3 Aard Build Armour and Weapons
To create this Witcher 3 Aard Build, it’s recommended to use the Gryphon Witcher Gear. You’ll be able to craft the basic version of this armour quite early in the game, but you won’t get access to the fully upgraded version until much later.
We need the fully upgraded version to maximize the potential of this build, however it can work without it, it just won’t be quite as strong. To learn how to get the Gryphon Armour, check out our Gryphon Armour Guide.
The Gryphon Armour is useful for this Witcher 3 Aard Build a few different reasons:
- Extra sign intensity for all of our signs
- Allows us to cast an extra sign for free each time we cast a sign in Standard Mode.
- Empowers our Yrden sign, giving us a huge 100% buff to sign intensity while we are stood within our Yrden area, as well as a boost to stamina regen and reducing our damage taken from enemy attacks.
In terms of enhancements for weapons and armour, we’ll use a few different things.
Chest Armour
We ideally want the Entanglement rune from the Runewright for our Chest Armor in Witcher 3. This will automatically cast a Standard Yrden at the location of any enemy who is hit by the Alternate Yrden trap. You need to have funded the first two upgrades for the Runewright to get this rune.
Open the Runewright’s shop menu by talking to him, and navigate to the Enchanting menu, here you can find the Entanglement rune.
Other Armour Pieces
For our other armour pieces, we want Greater Glyphs of Aard. These will substantially improve the potency of our Aard sign, which is important for this build. Glyphs can be looted from containers and enemies in the world, and purchased from merchants who specialize in crafting or magical arts.
Weapons
For our weapons, we went with the Replenishment rune from the Runewright. This allows us to empower our sword attack with sign effects each time we cast a sign. To get the Entanglement rune, you need to have bought all three upgrades for the Runewright, which does cost a total of 30,000 gold.
If that’s way too much for you, then you don’t need to use Entanglement for this build to work. You can instead use Greater Veles Runestones, which simply give us a flat buff to our Sign Intensity. This is a valid option too, but it’s a bit less interesting. These runestones can generally be obtained from the same sources as the Aard Glyphs, mentioned above.
Don’t worry if you don’t initially have access to all of these runes and glyphs or can’t afford them all at once – they do improve the build but it can still work quite well without them.

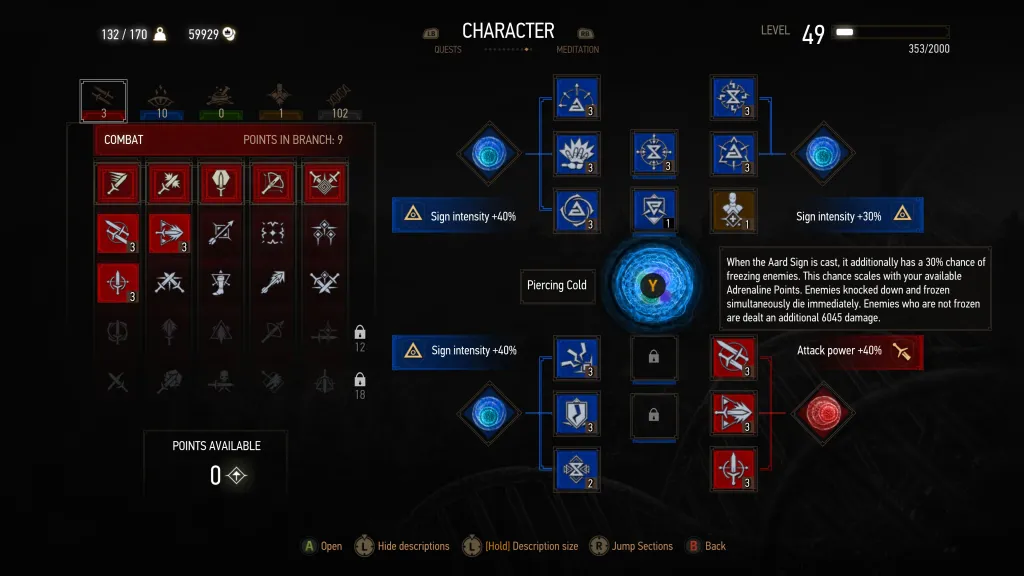
Witcher 3 Aard Build Skills and Perks
There are some Perks that are very important to unlock and activate to maximise the potential of this Aard Build for the Witcher 3.
First off, in the Mutagen slots, you’ll want to put a Greater Blue Mutagen in three of the slots, and a Greater Red Mutagen in the final slot. Remember to slot perks next to a Mutagen of the same colour for an additional bonus. These mutagens can be looted from powerful enemies, or crafted in the Alchemy menu by combining several lower quality mutagens.
We used the following Perks for this build, all fully upgraded to the highest level:
- Muscle Memory (Red)
- Strength Training (Red)
- Precise Blows (Red)
- Far-Reaching Aard (Blue)
- Aard Sweep (Blue)
- Aard Intensity (Blue)
- Shock Wave (Blue)
- Sustained Glyphs (Blue)
- Magic Trap (Blue)
- Yrden Intensity (Blue)
- Supercharged Glyphs (Blue)
- Delusion (Blue)
- Griffin School Techniques (Yellow)
To unlock and fully upgrade these skills, you need 35 Skill Points. There are two ways to get more skill points – each time you level up you will receive one, and the first time you interact with a newly discovered Place of Power you’ll also receive one.
We picked a few Red skills and a Red Mutagen just to give us a basic amount of damage buffs for normal sword attacks, because there are a few enemies in the game who are very resistant to magical attacks, so in those cases we won’t find ourselves struggling because we put all of our resources into blue skills.
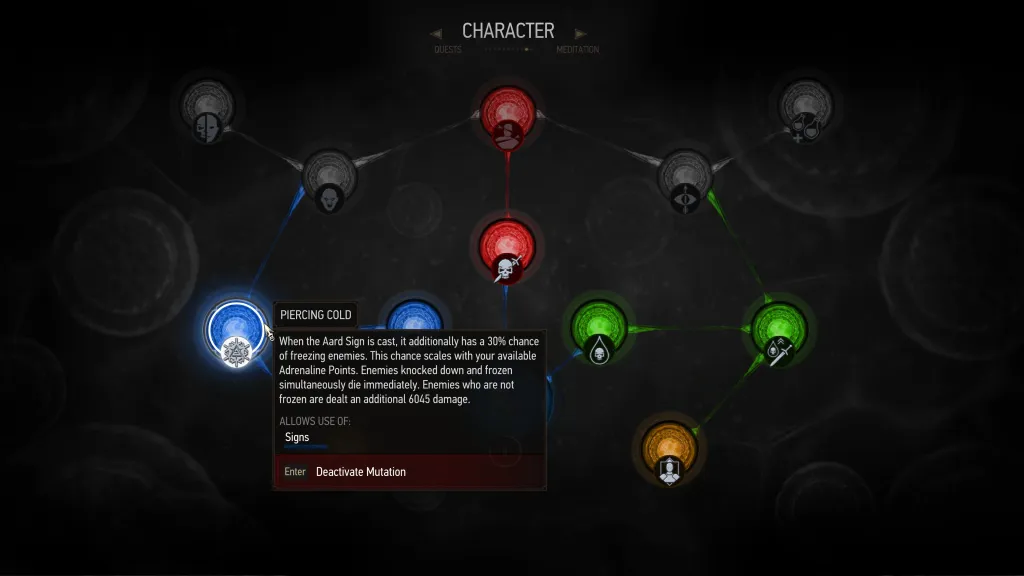
Mutation for the Witcher 3 Aard Build
To unlock the Mutation system you’ll need the Blood and Wine DLC, and you’ll need to complete the quest called Turn and Face the Strange.
For this Aard build, it is highly recommended to unlock and activate the Piercing Cold mutation. Doing this will require 6 Greater Blue Mutagens and 6 spare skill points. So in total this build needs 41 skill points to complete.
The Piercing Cold Mutation gives Aard a chance to freeze enemies (the chance scales based on how many Adrenaline Points you have, starting at 30%). Enemies who aren’t frozen take extra damage from the Aard sign instead, and you can also insta-kill enemies who are knocked down and frozen at the same time.
This makes alternate Aard the bread and butter of this build, able to cause complete havoc among our enemies, and the effort we’ve put into our sign intensity and stamina regen means that we’ll be able to cast Aard and Yrden almost constantly and deal considerable damage with them each time.
Potions and Bombs for the Witcher 3 Aard Build
Without a doubt the best potion to synergise with this build is the Ekimmara Decoction, which lets us heal from all damage we dish out. We can therefore heal from the AOE damage we’re doing with Aard and Yrden, resulting in really high amounts of healing when fighting against groups of enemies. You can find the recipe for the Ekimmara Decoction in a chest on the riverbank south of the Ransacked Village in White Orchard.
Alternatively, you can try out the Ancient Leshen Decoction which accelerates your stamina regeneration each time you cast a sign (but this is probably overkill to be honest) , or Ekhidna Decoction, which will heal you every time you use Stamina to cast a Sign.
The recipe for the Ancient Leshen Decoction can be found in the ransacked courtyard outside Triss’ house in Novigrad, or in the cellar where you encounter the Allgod in Velen. The Ekhidna recipe doesn’t have a guaranteed location, but can be found randomly in containers or in the wares of merchants who specialize in alchemy.
Any of these decoctions will synergise quite well with this build, but be wary that using one of them will considerably decrease your ability to use other Potions during combat. This is because we’ve put no skill points into green skills and therefore still have the baseline Toxicity limit of 100.
If you don’t want to use Decoctions, then Petri’s Philter is a good fit for a normal potion to use with this build, as it further increases our Sign Intensity. Swallow and White Raffard’s Decoction (this doesn’t count as a Decoction in spite of its name) are both useful healing potions which you can use in a tight spot.
For bombs, you can use any you want or not use any at all – they’re not essential for this build and generally have much lower impact than the Aard and Yrden Signs. The Northern Wind bomb freezes enemies and is quite a nice thematic option to accompany our freezing Aard signs, but it’s completely optional.
Gameplay Video of the Aard Build
Here is a quick video about the Witcher 3 Aard Build. You can see the devastation it pulls off with huge explosions to defeat pretty much any enemy around you.