

Welcome to the Diablo 4 Flurry Rogue Build. This is a melee focused version of the Rogue class which is designed to be fairly easy to play, and has high mobility and AOE damage too.
As the name suggests, this build will be focused around the Flurry skill, which is available for the Rogue to unlock quite early in the game, so it won’t be long until you can start building around it, even if you’re beginning from scratch.
This build guide includes a skill-point allocation section that tells you how to create the build as you are leveling up.
Rogue Flurry setup for Diablo 4
For this Rogue Flurry build in Diablo 4, you do not need to exactly match everything including the recommended Legendary Items and Aspects (which can take a while to obtain). Getting these will make the build significantly stronger, but it will still work well if you don’t have them.
You can unlock aspects in the Codex of Power by completing Dungeons, and doing Dungeons is also a good way to find Legendary Items, along with World Events.
Table of Contents:
- Skills Setup
- Passives
- Specialization
- Skillpoints
- Paragon Boards
- Legendary Gear Aspects
- Codex of Power Aspects
- Gear Types and Stats
Rogue Skills Setup
Let us take a look at the Diablo IV Rogue Build Skills Setup, I will first explain why we pick certain skills and what they exactly do for the Flurry build. I will also explain how to spend your skill points accordingly in case you are still leveling up.
Rogue Flurry Build Skills Setup:
Puncture
Throw blades a short distance, dealing X damage. Every 3rd cast Slows enemies by 20% for 2 seconds. Critical Strikes will always Slow.
- Upgrade 1 – Enhanced Puncture: Gain 2 Energy when Puncture damages a Crowd Controlled enemy.
- Upgrade 2 – Fundamental Puncture: Puncture now throws 3 blades in a spread, each dealing 35% of its Base damage. Hitting an enemy with at least 2 blades at once makes them Vulnerable for 2 seconds.
Explanation: Puncture is a very useful basic skill for this build, as it gives us Energy and renders enemies Vulnerable. It also has a high attack speed which can be utilized to quickly build up Combo Points to empower our other skills, which we will explain later in the guide.
Flurry
Unleash a flurry of stabs and slashes, striking enemies in front of you 4 times and dealing a total of X damage to each. Combo Points increase damage and grant an Attack Speed bonus:
1 Point: 15% damage & speed bonus
2 Points: 30% damage & speed bonus
3 Points: 45% damage & speed bonus
- Upgrade 1 – Enhanced Flurry: Each time Flurry damages a Crowd Controlled or Vulnerable enemy, you are Healed for 1% of your Maximum Life, up to 12% Maximum Life per cast.
- Upgrade 2 – Improved Flurry: If Flurry hits any Vulnerable enemy it will make all enemies hit by that cast Vulnerable for 3 seconds.
Explanation: Flurry is the main backbone of our build. It synergizes perfectly with the Rogue’s Combo ability and can spread the Vulnerable debuff to many enemies at once, giving you 20% bonus damage to those enemies.
For example you can apply Vulnerable to an enemy using the Fundamental Puncture upgrade mentioned above, then use Improved Flurry to spread the debuff to all enemies near you.
If all of that wasn’t enough, then as another bonus we can get some very nice healing from Enhanced Flurry, provided we damage Vulnerable or Crowd Controlled enemies.
It’s highly recommended to complete the Forsaken Quarry dungeon in Fractured Peaks as early as possible in your playthrough. This will unlock the Encircling Blades Aspect. Visit the Occultist to imbue this onto an item (preferably an Amulet, as weapons will be replaced very often as you level up). When you’ve done this, your Flurry will be changed into a circular AOE around you rather than a cone, and it will also deal extra damage, giving the build a massive power boost early on.
Shadow Step
Become Unstoppable and quickly move through the shadows to stab your victim from behind for X damage. Gain 50% increased Movement Speed for 2 seconds afterwards.
- Upgrade 1 – Enhanced Shadow Step: Damaging an enemy with Shadow Step increases your Critical Strike Chance against them by 8% for 3 seconds.
- Upgrade 2 – Methodical Shadow Step: Enemies damaged by Shadow Step are Immobilized for 2 seconds.
Explanation: Shadow Step is a great mobility skill, allowing you to quickly get in and out of melee combat. We also get the Unstoppable buff which prevents us from being Crowd Controlled, and cures any such effects already on us.
Dark Shroud
Surround yourself with up to 5 protective shadows. Gain 8.0% Damage Reduction per active shadow. Each time you take direct damage, that damage is reduced and a shadow is consumed.
- Upgrade 1 – Enhanced Dark Shroud: Dark Shroud’s shadows have a 10% chance to not be consumed.
- Upgrade 2 – Subverting Dark Shroud: Each active shadow from Dark Shroud grants you 4% increased Movement Speed.
Explanation: Dark Shroud is our main defensive skill, granting us up to 40% damage mitigation during combat. You definitely want to make sure that you use this skill when its cooldown runs out in order to stay healthy during combat.
With our chosen upgrades, you will also get some bonus movement speed which helps you to stay out of trouble.
Poison Trap
Place a trap that arms after 1.25 seconds. It activates when an enemy moves within range, applying X Poisoning damage over 9 seconds to enemies in the area.
You can have 4 armed traps out at once.
- Upgrade 1 – Enhanced Poison Trap: Poison Trap Knocks Down enemies for 1.5 seconds when it activates.
- Upgrade 2 – Countering Poison Trap: Poison Trap has a 30% chance to reset your Imbuement Skill Cooldowns when activated.
Explanation: Poison Trap serves two main purposes in this build. Firstly, it dishes out some extra poison damage to enemies in an Area of Effect. Secondly, it can be used to Crowd Control several enemies at once, keeping you safe in prolonged combat.
Poison Imbuement
Imbue your weapons with lethal poison. Your next 2 Imbueable Skills deal Poison damage and apply 100% of their Base damage as additional Poisoning damage over 5 seconds.
- Upgrade 1 – Enhanced Poison Imbuement: Poison Imbuement’s Poisoning Duration is increased by 1 second.
- Upgrade 2 – Blended Poison Imbuement: Critical Strikes with Poison Imbued Skills deal 75% increased Poisoning damage.
Explanation: We use Poison Imbuement to empower our Flurry, converting its damage type to Poison damage and adding an extra Poison Damage over Time. This helps to buff the single target damage of this build, since Flurry by itself is not amazing in that regard.

Diablo IV Rogue Best Passives
For this Diablo IV Rogue build, there are some very useful passives available that we will want to pick up at some point. These are listed below.
- Siphoning Strikes: Heal for 3% of your Maximum Life when you Critically Strike a Close Enemy.
- Stutter Step: Critically Striking an Enemy grants +15% Movement Speed for 4 seconds.
- Weapon Mastery: Gain damage bonuses when attacking, depending on your weapon type.
- Concussive: After knocking back or knocking down an enemy, gain 12% extra Crit chance against them for 3 seconds.
- Exploit: Gain +18% increased damage to Healthy and Injured enemies (Healthy enemies have over 80% Life remaining, Injured enemies have less than 35%)
- Malice: You deal 9% extra damage to Vulnerable enemies.
- Trap Mastery: When your Poison Trap or Death Trap activates, gain 12% extra Crit Chance against Vulnerable and Crowd Controlled enemies for 4 seconds.
- Haste: When at or above 50% maximum Energy, gain +15% Movement Speed. When below 50% Energy, gain +15% Attack Speed.
- Momentum (key passive): Cutthroat skills grant a stack of Momentum for 8 seconds if they hit a Stunned, Dazed or Frozen enemy, or hit any enemy from behind. While at 3 stacks of Momentum, you get 20% Damage Reduction, 30% increased Energy Regeneration, and 15% extra movement speed.
Diablo IV Rogue Best Specialization
It’s time to take a look at the Specialization aspect of this build. Specialization is the Rogue’s unique Class ability, enabling you to choose one of three powerful perks.
To unlock this feature, you’ll need to complete a Priority Quest which will become available when you reach Level 15.
For this build, we are using the Combo Points specialization, which will cause our Basic Skill casts (the Puncture skill, for us) to become more powerful by stacking up to 3 Combo Points, which then empower some of our other skills.
For this Diablo IV Flurry Build, this synergizes really well with our Flurry ability, which will gain an extra 45% damage and attack speed at 3 Combo Points. This also buffs the damage over time applied to the skill by Poison Imbuement.
Diablo IV Rogue Flurry Build Skillpoint Order
In this section of the guide, you can learn how to spend your skill points as you level up. This is perfect if you’re just starting out with your Rogue and want to gradually make this build as you level up. We’ve accounted for 58 skill points – the 48 you get from levels 2-49, and the 10 you get from earning Renown.
- Puncture
- Enhanced Puncture
- Flurry
- Enhanced Flurry
- Improved Flurry
- Fundamental Puncture
- Shadow Step
- Flurry tier 2
- Flurry tier 3
- Flurry tier 4
- Flurry tier 5
- Poison Trap
- Enhanced Poison Trap
- Dark Shroud
- Enhanced Dark Shroud
- Subverting Dark Shroud
- Poison Imbuement
- Enhanced Poison Imbuement
- Blended Poison Imbuement
- Countering Poison Trap
- Exploit (Subterfuge Passive)
- Exploit tier 2
- Exploit tier 3
- Malice (Subterfuge Passive)
- Malice tier 2
- Malice tier 3
- Deadly Venom (Imbuement Passive)
- Alchemical Advantage (Imbuement Passive)
- Debilitating Toxins (Imbuement Passive)
- Debilitating Toxins tier 2
- Debilitating Toxins tier 3
- Poison Imbuement tier 2
- Poison Imbuement tier 3
- Momentum (Key Passive)
- Enhanced Shadow Step
- Methodical Shadow Step
- Adrenaline Rush (Ultimate Passive)
- Haste (Ultimate Passive)
- Haste tier 2
- Haste tier 3
- Trap Mastery (Ultimate Passive)
- Trap Mastery tier 2
- Trap Mastery tier 3
- Sturdy (Core Passive)
- Siphoning Strikes (Core Passive)
- Siphoning Strikes tier 2
- Siphoning Strikes tier 3
- Concussive (Agility Passive)
- Concussive tier 2
- Concussive tier 3
- Poison Imbuement tier 4
- Poison Imbuement tier 5
- Weapon Mastery (Agility Passive)
- Weapon Mastery tier 2
- Weapon Mastery tier 3
- Stutter Step (Core Passive)
- Stutter Step tier 2
- Stutter Step tier 3
Rogue Paragon Boards
In this section we will explain how to build your Paragon Board for this Diablo IV Rogue Build. We have included a step by step explanation for progressing through the Paragon System, and at the bottom of the section are images for each board. If you want to view these in more detail, we have saved them here.
Here are the steps for building your Paragon Boards for the Rogue:
- Starting Board
- Progress up the board along the right side, towards the Glyph slot.
- Unlock the Glyph and socket the Closer Glyph.
- Progress to and unlock the Lawless and Skillfull Nodes.
- Unlock Dexterity Nodes within range of the Glyph, along with the Magic Nodes that give +5% Damage.
- Progress up to the board exit. Attach the Deadly Ambush board.
- Deadly Ambush
- Rotate the board so the Glyph is in the middle, towards the top.
- Progress upwards and unlock the Trapper node, then progress to the Deadly Ambush Node and unlock that too.
- Progress upwards and unlock the Glyph Slot. Socket the Exploit Glyph.
- Unlock the Engineering and Cunning Nodes, picking up Strength and Magic nodes along the way.
- Progress rightwards and then down to the Spring-Loaded Node.
- Exit the board on the right. Attach the Cheap Shot board.
- Cheap Shot
- Rotate the board until the Glyph slot is slightly to the right.
- Progress to the Safeguard Node via the two consecutive Dexterity Nodes.
- Progress to the Cheap Shot Node, then the Oppress Node.
- Progress to the Glyph Socket. Slot the Combat Glyph.
- Grab the Devious and Wiles Nodes, also picking up the Intelligence and Magic Nodes on the left side of the Glyph area.
- Progress directly up to the board exit. Attach the Tricks of the Trade Board.
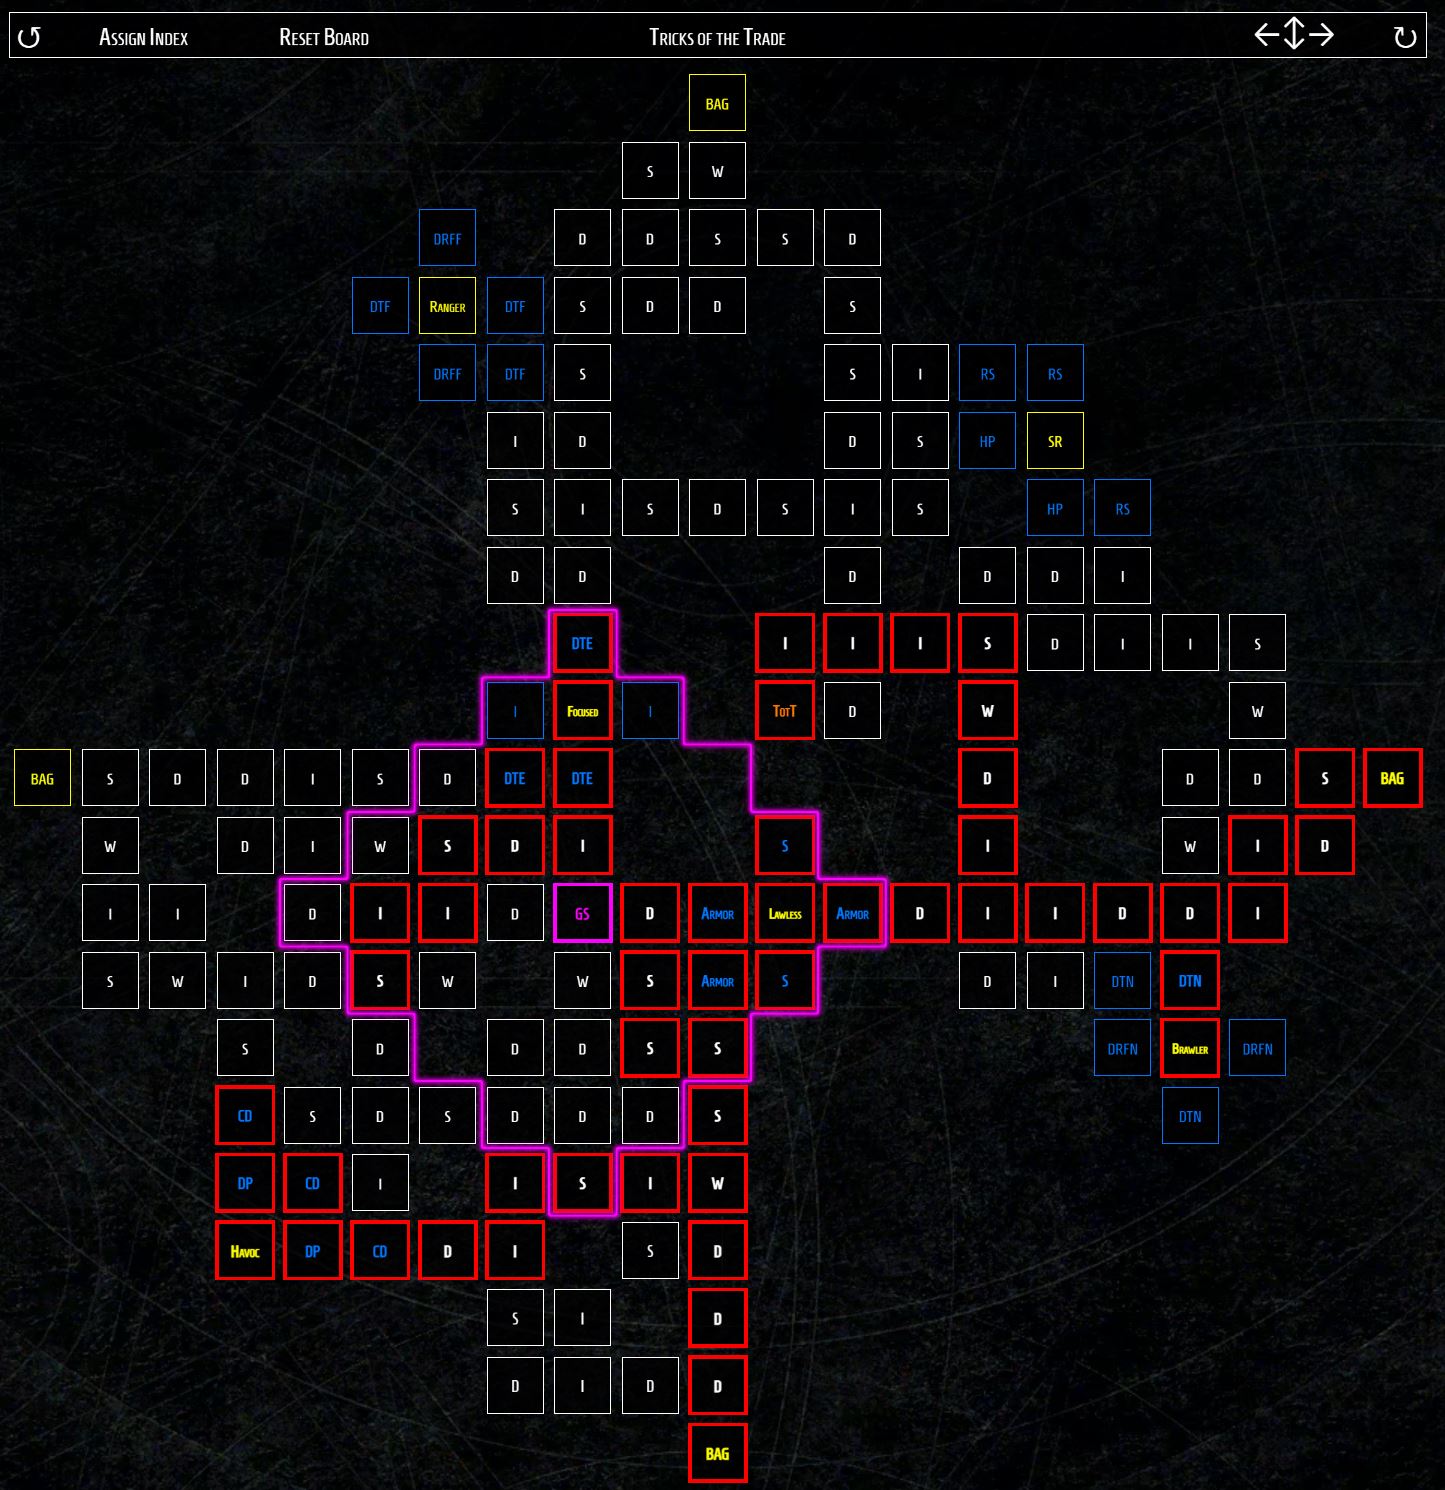
- Tricks of the Trade
- Rotate the board until the Glyph is on the bottom left.
- Progress to and unlock the Havoc Node, also unlocking the nearby Magic Nodes for Critical Strike and Physical Damage.
- From the original path into the board, continue upwards to unlock the Glyph slot, and slot the Ambush Glyph.
- Get the Focused Node, along with the nearby Magic Nodes for Elite Damage.
- Get the Lawless Node, and the nearby Magic Nodes. Then pick up remaining Strength Nodes in range of the Glyph.
- Progress to the right, then upwards, to unlock the Tricks of the Trade Node.
- Progress to and unlock the Brawler Node.
- Progress to the exit on the right side of the board. Attach the No Witnesses Board.
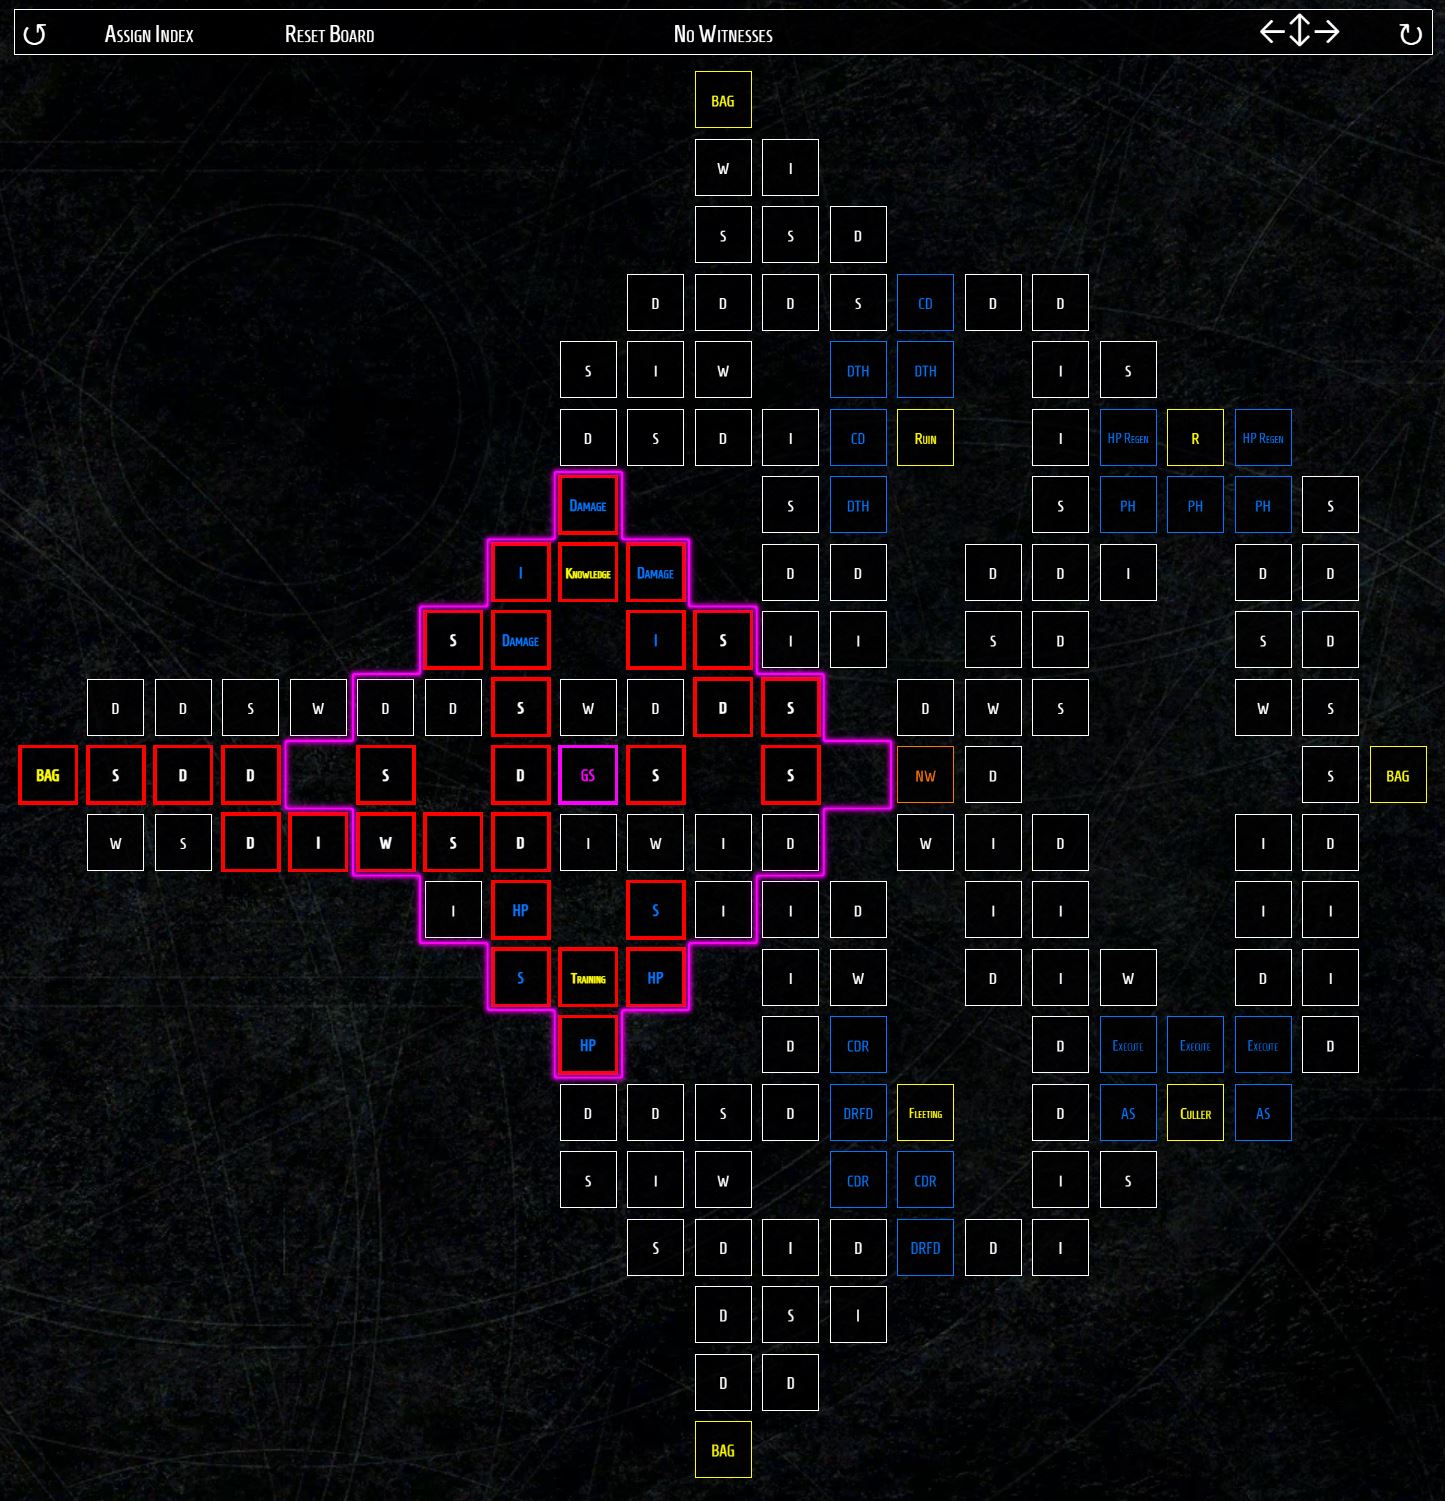
- No Witnesses
- Rotate the board so the Glyph slot is slightly left of centre.
- Progress to the Glyph Socket, and slot the Turf Glyph.
- Unlock the Training Node, and the nearby Magic Nodes for Strength and Maximum Life.
- Unlock the Knowledge Node, and the neaby Magic Nodes for Damage and Intelligence.
- Spend remaining points on Strength upgrades in range of the Glyph.

Recommended Legendary Gear
There are a few Aspects found only on looted Legendary gear that will synergise very well with this build. While you don’t need to have them right away to make the build work, it’s a good idea to keep an eye out for them and use them when possible.
We will list these options below:
- Accelerating Offensive Aspect – Critical Strikes with Core skills increase your attack speed by 25% for 5 seconds. Can be found on weapons, amulets, rings and gloves.
- Smiting Offensive Aspect – You have 20% increased Critical Strike chance against Injured enemies. While healthy, you gain 40% extra Crowd Control Duration. Available on weapons, amulets, rings and gloves.
- Defensive Aspect of the Crowded Sage – You heal for X life per second for each Close enemy, up to 605 Life per second. Available on Helms, Chest Armour and Pants.
Recommended Codex of Power Aspects
Next we will list the best Aspects from the Codex of Power for this Diablo IV Rogue build. These Aspects can be unlocked by completing their associated dungeon, and you can then visit the Occultist to imprint them on your gear. It’s generally not recommended to imprint Aspects on your weapon while you are leveling up, as you’ll be replacing it quite often when you find a better one, to keep increasing your damage output.
Below are the best Aspects for the build, along with where you can obtain them:
- Offensive Aspect of Encircling Blades – Flurry damages enemies in a circle around you and deals 15% increased damage. Can be imprinted on weapons, amulets, rings and gloves. Unlocked by completing Forsaken Quarry in Fractured Peaks.
- Offensive Aspect of the Expectant – Attacking enemies with a Basic skill increases the damage of your next Core skill by 10%, up to 30%. Can be imprinted on weapons, amulets, rings and gloves. Unlocked by completing the Underroot in Scosglen.
- Edgemaster’s Offensive Aspect – Skills deal up to 20% increased damage based on your available Primary Resource when cast, receiving the maximum benefit when you have full Primary Resource. Can be imprinted on weapons, amulets, rings and gloves. Unlocked by completing Oldstones in Scosglen.
- Rapid Offensive Aspect – Basic Skills gain 30% Attack Speed. Can be imprinted on weapons, amulets, rings and gloves. Unlocked by completing Buried Halls in Dry Steppes.
- Defensive Aspect of Disobedience – You gain 0.5% increased Armour for 4 seconds when you deal any form of damage, stacking up to 50%. Can be imprinted on Helms, Chest Armour, Pants and Amulets. Unlocked by completing Halls of the Damned in Kehjistan.
- Ghostwalker Mobility Aspect – While Unstoppable and for 4 seconds after, you gain 25% increased movement speed and can move freely through enemies. Can be imprinted on boots and amulets. Unlocked by completing Broken Bulwark in Scosglen.
Equipment Type and Stats
When deciding with equipment to wear, it’s generally best to look out for the following types of items:
- For melee weapons, look for Daggers that buff Core Skill Damage, Vulnerable Damage and Damage to Close Enemies.
- For ranged weapons, look for Crossbows that buff Core Skill Damage, Vulnerable Damage and Damage to Close Enemies.
- For Helms, look for Cooldown Reduction, Armour and Life.
- For Chest Armour, look for Damage Reduction, Armour and Life.
- For Gloves, look for increased Flurry Rank, Crit Chance and Attack Speed.
- For Pants, look for Damage Reduction, Armour and Life.
- For Boots, look for Movement Speed and Energy Cost Reduction.
- For Amulets, look for Movement Speed, Energy Cost Reduction, Increased Damage and Cooldown Reduction.
- For Rings, look for Increased Damage, Crit Chance, Crit Damage.
Finally, when filling sockets with stones, try to pick the following options:
- Weapons – Emerald: +9% Critical Strike Damage to Vulnerable Enemies.
- Armour – Topaz: +8% Damage Reduction while Control impaired.
- Jewelry – Skull: +170 Armour.
Remember that you can visit the Jeweler to refine stones into higher quality variants for improved effects.
Other Diablo 4 Builds:
FAQ about Rogue
You want to focus on Dexterity for the Rogue class in Diablo 4. Dexterity increases your Skill Damage by 0.1% per point spent.
The Rogue’s best Ultimate skill is called Death Trap. It deals insane damage in a medium-sized radius in any encounter in Diablo 4.
Currently, the best option for a Rogue to go with in Diablo 4 is the Flurry Rogue Build. It both provides high mobility and damage. In addition, it also focuses on poison imbuements.