


Welcome to the Diablo 4 Druid Werewolf Build.
This Druid Build is focused on Companions which deal damage and also take incoming damage off you while in combat. The companions deal high damage to the point where you sometimes barely have to do anything except watch your pets defeat all monsters around you. The Werewolves deal insane damage. Not only that but with the right gear you can also increase the number of companions.
Table of Contents:
Druid Companion Build for Diablo IV
For this Druid Companion build in Diablo 4 you won’t need the exact same setup, the build already works if you pick the recommended skills and passive perks. However, the build will perform better if you can get your hands on the right Legendary items and Aspects for it.
The Companions will deal most of the damage while you are busy surviving and annoying enemies around you. While doing that you also increase the damage of your Companions by a huge margin.

Skills for the Diablo IV Druid Build
In this section we will list the skills that are recommended for this Druid build in Diablo IV.
We will list the upgrades that you’ll want to pick, and also provide an explanation of how each skill fits into the build.
Skills:
Storm Strike
Generate Spirit: 14
Electricity gathers around your weapon, dealing X damage to your target and chaining to up to 3 surrounding enemies, dealing 20% less damage each time it chains.
You gain 25% Damage Reduction for 3 seconds after dealing damage with Storm Strike.
Upgrades:
- Enhanced Storm Strike – Storm Strike has a 15% chance to Immobilize all enemies hit for 2.5 seconds.
- Fierce Storm Strike – Storm Strike has a 50% chance to make enemies Vulnerable for 3 seconds.
Storm Strike is a useful Basic Skill for this build, because it not only generates some Spirit to allow us to keep casting other abilities, but it also grants us a decent amount of Damage Reduction and can make enemies Vulnerable too, making it easier for us to stay alive and keep dispatching enemies.
Shred
Shapeshift into a Werewolf and perform a trio of combo attacks:
3rd attack: Perform a larger finishing move dealing X damage.
Upgrades:
- Enhanced Shred – Shred gains 30% Attack Speed and Heals for 1% of your Maximum Life if an enemy is struck.
- Raging Shred – Shred’s third combo attack is larger and deals an additional X Poison Damage over 5 seconds.
When you cast Shred, you will perform the first attack in the combo, and a timer will appear on your skill bar which indicates how long you have to finish the combo. The second and third attacks in the Combo will not cost any Spirit, and you will get a more powerful effect on the final hit.
After finishing the combo with the third hit (or after the timer runs out), you’ll have to spend Spirit to cast the skill again.
Shred is the Core skill used in this build, and is our main source of damage output to be cast when we aren’t doing anything else.
Earthen Bulwark
Rocks surround you for 3 seconds, granting a Barrier that absorbs 45% of your Base Life in damage.
Upgrades:
- Enhanced Earthen Bulwark – Earthen Bulwark makes you Unstoppable while active.
- Preserving Earthen Bulwark – Earthen Bulwark grants 18% Base Life as Fortify.
Earthen Bulwark is a useful defensive skill. Its primary use in this build is to give us Crowd Control immunity, although you can also activate it strategically to defend yourself if you anticipate heavy incoming damage.
Remember that you can activate this skill when you are already Crowd Controlled in order to cure the effect from yourself.
Blood Howl
Shapeshift into a Werewolf and howl furiously, Healing you for 20% of your Maximum Life.
Upgrades:
- Enhanced Blood Howl – Kills reduce the cooldown of Blood Howl by 1 second.
- Preserving Blood Howl – Blood Howl also increases your attack speed by 15% for 4 seconds.
Another primarily defensive skill, this time focused around self-healing. However, Blood Howl also gives us some offensive buffs with the upgrades mentioned above, and with Enhanced Blood Howl you are rewarded for getting kills, as you’ll be able to accelerate how much self-healing you can do.
This skill helps you to maintain a good, aggressive momentum in combat.
Poison Creeper
Passive: A poison creeper periodically emerges from the ground every 7 seconds and applies X Poisoning Damage over 6 seconds to an enemy in the area.
Active: Vines strangle all surrounding enemies, Immobilizing them for 3 seconds and poisoning them for X damage over 6 seconds.
Upgrades:
- Enhanced Poison Creeper – Poison Creeper’s Immobilize duration is increased by 1 second.
- Ferocious Poison Creeper – Poison Creeper’s active poisoning duration is increased by 3 seconds.
Poison Creeper’s active ability provides our Druid Build with some extra Crowd Control, and also gives the build some much needed AOE damage potential, useful for dealing with large groups of enemies.
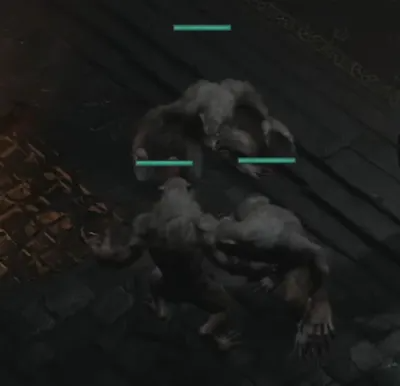
Wolves
Passive: Summon 2 Wolf Companions that bite enemies for X damage.
Active: Direct your Wolves to focus an enemy, leaping to them and striking for X damage.
Upgrades:
- Enhanced Wolf Pack – Wolves deal 20% increased damage to Immobilized, Stunned, Slowed or Poisoned enemies.
- Ferocious Wolf Pack – Lucky Hit: Your Wolves’ attacks have a 10% chance to Fortify you for 5% of your Base Life.
Our Wolves not only give this build its thematic flavour, but are also decent dual-purpose companions who can both damage enemies and take some aggro for us, reducing the amount of damage we take.
We’ll also be able to upgrade these Wolf Companions to Werewolves, and increase the number of them we can have. But we’ll get to that later in the guide.

Druid Spirit Boons
The Druid’s unique class mechanic is called Spirit Boons. You’ll need to reach Level 15 and complete a priority quest in Túr Dúlra in Scosglen in order to unlock the mechanic. You’ll need to defeat the Stronghold enemies before you can do the quest.
After you do this, enemies will begin dropping Druidic Spirit Offerings which can be spent on Spirit Boons at Túr Dúlra. For this build, it’s recommended to choose the following Spirit Boons:
- Wolf Spirit – Packleader: Lucky Hit: Critical Strikes have a 20% chance to reset the Cooldowns of your Companion Skills.
- Eagle Spirit – Scythe Talons: Gain 5% increased Critical Strike Chance.
- Snake Spirit – Masochistic: Critical Strikes with Shapeshifting Skills Heal you for 3% Maximum Life.
- Deer Spirit – Wariness: Take 10% reduced damage from Elites.
- Unlock all remaining boons, then bond with the Wolf Spirit and activate Bolster: Fortify for 10% of your Maximum Life when you activate a Defensive skill.
Order of Skillpoint Selection for the Diablo IV Druid Build
In this section we will cover the order in which you should ideally spend your skill points when making this Diablo IV Druid Build. This is perfect if you are just starting out with your Druid and want to gradually create this build as you level up.
We have included 58 Skill Points – the 48 you get from levels 2-49, and the 10 you receive by earning Renown from exploring Sanctuary.
- Storm Strike
- Enhanced Storm Strike
- Shred
- Enhanced Shred
- Raging Shred
- Fierce Storm Strike
- Shred tier 2
- Shred tier 3
- Shred tier 4
- Shred tier 5
- Earthen Bulwark
- Enhanced Earthen Bulwark
- Poison Creeper
- Enhanced Poison Creeper
- Ferocious Poison Creeper
- Wolves
- Enhanced Wolf Pack
- Ferocious Wolf Pack
- Poison Creeper tier 2
- Poison Creeper tier 3
- Poison Creeper tier 4
- Poison Creeper tier 5
- Call of the Wild (Companion Passive)
- Call of the Wild tier 2
- Call of the Wild tier 3
- Blood Howl
- Enhanced Blood Howl
- Preserving Blood Howl
- Heart of the Wild (Core Passive)
- Wild Impulses (Core Passive)
- Wild Impulses tier 2
- Wild Impulses tier 3
- Predatory Instinct (Core Passive)
- Bestial Rampage (Key Passive)
- Abundance (Core Passive)
- Abundance tier 2
- Abundance tier 3
- Digitigrade Gait (Core Passive)
- Digitigrade Gait tier 2
- Digitigrade Gait tier 3
- Predatory Instinct tier 2
- Predatory Instinct tier 3
- Preserving Earthen Bulwark
- Ancestral Fortitude (Defensive Passive)
- Vigilance (Defensive Passive)
- Vigilance tier 2
- Vigilance tier 3
- Quickshift (Ultimate Passive)
- Heightened Senses (Ultimate Passive)
- Heightened Senses tier 2
- Heightened Senses tier 3
- Natural Fortitude (Ultimate Passive)
- Natural Fortitude tier 2
- Natural Fortitude tier 3
- Defensive Posture (Ultimate Passive)
- Defensive Posture tier 2
- Defensive Posture tier 3
- Nature’s Resolve (Ultimate Passive)
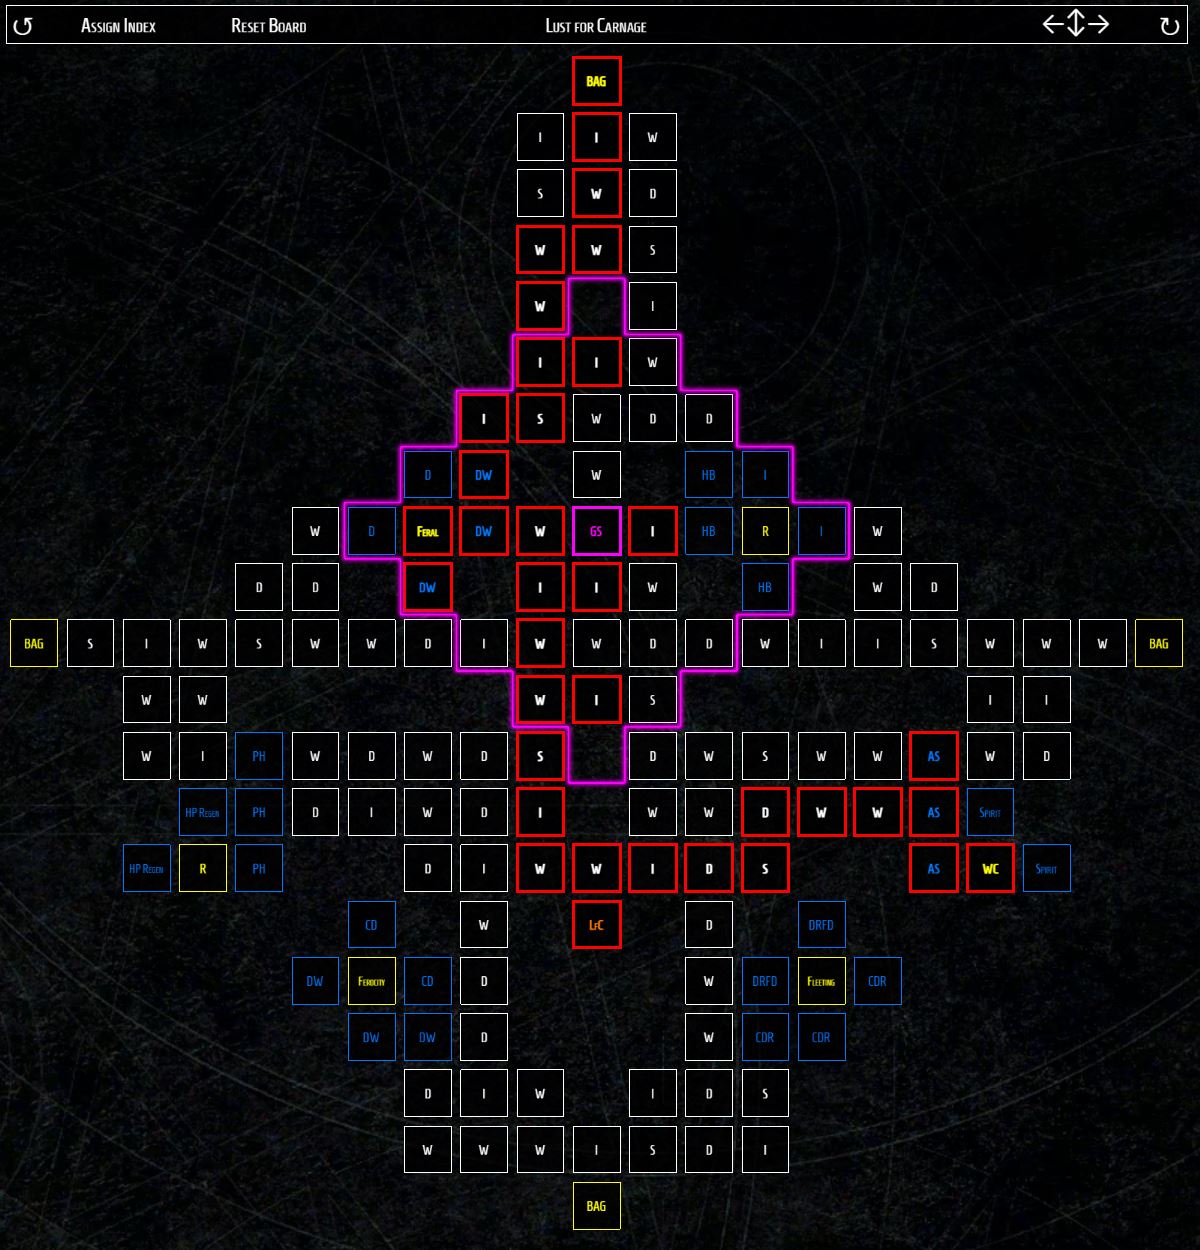
Druid Paragon Boards
In this section we will show you how to construct your Paragon Boards for the Druid, once you have reached level 50 and begin earning Paragon Points. We’ve included a step by step overview of how to progress your Paragon Boards and which Boards, Glyphs and Nodes to unlock. We’ve also included an image of each board at the bottom of this section. If you want to view them in more detail, we have saved them here.
Here are the steps for setting up your Paragon Boards for this Diablo IV Druid Build:
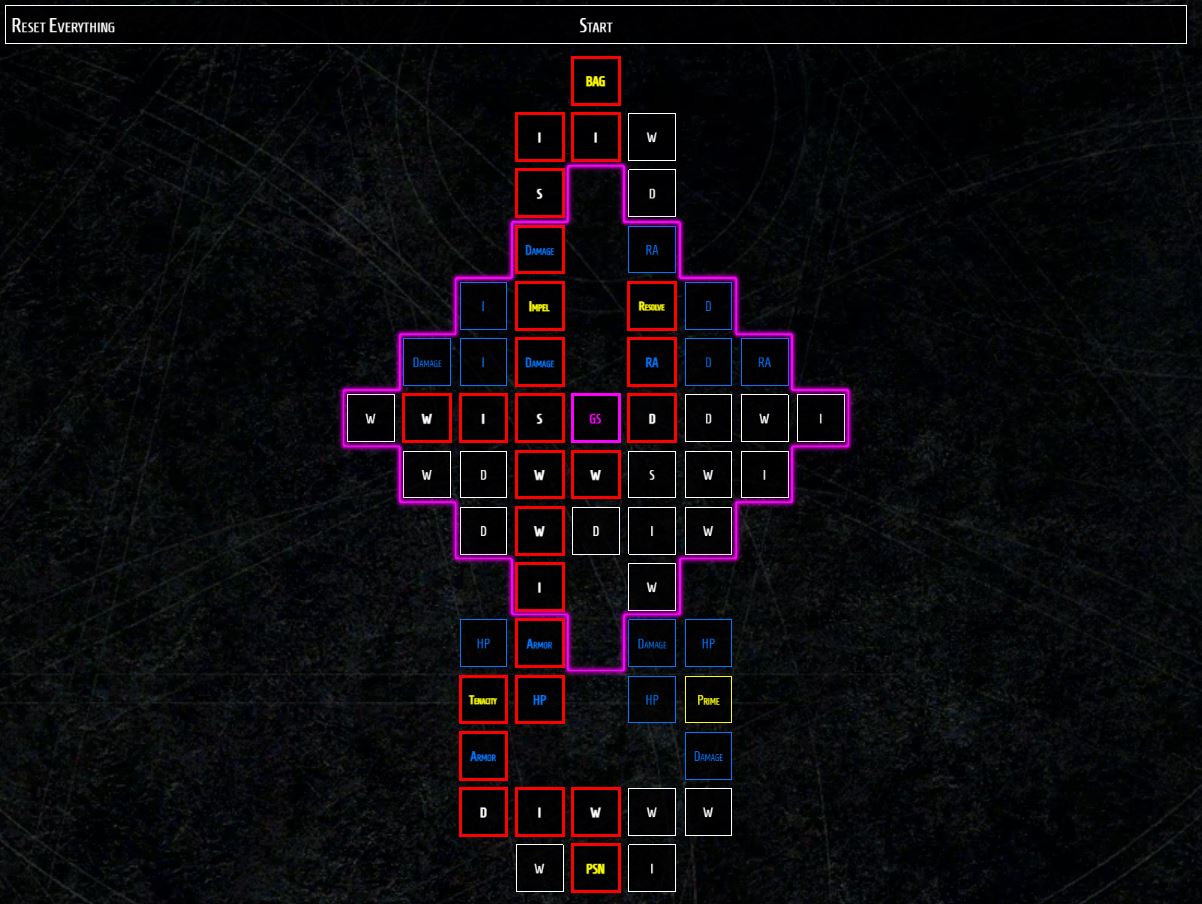
- Starting Board
- Progress up the left side of the Starting Board until you reach the Glyph Slot.
- Socket the Werewolf Glyph.
- Unlock Strength Nodes in the vicinity of the Glyph, along with the Impel and Resolve Nodes.
- Progress upwards from the Impel node to the exit of the board.
- Attach the Heightened Malice Board.
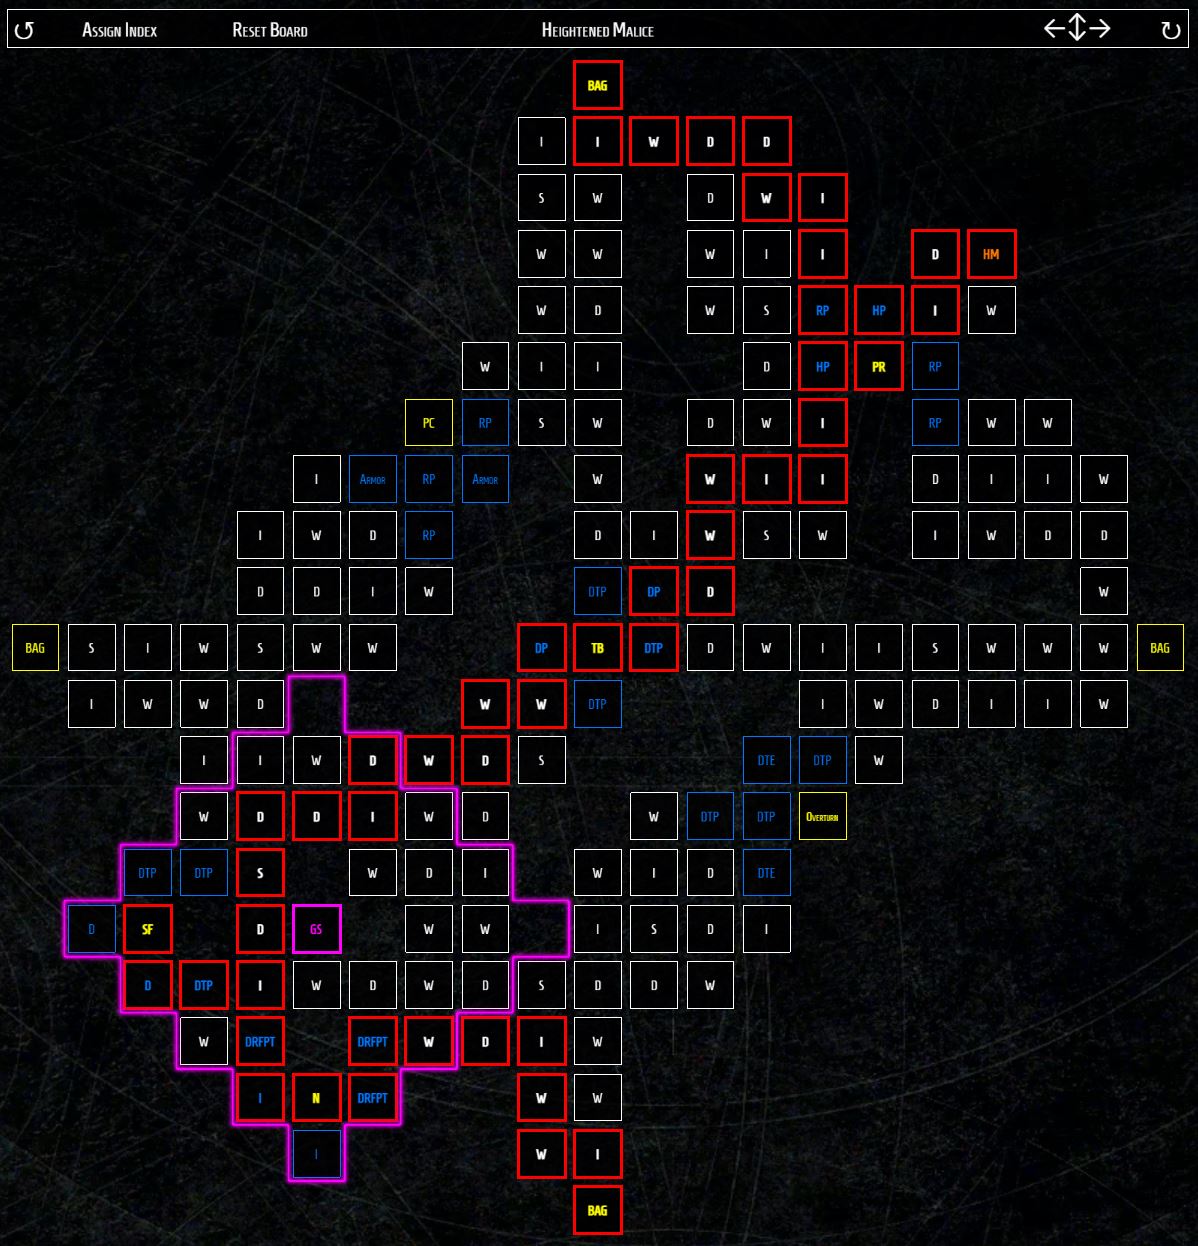
- Heightened Malice
- Ensure the board is rotated to have the Glyph on the bottom left.
- Progress leftwards to unlock the Nature Born and Sinking Fangs nodes.
- Progress to the Glyph Slot, and socket the Exploit Glyph.
- Unlock Dexterity Nodes in range of the Glyph.
- Progress to and unlock the Toxic Bane node.
- Progress to and unlock the Heightened Malice node, picking up Poison Resilience along the way.
- From Poisoned Resilience, progress upwards and leftwards to the exit of the board. Then attach the Ancestral Guidance Board.
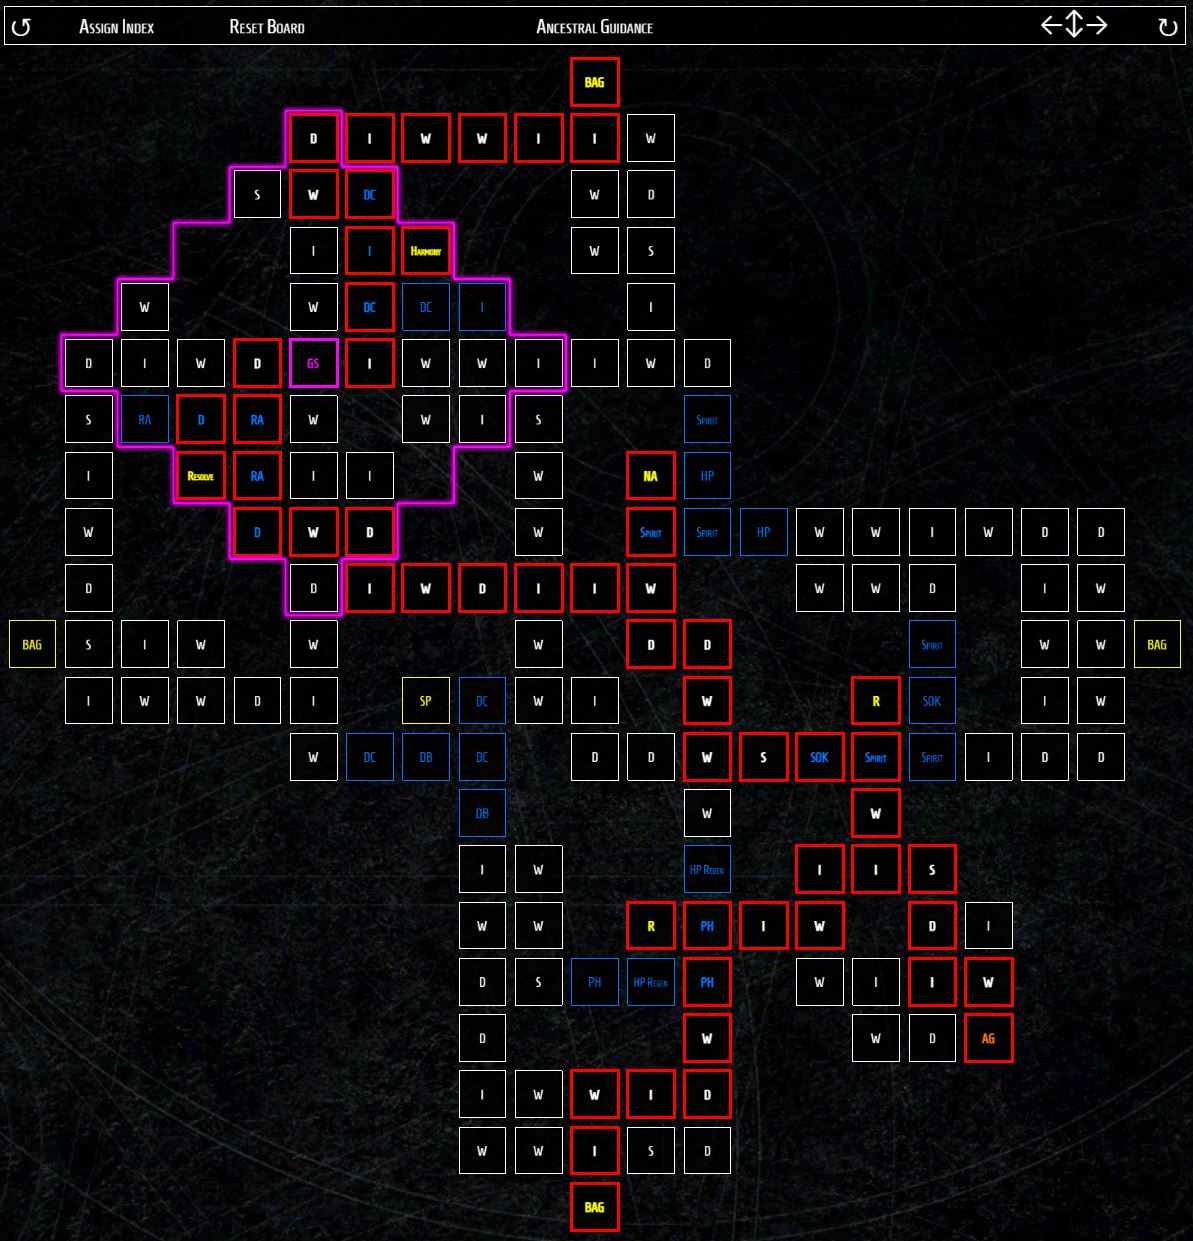
- Ancestral Guidance
- Make sure the board is rotated to have the Glyph on the top right.
- Progress to the Ancestral Guidance node and unlock it, also picking up Recuperate along the way.
- Progress to the Reclamation node.
- Progress leftward and upward to Natural Attunement.
- Progress leftward to unlock the Glyph slot, picking up Resolve along the way. Socket the Territorial Glyph.
- Unlock Dexterity Nodes in range of the Glyph, along with the Harmony Node.
- Progress upwards and to the right until you reach the exit of the board.
- Attach the Thunderstruck board.
- Thunderstruck
- Ensure the board is rotated to have the Glyph on the bottom right.
- Progress to the Glyph, unlocking the Hubris Node along the way. Socket the Tracker Glyph.
- Unlock Dexterity Nodes in range of the Glyph.
- Progress to the exit of the board. Attach the Inner Beast Board.
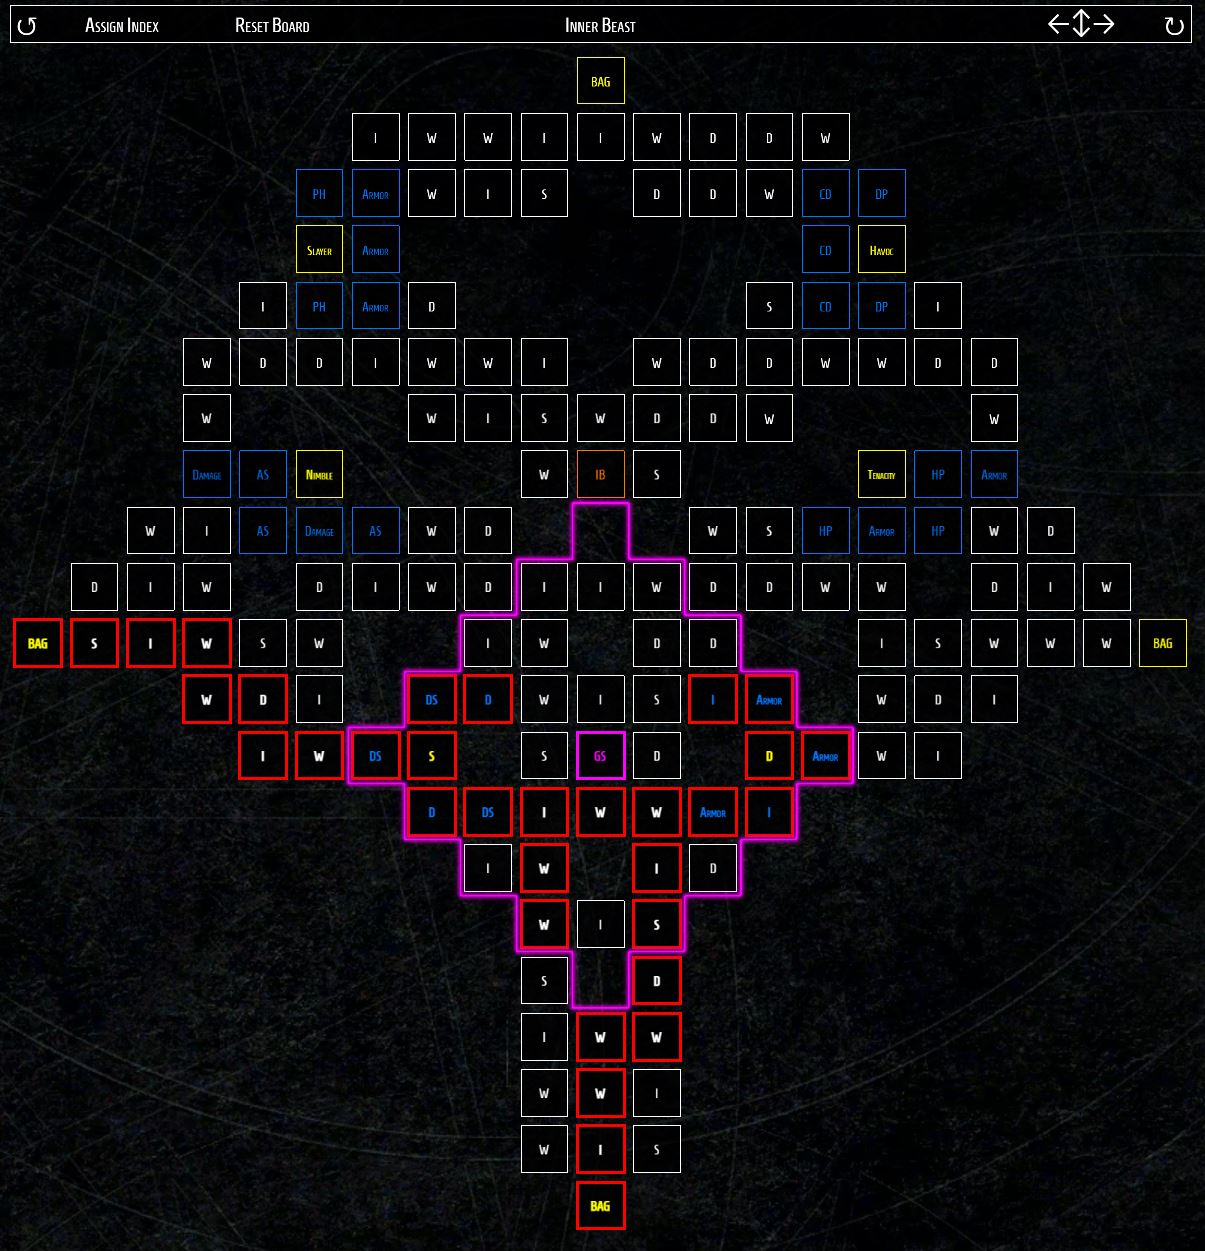
- Inner Beast
- Ensure the board is rotated to have the Glyph slightly below the middle.
- Progress to and unlock the Shapeshifter Node. Then unlock the Magic Nodes above and below it.
- Progress to and unlock the Glyph, Socketing the Fang and Claw Glyph.
- Unlock Willpower Nodes.
- Progress to the Determination node, and also unlock the nearby Magic Nodes.
- Progress to the exit at the bottom of the board. Attach the Lust for Carnage Board.
- Lust for Carnage
- Rotate the board to have the Glyph slot slightly above the middle.
- Progress down to the Glyph Slot, picking up the Feral Node along the way, along with the nearby Magic Werewolf Damage Nodes. Socket the Bane Glyph.
- Unlock Intelligence nodes and progress downwards until you unlock the Lust for Carnage Node.
- Progress to the right and get the Wild’s Call node, also picking up the three Magic Attack Speed Nodes along the way.

Druid Build Legendary Gear and Aspects
In this section we will include the best Legendary Aspects (or Unique Items) for each piece of gear on your Druid Companion Build. Some Aspects can be unlocked in the Codex of Power by completing a specific dungeon, whereas others need to be found on a looted Legendary item. You can visit an Occultist to imprint Aspects onto your gear.
It’s also advised that you refrain from applying Aspects to your weapon until you reach level 50, as you’ll want to be replacing your weapon very often when you find one with higher stats, so this would be a waste of resources.
- Weapon – Two-Handed Axe: Offensive Aspect of the Blurred Beast: While dashing, Shred seeks out nearby Poisoned enemies, instantly dealing 90% of the Poisoning damage to them. Only available from looted legendaries.
- Helm: Defensive Aspect of Might: Basic Skills grant 20% Damage Reduction for 6 seconds. Unlocked by completing Dark Ravine in Dry Steppes.
- Chest Armour: Defensive Aspect of Disobedience: You gain 0.5% increased Armour for 4 second when you deal any form of damage, stacking up to 50%.
- Gloves: Nighthowler’s Offensive Aspect: Blood Howl increases Critical Strike Chance by 10%. In addition, Blood Howl also affects nearby Companions and Players for 3 seconds. Unlocked by completing Forbidden City in Fractured Peaks.
- Pants: Temerity (Unique Pants): While Injured, your Potion also grants 30% Movement Speed for 2 seconds. +18 All Stats. +26% Potion Drop Rate. Lucky Hit: 5% chance to Heal 1,905 Life. +14% Healing Received. Effects that Heal you beyond 100% Life give you a Barrier up to 80% of your Maximum Life that lasts for 8 seconds. Unique items are found randomly in loot. (These stats show the best possible stat roll of Temerity). If you don’t have Temerity, use Defensive Aspect of the Protector instead, which is unlocked by completing Lost Archives in Fractured Peaks.
- Boots: Ghostwalker Mobility Aspect: While Unstoppable and for 4 seconds after, you gain 25% increased Movement Speed and can move freely through enemies. Unlocked by completing Broken Bulwark in Scosglen.
- Amulet: Offensive Aspect of the Alpha: Your Wolf Companions are now Werewolf Companions. Werewolf Companions deal 100% additional damage and can spread Rabies. Must be found from a looted Legendary item.
- Ring 1: Stormclaw’s Offensive Aspect: Critical Strikes with Shred deal 30% of the damage dealt as Lightning Damage to the target and surrounding enemies. Unlocked by completing Anica’s Claim in Fractured Peaks.
- Ring 2: Offensive Aspect of the Stampede: Gain 1 additional Companion. In addition, your Companion skills deal 20% bonus damage. Must be sourced from a looted Legendary item.
Best Stats and Socket Upgrades for the Druid
Now we will outline the best possible stats that you should look out for on your gear. Don’t worry if you don’t get the best possible stat rolls on every slot, most of the possible stats are at least useful even if they’re not best in slot.
- Weapon (Two-Handed Axe): Look for Vulnerable Damage, Damage over Time, Damage over Time, Critical Damage and Willpower.
- Helm: Look for Cooldown Reduction, Poison Creeper Ranks, Maximum Life, Barrier Regeneration and Willpower.
- Chest Armour: Look for Maximum Life and Damage Reduction.
- Gloves: Look for Critical Chance, Lucky Hit Chance, Willpower, Attack Speed, and Shred ranks.
- Pants: If not using Temerity, look for Maximum Life, Damage Reduction and Armour.
- Boots: Look for Movement Speed, Damage Reduction while Injured, Armour in Werewolf Form, Willpower and Dodge Chance.
- Amulet: Look for Cooldown Reduction, Call of the Wild Ranks, Companion Skill Ranks and Damage Reduction.
- Rings: Look for Maximum Life, Critical Strike Chance, Vulnerable Damage, Damage over Time and Damage to Slowed/Crowd Controlled Enemies.
Recommended Socket Upgrades:
- Weapon: Royal Emerald, for +12% Critical Strike Damage to Vulnerable Enemies.
- Armour: Royal Ruby, for +4% Maximum Life (per item)
- Jewelry: Royal Skull, for +250 Armour (per item)
Remember that you can visit a Jeweler vendor to combine three lower quality gems and forge a higher quality one.
Other Diablo 4 Builds:
FAQ about Druid
The best solo Druid build in Diablo 4 is the Druid Werewolf Minion Build. It has high overall damage and great defense. Most enemies will simply be defeated by your minions, never actually reaching the Druid.
A great subclass for the Druid in Diablo 4 is the Werewolf minion setup.