

Welcome to our Diablo 4 Sorcerer Build. This build is focused mostly on shock (lightning) magic to deal massive damage to enemies. It is good at both single target and AOE damage, and the low level experience is also generally good with this build. You don’t have to spend a long time leveling up to unlock powerful abilities.
In this guide we will take you through the build step by step, and include a guide for skill points in case you want to use the build for a new playthrough.
Table of Contents:
Diablo IV Storm Sorcerer Setup
For this Diablo 4 Sorcerer Build, you do not necessarily need to have everything exactly the same as what we have in this guide. If you have the same skills and passive perks then the build will perform relatively well regardless of what else you have.
However, if you manage to get your hands on the recommended Legendary Aspects and stat rolls then the build will perform even better.

Diablo IV Sorcerer Build Skills Setup
In this section we will list the skills and skill upgrades that are recommended. We’ll also provide an explanation of the skill, such as how best to use it or how it fits in with the build.
Skills:
- Arc Lash (Basic Skill)
- Chain Lightning (Core Skill)
- Teleport (Defensive)
- Ice Armour (Defensive)
- Frost Nova (Defensive)
- Unstable Currents (Ultimate)
Arc Lash
Unleash arcing lightning that deals X damage to enemies in front of you. Every 10 times that Arc Lash swipes, it Stuns all enemies hit for 2 seconds.
Upgrades:
- Enhanced Arc Lash – If Arc Lash’s initial swipe Critically Strikes, it swipes an additional time.
- Glinting Arc Lash – Hitting a Stunned Enemy with Arc Lash reduces your Cooldowns by 0.15 seconds.
Arc Lash is a great Basic Skill for this build, boasting a fast attack speed and some other useful effects. When we crit we get twice as much value from the skill, and later in the game the Glinting Arc Lash upgrade can become a really useful engine for reducing the Cooldowns of our other abilities.
In the early game you might want to use Flickering Arc Lash instead, since you don’t have many cooldowns and few ways of stunning enemies – during this early stage of your playthrough the Movement Speed buff is more valuable.
Chain Lightning
Unleash a stream of lightning that deals X damage and chains between nearby enemies and you up to 5 times, prioritizing enemies.
Upgrades:
- Enhanced Chain Lightning – Chain Lightning gains 3% increased Critical Strike Chance per bounce.
- Greater Chain Lightning – If Chain Lightning bounces off you, its next hit deals 10% increased damage.
Chain Lightning is an absolute powerhouse of a skill, useful in pretty much every situation. It deals amazing AOE damage and can hit faraway enemies, allowing you to clear out whole rooms while keeping good distance between yourself and the enemies.
Chain Lightning can also be used to deal decent single target damage to Elites and bosses, particularly since we chose the Greater Chain Lightning upgrade which will cause the skill to deal considerably more damage per hit when there is only one target.
Teleport
Transform into Lightning, becoming Unstoppable and surging to the target location, dealing X damage on arrival.
Upgrades:
- Enhanced Teleport – Teleport’s Cooldown is reduced by 0.5 seconds per enemy hit, up to 3 seconds.
- Shimmering Teleport – After Teleporting, you gain 30% Damage Reduction for 3 seconds.
Since the Sorcerer is quite a squishy class and ideally wants to spend most of its time at range casting spells, we really need a good mobility and escape ability to help us control the flow of battle and get out of trouble.
Teleport is just the ticket for addressing these needs – it gives us much greater mobility for escaping tricky situations and manipulating the positions of our enemies to our advantage (you can make them chase you into chokepoints, for example). It’s also useful for simply getting around quickly and skipping obstructions like ledges.
Also remember that Teleport briefly gives you Unstoppable, which means you can cast it when Crowd Controlled to get out of your vulnerable position, and rid yourself of whatever types of Crowd Control you’re afflicted with.
Ice Armour
A Barrier forms around you for 6 seconds, absorbing 30% of your Base Life in damage. While Ice Armour is active, 5% of your Damage Dealt is added to the Barrier.
Upgrades:
- Enhanced Ice Armour – When Ice Armour is active, your Mana Regeneration is improved by 25%.
Ice Armour is another important defensive skill, allowing you to shield yourself in tough situations. Often the few seconds of respite granted by Ice Armour is all you need to cast some powerful spells and turn the tide of battle.
What’s great about this skill is that the Barrier is replenished whenever you deal damage, so once you have this available then the best defense really is a good offense.
Frost Nova
Unleash a torrent of Frost, Freezing enemies around you for 3 seconds.
Upgrades:
- Enhanced Frost Nova – Killing enemies Frozen by Frost Nova reduces its cooldown by 1 seconds, up to 4 seconds per cast.
- Mystical Frost Nova – Frost Nova makes enemies Vulnerable for 4 seconds, increased to 6 seconds against Bosses.
Frost Nova is another Defensive Skill that’s great for controlling the flow of battle. It gives us a valuable AOE crowd control, especially useful if being attacked by a swarm of enemies.
The Mystical Frost Nova upgrade also allows you to make enemies Vulnerable in an AOE, increasing their damage taken by 20%.
Between Frost Nova, Ice Armour and Teleport, you have plenty of options for dealing with tough situations. Use them wisely and avoid putting all three on Cooldown at the same time, and you’ll always have a way to turn around any tough situation the game throws at you.
Unstable Currents
Lightning surges within you for 10 seconds. Whenever you cast a Shock skill, a random Core, Conjuration or Mastery Shock skill is also cast.
Upgrades:
- Prime Unstable Currents – Unstable Currents increases your Attack Speed by 25% while active.
Unstable Currents is a very strong Ultimate skill that basically turns your character into a walking thunderstorm, casting a random Shock skill for free every time you cast any Shock skill on your bar. There’s something about the chaotic nature of this skill that’s very fun to use.
Ideally you want to be spamming Arc Lash when Unstable Currents is active. This is because Arc Lash has a very fast Attack Speed, so it’s the best way of getting as much value as possible from Unstable Currents.
The cooldown of this skill is very long at 70 seconds, but it’s absolutely worth slotting. The massive DPS boost is just too good to ignore.

Diablo IV Sorcerer Build Skill Point Guide
In this section of the guide, we will list what you should spend each Skill Point on when making this build. This is ideal if you’re just starting out with your Sorcerer and want to gradually make the build as you level up.
We’ve included 58 Skill Points here – the 48 you get from levels 2 to 49, and the 10 extra points unlocked via Renown.
- Arc Lash
- Enhanced Arc Lash
- Chain Lightning
- Enhanced Chain Lightning
- Greater Chain Lightning
- Glinting Arc Lash (or Flickering Arc Lash for the early game, if you prefer)
- Teleport
- Ice Armour
- Frost Nova
- Chain Lightning tier 2
- Chain Lightning tier 3
- Chain Lightning tier 4
- Chain Lightning tier 5
- Arc Lash tier 2
- Arc Lash tier 3
- Arc Lash tier 4
- Arc Lash tier 5
- Enhanced Frost Nova
- Mystical Frost Nova
- Enhanced Teleport
- Shimmering Teleport
- Enhanced Ice Armour
- Align the Elements (Conjuration Passive)
- Unstable Currents
- Prime Unstable Currents
- Protection (Conjuration Passive)
- Glass Cannon (Defensive Passive)
- Glass Cannon tier 2
- Fire Bolt (For Enchantment)
- Fiery Surge (Ultimate Passive)
- Fiery Surge tier 2
- Fiery Surge tier 3
- Glass Cannon tier 3
- Vyr’s Mastery (Key Passive)
- Coursing Currents (Ultimate Passive)
- Electrocution (Ultimate Passive)
- Electrocution tier 2
- Electrocution tier 3
- Endless Pyre (Ultimate Passive)
- Warmth (Ultimate Passive)
- Warmth tier 2
- Warmth tier 3
- Devastation (Core Passive)
- Elemental Dominance (Core Passive)
- Elemental Dominance tier 2
- Elemental Dominance tier 3
- Icy Veil (Mastery Passive)
- Icy Veil tier 2
- Icy Veil tier 3
- Protection tier 2
- Protection tier 3
- Mana Shield (Conjuration Passive)
- Mana Shield tier 2
- Mana Shield tier 3
- Teleport tier 2
- Teleport tier 3
- Teleport tier 4
- Teleport tier 5
Sorcerer Paragon Boards
In this section, we will explain how to build the Paragon Boards for your Sorcerer. We have included a step by step overview of how to progress through the boards, and which Boards and Glyphs to use. At the bottom of this section there is also an image showing how to complete each board. If you want to view them in more detail, we have saved them here.
Below is the step by step Paragon guide for the Diablo IV Sorcerer Build:
- Starting Board
- Progress upwards on the right side of the board, unlocking the Elementalist Node and the nearby Magic Nodes.
- Progress to the Glyph Socket, unlock it, and slot the Exploit Glyph.
- Unlock Dexterity Nodes within range of the Glyph, along with the Elemental Balance Node and nearby Magic Nodes.
- Progress up the top left side of the board to the exit node. Attach the Burning Instinct Board.
- Burning Instinct
- Rotate the board so that the Glyph is on the bottom right.
- Progress up and then right to unlock the Cinders Node.
- Unlock the Glyph Socket, and slot the Territorial Glyph.
- Unlock the Smoldering Embers Node, nearby Magic Nodes, and Dexterity Nodes within range of the Glyph.
- Progress upwards and leftwards from the Glyph area, unlocking the Kindling Node and nearby Magic Nodes.
- Progress leftwards then downwards to unlock the Safeguard Node, and nearby Magic Nodes.
- Progress leftwards to the exit node. Attach the Frigid Fate Board.
- Frigid Fate
- Rotate the board so that the Glyph slot is slightly towards the top right.
- Progress to the Glyph Slot, taking the route with the most Dexterity Nodes. Slot the Tactician Glyph.
- Get the Weakness Node, and the nearby Magic Nodes that give +5% Vulnerable Damage.
- Get the Chilling Node, and the nearby Magic Dexterity Nodes.
- Progress up the rightmost path to get the Oppressive Node, and the nearby Magic Nodes.
- Progress directly to the exit node at the top of the board. Attach the Static Surge Board.
- Static Surge
- Rotate the board until the Glyph slot is slightly left of centre.
- Progress upwards, then rightwards to the Overwhelming Node. Unlock this and the nearby Magic Nodes.
- Go back to where you turned right, then progress to the Glyph Socket. Slot the Flamefeeder Glyph.
- Get the Incapacitate Node and the nearby Magic Nodes.
- Grab the remaining Dexterity Nodes in the Glyph area, then progress upwards to the Paralyzing Node, also unlocking the Magic Nodes for Stunned Damage.
- Progress upwards and rightwards to the exit node. Attach the Ceaseless Conduit Board.
- Ceaseless Conduit
- Rotate the board so that the Glyph slot is on the bottom left.
- Progress upwards, then rightwards to unlock the Hunter Killer Node and the nearby Magic Nodes.
- Go back to where you turned right, then head left to the Glyph Slot. Slot the Control Glyph.
- Grab the Galvanic Catalyst Node, and the nearby Magic Dexterity Nodes.
- Progress to and unlock remaining Dexterity Nodes in range of the Glyph.
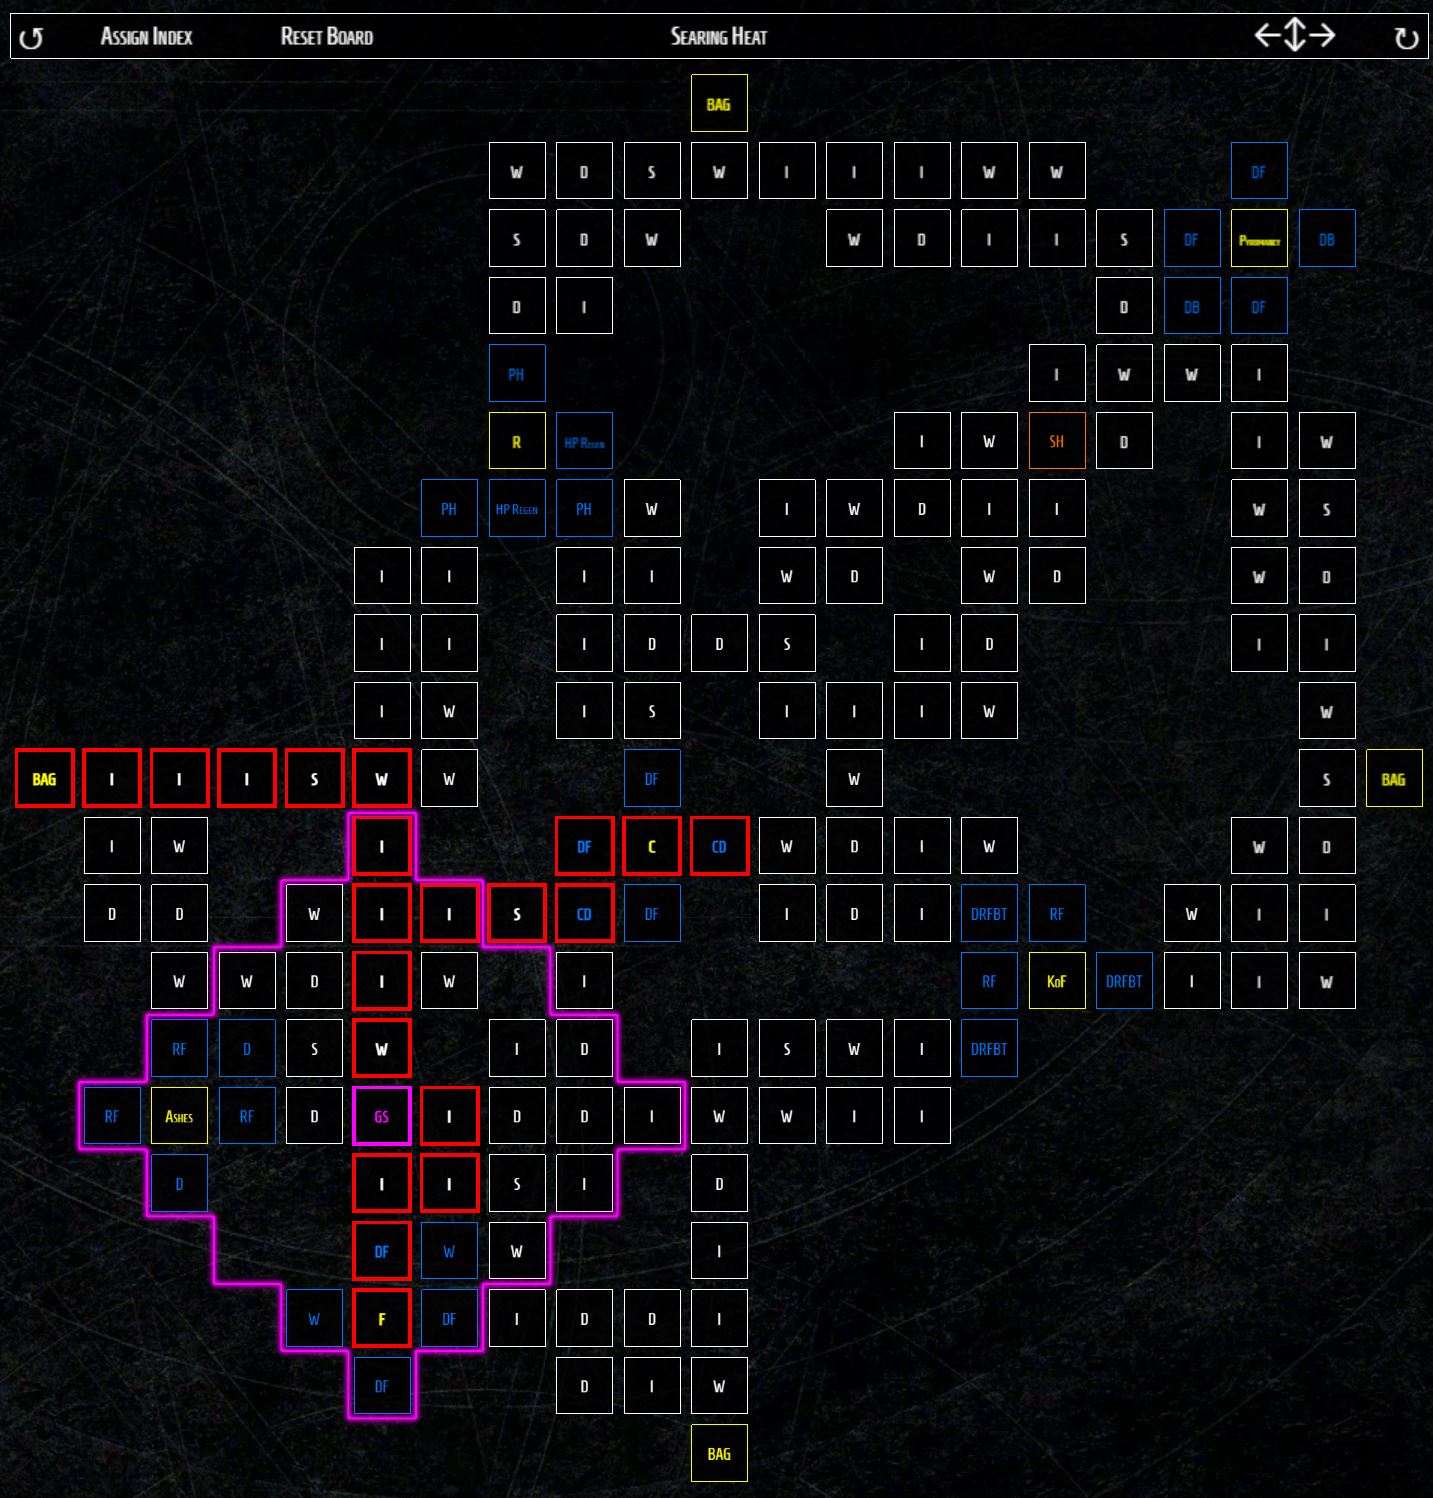
- Searing Heat
- Go back to the Burning Instinct Board. Progress from the upper right part of the Glyph area, to the exit node.
- Attach the Searing Heat Board. Rotate it so that the Glyph is on the bottom left.
- Progress directly right, then directly down to unlock the Glyph slot. Slot the Adept Glyph.
- Unlock the Flame-Touched Node.
- Progress to and unlock the Combustion Node. and the Magic Node for Critical Strike Damage.


Sorcerer Enchantment Explanation for Diablo IV
When you reach level 15 on your Diablo IV Sorcerer Build, you will unlock the priority quest called Sorcerer: Legacy of the Magi. We won’t give any spoilers about the contents of this quest, but when you complete it you will be able to make use of the Sorcerer’s Enchantment system.
Enchantments allow you to put one of your unlocked non-ultimate skills into a special slot, which will then provide an additional effect depending on the skill. It may give you free casts of that ability when a certain condition is met, or it may instead give you some other buffs.
When you hit level 30 you will also unlock a second Enchantment slot.
You’re free to change which Enchantment skills you have slotted at any time outside of combat with no cost, so it’s very easy to experiment with this mechanic and choose what options you like the most.
This mechanic is really flexible and there’s a lot of build-enabling options, or just cool tricks you can pull off with different combinations of Enchantments. So I definitely recommend trying out different stuff to see what you like.
However, for this build we are using the following Enchantments:
- Chain Lightning Enchantment – Chain Lightning forms automatically after spending 100 Mana.
- Fire Bolt Enchantment – Direct Damage from Skills applies up to an additional 23% Burning Damage over 8 seconds.
We’re using the Chain Lightning Enchantment to get us a free extra cast of Chain Lightning once in a while, kind of like a mini Unstable Currents.
Fire Bolt, while perhaps not completely in keeping with the overall Shock theme of the build, synergises very well with what we are doing, since we’re using direct damage pretty much exclusively. All of our skills will effectively do 23% extra damage with this.
In addition, Fire Bolt afflicts enemies with Burning Damage, which allows us to make use of the following passives without using any Fire Skills on our bar:
- Fiery Surge – Killing a Burning enemy increases your Mana Regeneration by 10% for 3 seconds.
- Warmth – Every 1 second, you Heal for 0.3% of your Maximum Life for each Nearby Burning enemy. Healing increased to 0.6% from Bosses.
This is a great example of how the Sorcerer’s Enchantment system can enhance builds in ways you might not initially expect.
Legendary Aspects for Diablo IV Sorcerer Build
In this section we will list the best Legendary Aspects (or Unique Items) for this Diablo IV Sorcerer Build.
Note that some of these Aspects can be sourced from the Codex of Power, while others must be sourced from looted gear.
- Main Weapon – Wand: Offensive Aspect of the Unbroken Tether – Chain Lightning has a 25% chance to chain an additional 2 times. Must be sourced from looted gear.
- Offhand Weapon – Focus: Accelerating Offensive Aspect – Critical Strikes with Core Skills increase your Attack Speed by 15% for 5 seconds.
- Helm – Harlequin’s Crest (Unique Item): +2752 Maximum Life, +10% Cooldown Reduction, +12% Resource Generation, +28 All Stats, +20% Damage Reduction, +4 Ranks to all skills (These are the best possible rolls for this item). Unique items must be found in loot.
- Helm (If you don’t have Harlequin’s Crest): Utility Aspect of Fortune: Your Lucky Hit Chance is increased by 10% while you have a Barrier active. Must be found in loot.
- Chest Armour – Raiment of the Infinite (Unique Item): +42 Intelligence, +23.5% Damage to Close Enemies, +23.5% Damage to Stunned enemies, +1 rank of the Glass Cannon Passive, After using Teleport, Close enemies are pulled to you and stunned for 3 seconds, but Teleport’s Cooldown is increased by 20% (These are the best possible rolls for this item). Unique items must be found in loot.
- Chest Armour (If you don’t have Raiment of the Infinite) – Defensive Aspect of Might: Basic Skills grant 20% Damage Reduction for 6 seconds. Unlocked by completing Dark Ravine in Dry Steppes.
- Gloves – Storm Swell Offensive Aspect: You deal 20% increased damage to Vulnerable enemies while you have a Barrier. Unlocked by completing Onyx Hold in Dry Steppes.
- Pants – Defensive Aspect of Disobedience: You gain 0.5% increased Armour for 4 seconds when you deal any form of damage, stacking up to 50%. Unlocked by completing Halls of the Damned in Kehjistan.
- Boots – Ghostwalker Mobility Aspect: While Unstoppable and for 4 seconds after, you gain +25% increased Movement Speed and can pass through enemies. Unlocked by completing Broken Bulwark in Scosglen.
- Amulet – Offensive Aspect of Control: You deal 35% more damage to Immobilized, Stunned or Frozen enemies. Unlocked by completing Sunken Library in Kehjistan.
- Ring 1 – Recharging Resource Aspect: Each time Chain Lightning bounced off you, gain 6 Mana. Unlocked by completing Zenith in Fractured Peaks.
- Ring 2 – Conceited Offensive Aspect: You deal 15% increased damage when you have a Barrier active. Must be sourced from looted gear.
You can visit an Occultist to imprint Aspects on your items, or to remove an Aspect from a looted item (for placing on a different item).
It’s generally not worth imprinting anything on weapons until you reach Level 50, as you’ll most likely be replacing your weapon very often.
Best Stat Rolls and Socket Upgrades
Finally, we’ll look at the best stat rolls and socket upgrades for each item slot.
- Weapons: Cooldown Reduction, Critical Strike Damage, Lightning Critical Strike Damage, Vulnerable Damage, Damage to Close Enemies.
- Helm: Cooldown Reduction, Basic Attack Speed, Intelligence, Total Armour, Maximum Life.
- Chest Armour: Damage Reduction, Total Armour, Maximum Life, Intelligence.
- Gloves: Attack Speed, Critical Strike Chance, Lightning Critical Strike Damage, Lucky Hit Chance.
- Pants: Damage Reduction, Total Armour, Maximum Life, Intelligence.
- Boots: Movement Speed, Rank increases for Teleport or Frost Nova, Intelligence, Total Armour.
- Amulet: Cooldown Reduction, Rank increases, Movement Speed, Damage Reduction
- Rings: Critical Strike Chance, Critical Strike Damage, Lightning Critical Strike Damage, Vulnerable Damage, Damage to Close Enemies.
And for the Socket upgrades, prioritize the following upgrades:
- Weapons: Royal Emerald: +12% Critical Strike Damage against Vulnerable Enemies.
- Armour: Royal Ruby: +4% Maximum Life
- Jewelry: Royal Skull: +250 Armour.
Remember that you can visit a Jeweler to combine three lower quality Socket items, creating one of the next tier above.