Welcome to the Best Astarion Build for BG3 (Thief Subclass). Thieves are the undisputed masters of the battlefield’s clock. By unlocking ![]() Fast Hands at Level 3, Astarion gains an unparalleled second Bonus Action, allowing him to attack, dash, and hide all in a single turn.
Fast Hands at Level 3, Astarion gains an unparalleled second Bonus Action, allowing him to attack, dash, and hide all in a single turn.
This makes the Rogue Thief one of the most versatile builds in the game, capable of delivering lethal burst damage while remaining completely untouchable.
Table of Contents for the BG3 Astarion Build:
- Astarion Build – First Steps
- Astarion Build Starting Point (Level 1)
- Astarion Build Leveling Progression
- Astarion Best Equipment
- Astarion Build Extra Info
For more Rogue builds, visit our BG3 Rogue Builds page or explore the complete BG3 Builds Database. We also have an optimized BG3 Astarion Build. You can also check out our BG3 Builds Tier List to see which builds perform best.
Strengths and Weaknesses list for the Astarion Thief Rogue Build:
Strengths
Weaknesses
BG3 Astarion Build Overview

Here we will have general overview of our Astarion build for BG3, such as the basics of the Rogue class and Thief subclass, and how to recruit and respec Astarion. If you already know all of that, it’s best to skip this section.
Rogue Class Summary
Rogues are the main “stealth” class in Baldur’s Gate 3. While other classes can stealth, none encourage and reward this playstyle as much as the Rogue.
All variants of the Rogue class are very good at stealing, lockpicking and pickpocketing. To learn more about how to maximise this playstyle, see our How to Steal and Pickpocket in BG3 guide.
If you don’t know what we mean by terms like Advantage, Action or Proficiency, or want to find out how systems like Stealth work, you will find our BG3 Hidden Mechanics Guide very useful.
Thief Subclass
The Thief subclass is especially adept at sneaking around, and it can use two Bonus Actions per turn. This makes for a perfect synergy with the Rogue’s ![]() Cunning Actions, allowing you to make a sneak attack and then retreat into the shadows on the same turn.
Cunning Actions, allowing you to make a sneak attack and then retreat into the shadows on the same turn.
Overall, the Astarion Thief Rogue combo has one of the best “Multiple Actions per turn” movesets. Thanks to all his bonus actions, he can defeat high-priority targets before they even get a chance to take a turn!
How to unlock Astarion in BG3
Astarion can be recruited very early in Baldur’s Gate 3. Almost immediately after you crash with the Nautiloid ship at the beach. You can find Astarion here on the map. All you really need to do is head northwest of where you start on the Ravaged Beach.
When you approach Astarion, you have three options.
- Easily. Stand back. (Best option)
- Kill it yourself – you look capable enough.
- Leave.
When you select the second or the third option, he will try to ambush you and slit your throat. Don’t worry it won’t come to that. The first option will also lead Astarion to attack you. However, you won’t have to deal with some checks to get his knife away from your throat.
Either way, the tadpole will connect you and clear things up. After all the talking, you can decide to recruit Astarion into your group.
Why (and How to) Respec Astarion
To follow this build guide precisely, you will need to respec Astarion.
It is up to you when you do this, but I recommend getting it done by the time you reach Level 4.
Here is a quick tutorial in case you don’t know how to respec characters in BG3:
BG3 Astarion Build At Level 1
In this section, we will explain the starting situation of the Astarion Build. You must go to Withers like explained above and respec. This allows us to optimize Astarion better.
You don’t actually need to change your class, but doing this will also allow you to change the ability point distribution of Astarion as if he was new character.
Race Info
![]()
Astarion is a High Elf, which gives him access to some extra bonuses:
Proficiency
- Proficiency with
 Longswords, Shortswords, Longbows and Shortbows.
- Lets you see in the dark, removing combat penalties that would normally apply in dark areas.
- You have
 Advantage on Saving Throws against being Charmed.
 - Immunity to being put to sleep by magic.
![]() Perception
Perception
- Helps you spot hidden details in the world.
Extra Cantrip
- High Elves can choose an additional Cantrip from the Wizard spell list, regardless of their class.
- Important: The Cantrip is cast with Intelligence (Wizards’ main stat).
- Therefore, make sure to select a non-damaging Cantrip, because our Intelligence modifier isn’t high.
- Select a utility cantrip, such as Mage Hand.
Abilities
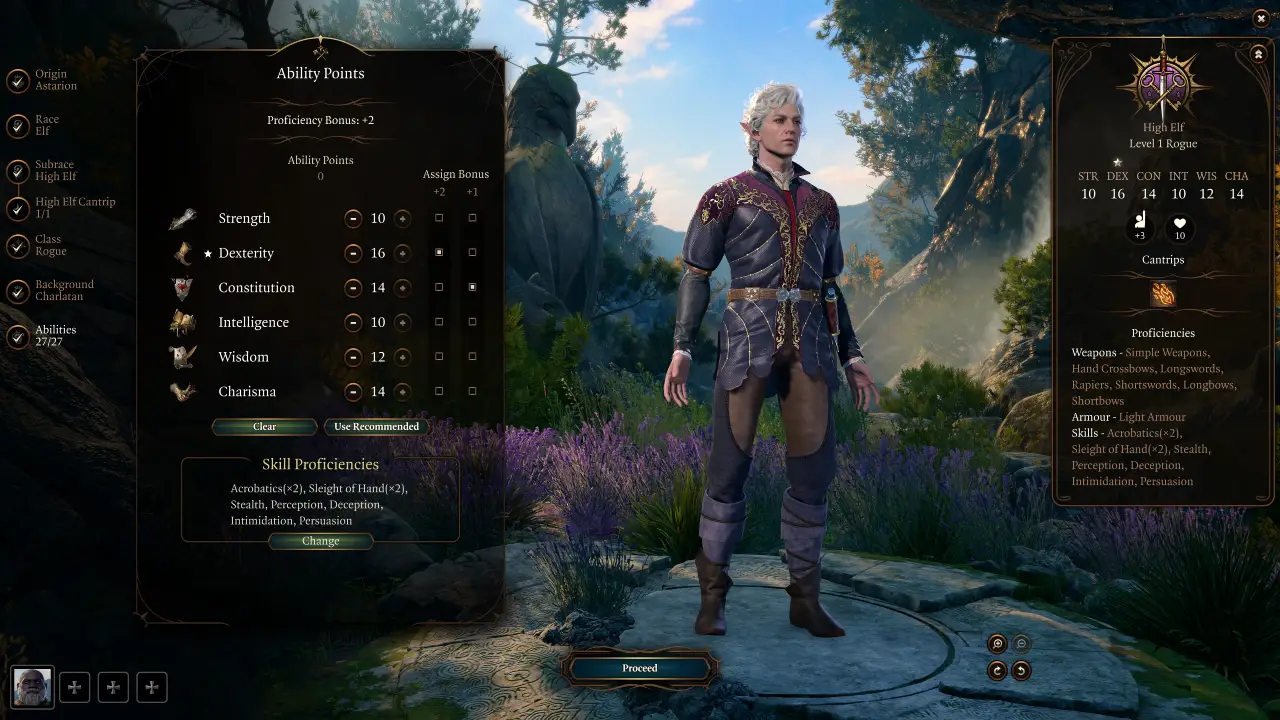
With the respec in mind, let’s distribute the Ability points optimally.
Bolded Abilities are essential. The others can be adjusted if you want.
![]() Strength – 10 Points
Strength – 10 Points
- Improves jump distance and carry weight.
![]() Dexterity – 16 Points
Dexterity – 16 Points
- Primary Stat.
- Boosts Damage, AC, and Dex-based skills.
![]() Constitution – 14 Points
Constitution – 14 Points
- Increases Max HP.
![]() Intelligence – 10 Points
Intelligence – 10 Points
- Not very important for this build.
![]() Wisdom – 12 Points
Wisdom – 12 Points
- Boosts Perception and saves against Mind Control.
![]() Charisma – 14 Points
Charisma – 14 Points
- Improves Dialogue dice rolls.
| Ability | Points | Why it matters |
|---|---|---|
| 10 | Mostly for jump distance and carry weight. | |
| 16 | Primary Stat. Boosts Damage, AC, and Dex-based skills. | |
| 14 | Increases HP. | |
| 10 | Not very important. | |
| 12 | Boosts Perception and saves against Mind Control. | |
| 14 | Improves Dialogue dice rolls. |
Skills
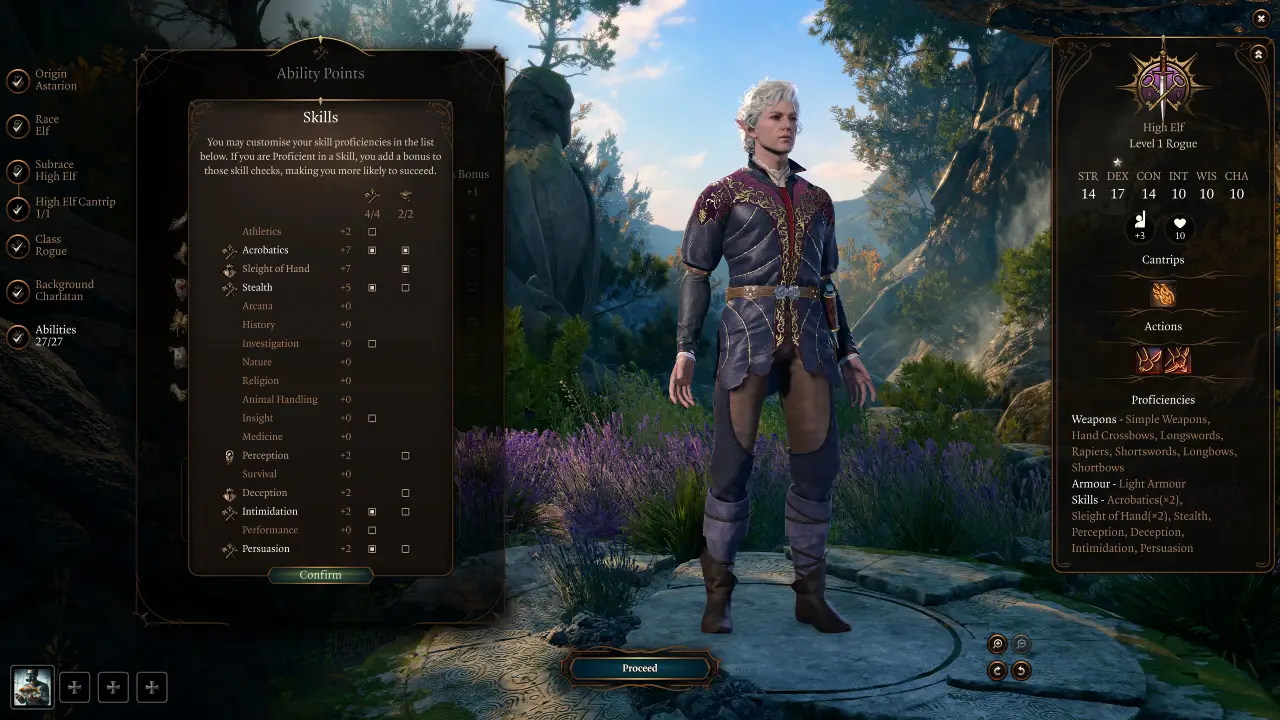
Astarion is locked into the Charlatan Background, which gives automatic Proficiency with the ![]() Deception and
Deception and ![]() Sleight of Hand Skills. For his remaining choices, we focus on maximizing his high Dexterity and utility.
Sleight of Hand Skills. For his remaining choices, we focus on maximizing his high Dexterity and utility.
We chose the following Proficiencies:
We’ll also choose the following Expertise:
Now that we’ve explained the starting point of the BG3 Astarion build, we will move onto a step-by-step leveling guide.
BG3 Astarion Build Leveling Guide (2-12)
We will now walk you through the process of leveling up Astarion. Note that the Rogue & Thief is a very linear class and subclass combo in terms of progression. While it offers fewer complex branching choices than other classes, every level gained adds raw power and unmatched reliability to your kit.
Early-Game Leveling Process (2-4)
In this section, we will summarise what you gain at each level up on the BG3 Astarion Build, as well as any recommendations for choices to make when leveling up. We’ll start with the earlier parts of the game, levels 2-4.
Level 2
At Level 2, we gain three very important new Bonus Actions:
Pro Tip: While other classes can perform these abilities, doing so consumes a normal ![]() Action rather than a
Action rather than a ![]() Bonus Action. This effectively means that the Rogue can Dash or Disengage on the same turn that they attack, while other classes cannot.
Bonus Action. This effectively means that the Rogue can Dash or Disengage on the same turn that they attack, while other classes cannot.
Level 3
At Level 3, the build becomes more powerful. You will unlock the Thief subclass and see a significant jump in your damage output.
At Level 3, Astarion gains an additional 1d6 for Sneak Attack Bonus Damage, meaning Sneak Attacks will now do between 2 and 12 bonus damage (instead of 1-6), depending on the damage roll.
The Thief Class gets an extra ![]() Bonus Action each turn (which is especially nice in combination with the Cunning Actions above).
Bonus Action each turn (which is especially nice in combination with the Cunning Actions above).
The defining feature of this build is ![]() Fast Hands, which grants Astarion a permanent additional Bonus Action every turn.
Fast Hands, which grants Astarion a permanent additional Bonus Action every turn.
This transforms how you play:
The Thief also gets a 50% Resistance to Falling Damage, which isn’t especially important but can occasionally be useful.
Level 4
At Level 4, we have to choose a Feat for the BG3 Astarion Build. Feats are strong passive effects that can enable a certain build idea or give a stat buff to increase damage or survivability.
Mid-Game Leveling Process (5-8)
We’ll now look at the mid-game levels for our Astarion Build, covering levels 5-8.
Level 5
Level 5 provides a massive boost to both Astarion’s lethality and his survivability. He becomes significantly harder to kill while his attacks grow even more potent.
Additionally, your Proficiency Bonus is increased from +2 to +3, meaning you’ll now get a +3 bonus when rolling for skills that you’re Proficient with.
You also get another Sneak Attack Die, so your Sneak Bonus Damage can now roll up to 18.
Level 6
At Level 6, there aren’t many choices to make.
All you need to do is choose two additional Skills to gain ![]() Expertise with.
Expertise with.
I recommend choosing the following:
Level 7
At Level 7, Astarion will gain an additional sneak attack damage die, meaning your bonus damage potential from stealth will now be 4-24.
Level 8
At Level 8, you’ll get to choose another Feat for your Astarion Build.
Late-Game Leveling Process (9-12)
Finally, let’s look at the end-game leveling up, covering levels 9-12.
Level 9
At Level 9, Astarion’s Proficiency Bonus is improved to +4. This means you now have a +4 bonus added to rolls for any skills you are Proficient at (or Attack Rolls using weapons you’re Proficient with). This bonus always applies unless you roll a 1 (Critical Fail/Miss).
You gain another Sneak Attack Die here too, meaning your attacks from stealth will now deal 5-30 bonus damage.
New Ability: ![]() Supreme Sneak
Supreme Sneak
- Spend an Action to become Invisible for up to 10 turns.
Level 10
Unlike other classes, the Rogue gets to choose an extra Feat at Level 10.
Level 11
At Level 11, you’ll gain another Sneak Attack Die, giving your attacks from stealth a possible 6-36 bonus damage.
Pro Tip: If you aren’t already, you should do your best to use the Thief’s extra Bonus Action and Cunning Actions to sneak as much as possible in combat, as the potential damage bonuses from stealth are getting really strong, and if you’re not utilising them, you’re missing out!
Level 12
If you’ve reached this point, then you have finished leveling up your BG3 Astarion Build. Congratulations!
At Level 12, you’ll get to choose one more Feat for Astarion.
We got all of the most important Feats already – the last choice is up to you. Pick one of the two recommended below:
Optional, but you could also go with a Multiclass spec at level 12.
Astarion Thief Build Equipment for Baldur’s Gate 3

Below is the recommended Equipment setup for this Astarion Thief Build in Baldur’s Gate 3. We have split the equipment into an early-game and late-game section, to ensure you can make use of this build regardless of how far into the game you are.
Some of the items are quite expensive – you may be interested in our BG3 Infinite Gold Guide to help you afford them all.
Early-Game
Early-game equipment can be obtained in Act I and the earlier parts of Act II. Try to get as many pieces as possible. If you miss some, don’t worry too much about it.
| Slot | Icon | Item | Effects | Location |
|---|---|---|---|---|
| Head |  |
Haste Helm |
|
In a wooden chest next to a cart, by the Blighted Village Waypoint |
| Cloak |  |
Cloak of Protection |
|
Purchased from Quartermaster Talli in Last Light Inn |
| Chest |  |
Spidersilk Armour |
|
Dropped by Minthara in the Shattered Sanctum |
| Gloves |  |
Gloves of Thievery |
|
Sold by Brem in the Zhentarim Hideout |
| Boots |  |
Disintegrating Night Walkers |
|
Looted from True Soul Nere in the Grymforge |
| Necklace |  |
Amulet of Misty Step |
|
Found in a chest in the Defiled Temple |
| Ring 1 |  |
Fetish of Callarduran Smoothhands |
|
Loot from the dead deep gnomes being thrown into the water in Grymforge. |
| Ring 2 |  |
Smuggler’s Ring |
|
Looted from a skeleton hidden in the bush, at Risen road in Act I. |
| Melee Mainhand |  |
Shortsword of First Blood |
|
Looted from an executed Deep Gnome in the Underdark |
| Melee Offhand |  |
Hunter’s Dagger |
|
Sold by Roah Moonglow in Shattered Sanctum |
| Ranged |  |
Hand Crossbow +1 (Dual Wield) |
|
Sold by Derryth Bonecloak in the Myconid Colony. |
Late-Game
Late-game equipment is available in Act III and the latter parts of Act II. However, sometimes items from the early-game section remain powerful enough to be carried into late-game as you will see here.
| Slot | Icon | Item | Effects | Location |
|---|---|---|---|---|
| Head |  |
Mask of Soul Perception |
|
In a locked Gilded Chest in Helsik’s room |
| Cloak |  |
Shade-Slayer Cloak |
|
Sold by Sticky Dondo in the Guildhall, Lower City Sewers. |
| Chest |  |
Bhaalist Armour |
|
Sold by Echo of Abazigal in the Murder Tribunal, if you become an Unholy Assassin |
| Gloves | |
Gloves of Thievery |
|
Sold by Brem in the Zhentarim Hideout |
| Boots |  |
Helldusk Boots |
|
Found in a locked gilded chest on the top floor of Wyrm’s Rock Fortress. |
| Necklace |  |
Fey Semblence Amulet |
|
Complete the Avenge the Hag Survivors quest in Act III. |
| Ring 1 |  |
Ring of Regeneration |
|
Sold inside Sorcerous Sundries in Baldur’s Gate’s Lower City. |
| Ring 2 |  |
Killer’s Sweetheart |
|
Found on the top level of the stone structure in the Self-Same Trial in the Gauntlet of Shar, Act II. |
| Melee Mainhand |  |
Crimson Mischief |
|
Looted from Orin, during Get Orin’s Netherstone. |
| Melee Offhand |  |
Bloodthirst |
|
Looted from Orin, during Get Orin’s Netherstone. |
| Ranged |  |
Hellfire Hand Crossbow + another Hand Crossbow |
|
Dropped by Yurgir in the Gauntlet of Shar. |
Astarion Build Extra Info

Here is some additional information, tips and tricks to help you get the most out of this BG3 Astarion Build.
Best BG3 Astarion Build Tips & Tricks
The Thief is easy to build but requires tactical precision to master. Here are a few tips and tricks that you can try out.
Mirror of Loss
If you successfully acquire a buff from the Mirror of Loss during your playthrough, you should put the extra points into Dexterity. This will improve Astarion’s damage, accuracy, initiative, armour class, and stealth.
If you don’t know what the Mirror of Loss is or how to use it, you may be interested in our Mirror of Loss Guide. The Mirror can give up to three additional Ability Points to all members of your party, making it very strong.
Best Party Composition for Astarion
Astarion has a Neutral Evil moral alignment at the start of the game (with a bit of a Chaotic Evil lean in some situations). While you can use any party composition with Astarion, you’ll have an easier time with characters who match up with his alignment.
This leaves the following four options as the most obvious choices:
Astarion Build Best Potions

Astarion Build Illithid Powers (optional)

Illithid Powers are unlocked later in BG3 when you learn more about Mind Flayers and Tadpoles. By eating Jars of Mind Flayer Parasites, you gain one point. This is another optional skill tree that you can get access to if you want. Here are some of the best Illithid Powers for the BG3 Astarion Build: