

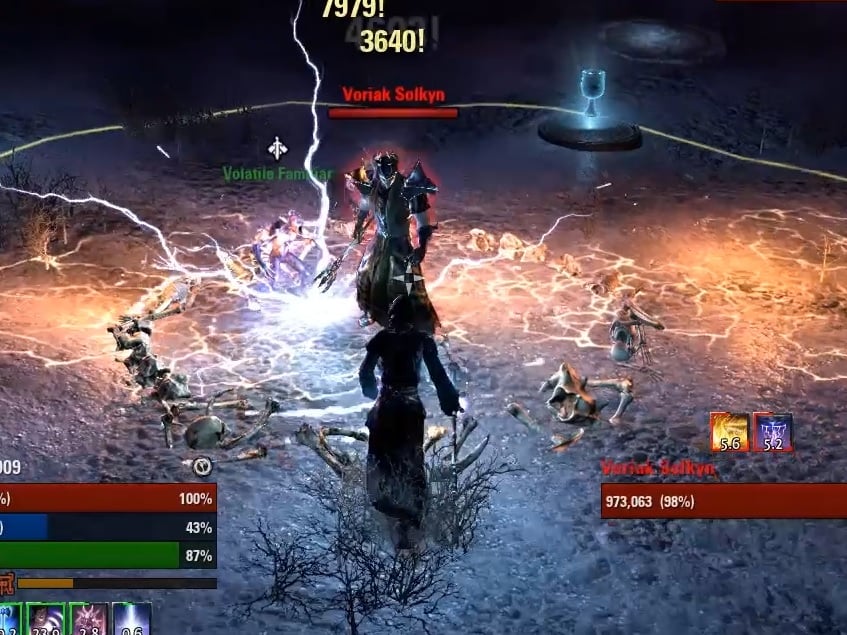
Welcome to the ESO Maelstrom Guide (Elder Scrolls Online). The guide will teach you how to successfully clear the Maelstrom Arena on veteran mode. A lot of people begin to have problems on the ice stage 5, stage 6 with the spider and especially the last boss in stage 9 with Voriak Solkyn always proves to be difficult.
This ESO Maelstrom Arena Guide will explain all the stages in depth with pictures, that way you can learn all the nice tricks to increase your damage and make your journey through the Maelstrom Arena a lot easier. You can also find the full list of rewards, such as the Maelstrom Weapons below.
If you have watched a Youtube video of a score run by one of the top players and just try to copy what they do, you will most likely be in a lot of trouble because those players have spent countless hours in the Maelstrom Arena, they know every single spawn point by heart and their tactics and builds don’t allow any mistakes. If you are new to the arena, you won’t know where exactly the monsters spawn, which ones to focus and what kind of attacks they have.
The incoming damage from some enemies is insane, so as a beginner, I don’t recommend using a full-dps-build. Go for some survivability too in the Maelstrom Arena, self-heals and/or shields are important, and make sure your sustain is good as well. I recommend having at least 300 Champion Points before you try out the veteran version of the Maelstrom Arena in ESO (Elder Scrolls Online)..
Table of contents
- Rewards in the Maelstrom Arena
- Basic Advice
- Arena 1 – Vale of the Surreal
- Arena 2 – Seht’s Balcony
- Arena 3 – Drome of Toxic Shock
- Arena 4 – Seht’s Flywheel
- Arena 5 – Rink of Frozen Blood
- Arena 6 – Spiral Shadows
- Arena 7 – Vault of Umbrage
- Arena 8 – Igneous Cistern
- Arena 9 – Theater of Despair, Endboss
- Achievements for Maelstrom Arena
- Builds for Maelstrom
- Maelstrom Arena Videos
Rewards in the ESO Maelstrom Arena
Like with any content in ESO (Elder Scrolls Online), you can also earn rewards in the Maelstrom Arena both on normal mode and veteran mode.
Maelstrom Arena Weapons
Maelstrom Arena Weapons drop in both normal and veteran mode. The Perfected versions can be obtained in veteran mode and the non-perfected versions can be obtained in normal mode.
- Perfected Crushing Wall & Crushing Wall
- Perfected Thunderous Volley & Thunderous Volley
- Perfected Merciless Charge & Merciless Charge
- Perfected Cruel Flurry & Cruel Flurry
- Perfected Precise Regeneration & Precise Regeneration
- Perfected Rampaging Slash & Rampaging Slash
Sets
There are a total of three sets that drop in the Maelstrom Arena:
Other
You can also earn some cool achievements that have special rewards attached to them in the Maelstrom Arena:
- Blademaster’s Mauve Dye – Maelstrom Arena Champion Achievement
- Maelstrom Baron Polymorph – Maelstrom Arena Conqueror Achievement
- The Flawless Conqueror Title – Maelstrom Arena: Perfect Run Achievement
New Updated Video Guide for the Maelstrom Arena!
Basic Advice for the ESO Maelstrom Arena
Lets first start with some basic advice for the Maelstrom Arena in ESO. These things here might sound trivial but these tips are very important for your first clear. If you understand these tips, then you will have a better time in the arena.
Quest / Saving your progress
Before entering the first stage of the Maelstrom Arena, make sure you accept the repeatable quest the NPC named Fa-Nuit Hen gives you. This quest serves as a savegame, allowing you to leave MSA or log out and to continue in the arena you left, rather than to start from the beginning again. If you abandon the quest, you will have to start over from scratch. There is another NPC with the fitting name “Tutor Riparius” who will gladly take your gold to repair your gear.
If you die and decide to resurrect at the wayshrine, you can go here and fix your gear. He will also appear after every arena boss, so you can repair between stages. And trust me you will need to repair your gear a lot. You can also buy Repair Kits from Guild Traders, which is usually cheaper then using the repair function on the NPC.
Food And Potions
- If you are a vampire, take some double Bloody Mara with you in case Arena 8 gets difficult due to the fire damage. You want to make sure to reduce your Vampire to stage 1, otherwise you will take too much damage in Arena 8.
- On a magicka character, Tri-Pots and Tri-Stat-Food can be useful if you are struggling with stamina sustain, especially in the last boss fight where you constantly have to block, interrupt and dodge.
- I highly recommend using good potions, they cost you quite a bit but it will make progress faster.
Ranged Interrupt
For Arena 5, 8 and 9 a ranged interrupt can be useful, especially on magicka characters who might struggle with stamina sustain in the Maelstrom Arena. Beware of Arena 7 though, if you interrupt the boss on that stage while he is screaming, he will enrage.
Crushing Shock would be an example of a ranged interrupt that everyone has access to as a magicka character. On a stamina character you are faster with running, so you can simply bash the enemy, close your gap with a dodge roll so you will not take any damage.
Kiting
Kiting is an important part of the Maelstrom Arena in ESO. What is kiting exactly? It means that you try to keep running away from the monsters, but still facing them. This way you can still damage the monsters but they have to get to you first before they can deal damage. If you just stand there, you will get a lot more incoming damage if all the monsters attack you. This only works with melee monsters, as ranged monsters can still use their abilities.
Sigils
You can find four sigils inside each of the rounds in the Maelstrom Arena. They respawn before every single round, so don’t hesitate to use them if you feel the need to. The sigils are a great help because they are really powerful if used in the right moments and can make a big difference for less experienced players.
You won’t see them being used in score runs by top players, as the use of sigils means a lower score, but they can really help you to get through veteran Maelstrom Arena. Use them if you feel like you are in trouble! All the sigil buffs have a duration of 30 seconds. They always spawn at the same location, so you can try to memorize where they are.
Sigil of Haste (Wings)
- This sigil looks like a wing. It grants you the Major Expedition buff, which increases your movement speed by 30%. It also increases your health, magicka and stamina recovery.
Sigil of Healing (Goblet)
- This sigil looks like a goblet and grants you a powerful heal over time.
Sigil of Power (Axe)
- This one looks like an axe and greatly increases your damage done.
Sigil of Defense (Shield)
- This sigil, which looks like a shield, gives you a lot of damage mitigation and additionally reflects all ranged attacks back to the attacker, often causing ranged mobs to even kill themselves.
Note: If you are going for the Maelstrom Arena: Perfect Run Achievement (No Death Run), you are allowed to use sigils.
Arena 1 – Vale of the Surreal
The Vale of the Surreal serves as the first stage of the ESO Maelstrom Arena and is a sort of check to make sure you meet the very minimum requirements in terms of dps and survivability to beat the arena.
Base mechanic
The only base mechanic worth mentioning in the first stage is the annoying little “whirlwind” which will follow you from Round 2 onwards and even during the boss fight. If you stand in it, it will put a small Damage over time (DoT) Effect on you and it will slow you down. It’s more annoying than dangerous, though it can become a problem during the main boss fight.
Rounds 1-3 Monsters
- Clannfear
- Scamp
- Dark Seducers
- Daedroth (Round 1)
- Bone Colossus (Round 2)
- Flesh Atronach (Round 3)
The first rounds shouldn’t pose any serious threats to you. Several daedra will spawn, luckily there are never many at the same time. As the spawn points are quite far apart from each other, it’s a good tactic to directly stand next to a portal and burst down the enemy that comes out of it.
Once that enemy is dead, you can focus on the other ones. Generally, you should try to focus ranged enemies first before turning to melee monsters. At the end of each round, a larger enemy will spawn, these serve as minibosses for each round in this part of the Maelstrom Arena.
Boss Arena 1 – Maxus The Many [HP: 659’583]
This boss is the easiest one in the entire Maelstrom Arena in ESO, but don’t underestimate him, he can put out a serious amount of damage.
Boss mechanics:
- Maxus’ most dangerous mechanic is the black ground he summons. It does a lot of damage if you stand inside it. Make sure not to get caught by the little whirlwind that follows you, the snare will make it difficult to get out of the black ground AoE.
- He also has a ranged attack, he shoots projectiles at you which deal quite a bit of damage, make sure to keep up your healing or shields.
- He will often teleport around.
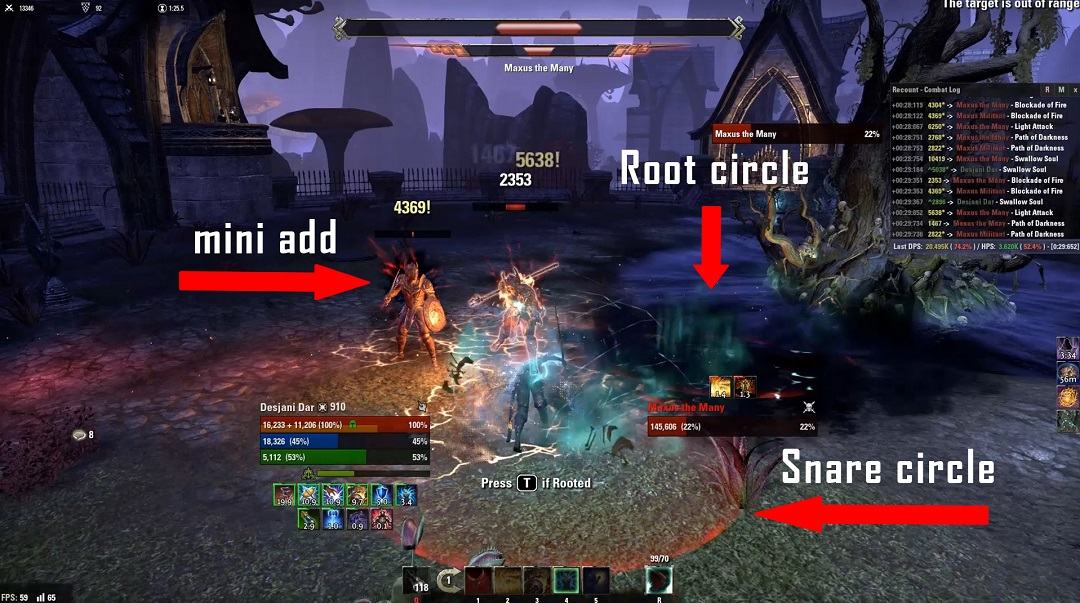
- “Pentagram”-AoE: If you run into this AoE, it will root you.
- He will spawn adds who are smaller copies of him. If they live too long, they will merge with him and heal him a lot. There will be one add in the first and also one in the second split phase, in the third phase he will already spawn two.
Put down your ground based AoEs before the boss spawns and start damaging him right away. After a short while, Maxus will spawn an add which will attack you as well, combined with the black ground he conjures and the boss’ ranged attacks this is a lot of incoming damage. Make sure you have your healing abilities ready and keep your buffs up. Try to avoid the damaging mechanics as much as you can.
To kill the first adds it should be enough to just place your ground based AoEs on the boss and a single target dot on the add while you keep focusing on Maxus. After a while, Maxus will port away and spawn another add at his new position. If the first add is still alive at this point, focus it down immediately, otherwise it will heal him.
Put down your AoEs again and focus the boss at his new position until he is either dead (if you have enough damage) or teleports again. If he teleports again make sure to focus down the add if it is still alive.
If Maxus is in execute range at this point, just focus him down at his new position and ignore the two adds that he spawns there. If he is not in execute range yet, focus the adds first before you continue damaging the boss, as two adds are probably too much to deal with and they will start healing him.
If you reach the point where he teleports another time and spawns adds, I strongly recommend you take a look at your build, buffs and rotation, as your dps isn’t quite where it should be if you want to clear the arena without horrible frustration.
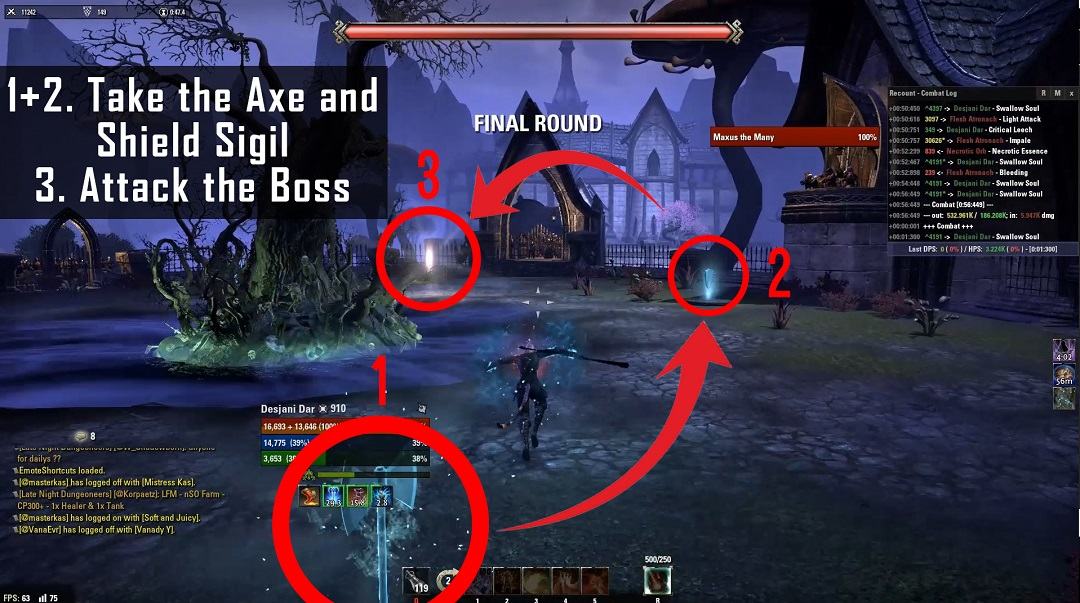
Tip: Make use of the axe and the shield sigil in this part of the Maelstrom Arena, activate them the moment the Boss spawns. By activating the axe sigil, you will get a huge damage boost, the shield sigil is nice because it will reflect the light attacks of the boss back to him.
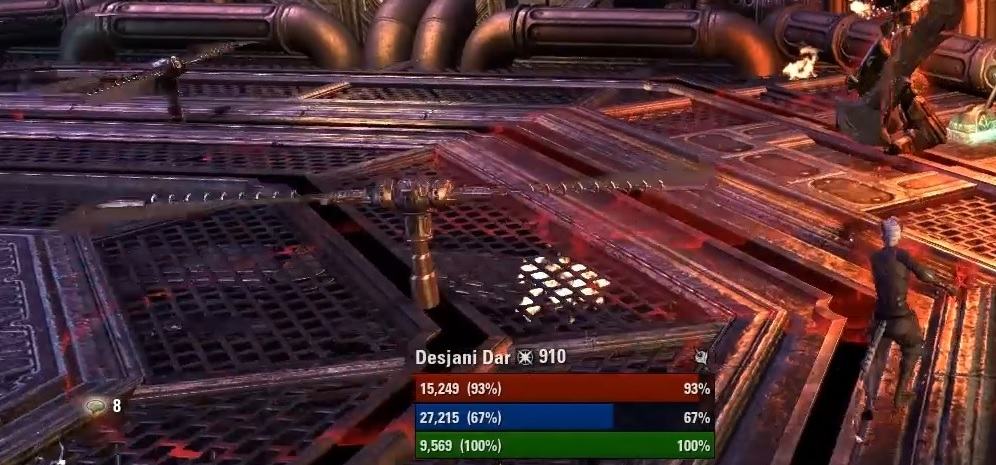
Arena 2 – Seht’s Balcony
Seht’s Balcony is the second arena of the Maelstrom Arena. You will be confronted with whirling blades, shock fields, plenty of enemies and a boss trio called Centurion Champion.
Base Mechanics:
- Whirling Blades: Every time you take damage from one of the spinning blades, you will have an eight second bleed DoT placed on you. This DoT stacks every time you run into a blade and will become difficult to out-heal at some point. To get rid of the bleed, you completely have to avoid taking damage from the blades for eight seconds. This is rather difficult while the blades are moving, so you have to pull one of the two blue glowing levers you can find at either side of the Arena. Those levers stop the blades from moving for ten seconds, giving you a chance to let the DoT run out. Absolutely avoid staying inside a blade’s radius.
- Shock Field: in the center of the room you can see a shock field. Don’t walk into it, it does damage to you and will knock you back, probably pushing you into the blades.
Rounds 1-3 Monsters
- Dwarven Spiders: They don’t do much damage to you, nevertheless you should make sure to kill them quickly. If they live too long, they will get into a “charge mode”, recognizable by a blue glow and a shield around the spider. If they go into this mode and any other mob is still alive, those other mobs can charge up their power at the spider and will do four times their former damage.
- Clockwork Sentry: This thing sends out a shock AoE that travels towards you and does quite a lot of damage if it hits you. They have very low health and therefore die quickly. Your ground AoEs should be enough to kill them.
- Dwarven Spheres: These start to appear from Round 2 onward. Focus these, they have a ground-based shock AoE which will most likely kill you if it hits you.
- Dwarven Centurion: These serve as mini-bosses at the end of each round. They have two AoE attacks; a steam cone which comes from the Centurion’s chest, and a heavy attack where he swirls his arms around himself, this does a lot of damage and needs to be dodged or blocked. He also does light attacks which knock you down. Make sure to kill the smaller mobs that spawn with him first before focusing him down.
During the regular rounds in this part of the ESO Maelstrom Arena, you will have to deal with the enemies while constantly getting damaged by the whirring blades. The blades put a nasty bleed dot on you and are more dangerous than the regular mobs. Make sure to absolutely avoid running with a blade. You absolutely need some sort of heal or shield to survive this stage.
This stage is a sustain check because you need to constantly heal, which drains resources fast. Both the healing sigil and the speed sigil are very useful in this stage, don’t hesitate to use them if you are struggling. The healing sigil puts a potent HoT on you which will help you to outheal the bleed DoT, and the speed sigil makes avoiding the blades easier while also increasing your resource recovery.
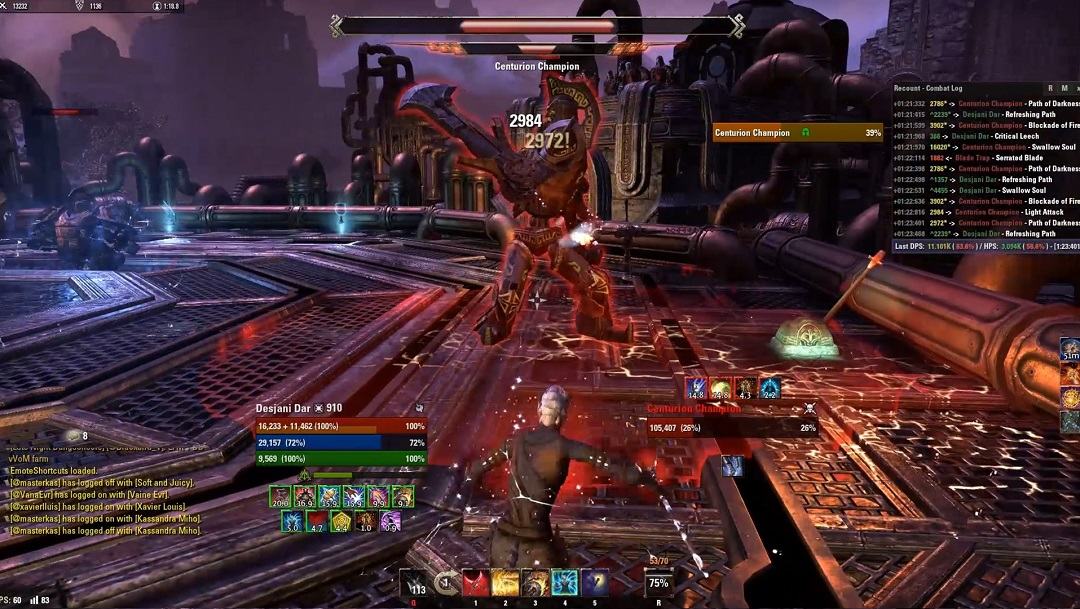
Boss Arena 2 – Centurion Champions [HP: 3x 395’748]
The boss fight of this round is a fight against three large Centurions. They will spawn after one another and go into a shielded/inactive phase from time to time, you usually have only one of them active at once. The Centurions have different attacks which are quite easily avoidable:
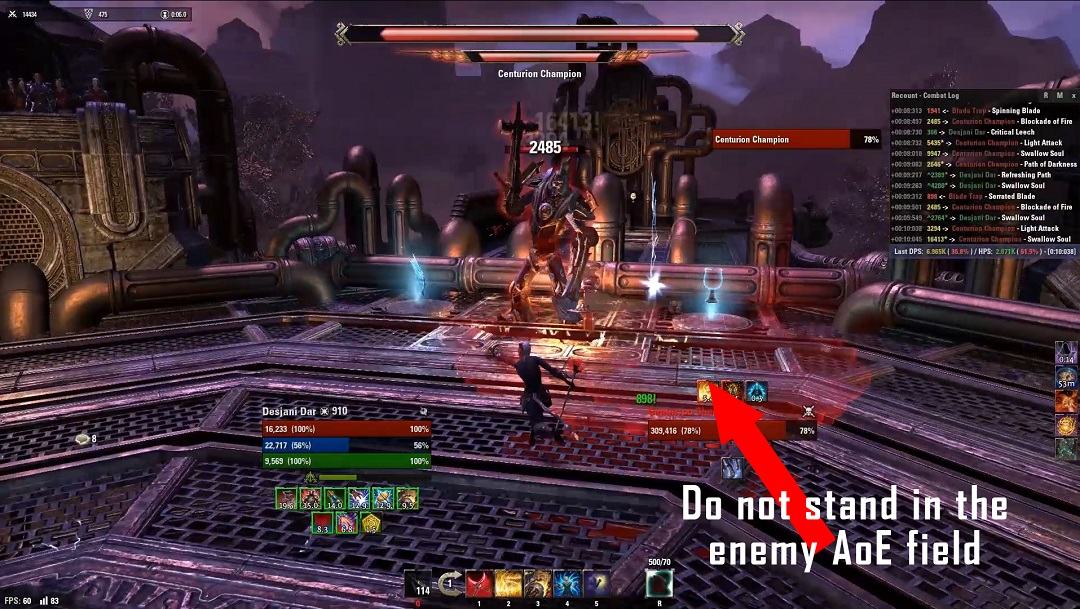
- They can do a shooting attack where they cast AoEs at your feet. Keep moving, they are easy to avoid.
- The Centurions will run towards you and do a steam breath attack, you can just sidestep out of the cone.
- They can also do the same melee AoE attack the little Centurions did before; it’s the attack where they swirl their arms around their bodies.
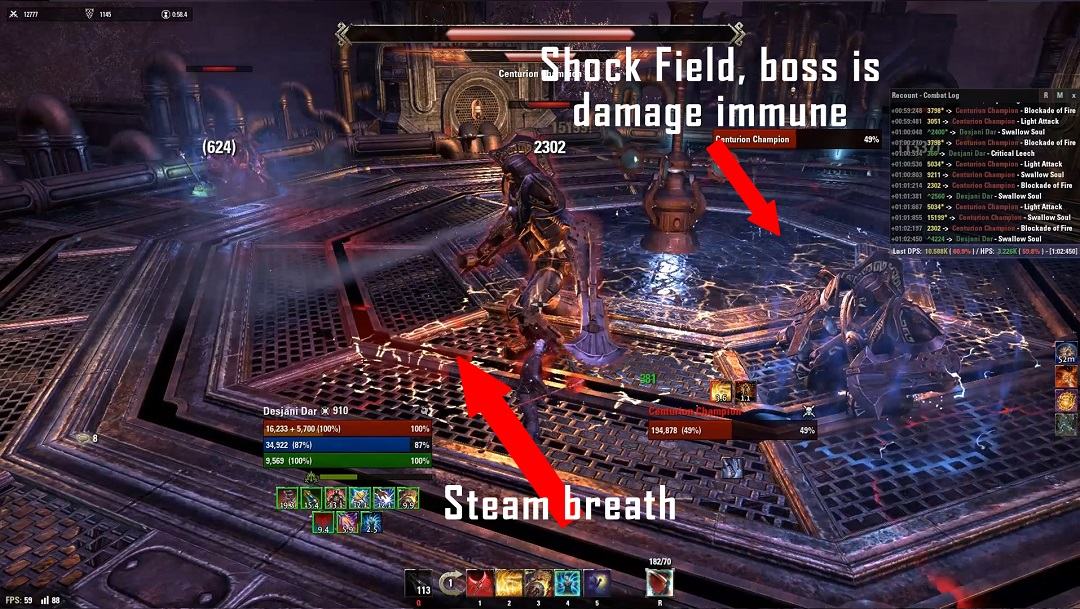
If you pull one of the two levers to stop the blades during the boss fight, the Centurion which is active at that moment will walk into the middle and “recharge” on the shock field there, this will heal him. You want to avoid that if possible, so make sure you stop the blades at the beginning of the fight to get rid of any bleed you have on you. This will buy you some time and make it possible to focus on damaging the first centurion when he spawns.
After damaging him for a few seconds, he will shield himself and go inactive, just stop damaging him as soon as he does this. The second centurion will have spawned and do his shooting attack. If possible, try attacking him from range until he is finished with this attack. You don’t want to run over to him; it’ll make the rest of the fight easier if he comes towards you so he gets closer to the first Centurion.
Once he shields himself as well, continue with the third centurion, who will likely be doing his shooting attack too once he spawns. Try luring him to the other two as well. Once the third one goes inactive, the first one will become active again. Just damage them in turns and always try to get them to stack close together, that way you don’t have to reapply all your ground AoEs every time one shields himself and another one stands up. Make sure to not stand inside their shields, as this does deal shock damage to you.
Continue damaging them in turns, pull the lever if you need to or take the healing sigil or the speed sigil if you struggle with resources and healing. Both sigils are incredibly useful here. If the fight takes too long, you will see two Centurions active at the same time, if this happens, the fight gets a lot tougher.
You should consider using the shield sigil at this point to save yourself from the damage the Centurions do to you.
Tip: As a new player I also recommend using the axe and shield sigil, this will make the fight a lot easier. In addition, you can also use the healing sigil, making it easier to combat the nasty bleed from the blades.
Arena 3 – Drome of Toxic Shock
The Drome of Toxic Shock is the third arena in the Maelstrom Arena and will test awareness as you need to be careful with the water in that area, it sometimes gets electrified!
Base mechanics:
- Shock water: The water between the three islands will become electrified from time to time, standing in electrified water will deal very high damage to you, so just try to stay on the islands and just run through the water quickly if you need to.
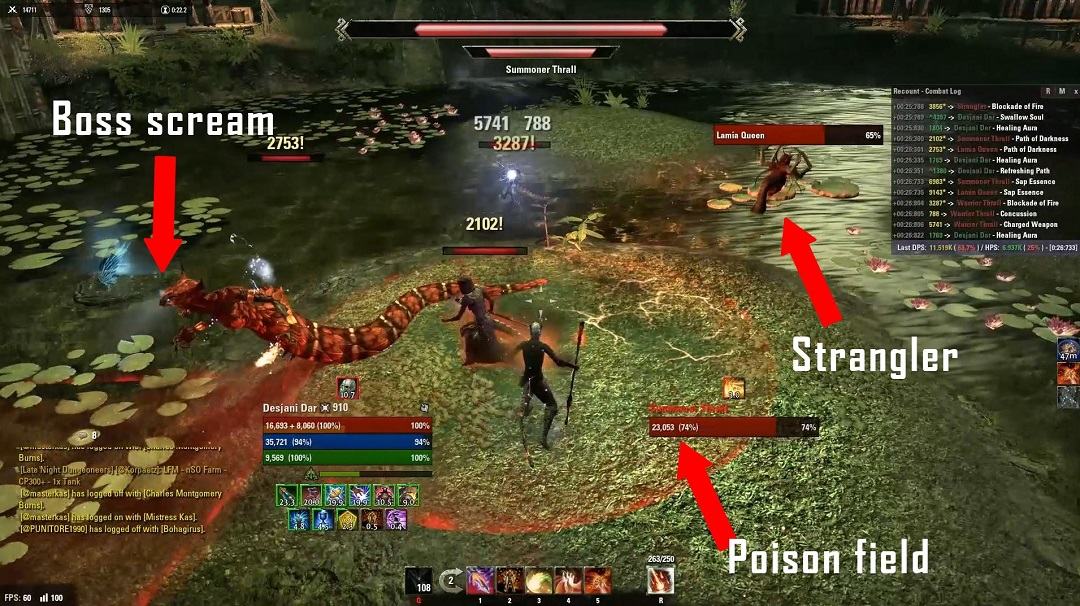
- Call Lightning: The Lamia Queen who watches you fight will send lightning strikes down at you, keep an eye out for the small AoE appearing at your feet and move out of it. Keeping in movement will make this easy to avoid.
- Healing AoE: From time to time, a big green “Healing Springs” AoE will appear on the ground. Any mob that stands inside this will get small healing ticks. You should be able to easily out-dps this mechanic though.
- Stranglers: During the whole time, stranglers will spawn. They will shoot a poison at you which snares you; the snare gets stronger the longer the Strangler stays alive. This snare will make it difficult to avoid the Call Lightning and to get through electrified water quickly, so make sure to kill appearing stranglers whenever you can. They have very low health and die quickly.
Rounds 1 – 4
- Summoner Thrall: Low health mage enemy.
- Brute Thrall: melee enemy.
- Lamia: Red Lamias are ranged adds and summon spectral adds, green Lamia are melee adds. Don’t run directly in front of them, they have a scream attack which will stun you.
- Snakes: They deal melee damage. When they are low health, they will cuddle up and heal themselves, interrupt this. They also have a conal tail swipe.
- Wamasu (Round 1): This mob is the miniboss of round 1, it has a strong conal tail swipe attack that you should step out of. It also does a shock breath, this attack is very slow and you need to avoid it.
- Queen’s Champion (Round 2): This is an Argonian stamina sorcerer using a two-handed weapon. Beware of his wrecking blow ability, dodge or block it.
- Queen’s Advisor (Round 3): this is a Hagraven miniboss that can pull you through the arena, possibly into the electrified water. She also has a drain attack which can be interrupted. Her light attacks also deal a lot of damage. She sometimes casts a s
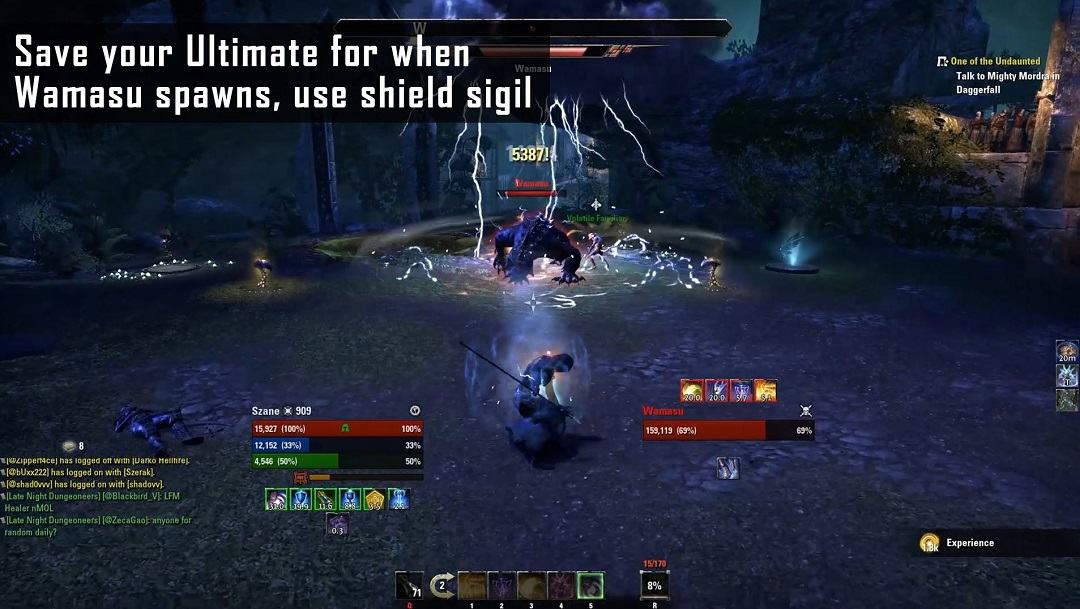
The first waves of mobs shouldn’t be too difficult, kill them while keeping an eye out for stranglers and the environmental mechanics. At the end of round 1, a Wamasu will spawn and together with it, a Brute and a Summoner appear. Kill the Summoner first, then the Brute, then focus the Wamasu. Don’t get too close to it and avoid its AoE attacks.
At the end of round 2, you will encounter the Queen’s Champion who is accompanied by two Lamia. Kill those Lamia first.
In Round 3, the miniboss is a Hagraven who can pull you into the electrified water. This is really nasty as you will get stunned and knocked down from the first tick in the water as well. Again, kill additional adds first before focusing the advisor down.
Boss Arena 3 – Lamia Queen [HP: 791’497]
Boss mechanics:
- Her light attacks deal a lot of damage, you want to make sure to have a healing effect on you to mitigate this.
- Conal scream; this attack will stun you if you get caught by it.
- Lightning strikes; from time to time the boss will cast lightning at you. You can damage her while she does this and move out of the shock AoEs.
- Stranglers will continue to spawn throughout the fight.
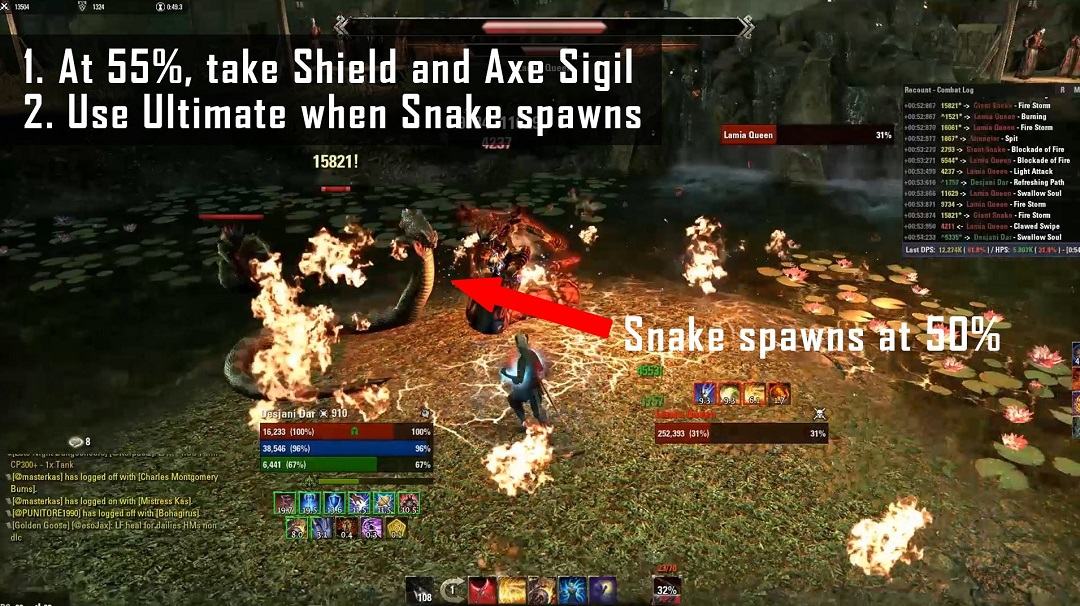
The Lamia Queen will slowly move towards you, place your AoEs and dots on her. At 75% of her health, two mobs will spawn, a Summoner and a Brute. If you want to play it safe, kill those two adds before continuing with damaging the boss. At 50%, a snake will spawn. Make sure it doesn’t heal itself up again and kill it quickly.
At 25%, the last set of adds will spawn. You can grab the shield sigil and burn the boss down. This boss shouldn’t be too difficult as long as you stay out of the water, avoid AoE attacks and keep an eye out for the Stranglers.
Tip: When the boss is at 55% health, activate the shield and axe sigil, this will make the fight a lot easier. Save your ultimate till 50%, because then the Snake will spawn, that way you can kill the snake pretty fast.
Arena 4 – Seht’s Flywheel
Seht’s Flywheel is the fourth arena in the ESO Maelstrom Arena, at the end of you will face a huge dwemer spider boss called “The Control Guardian”.
Base mechanics
- Dwarven Sentries: These work differently from arena 2. In this arena, they spawn on the outer edge of the arena from time to time and move towards the middle. They will position themselves on the little switches you can see there. After a few seconds, they will shield themselves and send out strong shock AoEs from their positions. They have very little health and you should try to not let several of them shield themselves at the same time, as the shock AoEs can get annoying.
Rounds 1-4
- Humanoid Scavengers; the mages will heal their allies and should be focused first.
- Dwarven Spider: A single spider doesn’t deal a lot of damage, but if you get hit by several of them, things can get nasty. They function in the same way as in Arena 2, if they live for too long, they will cast a blue shield around themselves and can empower other mobs.
- Dwarven Sphere: They shoot darts at you which don’t deal much damage. If you get close to them, they have a swirl AoE attack. Their most dangerous attack is the shockwaves they send out, you absolutely want to avoid getting hit by them.
- Achelir (Round 1): This is the miniboss of round 1, he is a fire mage with low health and low damage fire attacks.
- Aihrima (Round 2): She is the miniboss of round 2, she is a lightning mage who will cast a liquid lightning ability on you.
- Kotheid: (Round 3): This is a dragon knight with a two-handed weapon who serves as the miniboss of round 3.
The first rounds are rather easy. Different human enemies will spawn, they are easy to deal with. Same goes for the smaller dwarven enemies. Beware of the larger dwarven spheres though, their shockwave attacks deal insane damage and stun you. Always keep an eye out for the little dwarven sentries. At the end of each round, a named miniboss will spawn, make sure to kill the other enemies first before focusing the respective bosses.
In the beginning of Round 3, you will encounter a single dwarven sphere, immediately follow by additional two spheres and dwarven spiders. Try killing the two spheres from range. During the third round, try to get rid of any remaining dwarven sentry so you don’t have to deal with their shock attacks during the boss fight.
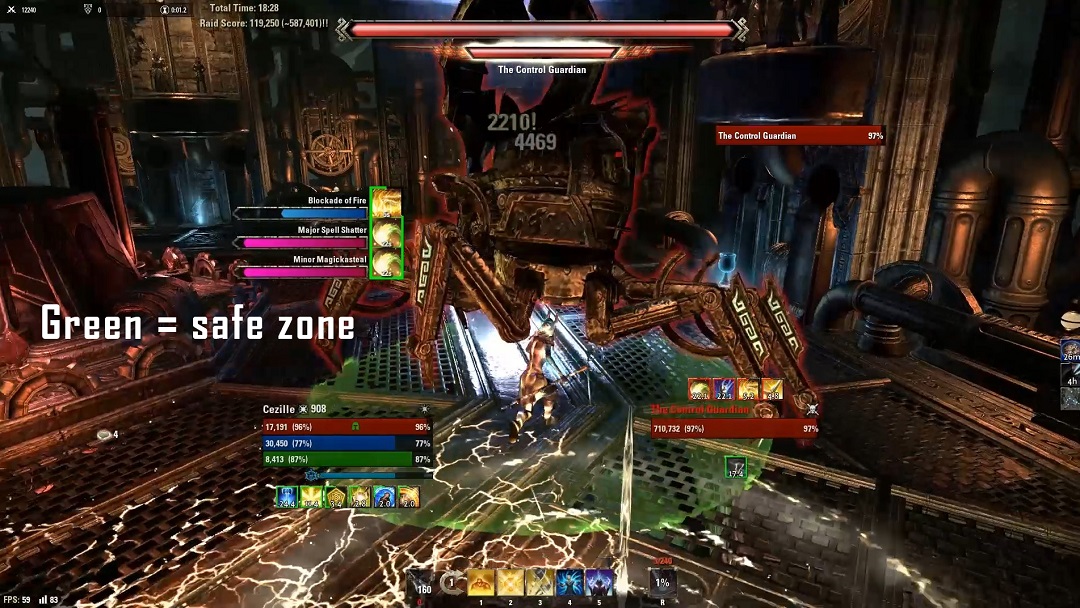
Boss Arena 4 – The Control Guardian [HP: 731’695]
This boss is almost a copy of the Engine Guardian in Darkshade Caverns 2. He spawns on the north side of the arena and will start moving around the arena in a great circle, counterclockwise. He has two phases:
- Lightning phase: He will start with this phase. During the lightning phase, the boss is moving and will shoot lightning attacks all around him. They deal a lot of damage and you want to avoid getting hit by them. The green AoE circle at his feet is where you want to be during this phase, as you are save from his lightning attacks there. You can run beneath him and damage him while he makes his way around the arena. Tab targeting the boss can help a lot here as he sometimes is a bit difficult to target otherwise.
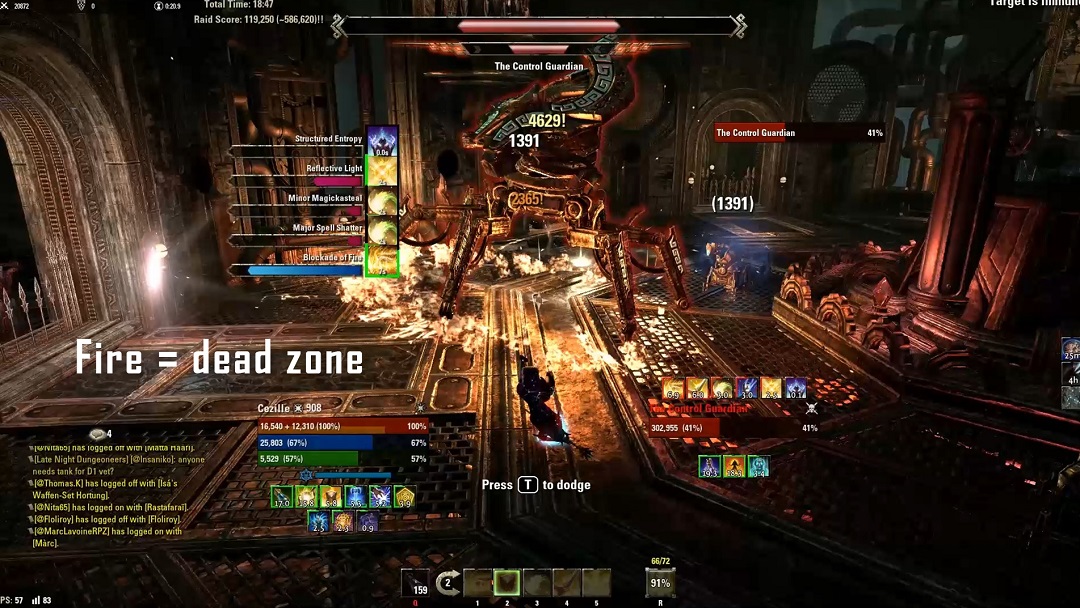
- Fire Phase: The boss will stop and cast strong fire AoEs around and beneath him during this phase, forcing you to get away from him. During this phase, you can deal with spawning mobs. Make sure to be back at the Control Guardian’s feet again once he goes back into the lightning phase.
This boss is a little dps race, killing him quickly will make things a lot easier, as more and stronger adds spawn the longer the fight takes. A good tactic is to move beneath the boss, cast your ground AoEs in front of him and continue with single target abilities then. His hitbox is big, so he shouldn’t get out of your AoEs too quickly. Damage him until he makes his fist stop. At this point, you will be close to the axe sigil. You can activate it and cast your ultimate and some ranged attacks.
If this is not enough to kill him yet, kill the spheres that have spawned and move back below the boss’ feet as soon as he gets up again. You will pass the shield sigil now, grab it to avoid taking too much damage from remaining adds. Continue damaging him until he stops again.
As the adds get stronger and stronger with each turn of phases, your goal should be to get the boss down by the end of the second fire phase.
Tip: Activate the axe sigil when the boss spawns, this will increase your dps by a lot. After the first green circle phase, activate the shield sigil that should be somewhere in front of you.
Arena 5 – Rink of Frozen Blood
The Rink of the Frozen Blood is the fifth part of the Maelstrom Arena. Now it gets interesting, the Rink of the Frozen Blood is where most players start to struggle as th endboss Matriarch Runa is really putting your skills to the test.
Base mechanics
- Chilled water: The water between the three platforms is deadly. If you need to run through it, make sure to be quick and jump onto one of the platforms as soon as possible, as a few unnecessary ticks of the water can kill you.
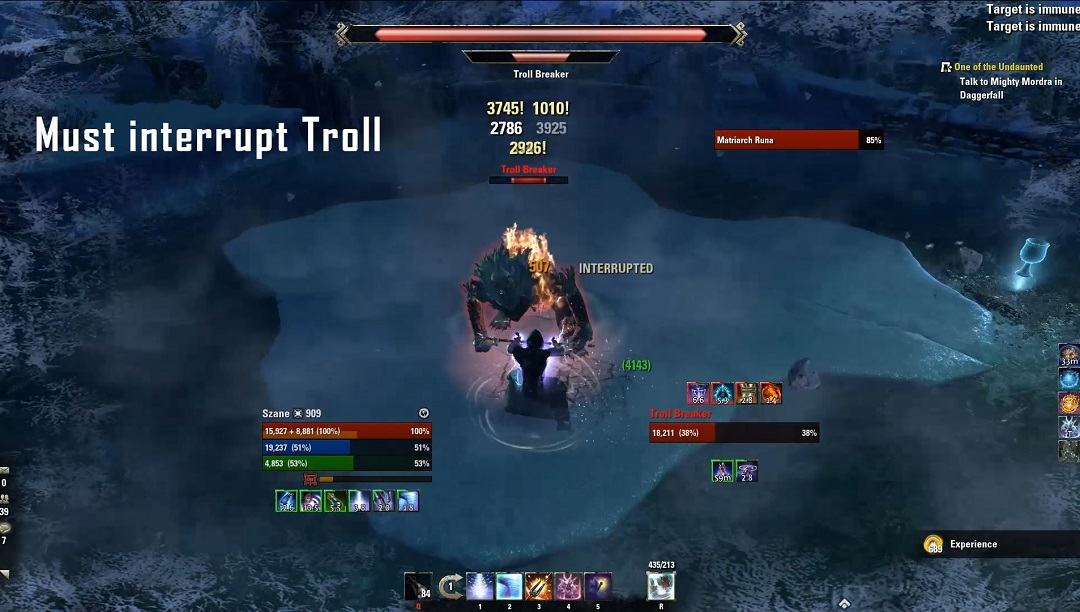
- Trolls: Every 20 seconds, a Troll will spawn in the middle of the arena and randomly run to one of the three platforms. There, he will begin to smash the platform with his fists. After 10 seconds, the platform will break and the troll moves on to the next one. You need to interrupt the troll’s smash or simply kill him before he can finish.
If he destroys a platform, this isn’t the end of the world UNLESS he does this in the boss fight, there it will lead to an unavoidable death. If a platform breaks in one of the former rounds however, just focus the Leimenid that spawns and continue the fight. Make sure to not stand on a breaking platform however, this will stun you. In combination with the water DoT and the damage you get from mobs, this will be deadly.
Rounds 1-4
- Huntsman Frostbiter: Mob using a two-handed weapon.
- Huntsman Heartfinder: Archer with strong ranged attacks.
- Huntsman Chillbane: Frost mages, they deal a lot of damage from range and their attacks will slow you down. They can summon wolves.
- Ogres: They only have melee attacks but will enrage after a certain time.
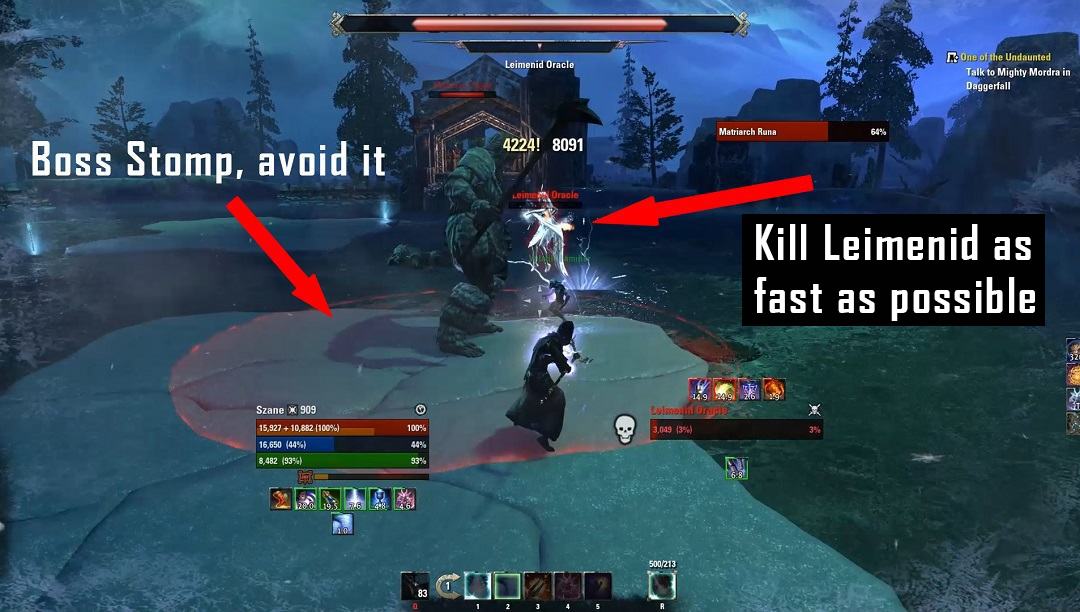
- Leimenid Oracles: they have strong ranged attacks.
- Angirgoth (Round 1)
- Ogre Elder (Round 2)
- Frost Atronach (Round 3): His light attacks deal a ton of damage.
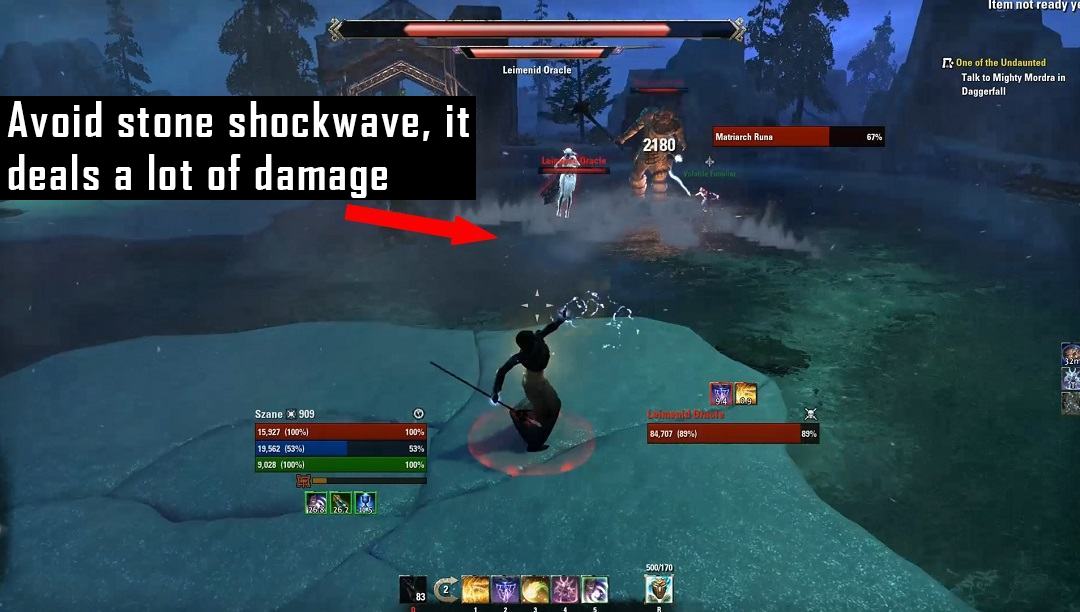
- Giants (Round 4): They have very, very strong AoE attacks. Avoid their conal club attacks and especially the “stone waves” they send out in a cone in front of them. They also have a shout which will fear you into the ice water, break free quickly. This scream has a massive range.
Generally, the ranged Huntsmen mobs should be your priority targets. They deal a significant amount of damage with their attacks. If you have a hard time dealing with them, consider taking the Sigil of Defense if several of them spawn. It will let you reflect all their attacks back to them and especially the Chillbane frost mages will die quickly from their own attacks.
The ranged mobs can become quite a problem for melee characters, as they have the nasty habit of standing in the middle of the water where you can’t comfortably attack them. Run to the far end of the platform you are standing on and try to outrange them, this will make them move towards your platform so you can hopefully damage them a bit better.
Round 1
This Round in the Maelstrom Arena starts with two huntsmen spawning on the platform with the speed sigil. Kill the Heartfinder first, but beware of the Frostbiter’s wrecking blow ability. After this, the next wave of mobs will spawn on the platform with the healing sigil. Also, a Troll should spawn now. Interrupt his smashing attack on the platform he runs to or kill him from range. Then turn to the mobs. It’s an archer and a frost mage, kill them quickly.
On the last platform (the one with both the power and the shield sigil), the last wave of mobs will spawn, again an archer and frost mage. Once they are dead, the miniboss will spawn on the first platform (healing sigil). She is named Angirgoth and has strong dual wield attacks. Once she reaches 60% health, she will transform into a werewolf and heal up a bit. Just make sure to avoid her pouncing attacks and take her down while continuing with the trolls.
Round 2
Two archers and an Ogre will spawn on the platform with the speed sigil. Kill the archers quickly and then turn to the Ogre. Once those mobs are dead, head back to the platform with the healing sigil. Two ogres and frost mage appear there. Keep an eye out for the trolls though.
The mini boss will spawn now. It’s a black colored Ogre Elder who isn’t dangerous, he will summon ice pillars that deal quite some damage but are easy to avoid. He will start to heal himself at some point, you can interrupt this. If you want, you can charge your ultimate on him as this will be very useful of the start of the next round.
Round 3
This is one of the most difficult rounds. Right at the start, you will encounter a large Frost Atronach, an Archer and a Leimenid oracle who will spawn on the platform with the speed sigil. Also, a Frost mage will spawn on the Healing Sigil platform. Once you kill the Frost Atronach, two Leimenids and an ogre spawn. After this, you will have to deal with another Frost Atronach, an Archer, a Leimenid and a Frost mage.
If you have your ultimate ready at the start of the round, use it on the first wave of mobs on the Speed Sigil platform. Then, continue until the last wave with the second Atronach spawns. Now, you can use the shield sigil. This will allow you to focus on the second Atronach and ignore the three ranged adds who accompany him, because they will die from their own reflected attacks.
Round 4
Round 4 starts off with two mages and two giants who can deal massive damage with their AoE abilities. Try to kill the mages first and then deal damage to both giants evenly. Once they are dead, Leimenids will spawn, this will give you a short break to recharge your ressources.
After the Leimenids are dead, the last wave of mobs appears. You will see another frost mage, two spectral bears (those respawn, so just AoE them, don’t focus them.) Also, a third giant will appear. He has the same attacks as the two before him. Kill the mage, avoid the giant’s AoEs and kill him.
Boss Arena 5 – Matriarch Runa [HP: 791’497]
Now you will encounter Matriarch Runa, a lady giant who is the boss of Arena 5 and one of the more difficult bosses in the ESO Maelstrom Arena. Many players struggle with this fight, but it really loses its scare if played slowly and correctly.
This fight is the opposite of a dps race, because all the mechanics are health based here and if you burn Runa too quickly, they will overlap and kill you. You can take your time, keep an eye on your resources and play each mechanic when it happens. The sigils can also help you a great deal during the fight.
Boss mechanics:
Runa basically has the same attacks as the three giants in the round before, but stronger.
- Trolls will continue to appear. Make sure to absolutely not let them break a platform, this will mean your unavoidable death in this fight.
- Avoid her club smashing attacks, her ground AoEs and the “stone shockwaves” the sends out. Break out of her fear attack immediately.
- She will break a platform at 75% and 45% health.
- Adds will spawn at 90%, 60% and 30% of the boss’ health.
I will explain this fight in three phases:
Platform 1:
The boss will spawn in the middle of the arena and run to the platform where you are. I recommend starting on the platform with the Speed Sigil, as the first pair of adds will spawn here. If a troll spawns, kill the troll wherever it’s headed (If you interrupt the troll and he stays alive, he will start smashing the platform again) and go back to Runa on the Speed sigil platform.
Damage her until she reaches 90% health, two mobs will appear close to your platform now. It’s an archer and a melee add. They spawn close to your platform. Focus them down and turn back to Runa. You can continue damaging her until she reaches the 75% health mark.
Once this happens, she will lose aggro, glow red and run to the middle of the platform. Grab the speed sigil and run away. She will break the platform and if you are still on it while it breaks, you will probably die.
Platform 2:
Run to the platform with the healing sigil. Make sure you deal with the Leimenid that spawned from the breaking first platform. If it’s dead, slowly bring Runa down to 60%, always keep an eye out for her attacks and spawning trolls. You can run away to kill trolls that run to the other platform, but always go back to the platform with the healing sigil.
At 60% of the boss’ health, adds will spawn again. This time it’s a frost mage and another melee. Again, focus them. Take the healing sigil if you feel the need to, especially on a melee character it can take a bit longer to take out the frost mage because it will stand in the water where you can’t damage it.
After you have dealt with the mobs, continue damaging Matriarch Runa until she reaches 45% health. She will break the second platform now. Run away again, unto the platform which has both the damage and the healing sigil.
Platform 3:
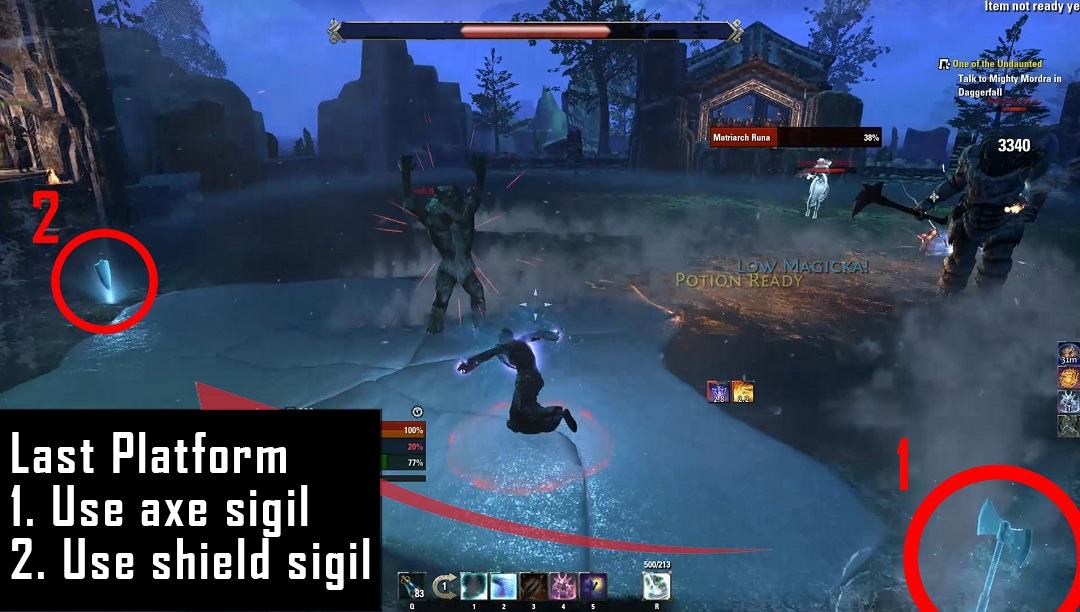
Kill the spawning leimenid again. Once Runa reaches the platform, bring her down to 30% of her health and then grab both the axe sigil and the shield sigil. Another wave of adds will spawn now, you can simply ignore them thanks to the shield sigil because both are ranged.
Runa is on a timer now, you have around 20 seconds to kill her before she will break the last platform. Drop your ultimate and burn her down, but make sure the platform doesn’t break early due to an uninterrupted troll.
Tip: Make sure that you do destroy the platform with the shield and axe sigil at the end, so you can easily pick both those sigils which will increase the chance to win tremendously.

Arena 6 – Spiral Shadows
The Sprial of Shadows is the sixth part of the Maelstrom Arena, you will fight a huge spider boss called “Champion of Atrocity” at the end.
Base mechanics
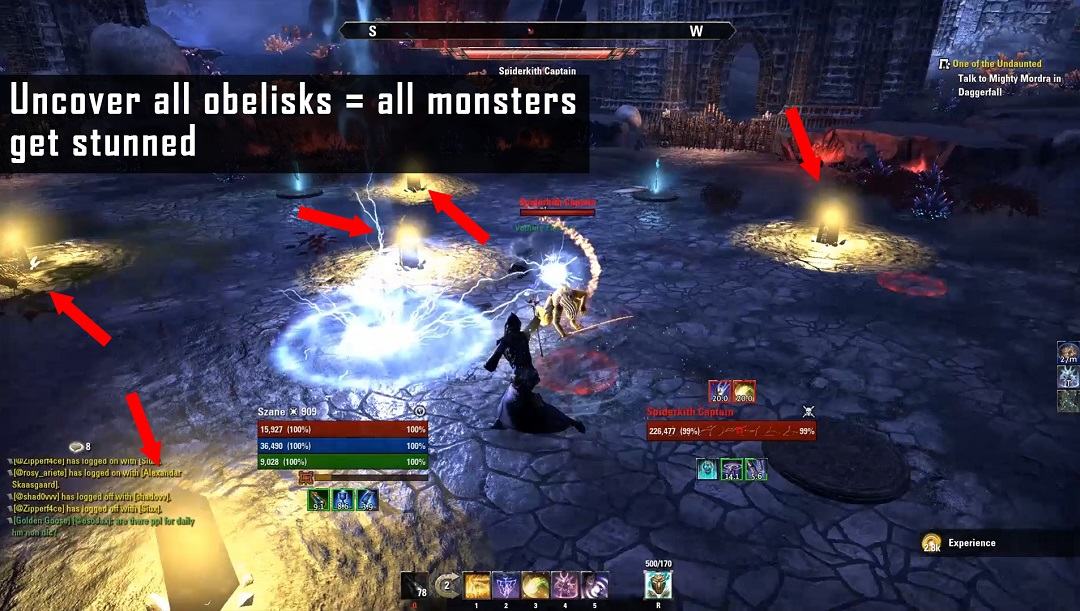
- Obelisks: There are 5 little stone obelisks/pillars in the arena. Those obelisks have two purposes.
- If you manage to remove the spiderwebs from all the obelisks so they are uncovered at the same time, they will all glow golden and all enemies in the arena get stunned for 10 seconds.
- One of the uncovered obelisks will have a golden glow and serve as a savespot from the appearing spider swarms
- You can un-web Obelisks by killing a Hoarvor close to it. If you kill a Hoarvor away from an obelisk, they will drop a poison grenade synergy that can be thrown at an Obelisk. Careful, if you throw a poison grenade you can not move for a second but you are still able to get damage from enemies.
From Round 2 onwards, Webspinners will spawn. They will try to put a web on a free obelisk, you have to kill them before they manage to do so.
You can leave four obelisks uncovered and save the stun for the moment a miniboss appears. - Spider Swarm: From time to time, a strange sound will start and a swarm of little red glowing Spiderlings will appear and chase you. The spiders deal a lot of damage and are very tanky, you won’t be able to kill them. You have to run to a golden glowing pillar, the spiders will vanish once they touch the light of the pillar. The glow will alternate between several pillars. Make sure to always have two pillars un-webbed! If only one obelisk is uncovered, it can happen that it isn’t glowing when the swarm appears and you will die.
- Call Lightning: From time to time, there will be lightning strikes coming down to the place where you stand. Keep moving out of the appearing AoEs if this happens, it’s easily avoidable.
Note: Turning off auto-cast in the settings can help you aim the grenade more carefully.
Rounds 1-4 Monsters
- Dread Scorpion
- Dire Wasp
- Spiderkith Daedra; especially the dual-wielding Berserkers can get annoying because they can stun/root you with their Nightblade abilities. Deal with those first.
- Webspinners: From Round 2 onwards, a Webspinner will spawn every 30 seconds and try to cover up an obelisk. You need to kill them before they do so. If they manage to cover a pillar, they will immediately go to the next one and continue there, so they really have to be killed as a priority target.
- Hoarvors: They don’t automatically aggro on you, you will need to bait them with a light attack or get really close to them to get them to follow you. Drag them to a covered pillar and kill them there. They are really squishy and have very low health, if they die you can use a poison grenade synergy to throw their remains on a pillar. This will take some time to aim though and you will be vulnerable during the throw animation. Don’t do this while you have Call Lightning on you or while being chased by mobs.
- Flesh Atronachs: Their basic attacks deal a lot of damage, dodge them!
- Lurchers: Similar to the flesh atronachs, they will do their usual pounding attacks
- Spiderkith Captain (Round 3): He is a stamina sorcerer with a two-handed sword. Make sure to always block his uppercut attack as it deals a lot of damage and knocks you down. This is deadly because you can get hit by lightning strikes while being stunned. His negate ability can also become annoying, especially if you are playing on a magicka character, get out of it as fast as you can and save your ultimate until after he casted the negate.
- Xivilai Toxicoli (Round 4): His light attacks deal low damage, but watch out for his wrecking blow. If you get hit by it at the same time as a lightning strike hits you, you will most likely die. He will also throw a green poison on you, if he hits you with this, you will get a poison DoT on you and will also be snared. Try to dodgeroll this if possible, you can also use the shield sigil to reflect the poison back at him. He also has a poison cone attack that is easily avoided.
- Spider Daedra (Boss fight): Those large spiders will spit at you and slow you down more and more with each spit attack. Kill them fast, if you are slowed down too much you will be unable to hide from the spider swarm or move out of the lightning strikes.
Round 1
You will have to deal with several waves of different types of Spiderkith enemies. They are not particularly difficult, this round serves as a warm up for you so you can get the hang of the Hoarvor/Obelisk mechanic.
All but one obelisk will be covered in the beginning. Make sure to free at least one additional obelisk to ensure you have a glowing pillar ready once the Spider swarm appears. This will happen towards the end of the round, run to the glowing pillar and attack the Spiderkith mobs from range until the little spiders have vanished.
At the end of the round, you will have to deal with a Flesh Atronach. Avoid his attacks as they hit hard. If you want, you can uncover four obelisks during the course of the round and free the last one once the Flesh Atronach appears, you can easily burn him down during the stun.
Round 2
Very similar to round 1, but additionally, Webspinners will spawn from now on and try to cover up obelisks you previously freed from webs. Kill them as soon as you see them or you won’t have save spot from the swarming spiders. At the middle of the round, another Flesh Atronach will appear.
This time, he will be accompanied by a wasp. Focus him down. After this, more Spiderkith Daedra will appear and then a second Flesh Atronach. This is the last mob of this round, deal with him like you did in round 1.
Round 3
Again, you need to deal with several waves of insects and Spiderkith enemies while killing Hoarvors and Webspinners. In the third wave, the Spiderkith Captain spawns in the middle of the arena. He is a stamina sorcerer as described above. If you can use the obelisk stun now, do so. If not, wait until the Spiderkith Captain drops his negate and then use your ultimate to burn him down.
Once he is at 25% of his health, additional mobs will appear, you really need to execute the Captain quickly then. This round, you will have to fight against another Flesh Atronachs and a Spiderkith Enervator mage. Kill the mage before turning to the Atronach.
Round 4
In the beginning a Lurcher spawns. They are hard hitting enemies, try to kite him and avoid his attacks. Once he is dead, the Xivilai Toxicoli will appear. Deal with this annoying mini boss and his attacks as mentioned above. When he is at 25% of his health, two archers and a Berserker will spawn, make sure to focus the Xivilai down once they appear. Then kill the Berserker before turning to the archers.
After that, two Lurchers spawn, they are the mini bosses of this round and the last mobs before the boss fight. Try to kite and fight them at range so you don’t get hit by their attacks. You can wait until they do their “shaking attack” where they stop running around. This attack has a small AoE and you can still attack them while standing outside of it. You can drag out this fight until you have four of the obelisks uncovered, this will give you a great start to the following boss fight.


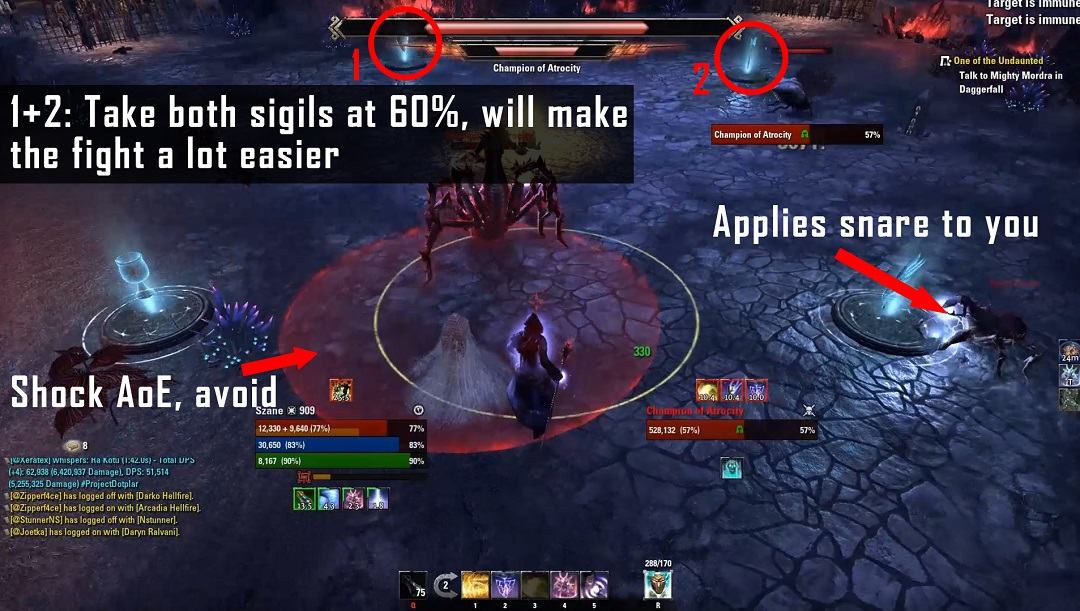
Boss Arena 6 – Champion of Atrocity [HP: 923’417]
Boss mechanics:
- She will summon Spider Daedra which will spit at you and slow you down until you have a 90% snare on you.
- Webspinners and Hoarvors continue spawning.
- The Swarming Spiders continue to appear.
- She will shoot lightning attacks at you, if you keep moving at all times, you can avoid those easily.
- She also has a large ground AoE shock explosion, this can oneshot you if you get hit by it, move out of the growing AoE as soon as it appears.
- She has a spit attack that deals more damage the more enraged she is.
- Enrage Mechanic: During the curse of the fight, she will enrage more and more. Every time she flashes in a red color, her enrage stage has increased. Her resistances will increase, so she takes less and less damage. At some point, her enraged spit attack will oneshot you and you can’t avoid this if it happens. Her enrage stage gets reset if you stun her with the obelisk mechanic.
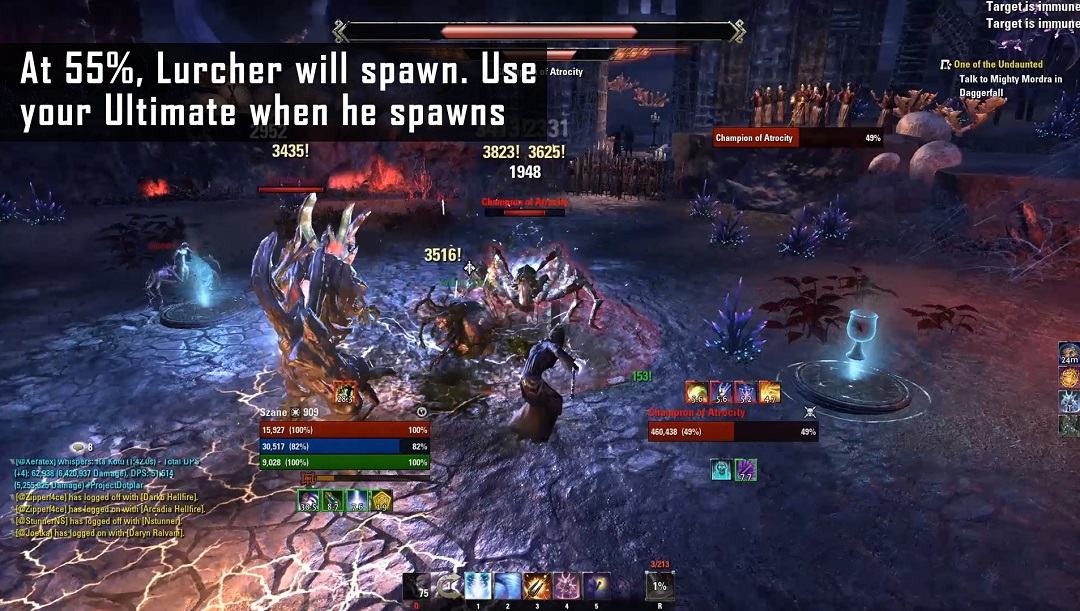
- At 50% of the boss’ health, a lurcher will spawn.
If you managed to uncover four of the obelisks in the previous round, grab the axe sigil, pull the spawning Hoarvor to the last obelisk and stun the boss. You can now immediately deal a lot of damage to the boss, with an ultimate ready you can possibly get her to execute range until the stun wears off, and if you are quick, you can kill her without having to deal with the Obelisk mechanic or any other mob again. This is the easy mode.
However, if you don’t have the synergy ready due to whatever reason (maybe you needed to use it on the two Lurchers in the round before, maybe you died during the boss fight and have to start over) you have to deal with the Champion of Atrocity the “normal” way. If you have died in the boss fight and have to start over, all but one obelisk will be covered by a web.
A Hoarvor will spawn right at the beginning of the fight, make sure to free a second obelisk with it. The boss will appear, place your DoTs and AoEs and start damaging her. After a few seconds, she will summon a little version of herself, a Spider Daedra. These spiders will spit at you and slow you down more and more with each spit attack. Kill them fast, if you are slowed down too much you will be unable to hide from the spider swarm or move out of the lightning strikes.
You have to always keep an eye out for Webspinners and Hoarvors, you will really need to pay attention on those due to the boss’ enrage mechanic. You have to reset her enrage stage by stunning her.
Note: You can miss an obelisk mechanic (Webspinners, Hoarvors or a combination of the two) two times. If you miss a third time, the boss will do his enraged oneshot spit at you.
Keep your DoTs and ground AoEs active on the boss while dealing with the Spider Daedra, Webspinners and Hoarvors. The speed sigil can be really helpful here as it mitigates the snare from the Spider Daedra a bit and help you to get to the obelisks in time.
You should get the boss to at least 50% until you stun her. If you want to do this in a real safe way, try to time the stun to that health mark or shortly after that. This will make it easy to deal with the additional spawning Lurcher. If you stun the boss before bringing her down to 50%, the Lurcher will spawn once the stun wears off. Once the boss is stunned, use your ultimate and burn her down, the Lurcher should die from cleave damage. Taking the axe sigil can make a great difference here. Take the shield sigil if the stun wears off and the boss is not dead yet or the Lurcher only spawns now.
Arena 7 – Vault of Umbrage
The Vault of Umbrage is the seventh stage of the Maelstrom Arena and can be one of the trickier ones to complete, because there is a minefield of poison flowers everywhere! The boss that you have to face at the end is called “Argonian Behemoth”.
Base mechanics
- Poison Flowers: You will notice several “flowers” growing all over the arena. If you get close to them, they will explode in a large AoE. Getting hit by this will put the hefty “volatile poison” DoT on you. You need to cleanse this in one of the two green glowing puddles at either side of the room. Once you used one of the pools, it will disappear for the rest of the round. You will want to stay rather close to them, however, enemies will get a strong damage shield when they step into a pool, so don’t camp inside them.
The flowers also explode randomly from time to time. If they spawn right in the middle of the arena where you will need to fight, you can trigger their explosion on purpose and “clean” the arena before the rounds. Just make sure to not get hit by the explosion. - Venom Callers: Those adds spawn on one of the four stone circles in the corners of the arena. This is time triggered, the first one will likely appear towards the end of round 1. When a Venomcaller spawns, your screen will turn green. Focus them down as soon as possible, because they will cause all poison flowers to explode. As soon as the first set of flowers has exploded, new ones will grow and immediately explode again. This will leave you with little to no space to fight, so make sure to kill the Venom Caller as quickly as possible. They have very little health so this shouldn’t take long.
Rounds 1-4 Monsters
- Feral Argonian
- Nix-Hound
- Venomcaller: see above
- Argonian Berserker: They use Nightblade abilities and their stuns can get annoying to break free out of. I’d recommend killing those first, as the stuns can become a problem in combination with the exploding poison flowers as well. They can also put a bleed DoT on you.
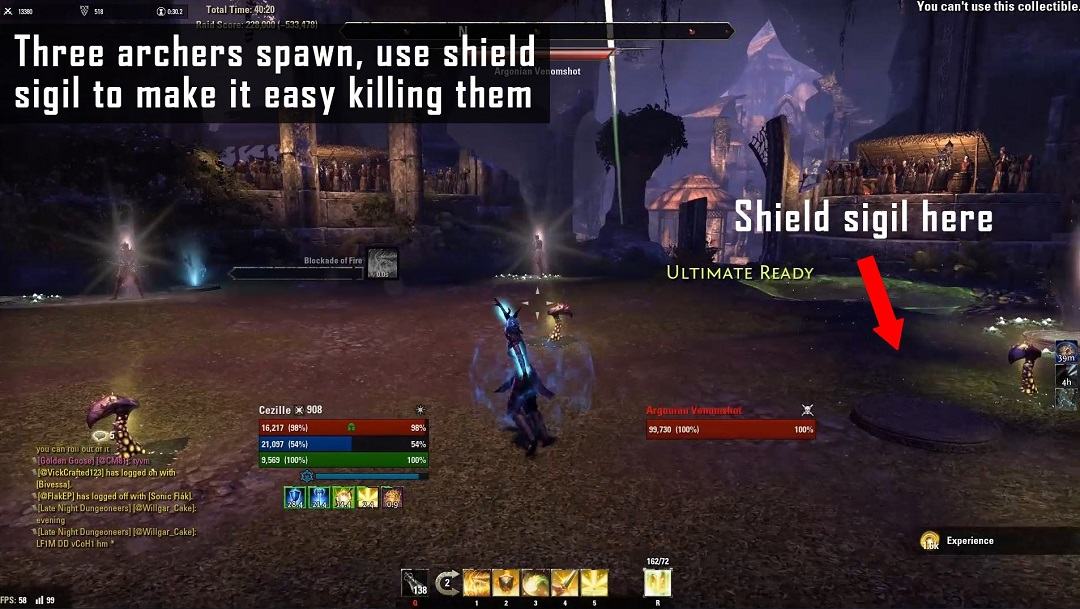
- Argonian Venomshot: If no Venomcaller is up, those are the most dangerous mobs. Their light attacks deal a lot of damage. If several archers spawn at the same time, they will immediately shoot a light attack at you, try to dodge this. If several archers hit you at the same time, their light attacks will kill you. All their attacks can be reflected with the shield sigil or player abilities.
They also have a poison spray AoE attack that’s rather easy to get out of, but if you get hit, you will have a nasty poison dot to deal with.
Their “Focused Aim” is their most dangerous attack though. They will start channeling it and both the Archer and your character will start to glow red. After around 3 seconds, the shot gets fired at you and will oneshot you if not blocked or dodged. You can interrupt this, and you can also reflect this back at them with the shield sigil, causing them to oneshot themselves. - Swamp Trolls (Rounds 1, 2 and 4): They serve as minibosses for the rounds they appear in. They do the usual troll attacks, a ground smashing attack and a rock throw. When they get to low health, they will enrage; this means they become immune to damage for a few seconds, grow taller and their attacks will deal increased damage after that. Overall, they are not really difficult to deal with, even though their rock throw can oneshot you when they are enraged.
- Wamasu (Round 3): The Wamasu casts lightning attacks at you that will snare you. He also has a dangerous stomping attack. He will get up on his hind legs and stomp on the ground with his front legs. This will cause swirling lightning AoEs to fly away from him in several directions. Don’t get too close to him when he does that, if those AoEs hit you, you will die. If you are in melee range and the Wamasu stands up on his hind legs, run away! He can also do a “lightning breath”, but you can avoid this rather easily.
Round 1
You will encounter the first waves of Argonian enemies. Kill the first Feral Argonian and Nix-Hound, then you will have to deal with your first Argonian Venomshot archer. It’s only one this time so it shouldn’t pose a threat to you. Kill the accompanying Feral Argonian as well. Once the archer is dead, two Berserkers will spawn, pay attention to their stun abilities and get rid of them quickly.
They are followed by another Berserker and an archer. At the end of the round, a Swamp Troll will appear. Avoid his attacks as good as possible and kill him. If he enrages before you can kill him, make sure to dodge his attacks.
Some time towards the end of the round, the first Venomcaller should appear in one of the corners. Stop whatever you are doing at that moment and focus the Venomcaller down immediately. Do so in every round that follows.
Round 2
First wave consists of two archers. When the first one down, three feral Argonians spawn, followed by two Berserkers. Once the Berserkers are killed, another Swamp Troll will spawn, he is accompanied by two Nix-Hounds. Get rid of those first as they don’t have a lot of health, deal with the troll the same way you did in Round 1.
Round 3
The third round starts off with Nix-Hounds and Feral Argonians who shouldn’t pose any serious threat. After this, two Venomshot archers will spawn. Dodge their light attack when they appear, then damage them. 20 seconds after the archers appear, the miniboss of this round will spawn, no matter if the archers are still alive or not.
You really want to make sure to have killed one of the archers at that point, if not both! The miniboss is a Wamasu which can deal serious damage. If you have your Ultimate ready, this is the moment to use it. If one or both archers are still up when the Wamasu appears, take the shield sigil! Avoid the wamasu’s attacks as described above and don’t hesitate to use sigils to help you with that.
Round 4
The first wave consists of two Feral Argonians and a Venomshot. They are followed by a Berserker and another Venomshot. Once these two mobs are down, three Archers will spawn at the same time. Immediately dodgeroll to avoid their first set of light attacks. You can also take the shield sigil to reflect their arrows back at them, which will make killing them a lot easier.
Once the archers are dead, two trolls will appear. The safe way is to damage them after each other so you don’t have to deal with two enraged trolls at the same time. If your AoE damage is good however, you can pull them close together and kill them at the same time.

Boss – Argonian Behemoth [HP: 1’234’736]
Boss mechanics:
- Swipe: His basic attack, can be easily outhealed as it deals low damage
- Staggering Stomp: He stomps on the ground and sends out stone shockwaves in several directions. Don’t stand too close to him so you don’t get hit by two of them at once.
- Smash: He will smash his fist on the ground, if this hits you while you are close to him you will get stunned.
- Wrecking Bite: if you get close to him and he manages to stun you with his smash attack, he will use this bite. This combination can be deadly; if you manage to survive it, the bite will put a heavy bleed DoT on you.
- Poison attacks: he will throw a small poison AoE on the ground, can be easily avoided
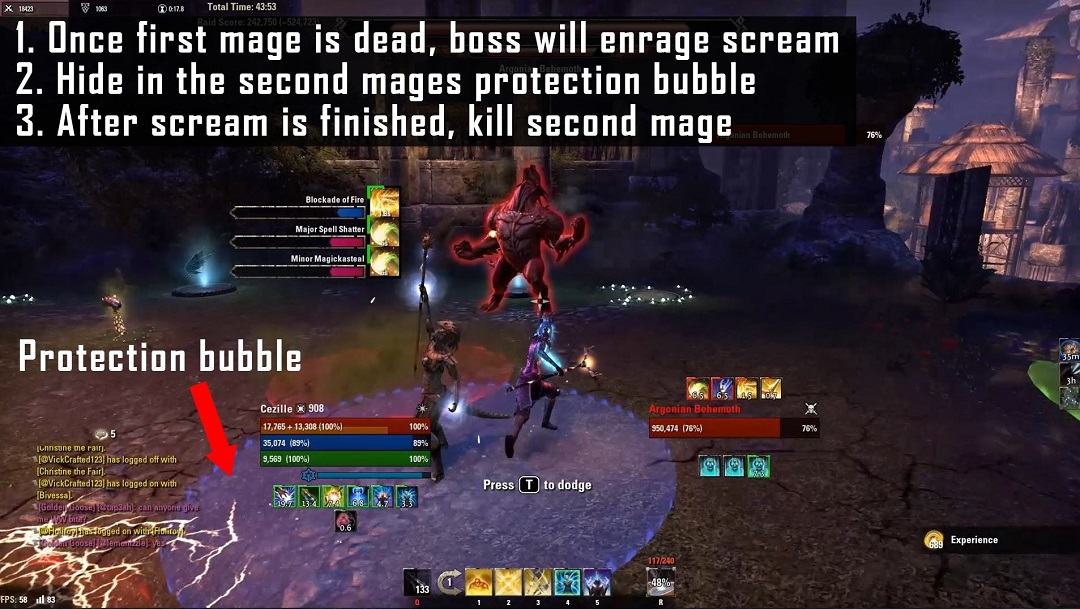
- Enraged Scream: This is highly deadly and will kill you within one or two seconds if you aren’t shielded by an Argonian Minder. Can be interrupted, this is not recommended though.
Attention: If you are wearing the Grothdarr monster set in the Maelstrom Arena, you might want to change to a different one for this fight as you could accidentally kill one of the mages in the boss fight.
The main mechanic of the fight is time based, so you really want to deal as much damage as possible. Consider taking the axe sigil early on. Make sure to always kill appearing Venom Callers. After around 20 seconds into the fight, two Argonian Minders will spawn. They are mages who cast lightning attacks at you.
Focus one of the Minders down immediately, preferably the one who’s further away from the boss. Once the first one is dead, head to the other one and stay close to him, but DON’T kill him, it’s important this one stays alive, so take care where you place your AoEs. This also is the reason why I don’t recommend wearing Grothdarr for this fight. Taking the shield sigil before the mages spawn is also a bad idea, it will reflect their lightning attacks back to them and this can kill them both at the same time.
The Boss will start his “Enraged Scream” attack as soon as the first mage dies, and the surviving Minder will cast a shield around himself; step inside this shield and stay there. If the Minder dies or you step out of the shield, you will die to the scream within one or two ticks.
The scream can be interrupted, but this is something that you absolutely don’t want to do as a beginner, as the boss stays enraged if you interrupt him and all his attacks will basically oneshot you from now on. If you are playing with a ranged interrupt such as “Crushing Shock”, make sure to NOT use it on the boss while he is screaming.
The scream attack has a duration of 10 seconds and you can damage the boss during that time. Once he’s finished screaming, the surviving Argonian Minder has to die quickly, otherwise he will do a teleport attack on you which knocks you down and deals a considerable amount of damage.
If you have a good feeling for the timing, you can start damaging the Minder during the last seconds of the scream phase so he dies before dealing damage again, but this is a bit risky as you really don’t want to kill the Minder too early. Continue damaging the boss and avoid his attacks as good as possible. If the boss isn’t dead after another 20 seconds, a new pair of Argonian Minders will spawn and you have to repeat the scream mechanic again.
If a Venomcaller spawns during the scream phase, it will die from the scream, but all the plants will still explode. This is where vMA can become very unfair and RNG comes into play: If you can move out of the poison AoE while still staying inside the shield, you are in luck.
If the poison covers the whole shielded area and hits you, your chances of survival are low. You can try to interrupt the boss and cleanse yourself, but you have to deal with his enraged attacks now. If the poison hits you very shortly before he ends his scream attack, you can try to heal and shield until you can run out of the save spot and into the cleansing puddle.
Also, the boss’ poison AoE deals enraged damage during the scream phase, if the surviving Minder ports right on top of that AoE and you have to stand in it, you will have to deal with a very hefty poison DoT that’s nearly impossible to outheal or shield against.

Arena 8 – Igneous Cistern
The Igneous Cistern is the eith part of the ESO Maelstrom Arena and will give you some breathing room before the final stage! The boss called “Valkyn Tephra” also isn’t that big of a problem because she got nerfed heavily, though still poses a challenge, don’t underestimate her.
Base mechanics
- Lava splashes: If you stay at one spot for too long, lava will get shot at you. This can be easily avoided by simply stepping out of the AoE marker. The lava stuns you if it hits you.
- Warding Stones: At the end of every round, a mini boss will spawn and one of the broken Warding Stones will become intact again. The Warding Stone needs to be destroyed before the miniboss can be damaged. The Boss fight of this round will have all three stones intact again and all three have to be destroyed before the boss can be damaged.
Round 1-4 Monsters
- Flame Atronach: They cast fire light attacks and fire AoE’s, not very harmful.
- Fire Shalk
- Dremora Caitiff: Dremoras using a Two-Handed sword; beware of their uppercut ability. If you get too far away from them, they use a critical rush ability which deals a lot of damage if you don’t block it. Try to stay close to them to avoid this.
- Dremora Gandrakyn: Dremora healers with quite strong healing powers; it gets very annoying if several of them spawn and cross-heal. Should be focused down
- Dremora Kyngald: Dremora fire mages, their most dangerous attack is their “inferno” attack, it’s a flame wheel they are casting above their head which shoots fire balls at you. Interrupt this immediately, the damage is quite insane as it gets stronger the longer it’s active; it can be dodged.
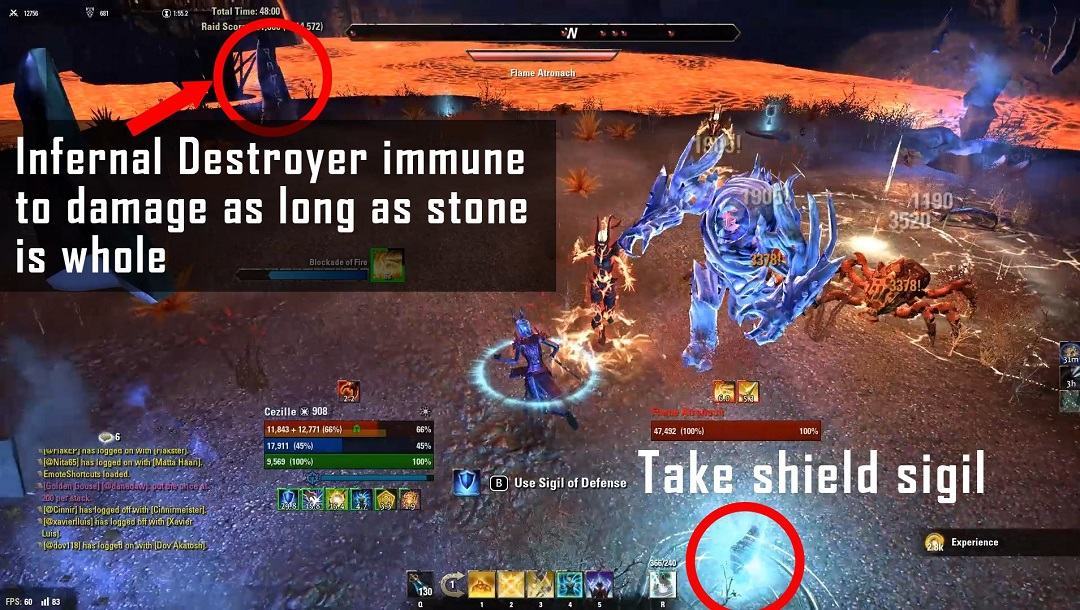
- Infernal Destroyer: Those Lurchers serve as the mini bosses for Rounds 1, 2 and 3. Their light attacks are very strong and deal a lot of damage. They also have a fire AoE attack that shoots three fire balls in your direction, this has high damage; avoid standing close to the Lurcher, as getting hit by several fireballs will probably kill you. Destroy their Warding Stone and try to fight them at range if possible.
This arena has a lot of fire damage, if you are a stage 4 vampire you should consider using some Double Bloody Mara to reduce your vampirism stage, otherwise the incoming damage can get very high.
Round 1
Two Fire Atronachs and a Dremora Caitiff appear. Focus on the Dremora, the Atronachs don’t deal a lot of damage. The second wave consists of two Gandrakyn healers and a Kyngald fire caster. Burn down one of the healers, interrupt the fire caster if he starts with his Fire Wheel attack, kill the second healer and then the fire caster itself.
After that, you will have to deal with another healer and a melee Dremora. The Miniboss of this round is a Lurcher enemy, called “Infernal Destroyer”. Destroy the one Warding Stone that got restored to be able to damage the miniboss and then focus on the Infernal Destroyer.
Round 2
A Dremora Kyngald fire mage and several Fire Shalks will spawn. Focus on the Dremora before dealing with the Shalks. Even though their damage output is low, the Shalks should be killed quickly as the next wave of mobs gets triggered before they all are dead.
A healer, a fire Atronach and the miniboss will appear already. Kill the mobs before destroying the intact Warding Stone and turning to the Infernal Destroyer.
Round 3
This round starts with two healers and a melee add. As always, focus on the healers first. When the last of the three mobs is at around 25%, three additional Dremora will spawn, this time it’s two melee Caitiffs and another Gandrakyn healer.
At the end of the round, the third Infernal Destroyer will spawn, together with a fire Shalk and a fire caster. Focus the Firecaster down before then killing the Shalk. Then destroy the Warding stone and after that, kill the Infernal Destroyer like in the previous rounds.
Round 4
Now things get tricky. Two Gandrakyn healers will spawn, together with two Kyngald fire casters and a Shalk. You need to kill the healers first, as it will be difficult to kill anything while they are still alive, so focus one healer down immediately after the spawn. While doing this, you need to keep an eye on the fire mages and be ready to interrupt their fire wheel attack as soon as they start casting it.
Taking the axe sigil plus the Healing sigil right at the start of this round can make this wave a lot easier to deal with. After the first wave of mobs is dead, two Dremora Caitiffs will spawn, beware of their melee attacks while still staying close to them so they don’t use their critical rush ability.
As soon as the first one dies, the next wave of adds will spawn; take the shield sigil now. The miniboss of this round will appear alongside two healers. If you are too slow, the healers will heal the remaining melee add to full health again, so you really need to kill the Caitiff fast.
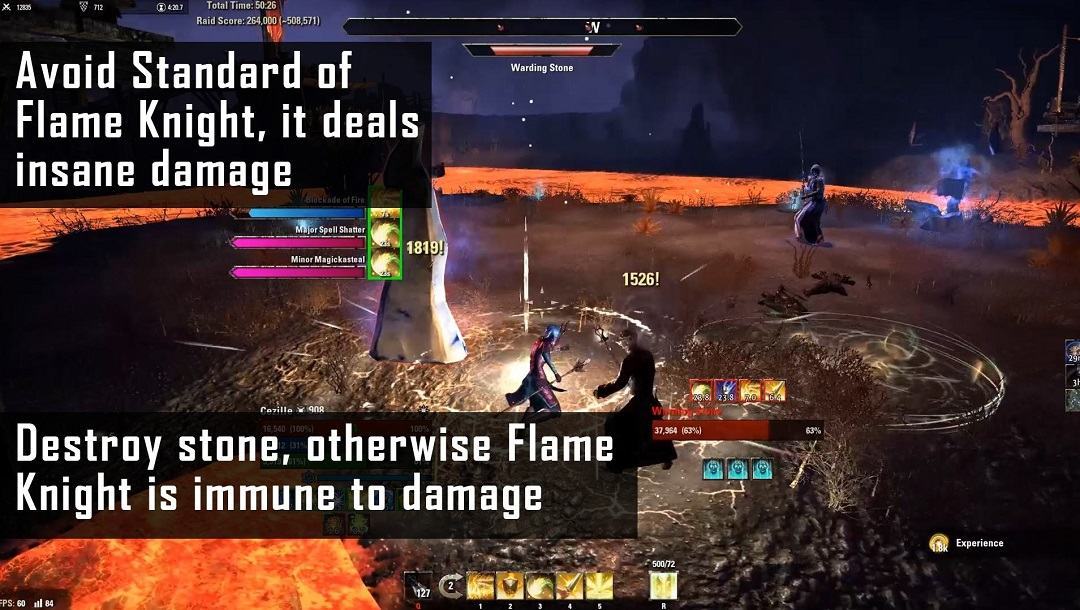
The shield sigil will reflect the healers’ abilities back to them, this will make killing them easier and also mitigate the minibosses damage quite a bit. The Flame Knight miniboss of this round is almost harder than the boss Valkyn Tephra. The Flame Knight’s attacks do insane damage. She will drop a Dragonknight standard and use chains to pull you inside the standard’s AoE immediately.
Either dodge or block the chains or get out of the standard as quick as you can, a few damage ticks will kill you. Try to kite her out of her Standard, as her damage will get buffed and her resistances increase while she is inside it. As in previous rounds, you need to destroy the repaired Warding Stone before being able to damage her.
Boss Arena 8 – Valkyn Tephra [HP: 548’772]
This is one of the easier boss fights in the Maelstrom Arena. When she spawns, all three Warding Stones get activated. Valkyn Tephra will slowly move towards you. She is very slow and can easily be kited. If she gets close to you, she deals a lot of damage with her carve ability though. Before you can damage the boss, you need to destroy all three of the Warding Stones. Then, Valkyn Tephra will get stunned for 10 seconds and you can damage her. After that time is up, the stones will get repaired again and you have to repeat the process of destroying them.
Around every 20 seconds of the fight, a Dremora Kyngald will spawn, focus them down as long as the boss is not stunned at that time.
An easy approach to this fight is to destroy two Warding Stones (take your time with this and charge your ultimate if it’s not ready yet) and then kite the boss until the first Kyngald appears. Make sure the last remaining Warding Stone is the one closest to the axe sigil.
Focus the Kyngald down once it spawns and then kite the boss close to the last stone. Place your ground AoEs on both the stone and the boss, quickly grab the axe sigil and destroy the stone so the boss gets stunned. Drop your ultimate on the boss and focus her with your strong single target abilities now.
If your damage is good enough, you can kill her in this one phase. If she becomes immune again, you will still have dealt a great amount of damage to her this way and can probably burn her in the next stun phase.
Destroy the stones again with the same tactic; take a short break after the second one to kill another spawning flame caster. You can also take the remaining other sigils now to increase your damage mitigation (and to reflect the fire attack back onto the Kyngald) and get a sustain boost if you feel the need for it. Just make sure to have your ground AoEs down already when you destroy the last stone.

Arena 9 – Theater of Despair
Theater of Despair is the final stage of the Maelstrom Arena and will put your skills to the ultimate test. The ninth arena is really difficult even before we get to meet the boss Voriak Solkyn.
Base mechanics
- White Ghosts: Those ghosts fly through the arena; if you run into them, you get quite a lot of damage and an annoying snare gets put on you.
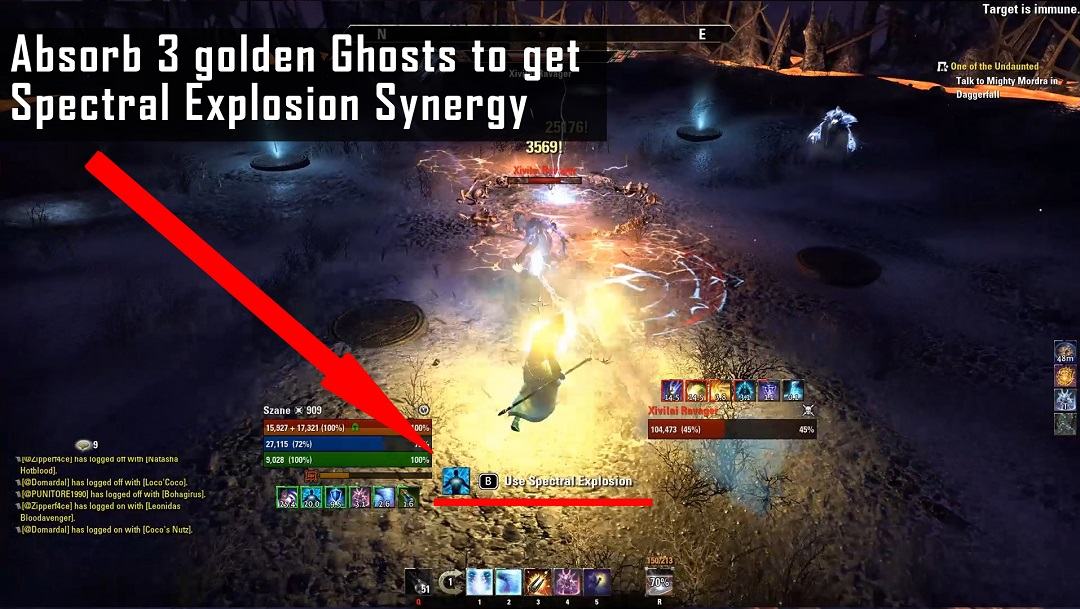
- Golden Ghosts: Every few seconds, a golden ghost will appear and fly towards an enemy. If you manage to catch three ghosts, the “Spectral Explosion” synergy will pop up. You have around 20 seconds to activate it. With this synergy, you can stun all enemies in the entire arena. However, if you caught one or two ghosts already and you let more than a minute pass without catching the next one, the count will be reset to zero. If an enemy catches a golden ghost, his resistances increase.
- Lava: if you get close to the edge of the arena, lava balls will fly at you. If you get hit by their AoE, you will get stunned and suffer high fire damage.
Round 1-5 Monsters
- Dremora Kyngald, Dremora Gandrakyn, Dremora Kynlurker, Dremora Beldakyn: Those are basic dremora mobs with low health. Watch out for the Kynlurkers, those are nightblade-like enemies that can stun you with ambush and soul tether. The Kyngalds are archers who have a “Taking aim” attack that can oneshot you. Interrupt them or dodge it.
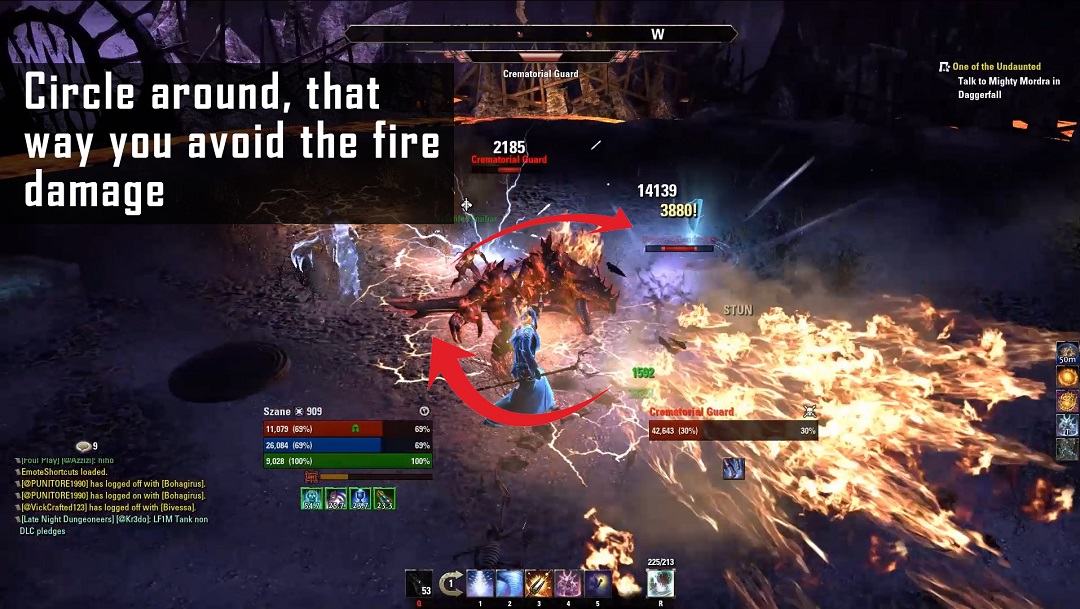
- Crematorial Guards: These monsters usually are your focus targets. They will run towards you and do a firebreath attack. If this hits you, it will put a heavy fire DoT on you which persists until the Crematorial Guard dies. The easiest method to avoid this is to stay close to the mob and circle around it while damaging it. They also have physical pounding attacks.
- Ogrims: They put a fire AoE on the ground and shoot fireballs at you. When they are low health, they will start pounding on their chests and heal themselves. This can be interrupted. If you are close to him when he starts that and you don’t block, it will knock you down and deal a lot of damage.
- Xivilai Ravager (Round 3): This enemy can cast a huge ground based fire AoE which deals a lot of damage and also knocks you down. He also has chains to pull you into his AoEs.
- Dremora Narkynaz (Round 4 and last phase of Boss Fight): Those Dremora spawn at the edge of the arena and slowly walk towards the middle. Once they arrive there, they will start a summoning ritual. If they manage to fulfill their ritual for around 15 seconds (note: this means 15 seconds in total; so if the first Dremora summons for e.g. 4 seconds, the second one for 8 seconds and the third one for 3 seconds, the ritual will be fulfilled), a huge Bone Colossus will spawn and you will be in great trouble. The Bone Colossus deals a lot of damage with his physical attacks and can also cast a potent fire attack. This attack basically is a rain of lava and close to impossible to outheal.
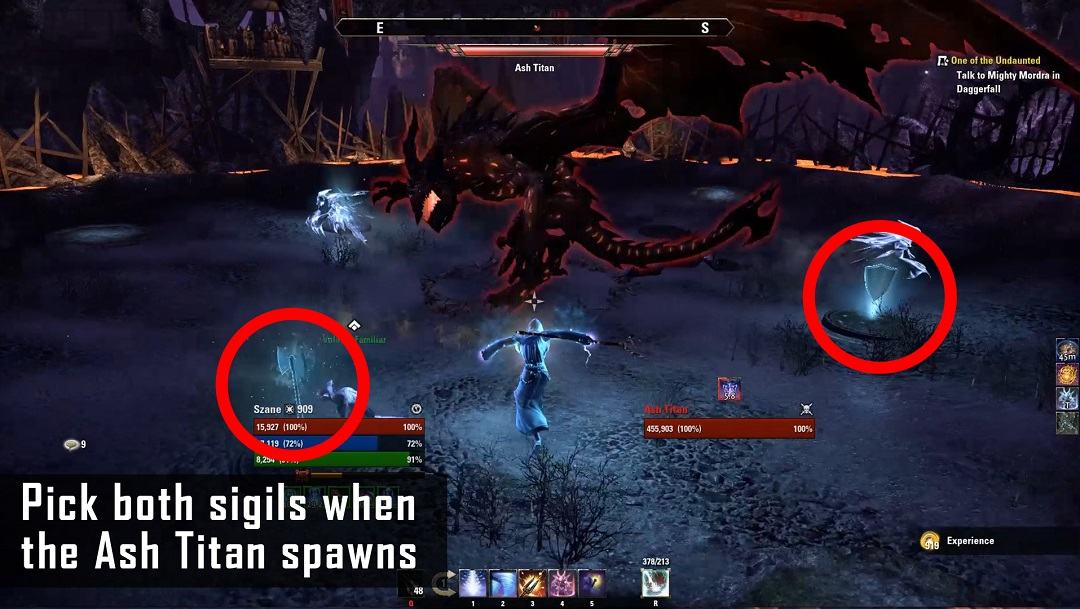
- Ash Titan (Round 5): He shoots fireballs at you, they do little damage. He also does a slow heavy attack with his claws, dodge this. At around 30% of his health, he knocks you back and sends walls of fire towards you with high speed.
Round 1
The first round in Arena 9 starts off with three different Dremora. Watch out for the Nightblade stuns; apart from that, they shouldn’t pose any threat to you. You will have to deal with two additional waves of Dremora, and at the end, a single Crematorial Guard will spawn. Circle around him to avoid his fire breath and kill him.
Round 2
You have to deal with several waves of Dremora again. Halfway through the round, a Crematorial Guard will spawn together with a Dremora. If you caught all golden ghosts until this point, the synergy should be ready so you can easily focus the Guard down.
If you don’t have the synergy ready, you can take the shield sigil to make your life easier. When the Crematorial Guard is dead, an Ogrim spawns, accompanied by two Dremora which should be dealt with first, as their talons and the soul tether can be annoying.
Round 3
This round starts with a Dremora Gandrakyn healer and a Crematorial Guard. The Crematorial Guard spawns out of the portal that’s close to the “door” at the edge of the arena. Focus the Guard down; interrupt the healer if needed. After that, three additional Dremora appear, once they are dead, the Xivilai Ravager will spawn.
Avoid his AoE attacks. Once he is at 30% of his health, an Ogrim and a Dremora will appear, stun them if you have the explosion ready. Once the Ogrim is dead, you will have to deal with another Crematorial Guard and a Dremora again.
Round 4
In this round, Dremora Narkynaz mages will appear. Those are your focus targets. They will spawn at the edge of the arena and slowly walk towards the middle, make sure to kill them before they arrive there and don’t let them do their summoning ritual. After two waves of Dremora, in the third wave you will encounter another Crematorial Guard.
After additional waves of Dremora, an Ogrim will appear. Attention: Together with the Ogrim, two Narkynaz summoners will spawn at the same time, make sure to kill them both before focusing the Ogrim.
Round 5
A Crematorial Guard and a Dremora spawn at the beginning of this round in the Maelstrom Arena. Once you kill them, the Ash Titan will appear. Outheal the small fireballs he shoots at you and dodge his heavy claw attacks. At around 30% of his health, he knocks you back and will start to send waves of fire towards you. Make sure to not stand too close to him at this point or you will get hit by several fire waves at once.
Once the titan is at 25% of his health, three additional Dremora mobs will spawn; focus the titan down and then deal with the Dremoras. Activating the shield sigil as soon as the titan knocks you back will make this part significantly easier as two of the Dremora are archers and the shield sigil will reflect their attacks back to them. After the three Dremora are dead, a single Ogrim will spawn. This is the last mob before the endboss fight, if you want you can charge your ultimate on him.
Tip: You can pick up the axe and shield sigil when the Ash Titan spawns, this will make the fight a lot easier.
Boss Arena 9 – Voriak Solkyn, Endboss [HP: 389’375]
This boss can be a real pain for inexperienced players. After a little practice however, you will see that this boss has the most choreography-like fight in the whole game, as almost every mechanic is time-based on the last boss in the Maelstrom Arena. Especially his knockback skull-attack gets very easy to dodge once you learn the rhythm of it, you will reach the point where you don’t even have to look at the boss anymore to avoid it.
You will need quite a lot of stamina to constantly interrupt the boss and to dodge his attacks, especially in the second phase of the fight. If you are playing a magicka character, consider using purple tri-stat-food or tri-pots here to get a bit of extra stamina.
Boss abilities:
- Light Attack: He shoots a small projectile at you, doesn’t deal a lot of damage.
- Heavy Attack: Voriak Solkyn shoots a single skull at you; will knock you down and stun you if not blocked or dodged.
- Necrotic Swarm: Interruptible channeled attack which rapidly shoots skulls at the player
- Necrotic Blast: Growing AoE attack around the boss, explodes once fully grown; stuns you and is mostly a oneshot.
- Lich Crystal: The boss summons a Lich crystal from the ground, this will explode in an AoE.
Phase 1 Voriak Solkyn
Voriak Solkyn spawns in the middle of the room. After about five seconds, he will do his heavy attack and shoot a skull at you. Either dodge this or block it, as it will knock you back and stun you otherwise, probably knocking you into a grey ghost. After around 10 seconds, a Dremora Gandrakyn healer will spawn and the boss will port away from the middle, most often close to the spawn position of the healer.
At his new position, Voriak Solkyn will start channeling his “Necrotic Swarm” attack and shoot skulls at you, you absolutely have to interrupt that attack as soon as possible. You can also take the shield sigil, it will reflect those skulls back at him. However, the shield sigil can be useful in a later phase of the fight and you should still have plenty of resources to interrupt him now, so I’d recommend getting used to playing this first phase without the shield sigil.
Place your ground AoEs on both the boss and the healer (they should be close enough together) and try to kill the healer. The boss will usually either cast his growing “Necrotic Blast” AoE attack or summon an exploding lich crystal from the ground now, make sure to get out of those AoE as they will most likely oneshot you.
Then, a Crematorial Guard will spawn close to the main boss. Focus the Crematorial Guard! This is the perfect moment to use an AoE ultimate on both the boss and the Guard, if you have one ready.
When you get him down to 70% of his health, Voriak Solkyn will become immune to damage and port to the upper level of the room, triggering the next phase of the fight. (If you have really good damage, you can even get him down to 70% even before he ports away from the middle or before the first Crematorial Guard spawns.)
Phase 2 Voriak Solkyn
Once the boss disappeared, one of the small stone plates will start to glow. A glowing spectral Clannfear will appear and run towards you. Kite the Clannfear to the glowing stone plate and kill it there. This will activate a portal which you can activate to get to the upper part of the room.
Depending on how much time activating the portal took you, another healer and maybe a Crematorial Guard will have spawned. If a healer appeared, kill it! If a Crematorial Guard appeared, and you are able to use the portal to the upper level before he can reach you, you can simply ignore him and port up. However, if a Crematorial Guard gets close to you and manages to get his fire DoT on you, you absolutely have to kill him before going up. His fire DoT would stay on you and kill you otherwise.
Once you ported, you will find yourself on a ring-shaped platform with three crystals. Lava comets will fall down at you, get out of their AoEs or you will get stunned. The boss is levitating in the middle, you can’t attack him in this phase. You need to destroy the three crystals to get him to port downstairs again. Destroying the crystals in one go gets a lot easier if you take the axe sigil, but this isn’t really necessary.
A few seconds after you arrive on the upper level, Voriak Solkyn will cast his skull attack at you again. Dodge or block it, if it hits you up here, you will likely get knocked off the platform and have to re-activate a portal downstairs. Start damaging the crystals.
While upstairs, notice you have a DoT on you, this is Voriak Solkyn’s “Soul Churn” ability. This DoT gets stronger the longer you stay up here. If the damage gets too high and becomes too difficult to outheal, jump down again. Absolutely do this early enough, before burning all your resources to zero, as a new Crematorial Guard, a healer and a clannfear will await you there. When you activate another portal and go back up, the DoT will have reset. . Don’t hesitate to use an Ultimate on the Crematorial Guard if you jump or fall down.
A few seconds after firing his first skull at you, the boss will start charging an attack. A little moving wall will appear now. You have 7-8 seconds to get behind that wall, as the boss will have finished charging his attack then and do a blast that will knock you down from the platform if you are not behind the moving wall. The wall will break after the blast attack. Now, the boss will shoot his skull attack at you twice (with around five seconds between the two skulls.).
Then, he will start charging again and the wall will reappear, but this time it moves faster. Get behind it again to avoid being knocked down. If you still haven’t destroyed all crystals after the second wall and are nowhere near destroying the last one at this point, consider jumping down to reset the DoT, as outhealing it will become more and more difficult and resource draining. Also, the third wall will move incredibly fast, likely forcing you to sprint and burn stamina this way as well.
Once you destroy the third crystal, you will get knocked to the lower level. If a Crematorial Guard is alive down there, it will die now. However, a healer will not die. That’s the reason why it is important to kill the healers before porting to the upper level. The boss will teleport back down as well, and the final phase begins.
Phase 3 Voriak Solkyn
Once the boss is back at the ground level in the Maelstrom Arena, he will instantly start his channeling his Necrotic swarm attack again. Interrupt him immediately OR (recommended) use the shield sigil now to reflect his attacks back onto him. Taking the sigil at this point will give you some breathing room to catch the first golden ghost, to reapply your dots and to get some resources back from heavy attacking if needed. Also, make sure to focus on the other mechanics that come into play now:
The Dremora Narkynaz conjurer’s from previous rounds will be back and slowly walk to the circle in the middle of the room, trying to summon the Bone Colossus the same way as before. Kill them before they can start their ritual.
In this phase, the golden ghosts will appear again, make sure to catch them, they absolutely are your first priority! The speed sigil comes in very handy here. Try to damage the boss as much as possible while collecting the ghosts. As soon as three golden ghosts have appeared, Voriak Solkyn will summon a Crematorial Guard.
If you haven’t missed a single golden ghost, you will have the spectral explosion ready at the exact same moment the Crematorial Guard appears, so use it as soon as the synergy button pops up. Take care though, it takes a second until the explosion happens and you can get stunned or damaged during that time.
If Voriak Solkyn is in execute range when you stun him, you can focus him and burn him down. If he is not in execute range or you are seriously struggling with resources and therefore can’t burn him, make sure to deal with the Crematorial Guard (your DoTs and a few heavy attacks should be enough to kill him and get some resources back) before turning to the boss again. You also have to focus the Crematorial Guard if your explosion synergy is not ready yet.
(If the boss catches three golden ghosts himself, he will start his “ultimate” attack; a storm will cover the whole arena and you will get a massive DoT from Voriak Solkyn’s “soul churn” ability, that’s the same damage over time you got while being upstairs killing the crystals. This time, the damage is a lot higher though, there is no way to survive this longer than a few seconds.)
Golden ghosts will continue to appear, so as long as you don’t let the boss catch three of them and you make sure to kill the Dremora Narkynaz mages before they summon the Bone Colossus, you can technically play this phase as long as you want to and are able to sustain it.
Always keep an eye on the boss to either interrupt his channeling attack or to dodge the skulls he shoots at you. Just don’t lose your nerve and stay focused, if you got this far, you will manage to kill Voriak Solkyn as well.


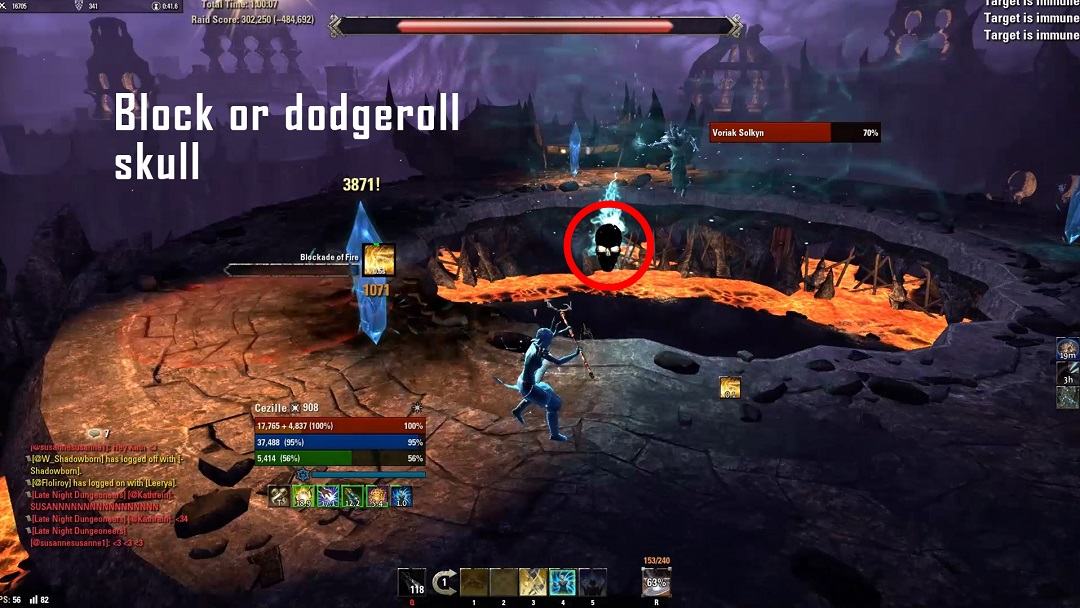
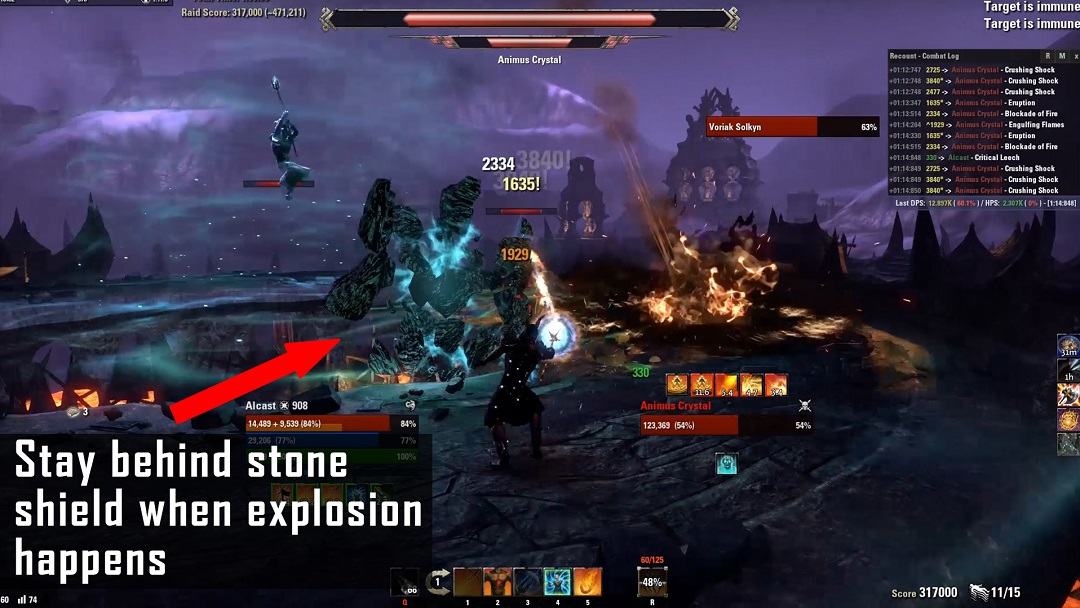

What happens after you finish the Maelstrom Arena in ESO?
Congratulations,you made it! Make sure to not forget to loot your chest that spawns and hand in the quest after going through the portal at the end of the Maelstrom Arena in ESO!
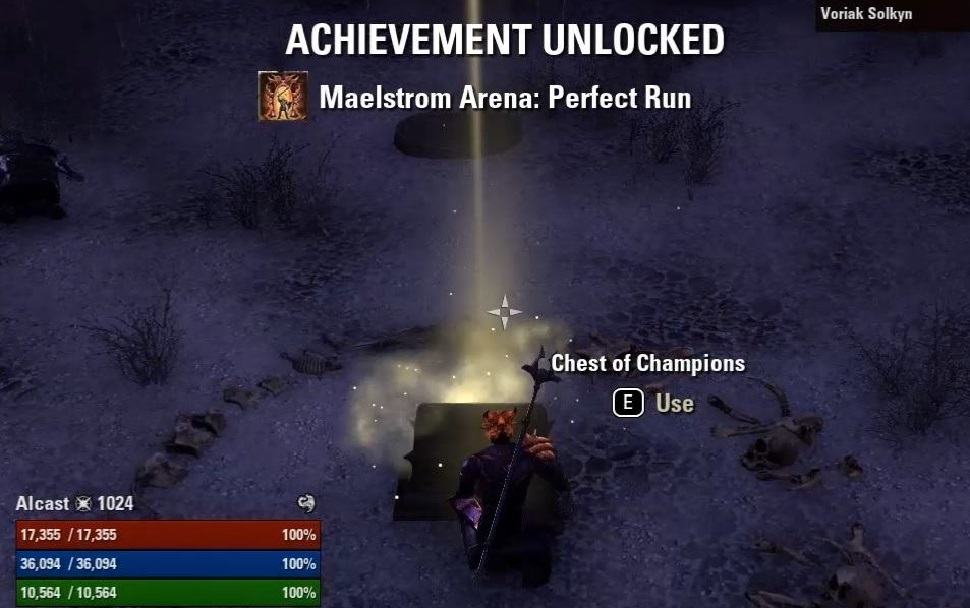
Achievements in the Maelstrom Arena in ESO
There is a total of three achievements that can be earned in the Maelstrom Arena.
- Maelstrom Arena Champion – Complete Maelstrom Arena on normal difficulty
- Maelstrom Arena Conqueror – Complete Maelstrom Arena on veteran difficulty
- Maelstrom Arena: Perfect Run – Complete Maelstrom Arena on veteran difficulty without dying or leaving the arena.
- Blademaster’s Mauve Dye – Maelstrom Arena Champion Achievement
- Maelstrom Baron Polymorph – Maelstrom Arena Conqueror Achievement
- The Flawless Conqueror Title – Maelstrom Arena: Perfect Run Achievement
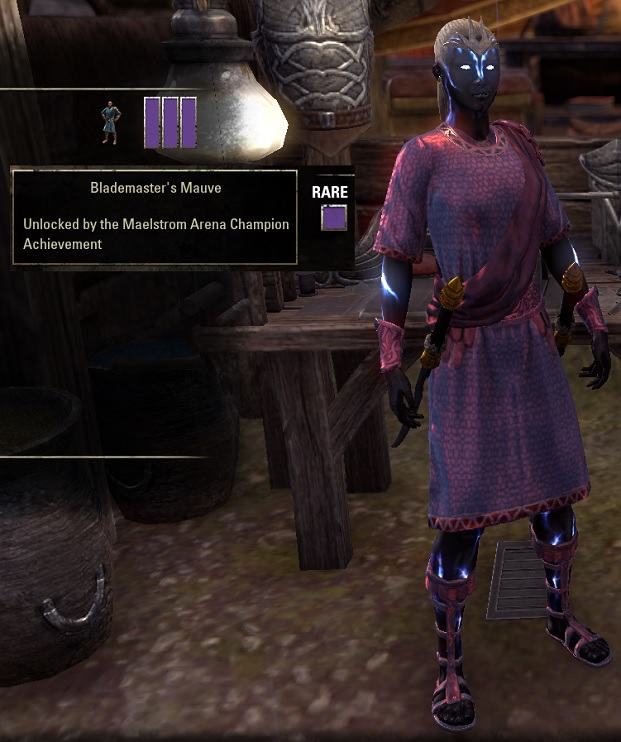

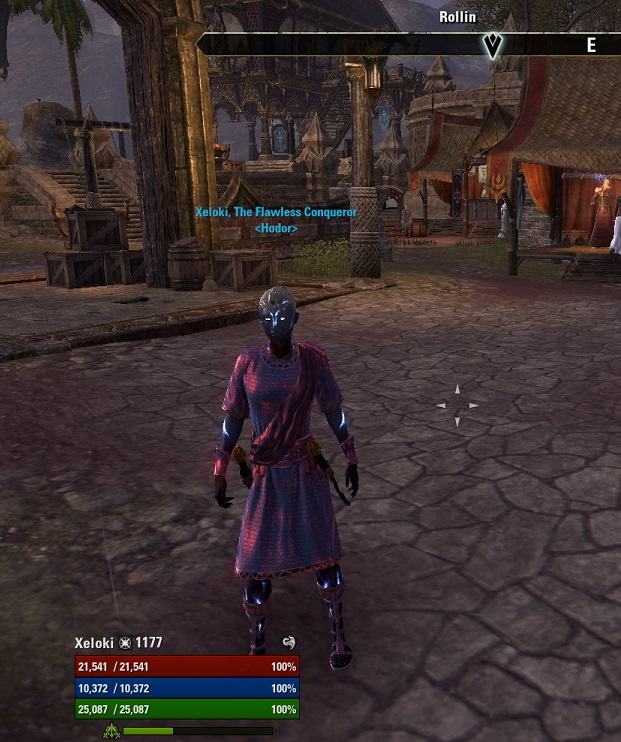
Builds for ESO Maelstrom Arena
You can find two very beginner friendly Maelstrom builds on my website:
- One Bar Magicka Sorcerer Build easy mode Maelstrom Arena Clear.
- Stamina Werewolf Build easy mode Maelstrom Arena Clear.
ESO Maelstrom Arena Videos
Here are some example runs that I did a while ago, you can also find more videos in the Maelstrom Gameplay section of the website.
Here a few examples:
Werewolf easy mode build for the Maelstrom Arena.
This Werewolf build is optimized fo the Maelstrom Arena. You can basically go from start to finish without leaving the Werewolf form once if you are good. However, most new players will probably drop out a few times, because you need to feed at the right moments. However, it doesn’t matter that much if you drop out of Werewolf a few times, you can always transform once your ultimate is full again. You can find the updated build here: Solo Werewolf Build.
One Bar Magicka Sorcerer easy mode build for Maelstrom Arena
The One Bar Sorcerer build is optimized for the Maelstrom Arena in ESO (Elder Scrolls Online). You can find the updated build here: One Bar Sorcerer Build.