Welcome to the Veteran Dragon Star Arena Guide for ESO (Elder Scrolls Online). The Guide will go through each Arena in great detail. Dragon Star Arena has a total of 10 Stages. Each Stage has a completly different theme and boss that you will encounter. This means that there is quite a lot to learn because you will not encounter the same thing twice! I will mostly talk about the important and most difficult mechanics for the Arena.
I do excpect that you have already cleared the Normal Dragon Star Arena to get familiar with some of the mechanics and attacks of the enemies. Sets such as Destructive Impact and Caustic Arrow will be rewarded after completing the Dragonstar Arena veteran.
Overview
- Stage 1 Dragon Star Arena
- Stage 2 The Frozen Ring
- Stage 3 The Marsh
- Stage 4 The Slave Pit
- Stage 5 The Celestial Ring
- Stage 6 The Grove
- Stage 7 The Circle of Rituals
- Stage 8 The Steamworks
- Stage 9 Crypts of the Lost
- Stage 10 The Champion’s Arena
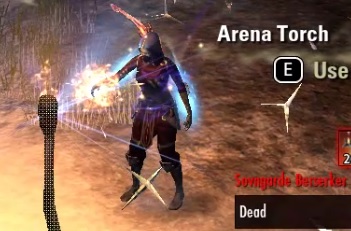
Stage 1 Dragon Star Arena
 You will be pitted against Fighters Guild enemies. The arena is covered in spike traps. This round has many healers, who can become a problem if you don’t take them out quickly and the S&B Melee mob does have a strong healing circle. The final boss is Champion Marcauld. There will be a lot of mobs that charge at you, most of them are easy to kill if you stand close together with your group.
Gladiator: Those are the most dangerous enemies in this stage, not because they deal a lot of damage but because of their healing circle. Once the Gladiator drops his healing circle you need to make sure to pull him and all other mobs out of the circle fast, otherwise they heal back to full health very quickly. The Healing Circle can not be interrupted but could be negated.
Bossfight: Champion Marcauld
This bossfight is not that difficult if you follow a few important steps. Make sure to move out of his healing circle as fast as possible so he and his minions do not heal back up. In addition to that make sure that you stand behind the boss, Marcauld has a very strong conal attack (Dawnbreaker) that does insane damage if not blocked, especially if you are a Vampire or a Werewolf.
At 70% and at 40% you will have mobs that spawn. At 40% a Gladiator will spawn that will most likely also drop a Healing Circle, sometimes in combination with the boss, make sure to focus that Gladiator so he dies as fast as possible.
Stage 2 The Frozen Ring
The arena contains three large fires, which you will need to fight beside and keep lit to avoid taking periodic damage from the icy conditions. The bosses are Yavni Frost-Skin and Katti Ice-Turner.
Deep Freeze Mechanic: This mechanic starts with Wave 3. The fires will extinguish and you need to make sure to light them up as fast as possible again to not die from deep freeze. If you are fast enough you only need to light the fires once every round. If not then make sure that you have someone dedicated to get those torches.
Casters and Archers: Those are the most dangerous mobs in this arena because of their strong AoE attacks. Make sure to focus them. When you chain the Casters/Archers in try to dodge roll through them before the chain animation is finished. It takes some practice but that will result in the Archers &Casters not running backwards and more into the group.
Bossfight: Yavni Frost-Skin & Katti Ice-Turner
This boss is fairly easy, make sure to stack both bosses. Stand right at the Gate when the Bosses Spawn, if you do that then the Caster will run away from you close to the fire and then you can bring the melee boss next to the mage. At 50% adds will spawn, with a troll and a archer that you need to chain in and taunt so they do not hit your healer and damage dealers.
Stage 3 The Marsh
Poisonous clouds will randomly spawn in the arena, and will deal massive damage if you touch them. You really need to memorize where you have free spots that are save from the poisonous clouds. The bosses are Nak’tah and Shillin.
Nereid: This is one of the more dangerous mobs in this arena. The mob drops a water aoe under someone. Everyone has to make sure to move out of it because it deals a lot of damage. I recommend focusing the add so it dies fast.
Strangler’s: Make sure to kill the stranglers as soon as they spawn, otherwise they will keep pulling players close to them and might cut them off from the rest of the group. Waves 3 & 4 two Strangler’s will spawn in the North-West & South-West corner.
Bossfight: Nak’tah & Shillin
One or both Damage Dealers have to make sure to kill the Strangler’s that spawn on the Sout-East & Sout-West corner. After that make sure to kill the Totem of the Mageboss and focus him. The Mage boss will teleport around if you do not have a lot of dps. At around 75% and 40% mobs will spawn that need to be killed. I recommend saving your Ultimates for those adds so they die fast and you can focus the bosses again.
Stage 4 The Slave Pit
In this round you face Dunmer enemies from House Dres, as well as Kwama, Netches and Kagouti. The Dres Enslavers have a special attack that attaches a blue chain to one of your group members, damaging them. You will also get Enslaver Ghosts that will wield their weapon dealing AoE damage in a certain area. You have to ignore them but keep healing, they have so much health its not worth killing them. Other than that the only really dangerous mobs in here are the Mages, they spawn AoE that goes straight in a line forward and can deal a lot of damage. Make sure to avoid them.
Another thing, sometimes you will get targeted by the Enslavers with a beam, if you get that you should make sure to go stay outside after a while. Because at the end a shadow which does the aoe attack will be placed on your position, you do not want that in the middle of your group.
Bossfight: Earthen Heart Knight
This boss has a lot of health and is very tanky if she activates here Magma armor, basically making her immune to damage for a short duration. She will also place Eruption on the ground from time to time, make sure to move the boss out of that area, because that AoE field does also a lot of damage to the tank and players.
You will also have the Enslaves adds that chain damage you and they will spawn ghosts at your spot that rotate their weapons and deal a lot of damage. I recommend ignorning the Enslavers and the ghosts, just be careful not to stand in the AoE fields and you need constant healing on you if you have the blue beam on you. Also adds will spawn at two points of the fight, make sure to kill them as fast as possible.
Stage 5 The Celestial Ring
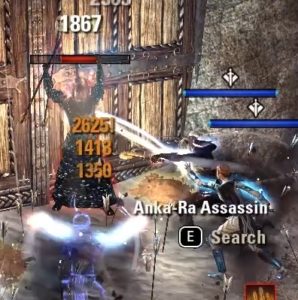
You will be facing off against the Anka-Ra warriors and enemy gargoyles in a sandy arena covered in constellation stones. The Anka-Ra Shadowcasters have an ability to mark a player for death via “Celestial Blast”, which can only be prevented by rushing to the highlighted constellation and standing there until the effect wears off. If you manage to kill the Shadowcasters fast enough you will not get any “Celestial Blast” at all. I highly recommend memorizing where and when those Shadowcasters spawn to nuke them as fast as possible. Also be careful of the archer that spawns in some of the rounds, because his AoE attack deals a lot of damage, you can interrupt it by either bashing or chaining him.
Bossifght: Anal’a Tu’wha
Right when the boss fight starts I recommend using Ultimates, you will also get a Gargoyle that can “stone” a player and a Shadowcaster along with the Boss. So make sure you focus the Shadowcaster first to kill him before he places the Celestial Blast on you, the tank has to make sure to keep the Boss and Gargoyle close by so you can damage them with AoE abilities at the same time. At some point the boss will drop a Standard, it deals an insane amount of damage thus you need to move out of it immediately, now make sure to go to the left side of the arena (left side from where you enter) and keep the boss there. At 40% you will get another Shadowcaster that spawns directly at the door, make sure to also focus him down so you do not get the Celestial Blast.
There will be add waves, the tank has to make sure to keep the Gargoyle taunted together with the boss, also be careful of the fire AoE lines that the Mage will cast.
Shadowcaster Spawns:
- 1st wave no caster
- 2nd wave north
- 3rd wave west
- 4th wave second spawn on west
- Boss: Shadowcaster spawns with boss in the North and a second shadow caster spawns at 40% boss health in the west
Stage 6 The Grove
In this round you will fight against Pacthunter Bosmer, along with werewolves, spriggans and lurchers. Aside from the Bosmer, every enemy will leave behind a green AoE upon death, which converts health into magicka when you stand in it but you also get a lot of damage from it. The tank has to make sure to keep the big mobs (Lurkers and Werewolfs) taunted, they have hard hitting attacks which will kill most non-tanks.
You will also get a few special archers that spawn, they will use a draining shot on you. You can dodgeroll this attack, if you do not dodgeroll it you will loose resources rapidly. Make sure to focus this mob as soon as it spawns.
Bossfight: Pishna Longshot
The boss also has a similar attack to the special archer, he will charge his bow and launch a draining shot at a player, make sure to dodgeroll it, otherwise your resources will be drained. Make sure to have AoE Ultimates ready at the start of the fight, because there will be mobs that spawn too so they die pretty fast and you can focus the boss. The boss also has a conal Bowspray attack, it is easy avoidable, just walk out of the area or block it. Tank also has to interrupt the boss from time to time when he tries to charge an attack. Other than that the boss itself is not really the most dangerous thing.
The big mobs will leave the green aoe fields on the ground, if you kill too many of those at the same time, they all will drop those green fields and the damage can stack and you might get oneshot, so be very careful about that. You will get a total of 2 addspawns during the bossfight, I recommend saving ultimates for those trashpacks.
Stage 7 The Circle of Rituals
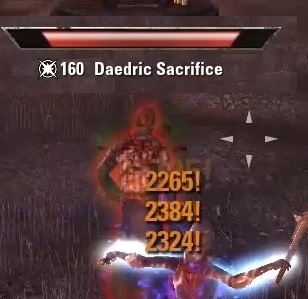
This round seemingly takes place in Oblivion, with a backdrop of Daedric ruins and lava. You will be fighting against Bloodwraith Dremora, banekin, daedroths, clannfear and spider daedra. The arena contains three altars, which Daedric Sacrifices will slowly walk towards constantly, small ones and later on big ones. If you don’t kill them in time, these prisoners will be transformed into “Sacrificial Summons”, which can either be a scamp or a Daedric Titan. Note that the sacrifices continue appearing even if your group isn’t in combat, creating an unkillable stack of Titans that can only be cleared by dying. Make sure to assign people to each side so they can always check whether a sacrifice spawns or not and then kill it as fast as possible, before it reaches the alter. If you encounter big sacrifices you might want both Damage Dealers on the mob.
You will get a lot of fire damage in this round, make sure to not be a vampire or reduce the stage to 1. The tank has to taunt most of the mobs because all of them do quite some damage. The daedroths also spit fire balls at everyone knocking players back, if not blocked.
Bossfight: Shadow Knight & Dark Mage
One very important thing first, the Mage can fully heal herself if not interrupted, this sometimes proves to be difficult if there is a Nova on the ground from the melee boss and a Negate from the ranged boss. The Mage also places mines on the ground, they deal a lot of damage. The tank an clear the mines or position the boss at a differeent spot. The melee boss will sometimes blind you and drop a Nova that deals a huge amount of damage, so make sure to not directly stand next to the boss.
Sacrifices will also spawn throughout this boss fight, always have people assigned to a side to clear them. You will get a lot of big sacrifices, they have more health so you might want to kill them with both Damage Dealers, depending how much damage you do. On top of that mobwaves will also appear, I recommend saving ultimate for those.
Stage 8 The Steamworks
This round you will be fighting against Dwarven Automatons and enslaved mages. The blue Centurions that spawn need to be taken down quickly, as they can freeze you in place or surround you with a slowing AoE, you can interrupt their ice attack if you are fast enough. The red Centurions shoot a fire AoE onto one player, but only if the ice Centurion is not interrupted. If you get both of those big AoE circles, make sure to stack them, yes stacking will negate the damage you receive from those two AoEs. The green Centurions perform a powerful spinning AoE, which will need to be tanked or kited. You will also find a lot of dangerous Mages that deal a lot of AoE damage, be careful to avoid the damage. On top of that there will also be a melee mage that drops negates over the group, kill it as fast as possible, that melee mage should be your priority.
You will also encounter dwemer mobs, especially the big spheres are dangerous, they have a big AoE line attack which is barely visible, but can almost oneshot you if you do not have a shield or smth else.
Bossfight: Mavus Talnarith
This fight is quite difficult, there is a lot of incoming damage, especially when all the mobs spawn. I recommend placing the boss either where he spawns or more towards the middle. The boss will place a scalding rune, if not blocked you will get knocked into the air, the damage you get is quite low. The boss will also use Shooting Star from time to time, if you do not block this attack you will almost certainly get oneshot. The sound is quite apparent of the Shooting Star. The boss will also shoot a fire wave towards the tank from time to time, try to avoid it as it deals quite a bit of damage.
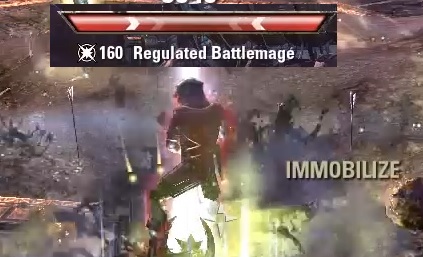
At 80% a melee battlemage will spawn, make sure to focus that mob because it will place negate on the group which can kill you if you do not move out fast. In addition to that a red, blue and green Centurion will spawn, make sure to interrupt the blue one to avoid the red and blue circles. I recommend saving your ultimates for after the melee mages death, so the Centurions die quickly. Another wave of Centurions will spawn at a later time.
Stage 9 Crypts of the Lost
This round takes place in a graveyard, and you will be faced with a lot of undead enemies. These include Graveoath skeletons and wraiths. The arena is dotted with “holes” in the ground, where skeletons will pull you down and force you to fight your way to a portal back to the arena, although they can easily be avoided. The most dangerous mobs are the ghosts, they shoot a ice aoe wave towards the player, which deals a lot of damage and roots you on the ground. The tank will be qutie busy as he has to taunt or chain most of the mobs. If you stack them all at one place it should be fairly easy to kill them fast with AoE damage.
In case someone gets pulled down by the skeletons in the hole, make sure to have a heal or a shield slotted. You will receive quite a bit of damage down in the seperate room. On the last wave before the boss, you will also get a ranged miniboss that spawns. He will be damage immune after he casts his shield, someone needs to go down the skeleton hole on purpose and kill the ghost that is down there so he looses his shield and you can kill him again. Same thing will happen again now this time on the right side of the arena a melee 2H mini boss will spawn, same thing here, someone has to go down to kill the ghost so the miniboss upstairs gets his shield removed. Both of those mini bosses have very strong attacks, the tank needs to make sure to keep them taunted and interrupt if necessary.
Bossfight: Vampire Lord Thisa
This boss has a lot of health. Two adds will spawn at the start with him, make sure to kill them first before you attack the boss. The boss has a huge batswarm attack which needs to be avoided, otherwise you will get a lo tof damage. Sometimes he also uses mistform, making him almost immune to damage. he also has a strong shieldcharge attack, the tank should make sure to block it. At 80% on left side a mage miniboss and on the right side a melee 2H miniboss will spawn and send their ghosts down the skeleton hole. One player has to go down and kill both of those ghosts. I recommend going down at like 90-85% boss health so you can already wait there and spawnkill the two ghosts. Once the two ghosts are dead the player can go back up and help kill the two mini bosses. You will also get an add wave later in the fight, but after that there is nothing special, just the boss.
Stage 10 The Champion’s Arena
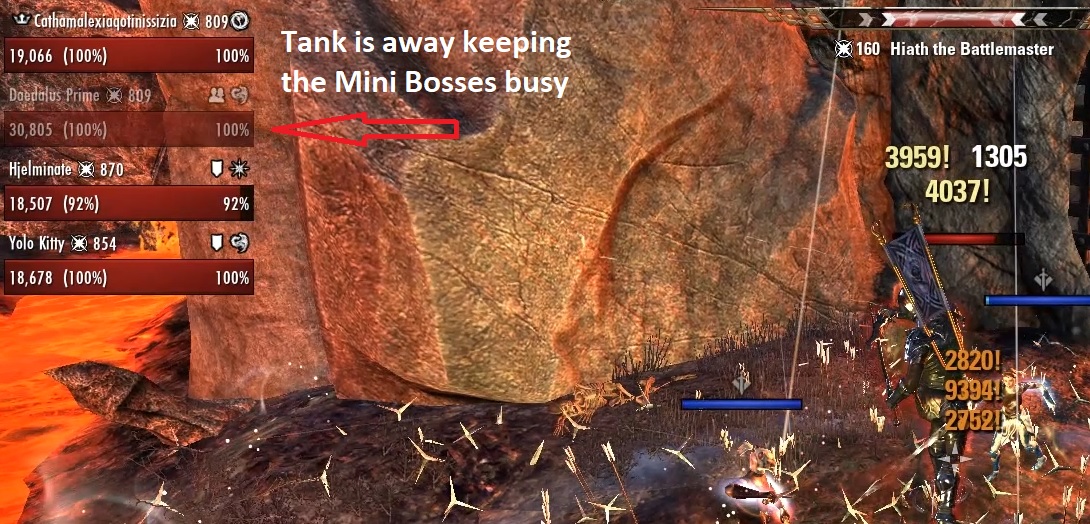
Bossfight: Hiath the Battlemaster
The final round takes place in Boethiah’s realm of Oblivion. Unlike the previous rounds, it is a single, prolonged boss fight with no checkpoints or waves. You will be fighting Boethiah’s Champion, Hiath the Battlemaster. There is a few tactics that usually work with this bossfight. I will explain the tactic where the tank takes away the mini adds so healer and damage dealer can focus on the alone, the healer needs to slot a taunt for this to work. As Hiath’s health decreases, he will summon Champion Marcauld and Mavus Talnarith at 75%. At 50%, he will summon Yavni Frost-Skin and the Dark Mage.
Now when the bossfight starts, the tank will take the boss to the uper area and everyone else will stand at the entrance door. The tank needs to be able to survive alone for a bit. This way you can avoid the nasty fire AoE damage that he will place on the group at the start. Once the boss placed his fire AoE, the tank can walk back to the group, now everyone needs to damage the boss as fast as possible, when the first two mini bossses spawn, the tank taunts them and walks away with them back to the upper field. The Healer has to taunt the mainboss and bring him closer to the door. You will get pulled to the boss at 50%, followed by an explosion. If healing is on the ground you will survive, now here it is important that the tank is far enough away so he does not get pulled. After this the tank can slowly walk back and taunt the two new adds that spawn and walk away back up again. The other three players then just focus on killing the boss as fast as possible, at 25% the boss will pull the player to him again but just keep damaging the boss. I recommend watching the youtube video so you get a really good idea of how it is done.