

Welcome to the ESO Frostvault Guide. The Frostvault dungeon is located in the west of Eastmarch, the dungeon is part of the Wrathstone DLC. In the Frostvault dungeon you will encounter a total of five bosses and a few trashpacks. The first two bosses are fairly easy, but after that it gets more complicated. The last boss also has a hardmode which is a beast of its own, it is currently one of the more difficult hardmodes in dungeons.
- Rewards & Loot
- First Boss – Icestalker Troll Boss
- Second Boss – Warlord Tzogvin
- Third Boss – Vault Protector
- Fourth Boss – Rizzuk Bonechill
- Final Boss – The Stonekeeper
- Full Video with Boss Timestamps
Rewards & Loot
Sets in Forstvault ESO
There is a total of 3 different sets plus a Monster Set that drops in the Frostvault.
Rewards
- Non Combat Pet: Icebound Dwarven Spider – Complete Frostvault on veteran mode.
- Title: Frozen Treasure Seeker – Complete the following achievements: Frostvault Conqueror, Vault Cracker, Safe Keeping, Smash and Grab.
- Dye: Glacial Topaz: Enter both Frostvault and Depths of Malatar to obtain this dye.
First Boss – Icestalker Troll Boss
Boss Health:[HP: 3,867 Mio]
This boss is fairly easy, all you have to make sure is to face the boss away from the group as a tank. He will stomp onto the ground and a conal stonewave will appear, if it goes into the group it will do a lot of damage but as a tank you can absorb the damage easily. The second attack which is a knock up will target a random group member, after the knock up you have to make sure to interrupt the boss, otherwise the player will get a crazy blow to his face and most likely die.


Second Boss – Warlord Tzogvin
Boss Health: [HP: 4,060 Mio]
This boss has a lot of AoE skills that you need to try to avoid. He also does use Wrecking Blow, for the tank not such a big deal but if another group member is targeted it will oneshot the player (you can dodgeroll the attack). He also has a whirlwind attack that does medium damage, you can ignore or block the damage. After a while he will summon his fire greatsword and leap into the air, once he comes back down all people that are close by will get knocked back.
After the knockback, he will start casting flames on all group members, make sure not to stand close to each other, otherwise you overlap the fire damage and will die. The next weapon he is going to summon is the frost greataxe, once the axe is summoned frost whirlwinds will appear over the whole arena that you need to avoid. It is also possible that one of the whirlwinds will follow a player, make sure to kite the it and do not run through your group with it to avoid damage.
Note: Sometimes you will see a notification “tethered”, this means two players have been tethered and need to walk away from each other to break the tether.

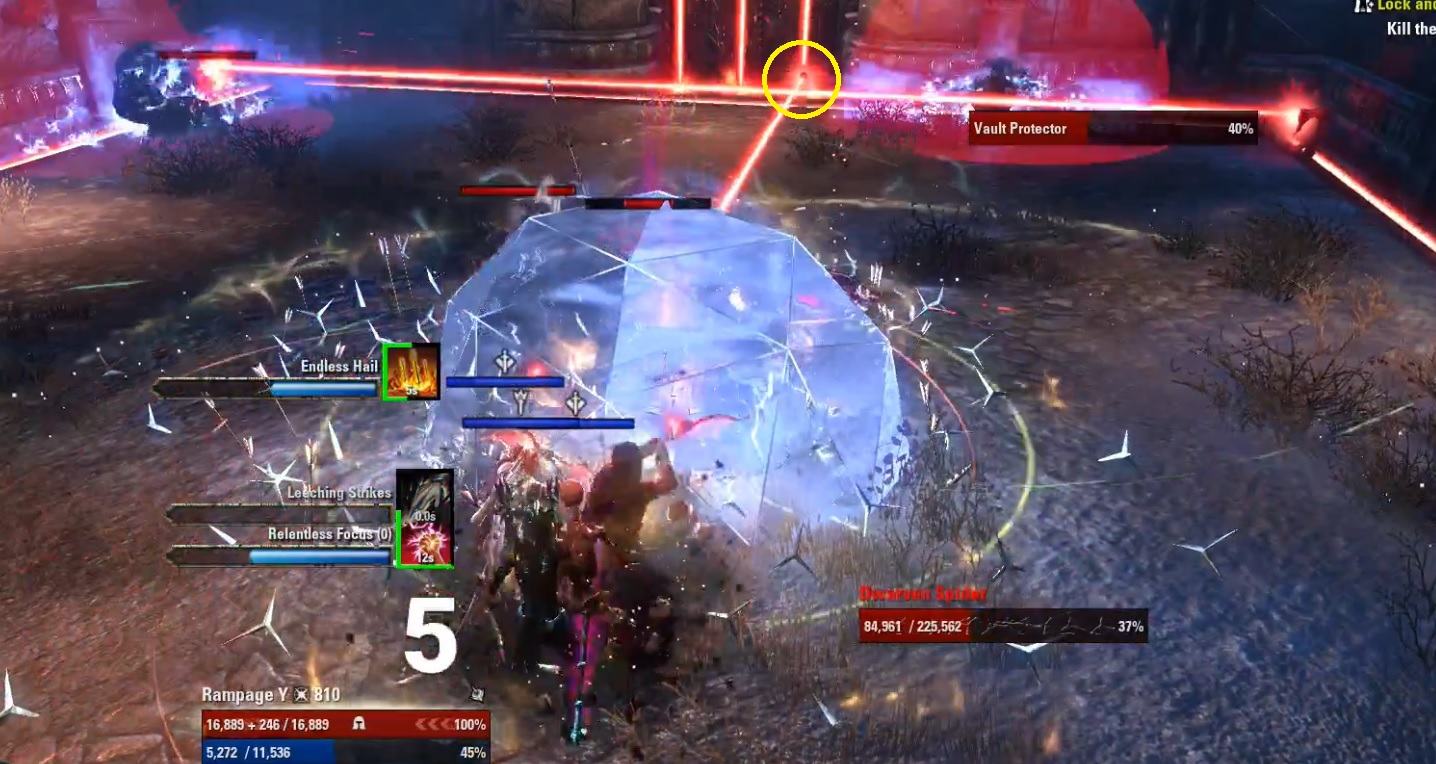
Third Boss – Vault Protector – Frostvault ESO
Boss Health: [HP: 3,909 Mio]
Here it starts to get really tricky, this boss kind of reminds me of the laser room in Resident Evil. In addition to the Vault Protector boss, there is a lot of adds that spawn. Make sure to kill them as fast as possible, because if the small spiders will stay alive for too long they will turn into a charging module for the Dwemer Spheres (snipers, can’t be pulled) and they will deal increased damage. If you kill the small spiders be careful, they will detonate after they die.
The boss itself is not really dangerous, he has a few attacks but as long as the boss stays on the tank it should not cause problems. The challenge here comes in dealing with the laser beams. After you damage the boss to a certain health %, he will turn into an ice cube and lasers will appear. Now you have to take a look on which side the laser beam is getting powered, once you know that you have to go to the other side of the ice cube to avoid the laser beam damage.
The laser beam damage pretty much oneshots everything, so it must be avoided at all cost. At the start there is only one laser beam, but the closer the boss gets to death, the more beams will show up. There will also be blue balls rolling around, you can just ignore them, if you run into them they will stun you.
Tip: Keep the boss somewhere in the middle to make it easier to avoid the laserbeams. The laserbeams are always either clockwise or counterclockwise.
Boss Shield:
- 75% – 1 Laserbeam phase
- 40% – 2 Laserbeam phases
- 20% – 4 Laserbeam phases
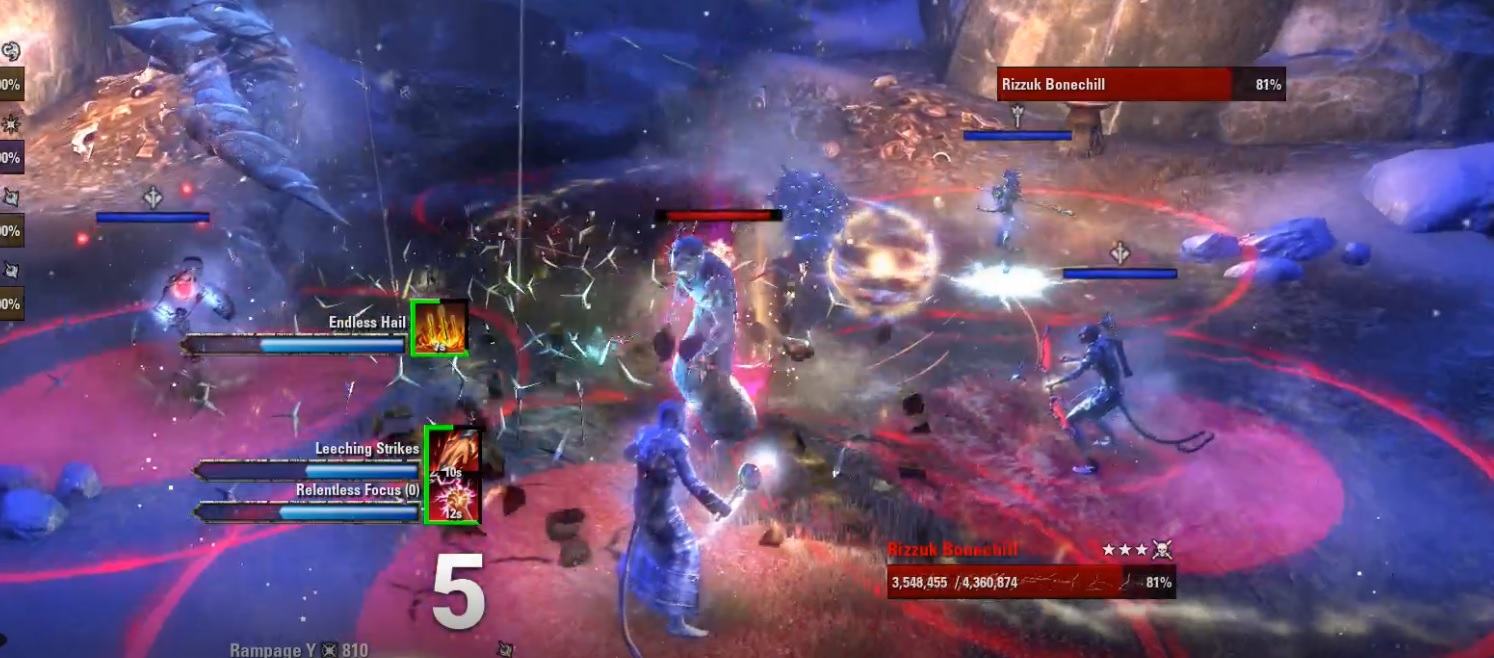
Fourth Boss – Rizzuk Bonechill
Boss Health: [HP: 3,607 Mio]
There is a lot of AoE damage in this fight, make sure to avoid all the AoE damage or block it if necessary. Rizzuk will teleport to the middle and cast a frost blast after a while, infecting everyone with some sort of curse. After a few seconds you will get frozen and explode in a certain area. Make sure that all group members are split, if you overlap this AoE damage with two people because you are too close together you will die.
From time to time there will also be a spiked iceball rolling around. Make sure to block the damage if it comes close to you and the ice ball explodes, it does medium damage if blocked. There are also big icestorm AoE fields in the arena, they will oneshot you but are easily avoidable as they are just static. The boss will also start channeling frost bolts, you have to interrupt this, otherwise it will deal an insane amount of damage to random group members.
Avalanche: The tank has to mainly focus on tanking the Avalanche. The Avalanche has an attack where he spawns a cricle and on the edge you can find Ice spikes, the tank has to stay INSIDE this area and face tank the damage, if you go out you will most likely immediately die, so you are supposed to stay in there and take the hits.
Note: Just focus Rizzuk, once Rizzuk is dead both bosses will die.
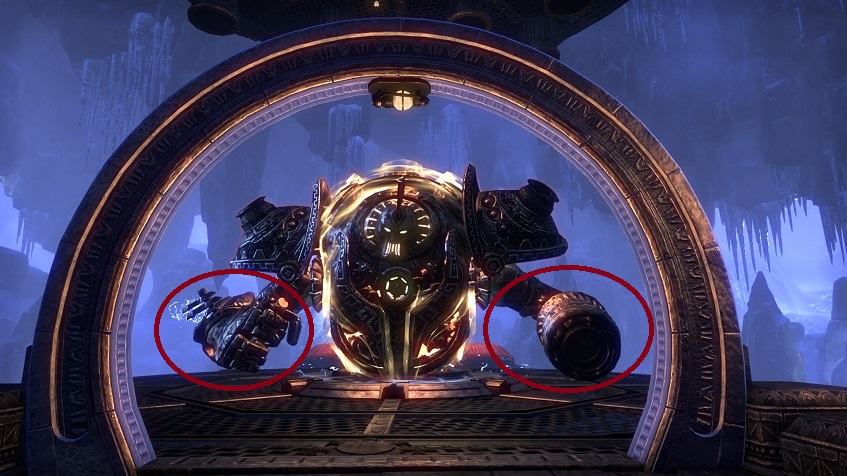
Final Boss – The Stonekeeper
Boss Health: [HP: 4,233 Mio]
This boss has a lot of mechanics. As a tank you have to deal with a big heal debuff on you. On top of that he also shoots laser beams and a fire cone at the tank, you will need a lot of health and healing to survive. You can once again find roaming blue balls rolling around, if you walk into them they will stun you and deal medium damage.
The boss has two arms that you need to focus on first before you even can damage the boss. His right arm has a blade attached to it, make sure to stay out of the AoE range, otherwise you will get a lot of damage. After the arm is broken, a Dwarven Centurion will spawn, kill him as fast as possible.
- Right Arm: Rotary Blades Gauntlet
- Left Arm: Flame Bellows Gauntlet
After both arms are defeated, you can start damaging the boss till he reaches 55% health. From 100% to 55% you will have to be careful, he will now start to rotate and spit fire out of his sides where the arms were. If you get it by the fire you instantly die.
Once you reach 55%, you have to go to one of the green glowing beams and transform into a Skeevaton. Once all four players are downstairs charge up your ultimate in the middle by pressing the first skill. After that you can split up. The blue lines will lead you to a Shock Conveyor that you need to disable with your Ultimate. Once that happened. The difficult thing here is, that there is traps like Fire Blasters and rotating blades that can kill you. So make sure to use your speedbuff and healing ability!
After you deactivated four Shock Conveyors you will get teleported back up, the boss has his arms again! Now same thing happens as before, kill the arms and after that damage the boss. The only thing that is different now is that there will be random rotating blades that circle the room. If you dodgeroll or shield them, you will take no damage but keep in mind they also apply a bleed on you if you do not avoid them.
From 55% to 0% you will have all the mechanics from before, but now the boss will also do steambreaths out of his arms to protect him. The damage basically oneshots, so you want to make sure to not stand on the side anymore, but rather closer to the back, just keep in mind that you do not forget to heal the tank.
Final Boss Hardmode
Boss Health: [HP: 5,927 Mio]
This was the most efficient tactic we could find. Number 1 and 2 all Skeevatons move together and number 3 and 4 we split into two groups. That way when you split into two groups you do not have to go back anymore, so you have less chance of actually ending up dead.
- 1: All 4 together
- 2: All 4 together
- 3: Tank & DD
- 4: Healer & DD

Skeevaton Skills in the Frostvault Dungeon
When you enter the Skeevaton phase, the race will not start as long as you do not charge up ultimate, so you have time to read the skills.
There are three different skeevaton roles. You have the damage dealer, a healer and a tank with a few different skills.
- All Skeevatons have
- Absorb Energy – Spam this at the start to charge up ultimate
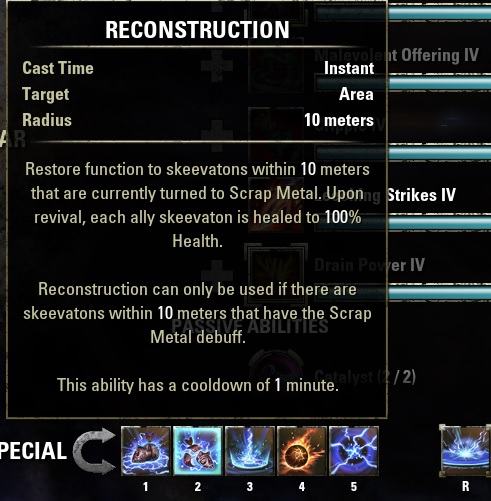
- Reconstruction – Mass resurrection
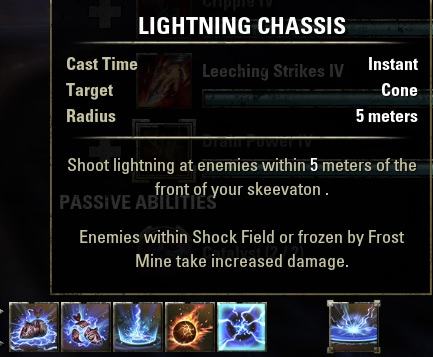
- Lightning Chasis – Conal shock damage, low impact damage
- Damage Dealer
- Frost Mine – Freezes enemies in place
- Volatile Spheres – Deals massive amount of damage and oneshots frozen enemies
- Shock Field Ultimate – Puts a snare on the enemy and increases enemies damage taken
- Healer
- Speedbuff – Gives you a speedbuff for a short duration
- Heal – Heals everyone in a 3 meter radius, the allies need to be close to you when you activate the skill
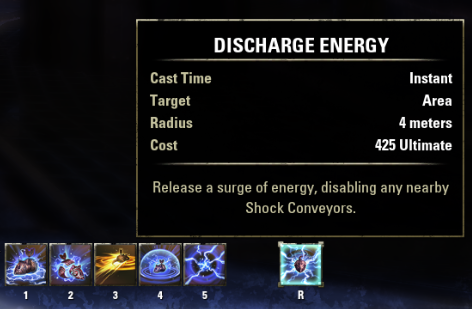
- Discharge Energy Ultimate – Used to kill off the Shock Converyors, oneshots them
- Tank
- Speedbuff – Gives you a speedbuff for a short duration
- Energy Shield – Applies a shield to the whole group to protect from damage
- Discharge Energy Ultimate – Used to kill off the Shock Converyors, oneshots them


Skeevaton Phase Video Guide
ESO Frostvault has a tricky phase where you transform into a Skeevaton, the video showcases how the phase works.
Full Veteran & Hardmode Run
Here you can find our first run through the Frostvault dungeon on the live server with timestamps to all the bosses.
Timestamps for the bosses:
- First Boss Icestalker Troll Boss – 1:33
- Warlord Tzogvin – 3:44
- Vault Protector – 5:40
- Rizzuk Bonechill – 11:07
- Stonekeeper Hardmode – 17:05