


Welcome to the Bloodroot Forge Guide for ESO. This Dungeon is unlocked when you are purchasing the Horns of the Reach DLC, it is located in Craglorn.
Table of Contents
- Trash Monsters
- First Boss – Mathgamain
- Second Boss – Caillaoife
- Third Boss – Stoneheart
- Fourth Boss – Galchobhar
- Fifth Boss – Bullblood Trio
- Final Boss – Earthgore Amalgam
- Update Log
Trash Monsters – Bloodroot Forge Guide ESO
Strangler – Poison AoE Damage

You will find those mobs at the start of the dungeon. I highly recommend always killing them first, because they can place a very strong Poison AoE below you which deals an insane amount of damage. You can just simply move out of it and once the Strangler is dead not more will spawn.
Fire Shalks – Fire Ball
 Fire Shalks will shoot a fire ball towards one of your group members, the group member will get a distinctive fire aura around his Screen so it is easy to catch. You have to run towards a platform in the molten Nirncrux (Which looks like lava but it is not lava). When the fire ball hits the molten Nirncrux it will disappear. If you fail to get rid of the fire ball, it will hit you and deal an insane amount of damage. You can block the damage, be careful as it still deals a ton of damage even when blocked.
Dreadhorn Earthgorer – Mini Vulcan Fire Damage
The Earthgorer smashes his weapon into the ground and a small hole “mini-vulcan” appears. The tank has to make sure to stand on top of it to block the damage. Otherwise the fire balls will hit the other group members and they will most likely die as it deals an insane amount of damage.
Dreadhorn Firehide – Chainroot
After a while, the Firehide will root two groupmembers with chains. The other two groupmembers have to interrupt the Firehide mob. If it is not being interrupted the other two players that are rooted will die. If you interrupt, the two rooted people have to move away from their position, as afterwards a fire AoE will be on the ground which deals an insane amount of damage. So make sure to stay close to this mob and be ready to interrupt it.
First Boss – Mathgamain
The First Boss is pretty simple. The Tank has to make sure to face the boss away from the group. Because he has a really strong conal AoE damage attack that will oneshot group members. The Boss will also spawn a lot of adds, the tank should taunt the big ones. The group has to make sure that they kill stranglers first, if any spawn. Other then that I recommend saving ultimates for when there are 5-6 mobs and then AoE them down and after that kill the boss.
Second Boss – Caillaoife
This boss is already a bit more difficult. At 75%, 50% and 25% the boss will put up a “Forest” that gives her a protection field making her immune to damage. Adds will spawn and they need to be killed, otherwise the Forest will not disappear. It is very important that you move away from her, if you stay too close when the Forest comes up you will get knocked back and some of the adds that spawn might kill you. If you stand far enough away you will not get knocked away. Tank should taunt all the adds and the rest of the group focuses on killing them. Once again make sure to kill Stranglers as soon as they spawn to avoid the strong poison AoE damage.
The Tank also has to make sure to face the boss away from the group, as she has a pretty strong conal AoE damage which will most likely kill you. One Group Member will also get some kind of Icy Aura around him, the boss will then shoot some ice AoE attack at this person, it does not do a lot of damage but roots you and can be quite annoying. You can purge it or just avoid being hit by it.
Third Boss – Stoneheart
The boss has two different fire AoE attacks, which can be easily avoided as one is just static on the ground and the other fire AoE is very small. Other than that make sure to always kill the Stone mobs that he “ressurects”. If they are not killed fast enough you will constantly get AoE damage under you which will kill you eventually. At 25% I recommend just nuking the boss down as he starts spawning a lot of the Stone mobs at once.
Fourth Boss – Galchobhar
Galchobhar is the most difficult boss in Bloodroot Forge. You already encountered most of the mechanics earlier in the dungeon. Fire Shalks will spawn, he will also ressurect Stone mobs from time to time. Make sure to avoid the Fire damage from the Fire Shalks, remember you can get rid of the Fire ball when you hop on one of the stones outside. Make sure to not stand too long on one stone as the platform will disappear after a while.
The Tank has to make sure to plug the Fire holes the boss will open on the ground. Otherwise the damage will kill the group pretty fast. On top of that I recommend placing the boss close to one of the Stone mobs so you can both damage the boss and the add.
The boss will also throw his Weapon into the middle of the room, you have to make sure to jump to one of the platforms outside to not get instantly killed. Only one person should stand on each platform. The more people that stand on the platform, the faster it will disappear.
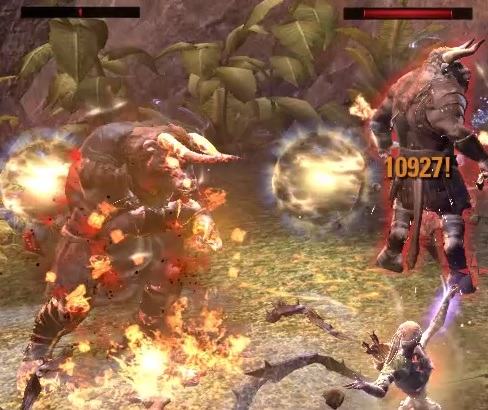
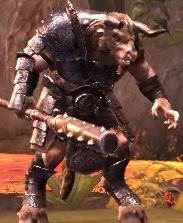
Fifth Boss – Bullblood Trio

This boss is just kind of a mini boss. Make sure to stand next to the boss on the right side of the image. He also roots two group members and the other ones have to make sure to interrupt. Other than that the tank can just tank all 3 bosses close together and you need to avoid some AoE damage. This boss is pretty easy.
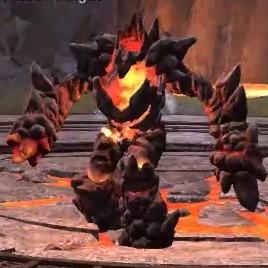
Last Boss – Earthgore Amalgam
Now this boss is a bit tricky due to coordination of movement. I recommend placing the group between the edge of the arena and the boss, because the boss shoots Lava AoE out of him which will start growing once it hits the edge or traveled far enough, so you can make sure to have most of them towards the edge instead of the middle. You can also use the two braziers in non hardmode which make the bossfight easier as you can interrupt the bosses Stonefall AoE attack.
Boss Mechanics
- Stonefall AoE
- The Boss starts channeling and gets a shield which basically makes him immune to damage. Stones start falling down from the roof of the arena. You have to avoid them otherwise you most likely die immediately. I recommend just swapping between two places. Go outside and then back inside again with the two DDs and the healer. Tank has his own position as he still needs to be able to taunt the bosses and keep them away from the group. This way the healer has an easier time to heal the group compared to when people decide to run around like headless chickens.
- Lava AoE
 Make sure that the all the players face against a wall. The boss will shoot Lava towards a person and it will go through them and impact on the wall. If you are spread over the whole map it will randomly place the lava and it can be a problem later on in the fight. The Lava shoots some kind of fire balls that stun you after like 3-4 hits. So it is important that you keep changing positions slightly so you do not get stunned all the time.
 - Boss Copies
- The Boss will spawn two additional copies of him once you inflict enough damage. This is mostly a challenge for the tank as it will make resource management pretty difficult. Once the last copie spawns, make sure to nuke it down as fast as possible, it has the lowest amount of health and should die pretty fast.
- Random Stones AoE
- From time to Time also stones fall down, you barely notice them tho as they are not that common and easy avoidable.
- Braziers
- In Non Hardmode you can active the braziers to gain some advantage. I only recommend doing it if you really have problems with the boss tho. One does stun the boss (fire brazier), which you can do when he starts channeling his Stonefall AoE attack. And the other one removes the Lava Fields (blood brazier).
 Make sure that the all the players face against a wall. The boss will shoot Lava towards a person and it will go through them and impact on the wall. If you are spread over the whole map it will randomly place the lava and it can be a problem later on in the fight. The Lava shoots some kind of fire balls that stun you after like 3-4 hits. So it is important that you keep changing positions slightly so you do not get stunned all the time.
Last Boss – Earthgore Amalgam Hardmode
Hardmode is not really different from the normal bossfight. The Boss has more health and now you can not active the braziers anymore to help you against the boss.