Welcome to the Best BG3 Minthara Build Guide. In this Baldur’s Gate 3 guide, we will explain how to create a powerful Vengeance Paladin build for Minthara. Paladins like Minthara are strong melee combatants who can empower their attacks or aid allies with supplementary spellcasting.
Please visit our Best BG3 Builds overview page for more builds, or our BG3 Paladin Builds category page to see all of our Paladin builds. You might also be interested in our Best BG3 Paladin Build or our BG3 Oathbreaker Paladin Build. If you are interested in builds for the other members of your party, check our BG3 Origin & Companion Builds category page. To get an overview of all classes please visit the BG3 Classes overview page.
Table of Contents for the BG3 Minthara Build:
- Introduction to the Minthara Build
- Setting Up the Minthara Build
- Levelling the BG3 Minthara Build
- Minthara Equipment
- Minthara Build Tips & Extras
Minthara Build Strengths
Minthara Build Weaknesses
BG3 Minthara Paladin Build Overview
In this section, we will introduce the basics of Minthara and her Paladin class in BG3. We will also explain how to recruit Minthara and why you should respec her immediately after adding her to your party.
If you are already familiar with this info, please skip to the next section where we cover the build itself.
Paladin Class Summary
Minthara uses the Paladin class by default, and we will stick to that for our build. Paladins are great melee fighters, and they also have access to healing spells from the start of the game. They can infuse extra damage into their weapon attacks with powerful Smite Spells. Paladins have access to a fair amount of supportive spells, but not as many as Clerics.
Paladin Benefits
These are some of the most important bonuses granted by the Paladin class.
Lay on Hands (Level 1) – Spend your Lay on Hands charges to heal a creature or cure it of diseases. Does not work on constructs or undead.
Divine Smite (Level 2) – Infuse additional
Radiant Damage into your weapon attacks. This damage is increased when targeting Fiends or Undead.
Extra Attack (Level 5) – Each
Action now yields two weapon attacks, rather than one.
Aura of Protection (Level 6) – You and nearby allies gain a bonus to
Saving Throws equal to your Charisma Modifier. The aura disappears if you are unconscious.
Aura of Courage (Level 10) – You and nearby allies cannot be
Frightened. The aura disappears if you are unconscious.
Oath of Vengeance Summary
You have set aside even your own purity to right wrongs and deliver justice to those who have committed the most grievous sins.
The Oath of Vengeance is Minthara’s Paladin subclass. While it is possible to change this, it is a good fit for her, and we felt no need to adjust it.
Oath of Vengeance Benefits
Here are the most important aspects of the Vengeance Paladin subclass:
Inquisitor’s Might (Level 1) – You or an ally’s weapon deals additional
Radiant Damage equal to your Charisma Modifier, and has a chance to
Daze enemies for 1 turn.
Abjure Enemy (Level 3) –
Frighten an enemy, giving them
Disadvantage on Attack Rolls and Ability Checks, and preventing them from moving.
Vow of Enmity (Level 3) – Gain
Advantage on Attack Rolls against an enemy.
Relentless Avenger (Level 7) – When you hit an enemy with an Opportunity Attack, you get an extra 4.5m of Movement Speed on your next turn.
How to Recruit Minthara in BG3
This section explains how to recruit Minthara in Baldur’s Gate 3. This contains plot spoilers for parts of Act I and Act II.
To be able to recruit Minthara in Act II, the player first needs to ensure that Minthara survives Act I. There are two ways to do this:
- The Normal method – This is the method that is typically associated with an “evil” playthrough of BG3, and is the intended way to recruit Minthara.
- Side with Minthara after visiting her at the Shattered Sanctum and help her raid the Druid Grove with the Goblins. Note that this course of action may cause strongly good-aligned characters like Wyll and Karlach to leave your party permanently.
- Minthara will then temporarily join your camp for a celebration and inform you that she’s actually been ordered to kill you, which you’ll need to talk her out of. She’ll then go her own way for the time being.
- In Act II, rescue Minthara from the dungeons of Moonrise Towers (more info below)
- The Knockout method – This method is more compatible with neutral or good playthroughs, as you can still side with the Tieflings in Act I. It’s a lot more complicated, quite cheesy, and you must follow the steps below precisely and in the given order, or else it will not work:
- Rescue Halsin and accept his quest to eliminate the three Absolute leaders. Do not ask Halsin to join your party, as this will make everyone in Shattered Sanctum permanently hostile, rendering the next steps impossible. Just accept the quest and then let him go back to the Grove.
- Speak with Minthara and convince her that you are on her side. Do not speak out against the raid on the Druid Grove.
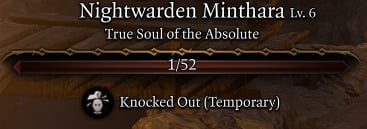
- Toggle on non-lethal attacks, then attack and defeat Minthara. She should have the “Temporarily Hostile” Condition while you’re fighting her. If she doesn’t have this, you did something wrong and should reload and restart the process. After you defeat her, she should be “Knocked Out (Temporary)” with 1 HP.
- Now, eliminate the other two leaders. Do not Long Rest or Fast Travel.
- Finish Halsin’s quest. Do not Long Rest or Fast Travel until the quest is completed.
Once you have completed either of the above two methods, continue the game as normal until reaching Moonrise Towers in Act II.
At Moonrise Towers, you will find Minthara being put on trial for failing the Absolute, and she will be sentenced to “re-education”. Proceed as below:
- Follow the blood trail into the dungeon and into her cell.
- Rescue her by killing her two guards.
- Upon leaving the dungeon with Minthara in tow, the first guard you see will stop you and be suspicious that Minthara is with you instead of in a cell. You’ll need to convince the guard that nothing is amiss, or to turn a blind eye.
- If you fail to convince the guard, you’ll need to fight your way out, ensuring Minthara survives. There are a lot of strong enemies here that you may not be ready to take on yet, so it’s probably best to just run away with as little combat as possible if this happens.
- Escort Minthara out of Moonrise Towers and beyond the bridge. Do not Fast Travel or Long Rest until this is done.
- You can then speak to Minthara and recruit her to your camp. Speak to her again in your camp to recruit her to your party.
How (and Why) to Respec Minthara in BG3
When recruited to your party, Minthara will start off with a sub-optimal Ability and Skill distribution, and I highly recommend fixing this as soon as possible. To do this, you need to respec Minthara. Select Minthara and go and speak to Withers in your camp. Ask “Can you help me change my class” to open the respec menu. This costs 100 gold.
Then proceed with the build guide below, starting at Level 1 and working your way through any level-ups you have done so far in your playthrough.
Setting Up the BG3 Minthara Build
Minthara is not an Origin character and cannot be recruited as a Companion until partway through Act II. Therefore, you’re likely to be at least Level 5 before you can recruit her to the group in Baldur’s Gate 3.
After recruiting her, we strongly recommend doing a respec to correct her starting Abilities, as described above. Select the options in this section in the respec menu, then move onto the levelling up guide below.
Race
Minthara is a Lolth-Sworn Drow.
Drow have the following passive abilities, which are always active:
- Drow Weapon Training – You have Proficiency with Rapiers, Shortswords and Hand Crossbows
- Superior Darkvision – You can see in the dark up to a distance of 24 metres.
- Fey Ancestry – You have Advantage on Saving Throws against being Charmed, and magic can’t put you to Sleep.
- Keen Senses – You gain Proficiency in the Perception skill, helping you to spot hidden details while exploring and sometimes identify signs in an NPC’s behaviour or body language.
- Drow Magic – You gain access to the following spells:
Dancing Lights Cantrip (Level 1) – Create magical light sources to illuminate an area. Requires Concentration.
Faerie Fire (Level 3, once per Long Rest) – Attempt to debuff all characters in an area with Faerie Fire. If successful, all affected targets become visible, and Attack Rolls against them have an
Advantage. Requires Concentration.
Darkness (Level 5, once per Long Rest) – Creates a cloud of magical darkness that heavily obscures and
Blinds those within. Ranged attacks cannot be made into or out of the area. Requires Concentration.
Minthara Paladin Actions
Paladins like Minthara have two types of special class actions.
First is Lay on Hands, a powerful healing action that consumes Lay on Hands Charges when used. When depleted, you must take a Long Rest to replenish the charges. You will sometimes gain additional charges when you Level Up. Lay on Hands can be cast with the following variants:
Lay on Hands: Cure – Imbue your hands with divine power to cure all diseases and poisons affecting a creature. Uses 2 charges.
Lay on Hands: Lesser Healing – Imbue your hands with divine power to heal an ally for (Paladin level x 2). Uses 1 charge.
Lay on Hands: Greater Healing – Imbue your hands with divine power to heal an ally for (Paladin level x4). Uses 2 charges.
Additionally, you gain access to Channel Oath Abilities. The exact Channel Oath abilities available to you will depend on your subclass. For now, we just get 1 Channel Oath Charge, which must be replenished via a Long Rest, but more can be gained from levelling up.
Subclass
The Paladin has to choose its Subclass during Character Creation, from the Class menu. For this build, we’ll be sticking with Minthara’s default Oath of Vengeance subclass.
To begin with, you just get one extra feature from your Oath of Vengeance subclass:
Inquisitor’s Might – You or an ally’s weapon deals additional
Radiant Damage equal to your Charisma Modifier, and has a chance to
Daze enemies for 1 turn. To begin with, this will deal 3 bonus damage (with a Charisma score of 16).
Abilities
We need to attain high Charisma to improve our Spellcasting, and high Strength for our Melee attacks. Constitution is also fairly important – it’s usually advised to have at least 14 points in this to make sure you have a decent amount of HP. Constitution is also taken into account on Concentration Checks (if the effects of an ongoing Concentration Spell will continue after you take damage). While many of our builds recommend putting points in Dexterity to improve your Armour Class, this is not required here since Minthara can wear Heavy Armour.
Go for an Ability Allocation that looks something like this:
Strength – 16
Dexterity – 10
Constitution – 14
Intelligence – 8
Wisdom – 10
Charisma – 16
Bolded Abilities are essential for the build. The others can be tweaked if you want.
Background & Skills
Minthara is locked into the Noble Background, which gives Proficiency with the following two Skills:
History (INT) – This is not a good fit for Minthara, since there is no point in focusing on the Intelligence Skill for a Paladin. But we cannot change it, so it’s better than nothing. Successful history rolls will sometimes provide you with extra lore information or dialogue choices.
Persuasion (CHA) – A much better fit for Minthara, as we’re putting quite a bit of emphasis into Charisma to improve her spellcasting. Persuasion helps you to convince NPCs in dialogue checks that are marked with Persuasion. However if you’re not using Minthara for dialogue then you probably won’t get much of a benefit from this.
As a Drow Paladin, we get to choose two more Skills from a limited selection. Out of the available options, we found the following to be the best:
Athletics (STR) – Being a Strength Skill, Athletics is a perfect fit for Minthara, as we’ll be increasing her Strength as much as possible as we level up. Athletics helps Minthara to push and throw enemies, and resist being pushed by enemies.
Intimidation (CHA) – Similar to Persuasion, mentioned above, except that it focuses on trying to scare NPCs into doing what Minthara wants.
Minthara Build Levelling Guide
Now we will go through the whole levelling process from level 2 to max level 12. If you respec Minthara as advised above, you will then immediately need to progress through several levels, as your party is likely to be around level 5-8 when you recruit her. You can use the levels below as a guide on how to level up Minthara, then return to this guide for subsequent levels as you progress towards the end of the game.
Early-Game Minthara Levelling
We’ll start with the early-game levels, 2-4. You will probably need to progress through all of these immediately after recruiting Minthara.
Level 2 – BG3 Minthara Build
At Level 2, Minthara will get two First Level Spell Slots, allowing her to cast two Spells per Long Rest.
Next, you unlock the Divine Smite Spell, which lets you spend a Spell Slot to infuse your next Melee Weapon Attack with 2-16
Radiant Damage. Fiends and Undead will take an additional 1-8 damage.
You’ll need to select a Fighting Style for Minthara at Level 2. For this build, we’re going to be using two-handed weapons, so we recommend the Great Weapons Fighting Style. This will reroll your damage dice for your weapon whenever they produce a 1 or a 2 (only one reroll is allowed per attack). This makes low rolls much less likely and can significantly improve your damage output with Minthara.
You’ll be able to select a number of Prepared Spells here too. The formula for the exact number is (1 + Charisma Modifier), and this will be recalculated each time you level up. For now, if you have 16 or 17 Charisma you’ll get four Spells.
We recommend choosing the following Spells:
Compelled Duel – Use a divine command to compel an enemy to attack only you. The target gains
Disadvantage on
Attack Rolls against anyone but you. Requires Concentration. This spell is effectively a taunt, allowing your Paladin to act as a tank for your Party. Since you can only have one Concentration effect active at a time, it’s not possible to taunt multiple enemies by casting the spell again on subsequent turns.
Divine Favour – Your prayer empowers you with divine radiance. Your weapons deal an additional 1-4
Radiant Damage. Requires Concentration. This Spell only consumes a
Bonus Action, so you can attack your opponent on the same turn after casting the spell.
Thunderous Smite – Your weapon rings with thunder as you strike, pushing your target 3m away and possibly knocking them
Prone. If the spellcaster misses the initial Attack, the spell slot and Bonus Action are not consumed. You can sometimes use this to knock enemies off ledges or cliffs for extra fall damage, potentially one-shotting them.
Wrathful Smite – Your weapon absorbs your wrath as you strike, possibly
Frightening your target. If the spellcaster misses the initial Attack, the spell slot and Bonus Action are not consumed. Frightened Enemies are unable to move, so this is a great way to lock down a dangerous enemy for a while.
Level 3 – BG3 Minthara Build
At Level 3 you gain the Divine Health passive effect, giving immunity to disease. You also gain another Spell Slot, bringing your total to three.
You’ll gain two new Oath of Vengeance actions for your BG3 Minthara Build:
Abjure Enemy –
Frighten an enemy, giving them
Disadvantage on Attack Rolls and Ability Checks, and preventing them from moving. Very useful for locking down a dangerous or annoying enemy.
Vow of Enmity – Gain
Advantage on Attack Rolls against an enemy. Makes your attacks much more accurate, which is especially useful against enemies with high armour.
You also unlock another two Spells from your subclass. These are:
Bane – Attempt to place the Bane debuff on all targets in the targeted AOE. Applies a 1d4 penalty on Attack Rolls and Saving Throws for the targets. They can resist the debuff with a Charisma Saving Throw.
Hunter’s Mark – Place a mark on the target. The marked creature takes 1d6 extra damage from your attacks. If the target dies before the spell ends, you can reapply it to a new creature without spending another spell slot. This is a strong debuff for dishing out damage, but be wary that it requires Concentration to maintain, so casting another Concentration Spell will immediately remove the effect, and remove your ability to recast it for free.
Level 4 – BG3 Minthara Build
At Level 4, you’ll need to choose a Feat for your Minthara Build. Feats are strong passive features that can be used to enable a specific build, or simply provide additional Ability buffs.
Choose the Ability Improvement Feat, which will give you 2 extra Ability Points to spend. Put both of the points into Strength, which should increase it to 18. This will improve your melee attack rolls. The hit chance of your Smite spells also depends on Attack Rolls, so boosting Strength will improve the vast majority of your attacks.
You’ll also gain an extra Lay on Hands Charge at this level, taking your total amount up to 4.
The formula to determine how many Spells you can Prepare at once is also slightly changed here. It is now (2 + Charisma Modifier). This, combined with the Charisma Ability Improvement above, should unlock two additional Spells. However, we advise that you wait until Level 5 before allocating these, since we’ll unlock more powerful Second Level Spells at that point.
Mid-Game Levelling Guide for BG3 Minthara Build
We will now go through the mid-game levels for the BG3 Minthara Build. You will most likely find yourself partway through this section after recruiting Minthara in Act II and assigning the levels that you’ve already progressed through.
Level 5 Minthara Build for Baldur’s Gate 3 PS5/PC
At Level 5, Minthara becomes considerably more powerful.
First of all, Minthara gains an extra attack, which means that each Action can now be used for two weapon attacks, instead of one. Bonus Actions and Reactions are unchanged.
You gain another First Level Spell Slot, taking your total up to 4, and you also get two Second Level Spell Slots.
As mentioned at Level 4, you should be able to choose two additional Spells now, so we can grab a couple of Second Level Spells right away! We recommend going for the following options:
Aid – Heals the entire party for 5 HP, and also increases their Maximum HP by 5 until the next Long Rest. This is very useful for improving everyone’s survivability, and it’s definitely worth casting this soon after your Long Rest.
- If you have a Cleric in your party, you should leave this spell to them because they can upcast it to a higher level, giving your party more HP. In that case, choose any other spell you like for your Paladin.
Branding Smite – Your weapon gleams with astral radiance as you strike and possibly mark your targets with light, preventing them from turning Invisible. If the spellcaster misses the initial Attack, the spell slot and Bonus Action are not consumed. This is great for keeping tabs on tricky enemies who are likely to start sneaking around.
Minthara also unlocks two new Spells from the Vengeance Paladin subclass at Level 5 (these don’t need to be Prepared like those mentioned above):
Misty Step – Allows you to teleport to a visible and unoccupied space within 18 metres. Great for quickly jumping into melee or for escaping when things start to go badly wrong. Only uses a
Bonus Action, so you can make an attack or cast another spell on the same turn that you use this.
Hold Person – A powerful stun that completely paralyses the target and prevents them from doing anything. They will continue to roll Wisdom Saving Throws to try to break free. Melee attacks against the victim will be guaranteed crits, which means that even the toughest enemies can be defeated in a couple of turns if you manage to cast this on them successfully. The limitation of this spell is that it can only be cast on humanoid targets.
Level 6 – BG3 Minthara Build
At Level 6, you’ll unlock the Aura of Protection. When activated, you and allies within 3 meters of you will have your Charisma Modifier added to their Saving Throws. This helps to protect your team against enemy spells and effects, and will improve the longevity of everyone it applies to. However, the fairly small AOE does make this difficult to use in some situations.
That’s pretty much all you get at Level 6, so there’s not much else to talk about in this section.
Level 7 – BG3 Minthara Build
At Level 7, Minthara gains the following features:
- Another Second Level Spell Slot, bringing her total to three.
Relentless Avenger – If you hit an enemy with an Opportunity Attack, you’ll get 4.5 metres of extra Movement Speed on your next turn.
Level 8 – BG3 Minthara Build
At this Level, you’ll need to choose another Feat for Minthara. We recommend choosing Ability Improvement again, and once again putting both of the points into Strength, increasing it to 20.
This will further improve your Attack Rolls, making your melee attacks more accurate.
Late-Game Levelling Guide for the BG3 Minthara Build
We’ll now finish the Levelling Guide by covering the late-game levels, 9-12.
Level 9 – BG3 Minthara Build
At Level 9 Minthara will unlock third level Spells, and receive two third level Spell Slots so she can begin casting them.
The following spells are great options to pick up here:
Revivify – Allows you to resurrect a fallen ally, without needing to use a revivification scroll.
Blinding Smite – Deals a hefty chunk of
Radiant Damage to the target, and possibly
Blinds them.
Warden of Vitality – While this aura lasts, you can cast Restore Vitality as a bonus action to heal yourself or nearby allies. This is especially good as it doesn’t require Concentration and lets you heal your team with a
Bonus Action, allowing you to continue making attacks and concentrating on another spell.
You’ll also unlock two spells from your subclass. Once again, these spells do not need to be prepared:
Haste – Give yourself or an ally the
Hasted buff, which doubles their Movement Speed, gives a bonus to
Armour Class,
Advantage on Dexterity Saving Throws, and gives them an extra
Action each turn. This is a pretty overpowered buff, and should ideally be cast on your strongest damage dealer, whether that is Minthara or someone else. Beware that when the effect ends, the hasted creature becomes
Lethargic, preventing them from doing anything on their next turn.
Protection from Energy – Give yourself or an adjacent creature a 50% Resistance to either
Acid,
Cold,
Fire,
Lightning or
Thunder damage. This is quite a situational spell, but it might come in useful in fights that mostly or solely feature one elemental damage type.
The Haste buff is really strong – while it’s also possible to get the same buff from Potions of Speed, by using the spell it is readily available and it can also last for twice as long when using the spell version (10 turns for the spell, 5 for the potion). Be careful when using Minthara to cast Haste, however. If the Concentration is broken due to taking damage, the spell will immediately end and cause the Lethargic condition. Therefore you may want to ensure Minthara is in a relatively safe position before using this spell.
Level 10 – BG3 Minthara Build
At Level 10, you’ll earn the Aura of Courage for your Minthara Build in BG3. This is another aura spell, this time allowing you to give you and your allies immunity to becoming
Frightened. The aura disappears if you fall Unconscious.
You will also get another Lay on Hands Charge at level 10, alongside the usual HP increase.
Level 11 – BG3 Minthara Build
At this Level, you gain Improved Divine Smite, a nice buff to the Divine Smite feature we unlocked way back at Level 2. This basically adds another damage die to your Divine Smite, meaning it can now do 3-24 damage per hit.
You’ll also earn an extra Third Level Spell Slot, taking your total up to three. And like always, your HP also increases.
Level 12 – BG3 Minthara Build
You have now reached the maximum level for your BG3 Minthara Build! At Level 12, it’s time to select one final Feat for your character. If you didn’t already, we recommend choosing the Savage Attacker Feat now, which will allow you to roll two damage dice on your weapon attacks, choosing the highest one for your damage value.
If you already have Savage Attacker, you can instead get the Tough Feat, which will increase your HP by 24.
Important: End-Game Respec
In Act III, you’ll have an opportunity to obtain an item called Gauntlets of Hill Giant Strength. We strongly recommend picking this item up and equipping it on Minthara. You can find out more about how to obtain the item in the Late Game Equipment section below.
When equipped, these Gauntlets will set Minthara’s Strength rating to 23, which is more than anything we’ve been able to do with the Ability Improvements mentioned above. When you’ve achieved this, you should visit Withers in your camp and respec Minthara again. Do everything the same as before, except change the Ability Improvements to boost your Charisma instead of your Strength. This allows you to have 23 Strength and 20 Charisma, enjoying improved melee prowess and better spellcasting at the same time.
Another option is to increase your Constitution to 18 for more HP and better resistance during Concentration Checks.
BG3 Minthara Build Equipment
We will now list the best equipment for the Minthara Build in BG3. In most of our builds, we include both an early-game and late-game section for the equipment, but since Minthara cannot be recruited until around halfway through the game, we’ll skip the early-game equipment this time.
| Slot | Icon | Item | Effects | Location |
|---|---|---|---|---|
| Head |  |
Helm of Balduran |
|
Defeat Ansur the dragon below Wyrm’s Crossing. See below for more details. |
| Cloak |  |
Cloak of Protection |
|
Purchased from Quartermaster Talli in Last Light Inn |
| Chest |  |
Adamantine Splint Armour |
|
Must be crafted at the Adamantine Forge. |
| Gloves |  |
Gauntlets of Hill Giant Strength |
|
Taken from a pedestal in the archive of the House of Hope. |
| Boots |  |
Helldusk Boots |
|
Found in Gortash’s personal chest at the top of Wyrm’s Rock Fortress |
| Necklace | Unflinching Protector Amulet |
|
Worn by Ptaris in the Lodge – Basement Docks. You must have given the Githyanki Egg to Esther in Act I | |
| Ring 1 |  |
Ring of Regeneration |
|
Sold by either Rolan or Lorroakan’s Projection in Sorcerous Sundries |
| Ring 2 |  |
Ring of Free Action |
|
Purchased from Araj Oblodra in Moonrise Towers. |
| Main Weapon |  |
Balduran’s Giantslayer |
|
Looted from Ansur in the Dragon’s Sanctum |
| Second Weapon | Any Ranged Weapon |
|
N/A |
Now, let’s see where you can get the endgame gear for your Minthara Build in Baldur’s Gate 3:
Helm of Balduran
The Helm of Balduran is a legendary item that is one of the most powerful items in Baldur’s Gate 3. It gives you the following perks:
- Critical Strike Immunity: Attackers can’t land Critical Hits on the wearer.
- Balduran’s Vitality: The helmet heals you 2 Hit Points at the beginning of every turn.
- Balduran’s Favour: You have a +1 bonus to Armour Class and Saving Throws.
- Stun Immunity: You cannot be Stunned.
You can get the Helm of Balduran by defeating Ansur in the Dragon’s Sanctum. You get there by going through the secret passage in the Wyrm’s Rock Prison. You open the secret passage by turning off the two torches. You get into the prison either through a crack in the wall or through the main building of Wyrm’s Rock Fortress. To get into the Dragon’s Sanctum you have to solve some puzzles in the Wyrmway first.
You can also read our in-depth guide on How to get the Helm of Balduran in BG3 to get a detailed walkthrough.
Note: Another good option would be the Grymskull Helm. The helmet is dropped by the boss Grym in the Adamantine Forge. You can also simply keep using the Helmet of Smiting.
Cloak of Protection
The Cloak of Protection is one of the few cloaks in BG3 that you can get right at the start of Act 2. This item can be purchased by Quartermaster Talli in Last Light Inn, it doesn’t cost that much either so it is a good pick. The cloak gives you extra +1 Armour Class and +1 Saving Throw.
You can also read our in-depth guide on How to get the Cloak of Protection in BG3 which explains everything in detail.
Adamantine Splint Armour
The Adamantine Splint Armor can be obtained in Act I, so you’ll need to get it some way before you can even recruit Minthara, then hold onto it in the meantime. Despite it being an Act I armour piece, it is one of the strongest pieces of armour in BG3.
It comes with an Armour Class of 18, reduces all incoming damage by 2 and completely prevents attackers from landing Critical Hits on Minthara. This is ideal for helping a melee-focused character like Minthara to stay alive and in good condition.
The Adamantine Splint Armour must be crafted at the Adamantine Forge by combining Mithral Ore with the Splint Mould at the forge.
Gauntlets of Hill Giant Strength
The Gauntlets of Hill Giant Strength are very rare gloves that boost your Strength up to 23, which is very high. This will considerably improve your weapon damage and accuracy with melee weapons. They are located in the House of Hope in the Archive alongside the Amulet of Greater Health and the Orphic Hammer.
To get to the House of Hope you need to successfully perform the ritual to open the portal upstairs in the Devil’s Fee house in the lower city. Be prepared, tough fights ahead!
Helldusk Boots
The Helldusk Boots are very rare boots that you can acquire in Act 3. You cannot be forcibly moved by a foe’s spells or actions, and you ignore the effects of Difficult Terrain. And even more important, you get the Hellcrawler action. Think of this as a secondary Misty Step, now you can teleport up to 18m and deal fire AoE damage. This will once again improve our mobility by a huge amount.
The Helldusk Boots can be found in Lord Enver Gortash’s personal chest at the upper levels of Wyrm’s Rock Fortress. The upper levels can be reached through the gate at the main floor. Best to bring some Invisibility potions to pull this off without alarming everyone in the fortress.
Unflinching Protector Amulet
The Unflinching Protector Amulet allows you to use your Reaction to force an attack against a nearby ally to miss. You can do this once per Short Rest.
To get this amulet, you need to defeat Ptaris in The Lodge – Basement Docks in Act III. Ptaris will only be there if you gave the Githyanki Egg to Lady Esther near Rosymorn Monastery at the end of Act I. If you missed out, you can replace this with pretty much any other amulet that makes sense.
Ring of Regeneration
The Ring of Regeneration lets you restore 1-4 Hit Points at the beginning of your turn. This helps you to stay alive and healthy throughout combat. If you feel like Minthara fares fine without it, you can give the ring to someone else and give her something else.
The Ring of Regeneration is sold by either Rolan or Lorroakan’s Projection in Sorcerous Sundries. If Lorroakan has been killed, the ring can instead be found in Rolan’s inventory in Ramazith’s Tower.
Ring of Free Action
The Ring of Free Action is useful for any character, but it’s especially good on a melee character like Minthara who needs to stay mobile. It prevents you from being slowed down by Difficult Terrain such as mud, grease or ice, and also makes you immune to being paralysed or restrained by spells. Note that the immunity to Difficult Terrain does not make you immune to other effects associated with the terrain type, such as slipping on ice or taking damage when walking over spikes.
The Ring of Free Action can be purchased from Araj Oblodra in Moonrise Towers.
Balduran’s Giantslayer
A legendary Greatsword, Balduran’s Giantslayer is one of the most powerful melee weapons available in Baldur’s Gate 3. It comes with a +3 enchantment, meaning your Attack and Damage Rolls will have a +3 bonus applied to them. When the sword hits a foe, the damage bonus from your Strength Modifier is doubled – this is an especially good combo with the Gauntlets of Hill Giant Strength, since your Strength Modifier is +6 with those gloves, meaning you’ll gain an additional +6 bonus damage when combining them with this weapon.
The sword also gives you the power to grow to a giant size for 10 turns, gaining Advantage on all Strength checks (including Saves), a considerable 27 Temporary HP, and 1d6 bonus damage on attacks. You can use it again after every Short and Long Rest.
Balduran’s Giantslayer is looted from Ansur the Dragon in the Wyrmway. This is the same location as the Helm of Balduran, mentioned above.
Minthara Build Extra Info
Here is some additional info that will help you to get the most out of this Minthara build in Baldur’s Gate 3.
BG3 Minthara Build Tips & Tricks
Since we have a few different Concentration Spells with this build, it’s important to stay mindful of which ones require Concentration and which ones don’t. Remember that casting a Concentration Spell will immediately end the effects of your previous Concentration Spell, if they were not already broken.
On a similar topic, taking damage while Concentrating on a spell will always subject you to a Concentration Check, and failing the Check will end the spell. It’s good to be mindful of this when you have a lot of enemies nearby – it might not be a good idea to cast a Concentration Spell with the intention of keeping it active for a long time, if you’re currently dealing with multiple melee assailants.
Minthara is best used as a melee heavy-hitter most of the time, using her spell slots on Smite Spells allows her to deal extra damage to enemies. However, her ability to buff and heal allies and debuff enemies supplements her attacking prowess nicely, allowing Minthara to form the backbone of your party.
BG3 Minthara Best Party Composition
Minthara has a Lawful Evil moral alignment at the start of the game. While you can use any party composition with Minthara, you’ll have an easier time with characters who match up with her alignment. This leaves the following four options as the most obvious choices:
Astarion (Neutral Evil) – With a fairly similar alignment, Minthara and Astarion will get along fine in most cases.
Lae’zel (Lawful Evil) – While Lae’zel comes from a very different background to Minthara, the two have quite a lot in common and share the same lawful evil outlook, favouring a hierarchy where the weak are lesser beings who ought to bow before their betters.
The Dark Urge (Chaotic Evil) – The Dark Urge is only available if chosen as your origin character at the start of the game. Unlike other Origins, Dark Urge is fully customisable. Minthara isn’t exactly fazed by the Dark Urge’s violent tendencies, and she can find common ground with this origin later in the story depending on your choices (no spoilers, though).
Shadowheart (Neutral Evil or True Neutral) – Shadowheart starts the game with quite a neutral alignment, and as a result, she can get along with just about anyone. Regardless of whether you choose her good or evil path, you shouldn’t have any issues keeping both characters content.
Overpowered Potions for Minthara in BG3
In this section, we will talk about the best Potions and Elixirs that make Minthara even stronger.
Potions are consumables that generally last for a few turns and provide powerful but short-lived bonuses. You can have several Potions active at a time.
Elixirs, on the other hand, give the drinker an effect that lasts until the next Long Rest. Each character can only have one active Elixir at a time – drinking another Elixir will replace the effects of the previous one. Fully utilizing alchemy so that your characters use suitable Potions and Elixirs in tandem is a vital aspect of combat in BG3, especially if you are playing on Tactician or Honour difficulty.
Potion of Speed
The Potion of Speed is arguably the most powerful potion in Baldur’s Gate 3. It doubles your Movement Speed and gives you an
extra Action each turn.
One drawback of this potion is that when it expires, your character will be Lethargic for one turn, unable to move or take any
Actions. So you should be careful not to have your character stranded in a dangerous position when the potion runs out!
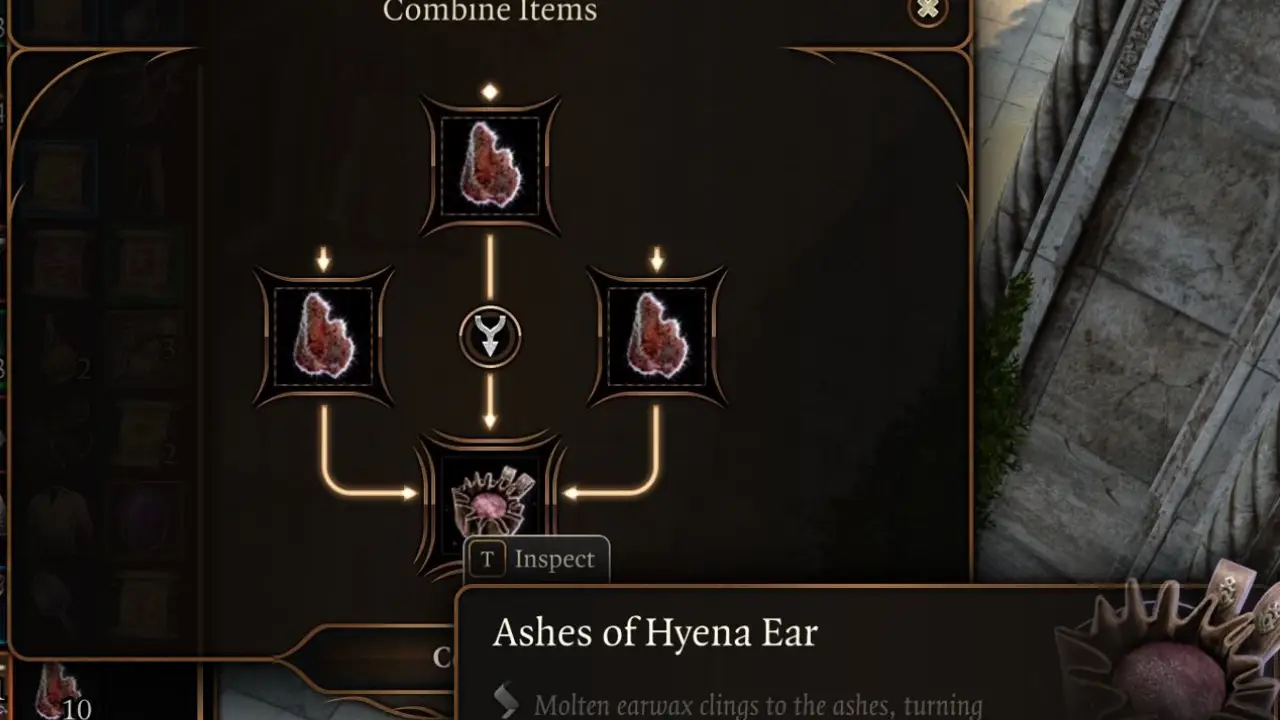
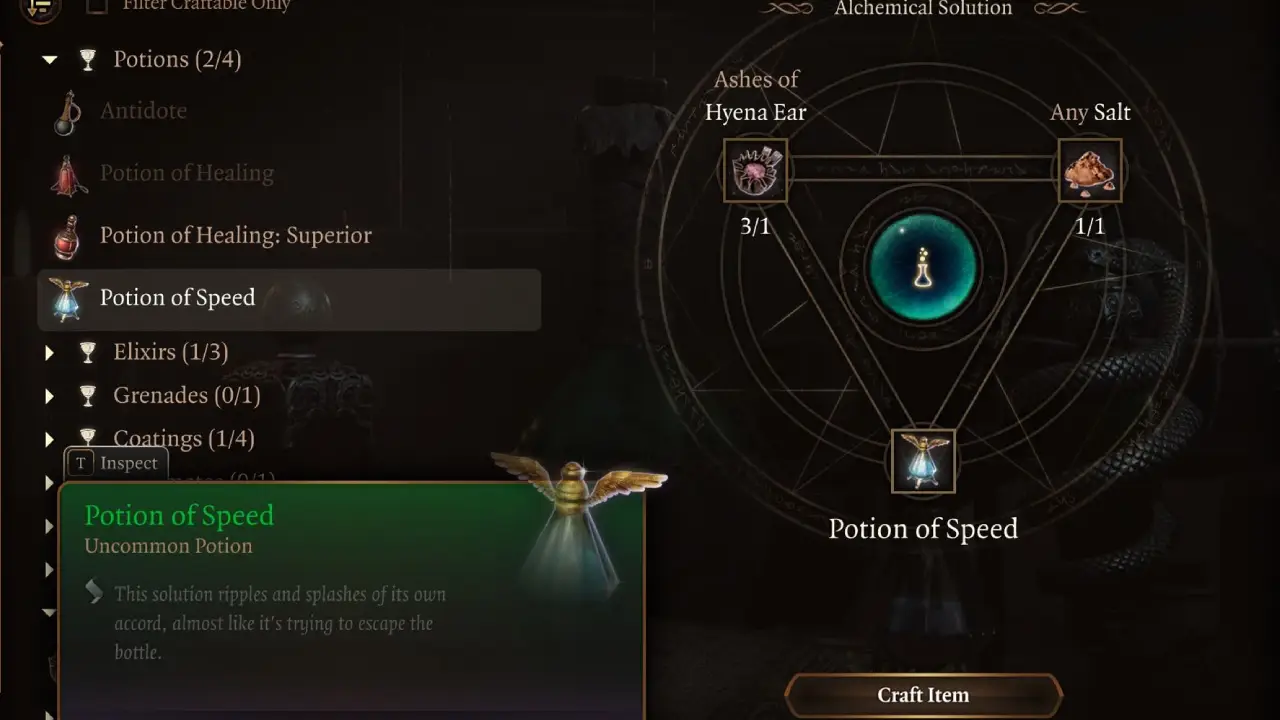
You can craft the Potion of Speed in the alchemy menu by combining Ashes of Hyena Ear with any Salt. Create ashes, salts and other alchemy concentrates by combining three of the same ingredients together – for example, combining three
Hyena Ears will create
Ashes of Hyena Ear.
Hyena Ears can normally be looted from either Hyenas or Gnolls – you can find a lot of them around the Risen Road in Act I, for a good supply of them, which should last you a while.
Elixir of Bloodlust
You can combine the speed potion with the Elixir of Bloodlust. Elixirs and Potions can be stacked with each other, but you can only have one Elixir active at a time. Potions tend to expire after a few turns, whereas Elixirs last until your next Long Rest, unless you drink a different Elixir in the meantime.
The Elixir of Bloodlust grants your character another
Action when you kill an enemy. This effect can only trigger once per turn. Combined with the
Potion of Speed, this gives you two additional attacks if you defeat an enemy on your turn.
It can be crafted by combining Ashes of Worg Fang with any Salt.
Worg Fangs are looted from Worgs, the beasts usually kept by Goblins.
This is an OP alchemy combo that you can use to turbocharge Minthara’s mobility and damage output in tough fights!
Minthara Build Illithid Powers (optional)
Illithid Powers are unlocked later in BG3 when you learn more about Mind Flayers and Tadpoles. By eating Jars of Mind Flayer Parasites you gain one point. This is another optional skill tree that you can get access to if you want. Here are some of the best Illithid Powers for the BG3 Minthara Build:
Mind Blast: A conal blast of
Psychic Damage that can also stun several targets at once. If you are outnumbered by several advancing enemies, then Mind Blast can help to swing things back in your favour.
Cull the Weak: When you reduce a creature’s hit points below a certain threshold, this power instantly kills it and deals 1-4
Psychic Damage to nearby enemies. This is particularly effective when engaging groups of weaker foes, enabling you to thin their numbers rapidly.
Fly: This can be used to reach hard to get to places or change positions in combat.
Mind Sanctuary: This creates an area that allows all within to use
Actions and
Bonus Actions interchangeably. This typically means you can deal more damage, since you can use your Bonus Action as a normal Action. However, enemies who are inside the area will also enjoy its benefits. Be careful with your placement so that your party gets buffed by the Mind Sanctuary and not the enemies!
Psionic Backlash: This is a top-tier
Reaction from the Illithid Powers skill tree in BG3. It allows you to deal
Psychic Damage when a nearby enemy casts a spell. This is especially useful if the target is casting a Concentration Spell. The damage from Psionic Backlash can immediately break their Concentration, ending the spell’s effects.


