


Welcome to the Ultimate BG3 Jaheira Build guide for Baldur’s Gate 3.
For this Jaheira build we’ll be using the Circle of the Land Druid subclass, which is themed around magical prowess and is one of the best spellcasting classes in the game – they can manipulate the powers of nature to hinder enemies with AOE damage, debuffs and crowd control, while buffing and healing your allies.
Please visit our Best BG3 Builds overview page for more builds, or check out our Best BG3 Druid Build with the Circle of the Moon subclass. If you are interested in builds for the other members of your party, check our BG3 Origin & Companion Builds category page.
Table of Contents for the BG3 Jaheira Build:
- Introduction to the Jaheira Build
- Jaheira Build Character Creation
- Jaheira Levelling Progression
- Jaheira Equipment
- Jaheira Build Extra Info
BG3 Jaheira Build Overview
Here is a quick overview of the Druid Class and the Circle of the Land subclass, which we’ll be using for this Jaheira build. We’ll also explain how to recruit Jaheira, and how to respec her ability scores (strongly recommended). If you’re already familiar with this info, you may want to skip this section.
Druid Class Summary
These are the most important aspects of the Druid Class in Baldur’s Gate 3:
 Wild Shape (Level 2) – You can use a Wild Shape Charge to transform into a beast. When your beast form reaches 0 HP, you return to human form with the HP you had before you transformed. As you level up, you’ll unlock more Wild Shapes. Some Wild Shapes are unique to specific Druid subclasses.
- Wild Shape Improvement (Levels 4, 8 and 12) – Wild Shape Attack Damage is increased.
- Wild Strike (Level 5) – You can attack twice per Action while in Wild Shape form.
- Improved Wild Strike (Level 10) – You can attack three times per Action in Wild Shape form.
In addition to these class features, the Druid gains access to a fairly wide range of spells, with a high portion of Concentration Spells. They are particularly good at channelling AoE damage, buffs and debuffs. They also possess several healing spells. This combination of features makes the Druid quite versatile. On the other hand, the Druid can be tricky to play because you cannot cast spells while in animal form, and you don’t have many non-Concentration Spells or strong Cantrips.
Circle of the Land Subclass Summary
Now, let’s look at the most important features of the Circle of the Land subclass:
- Natural Recovery (Level 2) – Replenish expended Spell Slots. Limited by your Natural Recovery Charges. Only works outside of combat.
- Circles (Levels 3, 5, 7, 9) – As you level up, you can choose Circles of the Land and gain additional spells associated with them. Some of these spells are otherwise unavailable to Druids.
- Land’s Stride (Level 6) – Difficult Terrain no longer slows you down. You gain
 Advantage on Saving Throws against plant-based surfaces, and plant-based surface hazards such as thorns will no longer damage you.
 - Nature’s Ward (Level 10) – Elementals and fey cannot Charm or Frighten you. Disease and Poison no longer affect you.
How to unlock Jaheira in BG3
First, let’s take a look at how to unlock BG3 Jaheira Companion. You can only recruit Jaheira after you reach Act 2 of Baldur’s Gate 3. And from there it will still take almost to the end of Act 2 until you can recruit her to your party. Here are the steps it takes to recruit Jaheira in BG3:
- Head to the Shadow-Cursed Lands (Act 2)
- Talk to Jaheira at the Last Light Inn
- Infiltrate the Moonrise Towers
- Get Inside the Gauntlet of Shar
- Free the Nightsong in Shadowfell
- Attack the Moonrise Towers with Jaheira
- Defeat Kethric Thorm and Recruit Jaheira
Once you have defeated Kethric Thorm and Jaheira is still alive she will join your party.
How (and Why) to Respec Jaheira in BG3
When recruited to your party, Jaheira starts with a sub-optimal Ability and Skill distribution, and I highly recommend fixing this as soon as possible. To do this, you need to respec Jaheira. Select her and go and speak to Withers in your camp. Ask “Can you help me change my class” to open the respec menu. This costs 100 gold.
Then proceed with the build guide below, starting at Level 1 and working your way through any level-ups you have done so far in your playthrough.
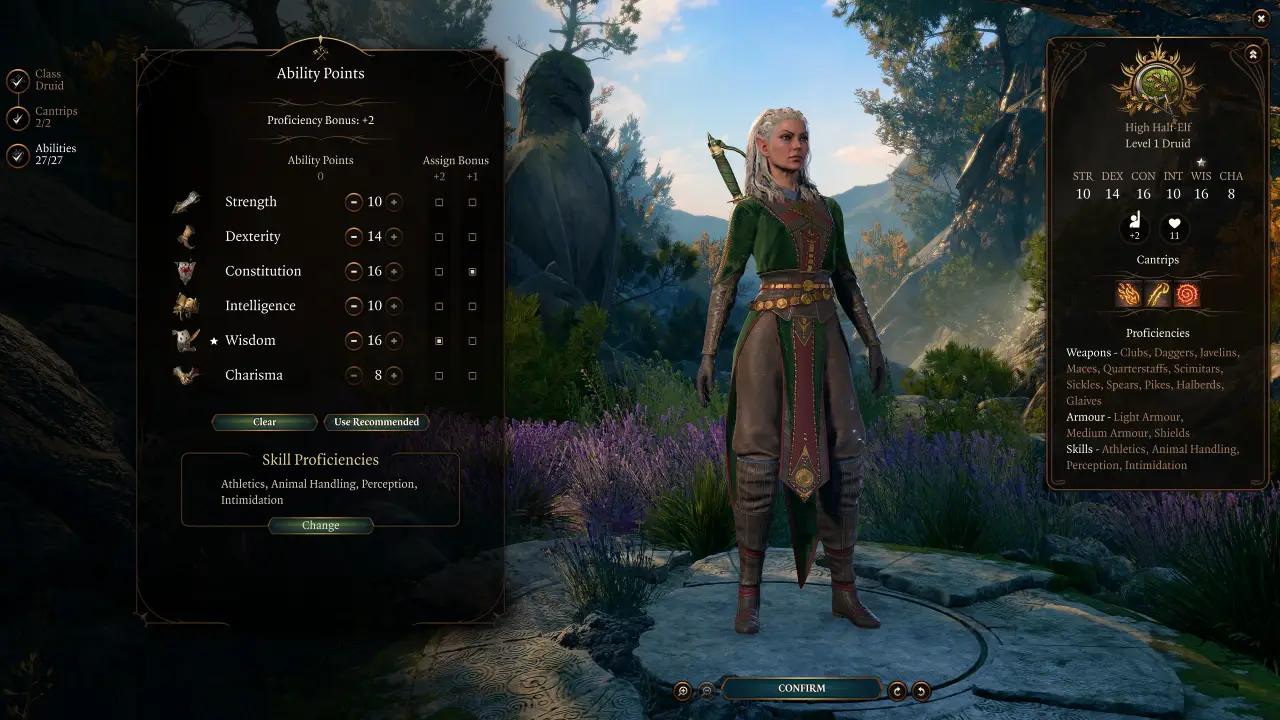
Starting Abilities for the BG3 Jaheira Build
In this section, we will explain the ideal starting attributes for Jaheira in BG3. You cannot recruit Jaheira until the end of Act II. After recruiting her, we strongly recommend doing an immediate respec (see above) to fix her starting Ability Distribution.
Race
Jaheira is a High Half-Elf. This race gives the following benefits:
- Civil Militia – Proficiency with Spears, Pikes, Halberds, Glaives, Light Armour, and Shields.
- Darkvision – Passively see in the dark up to a distance of 12 metres, negating any combat penalties that would otherwise apply.
- Fey Ancestry – You have Advantage on Saving Throws against being Charmed, and magic cannot put you to sleep.
- Extra Cantrip – High Elves can choose one Cantrip from the Wizard list to learn, regardless of class. We recommend using Fire Bolt, as this provides you with the strongest damage potential from your Cantrip.
Cantrips
You can choose two Cantrips to start the game with. We recommend the following options:
- Thorn Whip – Does a modest amount of Piercing Damage, but its most useful application is its ability to control the position of enemies on the battlefield. If an enemy is entrenched in a strong position and giving you a hard time, you can use Thorn Whip to pull them towards you. This is especially useful against enemies who have an elevation advantage over you. Thorn Whip can pull them down to your level. Depending on how high they are, they may receive additional falling damage.
- Poison Spray – A short-range Cantrip that deals a decent amount of Poison Damage to the target.
Note that the number of Prepared Spells we can have depends on our Character Level and our Wisdom. Each character Level will give another slot, and increasing our Wisdom skill further will also add to this.
Spells
You also need to select four Prepared Spells to begin the game with. On the Druid, your spells need to be prepared before you can use them. We recommend choosing the following four spells:
- Speak with Animals – You can speak with animals, potentially uncovering additional information and quest paths. This will not consume a Spell Slot when cast outside of combat.
- Thunderwave – Thunderwave produces a large directional wave originating from your character, knocking back all characters and objects in its path. It also deals some Thunder Damage. Not only is this a decent AOE damage spell, it’s also great for creating space, and you can knock enemies off ledges or cliffs, subjecting them to additional fall damage or even an immediate demise.
- Faerie Fire – Faerie Fire is an AOE debuff spell, placing an effect on characters in the area that improves Attack Rolls against them. It requires Concentration to maintain the spell, but you’re generally going to have considerably better results from attack rolls as long as you can maintain this on your targets. Just be careful not to place it on your allies by accident. This also prevents targets from being Invisible.
- Healing Word – Healing Word is a nice healing spell that can be used at long range. At first glance, you might think that Cure Wounds is better, due to its higher potential healing roll. However, this is a mistake. Cure Wounds can only be cast at Melee Range, which gives it a major disadvantage versus Healing Word, and Healing Word is also a Bonus Action, meaning you can still attack or cast another cantrip or spell on the same turn.
Note that the number of Prepared Spells we can have depends on our Character Level and our Wisdom. Each character Level will give another slot, and increasing our Wisdom skill further will also add to this.
Background & Skills
Jaheira is locked into the Soldier Background. It cannot be changed even when you respec. This gives you the following Skill Proficiencies:
- Athletics (STR) – Helps Jaheira to push around other characters, and resist being pushed herself. This isn’t an ideal pick for us because we won’t be focusing much on Strength, but we are stuck with it, so it’s better than nothing.
- Intimidation (CHA) – Also not an ideal choice because we won’t be focusing much on Charisma either. Unfortunately, Jaheira’s Background just isn’t ideal for most Druid builds, but it’s not too much of a problem.
While Jaheira’s Background Skills are not ideal, we can make two picks of our own. We recommend choosing any of the Wisdom-based skills. We went with the following:
 Animal Handling (WIS) – A good fit for a Druid. Animal Handling helps you to tame or calm animals in various situations. If you’re not using Jaheira for any dialogue encounters, you could change this to another skill like Survival.
- Perception (WIS) – Helps Jaheira to identify hidden details in the world, and in the behaviour of other characters. This can sometimes reveal hidden paths or unlock special dialogue options.

Abilities
For Jaheira, Wisdom is the most important ability, followed by Constitution and Dexterity. Wisdom is used to determine how effective your spells are. Dexterity adds a bonus to your Armour Class, and Constitution increases your HP and makes it easier to succeed Concentration Saving Throws (continuing the effects of an ongoing Concentration spell after you take damage).
Therefore, we recommend an ability distribution that looks like this:
- 10 Strength
- 14 Dexterity
- 16 Constitution
- 10 Intelligence
- 16 Wisdom
- 8 Charisma
Concentration
The concentration mechanic is important for any spellcaster to understand. Many spells that leave a lingering effect on an enemy or an area require Concentration to maintain. You can see if a spell requires Concentration on its tooltip.
This means that whenever the caster takes damage, they must roll a Concentration Check. Failing the check will break Concentration and put an end to any ongoing Concentration spells that they were maintaining. Having a higher Constitution score improves your chances of passing Concentration Checks.
You can only have one Concentration spell active at a time (per character). Casting another Concentration Spell will replace the ongoing effects of the previous one. Stay mindful of this, and ensure you check the tooltip of a spell before you cast it.
Jaheira Levelling Guide
We will now walk you through the full levelling up process for our BG3 Jaheira Build.
Early-Game Levelling for the BG3 Jaheira Build
We’ll start by walking you through levels 2-4.
Level 2
For this Jaheira build, we’ll be using the Circle of the Land subclass.
From this level onwards, you can use your Wild Shape charges to transform into a Badger, Cat, Spider or Wolf.
Meanwhile, your Circle of Land subclass will initially grant you the following benefits:
- Choose an additional Cantrip. If no one else in your party has Guidance, then that is a very important cantrip to have available, particularly for improving your chances in various out-of-combat checks. However, if Guidance is already covered, go with the Resistance cantrip instead.
- Natural Recovery – Activate once per Long Rest to recover a spell slot. The Spell Slot level that can be replenished with this action is equal to half of your Druid level, rounded up.
Finally, you can choose one more spell at this level. I recommend the ![]() Ice Knife spell, which gives the build some much-needed burst damage, with some modest AOE potential too.
Ice Knife spell, which gives the build some much-needed burst damage, with some modest AOE potential too.
Level 3
At Level 3, you gain access to second-level spells – more powerful forms of magic for Jaheira.
You can choose a Land type to derive some spells from. The strongest option here is Arctic, which gives you:
- Spike Growth – Create a large AOE of deadly spikes. The spikes slow down and deal Piercing Damage to anyone trying to move through them. This is an excellent area denial spell and enemies often don’t know what to do about it. Sometimes they will find a long route around the spikes, or sometimes they will just try to walk through them, often dying in the process. This spell is ideal for creating chokepoints and can make some fights much easier.
- Hold Person – A strong single-target stun that completely paralyses the target unless they perform a Saving Throw. Held targets cannot move, take any actions or do anything besides roll a new Saving Throw attempt each turn. All melee attacks against them are guaranteed crits. If you have a good melee hitter like a Barbarian in your group, then a successful Hold Person cast is often a death sentence for the target.
You can choose one other spell from the Druid spell list to prepare, too. I recommend getting ![]() Moonbeam, which is a small
Moonbeam, which is a small ![]() Radiant Damage AOE that remains in place and damages anyone who touches it. As long as you maintain Concentration, you can move the beam each turn.
Radiant Damage AOE that remains in place and damages anyone who touches it. As long as you maintain Concentration, you can move the beam each turn.
Level 4 – BG3 Jaheira Build
At Level 4, you can choose a Feat for Jaheira, enhancing her abilities. We recommend choosing Ability Improvement, which unlocks 2 additional Ability Points. Put both points into Wisdom to improve your Spellcasting.
You can choose another Cantrip at this level. If you didn’t already get the ![]() Resistance Cantrip, grab that one here. Otherwise, just get whatever you like the most from the remaining options.
Resistance Cantrip, grab that one here. Otherwise, just get whatever you like the most from the remaining options.
Finally, you can select one additional spell from the Druid list to prepare. I recommend removing Faerie Fire and adding both of the following Spells to your prepared slots:
- Enhance Ability – Grant yourself or an ally Advantage on all checks using the chosen Ability. Lasts until Long Rest or until Concentration is broken. When applicable, you can activate this in out-of-combat dice rolls in the same way as the Guidance cantrip. This is a really handy spell to have available.
- Heat Metal – Targets an enemy with a metal weapon or armour. Deals fire damage and forces the enemy to either drop the item or receive
 Disadvantage on Attack Rolls and Ability Checks. This is a strong dual-purpose spell that can debuff or disarm an opponent while also dealing damage. The spell requires Concentration, and you can trigger the damage again each turn as long as you retain Concentration.
Mid-Game BG3 Jaheira Build Levelling Guide
We’ll now go through the mid-game levels, 5-8.
Level 5 – BG3 Jaheira Build
At Level 5, you gain the ![]() Wild Strike passive, which gives you an extra attack per Action when in a Wild Shape form..
Wild Strike passive, which gives you an extra attack per Action when in a Wild Shape form..
Your damaging Cantrips will gain an extra damage die at this level – they will now deal twice as much damage.
Circle of the Land Druids can choose another Land type to gain spells from. I recommend choosing Grassland this time, which gives you:
- Daylight – Infuse an object with (or create a static orb of) daylight, which can dispel most forms of darkness. This is very useful in the early parts of Act II when you may lack a proper method to deal with the Shadow Curse – however be warned that it is not sufficient to dispel the shadows in the darkest areas of Act II.
- Haste – Hasten yourself or an ally for up to 10 turns, improving their Armour Class, Movement Speed, granting an extra Action each turn and giving Advantage on Dexterity Saves. Requires Concentration. When the condition ends, the target becomes Lethargic for 1 turn, preventing them from moving or taking actions. This is the same buff that you get from a Potion of Speed, however it can last for much longer with the Haste spell. I recommend casting this on your most powerful melee damage dealer, someone like a Fighter or Barbarian. Just remember that you can only have one Concentration spell active at a time (per spellcaster).
In addition, you can choose one more Druid spell to prepare – you now have access to Third Level spells, too. ![]() Call Lightning is a good option – it deals considerable AOE damage, and you can recast it again each turn as long as you maintain Concentration.
Call Lightning is a good option – it deals considerable AOE damage, and you can recast it again each turn as long as you maintain Concentration.
Level 6 – BG3 Jaheira Build
At Level 6, you gain access to Land’s Stride: Difficult Terrain, which prevents you from being slowed down by Difficult Terrain such as vines, grease or ice – however you can still fall victim to other effects associated with the terrain, such as slipping on ice or being entangled by vines.
You may choose one more spell at this level, too. We recommend ![]() Protection from Energy, which lets you give a creature you touch a 50% Resistance to an elemental damage type. This is quite situational, but keep it in mind when you encounter a fight that features heavy damage of a particular type.
Protection from Energy, which lets you give a creature you touch a 50% Resistance to an elemental damage type. This is quite situational, but keep it in mind when you encounter a fight that features heavy damage of a particular type.
You can also use your Wild Shape to transform into an Owlbear or a Panther.
Level 7 – BG3 Jaheira Build
At Level 7, your magic becomes quite a bit more powerful, as you gain access to fourth level spells at this level.
You can choose another type of Land to derive spells from. A strong option here is Desert, which grants:
- Blight – A strong single-target damage spell, it can deal up to 64 Necrotic Damage, and even if the target performs a Constitution Saving Throw, they will still take half of the damage.
- Wall of Fire – Requires Concentration. Create a wall of flames that deals up to 40 Fire Damage to anyone who starts their turn in the wall or who tries to pass through. Good area denial effect, can also be used to create artificial chokepoints.
You can also choose one more spell from the Druid list to prepare. ![]() Conjure Woodland Being allows you to summon a dryad, who can, in turn, summon a tree spirit. This spell is essentially two summons in one. They can last until your next Long Rest, so you might as well pre-summon them before combat. They can deal some extra damage to enemies, create difficult terrain and distract enemies from attacking you directly.
Conjure Woodland Being allows you to summon a dryad, who can, in turn, summon a tree spirit. This spell is essentially two summons in one. They can last until your next Long Rest, so you might as well pre-summon them before combat. They can deal some extra damage to enemies, create difficult terrain and distract enemies from attacking you directly.

Level 8 – BG3 Jaheira Build
At Level 8, you must choose another Feat. I recommend choosing Ability Improvement again, and using it to increase your Wisdom to 20. This will increase your Wisdom Modifier to ++5, giving you the best possible odds on your Spellcasting Rolls.
Now that your Wisdom has been increased to 20, you can choose two more spells from the Druid spell list:
- Freedom of Movement – A situational spell, this can be used to immediately cure any stun and grant immunity to the slowing effects of difficult terrain. It also prevents the target from being magically paralysed or restrained.
- Confusion – Creatures in the target area who fail a Wisdom Saving Throw become confused, acting irrationally. They will be forced to spend their turn moving around randomly, attacking a random creature regardless of allegiance, or sometimes may just pass their turn entirely. Sometimes this can be better than a stun, as you can temporarily turn your enemies against each other.
Late-Game Levelling Guide for the BG3 Jaheira Build
We’ll now look at the latter levels for the BG3 Jaheira Build. This includes levels 9-12.
Level 9 – BG3 Jaheira Build
At Level 9, you gain access to even more powerful magic for Jaheira.
For the final time, you can choose a Land type to inherit two extra spells from. This time we recommend Desert, which grants:
- Insect Plague – Locusts attack everyone within range, dealing 4-40 Piercing Damage, making the area Difficult Terrain, and imposing Disadvantage on Perception Checks. Requires Concentration to maintain.
- Wall of Stone – Create a wall of solid stone pillars. The pillars have 30 HP each. Another good spell for creating artificial chokepoints, it doesn’t damage enemies like Wall of Fire, but it forces them to either find a path around the wall or waste their time attacking the stone pillars.
In addition, you may choose one more spell from the Druid spell list. ![]() Mass Cure Wounds is a great spell that can heal your entire party at once.
Mass Cure Wounds is a great spell that can heal your entire party at once.
Level 10 – BG3 Jaheira Build
At this level, you unlock the Dilophosaurus Wild Shape, allowing you to transform into a dinosaur.
You can now attack three times per action when in beast form.
Your cantrips gain another damage die, now having three dice each. You can also choose another Cantrip – we already picked out the best ones, so just get whichever one you like the most.
You gain ![]() Nature’s Ward, giving immunity to poison and disease, and preventing you from being
Nature’s Ward, giving immunity to poison and disease, and preventing you from being ![]() Charmed or
Charmed or ![]() Frightened by fey and elementals.
Frightened by fey and elementals.
Finally, you can choose one more Druid spell to prepare. I recommend picking ![]() Greater Restoration – a situational spell that allows you to cure a charm, petrification, stun or curse from a creature.
Greater Restoration – a situational spell that allows you to cure a charm, petrification, stun or curse from a creature.
Level 11 – BG3 Jaheira Build
At Level 11, you gain access to Sixth-level spells, the most powerful tier of magic in Baldur’s Gate 3.
![]() Sunbeam is a very powerful spell that deals high
Sunbeam is a very powerful spell that deals high ![]() Radiant Damage in a long line-shaped AOE. You can recast it each turn, as long as you maintain Concentration. We recommend choosing this spell at Level 11.
Radiant Damage in a long line-shaped AOE. You can recast it each turn, as long as you maintain Concentration. We recommend choosing this spell at Level 11.
Level 12 – BG3 Jaheira Build
This is the highest possible level for the Jaheira Build. You must choose one final Feat. I recommend choosing the War Caster Feat. The most important aspect of this Feat is that it gives you Advantage on Concentration Saving Throws. This makes it much harder for enemy attacks to disrupt your Concentration Spells. Being a Druid, Jaheira has a lot of strong Concentration Spells in her arsenal, so this Feat is a perfect fit.
You can also choose one more spell to Prepare.
If nobody else in your party has ![]() Heroes Feast, then it’s a very good idea to grab this. It gives your entire party 12 extra HP,
Heroes Feast, then it’s a very good idea to grab this. It gives your entire party 12 extra HP, ![]() Advantage on Wisdom Saving Throws and immunity to Diseased,
Advantage on Wisdom Saving Throws and immunity to Diseased, ![]() Poisoned and
Poisoned and ![]() Frightened. This is a very good buff, and it lasts until your next Long Rest, so I highly recommend having someone in your party to cast it immediately after each Long Rest. If you have a Cleric in your party, then they can do it instead of the Druid, for example.
Frightened. This is a very good buff, and it lasts until your next Long Rest, so I highly recommend having someone in your party to cast it immediately after each Long Rest. If you have a Cleric in your party, then they can do it instead of the Druid, for example.
If Heroes’ Feast is already covered, then give ![]() Wall of Thorns a try. As the name suggests, this conjures a wall of thorny vines that deal 7d8
Wall of Thorns a try. As the name suggests, this conjures a wall of thorny vines that deal 7d8 ![]() Piercing Damage to anyone trying to move through them. Moving through the vines reduces Movement Speed by 75% and can also cause them to become
Piercing Damage to anyone trying to move through them. Moving through the vines reduces Movement Speed by 75% and can also cause them to become ![]() Entangled (immobilised), meaning they will be forced to stay there and take even more damage on their next turn. This is like a juiced-up version of the Spike Growth spell from earlier, and it can cause serious problems for enemies. If you are taking a defensive position in a battle, then this spell is ideal for making sure anyone who wants to reach you has a horrible time. Just try to put in a location that cannot be bypassed – the AI will (usually) try to avoid nasty AOE effects like this and doesn’t mind spending 3 turns running the long way around.
Entangled (immobilised), meaning they will be forced to stay there and take even more damage on their next turn. This is like a juiced-up version of the Spike Growth spell from earlier, and it can cause serious problems for enemies. If you are taking a defensive position in a battle, then this spell is ideal for making sure anyone who wants to reach you has a horrible time. Just try to put in a location that cannot be bypassed – the AI will (usually) try to avoid nasty AOE effects like this and doesn’t mind spending 3 turns running the long way around.

BG3 Jaheira Druid Build Equipment
In this section, we will take a look at the best equipment for the Jaheira build. In most of our builds, we include both an early-game and a late-game version of the equipment. However, since Jaheira can’t be recruited until the end of Act II, we’ll be skipping the early-game gear this time.
Some of the items are quite expensive – you may be interested in our BG3 Infinite Gold Guide to help you afford them all.
| Slot | Icon | Item | Location | Benefits |
|---|---|---|---|---|
| Head |  |
Hood of the Weave | Sold by Mystic Carrion in Philgrave’s Mansion | • +2 to Spell Save DC |
| Cloak |  |
Cloak of the Weave | Sold by Helsik at the Devil’s Fee (After Special Stock unlock). | • +1 to Spell Save DC and Spell Attack Rolls |
| Chest | Armour of Landfall | Sold inside Sorcerous Sundries | • Advantage on Constitution Saving Throws • Can cast Plant Growth for free • +1 to Spell Save DC • Starting your turn on Vines or Plant Growth heals you 1d4 |
|
| Gloves |  |
Helldusk Gloves | Dropped by Haarlep in the House of Hope. | • +1 to Spell Save DC and Spell Attack Rolls • +1 to Strength Saving Throws. • Access to Rays of Fire, a unique Cantrip • Weapon Attacks gain 1d6 Fire Damage. Unarmed Attacks gain 1d6 Necrotic Damage. |
| Boots |  |
Helldusk Boots | Looted from a locked gilded chest on the top floor of Wyrm’s Rock Fortress | • You cannot be forcefully moved by enemy spells or actions • Immunity to being slowed by Difficult Terrain • You can use your Reaction to succeed a Saving Throw you were about to fail. |
| Necklace | Amulet of Greater Health | House of Hope Archive. | • Boosts Constitution to 23. | |
| Ring | Ring of Regeneration | Sold inside Sorcerous Sundries. | • Restores 1-4 HP beginning of every turn. | |
| Ring |  |
Ring of Feywild Sparks | Dropped by Auntie Ethel in Act III (Blushing Mermaid Cellar) | • Hidden +1 buff to Spell Save DC |
| Main Hand | Justiciar’s Scimitar | Dropped by Lythindor in the Gauntlet of Shar. | • Chance to blind target if you attack with Advantage. • +2 Enchantment. • Shadowsoaked Blow action. |
|
| Off Hand | Belm | In an Opulent Chest in the cellar of Elerrathin’s Home | • +2 Enchantment • Use Whirlwind Attack to make an Attack Roll against all nearby foes • Use Perfectly Balanced Strike to make a full-damage attack with a Bonus Action each turn. |
Now let’s see what the endgame gear does for our BG3 Jaheira Build and where you can find it.
Hood of the Weave
The Hood of the Weave improves your Spell Save DC by +2, meaning enemies will have to roll 2 more points in any given Saving Throw to succeed it. This makes many of your spell effects harder to resist.
It is sold by Mystic Carrion in Philgrave’s Mansion, Act III.
Cloak of the Weave
The Cloak of the Weave adds a +1 bonus to your Spell Difficulty Class and Spell Attack Rolls. This makes it harder for enemies to resist or dodge your spells.
The cloak is sold by Helsik at the Devil’s Fee, after unlocking her special stock.
Armour of Landfall
The Armour of Landfall boosts your spellcasting prowess further, by adding another +1 bonus to your Spell Save Difficulty Class. It also gives you Advantage on Constitution Saving Throws. As an additional (but fairly minor) bonus, it allows you to cast the Plant Growth spell for free, and heals you for 1d4 HP when you are standing on a Plant Growth or Vines surface.
The Armour of Landfall is sold inside Sorcerous Sundries.
Helldusk Gloves
The Helldusk Gloves give a +1 bonus to Jaheira’s Strength Saving Throws and infuse her weapon attacks with 1d6 bonus Fire Damage. More importantly, they give a +1 bonus to spell Attack Rolls and Spell Save DC, making all of your spells more likely to have the desired effect against enemy targets.
The gloves are dropped by Haarlep in the House of Hope.
Helldusk Boots
The Helldusk Boots prevent Jaheira from being forcefully moved by an enemy’s spells or actions, and give her immunity to the effects of Difficult Terrain. You can also use a Reaction to succeed a Saving Throw that you would have failed, making these extremely good defensive boots. As another added bonus, you get access to the Hellcrawler action, which allows you to teleport and deals fire damage to anyone at the destination.
These boots can be looted from a locked gilded chest on the top floor of Wyrm’s Rock Fortress. Take them before Gortash’s coronation to avoid making NPCs in the area hostile.
Amulet of Greater Health
The Amulet of Greater Health is another item that is immensely powerful. It will boost your Constitution score to 23, increasing your health tremendously. Like the Gauntlets of Hill Giant Strength and Orphic Hammer it can also be found inside the Archive in the House of Hope that you reach via Devil’s Fee.
You can also read our in-depth guide on How to get the Amulet of Greater Health in BG3.
Ring of Regeneration
The Ring of Regeneration lets you restore 1-4 Hit Points at the beginning of your turn.
It is sold in Sorcerous Sundries, by either Rolan or Lorroakan’s Projection.
Ring of Feywild Sparks
The Ring of Feywild Sparks is, on the surface, designed for the Sorcerer class. However, it provides a hidden +1 boost to your Spell Save DC, making all spells that impose a Saving Throw require a higher roll for the target to resist. This is, therefore, a good item for almost any spellcaster to use.
To get the Ring, you need to loot it from Auntie Ethel in Act III, in the cellar of the Blushing Mermaid.
Justiciar’s Scimitar
The Justiciar’s Scimitar is one of the more powerful Scimitars out there, if you attack with Advantage, you have a chance to Blind your target. It also has a +2 Enchantment on it and the Shadowsoaked Blow. This is dropped by Lythindor in the Gauntlet of Shar in Act 2. You have to attack the rats, they will then transform into Lythindor.
Belm
Another great Scimitar, in keeping with Jaheira’s theme. Belm‘s most useful feature is Perfectly Balanced Strike, a Bonus Action that allows you to make a full-damage attack with your offhand weapon each turn, even when lacking the Two Weapon Fighting Style. It also comes with Whirlwind Attack, an Action that lets you make a separate Attack Roll against all nearby enemies.
Belm is located in an Opulent Chest in the cellar of Elerrathin’s Home
Markoheshkir (Alternative)
If you don’t really care about sticking to Jaheira’s Scimitar theme, you can instead fall back on Markoheshkir, the most powerful Quarterstaff in the game. This staff gives you another +1 bonus to your Spell Save DC, lets you cast one spell of any level without a Spell Slot per Long Rest, and gives you access to Kereska’s Favour, a unique spell that gives you special elemental buffs.
Equipping this staff instead of the Scimitar’s leans fully into the spellcasting focus of the Circle of the Land subclass, but means that you give up Jaheira’s decent (if not spectacular) melee abilities. If you do this, you need to be especially careful with keeping Concentration on your spells because the Druid suffers from a lack of a powerful Cantrip, and you might be left reliant on your Wild Shape to deal damage if you burn through your Spell Slots too quickly.
Jaheira Build Extra Info
Below you will find some extra information and tips to help you get the most out of this Jaheira Build for Baldur’s Gate 3.
BG3 Jaheira Build Tips & Tricks
The main weakness of Druids like Jaheira in Baldur’s Gate 3 is that they lack a strong damage cantrip – the best option in this regard is Thorn Whip, which has a tendency to be quite inaccurate and doesn’t do much damage. The class somewhat makes up for this by giving you powerful melee attacks in some Wild Shape forms, such as the Owlbear. However, the problem with this is that you cannot cast spells while in animal form – something that is especially relevant for Circle of the Land Druids, who are the most spellcasting-focused type of Druid.
Here are some potential solutions to this problem:
- Use a decent ranged weapon such as a Longbow instead, since Jaheira is a Wood Elf and has Proficiency with them
- Stick to melee weapon attacks. However, this can complicate spellcasting because while in melee range, you are very vulnerable to Concentration Checks due to taking damage.
- Find an item that grants you a stronger cantrip, such as the Incandescent Staff, which gives the Fire Bolt Cantrip – You can purchase this staff from Quartermaster Talli at Last Light Inn.
- Use the Spell Sniper feat to unlock Fire Bolt and Eldritch Blast, but this is quite wasteful because its Crit buff will not apply to most of your spells, and it denies you access to a more widely useful Feat, like War Caster or an Ability Improvement on your Wisdom.
- Rely on a “spammable” spell, like Call Lightning, and be careful not to lose Concentration too often.
- Use your Wild Shape when not casting spells, but then you might feel better off switching to the Circle of the Moon subclass.
It’s important to use at least one of these methods. Otherwise, you’re likely to find that you burn through your Spell Slots far too quickly. This is especially true on Tactician difficulty, when camp supply costs are doubled, meaning you need 80 Camp Supplies to restore all spell slots, rather than the usual 40.
Once this problem is taken care of, the main concern is the positioning of your Druid. This class has many powerful Concentration spells that can totally turn the tide of battle when able to persist for several turns. But when using these spells, beware that every time you take damage you risk failing a Concentration Saving Throw and having the spell effects broken, which can undermine your plans. So sometimes you may want to keep your Druid further away from enemies than other party members, to minimise the chance that this will happen. Try to utilize line-of-sight to stay clear of enemy ranged attacks, too.
While the Druid is a very strong class, these problems make them harder to play than you might expect, especially for beginners. However, with some planning, foresight and experience, you can overcome these issues.

Best Party Composition for Jaheira
Jaheira’s neutral moral alignment means she can easily get along with any party members. However, you might upset her if you consistently make evil choices.
Can Jaheira Use Illithid Powers in BG3?
Unlike the various origin characters in BG3 (and Minthara), Jaheira cannot access Illithid Powers because she is not infected with the Tadpole.
Top 5 Jaheira Build Spells in Baldur’s Gate 3
1. Moonbeam Spell
Moonbeam is available at level 3, so Jaheira can use it from the moment you recruit her. It is a tier 2 spell. The spell summons a pillar of radiant light that inflicts damage to creatures within its area. You can cast Moonbeam before using your Wild Shape, allowing you to maintain its effect while in beast form.
2. Spike Growth Spell
Spike Growth is also available at level 3. It is also a tier 2 spell. The spell places spikes all over the floor, dealing piercing damage to enemies. Additionally, it also halves their movement speed in the spiked area. Spike Growth can be used strategically to hinder enemies from moving fast in certain areas. You can also cast this before you transform into a Wild Shape form!
3. Freedom of Movement Spell
Unlocked at Level 7, Freedom of Movement is an excellent support spell that Jaheira can access. It is a Concentration Spell that gives the target immunity to most stuns and immobilising effects. Additionally, it immediately snaps the target out of any such effect. Freedom of Movement is great for giving a powerful melee-focused ally almost unstoppable mobility.
4. Insect Plague Spell
Insect Plague is unlocked at level 9. It is a tier 5 spell. This powerful endgame ability summons a swarm of locusts within a designated area, damaging all creatures inside. Additionally, it transforms the terrain into difficult ground, hindering movement and imposing disadvantage on Perception checks for those affected. Insect Plague excels in strategic applications, particularly when deployed at choke points to obstruct enemy advances and control the battlefield.
5. Sunbeam Spell
Sunbeam is unlocked at level 11. It is a tier 6 spell. Sunbeam is an exceptional endgame spell that unleashes a devastating beam of radiant energy, dealing significant damage to all enemies in its path. In addition to its raw power, it blinds affected enemies. Sunbeam is particularly effective in chokepoint scenarios, where it can target multiple foes that are lined up simultaneously, maximizing its destructive potential. It is particularly destructive against undead enemies.
Other BG3 Companion Builds: