Welcome to the Best BG3 Moon Druid Build Guide. The Circle of the Moon Druid is an early-game powerhouse, leveraging the Bear Wildshape form to overwhelm enemies with high survivability and serious damage.
Moon Druids only grow stronger over time, evolving into excellent summoners with access to powerful late-game spells, making them a versatile threat at every stage of Baldur’s Gate 3.
For more Druid builds, visit our BG3 Druid Builds page or explore the complete BG3 Builds Database. You can also check out our BG3 Builds Tier List to see which builds perform best.
Table of Contents for the BG3 Moon Druid Build:
- Introduction to the Moon Druid Build
- Character Creation – Level 1
- Druid Leveling Progression
- Druid Equipment
- Druid Build Extra Info
- Druid Build FAQ
Strengths and Weaknesses list for the Moon Druid Build:
Strengths
Weaknesses
BG3 Druid Build Overview

Below is a brief breakdown of the Druid class and the Circle of the Moon subclass mechanics used in this build. If you are already familiar with the basics, feel free to skip ahead to the build specifics.
Druid Class Overview
Druids are very versatile. They can function as a tank, supporter or caster, depending on their subclass. These are the most important aspects of the Druid Class in Baldur’s Gate 3:
Circle of the Moon Subclass Overview
Circle of the Moon Druids excel at frontline combat. With Combat Wild Shape, you can transform into a high-health Bear, absorbing massive damage early game. Each transformation acts as a fresh pool of HP with specialized attacks, making you incredibly difficult to kill. For a deep dive into all available forms, visit the Wild Shape section of the guide.
Some of the more important features that are exclusive to the Moon Druid:
Here is a quick video showcasing the power of summons and wild shape forms with the Moon Druid Build.
Character Creation (Level 1)
This section covers the optimal Character Creation choices for a Circle of the Moon Druid Build. While there is room for personal preference, these specific selections provide the strongest possible preset for your build at level 1.
Top 5 Druid Races
Character creation is more flexible than ever: your race does not affect your Ability Scores, allowing for any class combination without a mechanical penalty. However, racial passives and proficiencies still offer distinct tactical advantages.
To optimize your Druid, look for races that offer utility beyond raw stats, such as:
Wood Elf
![]()
Wood Elves are a great choice for most build types in BG3, thanks to their superior movement speed. Natural Proficiency in Perception is always useful, and immunity to magical Sleep will help you out a lot, especially in the early game, where enemy mages love to spam this spell.
You can also use a Half Wood-Elf for most of the same benefits.
- Proficiency in
 Stealth and Perception
 - Extra Weapon Proficiencies:
- Shortswords
- Longswords
- Shortbows
- Longbows
- Fey Ancestry
 Advantage against Charmed
- Immune to Magical Sleep
- Darkvision
- Fleet of Foot – 1.5 metres of extra Movement Speed
Duergar
![]()
With their wide choice of armour and weapon proficiencies, and resistances to poison, charm, and paralysis, Duergar are one of the strongest races in BG3.
The only downside of Duergar is their small stature, which reduces their base Movement Speed to 7.5 metres per turn (most races get 9 metres).
- Can wear Medium Armour
- Can wield axes and hammers
- Dwarven Resilience
- Advantage against Poisoned
- Resistance to Poison Damage
- Superior Darkvision
- Duergar Resilience
- Advantage on Saving Throws against illusions
- Advantage against Charmed and Paralysed
- Duergar Magic
- Enlarge (Level 3)
- Invisibility (Level 5)
Gold Dwarf
![]()
The Gold Dwarf is good for beginner players, because it gets some extra HP as you level up.
- Can wear Medium Armour
- Can wield axes and hammers
- Dwarven Resilience
- Advantage against Poisoned
- Resistance to Poison Damage
- Darkvision
- Dwarven Toughness – You gain 1 additional HP per level
Forest Gnome
![]()
Gnomes gain Advantage on Intelligence, Wisdom and Charisma Saving Throws, a strong bonus which shouldn’t be underestimated.
The three Gnome variants are very similar, but the Forest Gnome is a good thematic choice for a Druid.
Like Dwarves, Gnomes are small, so they have reduced Movement Speed.
- Gnome Cunning
- Advantage on Intelligence, Wisdom and Charisma Saving Throws
- Darkvision
- Speak with Animals
- Slow Movement
Human
![]()
Humans are useful for their unrestricted Skill choice. Used wisely, this allows your character to be proficient with a useful Skill that wouldn’t normally be available for your Class.
The extra carrying capacity is a nice boost, too.
- Can wear Light Armour and Shields
- Extra Weapon Proficiencies:
- Spears
- Pikes
- Halberds
- Glaives
- Human Versatility
- One unrestricted Skill choice
- Increases Carrying Capacity by 25%
| Race | Strengths | Info |
|---|---|---|
Wood Elf |
|
Wood Elves are a great choice for most build types in BG3, thanks to their superior movement speed. Natural Proficiency in Perception is always useful, and immunity to magical Sleep will help you out a lot, especially in the early game, where enemy mages love to spam this spell.
You can also use a Half Wood-Elf for most of the same benefits. |
Duergar |
|
With their wide choice of armour and weapon proficiencies, and resistances to poison, charm, and paralysis, Duergar are one of the strongest races in BG3.
The only downside of Duergar is their small stature – this reduces their base Movement Speed to 7.5 metres per turn (most races get 9 metres). |
|
Gold Dwarf |
|
The Gold Dwarf is good for beginner players, because it gets some extra HP as you level up. |
Forest Gnome |
|
Gnomes gain Advantage on Intelligence, Wisdom and Charisma Saving Throws, a strong bonus which shouldn’t be underestimated.
The three Gnome variants are very similar, but the Forest Gnome is a good thematic choice for a Druid. Like Dwarves, Gnomes are small, so they have reduced Movement Speed. |
|
Human |
|
Humans are useful for their unrestricted Skill choice. Used wisely, this allows your character to be proficient with a useful Skill that wouldn’t normally be available for your Class.
The extra carrying capacity is a nice boost, too. |
Background & Skills
The following Backgrounds are the best choice for your Moon Druid Build. These backgrounds give us the most proficiency with Wisdom-based skills. You will want to have high Wisdom on your Druid, since this is the ability needed for spellcasting in this class. These backgrounds fit nicely with that.
| Background | Skills | Why it’s good |
|---|---|---|
Acolyte |
Insight, Religion | Provides two Wisdom-based skills, making you much better at detecting lies and understanding lore. |
Folk Hero |
Animal Handling, Survival | Perfectly thematic. Enhances your ability to interact with beasts and navigate the wilds. |
Guild Artisan |
Insight, Persuasion | This gives you Persuasion, allowing your high-Wisdom Druid to be a much more effective party negotiator. |
Acolyte – Insight & Religion
Provides two Wisdom-based skills, making you much better at detecting lies and understanding lore.
Folk Hero – Animal Handling & Survival
Perfectly thematic. Enhances your ability to interact with beasts and navigate the wilds.
Guild Artisan – Insight & Persuasion
This gives you Persuasion, allowing your high-Wisdom Druid to be a much more effective party negotiator.
Now we want to select Skills for our Moon Druid Build. Any remaining options that are Wisdom or Dexterity-based are a great fit. Here are the recommended options:
Abilities
For the Druid, Wisdom is the most important ability, followed by Constitution and Dexterity. We want 16 points in Wisdom to improve the efficacy of spellcasting, and 16 in Constitution will improve your HP and your ability to maintain Concentration on your spells. Dexterity helps to improve your Armour Class.
![]() Strength – 10 Points
Strength – 10 Points
- Improves jump distance and carry weight.
- Only affects your human form.
![]() Dexterity – 14 Points
Dexterity – 14 Points
- Boosts Armour Class (AC) and Initiative.
- Helps you act sooner in combat.
![]() Constitution – 16 Points
Constitution – 16 Points
- Increases Max HP.
- Vital for Concentration Checks to keep spells active.
![]() Intelligence – 8 Points
Intelligence – 8 Points
- Not relevant for our build.
![]() Wisdom – 16 Points
Wisdom – 16 Points
- Primary Stat.
- Powers your spell accuracy and damage.
![]() Charisma – 10 Points
Charisma – 10 Points
- Can be useful in social interactions.
| Ability | Points | Why it matters |
|---|---|---|
| 10 | Mostly for jump distance and carry weight, but only relevant in human form. | |
| 14 | Important: gives you a higher Armour Class and improves initiative. | |
| 16 | Important: Increases HP and helps Concentration checks for spells. | |
| 8 | Not relevant for our build. | |
| 16 | Most Important: Main spellcasting ability for Druid. | |
| 10 | Can be useful in social interactions. |
Cantrips
You can choose two Cantrips to start the game with. We recommend the following options:
Spells
You also need to select four Prepared Spells to begin the game with. On the Druid, your spells need to be prepared before you can use them. We recommend choosing the following four spells:
Note that the number of Prepared Spells we can have depends on our Character Level and our Wisdom. Each character Level will give another slot, and increasing our Wisdom skill further will also add to this.
Concentration Mechanic Explained
Many powerful Druid spells require Concentration to remain active. Here is how it works:
Leveling Guide for our Moon Druid Build in BG3

We will now walk you through the full leveling-up process for our BG3 Moon Druid Build.
Level 2-4 (Early Game)
At level two, you can select your Druid Subclass Circle of the Moon and you get new Tier 1 Spells and the Wild Shape forms Bear, Badger, Cat, Wolf, Spider. Level three unlocks Tier 2 Spells and level four allows you to select a Feat and unlock new Wild Shape forms Dire Raven and Deep Rothe.
- Level 2 – Subclasses Selection and Wild Shape forms
- Level 3 – Tier 2 Spells
- Level 4 – Feat + New Wild Shape forms
Level 2 – Subclass Selection and new Wild Shape Forms
![]()
Subclass Selection: Circle of the Moon Druid
For this Druid build, we’ll be using the Circle of the Moon subclass, which gives us greater options with animal transformations, something that makes your character more versatile both inside and outside of combat.
Level 3 – Tier 2 Spells
At Level 3, your Druild Build will gain access to second-level spells for the first time (this can be a bit confusing at first, but just try to think of spell levels as a completely separate system from character levels).
You’ll also receive at least one more spot for a Prepared Spell. It’s a good idea to begin adding Level 2 Spells to your arsenal here. Make sure to have a good mix between Level 1 and Level 2 spells on your Prepared Spells. Some good Level 2 options are:
These spells all provide great options for controlling the battlefield and disrupting your enemies’ plans with troublesome AOEs and debuffs. You can add all three immediately, or just take 1-2 for now and wait until you have more Level 2 Spell Slots before getting the others.
Level 4 – Feat, Spells & New Forms
At Level 4, your Druid gains a massive boost to spell accuracy and two highly specialized Wild Shape forms.
Level 5-8 (Mid-Game)
The BG3 Druid Build mid-game leveling process consists of levels 5-8. At level five, you unlock Tier 3 Spells and gain the Wild Strike passive that makes your Wild Shapes more powerful. At level six, you gain the ultimate Wild Shape from Owlbear, which is our main form going forward! At level seven, you unlock Tier 4 Spells. At level eight, you unlock a new Feat and the Wild Shape Sabre-Toothed Tiger.
- Level 5 – Tier 3 Spells, Wild Strike Passive
- Level 6 – New Wild Shape Owlbear
- Level 7 – Tier 4 Spells
- Level 8 – Feat, New Wild Shape Sabre Toothed Tiger
Level 5 – Tier 3 Spells and Wild Strike Passive Unlocks
At Level 5, your combat power doubles thanks to Wild Strike and high-impact area control spells.
Level 6 – Owlbear!
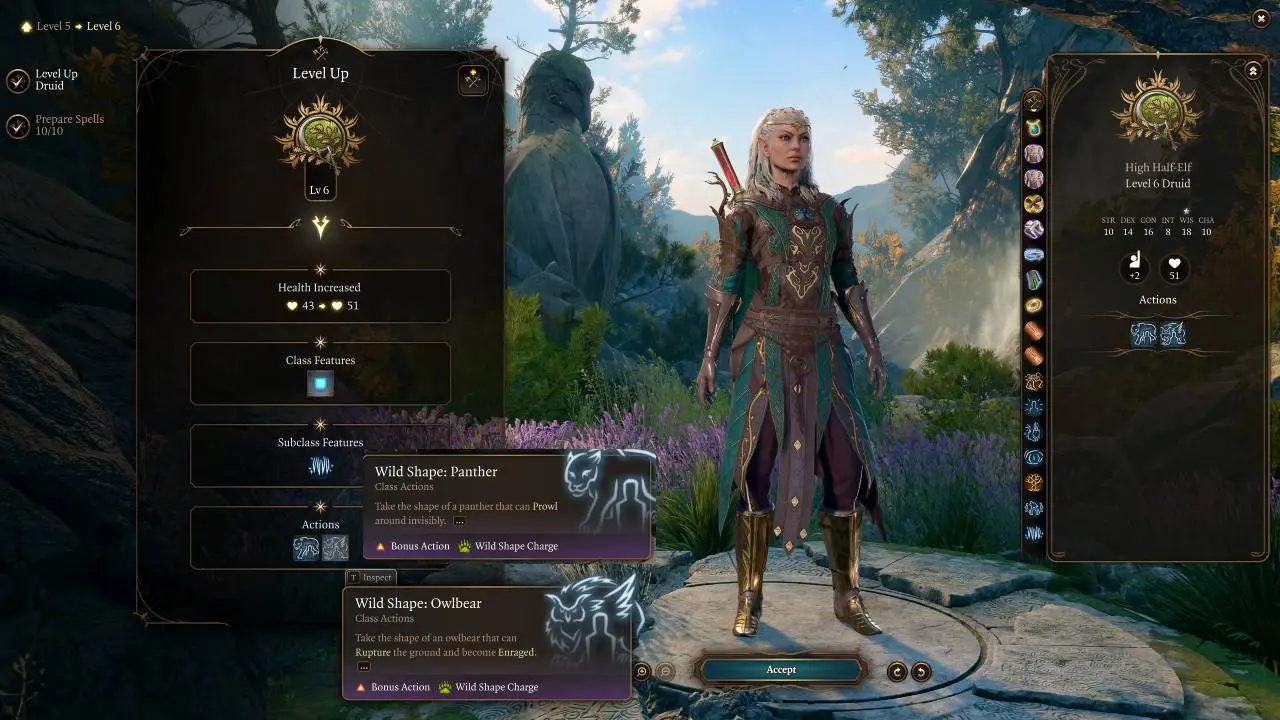
At Level 6, the BG3 Circle of the Moon Druid Build gains more buffs and options for its Wild Shapes:
You also gain an additional Third Level Spell Slot for your Moon Druid Build.
You’ll be able to choose another Spell to Prepare, too. We recommend choosing whichever spell from Level 5 that you didn’t get already.
At this point, you might want to consider using the ![]() Owlbear rather than the
Owlbear rather than the ![]() Bear as your main Wild Shape for combat. It has very powerful attacks and can damage or
Bear as your main Wild Shape for combat. It has very powerful attacks and can damage or ![]() Frighten enemies in an AOE around your character. Make sure to give it a try and see which one you like best.
Frighten enemies in an AOE around your character. Make sure to give it a try and see which one you like best.
Level 7 – Tier 4 Spells
At Level 7, you unlock your first Level 4 spell slot and an additional prepared spell slot.
Level 8 – New Feat, Sabre-Toothed Tiger & Spell
At Level 8 we can select a new feat and get access to the Sabre-Toothed Tiger shape.
Additionally, you will be able to prepare two more Spells (if you increased your Wisdom to 20).
End-Game Leveling 9-12 for your BG3 Druid Build
The BG3 Moon Druid end-game leveling process starts at level 9 and ends with max level 12. At level nine, you unlock Tier 5 Spells. At level ten, you unlock the Dilophosaurus and Myrmidon Wild Shapes. At level eleven, you unlock Tier 6 Spells. Level twelve allows you to unlock another Feat.
Level 9 – Tier 5 Spells
At Level 9, you unlock your first Level 5 Spell Slot. You can now prepare one additional spell; choose based on your party’s current weakness.
Level 10 – Dilophosaurus and Myrmidon Wild Shapes Unlock

At Level 10 with your Moon Druid Build, you can prepare another Spell as usual, so we recommend choosing whichever one you didn’t pick up at Level 9.
Level 11 – Tier 6 Spells
At level 11, you get access to Sixth-tier Spells, the highest tier of magic in Baldur’s Gate 3. These very powerful spells can only be cast once per Long Rest.
Level 12 – New Feat
At Level 12, you will be able to choose one final Feat for your BG3 Moon Druid Build. Depending on your playstyle, pick the one that makes most sense.
Best Equipment for the BG3 Moon Druid Build
Here you will find the best equipment for this Moon Druid Build. You don’t need to get all the items – try to view the lists as a wishlist rather than a precise blueprint. That said, the more you can find, the better the build will perform.
We’ve split this into an early- and late-game section.
Early-Game Gear
This is the early-game gear setup that you can use for your Druid. You can find these items in Act 1 or early Act 2. Until you find the right piece of gear, just use whatever you have.
Note: Sometimes, traders won’t have all items available at the same time as their inventory rotates. You can use a Long Rest to reset the trader’s items, might have to do that several times for it to show up.
| Slot | Icon | Item | Location | Benefits |
|---|---|---|---|---|
| Head | Key of the Ancients | Dropped by Findal in the Underground Passage. You can enter the Passage outside of the Druid Grove or inside the Druid Grove. |
|
|
| Cloak | Cloak of Protection | Purchased from Quartermaster Talli in Last Light Inn (early Act 2). |
|
|
| Chest | Barkskin Armour | Purchased from Quartermaster Talli at Last Light Inn (early Act 2). |
|
|
| Gloves | Gloves of the Growling Underdog | Go to the Goblin Camp, then enter the Shattered Sanctum and make your way towards the other side of the area to find Razglin and his treasure. |
|
|
| Boots |  |
Disintegrating Night Walkers | Looted from True Soul Nere in Underdark – Grymforge. |
|
| Necklace | Anything you find | None | None | |
| Ring | Ring of Protection | Complete the Steal the Sacred Idol quest inside the Druid Cave. To start the quest and head into the Tiefling Hideout in the Druids Grove and talk to Mol. |
|
|
| Ring | The Whispering Promise | Sold by various Merchants: Volo, Grat the Trader, Roah Moonglow, Brem. |
|
|
| Main Hand | Adamantine Scimitar | Crafted at the Adamantine Forge. Read: how to get into the Underdark. Once you are in the Underdark you have to take a boat to the Grymforge. Additionally, you will have to find the Scimitar Mold and Mithral Ore to craft the weapon at the Adamantine Forge. |
|
|
| Off Hand | Scimitar +1 | Sold by various traders in Act 1 or looted from a crate near Dammon at the Druid Grove. |
|
Pro-Tip: Why Barkskin Armour?
For Circle of the Moon Druids, ![]() Barkskin Armour is a game-changer. Standard armor classes often don’t carry over into Wild Shape, but the “Permanent Barkskin” effect ensures your Bear or Owlbear form stays at a minimum of 16 AC, making you significantly harder to hit in the front lines.
Barkskin Armour is a game-changer. Standard armor classes often don’t carry over into Wild Shape, but the “Permanent Barkskin” effect ensures your Bear or Owlbear form stays at a minimum of 16 AC, making you significantly harder to hit in the front lines.
Late-Game Gear
The late-game gear setup is built together with items from late Act 2 and Act 3. While you don’t need all these items, it is recommended to get as many as possible to increase the overall power of the BG3 Moon Druid Build.
| Slot | Icon | Item | Location | Benefits |
|---|---|---|---|---|
| Head | Shapeshifter Hat | Sold by Helsik at the Devil’s Fee (After Special Stock unlock). |
|
|
| Cloak |  |
Cindermoth Cloak | Aelis Siryasius in the Lower City. |
|
| Chest | Armour of Moonbasking | Voiceless Penitent Bareki Merchant in Lower City Sewers near Undercity Ruins Waypoint. Coordinates X: -157, Y: 939. |
|
|
| Gloves | Unwanted Masterwork Gauntlets | Forge of the Nine house basement (where Dammon works in Act 3), inside the Gilded Chest. You can break the wall to enter the basement |
|
|
| Boots | The Speedy Lightfeet | Under the Mill at Blighted Village inside Heavy Chest. |
|
|
| Necklace | Amulet of Greater Health | Archive in the House of Hope that you reach via Devil’s Fee. Full Guide: How to get the Amulet of Greater Health in BG3. |
|
|
| Ring | Ring of Regeneration | Sold inside Sorcerous Sundries in Baldur’s Gate’s Lower City.
|
|
|
| Ring | Shapeshifter’s Boon Ring | Dropped by the Strange Ox in the Last Light Inn at the start of Act 2. |
|
|
| Main Hand | Justiciar’s Scimitar | Dropped by Lythindor (Attack the Rats) in the Gauntlet of Shar. |
|
|
| Off Hand | Belm | In an Opulent Chest in the cellar of Elerrathin’s Home |
|
Pro Tip: Ring of Regeneration
The ![]() Ring of Regeneration lets you restore 1-4 Hit Points at the beginning of your turn. The ring synergizes well with The Reviving Hands, Hellrider’s Pride, The Whispering Promise and Boots of Aid and Comfort. You could create a chain reaction with all these items if you want to.
Ring of Regeneration lets you restore 1-4 Hit Points at the beginning of your turn. The ring synergizes well with The Reviving Hands, Hellrider’s Pride, The Whispering Promise and Boots of Aid and Comfort. You could create a chain reaction with all these items if you want to.
This ring can be acquired in Act 3, specifically at Sorcerous Sundries in Baldur’s Gate’s Lower City. The availability of the ring depends on the status of two characters, Rolan and Lorroakan:
- If Rolan is deceased: The ring is sold by Lorroakan’s Projection within Sorcerous Sundries.
- If both Rolan and Lorroakan are alive: The ring is available for purchase from Rolan at Sorcerous Sundries.
- If Rolan is alive and Lorroakan is dead: The ring can be pickpocketed from Rolan in Ramazith’s Tower shortly after Lorroakan’s demise; however, it may disappear from his inventory later.
Please note that the ring’s availability is influenced by your in-game decisions and interactions with these characters.
Pro Tip: Flame Blade
This isn’t actually a weapon until you cast it. The ![]() Flame Blade Spell is learned at level 3, so you can already use this in the early game if you want to give it a try.. The Flame Blade also uses your Wisdom modifier for attack rolls.
Flame Blade Spell is learned at level 3, so you can already use this in the early game if you want to give it a try.. The Flame Blade also uses your Wisdom modifier for attack rolls.
Druid Build Extra Info

Below you will find some extra information and tips to help you get the most out of this Moon Druid Build for Baldur’s Gate 3.
How to Play the Circle of the Moon Druid in BG3
Early Game
Normally, Druids start out slow, but because we use the Circle of the Moon Subclass, we can utilize the bear early game to become powerful fast!
Mid Game
At Level 5, your power spikes significantly with ![]() Wild Strike (Extra Attack).
Wild Strike (Extra Attack).
Late Game
In the late game, your role is to control the battlefield while being nearly impossible to kill.
Top 5 Moon Druid Build Spells in Baldur’s Gate 3
Here you can find a quick explanation of what are the best five spells for our Circle of the Moon Druid in BG3.
Druid Wild Shape Forms List

This BG3 Moon Druid Build can use the Wild Shape mechanic to transform into various animals, each with their own abilities, strengths, and weaknesses. The table below shows the available animals, the requirements for unlocking them, and their abilities.
You can find even more details about Wild Shapes in the BG3 Wild Shape Druid Guide.
| Wild Shape | Requirement | Abilities |
|---|---|---|
| Badger | Level 2 Druid | Bite, Claws, Burrow |
| Bear | Level 2 Moon Druid Exclusive | Goading Roar, Claws |
| Cat | Level 2 Druid | Claws, Meow |
| Spider | Level 2 Druid | Web, Venomous Bite |
| Wolf | Level 2 Druid | Inciting Howl, Bite, Exposing Bite |
| Dire Raven | Level 4 Moon Druid Exclusive | Beak Attack, Rend Vision |
| Deep Rothé | Level 4 Druid | Gore, Charge |
| Owlbear | Level 6 Druid | Claws, Enrage, Rupture |
| Displacer Beast | Astral Tadpole Powers | Illusory Copy, Displace |
| Panther | Level 6 Druid | Bite, Prowl, Jugular Strike, Pounce |
| Sabre-Tooth Tiger | Level 8 Druid | Shred Armour, Jugular Strike, Bite |
| Diplophosaurus | Level 10 Druid | Bite, Pounce, Corrosive Spit |
| Earth Myrmidon | Level 10 Moon Druid Exclusive | Burrow, Sludgy Sling, Elemental Warp, Muck to Metal |
| Water Myrmidon | Level 10 Moon Druid Exclusive | Explosive Icicle, Hiemal Strike, Healing Vapours |
| Air Myrmidon | Level 10 Moon Druid Exclusive | Invisibility, Raging Vortex, Electrified Flail |
| Fire Myrmidon | Level 10 Moon Druid Exclusive | Myrmidon’s Immolation, Cinderous Swipe, Scorching Strike |
Level 2
Level 4
- Deep Rothé
- Dire Raven (Moon Druid Exclusive)
Level 6
- Owlbear
- Panther
- Displacer Beast (Only with Tadpole Powers)
Level 8
Level 10
- Diplophosaurus
- Earth Myrmidon (Moon Druid Exclusive)
- Water Myrmidon (Moon Druid Exclusive)
- Air Myrmidon (Moon Druid Exclusive)
- Fire Myrmidon (Moon Druid Exclusive)
Best BG3 Druid Build Wild Shape Forms
There are plenty of good Wild Shape forms for different situations in BG3. The main forms that we will be using for combat are the ![]() Bear and the
Bear and the ![]() Owlbear. These are both tanky and deal massive melee damage.
Owlbear. These are both tanky and deal massive melee damage.
Bear Wild Shape

At Level 2, the Moon Druid immediately unlocks the Bear Wild Shape, providing a massive early-game power spike. While other Druid subclasses often struggle in Act 1, the Bear form grants you an incredible 30 Hit Points right out of the gate, making you the ultimate early-game tank.
Owlbear Wild Shape

Upon reaching Level 6, you unlock the iconic Owlbear Wild Shape, the definitive powerhouse of the mid- and end-game. Boasting a massive 65 Hit Points, its true strength lies in its mobility; use its signature jump to deal devastating AoE Crushing Damage upon impact, flattening groups of enemies at once.
Utility Wild Shape Forms
The utility Wild Shape Forms aren’t used in combat, they are useful outside of it. Here are a few key forms that can perform amazingly:
- Badger: The badger can burrow underground, allowing you to skip certain doors or walls.
- Cat: With the cat, you can skip enemies unnoticed.
- Dire Raven: Reach hard to get to places by flying there.
BG3 Druid Build Summons

Not only can your Druid transform into creatures, but you can also summon them to fight alongside you!
At level 7, you will be able to use Conjure Minor Elemental and Conjure Woodland Being. At level 9, you can use Conjure Elemental. This means that our Moon Druid Build will be able to use three Summons and its Wild Shape at the same time in Baldur’s Gate 3.
The level 7 summons are more of a distraction than anything else because they will be defeated fairly fast due to their low HP. But still, they soak up damage. The Elemental that you unlock at level 9 however, has plenty of HP and won’t immediately be defeated in late-game.
Druid Build Illithid Powers (optional)

Illithid Powers are unlocked later in BG3 when you learn more about Mind Flayers and Tadpoles. By eating Jars of Mind Flayer Parasites, you gain one point. This is another optional skill tree that you can get access to if you want.
Here are some of the best Illithid Powers for the BG3 Druid Build with the Circle of the Moon subclass:
BG3 Druid Multiclassing Highlights
Multiclassing is always an option in BG3. However, the Circle of the Moon Druid has a very strong lineup overall and doesn’t particularly need to multiclass or benefit much from it. But here are a few options you could consider when you want to multiclass on the BG3 Druid Build with the Circle of the Moon subclass.
- 10 Moon Druid + 2 Fighter
- 7 Moon Druid + 3 Thief + 2 Monk
BG3 Druid Frequently Asked Questions
Here are some frequently asked questions related to the BG3 Druid Build. Most of these questions have already been answered in the guide itself.
- What is the best Druid Subclass in BG3?
- What are the best Wild Shape Forms for BG3 Druids?
- What are the best BG3 Druid Spells?
- What’s the best race and stat allocation for a BG3 Druid?
- What roles can BG3 Druids Fulfil?
FAQ: What is the Best Druid Subclass in BG3?
We already touched on this in the BG3 Druid Subclass Comparison section.
Choosing the best Druid subclass in BG3 depends on your preferred playstyle, as each offers distinct strengths and focuses. Here’s a breakdown of the available subclasses and why the Circle of the Moon stands out as the most versatile and impactful choice for many players in BG3.
- Circle of the Moon (This Build): Excels in melee combat and tanking with enhanced Wild Shape options like the Owlbear and Earth Myrmidon. It offers unparalleled flexibility, allowing you to dominate in both offense and defense while maintaining spell concentration in beast form. Ideal for players seeking adaptability and raw power.
- Circle of the Land: A spellcasting specialist with expanded spell options for battlefield control and utility. Best for those who prefer a traditional caster role but lacks the combat flexibility of the Moon Druid. Full build can be found on the BG3 Circle of the Land Druid Build page.
- Circle of Spores: A hybrid subclass that combines necrotic damage, melee combat, and undead summoning. It’s unique and flavorful but less durable and impactful than the Moon Druid. You can find a full build on the BG3 Circle of Spores Druid Build page.
- Circle of the Stars: Excelling at buffing and enhancing the power of the whole group. The full build can be found on the BG3 Circle of Stars Druid Build page.
For most players, the Circle of the Moon subclass is the top choice, offering unmatched strength and versatility in any scenario early and late game.
FAQ: What are the best Wild Shape Forms for BG3 Druids?
Wild Shape is the defining feature of the Circle of the Moon Druid in BG3, allowing you to transform into powerful beasts and elementals that excel in combat, tanking, and utility. In BG3 several Wild Shape forms stand out for their effectiveness. Here’s a breakdown of the best forms and when to use them.
- Bear: Early-game tank and melee combatant
- Owlbear: Mid-game tank and melee combatant
- Cat: Walk past enemies undetected
- Badger: Can dig below the surface to skip doors or walls
- Dire Raven: Fly to hard to get to places
The Bear/Owlbear are our main Wild Shape forms in combat. Whereas the other forms are mostly for utility and exploration.
FAQ: What are the best BG3 Druid Spells?
The BG3 Druid Build has plenty of amazing spells at their disposal. Here are some of the best spells that you can use with your Circle of the Moon Druid. Most of them either deal massive damage or are used to hinder your enemies at moving forward or slowing them down.
You can find a more detailed breakdown about this in the Top 5 Druid Build Spells section.
- Moonbeam: The spell summons a pillar of radiant light that inflicts damage to creatures within its area.
- Spike Growth: The spell places spikes all over the floor, dealing piercing damage to enemies and halving their movement speed.
- Sleet Storm: Creates an ice surface, slowing down enemy movement once again and making them possibly slip over. Also interrupts casters.
- Insect Plague: Summons a swarm of locusts within a designated area, dealing damage to all creatures inside and slowing them down.
- Sunbeam: Exceptional endgame spell that unleashes a devastating beam of radiant energy, dealing significant damage and blinding all enemies in its path.
FAQ: What’s the best Race and Stat Allocation for a BG3 Druid?
Hands down the best race for our BG3 Moon Druid is Wood Elf. It offers Movement Speed, great for quickly taking advantageous positions and outrunning enemies. For the Druid, Wisdom is the most important stat followed by Constitution and Dexterity. To start your journey with the Druid we recommend adding 17 Wisdom, 16 Constitution and 14 Dexterity in the Character Creation.
FAQ: What Roles can a BG3 Druid Fulfil?
Druids are incredibly versatile in BG3, adapting to various party needs based on subclass and spell choices. Here are their primary roles:
- Tank:
- Best Subclass: Circle of the Moon.
- Key Abilities: Durable Wild Shape forms (Bear, Earth Myrmidon), Barkskin, and healing spells.
- Damage Dealer:
- Best Subclass: Circle of the Moon.
- Key Abilities: High-damage Wild Shapes (e.g., Owlbear), Insect Plague, and Sunbeam.
- Battlefield Controller:
- Best Subclass: Circle of the Land.
- Key Abilities: Entangle, Spike Growth, and Wall of Thorns.
- Healer and Support:
- Best Subclass: Any.
- Key Abilities: Healing Word, Goodberry, and Mass Cure Wounds.
- Utility Specialist:
- Best Subclass: Any.
- Key Abilities: Pass Without Trace, Speak with Animals, and traversal Wild Shapes.
- Summoner:
- Best Subclass: Spores.
- Key Abilities: Conjure Animals and Conjure Woodland Beings and Conjure Undead.