


Type: Dungeon, Trial, Arena & Overland
Buildname: Venom
Table of Contents
- Build Setup
- Resource Management
- Rotation
- AoE Setup
- Maelstrom & Vateshran Arena
- Gameplay
- Dragonknight Subclassing
- Outfit Style Showcase
- Update Log
Welcome to the Group DPS Stamina Dragonknight Build for ESO (Elder Scrolls Online). Stamina Dragonknights are strong and can deal a lot of damage and they also have some unique buffs to bring into the group.
- Medium Armor Build
- Dual Wield & Two-Handed Setup
- High Single Target (ST) Damage
- High Area of Effect (AoE) Damage
- Good Sustain
- Maximum Damage Build
- Trials, Dungeon & Arena Group Build
Other Stamina Dragonknight Guides:
You can also find plenty of other Stamina Dragonknight content on the website such as:
- Stamina Dragonknight Beginner Guide (Read first if you are a new player)
- Stamina Dragonknight Beginner 160CP Build (Made for new players)
- Stamina Dragonknight Bow Build
- Stamina Dragonknight Two Hander Build
- SOLO Stamina Dragonknight Build
Build Setup – ESO Stamina Dragonknight Build
Let’s take a look at the ESO Stamina Dragonknight Build. Below, you will find things like Sets, Skills, Champion Points, Buff-food, Mundus Stone, Potions, Passives, and Attributes. These are all important aspects of the Stamina Dragonknight Build.
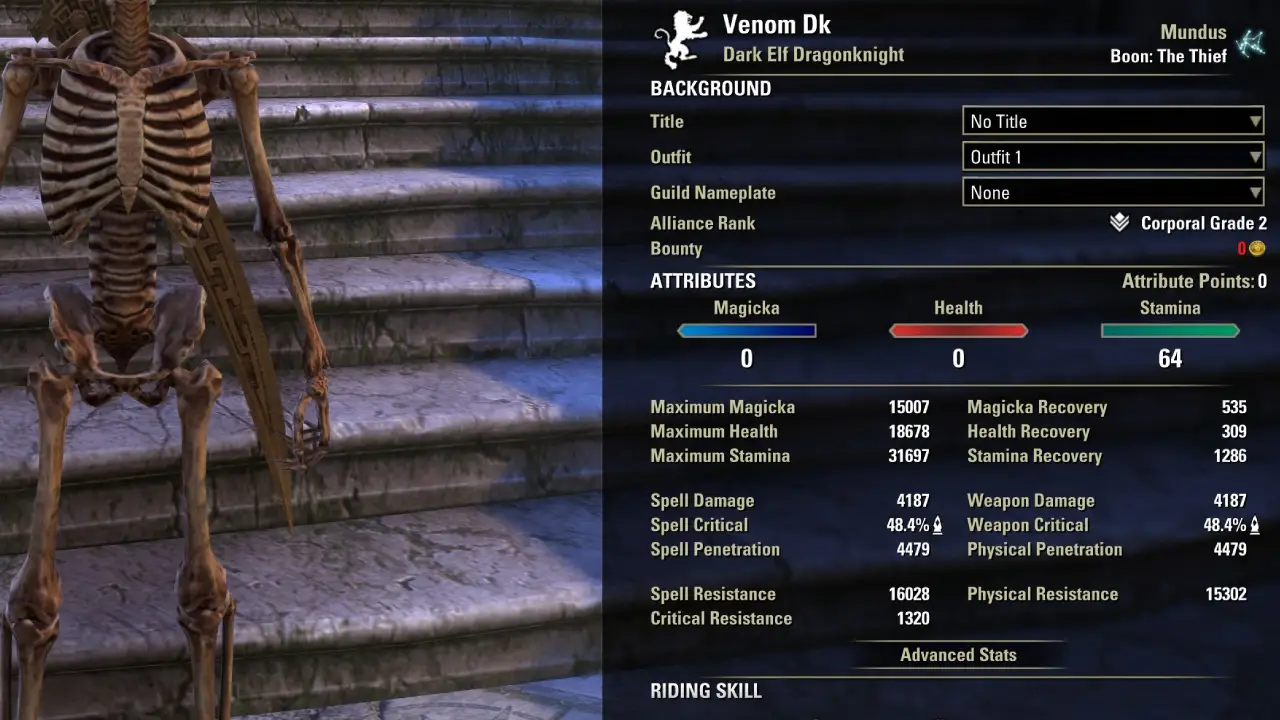
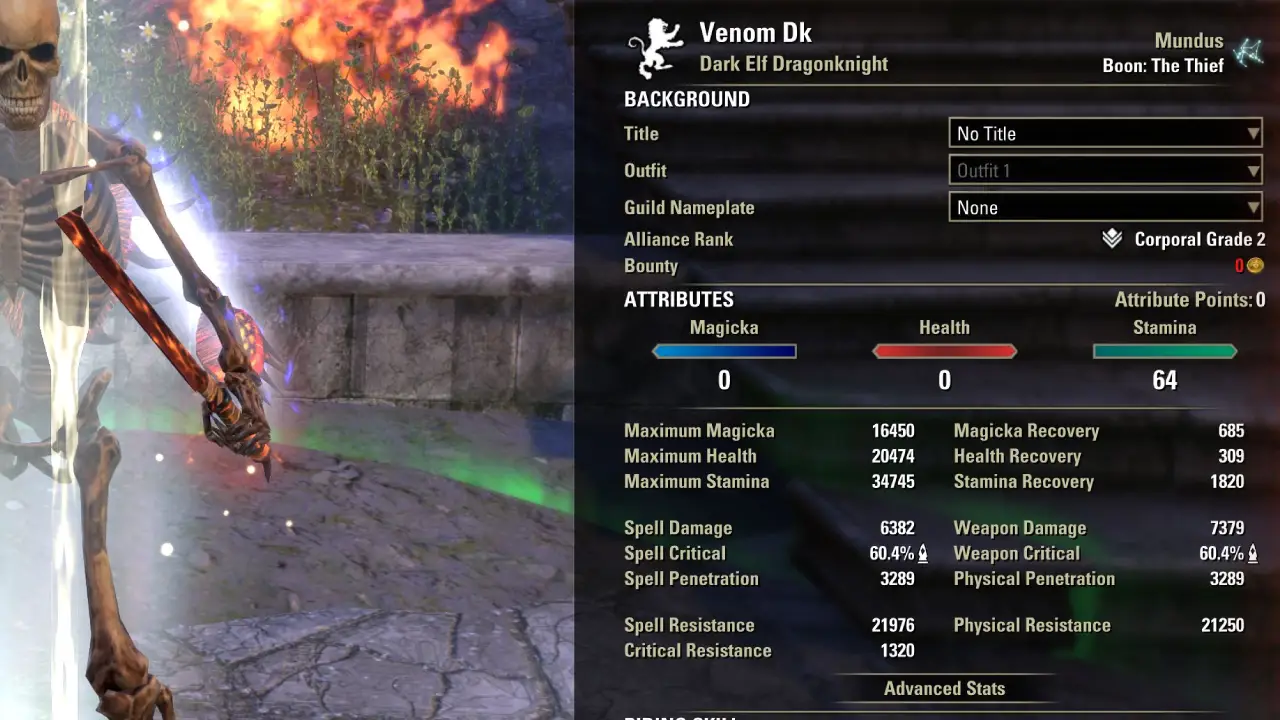
5x Pillar of Nirn, 5x Perf. Null Arca, 1x Slimecraw, 1x Velothi Ur-Mage’s Amulet on a Dark Elf with Lava Foot Soup and Saltrice buff food.
- Unbuffed: Out of combat, buff food active.
- Buffed: In combat, raid target dummy buffs, Essence of Power potion, weapon damage enchantment active.
Gear for the Stamina Dragonknight Build
You will find 3 different setups here. Setup 1 is the preferred setup. People who do not have all the gear yet can use Setup 2 which is easier to obtain and beginners can use Setup 3.
- Setup 1 is with Trial Gear
- Setup 2 is without Trial Gear
- Setup 3 is for Beginners
There are a lot of good Stamina Sets available, you can find more viable stamina dps sets in this Stamina DPS Sets Article. I also elaborate on specific sets that are often used in this article to give you a bit more insight as to why they are used.
Gear Setup 1 – Stamina Dragonknight Build
This is the tier 1 setup for the Stamina Dragonknight Build that you should try to get, this is the most optimal setup to achieve high damage.
| Gear | Set | Weight | Trait | Enchantment |
|---|---|---|---|---|
| Chest | Perfected Null Arca | Medium | Divine | Stamina |
| Belt | Perfected Null Arca | Medium | Divine | Stamina |
| Shoes | Perfected Null Arca | Medium | Divine | Stamina |
| Pants | Perfected Null Arca | Medium | Divine | Stamina |
| Hands | Perfected Null Arca | Medium | Divine | Stamina |
| Head | Pillar of Nirn | Medium | Divine | Stamina |
| Shoulder | Slimecraw | Light | Divine | Stamina |
| Necklace | Velothi Ur-Mage’s Amulet | Jewelry | Bloodthirsty | Weapon Damage |
| Ring | Pillar of Nirn | Jewelry | Bloodthirsty | Weapon Damage |
| Ring | Pillar of Nirn | Jewelry | Bloodthirsty | Weapon Damage |
| Weapon 1 DW | Pillar of Nirn | Dagger | Nirnhoned | Poison Damage Enchant |
| Weapon 1 DW | Pillar of Nirn | Dagger | Charged | Fire Damage Enchant |
| Weapon 2 | Perfected Merciless Charge | 2H Sword | Infused | Weapon Damage Enchant |
Gear Setup 2 – Stamina Dragonknight Build
This setup is for those who have not yet had the chance to step into a trial. You will deal slightly less damage than with the tier 1 setup, but not by much. Overall, the gear here is easier to get because you aren’t required to enter a trial.
- Briarheart Dagger: There is a unique Dagger “Materre’s Bodkin” that you can get fairly easily, instead of buying an expensive one in the guild store.
| Gear | Set | Weight | Trait | Enchantment |
|---|---|---|---|---|
| Chest | Hunding’s Rage | Medium | Divine | Stamina |
| Belt | Hunding’s Rage | Medium | Divine | Stamina |
| Shoes | Hunding’s Rage | Medium | Divine | Stamina |
| Pants | Hunding’s Rage | Medium | Divine | Stamina |
| Hands | Hunding’s Rage | Medium | Divine | Stamina |
| Head | Random Monster Set | Medium | Divine | Stamina |
| Shoulder | Random Monster Set | Medium | Divine | Stamina |
| Necklace | Briarheart | Jewelry | Bloodthirsty | Weapon Damage |
| Ring | Briarheart | Jewelry | Bloodthirsty | Weapon Damage |
| Ring | Briarheart | Jewelry | Bloodthirsty | Weapon Damage |
| Weapon 1 DW | Briarheart | Dagger | Nirnhoned | Poison Damage Enchant |
| Weapon 1 DW | Briarheart | Dagger | Charged | Fire Damage Enchant |
| Weapon 2 | Merciless Charge | 2H Sword | Infused | Weapon Damage Enchant |
Gear Setup 3 Beginner – Stamina Dragonknight Build
This setup is dedicated to people that have not had the chance to farm the necessary gear for the maximum damage potential. All the gear here is either craftable or cheap to get in a guildstore.
Make sure to ask a friend to craft Hunding’s Rage and Night Mother’s Gaze. Agility jewelry can be obtained in the Guildstores. I do recommend having around 18k health (with buff-food). You can buy cheap Agility jewelry with healthy trait to reach this value if you want.
| Gear | Set | Weight | Trait | Enchantment |
|---|---|---|---|---|
| Chest | Hunding’s Rage | Medium | Divine | Health |
| Belt | Night Mother’s Gaze | Medium | Divine | Stamina |
| Shoes | Night Mother’s Gaze | Medium | Divine | Stamina |
| Pants | Hunding’s Rage | Medium | Divine | Stamina |
| Hands | Hunding’s Rage | Medium | Divine | Stamina |
| Head | Night Mother’s Gaze | Medium | Divine | Stamina |
| Shoulder | Night Mother’s Gaze | Medium | Divine | Stamina |
| Necklace | Agility | Jewelry | Robust | Weapon Damage |
| Ring | Agility | Jewelry | Robust | Weapon Damage |
| Ring | Agility | Jewelry | Robust | Weapon Damage |
| Weapon 1 DW | Hunding’s Rage | Dagger | Nirnhoned | Poison Damage Enchant |
| Weapon 1 DW | Hunding’s Rage | Dagger | Charged | Fire Damage Enchant |
| Weapon 2 | Hunding’s Rage | 2H Sword | Infused | Weapon Damage Enchant |
Where can I get the gear?
Perfected Null Arca: vLucent Citadel Trial
Pillar of Nirn: Falkreath Hold Dungeon
Perfected Merciless Charge (Maelstrom 2H): vMaelstrom Arena
Merciless Charge: nMaelstrom Arena
Slimecraw: vWayrest Sewers 1, Undaunted Enclave
Velothi Ur-Mage’s Amulet (Mythic): Antiquities
Perf. Ansuul’s Torment: vSanity’s Edge Trial
Perfected Spectral Cloak: vBlackrose Prison
Hunding’s Rage: Craftable
Night Mother’s Gaze: Craftable
Agility: Guildstore
Briarheart: Wrothgar, Guildstore
Skills for the Stamina Dragonknight Build
The skill setup for the Stamina Dragonknight Build is very focused on maximizing your damage in your group.
Barbed Trap Replacement: You can also use Igneous Weapons instead of Barbed Trap on the backbar. This will make the rotation easier as Igneous Weapon has a long duration.


| Dual Wield Mainbar | 2H-second bar |
|---|---|
| Slot 1: Searing Claw | Slot 1: Stampede |
| Slot 2: Deadly Cloak | Slot 2: Barbed Trap |
| Slot 3: Disintegrating Dragonfire | Slot 3: Incinerate |
| Slot 4: Magma Fist | Slot 4: Carve |
| Slot 5: Molten Whip | Slot 5: Shatterspike Mantle |
| Ultimate: Flawless Dawnbreaker | Ultimate: Shifting Standard |
- Searing Claw: Strong damage over time effect that also applies the Burning status effect.
- Deadly Cloak: Deals great AoE (area of effect) and single target damage and gives us 20% AoE damage mitigation.
- Disintegrating Dragonfire: Deals great ST and AOE damage. Also applies Major Breach to all targets hit.
- Magma Fist: Your main spammable. Also increases the enemy’s damage taken per stack.
- Molten Whip: Your second spammable. However, only activate at full stacks to deal high damage.
- Flawless Dawnbreaker: This ultimate can be used for AoE (area of effect) encounters, for single target we use the other ultimate on the back bar.
- Stampede: Very powerful Single Target and AoE ability.
- Barbed Trap: Deals good ST damage and applies Minor Force.
- Incinerate: Deals flame damage to enemies in its range. Has a chance to apply Burning. Gives you Major Savagery on both bars.
- Shatterspike Mantle: Deals good ST and AOE damage over time. Also increases your defense.
- Shifting Standard: Your main Ultimate, it increases all your damage and also decreases incoming damage.
Class Mastery
Class Mastery allows pure class builds to get two additional powerful passives to better compete against Subclass builds. Activating subclassing will deactivate Class Mastery passives.
All Dragonknight Class Mastery Passives
For our Stamina Dragonknight Build, we are going to use the following:
 Inexorable Descent – Boosts Landslide passive to give 2% per stack instead of 1% damage boost.
- Wildfire Embers – Applies extra DoT.


Champion Points for the Stamina Dragonknight Build
Below you can find the Champion Points setup for this build. Work your way from top to bottom in your allocation. For more information on Champion Points, please visit the Champion Points Overview Page on ESO-Hub.com.
Hovering over each perk will give you insights on what it does. Presets are also provided for each of the allocations below.
Click the tab below to open the allocation.
Important Info for the Stamina Dragonknight Build PvE
In this section of the ESO Stamina Dragonknight Build we are going to take a look at Buff-food, Mundus Stone, Potions, Poisons, Passives and Attributes you should use.
All these things are important, I will give you one example to showcase how fast you can lose power. Often players forget to use/activate the Medicinal Use passive. Therefore the player won’t be able to have a 100% uptime on his potions, which means he will lose a lot of weapon damage, weapon critical and resources.
Buff-food
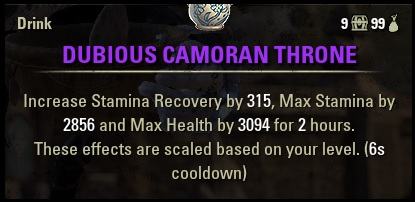
Any of the three foods below works well with the build. For a list of all buff food and drink consumables please visit the Buff Food and Drinks Overview Page.
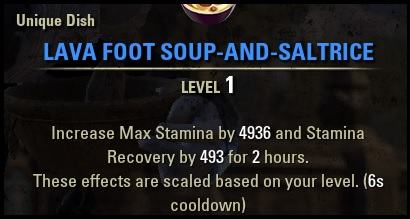
Lava Foot Soup and Saltrice
(Max Stamina, Stamina Recovery)
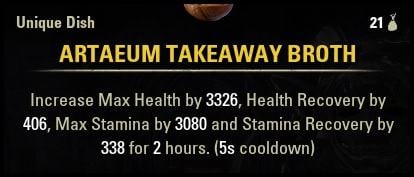
Artaeum Takeaway Broth
(Max Health+Max Stamina+Stamina Recovery+Health Recovery)
Dubious Camoran Throne
(2nd option if Artaeum is too expensive)
Mundus Stone
The Thief Mundus Stone increases our overall Critical Chance which boosts our damage. For more information on Mundus Stones please visit the Mundus Stone Overview Page.
The Thief Mundus Stone (Increased Critical Chance)
Race
Any race with stamina-based perks works for this setup. If you want a complete overview of all races and racial passives, then I recommend checking out the ESO Races Overview page.
Orc
Khajiit
Dark Elf
Nord
Redguard
Wood Elf
Imperial
High Elf
Potions
Incinerate already provides us with Major Savagery, so we can use this potion to get all the benefits. If you replace Barbed Trap with Igneous Weapons, which provides Major Brutality, you could use Tri-Stat/Crown Tri-Stat potions instead. But you need to make sure they’re up all the time.
Essence of Power Potions
(Spell & Weapon Damage, Restore Magicka, Restore Stamina)
(Columbine, Corn Flower, Blessed Thistle)

Passives for the Stamina Dragonknight Build
Below you can find a full list of all the recommended passives for the Stamina Dragonknight Build.
- Ardent Flame: Combustion, Traumatic Burns, Fan the Flames, A Soul Ablaze
- Draconic Power: Burnished Scales, World in Ruin, Elder Dragon, The Storm Voice
- Earthen Heart: Heart of Stone, Landslide, Blessing at the Peak, Mountain Giant
- Dual Wield: Slaughter, Dual Wield Expert, Controlled Fury, Ruffian, Twin Blade and Blunt
- Two Hander: Forceful, Heavy Weapons, Balanced Blade, Follow Up, Battle Rush
- Medium Armor: Dexterity, Wind Walker, Improved Sneak, Agility, Athletics
- Fighters Guild: Intimidating Presence, Slayer, Banish the Wicked, Skilled Tracker
- Undaunted: Undaunted Mettle, Undaunted Command
- Racial: All
- Alchemy: Medicinal Use
Attributes
All into Stamina
Resource Management
The Storm Voice activates whenever we use either one of our Ultimates and returns resources.
Combustion returns Magicka every time we apply the Burning Status effect.
Mountain Giant restores additional Stamina whenever we do a Heavy Attack.
Energy Orb can be provided by group members such as your Healer or Tank. When you get close to the Orb you can activate its synergy to regain resources.
Potions should always be used on cooldown to gain the maximum benefit from them.
Heavy Attacks help you restore Stamina. If you drop low on resources, do a few Heavy Attacks between skills to refill your Stamina.
- The Storm Voice
- Combustion
- Mountain Giant
- Orb Synergy
- Potions
- Heavy Attacks
Rotation for the Stamina Dragonknight Build
Here is a quick explanation of what you have to do with all the skills on your bar.
- Your main spammable is Magma Fist & Molten Whip. Only use Molten when it has the enhanced damage.
- Reapply DoTs (damage over time) effects after they run out: Deadly Cloak, Stampede, Carve, Disintegrating Dragonfire, Searing Claw, Incinerate, Shatterspike Mantle, and Barbed Trap.
- Activate the Shifting Standard Ultimate whenever it is ready
- Always light attack between each ability.
You can always replace a skill with Resolving Vigor to get a self-heal.
Area of Effect Setup
This setup here is focusing on an AoE setup, this way you can be more effective when fighting trash packs or just a large amount of monsters.
Gear Setup
| Gear | Set | Weight | Trait | Enchantment |
|---|---|---|---|---|
| Chest | Perf. Ansuul’s Torment | Medium | Divine | Stamina |
| Belt | Perf. Ansuul’s Torment | Medium | Divine | Stamina |
| Shoes | Perf. Ansuul’s Torment | Medium | Divine | Stamina |
| Pants | Perf. Ansuul’s Torment | Medium | Divine | Stamina |
| Hands | Perf. Ansuul’s Torment | Medium | Divine | Stamina |
| Head | Pillar of Nirn | Medium | Divine | Stamina |
| Shoulder | Pillar of Nirn | Medium | Divine | Stamina |
| Necklace | Pillar of Nirn | Jewelry | Bloodthirsty | Weapon Damage |
| Ring | Pillar of Nirn | Jewelry | Bloodthirsty | Weapon Damage |
| Ring | Pillar of Nirn | Jewelry | Bloodthirsty | Weapon Damage |
| Weapon 1 DW | Perfected Spectral Cloak | Dagger | Nirnhoned | Poison Damage Enchant |
| Weapon 1 DW | Perfected Spectral Cloak | Dagger | Precise | Fire Damage Enchant |
| Weapon 2 | Perfected Merciless Charge | 2H Sword | Infused | Weapon Damage Enchant |
Skills


Maelstrom & Vateshran Hollows Arena
Please check out the Solo Stamina Dragonknight Build for specific Maelstrom Arena and Vateshran Hollows Arena setups.
Gameplay for the Stamina Dragonknight Build
Please keep in mind, these videos are from old previous patches so the build won’t be exactly the same! However, the videos should be able to give you an idea of how a Stamina Dragonknight plays.
World’s first Tick-Tock Tormentor run with the Stamina Dragonknight
The video shows the world first Tick-Tock Tormentor run with an older build of the Stamina Dragonknight. While not relevant to the current build anymore, it is still an interesting video showcasing what this build used to look like.
ESO Dragonknight Subclassing Build Options
ESO’s Subclassing offers a lot of variety, allowing you to swap, mix, and match different skill lines of various classes all on one character. Read our How does Subclassing work in ESO guide to get an understanding of how the subclass system works. We also have plenty of ESO Builds optimized for Subclassing.
Outfit Style Showcase of the Venom Dragonknight Build for ESO
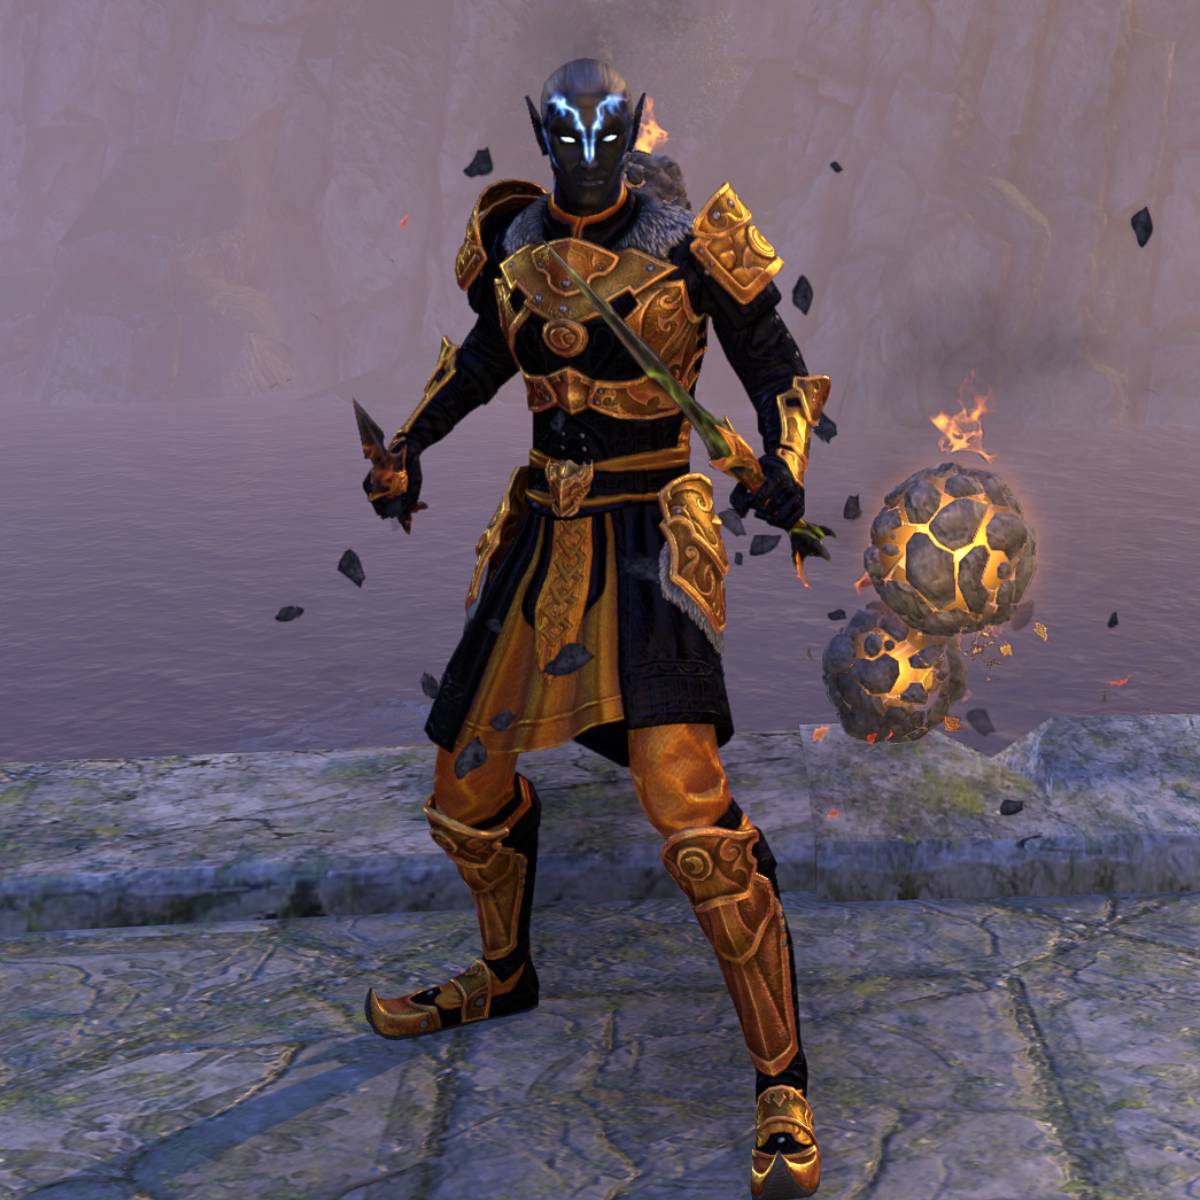
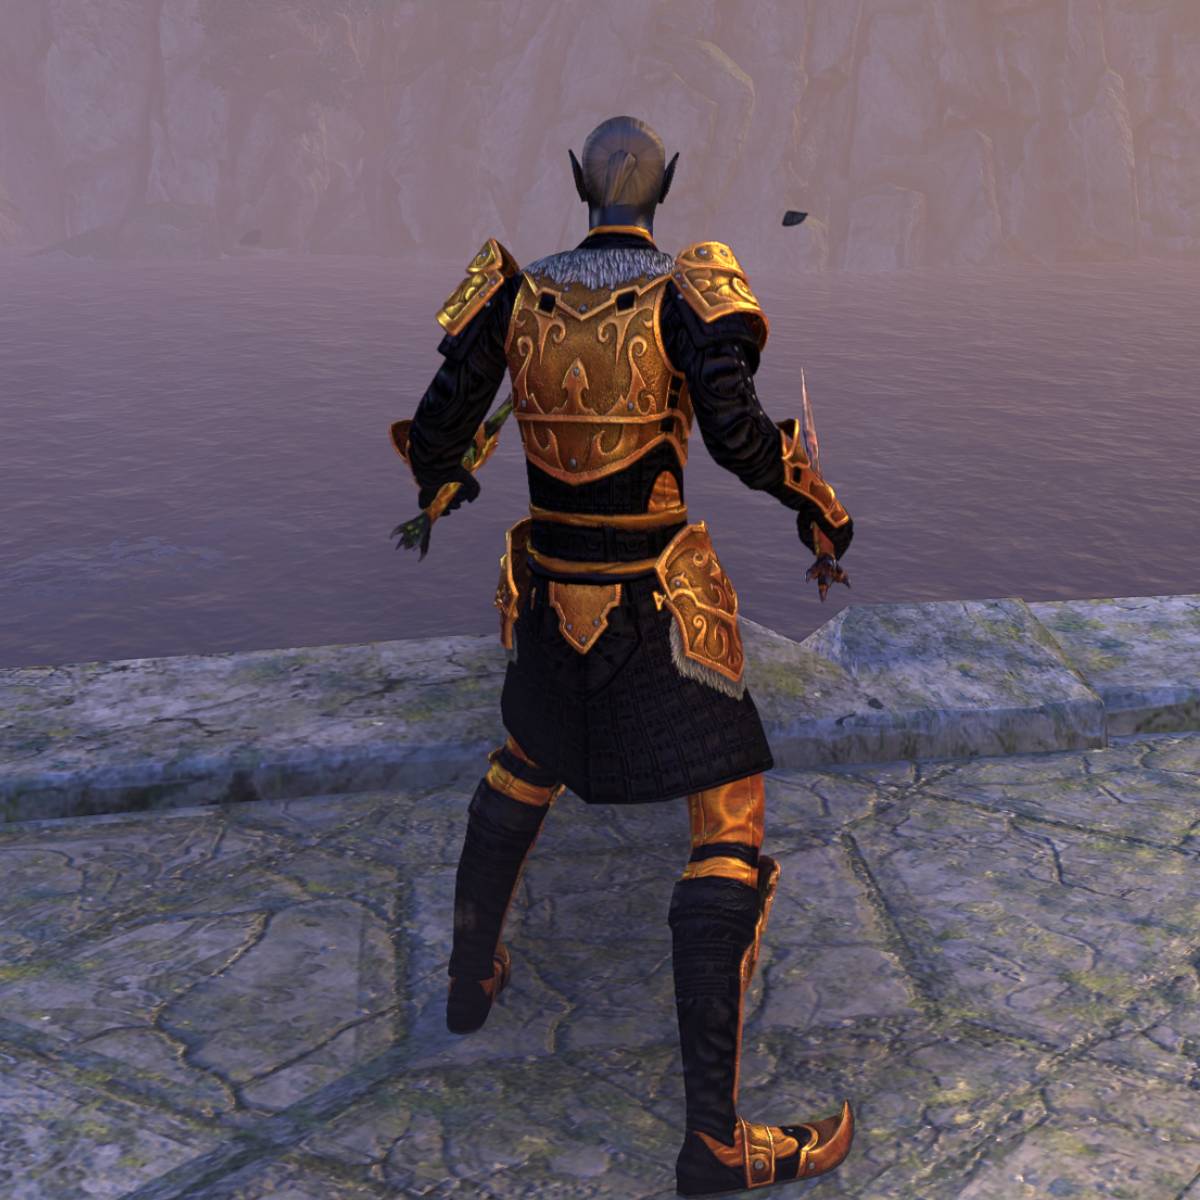
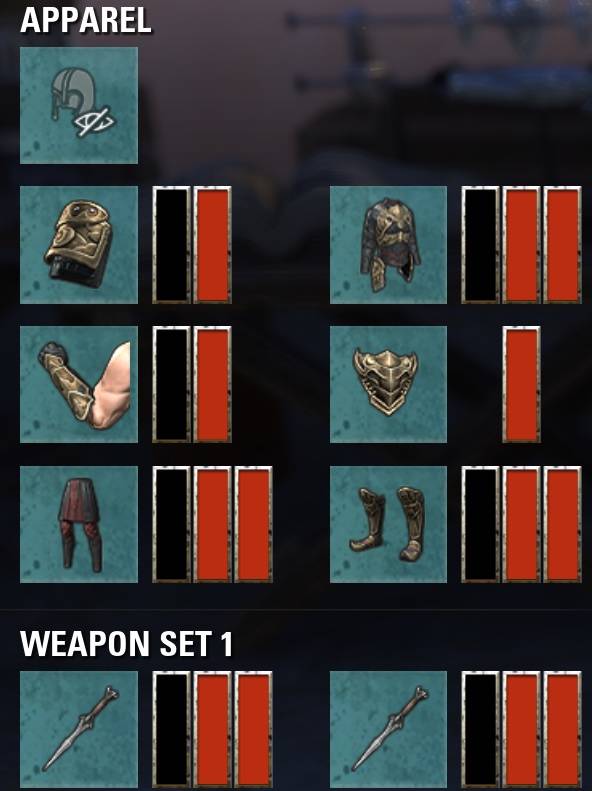
Let’s take a look at the outfit style of the Stamina Dragonknight PvE Build for ESO. You can find a close-up shot, an image from the back, and an image of the outfit editor dye station below.
- Moongrave Fane Motif Style: Arm Cops, Bracers, Guards, Jack, Belt, Boots, Daggers
- Skin: Dro-m’Athra
- Dyes: Void Pitch, Bloodroot Wine
| Slot | Name |
|---|---|
| Head | Hidden |
| Shoulder | Moongrave Fane Motif |
| Chest | Moongrave Fane Motif |
| Hands | Moongrave Fane Motif |
| Waist | Moongrave Fane Motif |
| Legs | Moongrave Fane Motif |
| Feet | Moongrave Fane Motif |
| Weapon | Moongrave Fane Motif |
| Skin | Dro-m’Athra |
| Dyes | Void Pitch, Bloodroot Wine |
Update Log for the ESO Stam DK Build PVE
11.08.2019 Updated Build for the SCALEBREAKER DLC, Elsweyr Chapter, Stamina Dragonknight Build PvE.
20.10.2019 Updated the Build for the DRAGONHOLD DLC.
19.02.2020 Updated the Build for the Harrowstorm DLC.
23.05.2020 Updated the Build for the GREYMOOR CHAPTER.
20.08.2020 Updated the Build for the STONETHORN DLC, Greymoor Chapter.
03.09.2020 Updated the Champion Points 810, 600, 300.
30.10.2020 Updated the Build for the MARKARTH DLC, Greymoor Chapter.
03.03.2021 Updated the Build for the FLAMES OF AMBITION DLC, Blackwood Chapter.
28.05.2021 Updated the Build for the BLACKWOOD CHAPTER.
02.09.2021 Updated the Champion Points link and added buff food tooltips, WAKING FLAME DLC, Blackwood Chapter.
22.10.2021 Updated the Build for the DEADLANDS DLC, Blackwood Chapter.
10.03.2022 Updated the Build for the ASCENDING TIDE DLC, High Isle Chapter.
27.05.2022 Updated the Build for the HIGH ISLE CHAPTER.
12.08.2022 Updated the Build for the LOST DEPTHS DLC, High Isle Chapter.
28.10.2022 Updated the Build for the FIRESONG DLC, High Isle Chapter.
13.03.2023 Updated the Build for the SCRIBES OF FATE DLC, Necrom Chapter.
31.05.2023 Updated the Build for the ESO Necrom Chapter.
26.10.2023 Updated the Build for Necrom Update 40.
06.03.2024 Updated the Build for the Scions of Ithelia DLC U41, Gold Road Chapter.
29.05.2024 Updated the Build for the Gold Road Chapter U42.
20.08.2024 Updated the Build for Update 43, Gold Road Chapter.
28.10.2024 Updated the Build for Update 44, Gold Road Chapter.
11.03.2025 Updated the Build for Update 45, Fallen Banners.
27.05.2025 Updated the Build for Update 46, Seasons of the Worm Cult Part 1.
18.08.2025 Updated the Build for Update 47 Feast of Shadows DLC, Seasons of the Worm Cult.
27.10.2025 Updated the Build for Update 48, Seasons of the Worm Cult Part 2.
09.03.2026 Updated the Build for Update 49, Season 0.
04.06.2026 Updated the Build for Update 50, Season 0 + 1.
15.09.2026 Updated the Build for Update 51, Season 1 and 2.
Tags: Stamina Dragonknight Build PvE, Stamina DK Build, Stam DK Build PvE.
Related Guides: