Welcome to The First Descendant Hailey Build Guide for Season 3 Episode 3.
In this guide, we’ll show you how to unleash the full potential of Hailey, the chill sniper goddess. From mastering her frosty abilities to selecting the perfect weapons, stats, and modules, this guide covers everything you need to create a truly devastating build for Hailey.
Table of Contents:
- How to play Hailey: A Deep Dive
- Hailey Builds Overview – Modules
- Trigger & Ancestor Modules
- Arche Tuning for Hailey
- Hailey Equipment Overview
- Hailey Basics
- Hailey’s Story
For builds on other Descendants, visit our The First Descendant Builds Database, or check out the Character Tier List or the Weapon Tier List.
TFD Wiki: We have expanded Alcasthq with tfd.gameslantern.com, a Wiki & Database for anything related to The First Descendant. Use the Character Editor or the Weapon Editor to theorycraft and create builds yourself. Browse Descendants, Weapons, Leaderboard Loadouts or use the Compare Tool. There are plenty of other features you can check out, too!
Here is a quick list of the strengths and weaknesses of the Hailey Build for The First Descendant.
Hailey’s Strengths
Hailey Weaknesses
How to Play Hailey in the First Descendant
Hailey is a great Descendant to take out Colossus bosses due to her specialized sniper damage. However, she is also an amazing weapon Descendant due to her skills that buff a weapon’s damage.
With the latest rebalancing round Hailey became a very powerful character, especially the Cold Heart Transcendent Module gives her a huge boost to all damage for both mobbing and bossing.
Hailey’s Equipment: Make Or Break It!
To unlock Hailey’s full potential, you need the right Weapons, Reactors, and External Components:
- Weapons: While you can use a powerful weapon with her to deal damage, they are mostly used as “stat stick” to boost her skills further. See the Best Weapons for Hailey section.
- Reactors: Selecting the right reactor can drastically boost your damage. Check out the Best Reactors for Hailey section.
- External Components: These are critical for survivability. Properly configured, they double or triple your HP and DEF. Learn more in the Best External Components for Hailey section.
Building a top-tier The First Descendant Hailey Build requires not only the right modules but also optimized weapons, reactors, and components.
Best Hailey Builds Overview for The First Descendant
Crystallization Catalysts: To unlock the necessary socket slots.
Energy Activator: To increase overall module capacity.
- Gold & Kuiper:
Best Gold Farming Method –
Best Kuiper Shard Farming Method.
Equipment: I will cover Weapons, Reactors, External Components, Inversion Reinforcements, and Transcendent Modules in the Hailey Equipment section. To maximize the power of any build, you must get the correct items!
| Name | Description |
|---|---|
| Hailey Mobbing Build | Used in any hard content that requires AoE damage. |
| Hailey Bossing Build | Used against hard Colossus fights. |
| N/A | N/A |
Hailey Mobbing Build
- Mobbing Build Type: Any hard difficulty mobbing content
- Mobbing Build Focus: Optimized for AoE damage and speed
- Playable on: Hailey
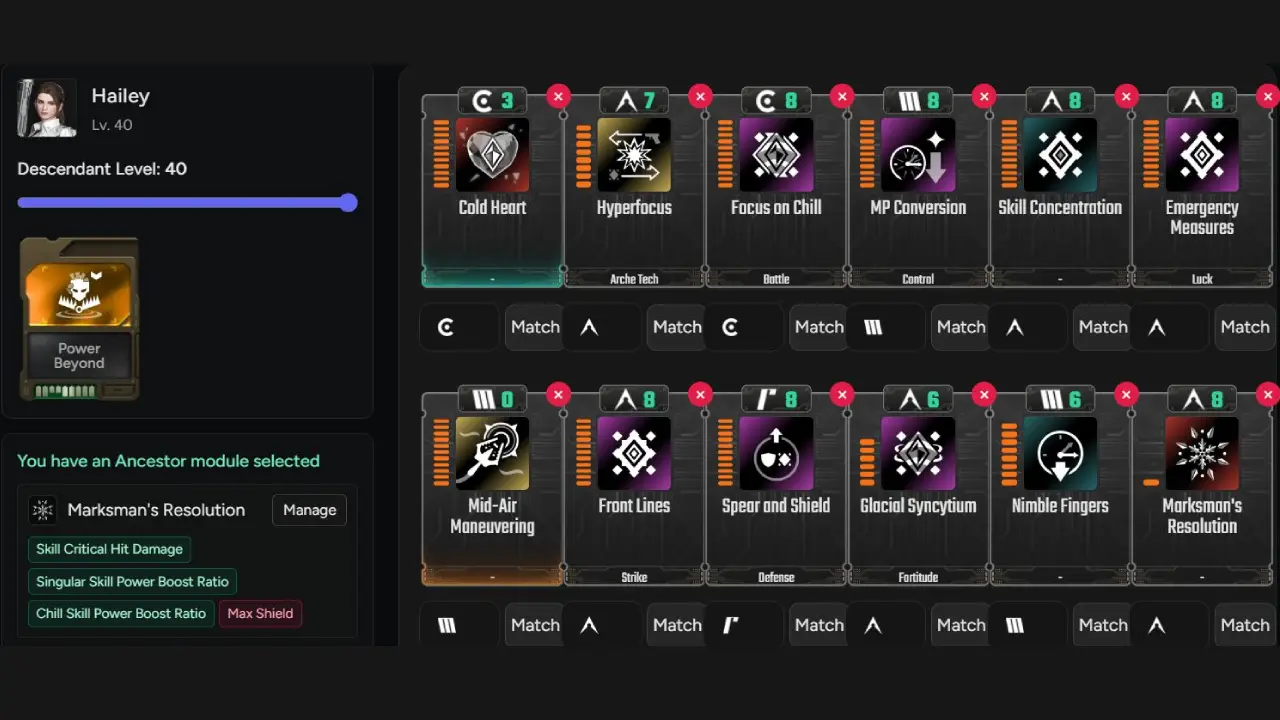
This is our Hailey Mobbing Build that is used in any difficult content that requires AOE damage. The Ancestor’s Module isn’t a must have, but it will obviously enhance the builds power even further if you have it with the right stats: Skill Critical Hit Damage, Singular Skill Power Boost Ratio, Chill Skill Power Boost Ratio. (Max Shield negative).
- No Ancestor Module? Place Increased HP in its place until you get a good Ancestor Module.
| Module Slot | Module Name | Mod Level | Socket Type | Crystallized |
|---|---|---|---|---|
| 0 (Trigger Module) | Power Beyond | N/A | N/A | N/A |
| 1 (Skill Module) | Cold Heart | Max | No | |
| 2 | Skill Expansion | Max | Yes | |
| 3 | Amplification Control | Max | Yes | |
| 4 | MP Conversion | Max | Yes | |
| 5 | Skill Concentration | Max | Yes | |
| 6 | Emergency Measures | Max | Yes | |
| 7 (Sub Module) | Mid-Air Maneuvering | Max | Yes | |
| 8 | Front Lines | Max | Yes | |
| 9 | Focus on Chill | Max | Yes | |
| 10 | Focus on Singular | Max | Yes | |
| 11 | Nimble Fingers | Max | Yes | |
| 12 (Ancestor Module) | Marksman’s Resolution | Max | Yes |
Ancestor Module: Skill Critical Hit Damage, Singular Skill Power Boost Ratio, Chill Skill Power Boost Ratio. (Max Shield negative)
Hailey Bossing Build for The First Descendant
- Bossing Build Type: Colossus fights on hard difficulty.
- Bossing Build Focus: Maximum Burst Damage, destroys any hard difficulty Colossus within seconds.
- Playable on: Hailey
This Hailey Bossing Build is focused on skill-based damage. Therefore, we need to boost our skill damage as high as possible to one-shot bosses.
- The Ancestor’s Module isn’t a must-have. Still, it will obviously enhance the builds power even further if you have it with the right stats: Skill Critical Hit Damage, Singular Skill Power Boost Ratio, Chill Skill Power Boost Ratio. (Go with Dimension as negative.).
- Hyperfocus: You must hit the boss first with a bullet for this to trigger the correct portion of the effect.
- No Ancestor Module? Place Increased HP in its place until you get a good Ancestor Module.
| Module Slot | Module Name | Mod Level | Socket Type | Crystallized |
|---|---|---|---|---|
| 0 (Trigger Module) | Power Beyond | N/A | N/A | N/A |
| 1 (Skill Module) | Cold Heart | Max | No | |
| 2 | Hyperfocus | Max | Yes | |
| 3 | Focus on Chill | Max | Yes | |
| 4 | MP Conversion | Max | Yes | |
| 5 | Skill Concentration | Max | Yes | |
| 6 | Emergency Measures | Max | Yes | |
| 7 (Sub Module) | Mid-Air Maneuvering | Max | Yes | |
| 8 | Front Lines | Max | Yes | |
| 9 | Spear and Shield | Max | Yes | |
| 10 | Glacial Synctium | Max | Yes | |
| 11 | Nimble Fingers | Max | Yes | |
| 12 (Ancestor Module) | Marksman’s Resolution | Max | Yes |
Ancestor Module: Skill Critical Hit Damage, Singular Skill Power Boost Ratio, Chill Skill Power Boost Ratio. (Go with Dimension as negative.)
Trigger and Ancestor Modules for the Hailey Build
Trigger and Ancestor Modules are also part of the module category, but they are a special type of module that are harder to unlock and acquire.
- Trigger Modules: Go into a special slot. Unlock special buffs and unique effects.
- Ancestor Modules: Go into a normal module slot. Enhance the build by adding additional stats.
Hailey Trigger Modules
You need to first unlock the trigger module slot for each character. Learn how to unlock Trigger Modules in The First Descendant.
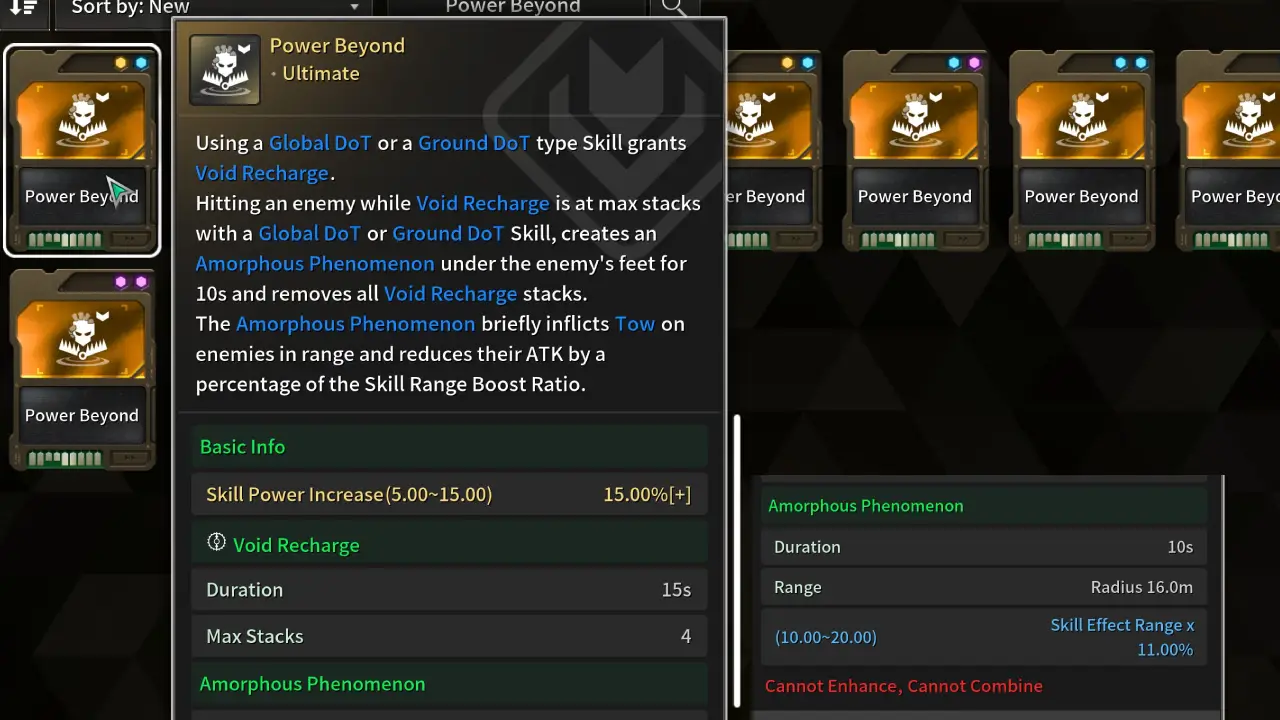
For our The First Descendant Hailey Build we want to use the Power Beyond trigger module like listed above for both the Hailey Mobbing Build and Hailey Bossing Build. Power Beyond doesn’t have to be activated; we just slot it to gain the extra 5-15% Skill Power Increase that is always active! Of course, you want to have the value as high as possible. Like mine in the screenshot with the max of 15% will give you a tremendous damage boost.
- Mobbing: Power Beyond
- Bossing: Power Beyond
Hailey Ancestor Module
Ancestor Modules can be slotted once you have acquired them. However, they are only worth it once you have an Ancestor module with good stat rolls on them.
- Hailey Ancestor Module: Marksman’s Resolution
Superconductive Cooling Units (Needed to Reroll perks): How to farm
- Must Read: How Ancestor Modules Scale & Examples
No Ancestor Module? Place Increased HP in its place until you get a good Ancestor Module.
- Ideal Positive Rolls
- Chill Skill Boost
- Singular Skill Boost
- Skill Critical Hit Damage
- Ideal Negative Rolls
- Dimension Skill Boost
Anything that boosts our damage will do great. And because we have an insanely high crit rate, it is important to get the Skill Critical Hit Damage. As negative roll you can go with Dimension since we don’t have any skill that uses this type with the Cold Heart transcendent module.
Ancestor Module: What to Replace and Why
To slot an Ancestor Module effectively, identify existing modules that share the same primary stat. By replacing a standard module with an Ancestor version that offers similar values, you maintain your core build while gaining its additional unique perks as a ‘free’ bonus.
- How to: Replace a standard module with an Ancestor Module that mirrors its main perk.
- The values should be close; you preferably don’t want to replace a 100% with a 30% value.
- Example 1: If your Ancestor Module provides Skill Critical Hit Rate, replace Skill Insight.
- Example 2: If your Ancestor Module provides Max HP, replace Increased HP.
- Example 3: If your Ancestor Module provides Skill Effect Range, replace Skill Expansion.
- Result: All other perks from the Ancestor Module will basically be a “freebie” and improve your build!
- Helpful Links:
As long as the Ancestor Module reaches a similar value to the one you’re removing, every additional stat on that Ancestor Module becomes a “free” bonus for your build.
Arche Tuning for Hailey
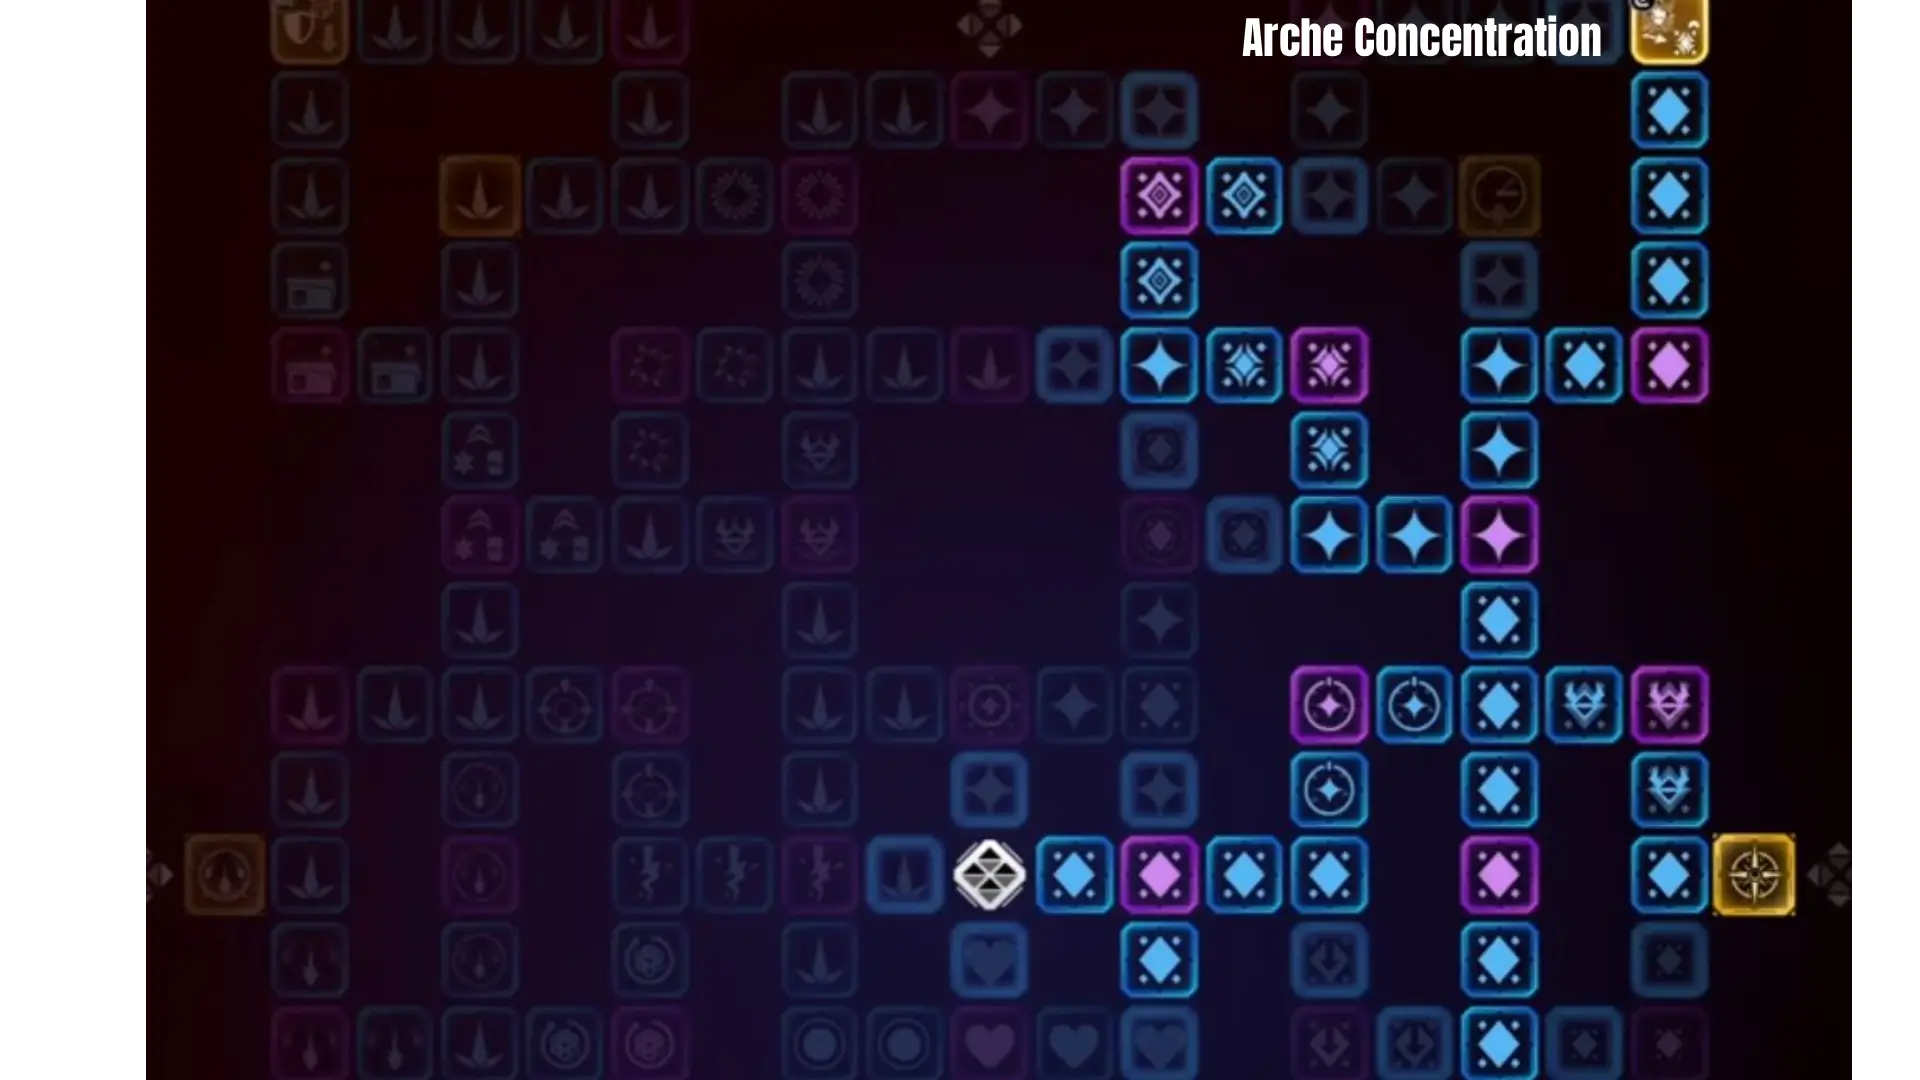
- Image 1: Mobbing Arche Tuning for Hailey
- Image 2: Bossing Arche Tuning for Hailey
The Arche Tuning System in The First Descendant is important for every Character; it buffs your stats by a good amount. You level up Arche Tuning in the Sigma Sector Dropoff Operation. Mutant Cells also drop there with a small chance.
Hailey Equipment Overview in The First Descendant
Equipment is the cornerstone of any successful The First Descendant Build. For Hailey, having the right setup can mean the difference between dominating a dungeon and falling short. This section breaks down the essential equipment types: Weapons, Reactors, External Components, and Transcendent Modules, and explains how they maximize her power.
| Equipment Type | Importance | Key Benefits |
|---|---|---|
|
|
|
|
|
|
|
|
|
|
|
|
|
|
Best Weapon for the Hailey Build in The First Descendant
Below are the Top Weapons for Hailey in The First Descendant for Mobbing and Bossing.
Top 3 Weapons for Hailey
Other Useful Weapons
Best Reactor for Hailey in The First Descendant
Selecting the best reactor for Hailey in The First Descendant can significantly enhance her abilities, allowing you to maximize her effectiveness in various scenarios. Not only does the reactor determine your skill damage, but it also gives additional secondary benefits through modifiers. These are often hard to get and take time to grind out!
| Best Reactor | Specs | Key Benefits | Best Builds |
|---|---|---|---|
Frozen Singularity Reactor |
|
|
|
Frozen Singularity Reactor |
|
|
How to find the Location of Reactors
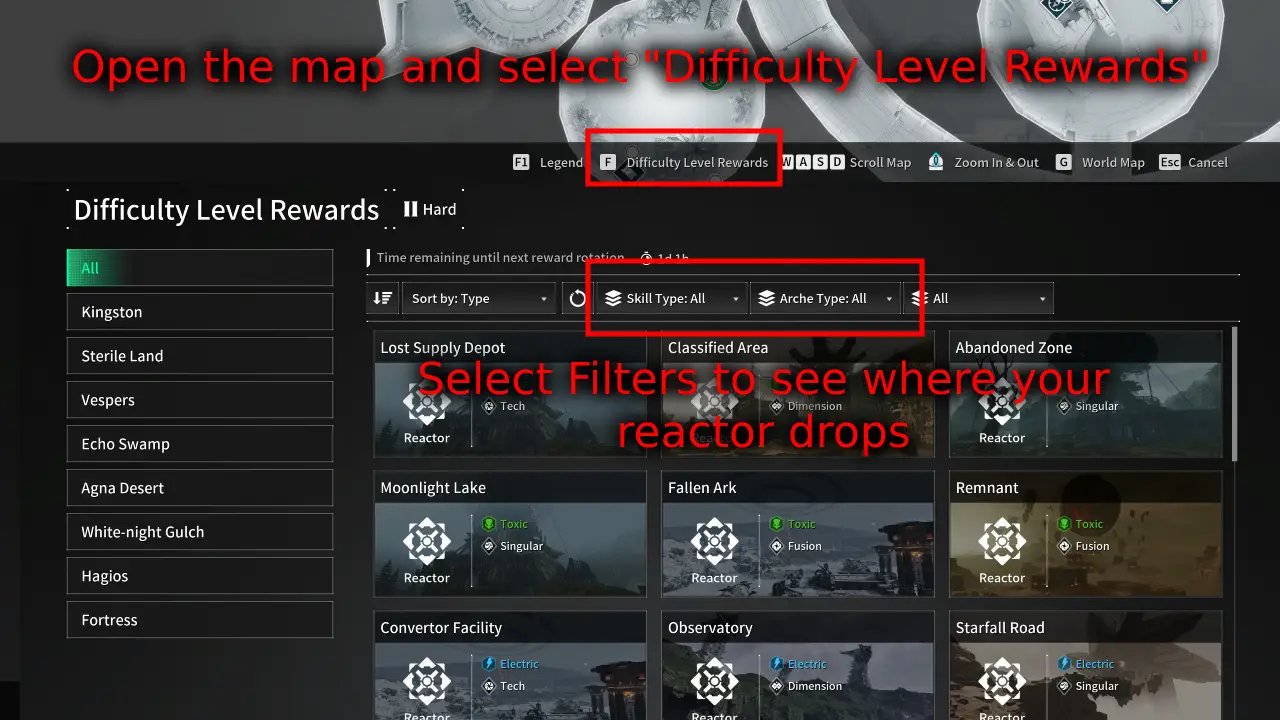
Reactor drop locations change every day. Not many players know this and get confused. Now, there is a reactor search function in-game. Go to the map and press on Difficulty Level Rewards. In here, you can see where all the reactors currently drop.
Note: It is possible that not all reactor types are currently dropping. You have to come back and recheck every day.
If your specified reactor drops in an area, you go there and farm any missions and monsters (Preferably missions with lots of monster spawns). There will be plenty of reactors dropping from monsters all over the place, any monster works. It will take a while to get a good reactor!
Best External Components for the Hailey Build
With Hailey, depending on what setup you run you want to have different External Components.
- Mobbing: 4x Polar Night
- Polar Night Auxiliary Power: MP Recovery Out of Combat & Max HP
- Polar Night Sensor: Max MP & MP Recovery in Combat
- Polar Night Memory: DEF & MP Recovery Modifier
- Polar Night Processor: Any stats are fine.
- Bossing: 4x Slayer
- Slayer Auxiliary Power: MP Recovery Out of Combat & Max HP
- Slayer Sensor: Max MP & MP Recovery in Combat
- Slayer Memory: DEF & MP Recovery Modifier
- Slayer Processor: Any stats are fine.
Additionally, External Components now also have core slots; it is recommended to slot Max HP and DEF cores.
Hailey Mobbing External Components
| External Component Part | Base Stat | Selective Best Stats | Cores |
|---|---|---|---|
| Max HP |
|
|
|
| Max HP |
|
|
|
| Max Shield |
|
|
|
| Max HP |
|
|
Hailey Bossing External Components
| External Component Part | Base Stat | Selective Best Stats | Cores |
|---|---|---|---|
| DEF |
|
|
|
| DEF |
|
|
|
| Max Shield |
|
|
|
| Max HP |
|
|
Note: You can replace one or two DEF cores with attribute resistance if you fight against specific enemy types.
Inversion Reinforcements Setup for Hailey
You can find the Inversion Reinforcements in the inventory, located on the bottom left side. This changes with every new season and needs to be leveled up again. You level up Inversion Reinforcements by doing any activity. However, the fastest way to advance it is by completing Disrupt Invasion (max 4 daily) in the dungeon terminal with the red dungeons.
At max level, you have unlocked everything. While the last perk is always active in each row, you can only slot three additional perks at the bottom. Here is what you want to prioritize:
- Hunting: Arche Circulation Tactic.
- Elemental: None.
- Recovery: Selective Neurostimulation.
- Survival: Deploy Hardened Shell.
- Season: None.
All Hailey Transcendent Modules Explained
First, let us look at the full list of all Transcendent Modules for Hailey in The First Descendant. It is important to note that not all of the modules will be used. Some are more effective than others!
| Module Name | Module Description | Best In Slot |
|---|---|---|
Cryogenic Cluster Shot |
Modifies the Cryo effect to Cryogenic, reducing the number of maximum stacks and effect strength, but dealing additional AoE damage to nearby enemies when the effect is removed. |
|
| Equipping a Unique Weapon decreases Additional Firearm ATK and Fire Rate, but increases Weak Point Damage and successfully attacking a Weak Point recovers Shield instead of MP. The increase in Weak Point Damage decreases when firing a Unique Weapon, but increases again on a successful Weak Point attack.. |
|
|
| Changes to a skill that attacks nearby targets with Chill when her Unique Weapon is not in use. Cryo changes to Ultra Cryo. Ultra Cryo: Max stacks remain the same, but when attacking with a skill, removes all stacked effects and deals additional damage. | ||
| Upon equipping her Unique Weapon, Hailey temporarily activates Camouflage, allowing her attacks to deal additional AoE damage to nearby enemies. |
|
Hailey Basics in The First Descendant
If it is your first time playing Hailey in The First Descendant, here are some useful things you should know.
- How to unlock Hailey
- Skills Explanation – Master Hailey’s Abilities
- Module Basics Explained!
- Best Grapple Hook for Hailey
How to Unlock Hailey in The First Descendant
Let’s look at how to unlock Hailey in the First Descendant. To unlock Hailey you have to purchase her from the store, or research her. You need the following items to research her:
- 1x Hailey Enhanced Cells
- 1x Hailey Stabilizer
- 1x Hailey Spiral Catalyst
- 1x Hailey Code
- 400k Credits
Note: Hailey acquisition is more difficult since you don’t need to farm Amorphous Materials but actual parts of items that are currently time-gated.
When you visit Magisters Anais at the Research Institute you can hover over each item. Then click on Acquisition Info and it will tell you where this specific item drops. You can view an in-depth guide here on How to get Hailey in The First Descendant.
The First Descendant Hailey Skills Explained
In this section, we are going to explain the skills available to our Hailey Build in the First Descendant, how each skill works and the best ways for you to use them.
| Icon | Skill Name | Description |
|---|---|---|
 |
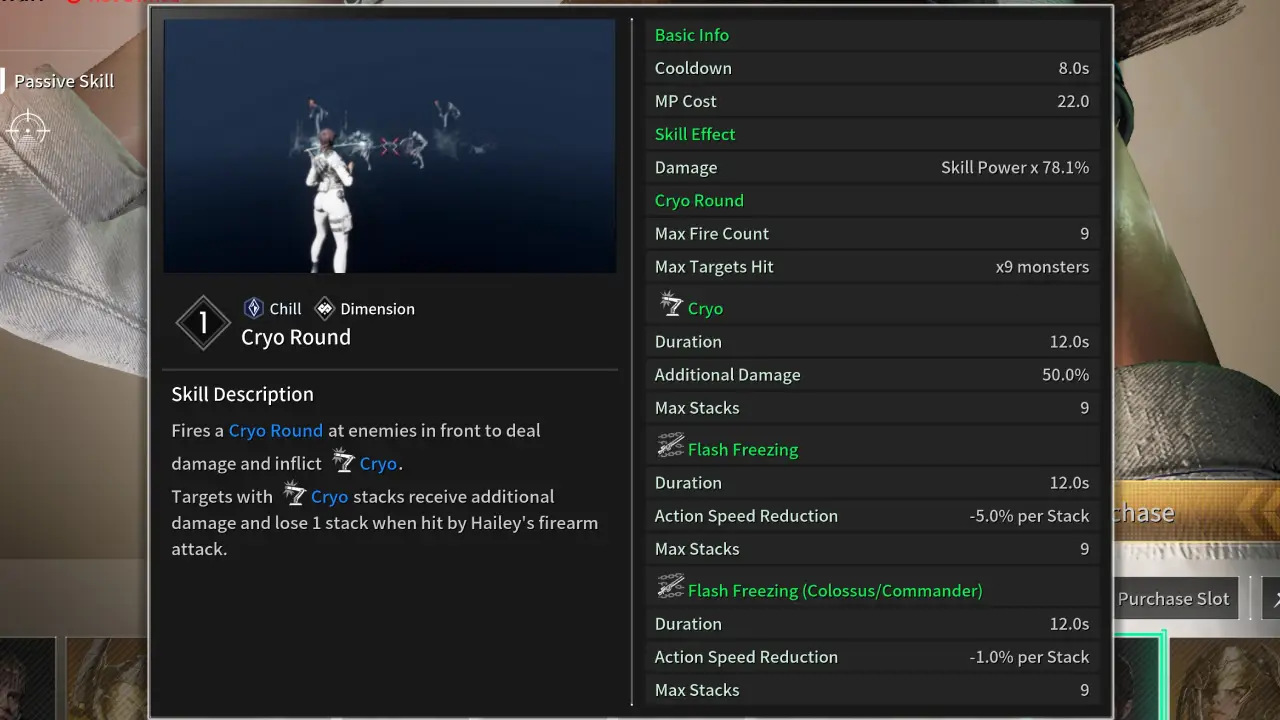
Cryo Rounds | Fires a Cryogenic Round at enemies in front to deal damage and inflict Cryo. Enemies inflicted with Cryo receive additional damage from firearm attack. |
 |
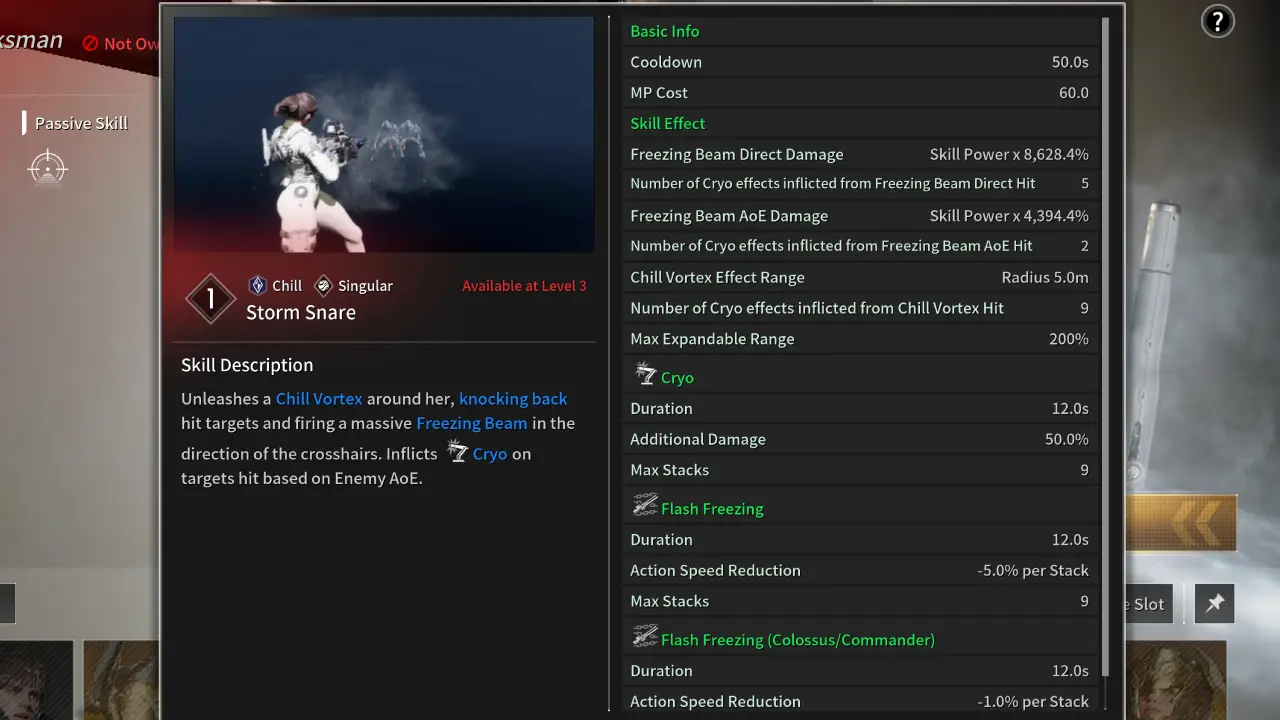
Storm Snare | Fires a glacial beam at an enemy to deal powerful damage and inflict Cryo. Inflicts Knockback and Flash Freezing to nearby enemies. |
 |
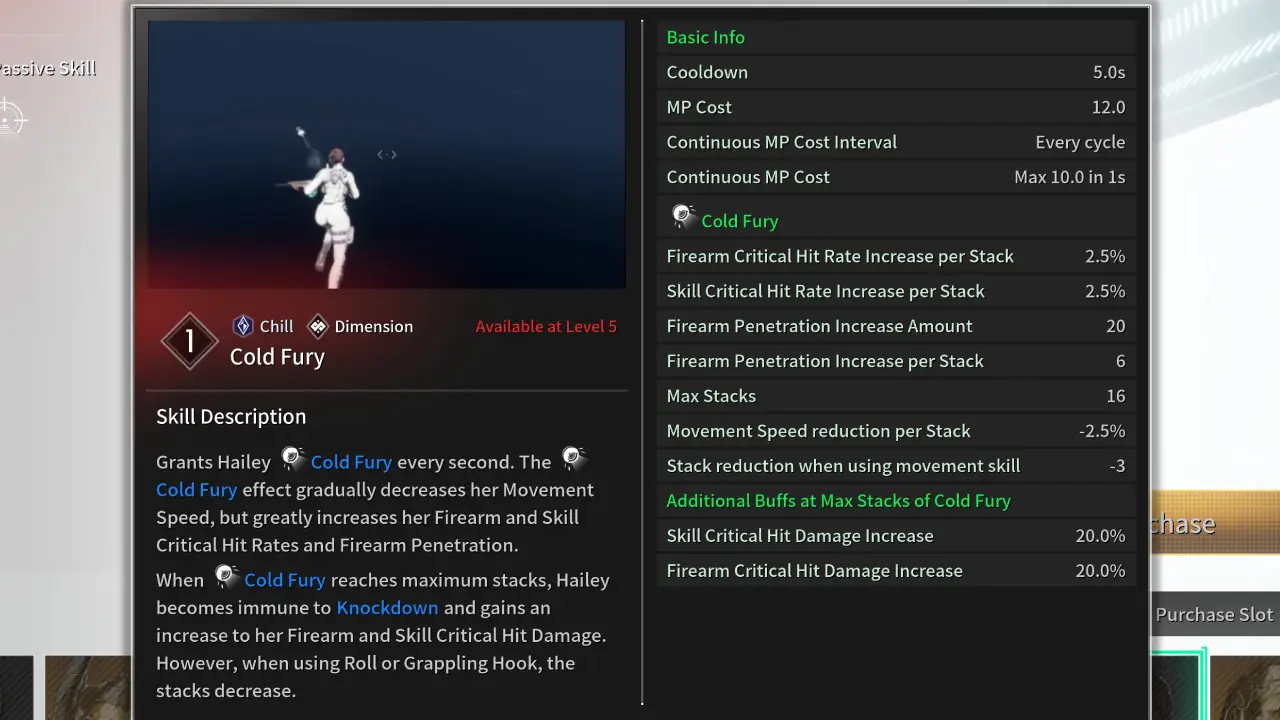
Cold Fury | Grants Cold Fury to Hailey. This effect gradually stacks. The more it stacks, the more Movement Speed decreases and Critical Hit Rate for firearms and skills increases. Becomes immune to Knockdown while the effect is active. |
 |
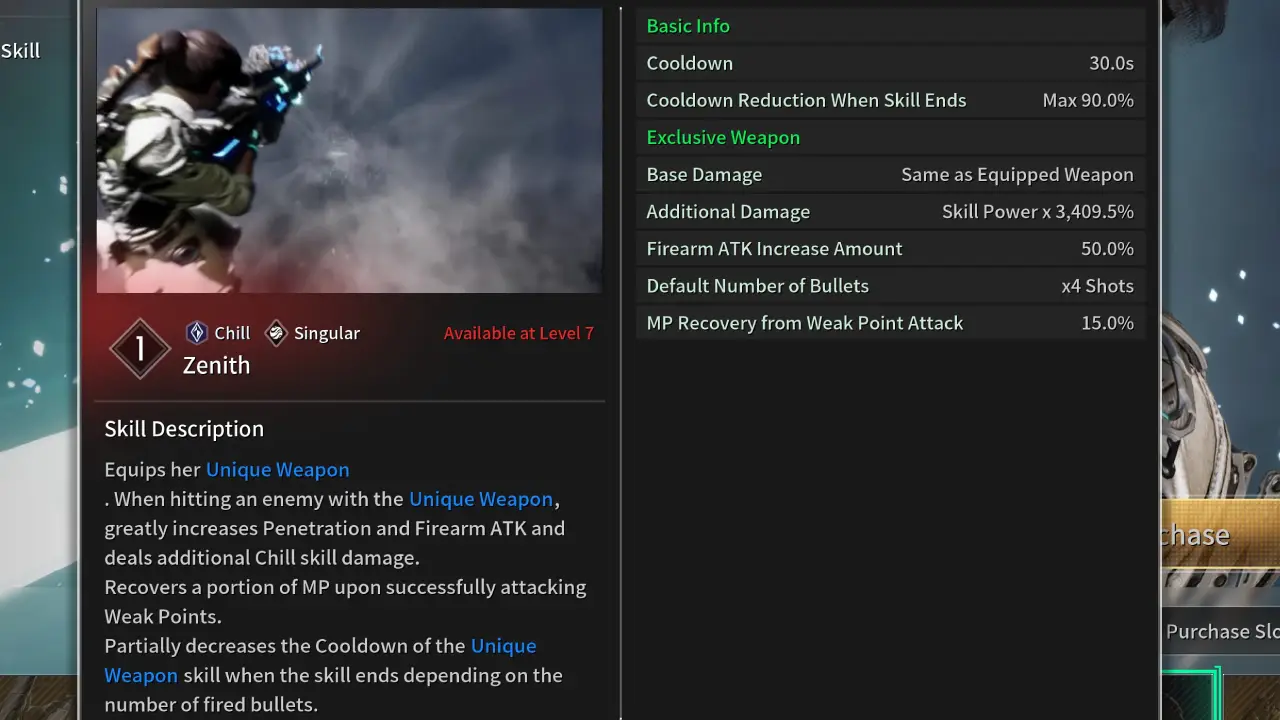
Zenith | Equips her Unique Weapon. When hitting an enemy with the Unique Weapon, deals additional Chill skill damage with greatly increased Penetration. Recovers a portion of MP upon successfully attacking Weak Points, and partially decreases the Cooldown when the skill ends depending on the number of fired bullets. |
 |
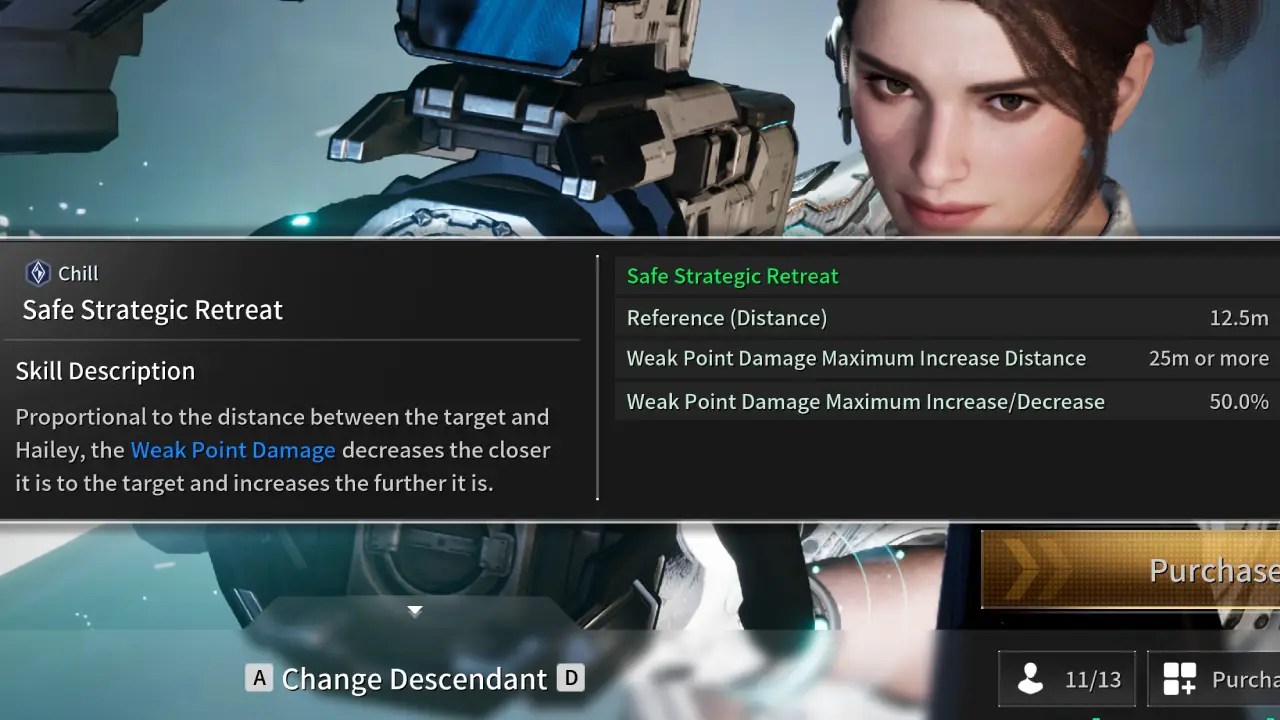
Safe Strategic Retreat (Passive) | Firearm Weak Point Damage increases when Hailey is further away from enemies, but decreases when she approaches them. |
Cryo Rounds
Cryo Rounds itself isn’t a strong skill. However, it allows us to get the Cryo stacks to 9, which will benefit our other skills. By having Cryo max stacks, we will get additional shots from other skills that benefit from the 50% damage buff that we add with our Storm Snare skill.
Storm Snare
Storm Snare deals insane damage to the target and adds the Cryo effect to the target (max 9 stacks), which gives us a 50% damage increase on our target as long as stacks are active. Each successful hit on the target will remove a Cryo stack.
Cold Fury
Cold Fury increases our Crit Hit Rate to insane levels (this is also the reason why we don’t have any Crit Hit Rate mods). This skill costs quite a bit and slows you down. Best to use this if fighting against high level targets only.
Zenith
Zenith is our main single-target damage skill. It deals insane damage especially if set up correctly with the other skills that give you higher Crit Hit Rate and the 50% damage increase. Zenith is also affected by what weapon you use. With the correct weapon we will deal way more damage (Base Damage = Same as Equipped Weapon) and also extend our magazine from 4 to 8 shots!
We use the Piercing Light Sniper Rifle because it has the highest base Firearm ATK.
Safe Strategic Retreat (Passive)
This passive allows us to deal more damage to the Weak Point of an enemy if we stand further away from the target!
How Modules Work in The First Descendant
Modules are the bread and butter of all The First Descendant Builds. There are a few important things to remember about modules. This is for both Descendant and Weapon Modules.
While most builds require you to increase Module Capacity with an Energy Activator (you get two for free), they won’t require you to reduce the Module cost with Crystallization Catalyst. However, if you want to truly min-max a build, you will need plenty of these Catalysts.
- How to increase your Module Capacity
- Module Levels and Cost
- Reduce the cost of Modules
- How to farm Modules
How to Increase Module Capacity
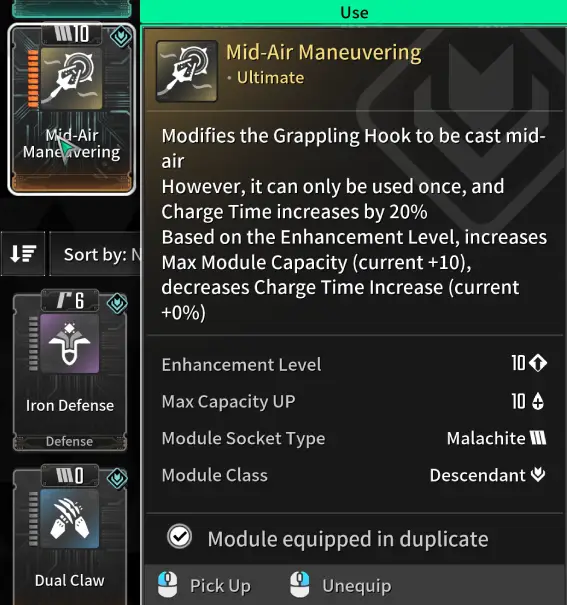
You get a base of 45 Modules for every Descendant character. And you can increase this up to 85 currently. First off, always slot a Sub Attack Module (Slot 7). When you increase this to the max level you will get an additional 10 Module Capacity. if you use a Crystallization Catalyst on the Sub Attack Module, you even get 15 extra slots. You will see this in the setup below.
Additionally, you can use an Energy Activator to increase your Module Capacity by another 20. However, these are fairly hard to farm, only use them on your best Descendants.
Lastly, increasing your Mastery Rank will also increase Module Capacity. Rank 1 gives you 25 Module Capacity, Rank 20 gives you 50 Module Capacity. That is how we reach the 80 Module Capacity that you see on most builds.
- Slot a Sub Attack Module (and max it out to get +10 capacity, crystallize it for +15)
- Use an Energy Activator (2o extra capacity)
- Increase Mastery Rank (25 base capacity, max 50)
Weapons: Basically the same, but because you don’t have Subattack Modules, the Energy Activator gives you 30 instead of just 20 extra capacity.
You can also read my in-depth guide on how to increase Module Capacity in The First Descendant if you need more information. Or my Best Energy Activator Farm Spots and our Best Crystallization Catalyst Farm Spots. I tested all of the grind spots by myself and have already farmed plenty of these items with this method.
Module Levels and Cost
Modules can be enhanced (leveled up) with Kuiper Shards in The First Descendant. Enhancing Modules increases their power. At higher levels, the power will increase way more than at lower levels. Therefore it is always recommended to max out the most important Module first.
Here is an example of a must-have Module called Increased HP for our Descendant. You will notice that we start at 22%, but at the max level, we get a whopping 218.5% increase in health!
| Level | Capacity Cost | Power |
|---|---|---|
| 0 – Base | 6 | 22% |
| 1 | 7 | 31.2% |
| 2 | 8 | 41.4% |
| 3 | 9 | 54.4% |
| 4 | 10 | 69.8% |
| 5 | 11 | 87.2% |
| 6 | 12 | 108.2% |
| 7 | 13 | 130.2% |
| 8 | 14 | 155.2% |
| 9 | 15 | 184.5% |
| 10 | 16 | 218.5% |
Transcendent Modules are the exception; they decrease Capacity Cost with higher levels!
For an in-depth overview, please visit our How to Level Up Modules in The First Descendant guide.
How to Farm Kuiper Shards
Kuiper Shards are used to level up Modules. We have a guide on the Top 3 Kuiper Shard Farming Locations in the First Descendant. We explain how to most efficiently farm Kuiper Shards (300-500k/hour) and show the amount you need to level up mods. As a summary, to max out a Module you need:
- Normal Modules: 103’100 Kuiper Shards
- Rare Modules: 206’200 Kuiper Shards
- Ultimate Modules: 309’300 Kuiper Shards
- Transcendent Modules: 515’500 Kuiper Shards
Always max out the most important Modules first, we will showcase the order below.
How to Reduce the Cost of Modules
To reduce the cost of Modules you need Crystallization Catalysts in The First Descendant. These require a lot of time investment, most builds won’t require you to get many if any at all (Budget Setup). But if you want to completely min-max you need to get plenty of them as technically, every slot can have a specific socket type to half the cost.
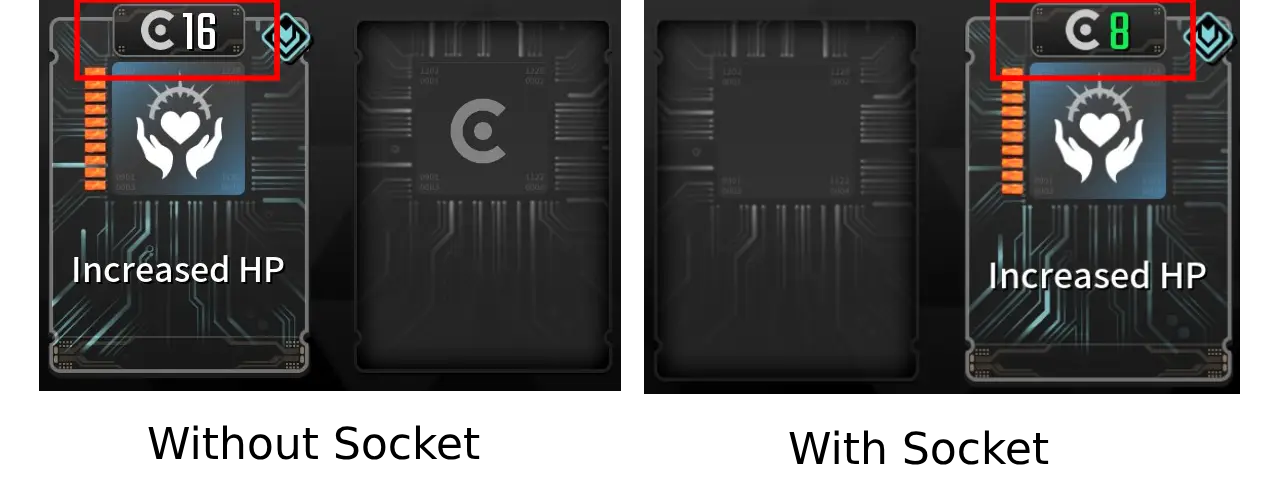
Modules have Socket Types. Our Increased HP Module has the Cerulean Socket Type.
- Module: Increased HP
- Socket Type: Cerulean
This is important because if we place our Increased HP Module in the fitting Socket Type, it will half the cost of the Module!
How to farm Modules in The First Descendant
Most The First Descendant Modules can be acquired fairly easily, but the higher-quality ones (Ultimate, Transcendent) are more tedious to obtain. Here is the easiest process to farm Modules quickly.
Open Map > Swap to Access Info > Select Modules
Here, you can find all Modules and their drop locations. If a module drops from several locations, it is recommended to select drop locations with higher drop chances.
There isn’t really much more to this. Simply check the location and go farm. Normal and Rare quality Modules have 30-50% drop chances in most cases. Ultimate ones range around the 5% mark and Transcendent ones can be a tough cookie with around 2% drop chance.
We will list the best farming location of modules in the next step of the guide.
Smooth Grapple Hook for your Hailey Build
Using the standard Grapple Hook in The First Descendant can be a pain, and it feels kinda frustrating at times. Don’t worry, there is a way better alternative that will make it a joy to use the grappling hook!
It is called the Mid-Air Maneuvering Sub Module. I use this on all my The First Descendant Builds because it improves grappling by so much.
With this Module, you can attach your Grapple Hook to anything, even air! That means you can simply aim towards the sky and Hook up your grapple hook there for guaranteed fast movement!
Here is a guide on how to get the Mid-Air Maneuvering Sub Module in The First Descendant. It won’t take a lot of effort, but it will definitely improve your build and overall gameplay in The First Descendant.
Hailey’s Story in The First Descendant
Hoping that these jinxes could be broken, Hailey’s 33rd Sniper Squad and the 16th Recon Squad headed out to the Snowfields in search of the Vulgus Fortress. Thanks to the Recon Squad’s efforts, Hailey and her sniper squad were able to set up a vantage point and wait at a good location. Now all they had to do was launch a reconnaissance stealth drone. But here was when the first jinx struck. The Vulgus troops, who were armed with thermal sensors that could easily detect human body temperatures, spotted them. The Vulgus immediately pinpointed the Recon Squad’s location and began attacking them. Hailey and her sniper squad quickly pointed their rifles at the enemy and waited for their targets to walk into the crosshairs amid the ensuing chaos.
“Ugh…! 33rd Sniper Squad… cease fire and retreat! RUN!”
Hailey couldn’t believe her ears. She couldn’t turn her back on her allies who were still alive and fighting to the bitter end. This wasn’t what she became a soldier for. She’d never disobeyed her superiors before, but this time, she decided, she would. Hailey straightened her position, closed her eyes, and recited the operational mantra like a prayer.
“Take out every enemy in every mission, and everyone returns alive.”
“Hit every enemy locked in the crosshairs. And we’ll all return alive.”
After a few deep breaths that dispersed in the wind, Hailey opened her eyes calmly. Her icy cold eyes locked on the enemy with pinpoint precision. Even the sounds around her seemed to be frozen. One shot, then another shot. Each time Haley squeezed the trigger, an enemy crumbled like bent grass. The enemies panicked and turned up their thermal sensors, but they couldn’t find her. And so, the Vulgus forces were wiped out by a single unseen sniper. Not only was it a victory, but it was also the moment when the squad’s operational mantra, which had never been achieved, was finally accomplished by Hailey, their youngest member. When asked by her superiors how it felt to be the exception to the rule, she smiled and said, “I’m happy. It happened just like our operational mantra says.” With that, everyone including Hailey who was deployed in the operation managed to return safe and sound.
Related Guides for The First Descendant
You can also check out our Ultimate Weapons Database for The First Descendant or the Builds Database for The First Descendant.


