Welcome to The First Descendant Sharen Build Guide for Season 3 Episode 3.
In this guide, we’ll show you how to unleash the full potential of Sharen, the stealth goddess. From mastering her stealth mechanic to the perfect weapons, stats, and modules, this guide covers everything you need to create a truly devastating build for Sharen.
Table of Contents:
- How to play Sharen: A Deep Dive
- Sharen Builds Overview – Module
- Trigger & Ancestor Modules
- Arche Tuning for Sharen
- Sharen Equipment Overview
- Sharen Basics
- Sharen’s Story
For builds on other Descendants, visit our The First Descendant Builds Database, or check out the Character Tier List or the Weapon Tier List.
TFD Wiki: We have expanded Alcasthq with tfd.gameslantern.com, a Wiki & Database for anything related to The First Descendant. Use the Character Editor or the Weapon Editor to theorycraft and create builds yourself. Browse Descendants, Weapons, Leaderboard Loadouts or use the Compare Tool. There are plenty of other features you can check out, too!
Here is a quick list of the strengths and weaknesses of the Sharen Build for The First Descendant.
Sharen’s Strengths
Sharen Weaknesses
How to Play Sharen in the First Descendant

Sharen is a stealth-based character, but her unique Transcendent Modules can drastically change her playstyle. Sharen is great at sniping bosses and dealing mid-range AOE damage. Learn about her skills in detail in the Sharen’s Skill Explanation section. Sharen’s Transcendent Modules are also exceptional!
Sharen can be played as a skill or weapon-based Descendant.
Sharen’s AoE Capabilities: Area Suppression
For Sharen’s AOE build we will be using one of her Transcendent Modules called Area Suppression. This allows us to scatter Shortwords around Sharen, all of them dealing independent damage.
- Check out the Sharen Mobbing Build for more information on how to build the perfect module setup to maximize her damage and range!
Sharen’s Single Target Damage: One Shot
Because Sharen has a stealth skill that also enhances her damage, it gets super easy to one-shot Colossuses on hard difficulty with the correct weapon and the Overcharged Edge Transcendent Module.
Check out her Sharen Bossing Build to see how you can destroy Colossus bosses within seconds!
Sharen’s Equipment: Make Or Break It!
To unlock Sharen’s full potential, you need the right Weapons, Reactors, and External Components:
- Weapons: You want specific weapons to enhance the effectiveness of her builds. See the Best Weapons for Sharen section.
- Reactors: Selecting the right reactor can drastically boost your damage. Check out the Best Reactors for Sharen section.
- External Components: These are critical for survivability. Properly configured, they double or triple your HP and DEF. Learn more in the Best External Components for Sharen section.
Building a top-tier The First Descendant Sharen Build requires not only the right modules but also optimized weapons, reactors, and components.
Best Sharen Builds Overview for The First Descendant
 Crystallization Catalysts: To unlock the necessary socket slots.
- Energy Activator: To increase overall module capacity.
- Gold & Kuiper: Best Gold Farming Method – Best Kuiper Shard Farming Method.
Equipment: I will cover Weapons, Reactors, External Components, Inversion Reinforcements, and Transcendent Modules in the Sharen Equipment section. To maximize the power of any build, you must get the correct items!
| Name | Description |
|---|---|
| Sharen Mobbing Build | Used in any hard content that requires AoE damage. |
| Sharen Bossing Build | Used against hard Colossus fights. |
| N/A | N/A |
Sharen Mobbing Build
- Mobbing Build Type: Any hard difficulty mobbing content
- Mobbing Build Focus: Skill-based Setup. Optimized for AoE damage, max range and speed!
- Playable on: Ultimate Sharen
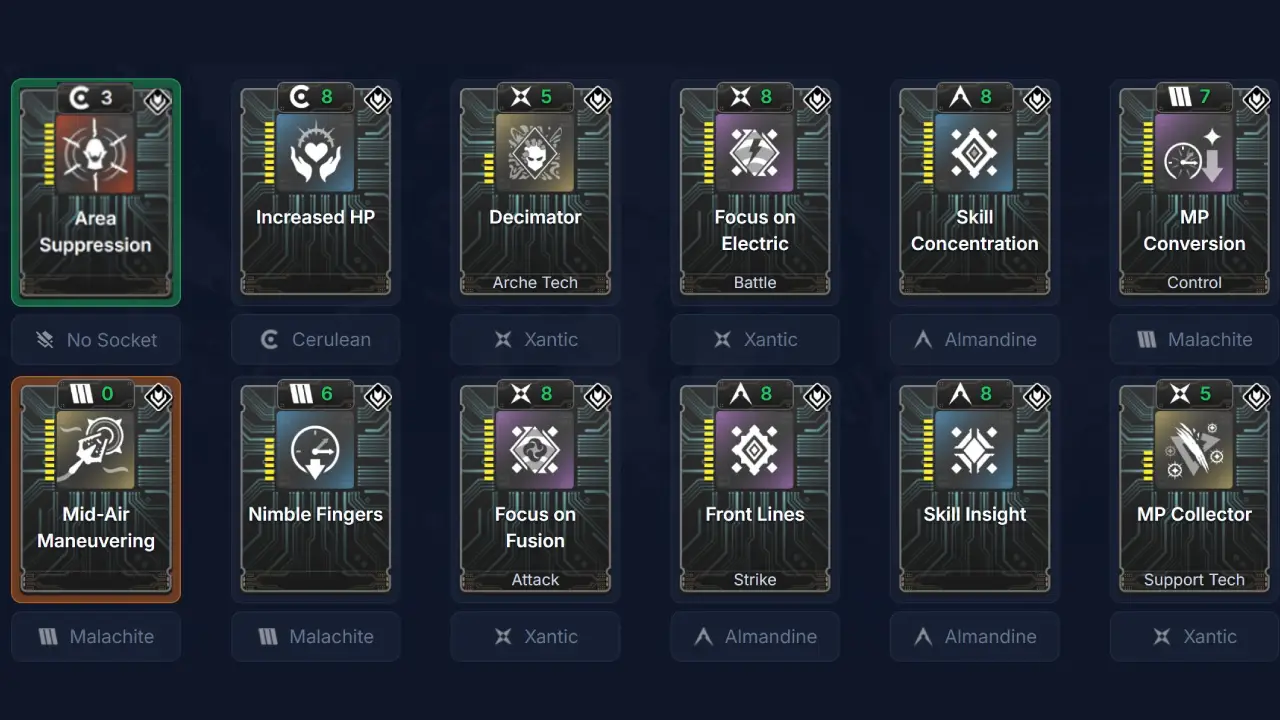
Our Sharen Mobbing Build focuses on the Area Suppression Transcendent Module exclusive to Ultimate Sharen. This allows us to throw daggers outwards around Sharen, dealing massive damage to enemies in its range. It is important that you are using the Blue Beetle weapon which boosts our damage even more! Please view all recommended weapons for Sharen.
Note: Skill Effect Range mods won’t help extending the radius of Area Suppression; it only increases the blast radius of the dagger itself and is therefore useless.
Sharen Mobbing Build Modules Explanation:
- Area Suppression: Changes her ultimate into an AOE skill around herself.
- Increased HP: + Max HP.
- Decimator: On kill, + Skill Power Modifier.
- Focus on Electric: + Electric Skill Power, – Skill Cooldown.
- Skill Concentration: + Skill Critical Hit Damage.
- MP Conversion: – Skill Cooldown, – Max MP.
- Mid-Air Maneuvering: Allows you to use the Grapple Hook anywhere, even air!
- Nimble Fingers: – Skill Cooldown.
- Focus on Fusion: + Fusion Skill Power Modifier, – Skill Cooldown.
- Front Lines: + Skill Critical Hit Damage, + Skill Critical Hit Rate.
- Skill Insight: + Skill Critical Hit Rate.
- MP Collector: Recovers MP on kill.
| Module Slot | Module Name | Mod Level | Socket Type | Crystallized |
|---|---|---|---|---|
| 0 (Trigger Module) | Power Beyond | N/A | N/A | N/A |
| 1 (Skill Module) | Area Suppression | Max | No | |
| 2 | Increased HP | Max | Yes | |
| 3 | Decimator | Max | Yes | |
| 4 | Focus on Electric | Max | Yes | |
| 5 | Skill Concentration | Max | Yes | |
| 6 | MP Conversion | Max | Yes | |
| 7 (Sub Module) | Mid-Air Maneuvering | Max | Yes | |
| 8 | Nimble Fingers | Max | Yes | |
| 9 | Focus on Fusion | Max | Yes | |
| 10 | Front Lines | Max | Yes | |
| 11 | Skill Insight | Max | Yes | |
| 12 | MP Collector | Max | Yes |
Sharen Bossing Build for The First Descendant
- Bossing Build Type: Colossus fights on hard difficulty.
- Bossing Build Focus: Weapon-based setup. Maximum Burst Damage, destroys any hard difficulty Colossus within seconds.
- Playable on: Normal Sharen & Ultimate Sharen
The Sharen Bossing Build focuses on dealing massive damage with sniper rifles. Please see the recommended weapons for Sharen section to see which sniper rifle to pick.
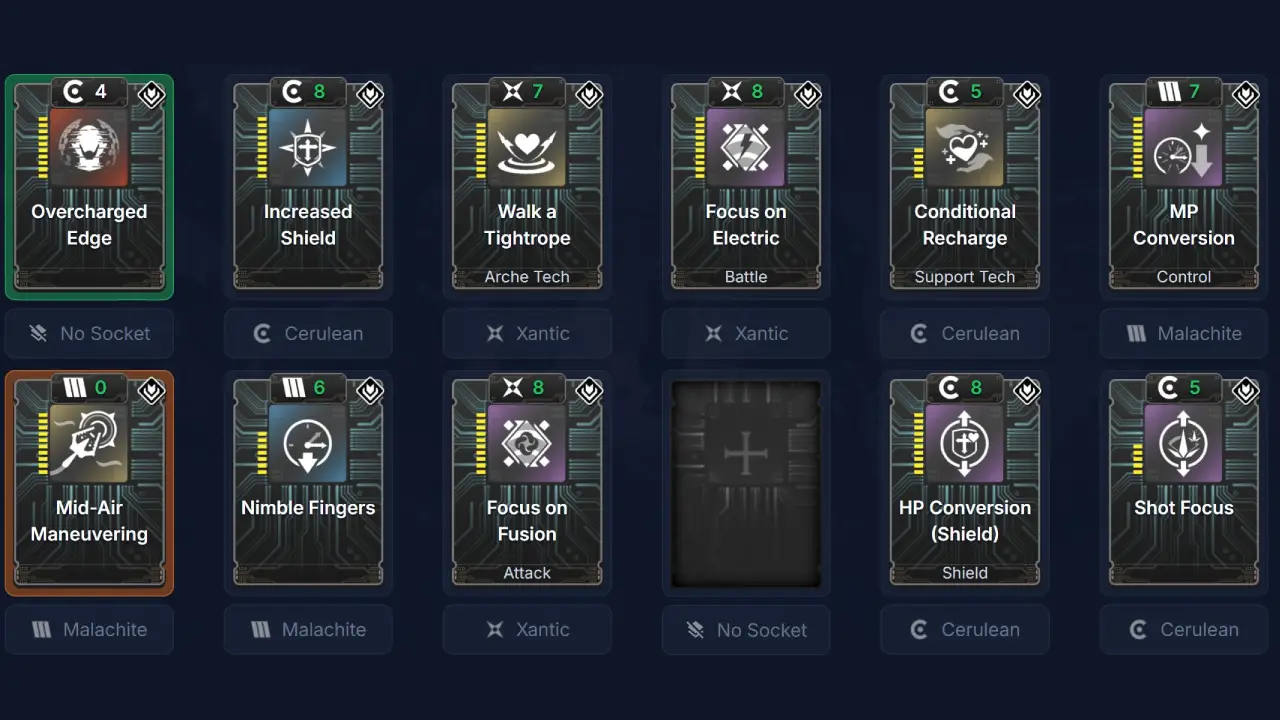
The Overcharged Edge Transcendent Module boosts our damage. Focus on Electric and Focus on Fusion are only slotted for Skill Cooldown; theoretically, you don’t even need to level these mods up because they always give the same amount of Skill Cooldown on any level. When you spawn, make sure to activate your first skill a few times until you drop below 50% to get extra damage from Walk a Tightrope module. We have the Conditional Recharge mod slotted that removes HP on skill use.
Sharen Bossing Build Modules Explanation:
- Overcharged: Ambush damage increases by the amount of shield consumed.
- Increased Shield: + Max Shield.
- Walk a Tightrope: When HP below 50%, + Skill Power Modifier, + Firearm ATK.
- Focus on Electric: + Electric Skill Power, – Skill Cooldown.
- Conditional Recharge: Consumes HP.
- MP Conversion: – Skill Cooldown, – Max MP.
- Mid-Air Maneuvering: Allows you to use the Grapple Hook anywhere, even air!
- Nimble Fingers: – Skill Cooldown.
- Focus on Fusion: + Fusion Skill Power Modifier, – Skill Cooldown.
- HP Conversion (Shield): + Max Shield, – Max HP.
- Shot Focus: + Firearm ATK, – Skill Power Modifier.
| Module Slot | Module Name | Mod Level | Socket Type | Crystallized |
|---|---|---|---|---|
| 0 (Trigger Module) | Power Beyond | N/A | N/A | N/A |
| 1 (Skill Module) | Overcharged Edge | Max | No | |
| 2 | Increased Shield | Max | Yes | |
| 3 | Walk a Tightrope | Max | Yes | |
| 4 | Focus on Electric | Base | Yes | |
| 5 | Conditional Recharge | Max | Yes | |
| 6 | MP Conversion | Max | Yes | |
| 7 (Sub Module) | Mid-Air Maneuvering | Max | Yes | |
| 8 | Nimble Fingers | Max | Yes | |
| 9 | Focus on Fusion | Base | Yes | |
| 10 | Empty/Flex | N/A | N/A | N/A |
| 11 | HP Conversion (Shield) | Max | Yes | |
| 12 | Shot Focus | Max |
Trigger and Ancestor Modules for the Sharen Build
Trigger and Ancestor Modules are also part of the module category, but they are a special type of module that are harder to unlock and acquire.
- Trigger Modules: Go into a special slot. Unlock special buffs and unique effects.
- Ancestor Modules: Go into a normal module slot. Enhance the build by adding additional stats.
Sharen Trigger Modules
You need to first unlock the trigger module slot for each character. Learn how to unlock Trigger Modules in The First Descendant.
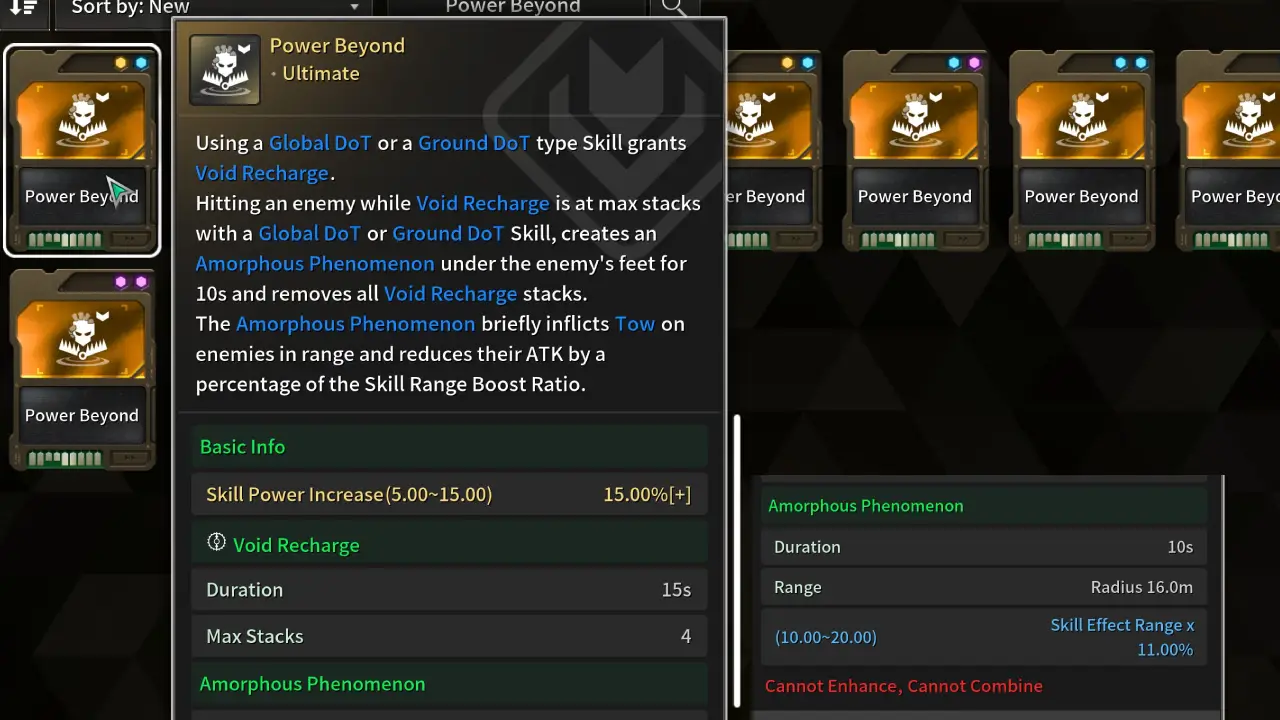
For our The First Descendant Sharen Build, you always want to use the Power Beyond trigger module. This gives us a flat 15% Skill Power Increase to all our damage, which is very powerful.
- Mobbing & Bossing: Power Beyond
Sharen Ancestor Module
Ancestor Modules can be slotted once you have acquired them. However, they are only worth it once you have an Ancestor module with good stat rolls on them.
- Sharen Ancestor Module: Assassin’s Resolution
- Superconductive Cooling Units (Needed to Reroll perks): How to farm
- Must Read: How Ancestor Modules Scale & Examples
It is only worth slotting an Ancestor Module if you have good rolls on it; otherwise, it isn’t worth it.
Mobbing Build with Area Suppressions
- Ideal Positive Rolls
- Electric
- Fusion
- Skill Critical Hit Damage
- Cooldown
- Ideal Negative Rolls
- Max Shield
- DEF
Bossing Build with Overcharged Edge
None
Ancestor Module: What to Replace and Why
To slot an Ancestor Module effectively, identify existing modules that share the same primary stat. By replacing a standard module with an Ancestor version that offers similar values, you maintain your core build while gaining its additional unique perks as a ‘free’ bonus.
- How to: Replace a standard module with an Ancestor Module that mirrors its main perk.
- The values should be close; you preferably don’t want to replace a 100% with a 30% value.
- Example 1: If your Ancestor Module provides Skill Critical Hit Rate, replace Skill Insight.
- Example 2: If your Ancestor Module provides Max HP, replace Increased HP.
- Example 3: If your Ancestor Module provides Skill Effect Range, replace Skill Expansion.
- Result: All other perks from the Ancestor Module will basically be a “freebie” and improve your build!
- Helpful Links:
As long as the Ancestor Module reaches a similar value to the one you’re removing, every additional stat on that Ancestor Module becomes a “free” bonus for your build.
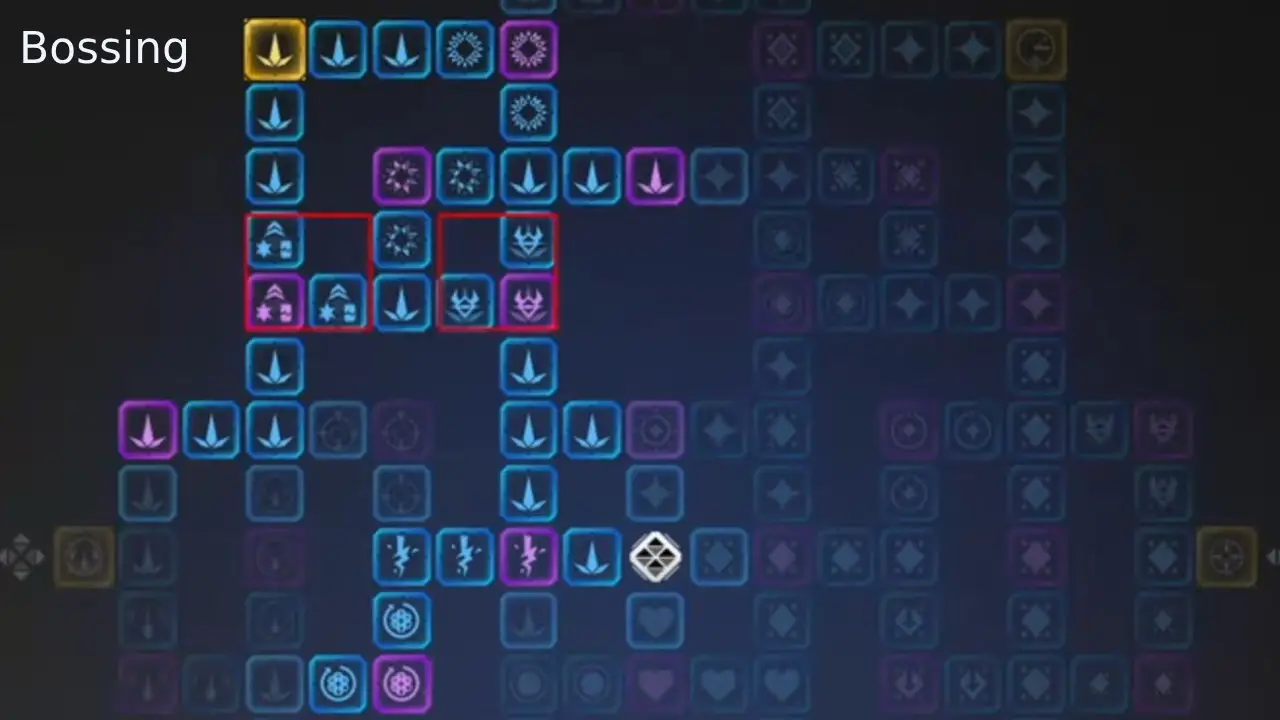
Arche Tuning for Sharen
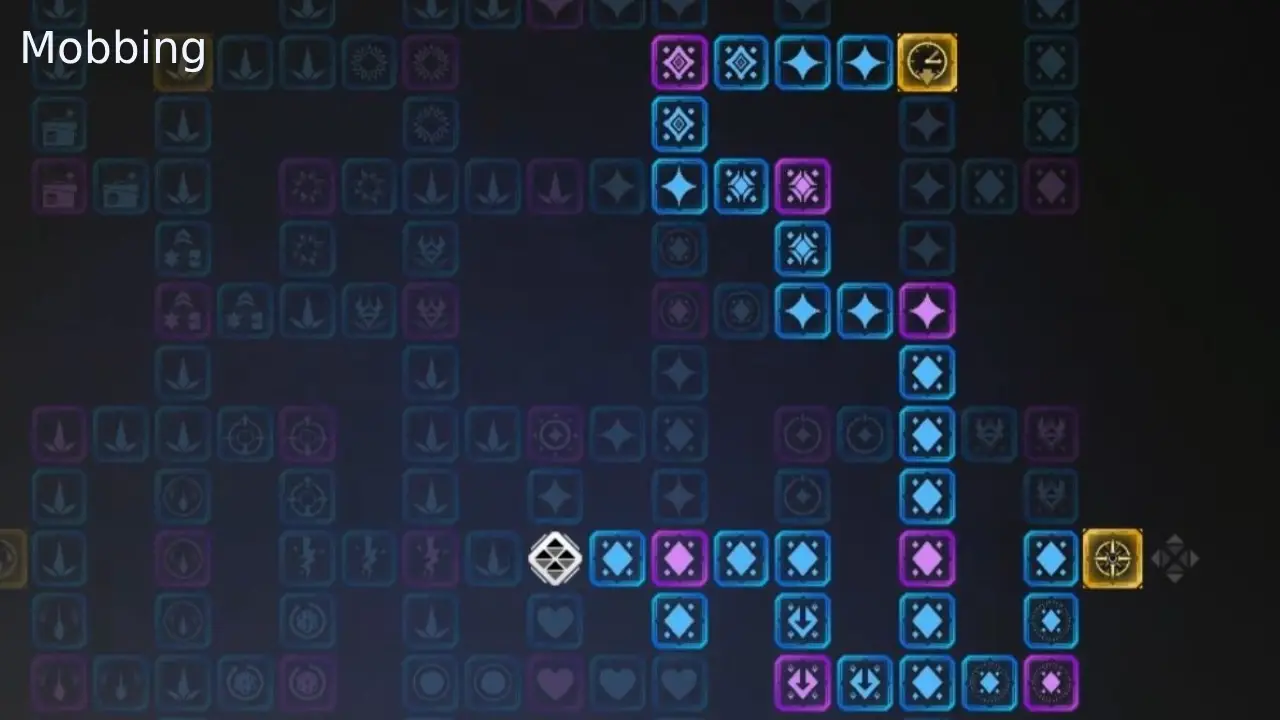
- Image 1: Sharen Mobbing Build
- Image 2: Sharen Bossing Build
The Arche Tuning System in The First Descendant is important for every Character; it buffs your stats by a good amount. For The First Descendant Sharen, we are focusing on the right and upper right section.
You level up Arche Tuning in the Sigma Sector Dropoff Operation. Mutant Cells also drop there with a small chance.
For Sharen, Arche Tuning changes depending on what setup you run. Sharen’s Mobbing Build focuses on powering up skills and reducing cooldown. Whereas Sharen’s Bossing Build wants to go to the other side and buff weapon damage!
Sharen Equipment Overview in The First Descendant

Equipment is the cornerstone of any successful The First Descendant Build. For Sharen, having the right setup can mean the difference between dominating a dungeon and falling short. This section breaks down the essential equipment types: Weapons, Reactors, External Components, and Transcendent Modules, and explains how they maximize her power.
| Equipment Type | Importance | Key Benefits |
|---|---|---|
|
|
|
|
|
|
|
|
|
|
|
|
|
|
Best Weapon for the Sharen Build in The First Descendant
Below you can find the Top 3 Weapons for Sharen in The First Descendant.
Top 3 Weapons for Sharen
| Weapon | Category | Key Features | Why It’s Great for Sharen |
|---|---|---|---|
|
Sniper Rifle |
|
|
| Scout Rifle |
|
|
|

|
Machine Gun |
|
|
Other Useful Weapons
| Weapon | Category | Key Features | Why It’s Great for Sharen |
|---|---|---|---|
| Rocket Launcher |
|
|
|
| Sword |
|
|
|
| Submachine Gun |
|
|
Best Reactor for Sharen in The First Descendant
Selecting the best reactor for Sharen in The First Descendant can significantly enhance her abilities, allowing you to maximize her effectiveness in various scenarios. Not only does the reactor determine your skill damage, but it also gives additional secondary benefits through modifiers. These are often hard to get and take time to grind out!
All our skills have the chill damage type. Additionally, because we use the Absolute-Zero Transcendent Module, our skills all turn singular. So we need to select a reactor with Chill + Singular!
| Best Reactor | Specs | Key Benefits | Best Builds |
|---|---|---|---|
| Tingling Mixture Reactor |
|
|
|
| Any Reactor |
|
|
How to find the Location of Reactors
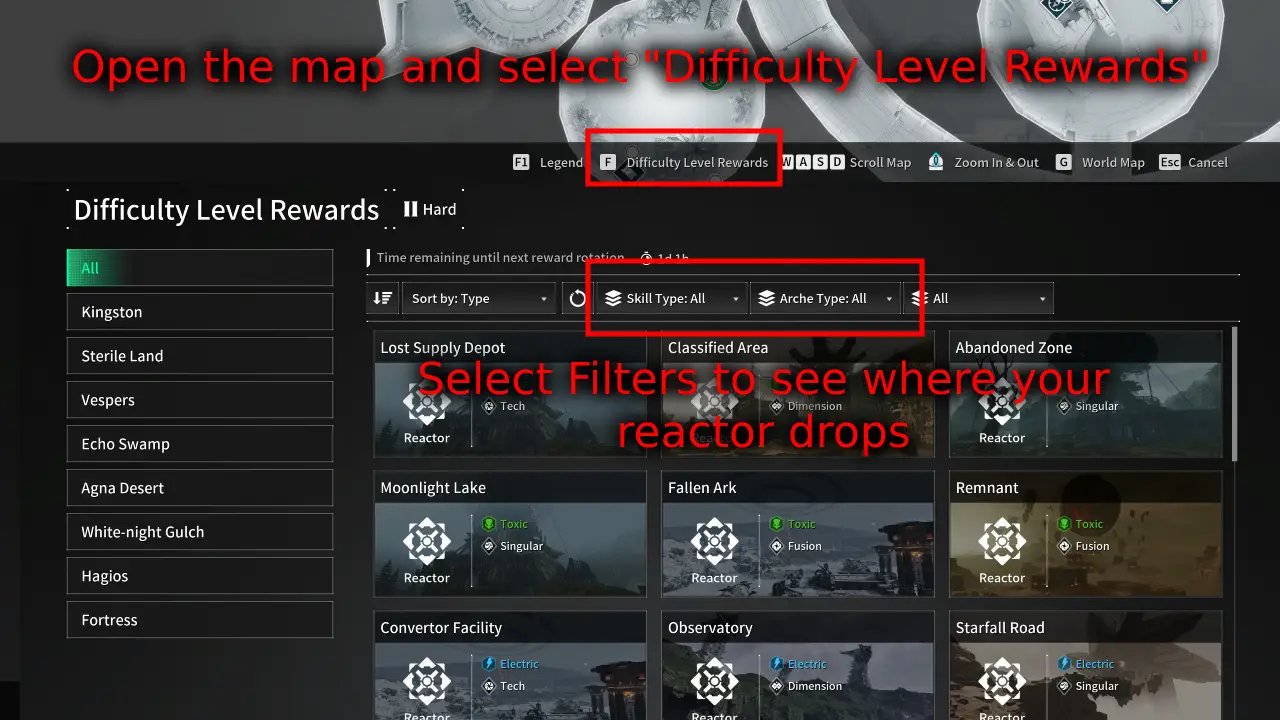
Reactor drop locations change every day. Not many players know this and get confused. Now, there is a reactor search function in-game. Go to the map and press on Difficulty Level Rewards. In here, you can see where all the reactors currently drop.
Note: It is possible that not all reactor types are currently dropping. You have to come back and recheck every day.
If your specified reactor drops in an area, you go there and farm any missions and monsters (Preferably missions with lots of monster spawns). There will be plenty of reactors dropping from monsters all over the place, any monster works. It will take a while to get a good reactor!
Best External Components for the Sharen Build
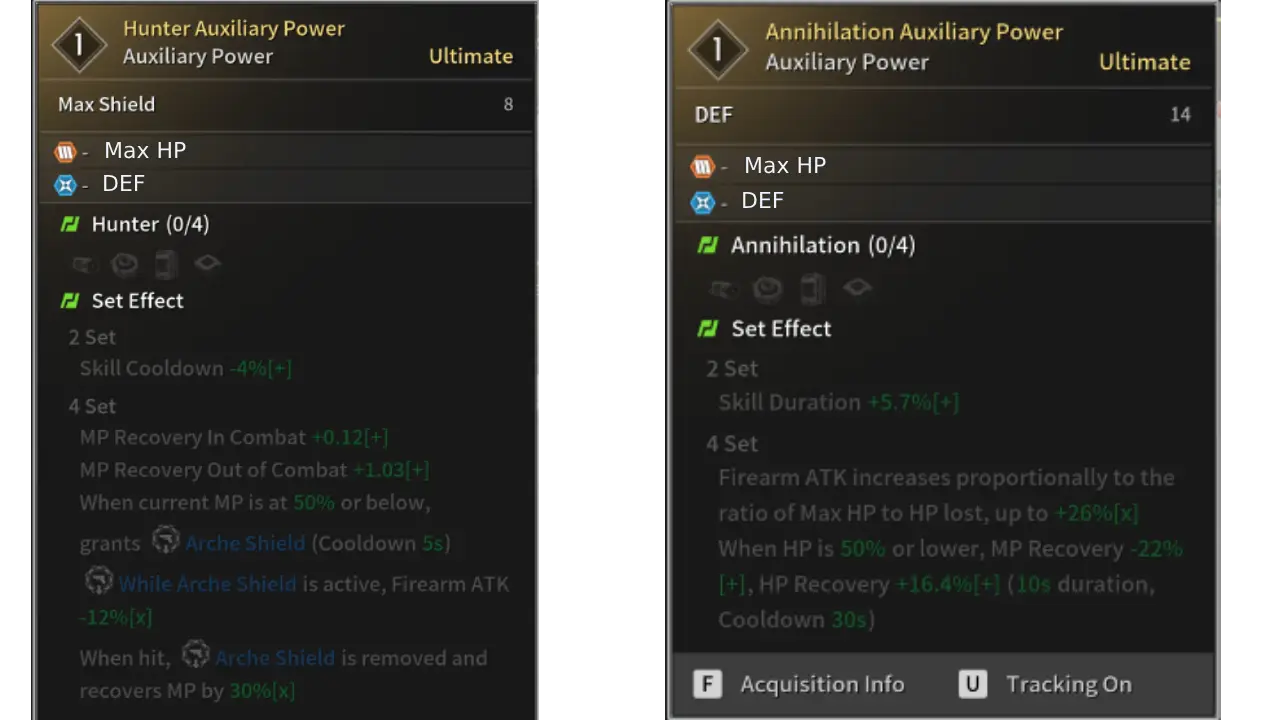
Depending on what build you run you want to use the follow External Component sets.
- The Hunter Set gives us extra Skill Cooldown reduction and returns MP, perfect for mobbing.
- The Annihilation Set boosts our Firearm ATK the lower the HP we have.
Additionally, External Components now also have core slots; it is recommended to slot Max HP and DEF cores.
| External Components Set | Set Effect | Why It’s Good | Recommended Build |
|---|---|---|---|
| 4x Hunter Set |
|
|
|
| 4x Annihilation Set |
|
|
| External Component Part | Base Stats | Selective Best Stats | Cores |
|---|---|---|---|
| Max Shield |
|
|
|
| DEF |
|
|
|
| Max Shield |
|
|
|
| Max HP |
|
|
Note: You can replace one or two DEF cores with attribute resistance if you fight against specific enemy types.
| External Component Part | Base Stats | Selective Best Stats | Cores |
|---|---|---|---|
| DEF |
|
|
|
| DEF |
|
|
|
| Max HP |
|
|
|
| Max HP |
|
|
Note: You can replace one or two DEF cores with attribute resistance if you fight against a specific colossus.
Inversion Reinforcements Setup for Sharen
You can find the Inversion Reinforcements in the inventory, located on the bottom left side. This changes with every new season and needs to be leveled up again. You level up Inversion Reinforcements by doing any activity. However, the fastest way to advance it is by completing Disrupt Invasion (max 4 daily) in the dungeon terminal with the red dungeons.
At max level, you have unlocked everything. While the last perk is always active in each row, you can only slot three additional perks at the bottom. Here is what you want to prioritize:
- Hunting: Arche Circulation Tactic!
- Elemental: None.
- Recovery: Selective Neurostimulation.
- Survival: Deploy Hardened Shell.
- Season: None.
All Sharen Transcendent Modules Explained
First, let us look at the full list of all Transcendent Modules for Sharen in The First Descendant. It is important to note that not all of the modules will be used. Some are more effective than others!
| Module Name | Module Description | Best In Slot |
|---|---|---|
Battlesuit Melting Rounds |
Modifies to stackable skill. Decreases the enemy’s Electric Resistance instead of stunning them. |
|
| Modifies Active Camouflage to consume Shields instead of MP. Ambush damage increases by the amount of Shields consumed. | ||
| Modifies Cutoff Beam so that it can be unleashed as Sword Aura. |
|
|
| Increases the targeting range of Flash Shortsword. Increases enemy targeting speed. |
|
|
Area Suppression (Ult) |
Changes the skill to scatter Shortswords around. Each Shortsword deals independent damage. | |
Ambushed (Ult) |
Modifies so that killing an enemy in Active Camouflage returns the user to the same state. In Active Camouflage, agility increases, and Shock Bomb skill is converted to an attack skill. |
|
Sharen Basics in The First Descendant

If it is your first time playing Sharen in The First Descendant, here are some useful things you should know.
- How to unlock Sharen
- Skills Explanation – Master Sharen’s Abilities
- Module Basics Explained!
- Best Grapple Hook for Sharen
How to Unlock Sharen in The First Descendant
Let’s take a quick look at how to unlock Sharen in the First Descendant. To unlock Sharen, you have to purchase her from the store, or research her. You need the following items to research Sharen:
- 1x Sharen Enhanced Cells
- Location: Echo Swamp Normal – Seed Vault
- 1x Sharen Stabilizer
- Location: Echo Swamp Normal – The Chapel
- 1x Sharen Spiral Catalyst
- Location: Agna Desert Normal – The Asylum
- 1x Sharen Code
- Location: Agna Desert Normal – Caligo Ossuary
- 400k Credits
When you visit Magisters Anais at the Research Institute you can hover over each item. Then click on Acquisition Info and it will tell you where this specific item drops. You can also view an in-depth guide on How to unlock Sharen in The First Descendant.
The First Descendant Sharen Skills Explained
In this section, we are going to explain the skills available to our Sharen Build in the First Descendant, how each skill works and the best ways for you to use them.
Sharen’s skill loadout is centered around ambushing enemies, gaining extra damage when attacking an enemy that is not attacking Sharen. To help with this, she can use the Active Camouflage skill, the cooldown of which is reset by successfully ambushing an enemy. Sharen can also Electrocute enemies in order to debuff them.
| Icon | Skill Name | Description |
|---|---|---|
 |
Cutoff Beam | Attacks enemy with electric blade to deal damage and inflict them with Electrocute effect. |
 |
Active Camouflage | Hides from enemies. When attacking or using skills, Active Camouflage state ends immediately, regardless of time remaining. When Active Camouflage state ends, Sharen enters Ambush mode, increasing damage of the next attack. |
 |
Impact Rounds | Launches built-in explosives forward from the arm to stun enemies. |
 |
Flash Shortsword | Targets enemies within aiming range, and throws multiple knives to attack them. Knives explode to inflict enemies with damage and Electrocute effect. |
 |
Assassinator (Passive) | Damage increases when attacking enemy that is not attacking Sharen. Killing enemies with a skill in Ambush state resets cooldown for Active Camouflage. |
Cutoff Beam
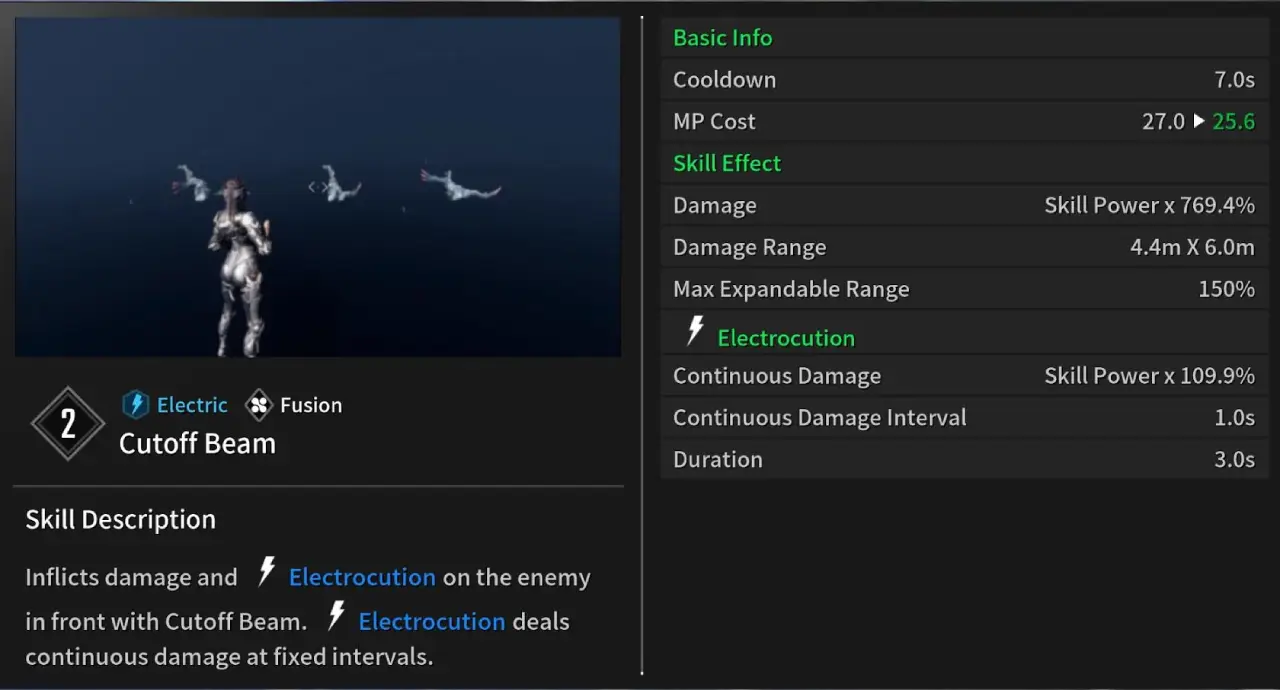
Inflicts damage and Electrocutionon the enemy in front with the Cutoff Beam. Electrocution deals continuous damage at fixed intervals.
How to use Cutoff Beam:
Cutoff beam is a fairly simple skill, dealing single-target damage to a nearby enemy, followed by damage over time from the Electrocution debuff. It is handy to use for extra damage against a single important target, when your other skills are on cooldown, or when you haven’t unlocked other skills yet.
Active Camouflage
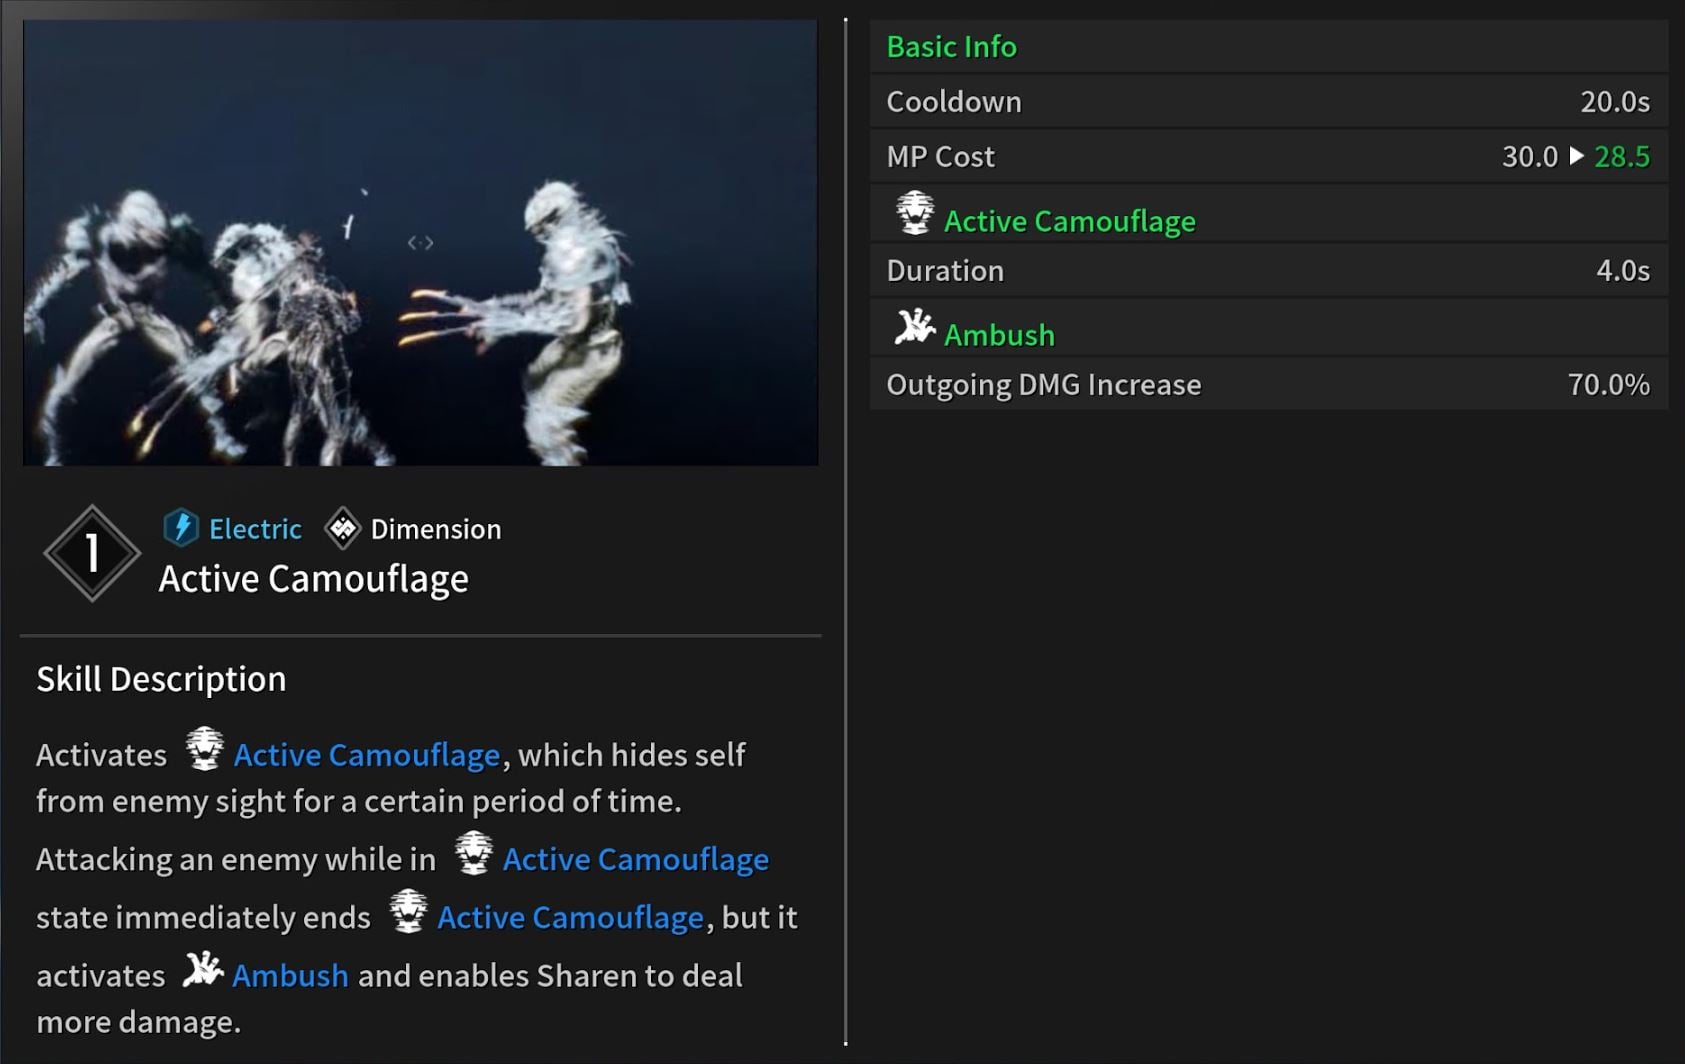
Allows Sharen to turn invisible, making it much easier to surprise enemies and play into Sharen’s strengths.
Active Camouflage Description:
- Electric – Dimension
- Hide self from enemies for a period of time.
- Attacking an enemy immediately removes Active Camouflage, but adds Ambush.
- Ambush increases your damagedealt.
How to use Active Camouflage:
Sharen’s Active Camouflage skill is a key element in her loadout. It is essential for playing into her Ambush mechanic, allowing you to gain a damage bonus against enemies. Using Active Camouflage turns you invisible, allowing you to get the jump on enemies without them seeing you. As soon as you attack an enemy, you’ll be visible again, but you’ll gain a damage bonus against them as a result of your Ambush.
If you manage to kill the ambushed enemy, your Active Camouflage Cooldown will be reset, thanks to the Assassinator passive, allowing you to repeat the process. This is how Sharen is able to move around and assassinate enemies without taking too much damage herself.
Shock Nuts
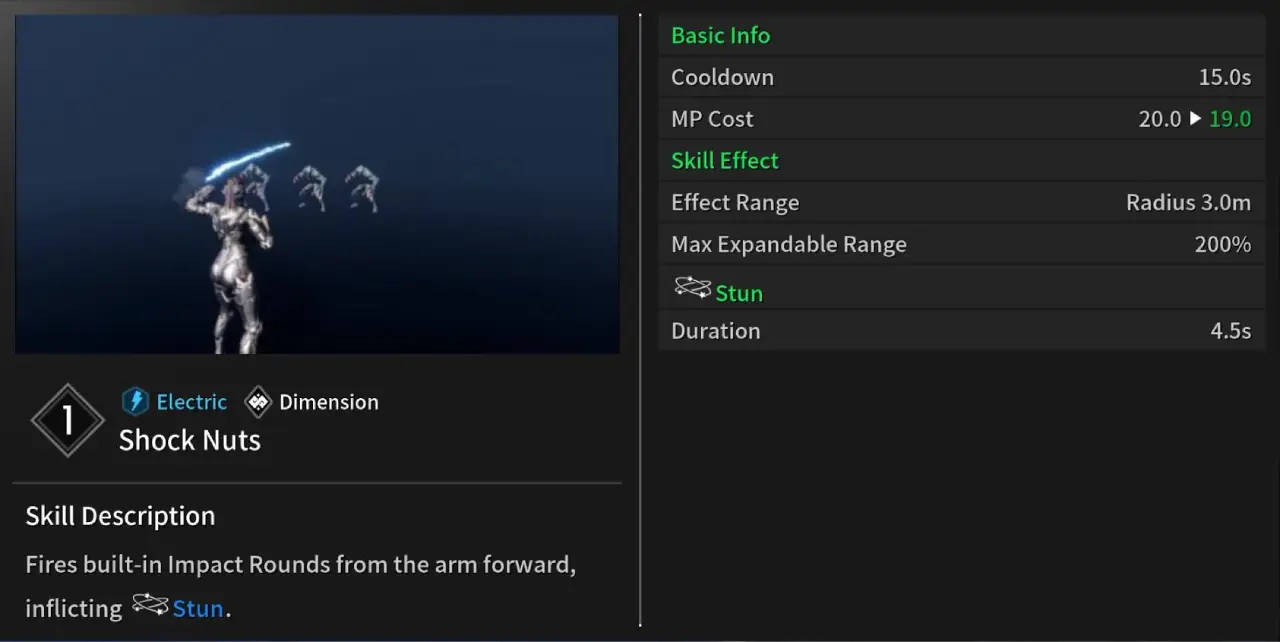
Impact Rounds fires special rounds from Sharen’s arms. Enemies hit by this skill are temporarily Stunned.
Impact Rounds Description:
- Electric – Dimension
- Fires Impact Rounds forward from Sharen’s arm
- Enemies hit by the rounds are Stunned
How to use Impact Rounds:
Impact Rounds is a great skill to use if you are dealing with too many enemies by yourself, or if you miscalculated your ambush and find yourself taking too much damage. It allows you to stun enemies, which in turn is great for escaping from a bad situation or just reducing the amount of pressure you have to deal with at any given moment.
If you have the Battlesuit Melting Nuts Descendant Module the Impact Rounds will debuff the enemy’s defense instead of stunning the enemy. This allows us to get higher single-target damage on tough enemies or bosses.
Flash Shortsword
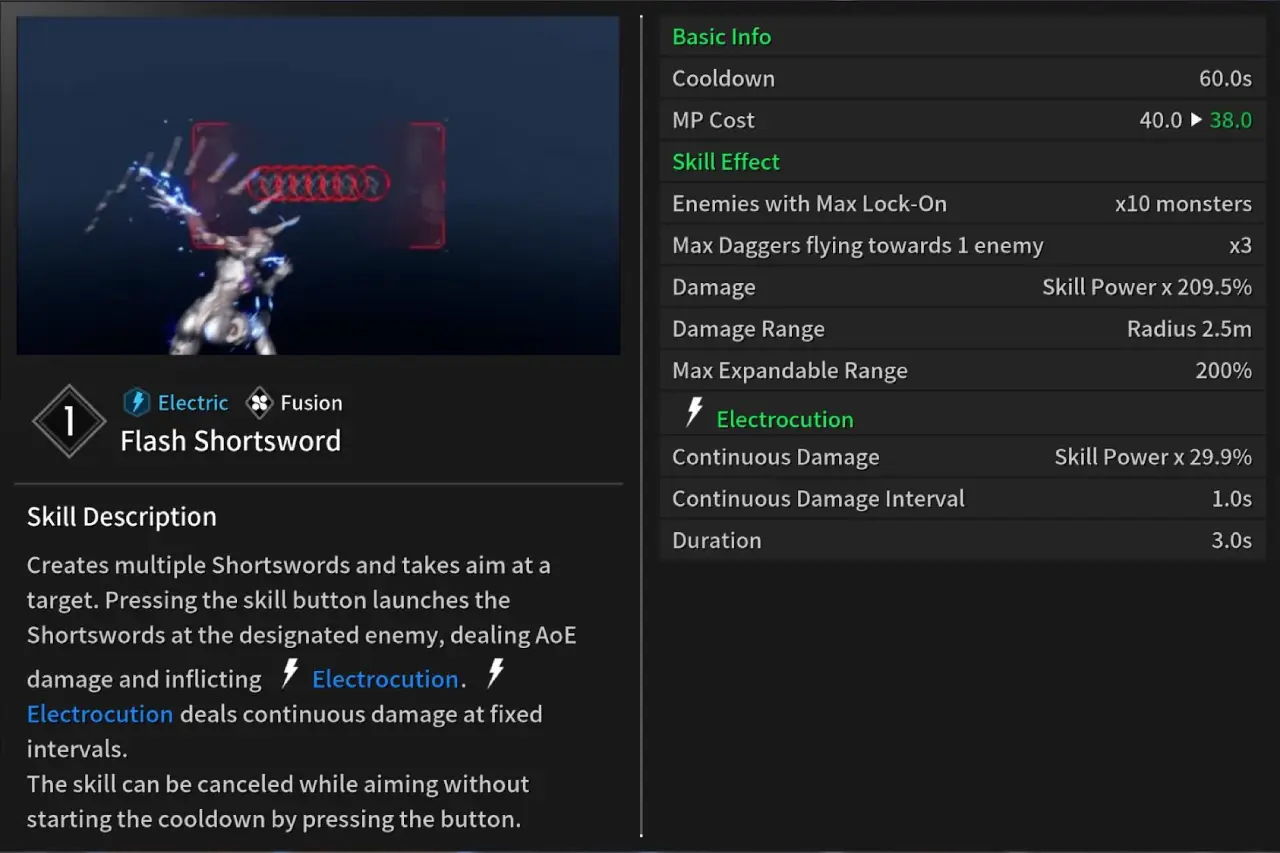
A projectile that can damage and Electrocute multiple enemies at a time.
Flash Shortsword Description:
- Electric – Fusion
- Creates multiple shortswords and takes aim at a target
- Pressing the skill button launches the Shortswords at the designated enemy
- Deals AOE damage and inflicts Electrocution, dealing continuous damage at fixed intervals.
- The skill can be cancelled while aiming without starting the Cooldown.
How to use Flash Shortsword:
While Sharen is primarily a single-target specialist, she does need some AOE potential to get by in the First Descendant, and the Flash Shortsword offers this AOE damage. Not only can you hit multiple enemies at once with Flash Shortsword, you can debuff all of the enemies with Electrocute, dealing extra damage over time and providing additional build possibilities.
Assassinator (Passive)
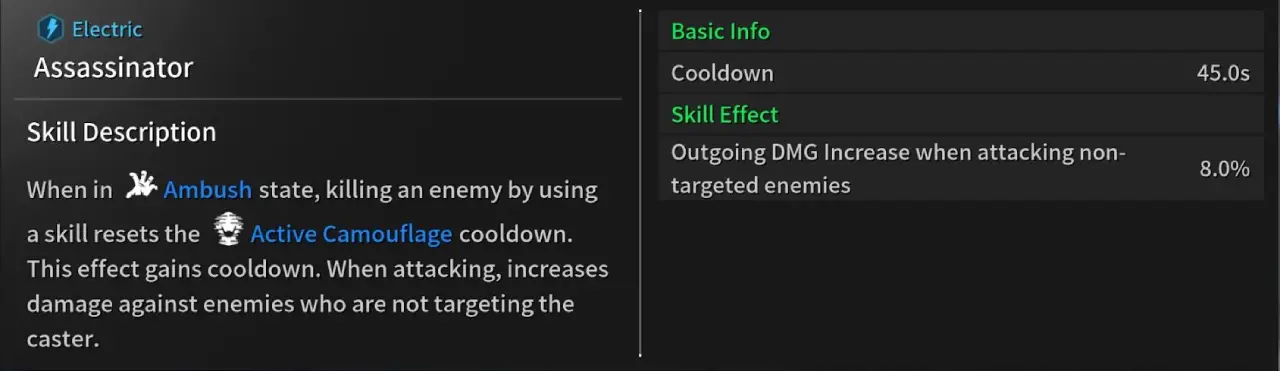
Allows Sharen to recharge her Active Camouflage ability immediately when killing an Ambushed enemy.
Rabbit Foot Passive Description:
- Electric
- When in the Ambush state, killing an enemy by using a skill resets the Active Camouflage cooldown.
- This effect gains cooldown.
- When attacking, increases the damage against enemies who are not targeting the caster.
How to use Assassinator:
The Assassinator passive is always active. It is great for dishing out lots of damage with Sharen, effectively turbocharging the Active Camouflage skill by heavily rewarding players who use it properly with extra damage and an instant cooldown reset of Active Camouflage, allowing them to push even more damage.
How Modules Work in The First Descendant
Modules are the bread and butter of all The First Descendant Builds. There are a few important things to remember about modules. This is for both Descendant and Weapon Modules.
While most builds require you to increase Module Capacity with an Energy Activator (you get two for free), they won’t require you to reduce the Module cost with Crystallization Catalyst. However, if you want to truly min-max a build, you will need plenty of these Catalysts.
- How to increase your Module Capacity
- Module Levels and Cost
- Reduce the cost of Modules
- How to farm Modules
How to Increase Module Capacity
You get a base of 45 Modules for every Descendant character. And you can increase this up to 85 currently. First off, always slot a Sub Attack Module (Slot 7). When you increase this to the max level you will get an additional 10 Module Capacity. if you use a Crystallization Catalyst on the Sub Attack Module, you even get 15 extra slots. You will see this in the setup below.
Additionally, you can use an Energy Activator to increase your Module Capacity by another 20. However, these are fairly hard to farm, only use them on your best Descendants.
Lastly, increasing your Mastery Rank will also increase Module Capacity. Rank 1 gives you 25 Module Capacity, Rank 20 gives you 50 Module Capacity. That is how we reach the 80 Module Capacity that you see on most builds.
- Slot a Sub Attack Module (and max it out to get +10 capacity, crystallize it for +15)
- Use an Energy Activator (2o extra capacity)
- Increase Mastery Rank (25 base capacity, max 50)
Weapons: Basically the same, but because you don’t have Subattack Modules, the Energy Activator gives you 30 instead of just 20 extra capacity.
You can also read my in-depth guide on how to increase Module Capacity in The First Descendant if you need more information. Or my Best Energy Activator Farm Spots and our Best Crystallization Catalyst Farm Spots. I tested all of the grind spots by myself and have already farmed plenty of these items with this method.
Module Levels and Cost
Modules can be enhanced (leveled up) with Kuiper Shards in The First Descendant. Enhancing Modules increases their power. At higher levels, the power will increase way more than at lower levels. Therefore it is always recommended to max out the most important Module first.
Here is an example of a must-have Module called Increased HP for our Descendant. You will notice that we start at 22%, but at the max level, we get a whopping 218.5% increase in health!
| Level | Capacity Cost | Power |
|---|---|---|
| 0 – Base | 6 | 22% |
| 1 | 7 | 31.2% |
| 2 | 8 | 41.4% |
| 3 | 9 | 54.4% |
| 4 | 10 | 69.8% |
| 5 | 11 | 87.2% |
| 6 | 12 | 108.2% |
| 7 | 13 | 130.2% |
| 8 | 14 | 155.2% |
| 9 | 15 | 184.5% |
| 10 | 16 | 218.5% |
Transcendent Modules are the exception; they decrease Capacity Cost with higher levels!
For an in-depth overview, please visit our How to Level Up Modules in The First Descendant guide.
How to Farm Kuiper Shards
Kuiper Shards are used to level up Modules. We have a guide on the Top 3 Kuiper Shard Farming Locations in the First Descendant. We explain how to most efficiently farm Kuiper Shards (300-500k/hour) and show the amount you need to level up mods. As a summary, to max out a Module you need:
- Normal Modules: 103’100 Kuiper Shards
- Rare Modules: 206’200 Kuiper Shards
- Ultimate Modules: 309’300 Kuiper Shards
- Transcendent Modules: 515’500 Kuiper Shards
Always max out the most important Modules first, we will showcase the order below.
How to Reduce the Cost of Modules
To reduce the cost of Modules you need Crystallization Catalysts in The First Descendant. These require a lot of time investment, most builds won’t require you to get many if any at all (Budget Setup). But if you want to completely min-max you need to get plenty of them as technically, every slot can have a specific socket type to half the cost.
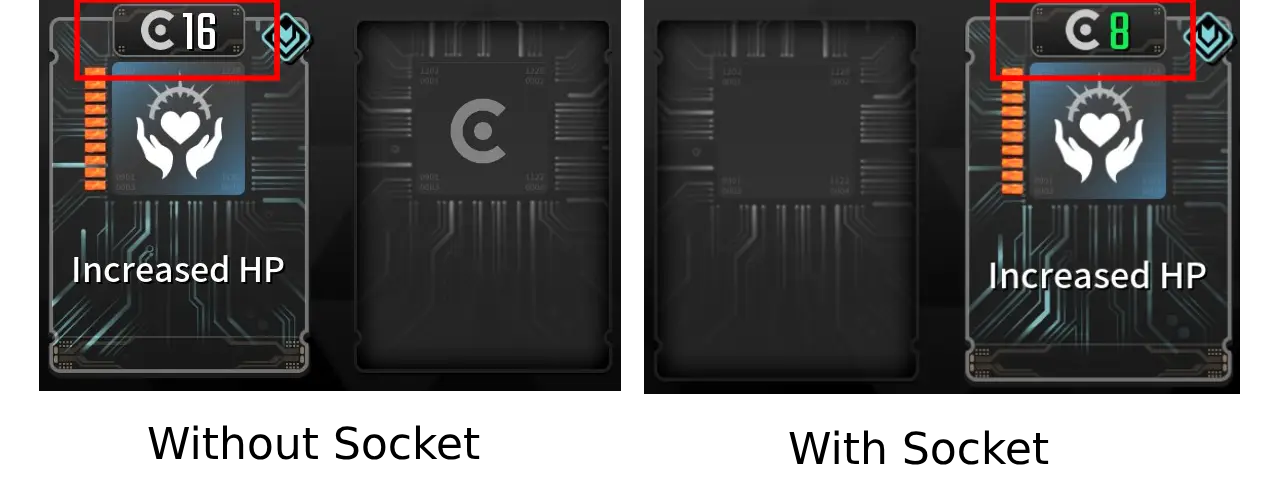
Modules have Socket Types. Our Increased HP Module has the Cerulean Socket Type.
- Module: Increased HP
- Socket Type: Cerulean
This is important because if we place our Increased HP Module in the fitting Socket Type, it will half the cost of the Module!
How to farm Modules in The First Descendant
Most The First Descendant Modules can be acquired fairly easily, but the higher-quality ones (Ultimate, Transcendent) are more tedious to obtain. Here is the easiest process to farm Modules quickly.
Open Map > Swap to Access Info > Select Modules
Here, you can find all Modules and their drop locations. If a module drops from several locations, it is recommended to select drop locations with higher drop chances.
There isn’t really much more to this. Simply check the location and go farm. Normal and Rare quality Modules have 30-50% drop chances in most cases. Ultimate ones range around the 5% mark and Transcendent ones can be a tough cookie with around 2% drop chance.
We will list the best farming location of modules in the next step of the guide.
Smooth Grapple Hook for your Sharen Build
Using the standard Grapple Hook in The First Descendant can be a pain, and it feels kinda frustrating at times. Don’t worry, there is a way better alternative that will make it a joy to use the grappling hook!
It is called the Mid-Air Maneuvering Sub Module. I use this on all my The First Descendant Builds because it improves grappling by so much.
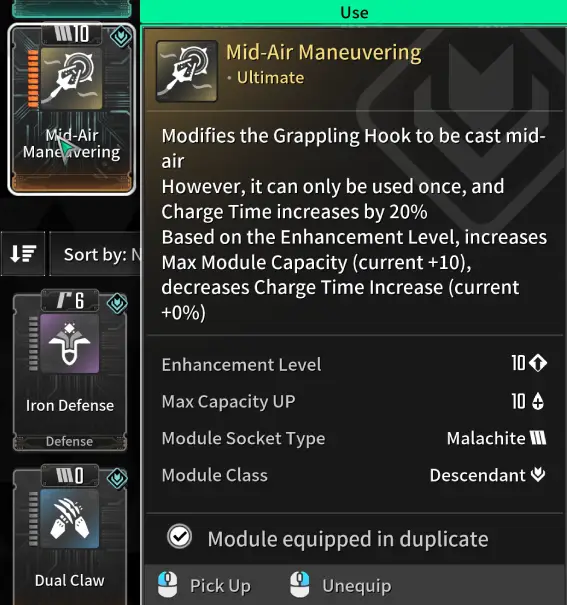
With this Module, you can attach your Grapple Hook to anything, even air! That means you can simply aim towards the sky and Hook up your grapple hook there for guaranteed fast movement!
Here is a guide on how to get the Mid-Air Maneuvering Sub Module in The First Descendant. It won’t take a lot of effort, but it will definitely improve your build and overall gameplay in The First Descendant.
Sharen’s Story in The First Descendant

An Assassin-type melee dealer with Electric Arche. Using camouflage, she can close the distance to her enemies whenever she desires, and ambish enemies anytime, anywhere.
Sharen, Colon Special Forces Agent No. 0 and unit commander, possessed such extraordinary skill that she was considered the strongest among non-Descendant fighters, and her close-quarter combat skills were so deadly that she had killed more Vulgus than even the heavily-armed Descendants. It was often said that should she possess Arche, she would be able to assassinate Karel… However, Sharen herself did not welcome this reputation. The reason being that the Vulgus assassination unit, which Sharen and the Colon Special Forces had been chasing, had slayed more Albion troops than the Vulgus Sharen had killed, vanishing into the shadows every time.
Eventually, in order to put an end to the gradually increasing allied casualties, Sharen decided to track down the deadly cyborg Vulgus. The operation’s mission was to determine the location of the target and call in a Descendant strike force. But Sharen had no intention of handing the final blow to this assassination unit to anyone else. Around this time, Sharen’s battle skills were at their peak, and according to the observation of the agents who were deployed with her, some of her movements were displaying an electrical phenomenon which seemingly appeared to be an Arche ability. Nobody doubted her inevitable victory.
However, the operation ended in failure.
Sharen, who awoke in an Albion operating room, could not believe her eyes. Her limbs were nowhere to be found, and she was writhing in agony in the middle of a hospital room, with just a bloody torso. According to the operation report, the Vulgus assassination unit had ambushed the Colon Special Forced in a display of skill far superior to Sharen’s. Trying to save her soldiers, Sharen suffered fatal injuries and lost consciousness. Luckily, she was rescued by No.17, an agent who had been deployed as backup. Although they had managed to successfully retreat to Albion, Sharen was at death’s door. Her only chance for survival was to transplant her major organs into a newly developed Arche Drive body prosthetic and pray she possessed Arche.
Sharen could not allow herself to die yet. She had to eliminate the cyborg who had brought about this chain of events. Even if she had to live every moment with the pain of blades cutting through her body, she would pay the enemy back with even more blades.
As her consciousness started to slip away, Sharen focused and projected her will. With this, her body started to slowly, and cautiously, replace itself with artificial muscles, synthetic fibers, and an obsidian Kuiper frame.
Related Guides for The First Descendant
You can also check out our Ultimate Weapons Database for The First Descendant or the Builds Database for The First Descendant.