Welcome to The First Descendant Lepic Build Guide for Season 3 Episode 3.
In this guide, we will explain how to create a powerful build for the Lepic Descendant. We’ll cover how the skills work and which weapons, stats and modules you need to create the most powerful build for Lepic.
Table of Contents:
- How to play Lepic
- Lepic Builds Overview – Modules
- Trigger & Ancestor Modules
- Arche Tuning for Lepic
- Lepic Equipment Overview
- Lepic Basics
- Lepic’s Story
For builds on other Descendants, visit our The First Descendant Builds Database, or check out the Character Tier List or the Weapon Tier List.
TFD Wiki: We have expanded Alcasthq with tfd.gameslantern.com, a Wiki & Database for anything related to The First Descendant. Use the Character Editor or the Weapon Editor to theorycraft and create builds yourself. Browse Descendants, Weapons, Leaderboard Loadouts or use the Compare Tool. There are plenty of other features you can check out, too!
Here is a quick list of the strengths and weaknesses of the Lepic Build for The First Descendant.
Lepic’s Strengths
Lepic Weaknesses
How to Play Lepic in the First Descendant

In this section, we are going to take a look at how Lepic works in The First Descendant. Lepic has fun skills like the Traction Grenade that tows in all enemies around it. This makes it easy to finish them off all in the same spot, especially effective when you can spam your damage Grenade. Lepic’s ultimate also deals massive burst damage. Learn about his skills in detail in the Lepic’s Skill Explanation section.
Lepic’s AoE Capabilities: TOW!
Lepic is a great character for mobbing because of his Traction Grenade that pulls all enemies into the same location. Not only that, but his damage Grenade also deals massive AoE damage. Check out the Lepic Mobbing Build to learn more on how to set it up.
Lepic’s Single Target Damage: Boss Shredding Galore!
Lepic’s ultimate deals massive burst damage, perfect to nuke any Colossus within seconds if you have the correct build! Check out the Lepic Bossing Build.
Lepic’s Equipment: Make Or Break It!
To unlock Lepic’s full potential, you need the right Weapons, Reactors, and External Components:
- Weapons: Lepic is a skill-based Descendant, therefore weapons aren’t that important. However, there are certain weapons that we can use as a “stat stick” to enhance Lepic’s power and mobility even further. Please view the Best Weapons for Lepic section of the build.
- Reactors: Selecting the right reactor can drastically boost your damage. Check out the Best Reactors for Lepic section.
- External Components: These are critical for survivability. Properly configured, they double or triple your HP and DEF. Learn more in the Best External Components for Lepic section.
Building a top-tier The First Descendant Lepic Build requires not only the right modules but also optimized weapons, reactors, and components.
Best Lepic Builds Overview for The First Descendant
 Crystallization Catalysts: To unlock the necessary socket slots.
- Energy Activator: To increase overall module capacity.
- Gold & Kuiper: Best Gold Farming Method – Best Kuiper Shard Farming Method.
Equipment: I will cover Weapons, Reactors, External Components, Inversion Reinforcements, and Transcendent Modules in the Lepic Equipment section. To maximize the power of any build, you must get the correct items!
| Name | Description |
|---|---|
| Lepic Mobbing Build | Used in any content that requires max AOE damage. |
| Lepic Bossing Build | Used against Colossus fights. |
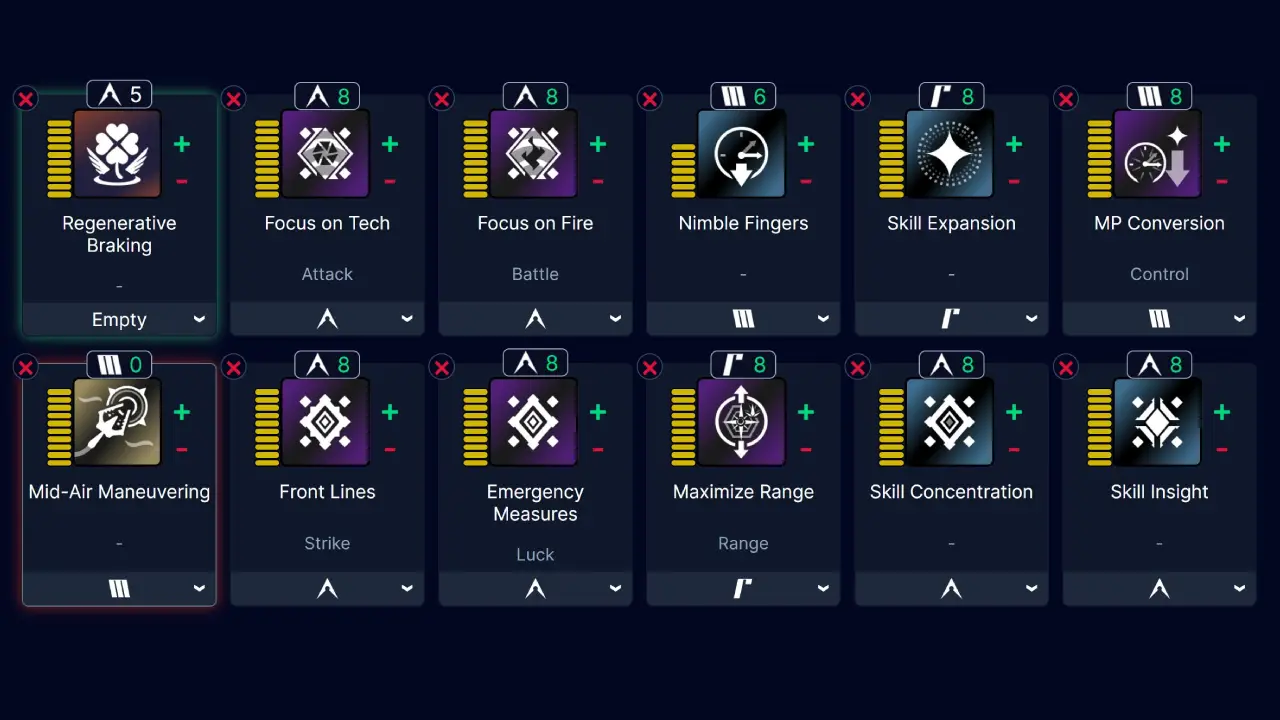
Lepic Mobbing Build
- Mobbing Build Type: 100%-400% Dungeons, Void Vessel, Disrupt Invasions, farming, anything with hard difficulty.
- Mobbing Build Focus: Optimized for speed, high damage, max range, and good survivability.
The purpose of this Lepic Mobbing Build for The First Descendant is to clear dungeon content like 100%-400% dungeons, Void Vessel or Invasions on hard difficulty.
This Lepic Mobbing Build gives you infinite skill spam. We have managed to reduce the skill cost and cooldown so far that you can literally spam skills. This is great for any content where hordes of enemies attack you.
Because we just spam skills with this mobbing setup, I highly recommend using the Secret Garden weapon as a stat stick for higher movement speed and extra damage due to its Pest Control ability that increases tech damage even further.
| Module Slot | Module Name | Mod Level | Socket Type | Crystallized |
|---|---|---|---|---|
| 0 (Trigger Module) | Power Beyond | N/A | N/A | N/A |
| 1 (Skill Module) | Regenerative Braking | Max | No | |
| 2 | Focus on Tech | Max | Yes | |
| 3 | Focus on Fire | Max | Yes | |
| 4 | Nimble Fingers | Max | Yes | |
| 5 | Skill Expansion | Max | Yes | |
| 6 | MP Conversion | Max | Yes | |
| 7 (Sub Module) | Mid-Air Maneuvering | Max | Yes | |
| 8 | Front Lines | Max | Yes | |
| 9 | Emergency Measures | Max | Yes | |
| 10 | Maximize Range | Max | Yes | |
| 11 | Skill Concentration | Max | Yes | |
| 12 | Skill Insight | Max | Yes |
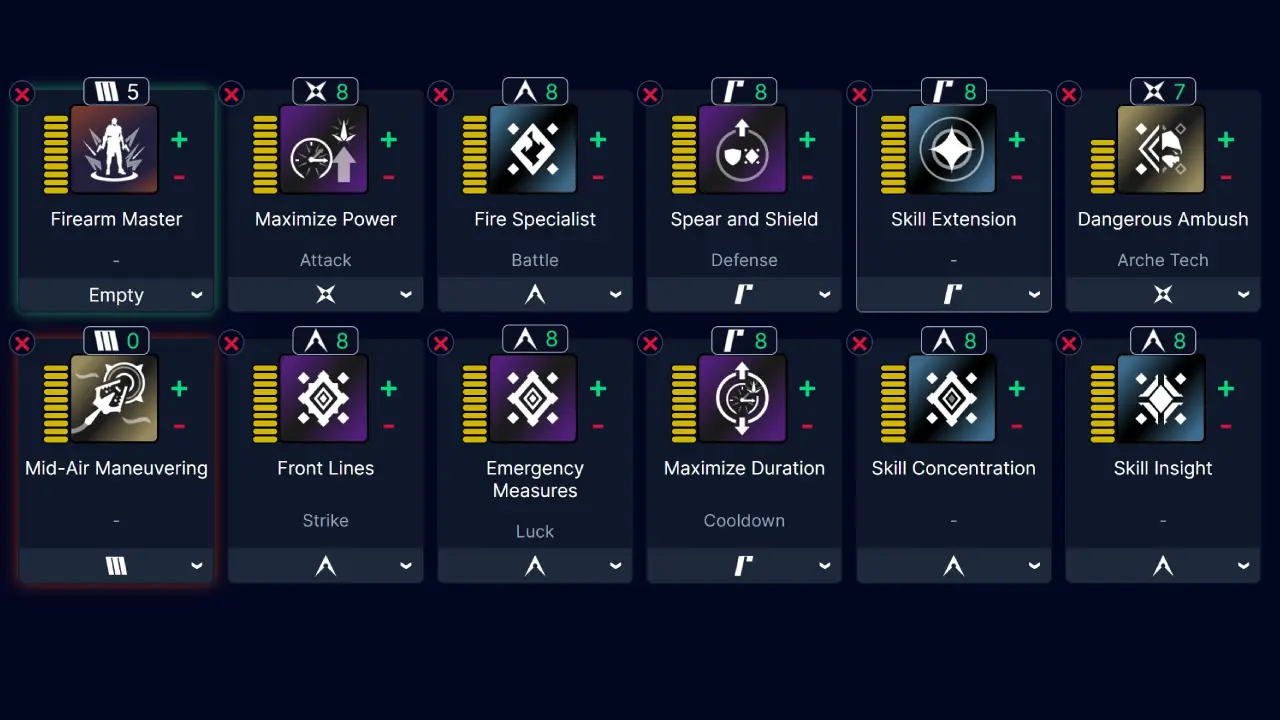
Lepic Bossing Build for The First Descendant
- Bossing Build Type: Colossus fights on hard difficulty.
- Bossing Build Focus: Maximum burst damage, but long cooldown if boss isn’t dead in the first burst window.
With this Lepic Bossing Build you can burst down any Colossus on hard difficulty. It is designed to have massive burst damage, but with a long cooldown. Therefore, you need to defeat the boss within the first few seconds.
| Module Slot | Module Name | Mod Level | Socket Type | Crystallized |
|---|---|---|---|---|
| 0 (Trigger Module) | Power Beyond | N/A | N/A | N/A |
| 1 (Skill Module) | Firearm Master | Max | No | |
| 2 | Maximize Power | Max | Yes | |
| 3 | Fire Specialist | Max | Yes | |
| 4 | Spear and Shield | Max | Yes | |
| 5 | Skill Extension | Max | Yes | |
| 6 | Dangerous Ambush | Max | Yes | |
| 7 (Sub Module) | Mid-Air Maneuvering | Max | Yes | |
| 8 | Front Lines | Max | Yes | |
| 9 | Emergency Measures | Max | Yes | |
| 10 | Maximize Duration | Max | Yes | |
| 11 | Skill Concentration | Max | Yes | |
| 12 | Skill Insight | Max | Yes |
Trigger and Ancestor Modules for the Lepic Build
Trigger and Ancestor Modules are also part of the module category, but they are a special type of module that are harder to unlock and acquire.
- Trigger Modules: Go into a special slot. Unlock special buffs and unique effects.
- Ancestor Modules: Go into a normal module slot. Enhance the build by adding additional stats.
Lepic Trigger Modules
You need to first unlock the trigger module slot for each character. Learn how to unlock Trigger Modules in The First Descendant.
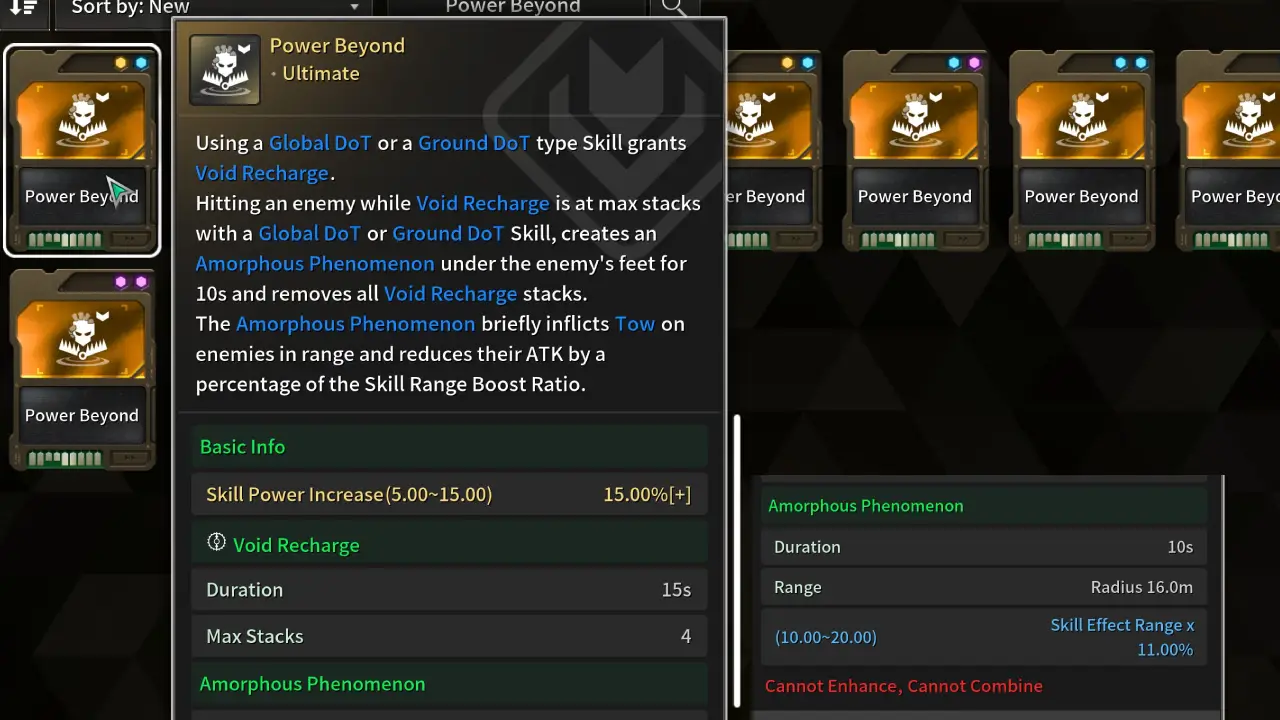
For our The First Descendant Lepic Build, you always want to use the Power Beyond trigger module. This gives us a flat 15% Skill Power Increase to all our damage, which is very powerful.
- Mobbing & Bossing: Power Beyond
Lepic Ancestor Module
Ancestor Modules can be slotted once you have acquired them. However, they are only worth it once you have an Ancestor module with good stat rolls on them.
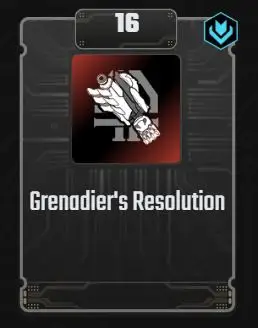
- Lepic Ancestor Module: Grenadier’s Resolution
- Superconductive Cooling Units (Needed to Reroll perks): How to farm
- Must Read: How Ancestor Modules Scale & Examples
It is only worth slotting an Ancestor Module if you have good rolls on it; otherwise, it isn’t worth it.
- Ideal Positive Rolls
- Fire
- Tech
- Skill Critical Hit Rate
- Skill Critical Hit Damage
- Skill Range
- Ideal Negative Rolls
- Max Shield
Ancestor Module: What to Replace and Why
To slot an Ancestor Module effectively, identify existing modules that share the same primary stat. By replacing a standard module with an Ancestor version that offers similar values, you maintain your core build while gaining its additional unique perks as a ‘free’ bonus.
- How to: Replace a standard module with an Ancestor Module that mirrors its main perk.
- The values should be close; you preferably don’t want to replace a 100% with a 30% value.
- Example 1: If your Ancestor Module provides Skill Critical Hit Rate, replace Skill Insight.
- Example 2: If your Ancestor Module provides Max HP, replace Increased HP.
- Example 3: If your Ancestor Module provides Skill Effect Range, replace Skill Expansion.
- Result: All other perks from the Ancestor Module will basically be a “freebie” and improve your build!
- Helpful Links:
As long as the Ancestor Module reaches a similar value to the one you’re removing, every additional stat on that Ancestor Module becomes a “free” bonus for your build.
Arche Tuning for Lepic
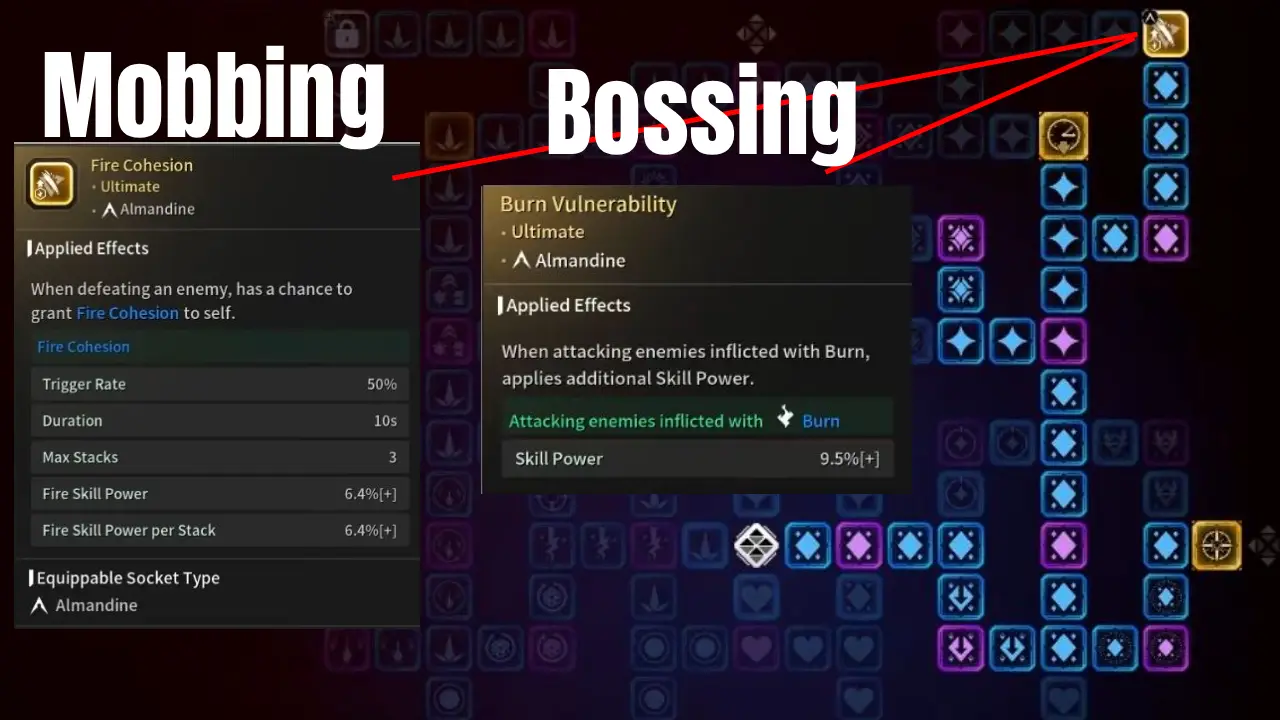
The Arche Tuning System in The First Descendant is important for every Character; it buffs your stats by a good amount. For The First Descendant Lepic, we are focusing on the right and upper right section.
You level up Arche Tuning in the Sigma Sector Dropoff Operation. Mutant Cells also drop there with a small chance.
- Mutant Cell:
- Mobbing: Fire Cohesion
- Bossing: Burn Vulnerability
Lepic Equipment Overview in The First Descendant

Equipment is the cornerstone of any successful The First Descendant Build. For Lepic, having the right setup can mean the difference between dominating a dungeon and falling short. This section breaks down the essential equipment types—Weapons, Reactors, and External Components—and explains how they maximize his power.
| Equipment Type | Importance | Key Benefits |
|---|---|---|
|
|
|
|
|
|
|
|
|
|
|
Best Weapon for the Lepic Build in The First Descendant
Because Lepic is a skill-based Descendant, the weapon is not that important. However, you still want to select specific weapons as a “Stat Stick” that give you enhanced mobility and effects to boost your skills further.
Top 2 Skill-based Stat Sticks for Lepic
Depending on which setup you run, you want to either have Blue Beetle or Secret Garden equipped.
| Weapon | Category | Key Features | Why It’s Great for Lepic |
|---|---|---|---|
| Tactical Rifle |
|
|
|

|
Machine Gun |
|
|

|
Hand Cannon |
|
|
Other Useful Weapons
| Weapon | Category | Key Features | Why It’s Great for Lepic |
|---|---|---|---|
| Rocket Launcher |
|
|
|
| Sword |
|
|
|
| Submachine Gun |
|
|
Best Reactor for Lepic in The First Descendant
Selecting the best reactor for Lepic in The First Descendant can significantly enhance his abilities, allowing you to maximize his effectiveness in various scenarios. Not only does the reactor determine your skill damage, but it also gives additional secondary benefits through modifiers. These are often hard to get and take time to grind out!
You want to make sure to get the correct mounting (Optimization Condition) to benefit from the 160% boost.
It is hard to get a Reactor with two best in-slot specs. However, you should be able to get a Reactor with at least one good spec. I will highlight the more important spec in bold in the table below.
| Best Reactor | Specs | Key Benefits | Best Builds |
|---|---|---|---|
| Burning Mechanics Reactor |
|
Faster skill cooldown and extra damage. | |
| Burning Mechanics Reactor |
|
Overall, the best damage vs Colossus |
Lepic Reactor Optimization Condition
To get the 160% boost, it is important to have the correct mounting type (Optimization Condition) on your Reactor. You can add up to three different mounting types! This is important, so when you swap your weapon you don’t lose the 160% boost!
How to find the Location of Reactors
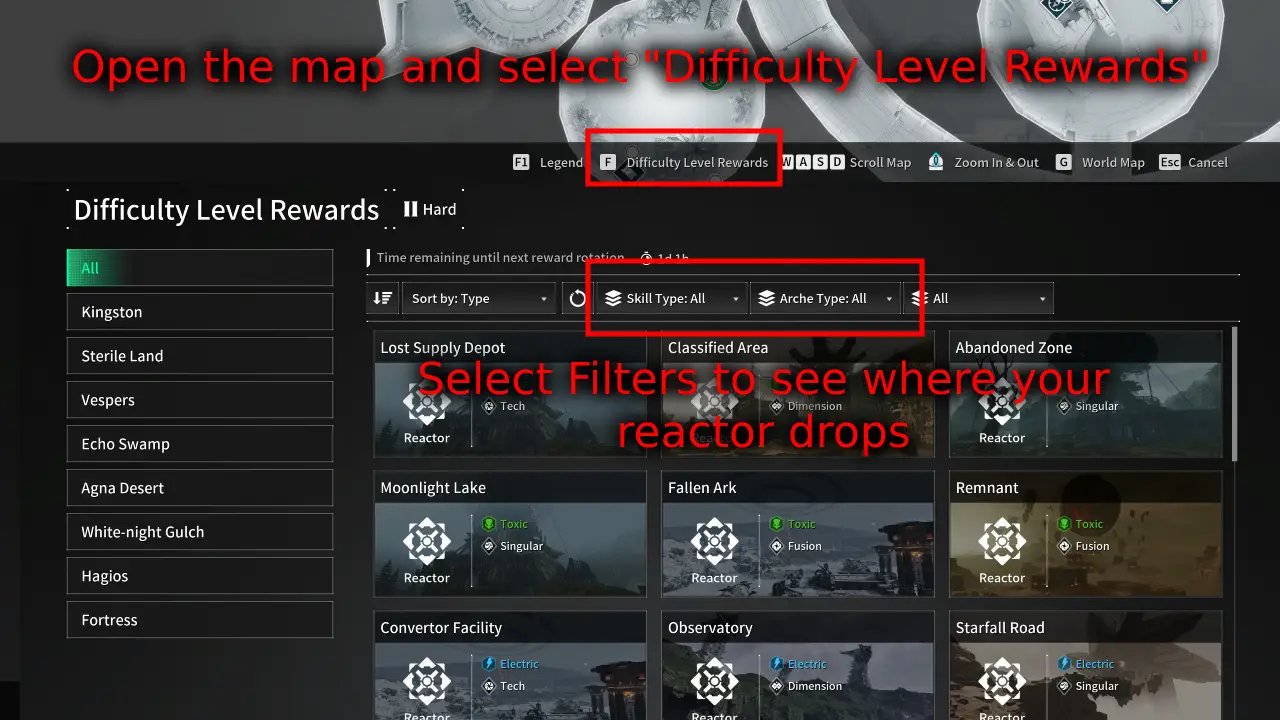
Reactor drop locations change every day. Not many players are aware of this and become confused. Now, there is a reactor search function in-game. Go to the map and press on Difficulty Level Rewards. In here, you can see where all the reactors currently drop.
Note: It is possible that not all reactor types are currently dropping. You have to come back and recheck every day.
If your specified reactor drops in an area, you go there and farm any missions and monsters (Preferably missions with lots of monster spawns). There will be plenty of reactors dropping from monsters all over the place, any monster works. It will take a while to get a good reactor!
Best External Components for the Lepic Build
I will show you two good options. The first option is 2x Hunter and 2x Ascending to get extra cooldown and cost reduction, also you will have a lot of HP because you get 3x HP based and 1x DEF based component base stats. The second option is 4x Slayer set. This will drastically reduce your HP (if you are too squishy, add a HP module), but increase your damage the most and also give you unlimited MP because of the sets effect.
Additionally, External Components now also have core slots; it is recommended to slot Max HP and DEF cores.
| External Components Set | Set Effect | Why It’s Good | Recommended Build |
|---|---|---|---|
| 2x Hunter Set 2x Ascending Armory Set |
|
Reduces cooldown and cost of your skills. | |
| 4x Slayer Set |
|
Maximizes Skill Power and restores resources due to towed. |
2x Hunter Set and 2x Ascending Armory External Components Setup
This is the safest setup because it allows us to stack three HP-based and one DEF-based components and still get good bonuses out of it. This also allows us to not use a HP Module in our setup, freeing up a slot for other mods.
- 2 Hunter Set:
- Skill Cooldown -4%.
- 2 Ascending Armory Set:
- Skill Cost -6.5%
| External Component Part | Base Stats | Selective Best Stats | Cores |
|---|---|---|---|
| Max HP |
|
|
|
| DEF |
|
|
|
| Max HP |
|
|
|
| Max HP |
|
|
Slayer External Components Setup
As a secondary option, you can use the Slayer set to push damage even further, but you will lower your survivability drastically because of the worse base stats.
| External Component Part | Base Stats | Selective Best Stats | Cores |
|---|---|---|---|
| DEF |
|
|
|
| Max Shield |
|
|
|
| Max Shield |
|
|
|
| Max HP |
|
|
Inversion Reinforcements Setup for Lepic
You can find the Inversion Reinforcements in the inventory, located on the bottom left side. This changes with every new season and needs to be leveled up again. You level up Inversion Reinforcements by doing any activity. However, the fastest way to advance it is by completing Disrupt Invasion (max 4 daily) in the dungeon terminal with the red dungeons.
At max level, you have unlocked everything. While the last perk is always active in each row, you can only slot three additional perks at the bottom. Here is what you want to prioritize:
- Hunting: Arche Circulation Tactic.
- Elemental: None.
- Recovery: Selective Neurostimulation.
- Survival: Deploy Hardened Shell.
- Season: None.
Lepic Basics in The First Descendant
If it is your first time playing Lepic in The First Descendant, here are some useful things you should know.
- How to unlock Lepic
- Skills Explanation – Master Lepic’s Abilities
- Module Basics Explained!
- Best Grapple Hook for Lepic
How to Unlock Lepic in The First Descendant
Let’s take a quick look at how to unlock Lepic in the First Descendant. To unlock Lepic, you have to select him in the tutorial, purchase him from the store, or research him. You need the following items to research Lepic:
- 1x Lepic Enhanced Cells
- 290x Semi-permanent Plasma
- 499x Monomolecular Extractor
- 34x Highly Concentrated Energy Residue
- Lepic Enhanced Cells Blueprint
- 200k Gold
- 1x Lepic Stabilizer
- 571x Superfluid
- 462x Shape Memory Alloy
- 43x Crystal Biogel
- 1x Lepic Stabilizer Blueprint
- 200k Gold
- 1x Lepic Spiral Catalyst
- 519x Metal Accelerant
- 554x Carbon Crystal
- 60x Complex Carbon Activator
- 1x Lepic Spiral Catalyst Blueprint
- 1x Lepic Code
- Intercept Battle: Hard Obstructer – Amorphous Material Pattern 106
- Location 2: Vespers Normal – Void Fusion Reactor – Vespers Ruins
- Location 3: Vespers Hard – Abyssal Void Fusion Reactor – Vespers Lost Supply Depot
- Location 4: White-night Gulch Hard – Abyssal Void Fusion Reactor – White-night Gulch Mountaintops
- 400k Credits
When you visit Magisters Anais at the Research Institute you can hover over each item. Then click on Acquisition Info and it will tell you where this specific item drops. We also have an in-depth guide on this, please visit the How to unlock Lepic in The First Descendant guide.
Ultimate Lepic: How to unlock Ultimate Lepic
The First Descendant Lepic Skills Explained
In this section, we are going to explain the skills available to our Lepic Build in the First Descendant, how each skill works and the best ways for you to use them.
| Icon | Skill Name | Description |
|---|---|---|
 |
Grenade Throw | Throws a grenade forward at the enemy. |
 |
Overclock | Increases all Skill ATK and adds a Burn effect to Grenade and Overkill for a set duration. |
 |
Traction Grenade | Throws a Traction Grenade forward to pull the enemies within range. |
 |
Overkill | Fires a powerful shell at the enemy. The shell is maintained at the landing point for a set period of time, inflicting constant damage. |
 |
Close Call (Passive) | Recover HP when taking fatal damage. Long Cooldown. |
Grenade Throw

Throws a grenade forward at the enemy.
Grenade Throw Skill Description:
- Fire – Tech
- Throws a grenade forward, inflicting AoE damage.
How to use Grenade Throw:
Grenade Throw is a useful AoE attack. It’s great at dealing damage to groups of enemies at once, but not so good against single-targets. However, if there is only one target to attack then you can use the grenade as it may still be your best option.
The great thing about Grenade Throw is its very low cooldown – you can throw a grenade once every six seconds.
Overclock
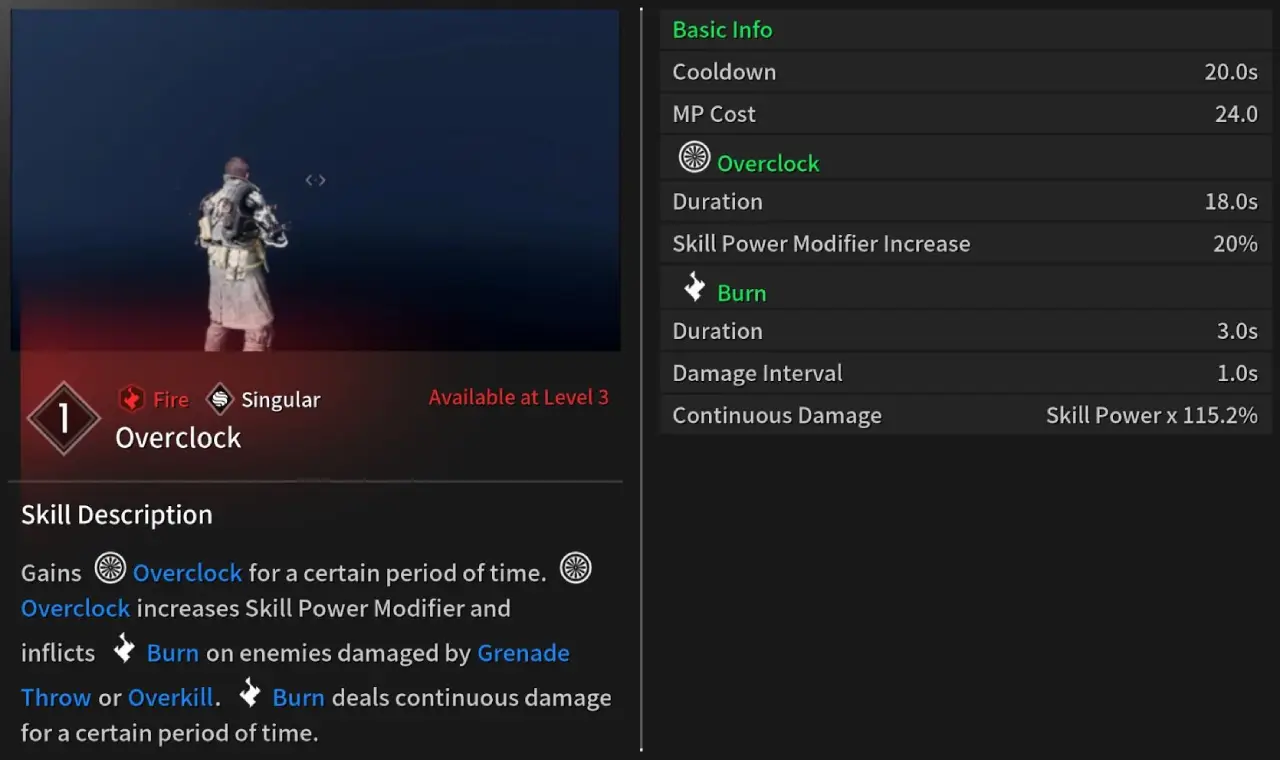
Increases all Skill ATK and adds a Burn effect to Grenade and Overkill for a set duration.
Overclock Description:
- Fire – Singular
- Gains Overclock for a period of time.
- Overclock increases Skill Power Modifier and inflicts Burn on enemies damaged by Grnade Throw or Overkill.
- Burn deals continuous damage for a certain period of time.
How to use Overclock:
Overclock is a self-buff skill that improves your Skill Power and causes your Throw Grenade and Overkill Skills to also make enemies Burn for damage over time. We recommend using Overclock as often as possible when in combat, as this will boost your damage output quite considerably. It’s especially important to ensure that Overclock is active before using Throw Grenade or Overkill.
Overclock has a 20-second cooldown and an 18-second duration, which means you can have the buff active almost constantly, as long as you can afford the MP Cost to keep casting it on cooldown.
Traction Grenade

Throws a Traction Grenade forward to pull the enemies within range.
Traction Grenade Description:
- Fire – Singular
- Throw a Traction Grenade forward to pull enemies for a period of time.
How to use Traction Grenade:
Traction Grenade doesn’t deal damage, but it can be used to disrupt enemies and pull them towards you. This can be used either offensively to begin an attack on a group of enemies or defensively to get some respite by disrupting enemy attacks.
Overkill
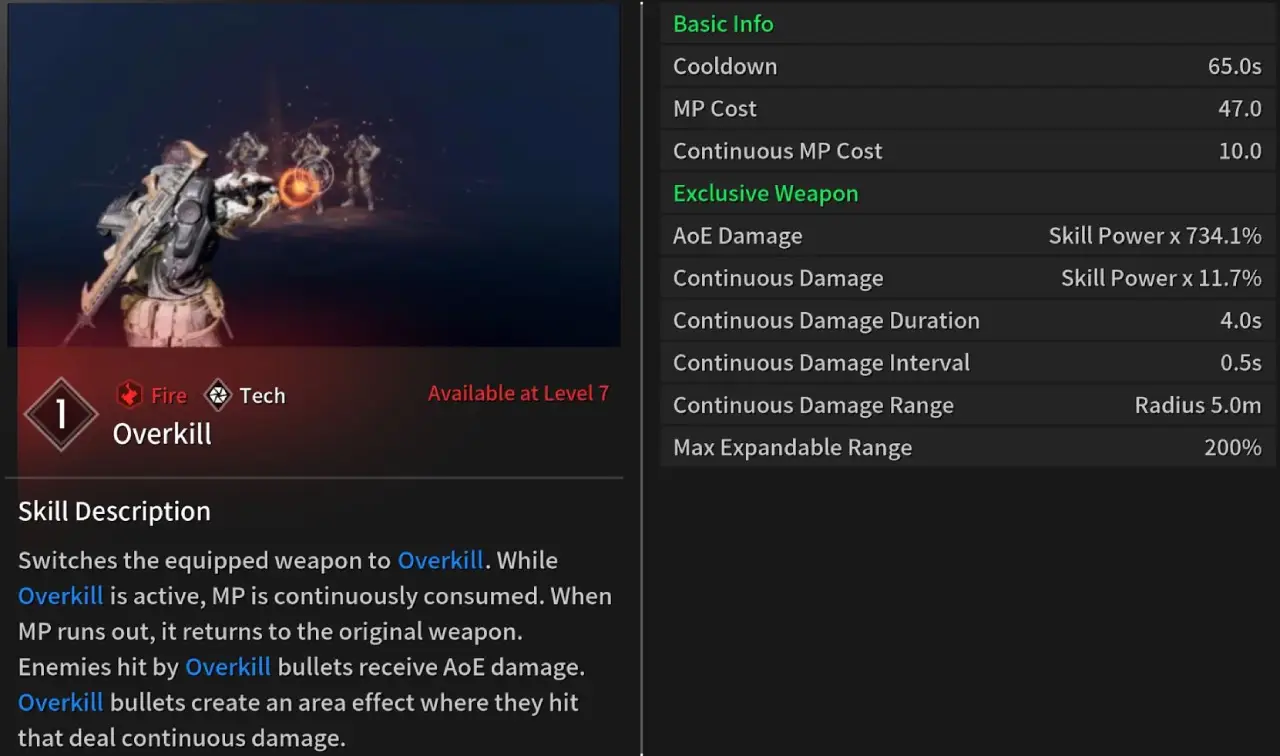
Fires a powerful shell at the enemy. The shell is maintained at the landing point for a set period of time, inflicting constant damage.
Overkill Description:
- Fire – Tech
- Switches the equipped weapon to Overkill.
- While Overkill is active, MP is continuously consumed. When MP runs out, return to the original weapon.
- Enemies hit by Overkill bullets receive AoE damage.
- Overkill bullets create an AoE where they hit that deals continuous damage.
How to use Overkill:
Overkill is Lepic’s most damaging Skill by far. It has a very long cooldown, and using it will expend all of your MP. Keep in mind that the skill costs a lot of MP to initially cast, and after that it will gradually consume your remaining MP. Therefore, it’s best to wait until your MP is almost or completely full. Otherwise, you may only have the skill active for a couple of seconds, which is a waste of potential damage output.
Overkill is the ideal answer to large groups of enemies, as it will quickly rack up huge DPS in these situations. It’s decent against single targets too, but in those cases you might be better off using your normal firearm.
Close Call (Passive)
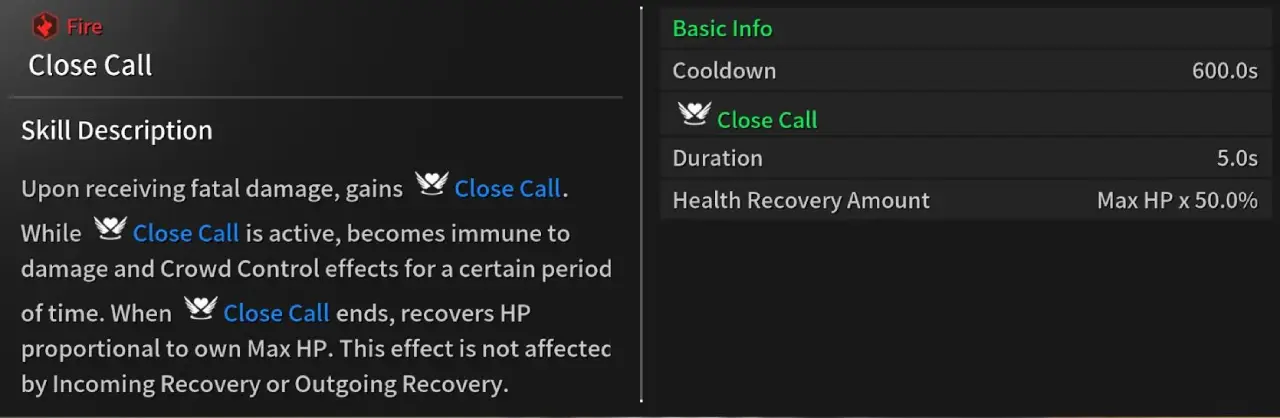
Recover HP when taking fatal damage. Long Cooldown.
Close Call Passive Description:
- Fire
- Upon receiving fatal damage, gain Close Call.
- When Close Call is active, become immune to damage and Crowd Control effects for a period of time.
- When Close Call ends, recover a portion of your Max HP.
- This effect is not affected by Incoming Recovery or Outgoing Recovery.
How to use Close Call:
Close Call is a passive skill, which means it is always active. It allows you to take greater risks than you normally would get away with, since this passive lets you cheat death.
You don’t need to worry about this passive much, it will sit in the background and activate when needed to save you from fatal damage. Just remember that it has a very long Cooldown – once activated you won’t get it again for 10 minutes!
How Modules Work in The First Descendant
Modules are the bread and butter of all The First Descendant Builds. There are a few important things to remember about modules. This is for both Descendant and Weapon Modules.
While most builds require you to increase Module Capacity with an Energy Activator (you get two for free), they won’t require you to reduce the Module cost with Crystallization Catalyst. However, if you want to truly min-max a build, you will need plenty of these Catalysts.
- How to increase your Module Capacity
- Module Levels and Cost
- Reduce the cost of Modules
- How to farm Modules
How to Increase Module Capacity
You get a base of 45 Modules for every Descendant character. And you can increase this up to 85 currently. First off, always slot a Sub Attack Module (Slot 7). When you increase this to the max level you will get an additional 10 Module Capacity. if you use a Crystallization Catalyst on the Sub Attack Module, you even get 15 extra slots. You will see this in the setup below.
Additionally, you can use an Energy Activator to increase your Module Capacity by another 20. However, these are fairly hard to farm, only use them on your best Descendants.
Lastly, increasing your Mastery Rank will also increase Module Capacity. Rank 1 gives you 25 Module Capacity, Rank 20 gives you 50 Module Capacity. That is how we reach the 80 Module Capacity that you see on most builds.
- Slot a Sub Attack Module (and max it out to get +10 capacity, crystallize it for +15)
- Use an Energy Activator (2o extra capacity)
- Increase Mastery Rank (25 base capacity, max 50)
Weapons: Basically the same, but because you don’t have Subattack Modules, the Energy Activator gives you 30 instead of just 20 extra capacity.
You can also read my in-depth guide on how to increase Module Capacity in The First Descendant if you need more information. Or my Best Energy Activator Farm Spots and our Best Crystallization Catalyst Farm Spots. I tested all of the grind spots by myself and have already farmed plenty of these items with this method.
Module Levels and Cost
Modules can be enhanced (leveled up) with Kuiper Shards in The First Descendant. Enhancing Modules increases their power. At higher levels, the power will increase way more than at lower levels. Therefore it is always recommended to max out the most important Module first.
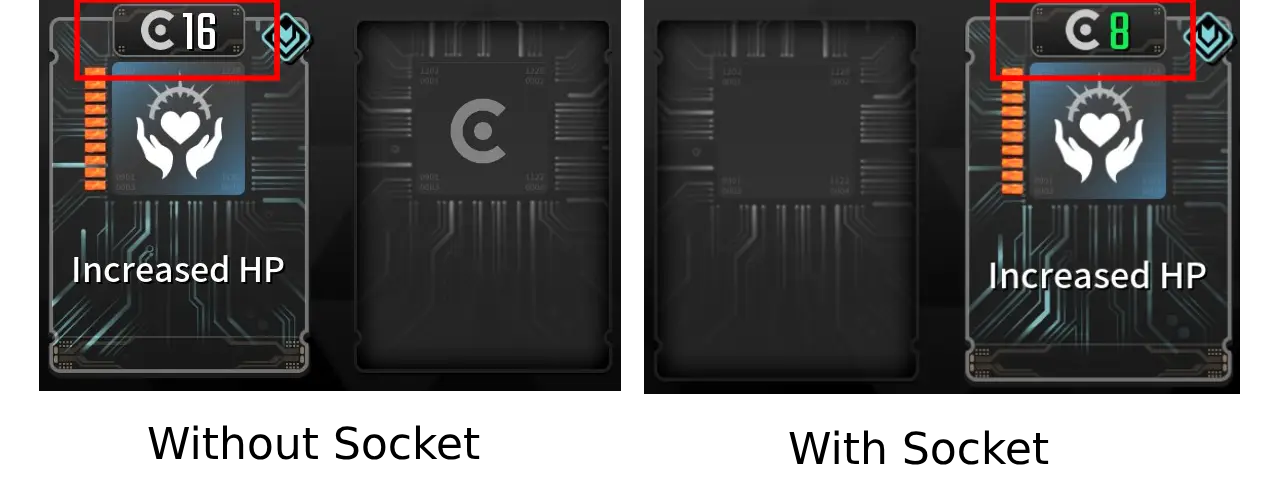
Here is an example of a must-have Module called Increased HP for our Descendant. You will notice that we start at 22%, but at the max level, we get a whopping 218.5% increase in health!
| Level | Capacity Cost | Power |
|---|---|---|
| 0 – Base | 6 | 22% |
| 1 | 7 | 31.2% |
| 2 | 8 | 41.4% |
| 3 | 9 | 54.4% |
| 4 | 10 | 69.8% |
| 5 | 11 | 87.2% |
| 6 | 12 | 108.2% |
| 7 | 13 | 130.2% |
| 8 | 14 | 155.2% |
| 9 | 15 | 184.5% |
| 10 | 16 | 218.5% |
Transcendent Modules are the exception; they decrease Capacity Cost with higher levels!
For an in-depth overview, please visit our How to Level Up Modules in The First Descendant guide.
How to Farm Kuiper Shards
Kuiper Shards are used to level up Modules. We have a guide on the Top 3 Kuiper Shard Farming Locations in the First Descendant. We explain how to most efficiently farm Kuiper Shards (300-500k/hour) and show the amount you need to level up mods. As a summary, to max out a Module you need:
- Normal Modules: 103’100 Kuiper Shards
- Rare Modules: 206’200 Kuiper Shards
- Ultimate Modules: 309’300 Kuiper Shards
- Transcendent Modules: 515’500 Kuiper Shards
Always max out the most important Modules first, we will showcase the order below.
How to Reduce the Cost of Modules
To reduce the cost of Modules you need Crystallization Catalysts in The First Descendant. These require a lot of time investment, most builds won’t require you to get many if any at all (Budget Setup). But if you want to completely min-max you need to get plenty of them as technically, every slot can have a specific socket type to half the cost.
Modules have Socket Types. Our Increased HP Module has the Cerulean Socket Type.
- Module: Increased HP
- Socket Type: Cerulean
This is important because if we place our Increased HP Module in the fitting Socket Type, it will half the cost of the Module!
How to farm Modules in The First Descendant
Most The First Descendant Modules can be acquired fairly easily, but the higher-quality ones (Ultimate, Transcendent) are more tedious to obtain. Here is the easiest process to farm Modules quickly.
Open Map > Swap to Access Info > Select Modules
Here, you can find all Modules and their drop locations. If a module drops from several locations, it is recommended to select drop locations with higher drop chances.
There isn’t really much more to this. Simply check the location and go farm. Normal and Rare quality Modules have 30-50% drop chances in most cases. Ultimate ones range around the 5% mark and Transcendent ones can be a tough cookie with around 2% drop chance.
We will list the best farming location of modules in the next step of the guide.
Smooth Grapple Hook for your Lepic Build
Using the standard Grapple Hook in The First Descendant can be a pain, and it feels kinda frustrating at times. Don’t worry, there is a way better alternative that will make it a joy to use the grappling hook!
It is called the Mid-Air Maneuvering Sub Module. I use this on all my The First Descendant Builds because it improves grappling by so much.
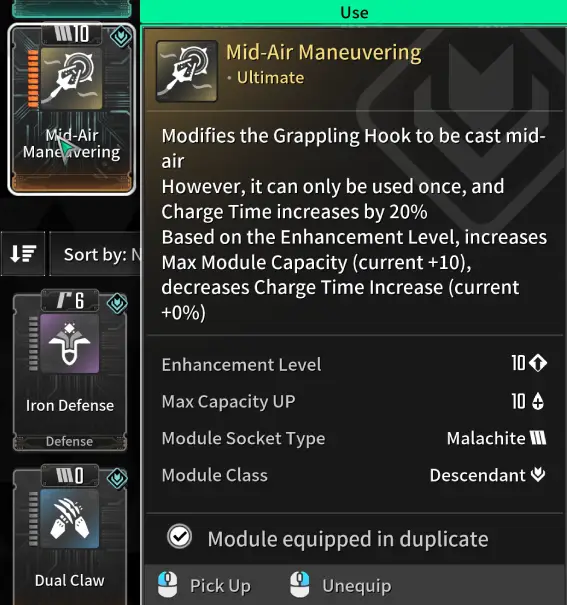
With this Module, you can attach your Grapple Hook to anything, even air! That means you can simply aim towards the sky and Hook up your grapple hook there for guaranteed fast movement!
Here is a guide on how to get the Mid-Air Maneuvering Sub Module in The First Descendant. It won’t take a lot of effort, but it will definitely improve your build and overall gameplay in The First Descendant.
Lepic’s Story in The First Descendant

An AoE dealer who uses grenades to attack. Clears the battlefield with his right arm and grenades which boast a powerful performance.
Jonathan Lepic of the dauntless 44th Grenadier Squad lost all his comrades, and his right arm, in a battle that because the final operation for his squad. Fighting until the bitter end, Lepic became a legendary soldier who annihilated the Vulgus corps with his one remaining atm. The dog tags of his fallen comrades clutched in his hands only added to his immeasurable grief after his lonely return.
The Magisters were interested in the physical capabilities of Lepic, the sole survivor. What if he was a Descendant that the Arche test missed? What if this was all a trial for a new Descendant? Eventually, the Magisters offered an Arche Drive Tactical Prosthetic Arm transplant to Lepic, who at that point, had given up on everything.
Although this device was only for Descendants, as those without Arche could die from a cerebral sensory overload, if Lepic was fated to prevail, it would be a golden opportunity for the Albion military to gain an exceptional Descendant… and for Lepic to return to the front lines. There was no need to ask Lepic twice.
Fortunately, the transplant was a success. Lepic’s dormant Arche was awakened by the pain from the surgery, and Lepic, who succeeded in controlling his prosthetic arm, officially became a Descendant. The last of the Grenadiers had returned to avenge his comrades.
Related Guides for The First Descendant
- The First Descendant Builds Database
- The First Descendant Bunny Build
- The First Descendant Sharen Build
You can also check out our Ultimate Weapons Database for The First Descendant or the Builds Database for The First Descendant.