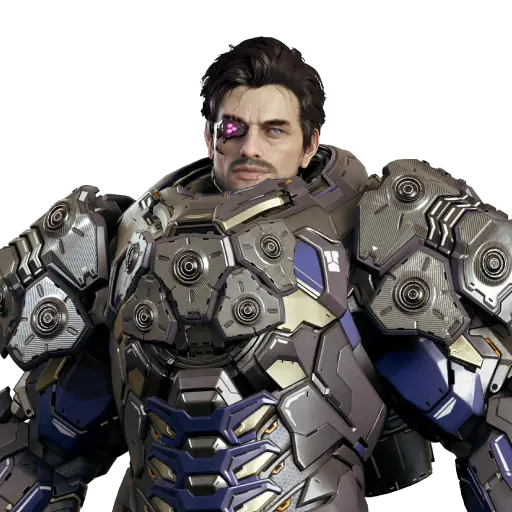
Welcome to The First Descendant Kyle Build Guide for Season 3 Episode 3.
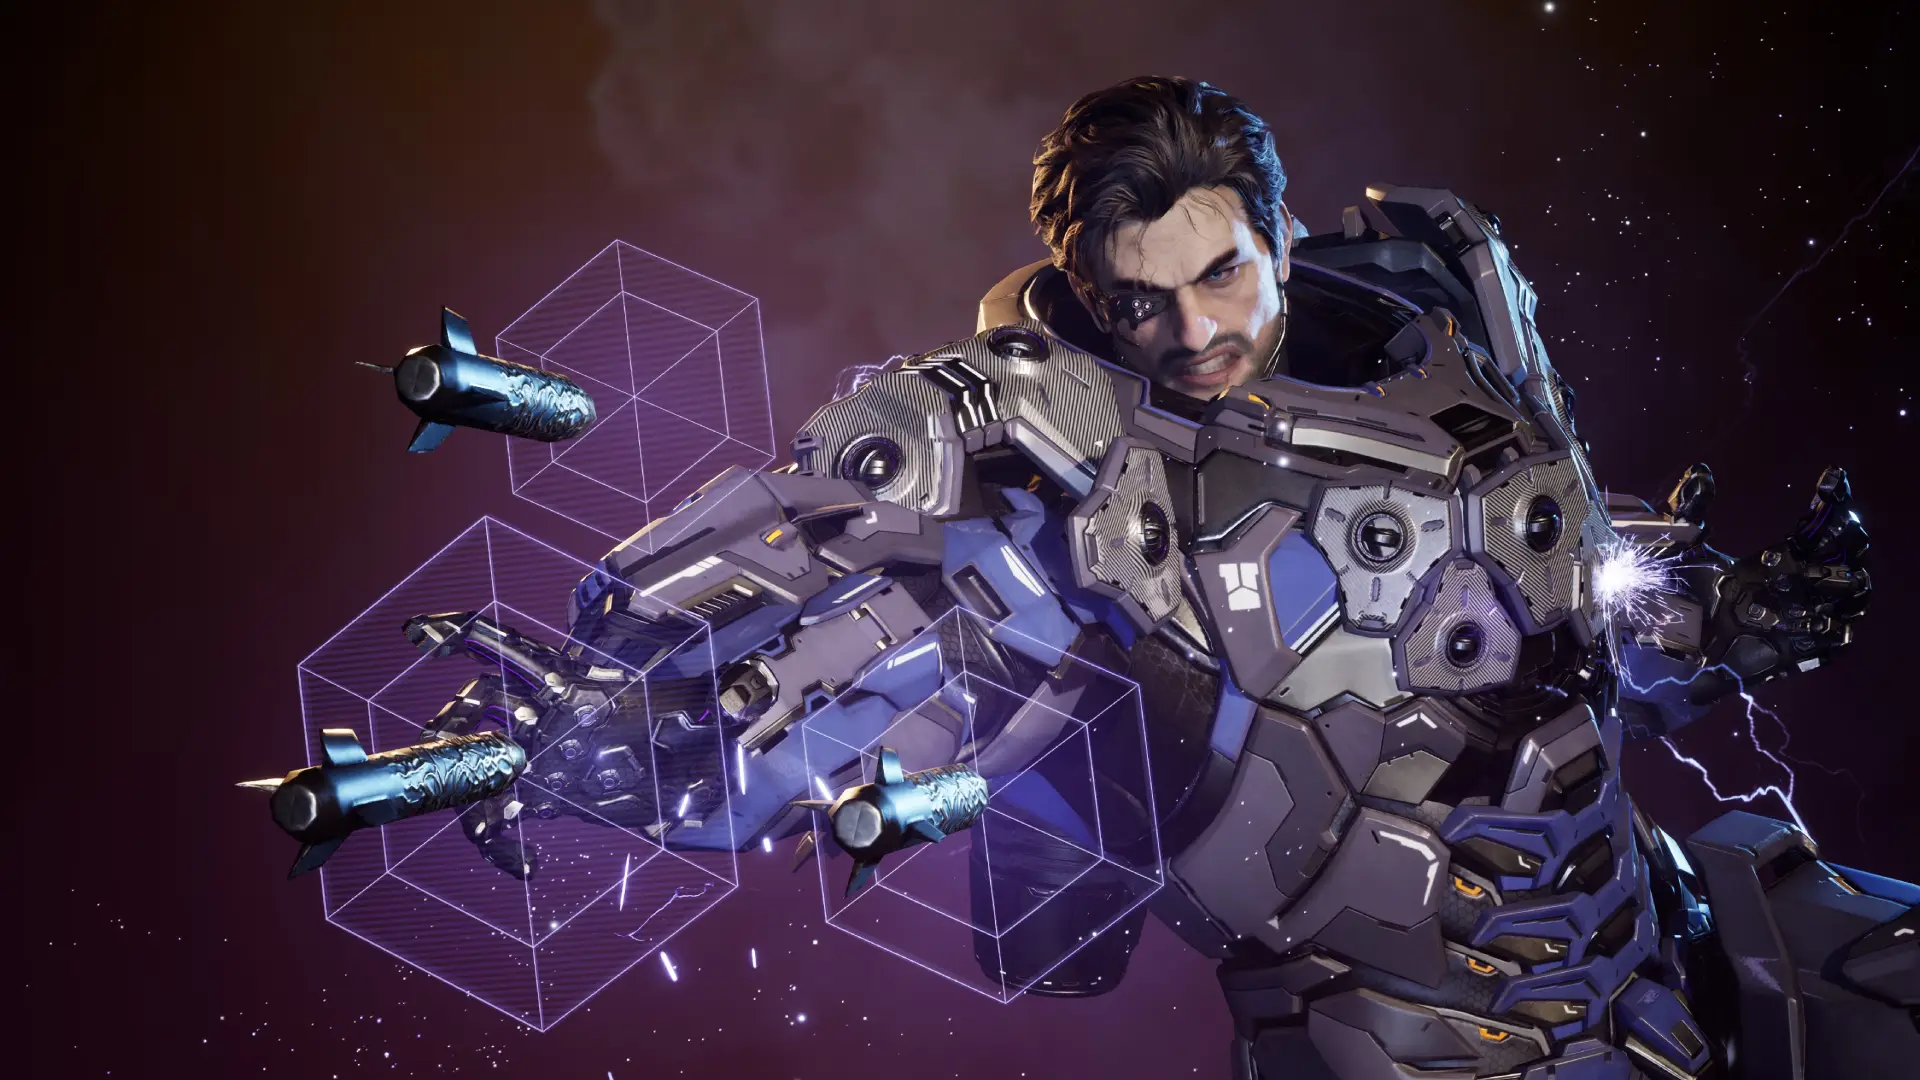
In this guide, we’ll show you how to unleash the full potential of Kyle, the Iron Man. Kyle is a great tanky damage dealer who generates and manipulates magnetic fields. Creates a barrier or radiates magnetic force to push enemies back and serves as a strong shield for his teammates. He also has a powerful ultimate that deals massive AoE and single-target damage.
Table of Contents:
- How to play Kyle: A Deep Dive
- Kyle Builds Overview
- Trigger & Ancestor Modules
- Arche Tuning for Kyle
- Kyle Equipment Overview
- Kyle Basics
- Kyle’s Story
For builds on other Descendants, visit our The First Descendant Builds Database, or check out the Character Tier List or the Weapon Tier List.
TFD Wiki: We have expanded Alcasthq with tfd.gameslantern.com, a Wiki & Database for anything related to The First Descendant. Use the Character Editor or the Weapon Editor to theorycraft and create builds yourself. Browse Descendants, Weapons, Leaderboard Loadouts or use the Compare Tool. There are plenty of other features you can check out, too!
Here is a quick list of the strengths and weaknesses of the Kyle Build for The First Descendant.
Kyle’s Strengths
Kyle Weaknesses
How to Play Kyle in the First Descendant
Kyle uses his Magnetic Force mechanic to power many of his abilities. Save up Magnetic Force to cause your skills to last longer and deal more damage. The amount of Magnetic Force Kyle can hold is scaled on his Max Shield stat, therefore it is strongly recommended to increase the Max Shield stat as much as possible to make him more durable and deadlier in combat.
The Kyle Mobbing Build focuses on dealing as much AOE damage as possible. The Kyle Bossing build focuses on dealing as much damage to Colossus bosses as possible, therefore it is more single-target. But the builds themselves don’t change that much because they all resolve around his insane ultimate skill.
Kyle’s Equipment: Make Or Break It!
To unlock Kyle’s full potential, you need the right Weapons, Reactors, and External Components:
- Weapons: Kyle is a skill-based Descendant, therefore weapons aren’t that important. However, there are certain weapons that we can use as a “stat stick” to enhance Kyle’s power and mobility even further. Please view the Best Weapons for Kyle section of the build.
- Reactors: Selecting the right reactor can drastically boost your damage. Check out the Best Reactors for Kyle section.
- External Components: These are critical for survivability. Properly configured, they double or triple your HP and DEF. Learn more in the Best External Components for Kyle section.
Building a top-tier The First Descendant Kyle Build requires not only the right modules but also optimized weapons, reactors, and components.
Best Kyle Builds Overview for The First Descendant
Crystallization Catalysts: To unlock the necessary socket slots.
Energy Activator: To increase overall module capacity.
- Gold & Kuiper:
Best Gold Farming Method –
Best Kuiper Shard Farming Method.
Equipment: I will cover Weapons, Reactors, External Components, Inversion Reinforcements, and Transcendent Modules in the Kyle Equipment section. To maximize the power of any build, you must get the correct items!
| Name | Description |
|---|---|
| Kyle Mobbing Build | Used in any content that requires max AOE damage. |
| Kyle Bossing Build | Used against Colossus fights. |
Kyle Mobbing Build
- Mobbing Build Type: 100%-400% Dungeons, Void Vessel, Disrupt Invasions, farming, anything with hard difficulty.
- Mobbing Build Focus: Optimized for speed, high damage, max range, and good survivability.
The purpose of this Kyle Mobbing Build for The First Descendant is to clear dungeon content like 100%-400% dungeons, Void Vessel or Invasions on hard difficulty.
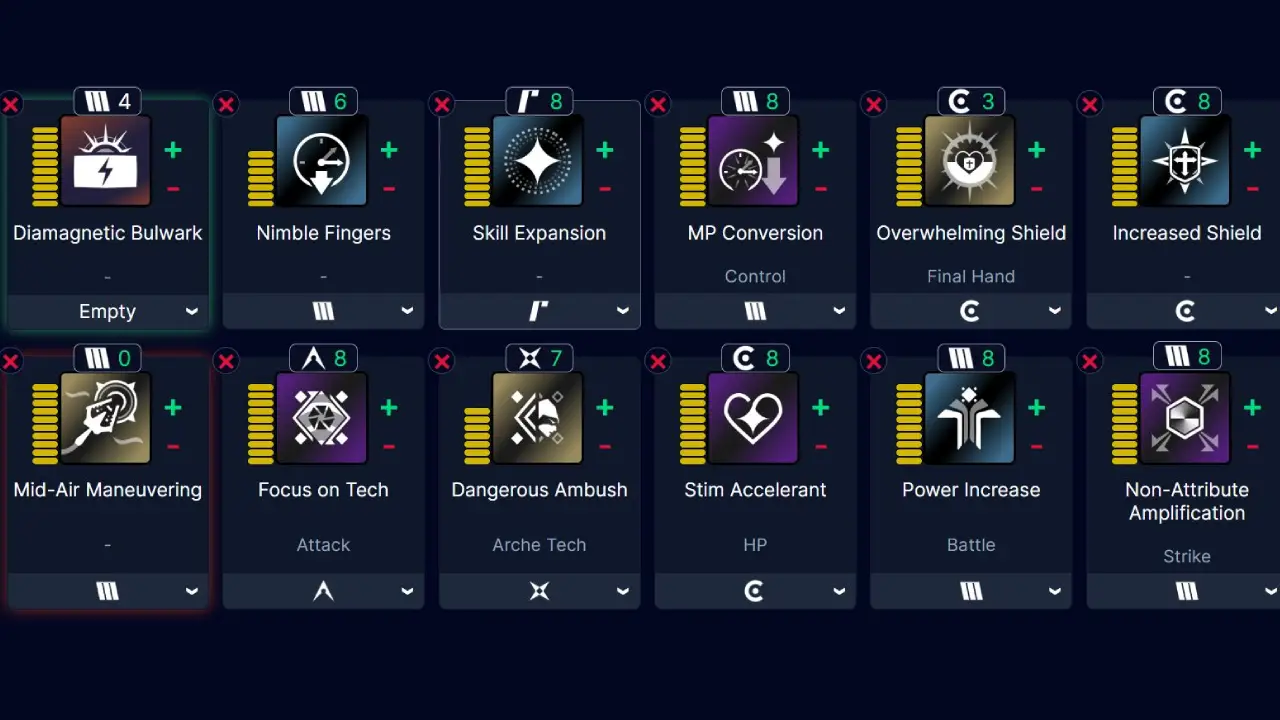
| Module Slot | Module Name | Mod Level | Socket Type | Crystallized |
|---|---|---|---|---|
| 0 (Trigger Module) | Power Beyond | N/A | N/A | N/A |
| 1 (Skill Module) | Diamagnetic Bulwark | Max | No | |
| 2 | Nimble Fingers | Max | Yes | |
| 3 | Skill Expansion | Max | Yes | |
| 4 | MP Conversion | Max | Yes | |
| 5 | Overwhelming Shield | Max | Yes | |
| 6 | Increased Shield | Max | Yes | |
| 7 (Sub Module) | Mid-Air Maneuvering | Max | Yes | |
| 8 | Focus on Tech | Max | Yes | |
| 9 | Dangerous Ambush | Max | Yes | |
| 10 | Stim Accelerant | Max | Yes | |
| 11 | Power Increase | Max | Yes | |
| 12 | Non-Attribute Amplification | Max | Yes |
Kyle Bossing Build for The First Descendant
- Bossing Build Type: Colossus fights.
- Bossing Build Focus: High damage and low cooldown to spam skills and kill boss as fast as possible.
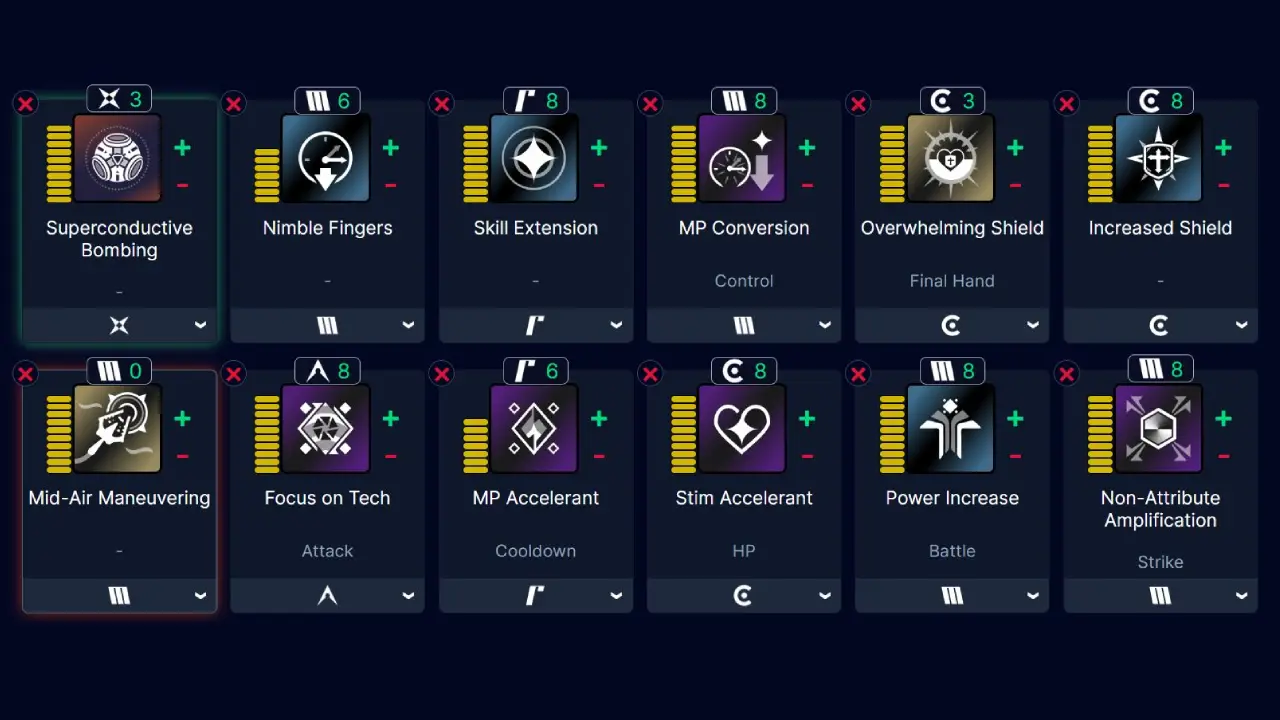
| Module Slot | Module Name | Mod Level | Socket Type | Crystallized |
|---|---|---|---|---|
| 0 (Trigger Module) | Battering Ram | N/A | N/A | N/A |
| 1 (Skill Module) | Superconductivity Bombing | Max | No | |
| 2 | Nimble Fingers | Max | Yes | |
| 3 | Skill Extension | Max | Yes | |
| 4 | MP Conversion | Max | Yes | |
| 5 | Overwhelming Shield | Max | Yes | |
| 6 | Increased Shield | Max | Yes | |
| 7 (Sub Module) | Mid-Air Maneuvering | Max | Yes | |
| 8 | Focus on Tech | Max | Yes | |
| 9 | MP Accelerant | Max | Yes | |
| 10 | Stim Accelerant | Max | Yes | |
| 11 | Power Increase | Max | Yes | |
| 12 | Non-Attribute Amplification | Max | Yes |
Trigger and Ancestor Modules for the Kyle Build
Trigger and Ancestor Modules are also part of the module category, but they are a special type of module that are harder to unlock and acquire.
- Trigger Modules: Go into a special slot. Unlock special buffs and unique effects.
- Ancestor Modules: Go into a normal module slot. Enhance the build by adding additional stats.
Kyle Trigger Modules
Trigger Modules are a new type of Modules that can be unlocked. Learn how to unlock Trigger Modules in The First Descendant.
- Mobbing Setup: Power Beyond
- Bossing Setup: Battering Ram
- Group with Luna Crit Buff: Power Beyond or Cyclic Amplifier (5s tech dmg duration every 15-20s)
Kyle Ancestor Module
Ancestor Modules can be slotted once you have acquired them. However, they are only worth it once you have an Ancestor module with good stat rolls on them.
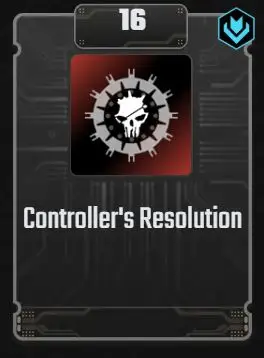
- Kyle Ancestor Module: Controller’s Resolution
Superconductive Cooling Units (Needed to Reroll perks): How to farm
- Must Read: How Ancestor Modules Scale & Examples
It is only worth slotting an Ancestor Module if you have good rolls on it; otherwise, it isn’t worth it.
Mobbing and Bossing Build
- Ideal Positive Rolls
- Non-Attribute
- Tech
- Cooldown
- Ideal Negative Rolls
- Skill Modifier
Groupbuild with Luna Crit Buff
- Ideal Positive Rolls
- Non-Attribute
- Tech
- Skill Crit Rate
- Skill Crit Damage
- Ideal Negative Rolls
- Cooldown
Ancestor Module: What to Replace and Why
To slot an Ancestor Module effectively, identify existing modules that share the same primary stat. By replacing a standard module with an Ancestor version that offers similar values, you maintain your core build while gaining its additional unique perks as a ‘free’ bonus.
- How to: Replace a standard module with an Ancestor Module that mirrors its main perk.
- The values should be close; you preferably don’t want to replace a 100% with a 30% value.
- Example 1: If your Ancestor Module provides Skill Critical Hit Rate, replace Skill Insight.
- Example 2: If your Ancestor Module provides Max HP, replace Increased HP.
- Example 3: If your Ancestor Module provides Skill Effect Range, replace Skill Expansion.
- Result: All other perks from the Ancestor Module will basically be a “freebie” and improve your build!
- Helpful Links:
As long as the Ancestor Module reaches a similar value to the one you’re removing, every additional stat on that Ancestor Module becomes a “free” bonus for your build.
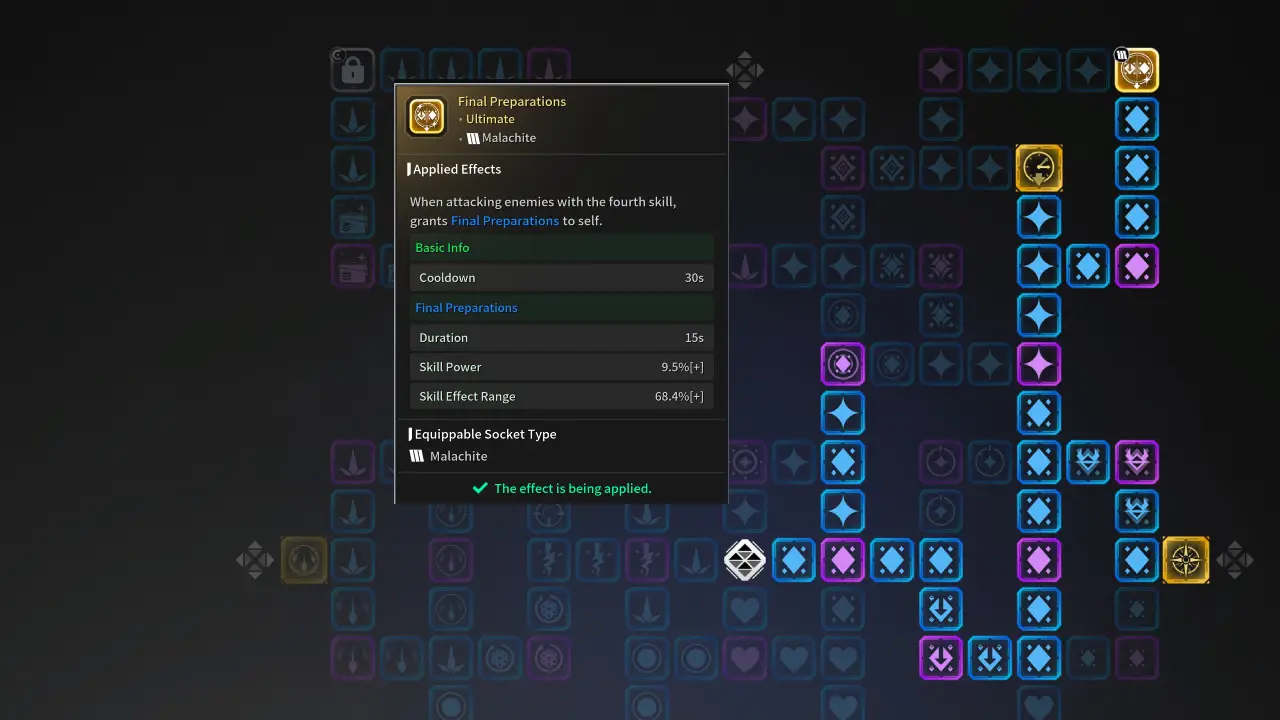
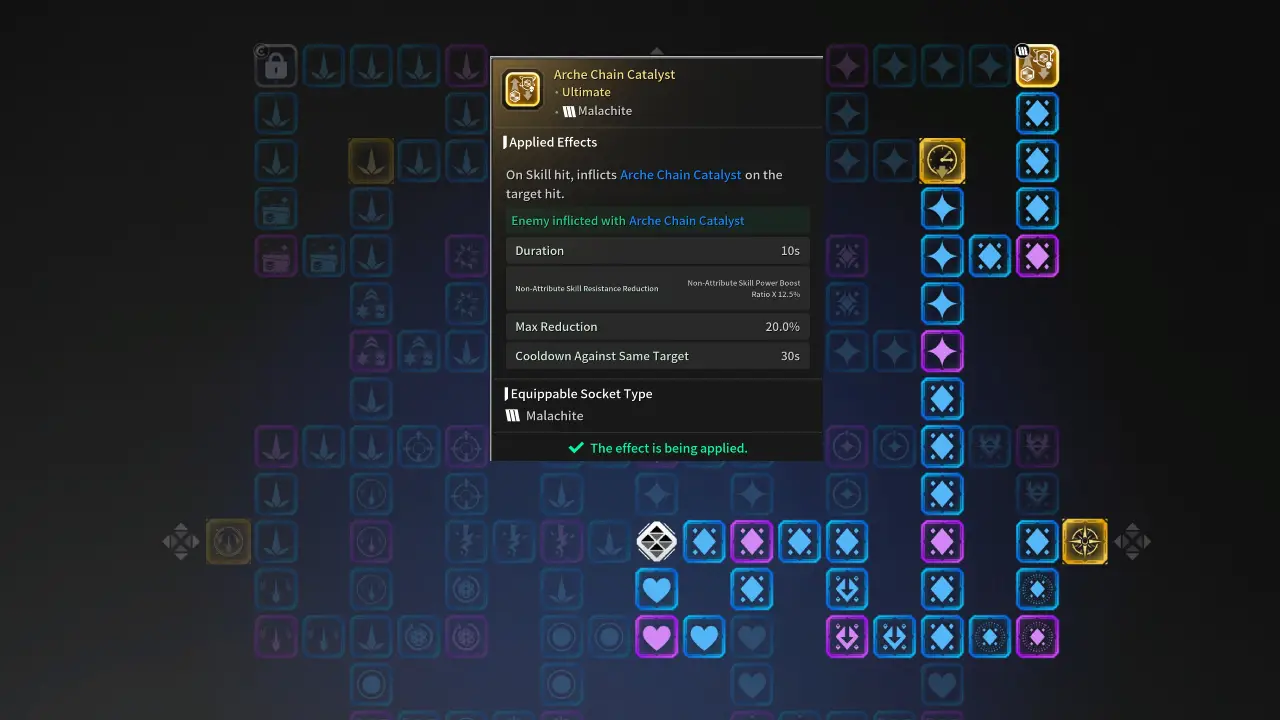
Arche Tuning for Kyle
- Left Image: Bossing Setup
- Right Image: Mobbing Setup
The Arche Tuning System in The First Descendant is important for every Character; it buffs your stats by a good amount. For The First Descendant Kyle, we are focusing on the right and upper right section.
You level up Arche Tuning in the Sigma Sector Dropoff Operation. Mutant Cells also drop there with a small chance.
- Mutant Cell: If you don’t want to swap back and forth you can just use Arche Efficiency Enhancement for both Mobbing and Bossing.
Kyle Equipment Overview in The First Descendant
Equipment is the cornerstone of any successful The First Descendant Build. For Kyle, having the right setup can mean the difference between dominating a dungeon and falling short. This section breaks down the essential equipment types—Weapons, Reactors, and External Components—and explains how they maximize his power.
| Equipment Type | Importance | Key Benefits |
|---|---|---|
|
|
|
|
|
|
|
|
|
|
|
Best Weapon for the Kyle Build in The First Descendant
Because Kyle is a skill-based Descendant, the weapon he uses is not that important. However, you still want to select A specific weapon as a “Stat Stick” that give you enhanced mobility and effects to boost your skills further.
Top 3 Weapons for Kyle
Here is my recommended setup for Kype, you will only need Secret Garden, but if you don’t have a fully optimized build yet, then Malevolent and Albion Cavalry Gun will be of great help!
Good Swords Options
While Swords aren’t a must-have, they can be helpful in certain situations! Especially Deus Ex Manus can be strong in Axion because it has a 4x damage multiplier versus Legion of Breach Commanders.
| Weapon | Category | Key Features | Why It’s Great for Kyle |
|---|---|---|---|

|
Power Melee Weapon |
|
|

|
Balanced Melee Weapon |
|
|
Other Useful Weapons
Best Reactor for Kyle in The First Descendant
Selecting the best reactor for Kyle in The First Descendant can significantly enhance his abilities, allowing you to maximize his effectiveness in various scenarios. Not only does the reactor determine your skill damage, but it also gives additional secondary benefits through modifiers. These are often hard to get and take time to grind out!
It is hard to get a Reactor with two best in-slot specs. However, you should be able to get a Reactor with at least one good spec. I will highlight the more important spec in bold in the table below.
| Best Reactor | Specs | Key Benefits | Best Builds |
|---|---|---|---|
| Materialized Mechanics Reactor |
|
Maximizing Colossus Damage. | |
| Materialized Mechanics Reactor |
|
Overall, the best damage for Mobbing. |
How to find the Location of Reactors
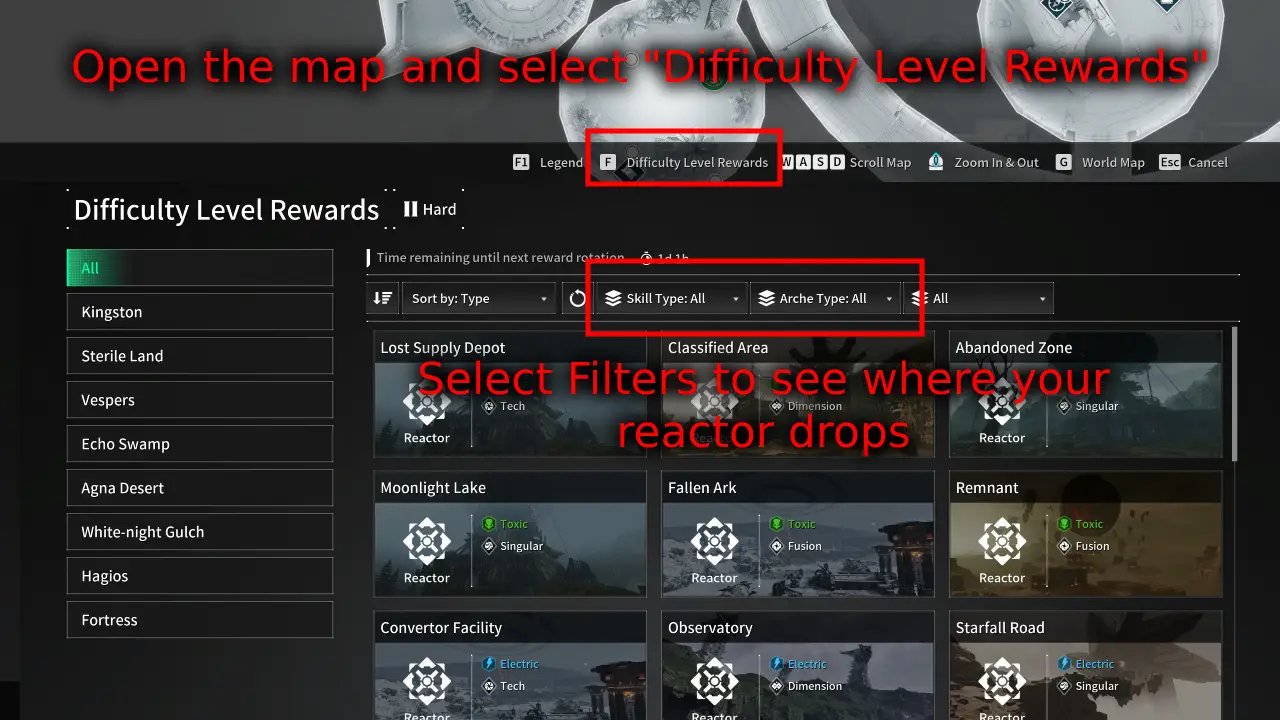
Reactor drop locations change every day. Not many players are aware of this and become confused. Now, there is a reactor search function in-game. Go to the map and press on Difficulty Level Rewards. In here, you can see where all the reactors currently drop.
Note: It is possible that not all reactor types are currently dropping. You have to come back and recheck every day.
If your specified reactor drops in an area, you go there and farm any missions and monsters (Preferably missions with lots of monster spawns). There will be plenty of reactors dropping from monsters all over the place, any monster works. It will take a while to get a good reactor!
Best External Components for the Kyle Build
- Enlightened Mage Set
Enlightened Mage Auxiliary Power: MP Recovery Out of Combat & Max HP
Enlightened Mage Sensor: Max MP & MP Recovery in Combat
Enlightened Mage Memory: DEF & MP Recovery Modifier
Enlightened Mage Processor: Any stats are fine.
Inversion Reinforcements Setup for Kyle
You can find the Inversion Reinforcements in the inventory, located on the bottom left side. This changes with every new season and needs to be leveled up again. You level up Inversion Reinforcements by doing any activity. However, the fastest way to advance it is by completing Disrupt Invasion (max 4 daily) in the dungeon terminal with the red dungeons.
At max level, you have unlocked everything. While the last perk is always active in each row, you can only slot three additional perks at the bottom. Here is what you want to prioritize:
- Hunting: Arche Circulation Tactic.
- Elemental: None.
- Recovery: Emergency Shield Augmentation.
- Survival: Shield Particle Reconfiguration.
- Season: None.
Kyle Basics in The First Descendant
If it is your first time playing Kyle in The First Descendant, here are some useful things you should know.
- How to unlock Kyle
- Skills Explanation – Master Kyle’s Abilities
- Module Basics Explained!
- Best Grapple Hook for Kyle
How to Unlock Kyle in The First Descendant
Let’s take a quick look at how to unlock Kyle in the First Descendant. To unlock Kyle, you have to purchase him from the store, or research him. You need the following items to research Kyle:
- 1x Kyle Enhanced Cells
- 554x Carbon Crystal
- 303x Hellion
- 58x Iorganic Biogel
- 1x Kyle Enhanced Cell Blueprint
- 200k Gold
- 1x Kyle Stabilizer
- 519x Metal Accelerant
- 499x Monomolecular Extractor
- 76x Deformed Biometal
- 1x Kyle Stabilizer Blueprint
- 200k Gold
- 1x Kyle Spiral Catalyst
- 408x Ceramic Composite
- 455x Reverse Charging Coil
- 30x Compound Carbon Activator
- 1x Kyle Sprial Catalyst Blueprint
- 1x Kyle Code
- Location 1: Vespers Hard – Abyssal Void Fusion Reactor – Vespers Lost Supply Depot
- Location 2: Sterile Lands Normal – Void Fusion Reactor – Sterile Land Repository
- Location 3: Hagios Hard – Abyssal Void Fusion Reactor – Hagios Dune Base
- Location 4: White-night Gulch Hard – Abyssal Void Fusion Reactor – White-night Gulch Observatory
- 400k Credits
When you visit Magisters Anais at the Research Institute you can hover over each item. Then click on Acquisition Info and it will tell you where this specific item drops. You can also view a more in-depth guide on How to unlock Kyle in The First Descendant.
The First Descendant Kyle Skills Explained
In this section, we are going to explain the skills available to our Kyle Build in the First Descendant, how each skill works and the best ways for you to use them.
| Icon | Skill Name | Description |
|---|---|---|
 |
Repulsion Dash | Charges towards the enemy, dealing damage. |
 |
Magnetic Bulwark | Creates a frontal Barrier to protect against enemy attacks. |
 |
Magnetism Spurt | When damaged, Magnetic Force is reduced instead of HP or Shields. After a certain period of time, Magnetic Force detonates to deal damage around him. |
 |
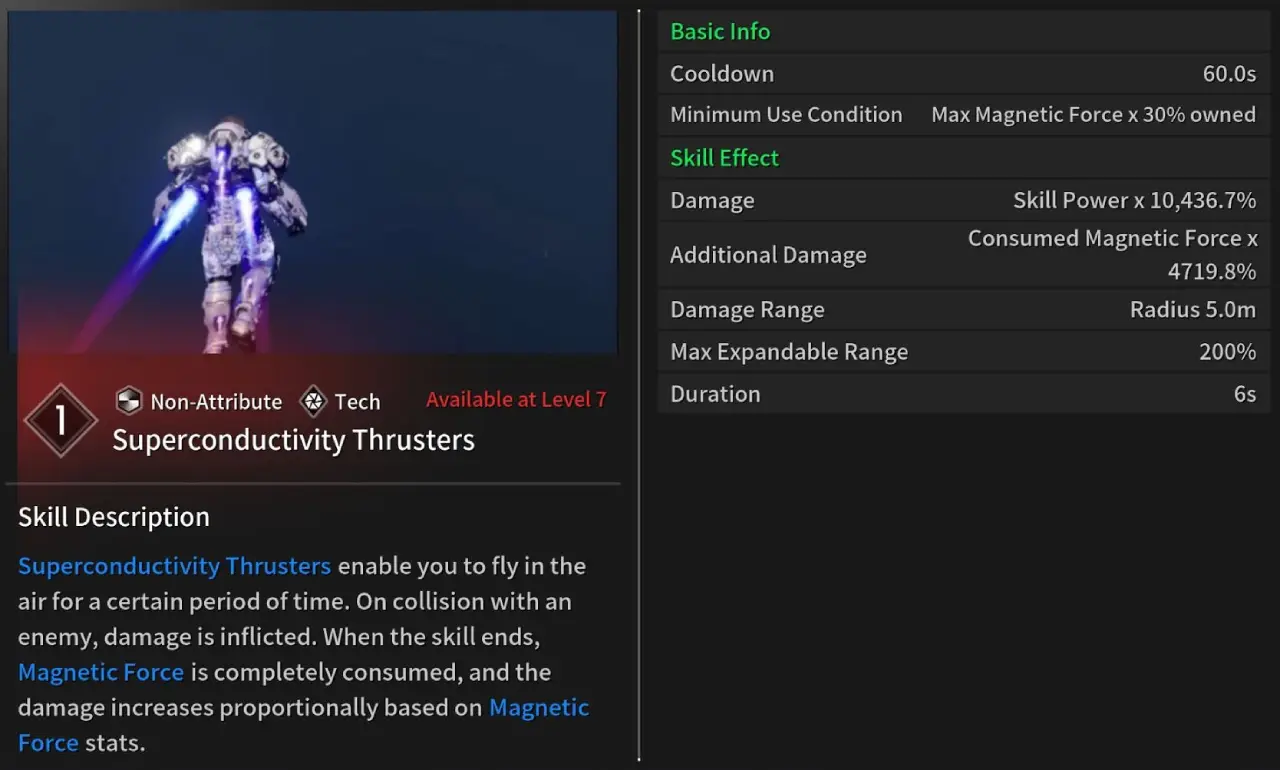
Superconductivity Thrusters | Allows Kyle to fly. When landing, deals damage in an area around his landing zone. |
 |
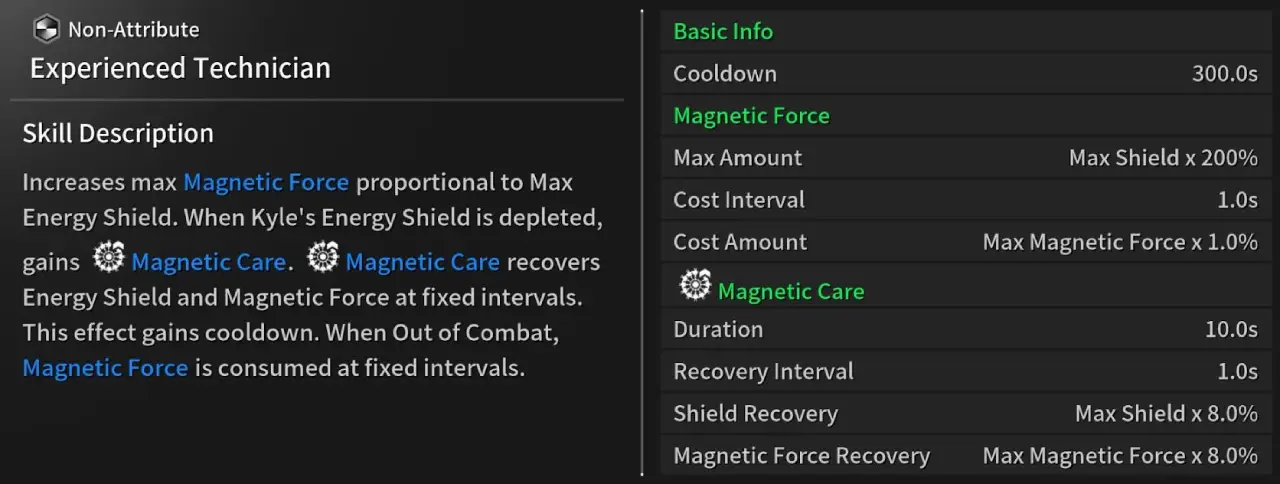
Experienced Technician (Passive) | Obtains Magnetic Force with his Skills. When his Shield is broken, he recovers Shield and Magnetic Force. |
Repulsion Dash
Charges towards the enemy, dealing damage.
Repulsion Dash Skill Description:
- Non-Attribute – Tech
- Charges forward to inflict damage and Knockback on the colliding enemy.
- Recovers Magnetic Force proportional to Max Energy Shield upon dealing damage to the enemy.
- When the skill ends, grants a DEF boost for a period of time.
How to use Repulsion Dash:
Repulsion Dash is useful for spearheading attacks at the beginning of combat. It deals damage in a small AoE and knocks enemies back. You’ll also get a defence buff, so you’ll take less damage for a few seconds. The cooldown is fairly short on Repulsion Dash, so you can use it several times in longer engagements.
| Basic Info | Values |
|---|---|
| Max Stacks | 3 |
| Stack Cooldown | 12 seconds |
| Skill Effect | Values |
|---|---|
| Max Move Distance | 10 metres |
| Damage | Skill Power x 360.2% |
| Damage Range | 1.5m x 1.5m |
| Magnetic Force Recovery | Max Shield x 30% |
| DEF+ | Values |
|---|---|
| DEF Increase Amount | 150% |
| Duration | 5 seconds |
Magnetic Bulwark
Creates a frontal Barrier to protect against enemy attacks.
Magnetic Bulwark Description:
- Non-Attribute – Dimension
- Creates a Barrier in front that block enemy projectiles.
- When the Barrier is hit, recovers Magnetic Force proportional to the enemy’s damage received.
How to use Magnetic Bulwark:
Magnetic Bulwark is a defensive skill that blocks enemy projectiles, allowing you to create cover at a location of your choosing. Maintining the barrier costs a small portion of your Max Shield every second, so be careful not to run it down too much.
| Basic Info | Values |
|---|---|
| Cooldown | 2 seconds |
| Shield Cost | 5% of Max Shield |
| Shield Cost Interval | 1s |
| Barrier | Values |
|---|---|
| Effect Range | 2m x 3m |
| HP | 50% of Caster’s Max Shield |
| DEF | 100% of Caster’s DEF |
| Duration | 8s |
| Magnetic Force Recovery | 100% of Energy Damage |
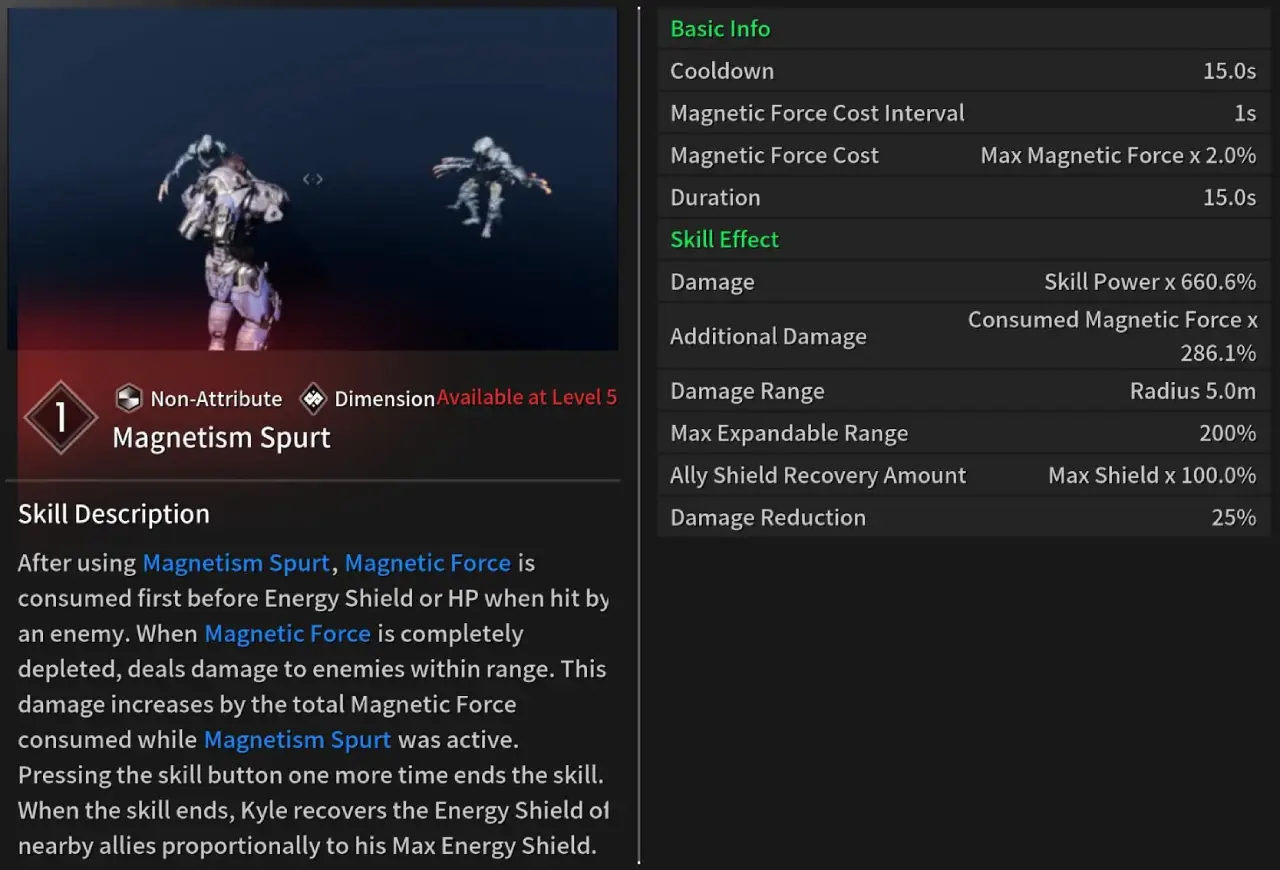
Magnetism Spurt
When damaged, Magnetic Force is reduced instead of HP or Shields. After a certain period of time, Magnetic Force detonates to deal damage around him.
Magnetism Spurt Description:
- Non-Attribute – Dimension
- After using Magnestism Spurt, Magnetic Force is consumed first before Energy Shield or HP when hit by an enemy.
- When Magnetic Force is completely depleted, deals damage to enemies within range. This damage increases by the total Magnetic Force consumed.
- Pressing the skill button one more time ends the skill. When the skill ends, Kyle recovers the Energy Shield of nearby allies proportionally to his Max Energy Shield.
How to use Magnetism Spurt:
Another handy defensive skill, Magnetism Spurt allows you to ignore damage for a while, by effectively using your saved up Magnetic Force as a secondary shield. Once it expires, you’ll deal a pulse of damage to all nearby enemies. The more Magnetic Force you consumed during the skill’s duration, the more damage you do. Therefore, it’s advisable to save up a decent amount of Magnetic Force before using Magnetism Spurt, but it’s not too essential because the skill has a short cooldown, so you don’t lose too much if you use it at a bad time.
| Basic Info | Values |
|---|---|
| Cooldown | 15s |
| Magnetic Force Cost Interval | 1 second |
| Magnetic Force Cost | 2% of Max Magnetic Force |
| Duration | 15 seconds |
| Skill Effect | Values |
|---|---|
| Damage | Skill Power x 660.6% |
| Additional Damage | Consumed Magic Force x 286.1% |
| Damage Range | 5m Radius |
| Ally Shield Recovery Amount | 100% of Kyle’s Max Shield |
| Damage Reduction | 25% |
Superconductivity Thrusters
Allows Kyle to fly. When landing, deals damage in an area around his landing zone.
Superconductivity Thrusters Description:
- Non-Attribute – Tech
- Enables you to fly in the air for a period of time
- Inflicts damage on enemies when you collide with them.
- When the skill ends, Magnetic Force is completely consumed, and the damage increases proportionally based on Magnetic Force stats.
How to use Superconductivity Thrusters:
Superconductivity Thrusters is a rather strange skill, since it at first glance it seems like it’s just a cool jetpack ability for moving around quickly, but colliding with enemies with the skill active actually does a huge amount of damage, with the precise amount increasing based on how much Magnetic Force you saved up. Note that your Magnetic Force gauge needs to be at least 30% full before you can activate the skill.
Due to the long cooldown of 60 seconds base, we recommend saving up more than the minimum 30% Magnetic Force before using this skill – with a long cooldown skill like this you ideally want to make sure that you have as a high a damage modifier as possible so you get the most value from the skill, and the way to do this is to save up more Magnetic Force before using it.
| Basic Info | Values |
|---|---|
| Cooldown | 60 seconds |
| Minimum Use Condition | 30% of Max Magnetic Force |
| Skill Effect | Values |
|---|---|
| Damage | Skill Power x 10,436.7% |
| Additional Damage | Skill Power x 4,719.8% |
| Damage Range | 5m Radius |
| Duration | 6 seconds |
Experienced Technician (Passive)
Obtains Magnetic Force with his Skills. When his Shield is broken, he recovers Shield and Magnetic Force.
Experienced Technician Passive Description:
- Non-Attribute
- Increases max Magnetic Force proportional to Max Energy Shield.
- When Kyle’s Energy Shield is depleted, gains Magnetic Care.
- Magnetic Care recovers Energy Shield and Magnetic Force at fixed intervals. This effect gains cooldown.
- When out of combat, Magnetic Force is consumed at fixed intervals.
How to use Experienced Technician:
Turret Sync is a passive skill, which means it is always active. This passive has two purposes. The first is to define how much Magnetic Force Kyle can hold – it scales based on your Max Shield stat, which is something to keep in mind when choosing your Components for the build – having more Max Shield will improve Kyle’s Max Magnetic Force, too.
The second purpose of the Experienced Technician passive is to provide a defensive utility. To summarise this effect, when your Max Shield runs out, you’ll automatically begin regaining Shield and Magnetic Force Recovery. The amount gained scales based on your Max Shield, so once again you are incentivised to build into Max Shield more heavily than with most other Descendants. Once triggered, this effect has a base cooldown of 5 minutes.
| Basic Info | Values |
|---|---|
| Cooldown | 300 seconds |
| Magnetic Force | Values |
|---|---|
| Max Amount | Max Shield x 200% |
| Cost Interval | 1 second |
| Cost Amount | Max Magnetic Force x 1% |
| Magnetic Care | Values |
|---|---|
| Duration | 10 seconds |
| Recovery Interval | 1 second |
| Shield Recovery | Max Shield x 8% |
| Magnetic Force Recovery | Max Magnetic Force x 8% |
How Modules Work in The First Descendant
Modules are the bread and butter of all The First Descendant Builds. There are a few important things to remember about modules. This is for both Descendant and Weapon Modules.
While most builds require you to increase Module Capacity with an Energy Activator (you get two for free), they won’t require you to reduce the Module cost with Crystallization Catalyst. However, if you want to truly min-max a build, you will need plenty of these Catalysts.
- How to increase your Module Capacity
- Module Levels and Cost
- Reduce the cost of Modules
- How to farm Modules
How to Increase Module Capacity
You get a base of 45 Modules for every Descendant character. And you can increase this up to 85 currently. First off, always slot a Sub Attack Module (Slot 7). When you increase this to the max level you will get an additional 10 Module Capacity. if you use a Crystallization Catalyst on the Sub Attack Module, you even get 15 extra slots. You will see this in the setup below.
Additionally, you can use an Energy Activator to increase your Module Capacity by another 20. However, these are fairly hard to farm, only use them on your best Descendants.
Lastly, increasing your Mastery Rank will also increase Module Capacity. Rank 1 gives you 25 Module Capacity, Rank 20 gives you 50 Module Capacity. That is how we reach the 80 Module Capacity that you see on most builds.
- Slot a Sub Attack Module (and max it out to get +10 capacity, crystallize it for +15)
- Use an Energy Activator (2o extra capacity)
- Increase Mastery Rank (25 base capacity, max 50)
Weapons: Basically the same, but because you don’t have Subattack Modules, the Energy Activator gives you 30 instead of just 20 extra capacity.
You can also read my in-depth guide on how to increase Module Capacity in The First Descendant if you need more information. Or my Best Energy Activator Farm Spots and our Best Crystallization Catalyst Farm Spots. I tested all of the grind spots by myself and have already farmed plenty of these items with this method.
Module Levels and Cost
Modules can be enhanced (leveled up) with Kuiper Shards in The First Descendant. Enhancing Modules increases their power. At higher levels, the power will increase way more than at lower levels. Therefore it is always recommended to max out the most important Module first.
Here is an example of a must-have Module called Increased HP for our Descendant. You will notice that we start at 22%, but at the max level, we get a whopping 218.5% increase in health!
| Level | Capacity Cost | Power |
|---|---|---|
| 0 – Base | 6 | 22% |
| 1 | 7 | 31.2% |
| 2 | 8 | 41.4% |
| 3 | 9 | 54.4% |
| 4 | 10 | 69.8% |
| 5 | 11 | 87.2% |
| 6 | 12 | 108.2% |
| 7 | 13 | 130.2% |
| 8 | 14 | 155.2% |
| 9 | 15 | 184.5% |
| 10 | 16 | 218.5% |
Transcendent Modules are the exception; they decrease Capacity Cost with higher levels!
For an in-depth overview, please visit our How to Level Up Modules in The First Descendant guide.
How to Farm Kuiper Shards
Kuiper Shards are used to level up Modules. We have a guide on the Top 3 Kuiper Shard Farming Locations in the First Descendant. We explain how to most efficiently farm Kuiper Shards (300-500k/hour) and show the amount you need to level up mods. As a summary, to max out a Module you need:
- Normal Modules: 103’100 Kuiper Shards
- Rare Modules: 206’200 Kuiper Shards
- Ultimate Modules: 309’300 Kuiper Shards
- Transcendent Modules: 515’500 Kuiper Shards
Always max out the most important Modules first, we will showcase the order below.
How to Reduce the Cost of Modules
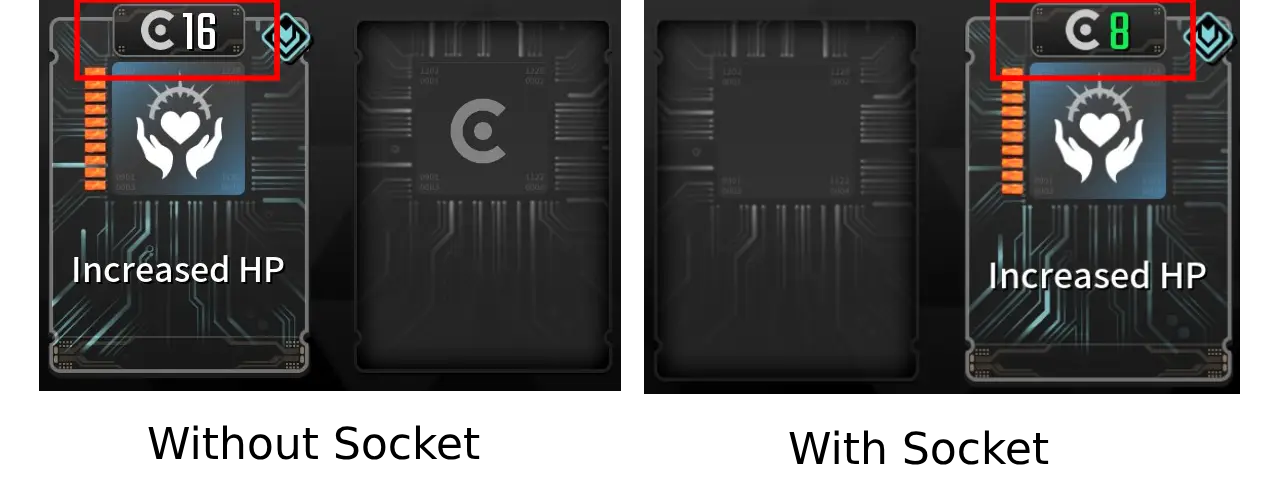
To reduce the cost of Modules you need Crystallization Catalysts in The First Descendant. These require a lot of time investment, most builds won’t require you to get many if any at all (Budget Setup). But if you want to completely min-max you need to get plenty of them as technically, every slot can have a specific socket type to half the cost.
Modules have Socket Types. Our Increased HP Module has the Cerulean Socket Type.
- Module: Increased HP
- Socket Type: Cerulean
This is important because if we place our Increased HP Module in the fitting Socket Type, it will half the cost of the Module!
How to farm Modules in The First Descendant
Most The First Descendant Modules can be acquired fairly easily, but the higher-quality ones (Ultimate, Transcendent) are more tedious to obtain. Here is the easiest process to farm Modules quickly.
Open Map > Swap to Access Info > Select Modules
Here, you can find all Modules and their drop locations. If a module drops from several locations, it is recommended to select drop locations with higher drop chances.
There isn’t really much more to this. Simply check the location and go farm. Normal and Rare quality Modules have 30-50% drop chances in most cases. Ultimate ones range around the 5% mark and Transcendent ones can be a tough cookie with around 2% drop chance.
We will list the best farming location of modules in the next step of the guide.
Smooth Grapple Hook for your Kyle Build
Using the standard Grapple Hook in The First Descendant can be a pain, and it feels kinda frustrating at times. Don’t worry, there is a way better alternative that will make it a joy to use the grappling hook!
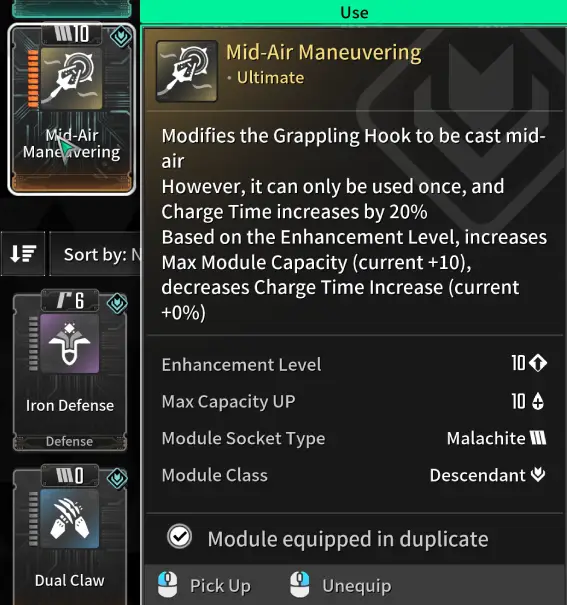
It is called the Mid-Air Maneuvering Sub Module. I use this on all my The First Descendant Builds because it improves grappling by so much.
With this Module, you can attach your Grapple Hook to anything, even air! That means you can simply aim towards the sky and Hook up your grapple hook there for guaranteed fast movement!
Here is a guide on how to get the Mid-Air Maneuvering Sub Module in The First Descendant. It won’t take a lot of effort, but it will definitely improve your build and overall gameplay in The First Descendant.
Kyle’s Story in The First Descendant
After a long period of time, the Spectral Digger finally sprung into life, and the entire Construction Corps shouted with joy. All that was left was for everyone to go home. However, the Legion of Darkness forces, which had been standing by on Karel’s orders, launched an ambush, and the joyful cries on the thought of returning home turned into screams.
Kyle, who had been wrapping things up in the back, could only look on as his teammates fell helplessly from the enemy’s bullets. Eventually, the bullets that pierced his teammates also began flying towards him. “I’m going to die soon”, Kyle thought as he closed his eyes tightly. While closing his eyes, something seemed to block the bullets. They fell to the floor powerlessly. Kyle intuitively knew why when he saw the bullets rolling around at his feet. He also possessed Arche, something he had only heard about until now.
However, by the time he realized he had this power inside of him, it was too late to save his teammates. Shocked, Kyle felt completely useless. With that, he retired, simply stating, “I did all I could” to HQ. During the time when he was hiding his power, unwilling to meet anyone, and wishing for his end to come, he happened to learn that the Spectral Digger had fallen into the hands of the Vulgus.
This was unacceptable to Kyle. That digger cost the lives of his teammates. It was the digger that he constricted with his teammates, whose bodies he was unable to recover due to the Vulgus ambush. Without hesitation, he went to HQ, telling them everything and making a pledge to walk the path of a Descendant. He would reclaim the Spectral Digger, recover the remains of his teammates, and bring them home. After which, he would pour out that expensive liquor they were so eager to drink in honour of them.
Related Guides for The First Descendant
- The First Descendant Builds Database
- The First Descendant Bunny Build
- The First Descendant Sharen Build
You can also check out our Ultimate Weapons Database for The First Descendant or the Builds Database for The First Descendant.


