

Welcome to the White-Gold Tower Guide for ESO. The White-Gold Tower dungeon is located in the heart of Cyrodiil, in the Imperial City, just like the Imperial City Prison dungeon. The White Gold Tower is part of the base game of ESO.
This dungeon has 6 bosses: 4 main bosses, 2 mini-boss encounters and a lot of trashmob packs. (Trashmob = Enemies that can add to the difficulty and liveliness of a dungeon/trial)
If you have more questions, you can also ask someone in our community partner discord about this White-Gold Tower Dungeon Guide!
The Story – White Gold Tower Dungeon
Conquered by the Daedra, Molag Bal wants to take over the Imperial City and absorb it into Coldharbour. Help Sister Terran Arminius, the mothpriest, and Clivia Tharn, current Empress Regent, to free the White Gold Tower of Molag Bal’s influence.
Table of Contents:
Sets in White Gold Tower
There are 3 different sets and one monster set that drops in the White Gold Tower Dungeon.
- Light: Spell Power Cure
- Medium: Essence Thief
- Heavy: Brands of Imperium
- Monster Set: Molag Kena (Veteran only)
Rewards from White Gold Tower
- Dye: Magnus Setting Red
Defeat the Adjudicator, the Elite Guard, the Planar Inhibitor, and Molag Kena in Veteran White-Gold Tower. - Dye: Tainted Turquoise
Locate and interact with all of the speaking stones in the White-Gold Tower.
Trashmonsters in White Gold Tower
- Grievous Twilights: They are mainly annoying because they teleport around.
- Spider Daedra & Spiderlings: Generic Trashmob.
- Banekin: Generic Trashmob.
- Xivkyn Bulwarks, Flagellants and Lacerators: The most important here are the Bulwark and the Lacerator. Keep the whole group away from the Lacerator and kill him the last, otherwise he will drop an AoE heal on the ground which makes it very hard to kill the rest.
- Shriven Aristocrats and Nobles: Generic Trashmob.
- Skeletal assassins and foot soldiers: Generic Trashmob.
- Dremora Churls, Ferylkyn, Morikyn and Sunderers: Generic Trashmob.
- Planemeld Rifts: These need to be killed when your vision goes grey. Usually a simple light attack can destroy these, otherwise they will spawn adds.
- Winged Twilights: They accompany the Grievous Twilights.
- Zombies: Generic Trashmob.
- Crematorial Guards: These Daedroth will spit fire, so the Tank should face them away from the group.
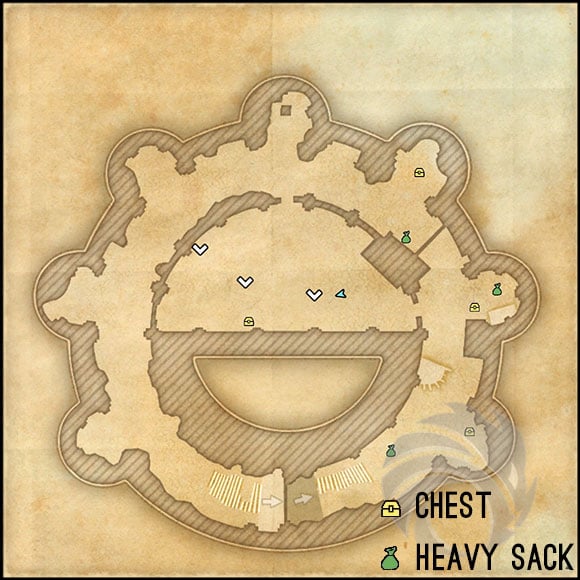
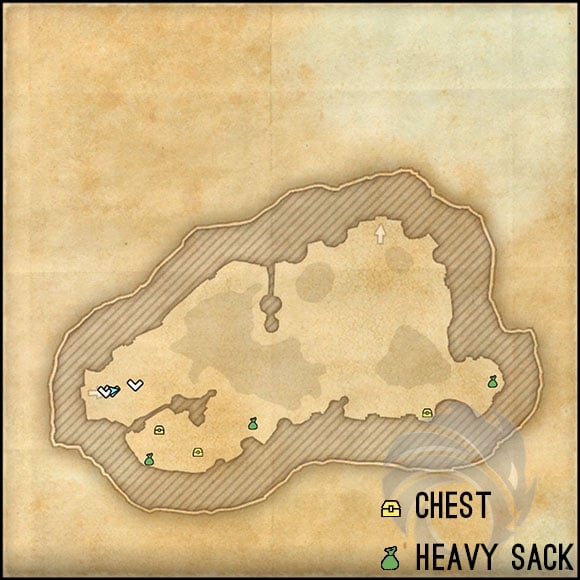
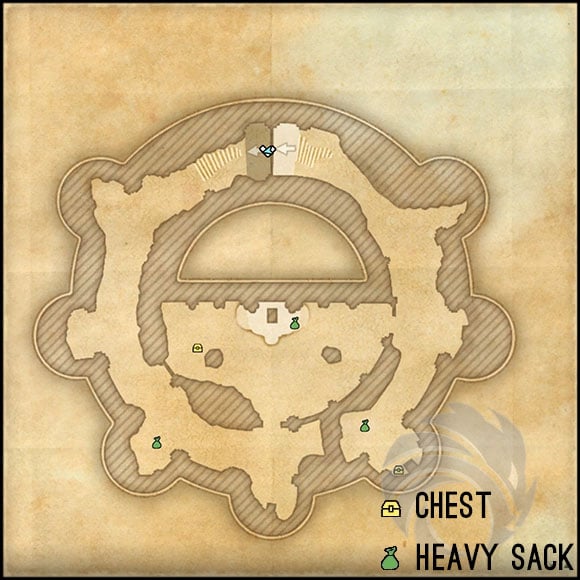
Boss Map & Treasure Chests
Bosses, Heavy Sacks and Treasure Chest location in the White Gold Tower Dungeon in ESO.
(click to enlarge)


White Gold Tower Bosses
Here you can find a list of all the White Gold Tower bosses in ESO.
| Boss | Health | Adds |
| The Iron-Swathed Glutton | 1,071,763 | None |
| The Adjudicator | 2,952,161 | Zombies |
| The Guards | 3,324,653 | None |
| The Scion of Wrath | 1,071,763 | None |
| The Planar Inhibitor | 3,308,249 | Rifts with Dremora adds |
| Molag Kena (Endboss) | 3,993,959 | Four protectors & Storm Atronach |
Bosses in White Gold Tower
Now lets take a look at all the bosses in the White Gold Tower, each bossfight has its own explanation of mechanics.
The Iron-Swathed Glutton

This is a Mini Boss, awaiting you before you can enter the White-Gold Tower. It’s a relatively harmless Mini Boss when you keep an eye on his most dangerous attack:
Poison Pools: Spawning poisonous pools around him, these will kill you if you don’t step out of these!
The Adjudicator

The Adjudicator is the first major boss you will encounter in the White Gold Tower. She can be pretty dangerous to the vitality of the party members, if they don’t know what they are doing.
Imprisoned: The boss can send any party member into a cage that is set on fire. If you don’t have a healer in your group, this might become a tricky situation, as you have to break out of it in order to not die. You can assign someone else to do the lockpicking, but they would need to find the cage first. This is advisable though if the healer is imprisoned.
Zombies: During the fight, the boss will spawn zombies. They should be killed because the longer the fight continues the more zombies will join in on the fight. If they should attack a party member, it’s advisable for them to get close to the boss so that AoE can kill these zombies, instead of running away.
Echoing Hands: This is by far one of the more dangerous attacks. Usually, she will focus on the first one to attack the boss with this attack, sending out three powerful waves of hands that will return to her. Best option here is to block when she does it, as this will mitigate the damage. Spreading out slightly helps as well, so that not everyone gets hit, as this will interrupt any actions of yours as well. Otherwise the attack is at a random member. You can also avoid it by managing to stay behind her!
Additionally, the two burning fires will throw fire into the room. Please don’t stand in these.
The Guards

After the Elder Scroll is released from it’s safekeeping, Clivia Tharn asks her three guards to kill you as she no longer has need of you.
The best approach to this encounter is when the Tank tries to stack all three of them, with being aware when to move out.
Micella Carlinus: We want to kill these three after another, going from most annoying to least annoying. Micella is the tank of the group and therefore a very dangerous enemy, being able to stun the Tank and being able to drop a gigantic Dragonknight standard, as well as increasing the DPS of the other guards. Bring her down as quickly as possible.
Cordius Pontifio: This boss is a mixture of a Nightblade and Dragonknight. He can deal a lot of damage, so should be killed with a careful eye on your health. Try avoiding standing in his standard.
Otho Numida: This is the healer of the group. If you find it hard to kill the other two, it’s probably because the healer will heal the other guards. You can easily avoid this by interrupting him. Even though he is a healer, he also deals a lot of fire damage.
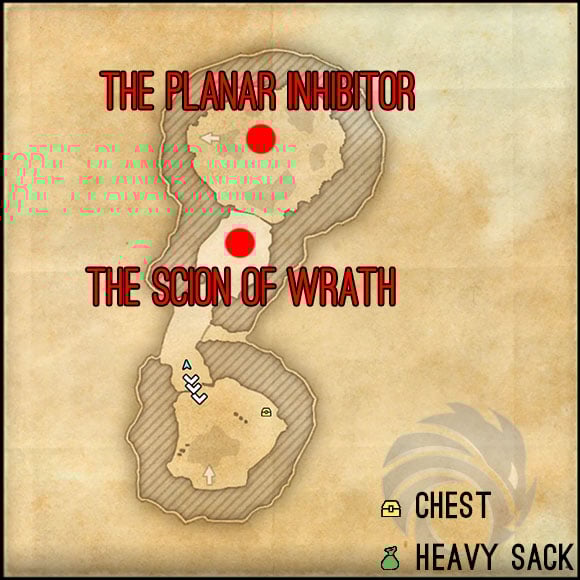
The Scion of Wrath

The Scion of Wrath is a Mini Boss awaiting you before you can face the next boss. He doesn’t have a lot of life, but can be very deadly to your group.
If you aren’t the Tank, don’t attack first. It will definitely kill you on veteran!
Also, as Tank, face this Mini Boss away from the group!
Fire Rain: If you interrupt this Mini Boss, he will let fire rain from the sky. So, even if the Tank can interrupt it, they probably shouldn’t, as the Fire Rain deals quite a lot of damage to the entire group.
The Planar Inhibitor

This can be quite a feat to overcome, because most people don’t understand the mechanics of this fight.
Pinion: One of the most important mechanics in this game is the Pinion. This will give any member of the group complete control over the Fire Atronach. Ideally, this would be the Tank, so let only the tank activate it.
Plane Meld Rifts: As you might have seen from the rooms before, these Rifts will spawn Dremora to aid the Planar Inhibitor to kill you. These have to be closed, otherwise they will continue spawning adds. Two group members will get a change in their vision. The screen will turn grey and that is the cue. Even a light attack closes them pretty quickly.
Phase Two: This boss has two phases. The first is the Planar Inhibitor standing still and will put a fire DoT on whoever has aggro, causing a lot of fire damage. In the second phase, the Tank now has to kite (keeping aggro while keeping a distance due to running away) the boss, otherwise he will quickly die.
She is more vulnerable to damage now though and moves slower, so focusing in this phase is a good idea. Don’t get close to the flames, otherwise you will die in a matter of seconds!
Molag Kena

Is it really a surprise that Clivia Tharn is not the one we expected her to be? Turns out she is Molag Kena, a powerful general of Molag Bal.
She is quite a complex boss and there are many mechanics that can make or break the fight, especially on Hardmode.
Right from the start, she will try to hinder you from attacking her by throwing you to the ground, lightning the outer ring on fire and summoning Lightning Aspects.
Make sure to not step into the fire, otherwise you are instantly dead!
Whatever you do, make sure to always keep a safe distance from the fire as this fight has many knockback abilities.
Lightning Aspects: Right in the beginning you can see four Lightning Aspects that shield her from any attacks. Which is why, in order to attack her, you need to kill these aspects first. There are two things though of which you should be aware. The first is that when they die, they will explode and most likely kill anyone that is standing in their blast radius.
Second is that each time Molag Kena spawns them at 60% and 30% boss health, they will stun everybody upon landing.
Shield: During the Shield phase, which is at 60% and 30% of her health, she is invulnerable to all attacks. You have to bring down the Lightning Aspects, but this isn’t the only obstacle. Periodically she will throw everyone to the ground, pushing you further and further each time, until you hit the firewall. Which means you can’t keep killing the aspects forever.
Also, she will emit waves that you can avoid by stepping in-between them, otherwise they will make you topple and deal quite a lot of damage.
Lightning: In order to distract you from your task, she will call forth two types of lightning: random sparks and a Lightning Wall. This wall will always start from the center, so try to position her in the center as well. This will make it easier to move with it and allow the DPS to place their AoE. The furthest you are away from the center, the faster the wall will move!
The Lightning wall will hurt, especially if you don’t have a healer or a self-heal. You can avoid most of the damage by dodge rolling through it or walking with it. Otherwise it will leave a very hurtful DoT (Damage over Time) on you.
Windtoss: Charging a powerful cone attack, Molag Kena tries to toss everyone as far away from her as possible with a strong windtoss. If the Tank isn’t quick enough, she will follow them through the room, making it harder to position her. The Tank should face her away from the group, otherwise everyone gets tossed back and stunned.
Storm Atronach: At random intervals, she will spawn one Storm Atronach. It will target a random player, walk up to it, zap it and upon arrival will stun that player and kill everyone in its’ blast radius. The DPS should focus instantly on the atronach!
Execute: At around 20% boss health, Molag Kena tries to kill you under all circumstances. She will now summon two Lightning Walls which make it pretty hard to avoid or even dodge roll through.
Hardmode Molag Kena
Lightning Wall: The Lightning Wall will now move a lot faster! She will also continue with all other attacks, so this could be considered a DPS check.
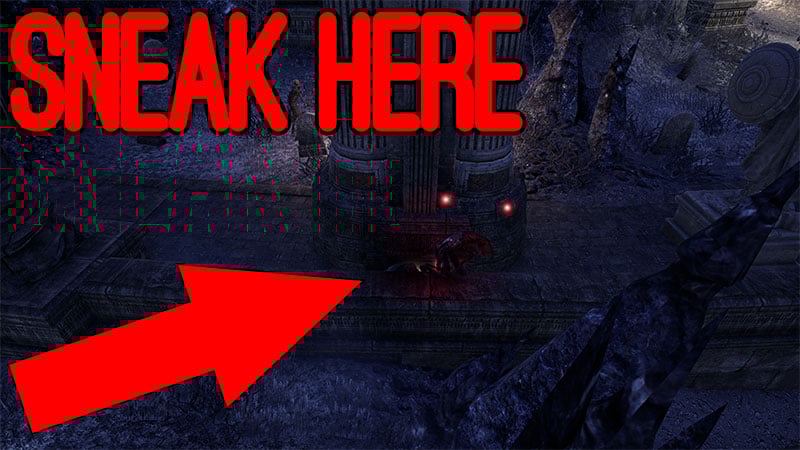
Skipping
There’s only one real skip at the very beginning of the White Gold Tower.. In order to explain it, there will be a few pictures.
At the first flight of stairs you have to walk them up, sneak and pass atop the wall until you reach the first Mini Boss.


Video Gameplay
Here you can find a full video walkthrough of the dungeon, to get to the right section, please use the timestamps below if you are just interested in one particular boss fight in the White Gold Tower.
- 1st Boss: The Iron-Swathed Glutton – 2:29
- 2nd Boss: The Adjudicator – 2:58
- 3rd Boss: Clivia’s Guards – 6:52
- 4th Boss: The Scrion of Wroth – 12:22
- 5th Boss: The Planar Inhibitor – 12:56
- Endboss: Molag Kena – 16:52
Related Topics:
Magicka DPS Sets
Stamina DPS Sets
Beginner Tanking Guide
ESO Item Sets
Undaunted Beginner Guide
Animation Cancelling Beginner Guide