“Lightbringer”
Type: Group Cyrodiil 12 Players
Table of Contents
- Introduction
- Resource Management
- PVP Setup
- Gear
- Skills
- Rotation and Combos
- Champion Points
- Important Info (Food, Mundus, Race, Potions, Passives, Attributes)
Introduction
Welcome to the Magicka Templar Healer Cyrodiil PvP Group Build “Lightbringer” for Elder Scrolls Online. Make sure to bookmark the link as I will keep updating the build for each new Update of ESO. The Lightbringer Build is optimized for Organized Group Play of 12 in Cyrodiil.
This build is oriented toward the Healer role.
As a healer, your role is not only to keep the group alive but also to provide them with any useful group buff available in the game with different sets or abilities.
Please note that the passive Light Weaver will now provide ultimate when healing allies under 50% health with any Restoring Light abilities.
We use a 5-1-1 light Setup with:
- Willpower
- Snow Treaders
- Perfected Grand Rejuvenation (Master Resto)
- Perfected Precise Regeneration (Maelstrom Resto)
Then you pick one of the following sets :
Finally, complete with a monster set :
The main reason why a Templar is still the main healing class in a raid is because of the following abilities :
- Repentance: Free and used every time we kill something
- Practiced Incantation: Combined with a Barrier, will save your raid in most situations against an enemy guild or heavy pressure
We also use Breath of Life to save one or two players or Blessing of Protection for raid burst healing, especially during an enemy Negate Magic.
With the Greymoor Chapter, we now make good use of Illustrious Healing with the Perfected Grand Rejuvenation staff which increase sustain provided to the raid even more by both Healers and Supports.
We buff the group with Minor Sorcery by keeping Living Dark up. Keep in mind that this buff affects only 12 players so the uptime won’t be 100% if you run more than 12 players.
We provide the group with Energy Orb during the kiting phase to provide an additional burst heal and more sustain to the whole raid. You can also consider slotting Radiant Destruction instead.
Extended Ritual provides the group with the Purify synergy and also provide us with Minor Mending.
Finally, we provide the strongest healing over time in the game, Radiating Regeneration with the Perfected Precise Regeneration.
*** IMPORTANT *** : This build requires a Stam Support who provides an uptime of 90%+ on Major Expedition and Minor Expedition with Charging Maneuver.
- Optimized for Organized Group Play of 12 in Cyrodiil
- Resto Staff / Resto Staff
- Light Armor
- Good Mobility
- Burst Healing
Resource Management
The Combustion Synergy from Energy Orb, The Worm’s Raiment buff always active, optimized uptime on Hollowfang Thirst and Symphony of Blades, between 6 to 10 layers of Illustrious Healing with the Perfected Grand Rejuvenation always active, Resto heavy attacks and potions are our major sources of sustain.
- Energy Orbs
- Resto Heavy attacks
- Master Resto Staff
- Wormcult
- Hollowfang
- Symphony
- Potions
PVP Setup
With Champion Points
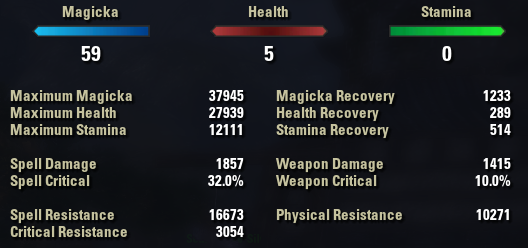
This screenshot was taken with Perfected Vestment of Olorime and our food buff.
Gear Setups
| Gear | Set | Type | Trait | Enchantment |
| Chest | Perfected Vestment of Olorime | Light | Impenetrable | Tri-Stat |
| Belt | Perfected Vestment of Olorime | Light | Impenetrable | Tri-Stat |
| Shoes | Snow Treaders | Medium | Impenetrable | Tri-Stat |
| Pants | Perfected Vestment of Olorime | Light | Impenetrable | Tri-Stat |
| Hands | Perfected Vestment of Olorime | Light | Impenetrable | Tri-Stat |
| Head | Earthgore | Heavy | Impenetrable | Tri-Stat |
| Shoulder | Earthgore | Light | Impenetrable | Tri-Stat |
| Necklace | Willpower | Jewelry | Arcane | Spell Damage |
| Ring | Willpower | Jewelry | Arcane | Spell Damage |
| Ring | Perfected Vestment of Olorime | Jewelry | Arcane | Spell Damage |
| Weapon 1 | Perfected Grand Rejuvenation | Resto Staff | Powered | Absorb Magicka |
| Weapon 2 | Perfected Precise Regeneration | Resto Staff | Powered | Absorb Stamina |
| Gear | Set | Type | Trait | Enchantment |
| Chest | Robes of Transmutation | Light | Impenetrable | Tri-Stat |
| Belt | Robes of Transmutation | Light | Impenetrable | Tri-Stat |
| Shoes | Snow Treaders | Medium | Impenetrable | Tri-Stat |
| Pants | Robes of Transmutation | Light | Impenetrable | Tri-Stat |
| Hands | Robes of Transmutation | Light | Impenetrable | Tri-Stat |
| Head | Earthgore | Heavy | Impenetrable | Tri-Stat |
| Shoulder | Earthgore | Light | Impenetrable | Tri-Stat |
| Necklace | Willpower | Jewelry | Arcane | Spell Damage |
| Ring | Willpower | Jewelry | Arcane | Spell Damage |
| Ring | Robes of Transmutation | Jewelry | Arcane | Spell Damage |
| Weapon 1 | Perfected Grand Rejuvenation | Resto Staff | Powered | Absorb Magicka |
| Weapon 2 | Perfected Precise Regeneration | Resto Staff | Powered | Absorb Stamina |
| Gear | Set | Type | Trait | Enchantment |
| Chest | Gossamer | Light | Impenetrable | Tri-Stat |
| Belt | Gossamer | Light | Impenetrable | Tri-Stat |
| Shoes | Snow Treaders | Medium | Impenetrable | Tri-Stat |
| Pants | Gossamer | Light | Impenetrable | Tri-Stat |
| Hands | Gossamer | Light | Impenetrable | Tri-Stat |
| Head | Earthgore | Heavy | Impenetrable | Tri-Stat |
| Shoulder | Earthgore | Light | Impenetrable | Tri-Stat |
| Necklace | Willpower | Jewelry | Arcane | Spell Damage |
| Ring | Willpower | Jewelry | Arcane | Spell Damage |
| Ring | Gossamer | Jewelry | Arcane | Spell Damage |
| Weapon 1 | Perfected Grand Rejuvenation | Resto Staff | Powered | Absorb Magicka |
| Weapon 2 | Perfected Precise Regeneration | Resto Staff | Powered | Absorb Stamina |
| Gear | Set | Type | Trait | Enchantment |
| Chest | Hollowfang Thirst | Light | Impenetrable | Tri-Stat |
| Belt | Hollowfang Thirst | Light | Impenetrable | Tri-Stat |
| Shoes | Snow Treaders | Medium | Impenetrable | Tri-Stat |
| Pants | Hollowfang Thirst | Light | Impenetrable | Tri-Stat |
| Hands | Hollowfang Thirst | Light | Impenetrable | Tri-Stat |
| Head | Earthgore | Heavy | Impenetrable | Tri-Stat |
| Shoulder | Earthgore | Light | Impenetrable | Tri-Stat |
| Necklace | Willpower | Jewelry | Arcane | Spell Damage |
| Ring | Willpower | Jewelry | Arcane | Spell Damage |
| Ring | Hollowfang Thirst | Jewelry | Arcane | Spell Damage |
| Weapon 1 | Perfected Grand Rejuvenation | Resto Staff | Powered | Absorb Magicka |
| Weapon 2 | Perfected Precise Regeneration | Resto Staff | Powered | Absorb Stamina |
| Gear | Set | Type | Trait | Enchantment |
| Chest | The Worm’s Raiment | Light | Impenetrable | Tri-Stat |
| Belt | The Worm’s Raiment | Light | Impenetrable | Tri-Stat |
| Shoes | Snow Treaders | Medium | Impenetrable | Tri-Stat |
| Pants | The Worm’s Raiment | Light | Impenetrable | Tri-Stat |
| Hands | The Worm’s Raiment | Light | Impenetrable | Tri-Stat |
| Head | Earthgore | Heavy | Impenetrable | Tri-Stat |
| Shoulder | Earthgore | Light | Impenetrable | Tri-Stat |
| Necklace | Willpower | Jewelry | Arcane | Spell Damage |
| Ring | Willpower | Jewelry | Arcane | Spell Damage |
| Ring | The Worm’s Raiment | Jewelry | Arcane | Spell Damage |
| Weapon 1 | Perfected Grand Rejuvenation | Resto Staff | Powered | Absorb Magicka |
| Weapon 2 | Perfected Precise Regeneration | Resto Staff | Powered | Absorb Stamina |
Where can I get the gear?
Perfected Vestment of Olorime: Cloudrest Veteran
Robes of Transmutation: Cyrodiil Quartermaster
Gossamer: Cradle of Shadows
Hollowfang Thirst: Moongrave Fane
The Worm’s Raiment: Vault of Madness
Snow Treaders: Mythic Item, Antiquities, Scrying, Excavation
Willpower: Imperial City
Perfected Grand Rejuvenation: Veteran Dragonstar Arena
Perfected Precise Regeneration: Veteran Maelstrom Arena
Earthgore: vBloodroot Forge, Urgarlag
Nightflame: vElden Hollow II
Skills
| Restoration Staff main bar | Restoration Staff off bar |
| Slot 1: Repentance | Slot 1: Living Dark |
| Slot 2: Breath Of Life | Slot 2: Energy Orb |
| Slot 3: Blessing of Protection | Slot 3: Extended Ritual |
| Slot 4: Illustrious Healing | Slot 4: Radiating Regeneration |
| Slot 5: Inner Light | Slot 5: Inner Light |
| Ultimate: Practiced Incantation | Ultimate : Solar Prison |
Skills Explanation
- Repentance: Stamina sustain and AOE heal.
- Breath of Life: Burst healing for a few players.
- Blessing of Protection: Burst raid healing.
- Illustrous Healing: Ground healing over time + Raid sustain.
- Living Dark: Minor Sorcery.
- Energy Orb: Burst heal synergy + Raid sustain.
- Extended Ritual: Burst heal synergy + Minor Mending + Ground healing over time.
- Radiating Regeneration: Targetted healing over time.
- Practiced Incantation: Aoe channeling heal.
- Solar Prison: Best damage synergy and Major Maim.
Rotation and Combos
Prebuffing Phase
With a Warden casting Expansive Frost Cloak, you don’t need to run Channeled Focus.
With a Dragonknight casting Igneous Weapons, you don’t need to run Degeneration.
Before any engagement, you want to make sure to maintain the following buffs and abilities:
- Minor Sorcery: Living Dark
- One cast ahead of the group: Illoustrious Healing
- Two or three casts: Radiating Regeneration
Offensive window
In a magicka group focus, the leader will usually start an engagement by doing a countdown of Proximity Detonation. As you hear the countdown, cast Living Dark.
Cast Illoustrious Healing once and Radiating Regeneration a few times, then position yourself on the sides of the impact (10 to 15 meters from the center).
Depending of the amount of pressure, burst heal with Breath of Life a few players getting close to 50% or use Blessing of Protection for more than two, especially under an enemy Negate Magic.
Finally, cast Repentance anytime you kill a few guards or players. The heal provided by this ability is actually insanely good and is one of the main reasons why templars are always on top of the healing meter.
Avoid using Extended Ritual and Energy Orb during an engagement. It’s better to rely on Overflowing Altar since it won’t show up until you need it. The point is to prioritize damage synergies.
Ultimate
I always recommend starting a new fight with Practiced Incantation until you get comfortable with the amount of pressure. At that point you can decide to drop some Solar Prison once in a while. This is not a bullet proof and you can still get bombed at any second.
Also, you want to use Practiced Incantation combined with a Barrier during heavy damage situations.
For example, preemptively if you are fighting an enemy guild and you expect a lot of damage or reactively if you see several group members going down. People running this skill should not be on the Ultimate tracker and should use it with their own judgement.
During openfield scenarios or when moving, position yourself ahead of the group, then channel the ultimate until most of the group has passed your position, then cancel it and catch up back to the front. If you struggle with mobility, consider adding one or two Swift on your jewelry.
Kiting Phase
When the leader calls to move away in a direction after an engagement, move in front of your group as fast as possible while spamming any of your burst heal abilities back pedalling if needed.
As soon as the group is no longer under heavy pressure, cast an Energy Orb in front of the group and reapply your healing over time abilities, Radiating Regeneration and Illoustrious Healing ahead of the group as you move.
If one person calls “stuck” at anytime, turn toward him and spam Breath of Life a few times.
Champion Points
Below you can find the Champion Points setup for this build. Work your way from top to bottom in your allocation. For more information on Champion Points, please visit the Champion Points Overview Page on ESO-Hub.com.
Important:
- Warfare Tree: This tree gives you a mix between damage, healing and damage mitigation.
- Fitness Tree: This tree gives you extra health, sustain and defensive buffs.
- Craft Tree: This tree is mostly optional, nothing really “impacts” combat, therefore you can pick whatever you prefer, or use the preset below.
- Perks: Hovering over each perk will give you insights on what it does. Presets are also provided for each of the allocations below.
Click the tab below to open the allocation.
Important Info for Magicka Templar PvP Build
Buff-food
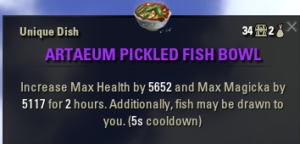
Artaeum Pickled Fish Bowl
Mundus Stone
The Steed (Increased movement) – The main reason of picking this mundus stone is to counter the lack of sprinting from the Treaders.
Race
Breton
High Elf
Argonian
Potions
Immovability Potions
(CC Immunity, Health, Magicka)
(Bugloss, Namira’s Rot, Columbine)
Passives
- Aedric Spear: Piercing Spear, Spear Wall, Burning Light, Balanced Warrior
- Dawn’s Wrath: Enduring Rays, Prism, Illuminate, Restoring Spirit
- Restoring Light: Mending, Sacred Ground, Light Weaver, Master Ritualist
- Restoration Staff: Essence Drain, Restoration Expert, Cycle of Life, Absorb, Restoration Master
- One Hand and Shield: Fortress, Sword and Board, Deadly Bash, Deflect Bolts, Battlefield Mobility
- Light Armor: Grace, Evocation, Spell Warding, Prodigy, Concentration
- Heavy Armor: Resolve, Constitution, Juggernaut
- Medium Armor: Wind Walker, Athletics
- Mages Guild: Magicka Controller
- Undaunted: Undaunted Command, Undaunted Mettle
- Assault: Continuous Attack, Reach, Combat Frenzy
- Support: Magicka Aid, Combat Medic, Battle Resurrection
- Racial: All
- Alchemy: Medicinal Use


