

Welcome to the best BG3 Arcane Archer Build. For this build, we will be using the Arcane Archer subclass of the Fighter class, which focuses more on ranged combat than the other Fighter subclasses, allowing you to shoot special magical arrows that can deal Psychic damage or temporarily banish foes from the world.
For more Fighter builds, visit our BG3 Fighter Builds page or explore the complete BG3 Builds Database. We also have an optimized BG3 Lae’zel Build (Fighter). You can also check out our BG3 Builds Tier List to see which builds perform best.
Table of Contents:
- Arcane Archer Build Overview
- Arcane Archer Build Character Creation
- Arcane Archer Build Levelling Progression
- Arcane Archer Build Best Equipment
- Arcane Archer Build Extra Info
Here is a quick overview of the Strengths and Weaknesses of the Arcane Archer build in Baldur’s Gate 3:
Arcane Archer Strengths
Arcane Archer Weaknesses

BG3 Arcane Archer Build Overview
Before we get started with our BG3 Arcane Archer Build, we will have a quick look at the Fighter Class and the Arcane Archer subclass, which we will be using for this build. If you are already familiar with how they work, please skip this section.
Fighter Class Summary
Here is a quick summary of the most important aspects of the Fighter class.
 Second Wind (Level 1) – Spend a Bonus Action to heal yourself for (1d10 + Fighter Level). Recharges on all Short and Long Rests.
- Action Surge (Level 2) – Gain an extra Action on your current turn. Recharges on all Short and Long Rests.
- Extra Attack (Level 5) – Your Actions now yield two weapon attacks, rather than one.
- Indomitable (Level 9) – When you fail a Saving Throw, you can roll again and use the new result instead. Once per Long Rest.
- Improved Extra Attack (Level 11) – Your Actions now yield three weapon attacks.
These Actions and Passive Features allow the Fighter to make more weapon attacks than any other class in the game, making them an excellent damage dealer, especially when wielding a heavy-hitting melee weapon.
Arcane Archer Subclass Summary
Here are the most important actions and features belonging to the Arcane Archer subclass.
- Arcane Arrows (Level 3) – A resource unique to the Arcane Archer subclass. They are used to power your Arcane Shots and can be replenished with a Short or Long Rest.
- Arcane Shots (Level 3) – Special ranged attacks unique to the Arcane Archer. For example:
- Bursting Arrow – Explodes in impact, dealing Force Damage to nearby targets.
- Grasping Arrow – Deals Poison Damage. Reduces the target’s Movement Speed and deals additional Slashing Damage when they move.
- Shadow Arrow – Deals Psychic Damage. The target will be Blinded unless they succeed on a Saving Throw.
- Curving Shot (Level 7) – When you miss with a magical ranged attack, you can use your Bonus Action to attack the next closest target with the same attack. This can happen once per turn.
- Magic Arrow (Level 7) – All your ranged attacks are considered magical, allowing them to bypass physical resistance.

Arcane Archer Build Character Creation (Level 1) for BG3
In this section, we will go over the basic Character Creation options for your BG3 Arcane Archer build, namely Background, Race, Skills and Abilities.
Race
The Arcane Archer build will work fine with any race, as the differences between the races in BG3 are quite small. However, some are a little bit better than others due to minor differences. Here are our top 5 choices, but if you want to use a different race, go for it.
| Race | Strengths | Info |
|---|---|---|
Wood Elf |
|
Wood Elves are a great choice for most build types in BG3, thanks to their superior movement speed. Natural Proficency in Perception is always useful, and immunity to magical Sleep will help you out a lot, especially in the early game, where enemy mages love to spam this spell. |
Duergar |
|
With their wide choice of armour and weapon proficiencies, and resistances to poison, charm, and paralysis, Duergar are one of the strongest races in BG3.
The only downside of Duergar is their small stature – this reduces their base Movement Speed to 7.5 metres per turn (most races get 9 metres). |
|
|
|
Drow have similar features to Wood Elves, sharing their Fey Ancestry. Drow can see in the dark at long distances and get a few spells – Faerie Fire is by far the most useful of these.
Unlike Wood Elves, Drow have standard Movement Speed. Both versions of the Drow are functionally identical – it’s just a lore difference between them. |
Githyanki |
|
Githyanki have excellent mobility thanks to Enhance Leap and Misty Step, allowing you to relentlessly pursue ranged enemies.
Additionally, Githyanki get the full benefits from equipping various Githyanki weapons, sometimes granting additional Psychic Damage or special features. |
|
Human |
|
Humans are useful for their unrestricted Skill choice. Used wisely, this allows your character to be proficient with a useful Skill that wouldn’t normally be available for your Class.
The extra carrying capacity is a nice boost, too. |
Background & Skills
The best Backgrounds to choose for the Fighter are either Outlander or Soldier, as these both give Proficiency in ![]() Athletics, the only Strength-based skill available through the Background selection. Athletics makes your Fighter better at pushing and throwing enemies, and helps them to resist enemy attempts to do the same in return.
Athletics, the only Strength-based skill available through the Background selection. Athletics makes your Fighter better at pushing and throwing enemies, and helps them to resist enemy attempts to do the same in return.
Distribute your other Skill picks as you wish – we went with ![]() Perception and
Perception and ![]() Survival, but the difference is quite mild, as none of the offered skills match up well with our Ability Distribution. If you already get Perception Proficiency from your race, change this to any other option.
Survival, but the difference is quite mild, as none of the offered skills match up well with our Ability Distribution. If you already get Perception Proficiency from your race, change this to any other option.
Abilities
The Arcane Archer Build needs to have high Strength and Dexterity at Level 1.
Strength is used for melee attacks, while Dexterity is used for ranged attacks. You should also have at least 14 points in Constitution; otherwise, your HP will be too low.
We went with this setup:
- Strength – 16
- Dexterity – 16
- Constitution – 14
- Intelligence – 8
- Wisdom – 10
- Charisma – 10
Fighting Style
The Fighter class can choose a Fighting Style to excel at. It won’t surprise you to know that we’re choosing the Archery Fighting Style for this build, which gives you a +2 bonus to Ranged Attack Rolls, making them considerably more accurate.

Levelling Progression for the Arcane Archer Build
This section will walk you through every level up for your Arcane Archer build in BG3, from levels 2 to 12. Where needed, we will advise you on the best choices to pick when levelling up.
Level 2
At Level 2, you can make use of ![]() Action Surge. This grants you an extra
Action Surge. This grants you an extra ![]() Action on your current turn, and it can be used once per Short Rest. This is really helpful when you need to take an extra action to finish off an enemy.
Action on your current turn, and it can be used once per Short Rest. This is really helpful when you need to take an extra action to finish off an enemy.
Also, make sure you make use of ![]() Second Wind, a pretty strong self-heal that the Fighter has from the start of the game. It can also be used once per Short Rest.
Second Wind, a pretty strong self-heal that the Fighter has from the start of the game. It can also be used once per Short Rest.
Level 3
At Level 3, it’s time to select your subclass. For this build, we are using the Arcane Archer subclass.
After choosing the Arcane Archer subclass, you unlock the following new features:
- Proficiency in the Arcana and Nature Skills
- Choose a Cantrip to unlock, either Guidance, Light or True Strike. Guidance is the only one of these that is good in my opinion, and it’s probably already covered if you have a Cleric in your party. Just choose whichever one your party doesn’t already have access to.
- 4 Arcane Arrows. This is a special resource that is used to cast your Arcane Archer actions. All arrows are replenished on Short and Long Rests.
- Arcane Shots – You can choose three Arcane Shots to unlock. These are powerful ranged attacks that only the Arcane Archer has access to. They can either deal bonus damage, cause a special effect, or both. I recommend choosing the following three to unlock:
- Bursting Arrow – Explodes on impact, dealing 2d6 Force Damage to enemies within 3 metres.
- Grasping Arrow – Deals an extra 2d6 Poison Damage on top of the regular attack damage. Reduces the target’s movement speed. Deals another 2d6 Slashing Damage when the target moves.
- Piercing Arrow – Pierces all targets within the line of your shot. They must all succeed a Saving Throw, or take 1d6 extra damage. This requires some patient positioning to line up the shot, but it’s worth it if you can make it work. Keep a lookout for chokepoints and other opportunities to arrange your enemies in a line.
Level 4
At Level 4, you must choose a Feat for your Arcane Archer.
We recommend choosing Ability Improvement and increasing your Dexterity to 18. This will improve your ranged Attack Rolls and damage output with ranged weapons, helping to boost your overall damage.
Level 5
At Level 5, you will gain an ![]() Extra Attack. This means that every Action will now grant you two weapon attacks, instead of the usual one. Bonus Actions and Reactions are unaffected by this change.
Extra Attack. This means that every Action will now grant you two weapon attacks, instead of the usual one. Bonus Actions and Reactions are unaffected by this change.
This is very powerful and hugely increases your damage potential per turn.
You can use this in combination with your ![]() Action Surge to make four weapon attacks in a single turn – perfect for when you need a heavy burst of damage.
Action Surge to make four weapon attacks in a single turn – perfect for when you need a heavy burst of damage.
Level 6
At Level 6, you can choose another Feat. I again recommend choosing Ability Improvement and using it to improve your Dexterity to 20. This will give you the maximum possible bonus of +5 to your ranged attacks from your Dexterity Modifier.
Level 7
At Level 7, the Arcane Archer gains a couple of fairly minor passive features:
- Curving Shot – When you miss with any magical ranged attack, you can spend your Bonus Action to instead attack the nearest other enemy with the same attack.
- Magic Arrow – All of your ranged attacks are considered magical to overcome enemy resistance to non-magical damage.
- Extra Arcane Arrow – You can now hold five Arcane Arrows instead of four.
- Extra Arcane Shot – You can choose one more Arcane Shot to unlock. I recommend:
- Seeking Arrow– This arrow deals 1d6 bonus damage and attempts to apply Faerie Fire to the target. This arrow cannot miss its target. If the Faerie Fire debuff succeeds, the target will be much more vulnerable to subsequent Attack Rolls, so this is a great Arcane Shot to use against a high-priority target like a boss or a powerful monster.
Level 8
At Level 8, you can choose another Feat for the Arcane Archer.
- If you’re using your melee attacks quite often, get the Savage Attacker Feat, which will roll all melee weapon attack damage dice twice, and choose the highest result. This will considerably increase your average damage output in melee.
- If you’re focusing mostly on ranged attacks, then choose the Sharpshooter Feat, which allows you to toggle a passive feature that applies 10 extra damage to your ranged attacks, but at the cost of a -5 penalty to Attack Rolls. This is great when you are shooting at targets that are easy to hit, but should be turned off when shooting at targets with good defences. Sharpshooters also ignore penalties usually imposed by shooting from low ground.
Level 9
At Level 9, you get the ![]() Indomitable passive. Once per Long Rest, this lets you automatically reroll a Saving Throw that you failed.
Indomitable passive. Once per Long Rest, this lets you automatically reroll a Saving Throw that you failed.
Level 10
At Level 10, the Arcane Archer can choose one more Arcane Shot to unlock. I recommend ![]() Shadow Arrow, which deals 2d6 bonus
Shadow Arrow, which deals 2d6 bonus ![]() Psychic Damage and will
Psychic Damage and will ![]() Blind the target, unless they succeed a Saving Throw.
Blind the target, unless they succeed a Saving Throw.
You also get another ![]() Arcane Arrow, allowing you to hold six of them.
Arcane Arrow, allowing you to hold six of them.
Level 11
At Level 11, your Extra Attack is replaced by ![]() Improved Extra Attack, which gives you three attacks per Action. At this point, your damage potential per turn is getting huge.
Improved Extra Attack, which gives you three attacks per Action. At this point, your damage potential per turn is getting huge.
Level 12
This is the highest level in Baldur’s Gate 3 – once you reach this point, you have finished levelling up your character.
You can choose one more Feat at Level 12. Choose either Savage Attacker or Sharpshooter, whichever you did not get at Level 8. If you are never using your melee weapon, choose something like Alert, Mobile or Tough to make your character more tanky or improve their mobility.
Equipment for the Arcane Archer Build
This section will list the best equipment for the BG3 Arcane Archer build. We have provided both an early-game and a late-game version of the list, so you can begin using the build early in the game instead of having to wait until Act III.
We have also included information about each item below the tables, such as how to obtain the item and any other notable information.
Don’t worry if your setup is not exactly the same as one of those outlined below – the build will still work fine if you’re missing some of the items.
Early Game Equipment
Early-game equipment is found in either Act I or the earlier parts of Act II.
| Slot | Icon | Item | Effects | Location |
|---|---|---|---|---|
| Head |  |
Haste Helm |
|
In a wooden chest next to a cart, by the Blighted Village Waypoint |
| Cloak |  |
Cloak of Protection |
|
Purchased from Quartermaster Talli in Last Light Inn |
| Chest |  |
Adamantine Splint Armour |
|
Must be crafted at the Adamantine Forge. |
| Gloves |  |
Gloves of Archery |
|
Buy from Grat the Trader inside the Goblin Camp |
| Boots |  |
Boots of Genial Striding |
|
Purchased from Blurg in the Myconid Colony, in the Underdark |
| Necklace |  |
Amulet of Misty Step |
|
Located in a chest in the Defiled Temple, near the Ogre called Polma. |
| Ring 1 |  |
Caustic Band |
|
You can purchase the ring from Derryth Bonecloak in the Underdark Myconid Colony |
| Ring 2 |  |
Crusher’s Ring |
|
Looted from Crusher in the Goblin Camp. You can also try to steal it without a fight during the dialogue interaction. |
| Melee Weapon |  |
Blooded Greataxe |
|
Purchased from either Grat the Trader in the Goblin Camp or Roah Moonglow in Shattered Sanctum |
| Ranged Weapon |  |
Gandrel’s Aspiration (or The Joltshooter) |
|
Looted from Gandrel near the Hag’s Hut
If you want to keep Gandrel alive, the Joltshooter is the next best option, awarded for saving Counsellor Florrick from Waukeen’s Rest |
This is the kind of versatile setup that will make the early-game in Baldur’s Gate 3 much easier. We’ve focused on improving your defence, mobility and stacking a few early damage boosts to make your attacks more potent. We also included the Blooded Greataxe, one of the strongest early-game melee weapon, allowing the Arcane Archer to still be a melee powerhouse when needed.
- Defensive Items
- Cloak of Protection: +1 Armour Class and Saving Throws
- Adamantine Splint Armour: Very strong Heavy Armour that can be obtained quite early in the game. Stops enemies from landing Critical Hits on you, reduces all damage taken by 2 points and debuffs enemies who hit you with melee attacks.
- Mobility Items
- Haste Helm and Crusher’s Ring – Improves your Movement Speed by 3m per turn (6m if you have them both)
- Boots of Genial Striding – Stops you from being slowed down by Difficult Terrain. Be careful that you can still slip on Grease and Ice, and dangerous terrain like Spikes will still damage you.
- Amulet of Misty Step – Allows you to teleport with the Misty Step spell. Githyanki already unlock the spell at Level 5, so you can give this amulet to another party member and wear something else if this applies to you.
- Attacking Items
- Gloves of Archery and Caustic Band – Wearing both of these gives all your ranged attacks +4 damage. This might not sound like much, but it is actually a pretty big buff, especially considering you can get both of these items in the first few hours of your playthrough.
- Blooded Greataxe and Gandriel’s Aspiration – The Arcane Archer is pretty unique in BG3 in that it allows your character to be a powerhouse both in melee and at long range. With this in mind, it makes sense to give this pairing, arguably the strongest melee and ranged weapons available in Act I (without cheesing the sword from the Githyanki Patrol) to your Arcane Archer. Depending on your whims and the moral alignment of your party, you might not want to kill Gandrel. In this case, the Joltshooter is still a very capable ranged weapon that you can use for now.
All of these items are easy and quick to get, except for the Cloak of Protection which isn’t available until Act II, and the Adamantine Armour which requires you to go on a bit of a dungeon crawl through the Grymforge and defeat a boss before you can get it. It’s worth it though – this armour is so good that it stays viable all the way until the end credits.
Late Game Equipment
Late Game equipment can be found in the latter parts of Act II, and Act III. This is the most powerful version of the build, with access to the best items in the game.
| Slot | Icon | Item | Effects | Location |
|---|---|---|---|---|
| Head |  |
Helm of Balduran |
|
Defeat Ansur the dragon below Wyrm’s Crossing. See below for more details. |
| Cloak |  |
Cloak of Elemental Absorption |
|
Looted from an Opulent Chest inside Ketheric Thorm’s Chambers |
| Chest |  |
Armour of Persistence |
|
Buy from Dammon in the Forge of the Nine |
| Gloves |  |
Gauntlets of Hill Giant Strength |
|
Taken from a pedestal in the archive of the House of Hope. |
| Boots |  |
Boots of Persistence |
|
Buy from Dammon in the Forge of the Nine |
| Necklace |  |
Corvid Token |
|
Buy from Mattis near the Requisitioned Barn, if he survives to Act III. |
| Ring 1 | |
Caustic Band |
|
You can purchase the ring from Derryth Bonecloak in the Underdark Myconid Colony |
| Ring 2 |  |
Ring of Free Action |
|
Buy from Araj Oblodra inside Moonrise Towers |
| Melee Weapon |  |
Balduran’s Giantslayer |
|
Looted from Ansur in the Dragon’s Sanctum |
| Ranged Weapon |  |
Gontr Mael |
|
Drops from the Steel Watcher Titan in the Steel Watcher Foundry |
This setup will give you a versatile setup for Act III that is strong both in melee and at long range. However, there are a couple of considerations to make, depending on your playstyle:
- The Gauntlets of Hill Giant Strength and Balduran’s Giantslayer are some of the best items in the game for melee builds. While the Arcane Archer is a very good melee fighter, if you’re mostly or entirely using it for ranged attacks, it isn’t worth using these items on this build and you should give them to a melee-focused party member. In that case, use another backup melee weapon and revert to the Gloves of Archery from the early-game setup.
- If you took a path in Act I that resulted in you killing Kagha and looting her Broodmother’s Revenge necklace, you can equip it instead of the Corvid Token once you have the Helm of Balduran. The Helm will heal you and trigger the necklace at the start of every turn, giving you 1d6 bonus Poison Damage on your first attack.
- The Armour of Persistence is only a small upgrade from the Adamantine Splint Armour. If your Arcane Archer’s survivability already felt fine, you may want to give it to another character in your party (if you have somebody else with Heavy Armour Proficiency).
Arcane Archer Build Extra Info
Below are some extra pieces of information that can help you get the most out of this Arcane Archer Fighter build.
BG3 Arcane Archer How to Play

While the Arcane Archer subclass is focused entirely on ranged combat, it does not lose any of the melee prowess of the basic Fighter Class. Therefore, the Arcane Archer is still a formidable melee combatant. This gives you very good versatility and allows you to punish enemies from any range.
Try to use the correct Arcane Shot for the situation you are in. For example:
- Piercing Arrow can damage several enemies in a linear AoE, so it works great in a chokepoint or when enemies are strung out in a line.
- Bursting Arrow is the best option for AoE damage in a more circular area.
- Grasping Arrow is the best for single-target damage, as long as you have a good chance to hit the target.
- Shadow Arrow can Blind the target, giving your party Advantage when attacking them, while imposing Disadvantage on the enemy’s attacks (and preventing them from making any ranged attacks).
- Similarly, Seeking Arrow can apply Faerie Fire, giving Advantage on Attack Rolls against the target. It also prevents them from entering stealth and highlights their position in dark environments, so even party members without Darkvision have no trouble hitting them. Seeking Arrow cannot miss the target, so if an enemy has an extremely high Armour Class, you can use this to guarantee some damage against them.
More generalised Fighter tactics also apply to the Arcane Archer. The most important of these is proper use of ![]() Action Surge. Use this when you need a quick burst of damage, as it will double the number of standard weapon attacks you can make on your turn. You can add to this even further by combining it with the right potions, which we’ll explain below.
Action Surge. Use this when you need a quick burst of damage, as it will double the number of standard weapon attacks you can make on your turn. You can add to this even further by combining it with the right potions, which we’ll explain below.
Overpowered Potions for the Arcane Archer Build
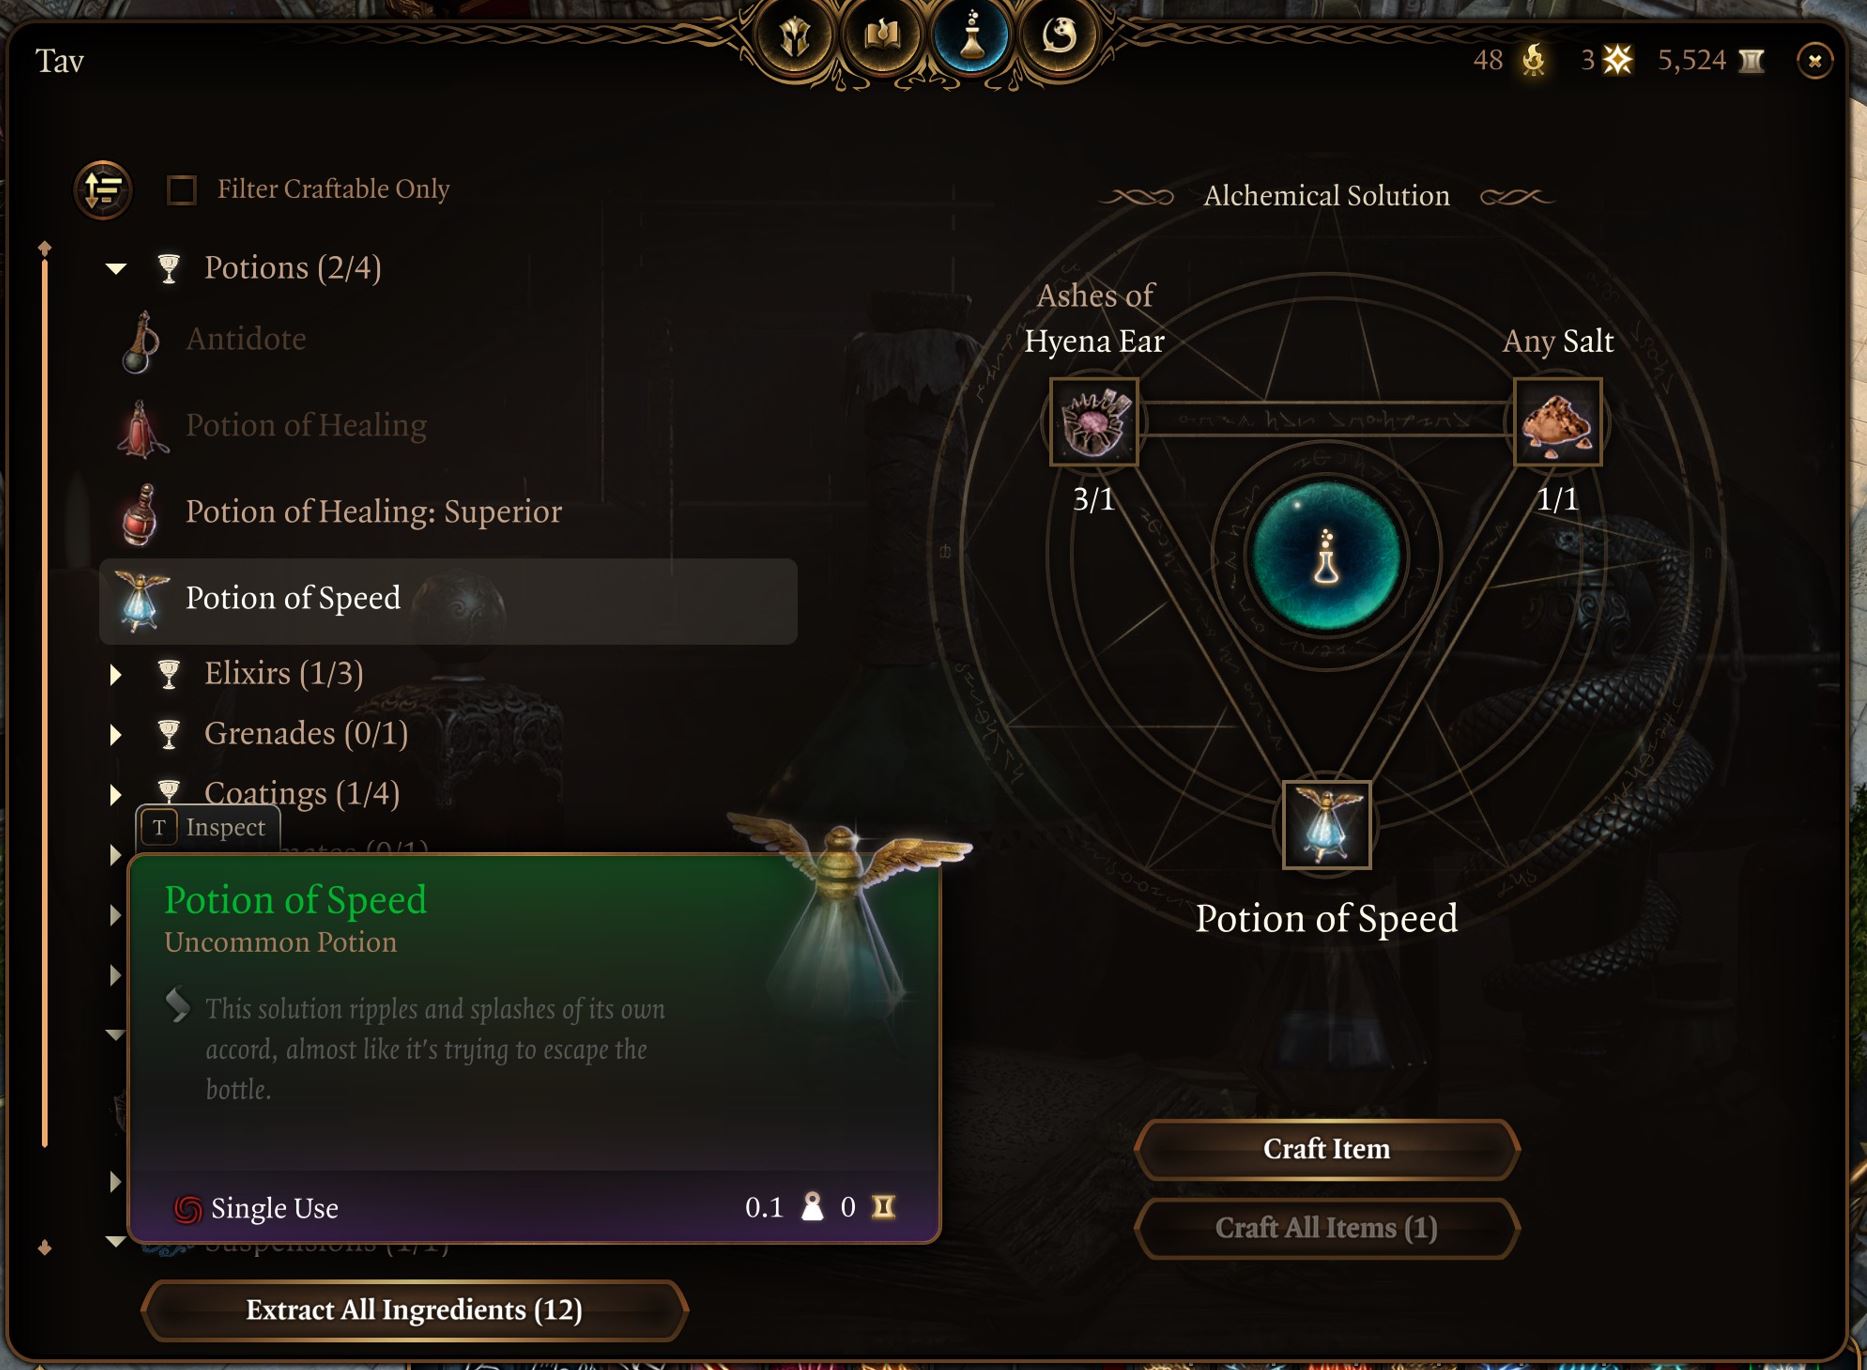
The ![]() Potion of Speed is arguably the most powerful potion in Baldur’s Gate 3. It doubles your Movement Speed and gives you an
Potion of Speed is arguably the most powerful potion in Baldur’s Gate 3. It doubles your Movement Speed and gives you an ![]() extra Action each turn.
extra Action each turn.
One drawback of this potion is that when it expires, your character will be ![]() Lethargic for one turn, unable to move or take any
Lethargic for one turn, unable to move or take any ![]() Actions. So you should be careful not to have your character stranded in a dangerous position when the potion runs out!
Actions. So you should be careful not to have your character stranded in a dangerous position when the potion runs out!
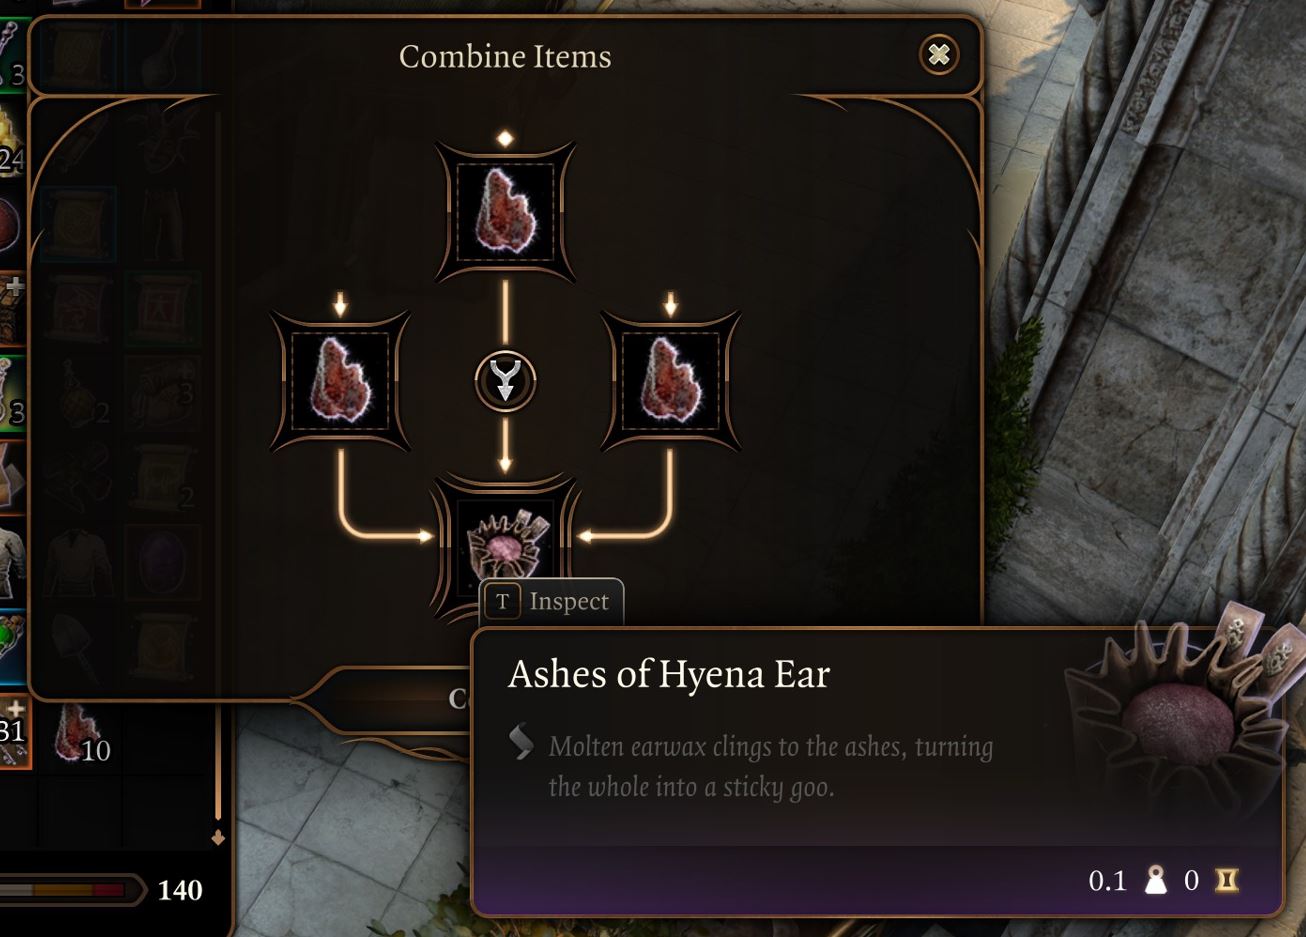
You can craft the Potion of Speed in the alchemy menu by combining ![]() Ashes of Hyena Ear with any Salt. Create ashes, salts and other alchemy concentrates by combining three of the same ingredients together – for example, combining three
Ashes of Hyena Ear with any Salt. Create ashes, salts and other alchemy concentrates by combining three of the same ingredients together – for example, combining three ![]() Hyena Ears will create
Hyena Ears will create ![]() Ashes of Hyena Ear.
Ashes of Hyena Ear.
Hyena Ears can normally be looted from either Hyenas or Gnolls – you can find a lot of them around the Risen Road in Act I, for a good supply of them, which should last you a while.
You can combine this with the ![]() Elixir of Bloodlust. Elixirs and Potions can be stacked with each other, but you can only have one Elixir active at a time. Potions tend to expire after a few turns, whereas Elixirs last until your next Long Rest, unless you drink a different Elixir in the meantime.
Elixir of Bloodlust. Elixirs and Potions can be stacked with each other, but you can only have one Elixir active at a time. Potions tend to expire after a few turns, whereas Elixirs last until your next Long Rest, unless you drink a different Elixir in the meantime.
The ![]() Elixir of Bloodlust grants your character another
Elixir of Bloodlust grants your character another ![]() Action when you kill an enemy. This effect can only trigger once per turn. Combined with the
Action when you kill an enemy. This effect can only trigger once per turn. Combined with the ![]() Potion of Speed, this gives you two additional attacks if you defeat an enemy on your turn.
Potion of Speed, this gives you two additional attacks if you defeat an enemy on your turn.
It can be crafted by combining ![]() Ashes of Worg Fang with any Salt.
Ashes of Worg Fang with any Salt. ![]() Worg Fangs are looted from Worgs, the beasts usually kept by Goblins.
Worg Fangs are looted from Worgs, the beasts usually kept by Goblins.
This is an OP alchemy combo that you can use to turbocharge the Arcane Archer’s mobility and damage output in tough fights!
BG3 Arcane Archer Build Best Party Composition
Your BG3 character will always perform better when they are in a party with allies who complement each other and work well as a team.
There are lots of awesome party compositions in BG3, with so many classes and subclasses, the possible combinations are almost limitless.
Here is a combo that works great for the Arcane Archer:
- This Arcane Archer Build
- A support Cleric to debuff enemies and heal your team
- I strongly recommend the Light Domain Cleric for this role!
- A magical support character with the Haste spell, to buff your main damage dealers.
- Circle of Land Druid or School of Evocation Wizard
- A melee-focused frontliner
Arcane Archer Build Illithid Powers (optional)

Illithid Powers are unlocked later in BG3 when you learn more about Mind Flayers and Tadpoles. By eating Jars of Mind Flayer Parasites you gain one point. This is another optional skill tree that you can get access to if you want. Here are some of the best Illithid Powers for the BG3 Fighter Build with the Arcane Archer subclass:
- Mind Blast: A conal blast of Psychic Damage that can also stun several targets at once. If you are outnumbered by several advancing enemies, then Mind Blast can help to swing things back in your favour.
- Cull the Weak: When you reduce a creature’s hit points below a certain threshold, this power instantly kills it and deals 1-4 Psychic Damage to nearby enemies. This is particularly effective when engaging groups of weaker foes, enabling you to thin their numbers rapidly.
- Fly: This can be used to reach hard to get to places or change positions in combat.
- Mind Sanctuary: This creates an area that allows all within to use Actions and Bonus Actions interchangeably. This typically means you can deal more damage, since you can use your Bonus Action as a normal Action. However, enemies who are inside the area will also enjoy its benefits. Be careful with your placement so that your party gets buffed by the Mind Sanctuary and not the enemies!
- Psionic Backlash: This is a top-tier Reaction from the Illithid Powers skill tree in BG3. It allows you to deal Psychic Damage when a nearby enemy casts a spell. This is especially useful if the target is casting a Concentration Spell. The damage from Psionic Backlash can immediately break their Concentration, ending the spell’s effects.
More Baldur’s Gate 3 Builds
- Druid Build – Circle of the Moon
- Bard Build – College of Lore
- Ranger Build – Hunter
- Monk Build – Way of Shadow
- Monk Build – Way of the Four Elements
- Monk Build – Way of the Open Hand
- Necromancer Build – Necromancy
- Fighter Build – Battle Master
- Barbarian Build – Berserker
- Warlock Build – Great Old One
- Cleric Build – Light Domain
- Rogue Build – Thief
- Sorcerer Build – Wild Magic
- Wizard Build – Evocation School
- More Baldur’s Gate Guides & Builds
If you want to check out the map of Baldur’s Gate 3, please visit the Baldur’s Gate 3 Interactive Map.