


Today, we are going to take a look at the Top 3 Kuiper Shard Farm Locations in The First Descendant. Kuiper Shards are very important for The First Descendant Builds. You need them to increase the level of your modules, and you need a humongous amount to max out all modules for a build.
Maxing out a module can cost between 100-500k Kuiper Shards. Most builds require between 7-12 mods for optimized builds in The First Descendant. Module capacity can also be increased to slot more mods for both your character and weapons.
To max out modules, you will have to spend the following Kuiper Shard amount:
| Level | Transcendent | Ultimate | Rare | Normal |
|---|---|---|---|---|
| 1 | 1500 | 900 | 600 | 300 |
| 2 | 3000 | 1800 | 1200 | 600 |
| 3 | 5500 | 3300 | 2800 | 1100 |
| 4 | 10000 | 6000 | 4000 | 2000 |
| 5 | 17000 | 10200 | 6800 | 3400 |
| 6 | 28500 | 17100 | 11400 | 5700 |
| 7 | 54200 | 28500 | 19000 | 9500 |
| 8 | 77500 | 46500 | 31000 | 15500 |
| 9 | 125000 | 75000 | 50000 | 25000 |
| 10 | 200000 | 120000 | 80000 | 40000 |
| Total | 515500 | 309300 | 206200 | 103100 |
Note: By increasing the module level, you also increase the module capacity cost except for Transcendent mods, which lower their capacity cost.
How to Maximize Kuiper Shard Gains
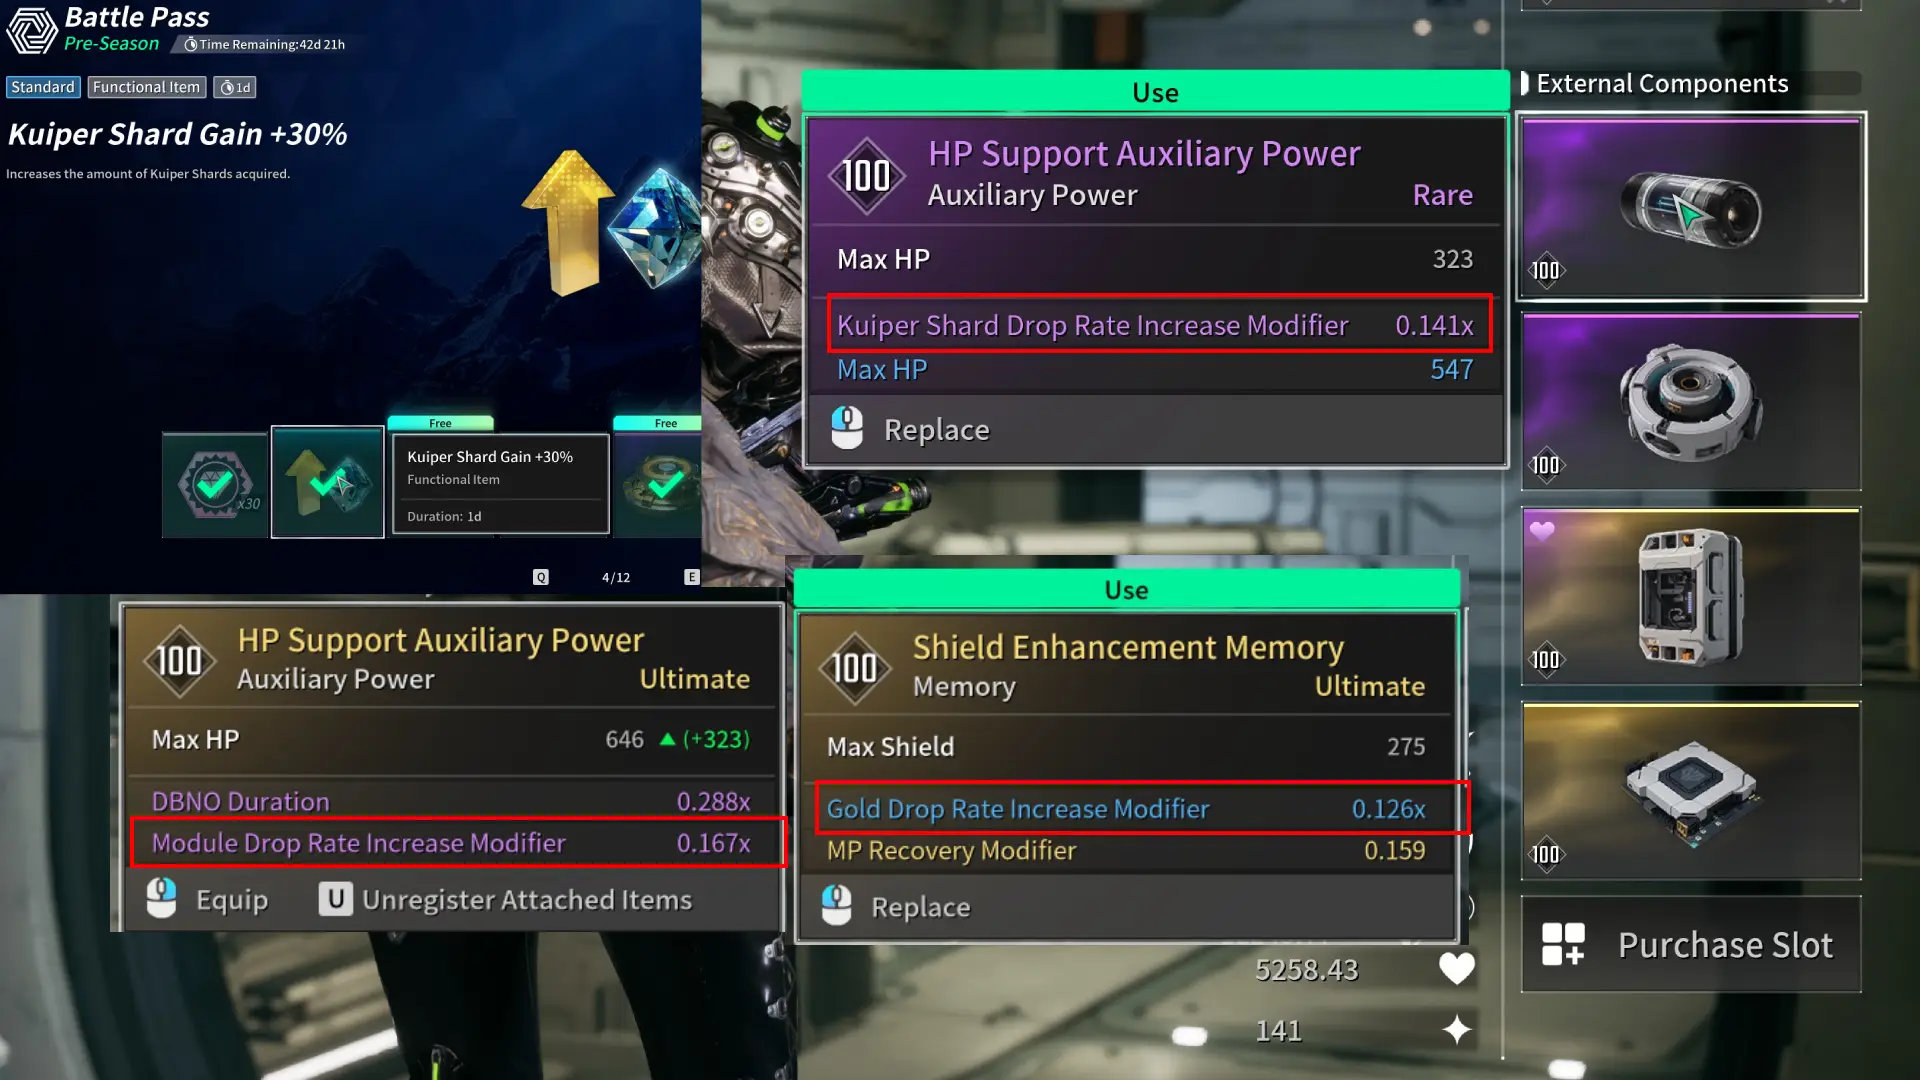
There are a few things that you can do to increase the amount of Kuiper Shards that you gain in The First Descendant. While these are not required, it is recommended to get them, after all, we want to be as efficient as possible! The most obvious one is the 30% Kuiper Shard buff, which you get from the store or Battle Pass. Nexon also sometimes gives it out for free if there are server issues. Use them when you know you can grind like crazy. The moment you take the item it will go active, therefore make sure to only select it once you have time.
Additionally, we can get External Components that have Kuiper Shard Drop Rate Increase Modifier. You can also look out for Module Drop Rare Increase Modifier and Gold Drop Rate Increase Modifier if you want those.
- 30% Kuiper Buff
- External Components that increase Kuiper Shard Drop Rate
Best Kuiper Shard Farm Locations in The First Descendant

Before we show the Kuiper Shard farm locations, it is essential to understand how we gain the big fat 300-500k Kuiper Shards per hour. First off, monsters that we defeat drop Kuiper Shards and even more important, the high amount of modules we farm from the locations can be deconstructed for Kuiper Shards. And with these two combined together, we can hit 300-500k Kuiper Shards easily in The First Descendant.
- Kuiper Shards from monsters
- Kuiper Shards from dismantled modules
Note: These spots are all easy to do, and there are almost always other players already farming there; join them!
You must have finished the campaign, to get to the 300-500k amount you need to play on hard difficulty. While you can do this on normal, it will drastically reduce your Kuiper Shard gains. All three Kuiper Shard Farm spots are in the Sterile Land zone on hard difficulty. Your main priority above anything else in The First Descendant is to finish the campaign as fast as possible to unlock the hard difficulty.
Spot 1 – Anticipated Ambush Point

The Anticipated Ambush Point is the best Kuiper Shard farm in The First Descendant. This is an “Extermination” type mission that often doesn’t take long to complete. It takes approximately 30 seconds or less to clear if you have a good group. No, you don’t need to have your buddies with you; simply join whoever is already farming there!
It is recommended to bring the Descendant Bunny because she simply has the best and fastest farming capabilities due to her area damage kit. The Descendant Valby is also great because she can place a lot of AoE damage on the ground before monsters even spawn. But in the end, any The First Descendant Character Build works and there is most likely already a Bunny there speeding up the farming process for your group!
- 30 seconds to finish the mission
- 3000-5000 Kuiper Shards per run
- Lots of Modules that you can dismantle for Kuiper Shards
- A lot of Weapons
- A lot of Reactors
- Precision Code Breakers to open Encrypted Vaults (75K Kuiper per opened rare vault)
I prefer the Anticipated Ambush Point farming method for Kuiper because this mission can also drop up to Rare Precision Code Breakers, which are hard to come by. The Precision Code Breakers are used to open Encrypted Vaults. The Rare Encrypted Vaults give 75k Kuiper as a reward. However, it is recommended to open the vaults with Enzo, as his passive lowers the difficulty of the mini-game associated with the Encrypted Vaults. This is also why Enzo is one of our must-have characters on our The First Descendant Tier List.
If you are a group of four you can also place someone where the mission starts. Once the mission is over, you can immediately restart it to save even more time. The person who does this, can run up and farm all items while the mission is active and then run back down to be ready for when the mission is finished.
In the video below I showcase how the Anticipated Ambush Point can be easily farmed.
Spot 2 – Large Nuclear Reactor
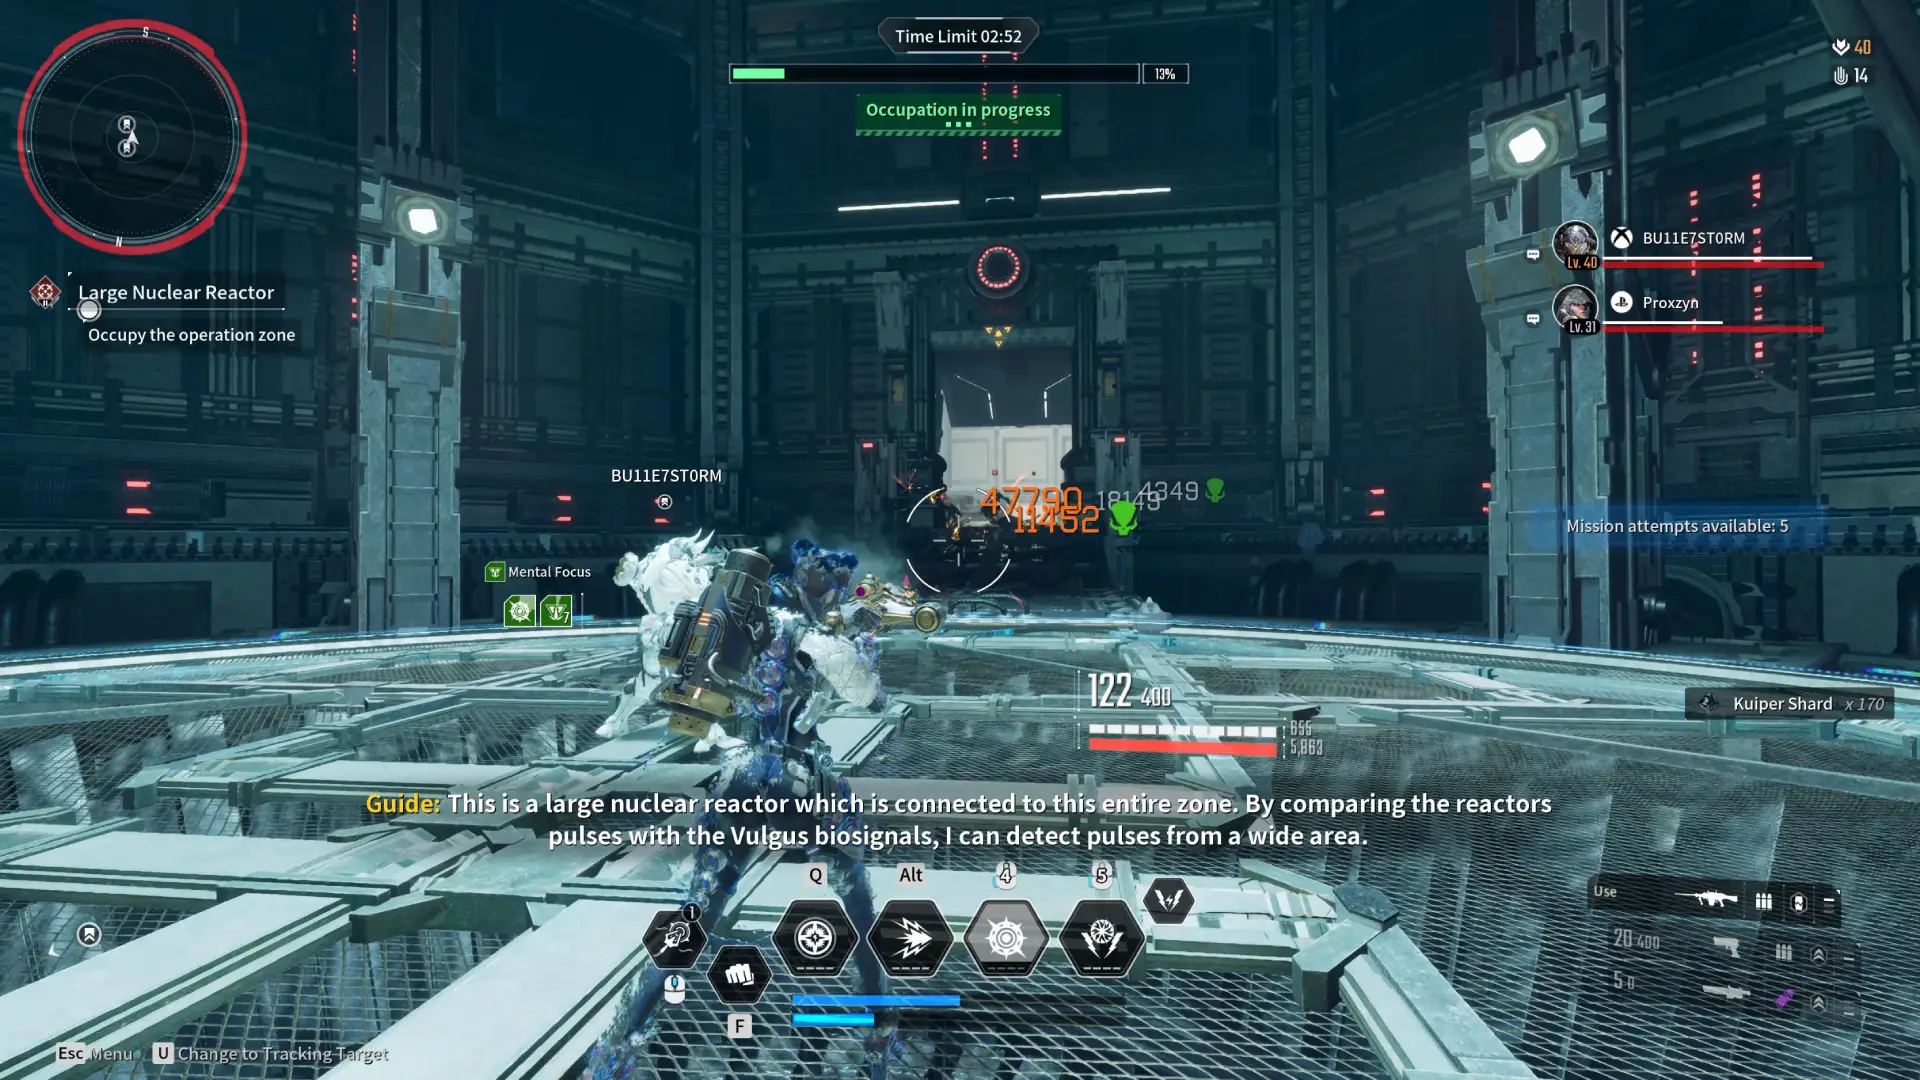
The second Kuiper Shard farm spot I like is the Large Nuclear Reactor in The First Descendant. Here you simply have to stand in the middle and monsters will rush at you. Keep defeating the monsters to gain Kuiper Shards, and once the mission is done, you can restart it immediately. Don’t forget to pick up any loot
- 60 seconds to finish the mission
- 2000-3000 Kuiper Shards per run
- Lots of Modules that you can dismantle for Kuiper Shards
- A lot of Weapons
- A lot of Reactors
Here is a video of myself farming the Large Nuclear Reactor in The First Descendant. Don’t forget to pick up the loot!
Spot 3 – Kuiper Mine
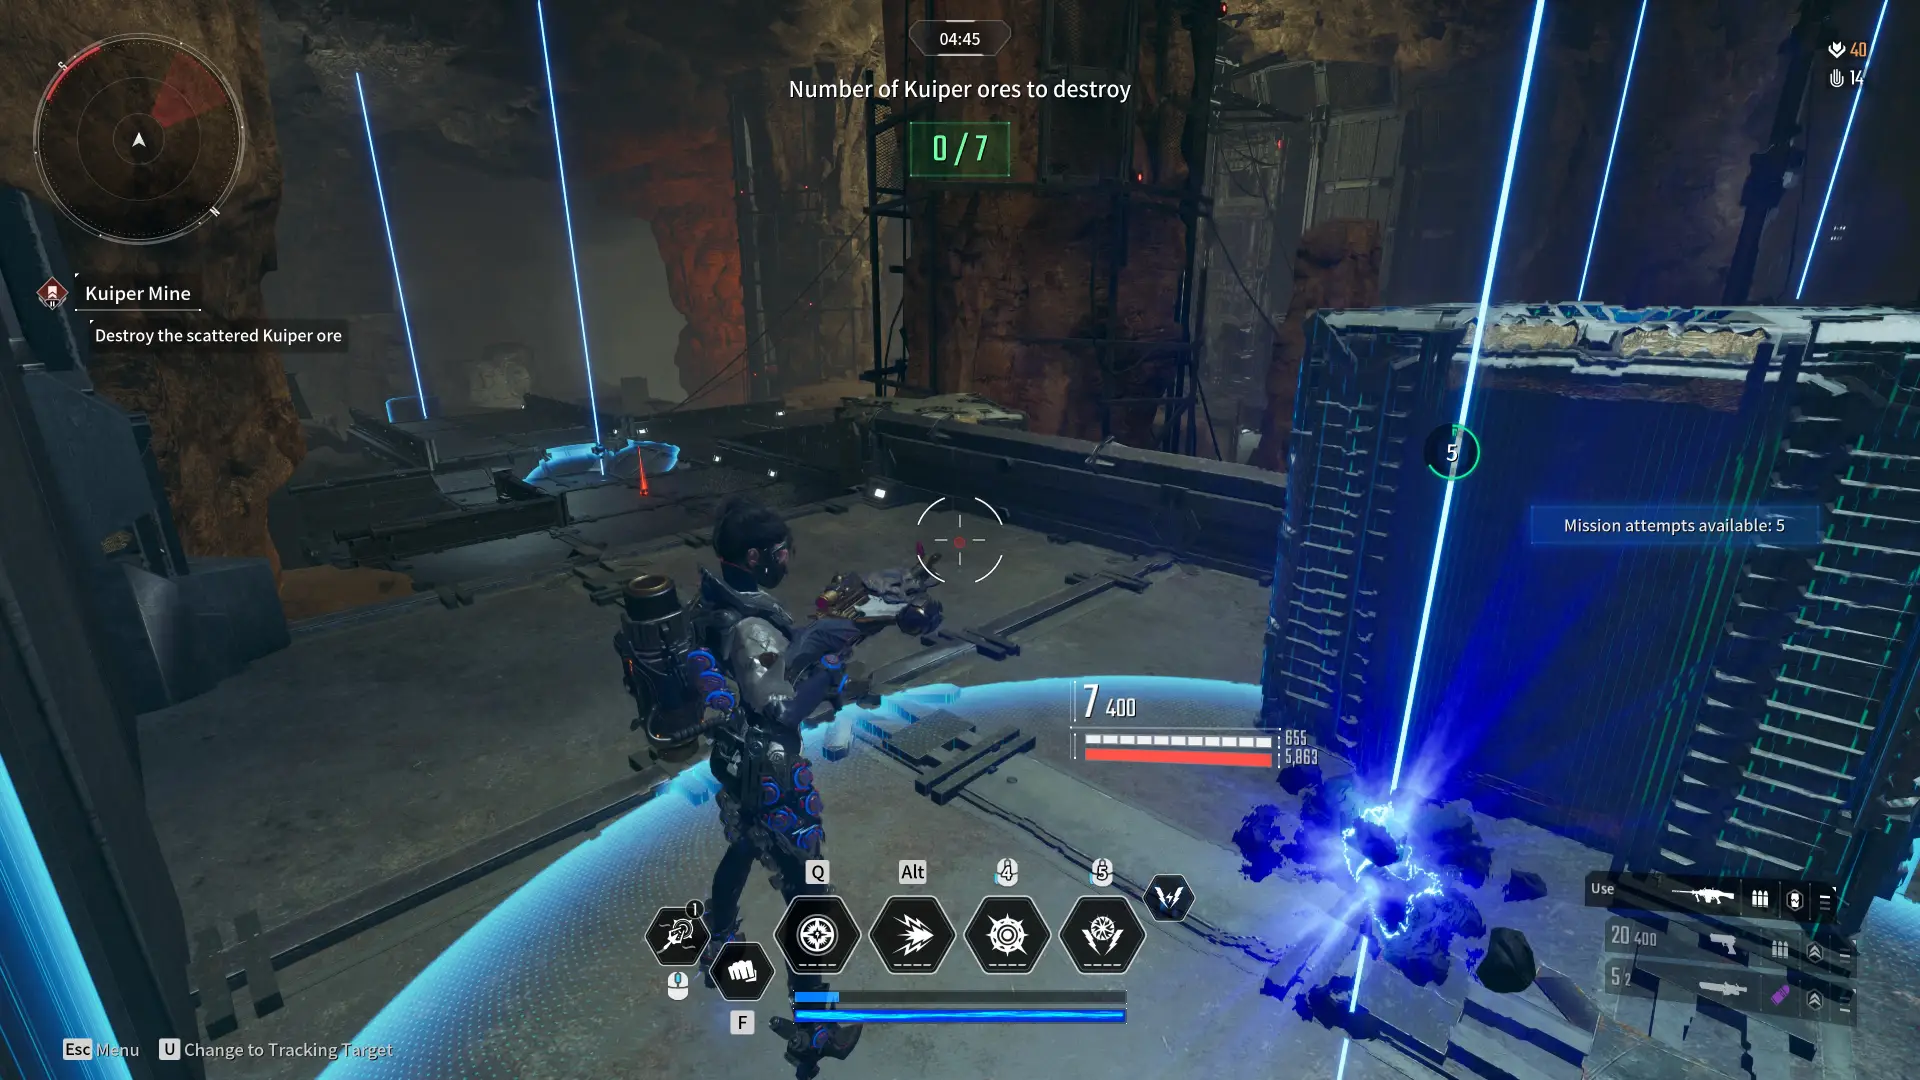
You can farm a good amount of Kuiper Shards in the Kuiper Mine. However, there is no reason to do this mission if the spot one and two are more superior. Therefore, I only recommend using the Kuiper Mine if you need a specific weapon or module. Otherwise, I would always select spot one or two.
How to: In the Kuiper Mine, you run around in circles, defeating the monsters that spawn. You don’t want to complete the object, so the monsters keep spawning. After five minutes you have to restart the mission as the timer runs out.
- 5-Minute Mission Timer
- 2000-2500 Kuiper Shards per run
- Lots of Modules that you can dismantle for Kuiper Shards
- A lot of Weapons
- A lot of Reactors
With any Bunny Build you will get the best results because you can simply run inside the inner circle. The faster you defeat the monsters, the faster new ones will respawn for more rewards.
Here is a quick video on how the Kuiper Mine in THe First Descendant is best farmed.
All three Kuiper Shard farming spots can be done with any The First Descendant Build but like mentioned above, it is recommended to bring as much area of effect damage as possible. The faster you wipe out waves of monsters, the sooner they will respawn. You can also take a look at our The First Descendant Tier List if you need further help on what character to select.
Thanks for reading our Top 3 Kuiper Shard Farm Spots in The First Descendant and happy hunting!