Welcome to our BG3 Mighty Brawler Build Guide. This is a multiclass build combining the Monk and Rogue classes.
The Mighty Brawler combines the Open Hand Monk’s various flurry Bonus Actions with the Thief’s extra Bonus Action, significantly increasing your damage potential. We’re also using Tavern Brawler and some very powerful gloves to make your punches hit like a truck.
This build is up to date with the latest version of BG3 (Patch 8). Visit our BG3 Builds Database page for more builds. You can find out how this build measures up to other Multiclass Builds on our BG3 Multiclass Builds Tier List.
Table of Contents:
- Mighty Brawler Build Overview
- Character Creation – Level 1
- Mighty Brawler Levelling Guide (2-12)
- Mighty Brawler Best Equipment
- Mighty Brawler Extra Info
- Mighty Brawler Build FAQ
BG3 Mighty Brawler Build Strengths & Weaknesses:
MIGHTY BRAWLER PROS
MIGHTY BRAWLER CONS
Mighty Brawler Multiclass Build Overview
This means that we have to be sure that the payoff of adding new classes to your build is worth it, because every level of a secondary class reduces the highest level we can reach with our primary class.
In this Mighty Brawler Multiclass Build, we’ll be combining the following classes:
Here is a quick overview of which class we pick when, this is important!
Mighty Brawler Character Creation (Level 1)

In this section, we will guide you through the best starting choices for creating your BG3 Mighty Brawler Multiclass Build.
Starting Class (Monk)
We’ll start by choosing the Monk class. The Rogue features of the build will be added later.
The Monk starts the game with the following features, which we’ll build on over the course of this guide:
Best Race
While this build will work fine with any race in the game, there are a few choices that stand out above the rest and can be chosen if you want to optimise the build as much as possible. Here are the five best race choices for the Mighty Brawler Build:
| Race | Strengths | Info |
|---|---|---|
Wood Elf |
|
Wood Elves are a great choice for most build types in BG3, thanks to their superior movement speed. Natural Proficiency in Perception is always useful, and immunity to magical Sleep will help you out a lot, especially in the early game, where enemy mages love to spam this spell. |
Githyanki |
|
Githyanki have excellent mobility thanks to Enhance Leap and Misty Step, allowing you to relentlessly pursue ranged enemies. |
|
Human |
|
The Human race is useful because you get an extra Skill pick and additional Carrying Capacity. |
Duergar |
|
With their wide choice of armour and weapon proficiencies, and resistances to poison, charm, and paralysis, Duergar are one of the strongest races in BG3.
The only downside of Duergar is their small stature, which reduces their base Movement Speed to 7.5 metres per turn (most races get 9 metres). |
|
Dragonborn, Any |
|
Dragonborns get access to a special Breath attack they can use once per Short Rest, which deals elemental damage in a directional AoE. They also get 50% Resistance to the same element. The damage element in question depends on which Dragonborn variant you choose.
The Fire and Poison variants are slightly better because many enemies attack with these damage types, making resistance to them more valuable. But don’t let this stop you from using whichever type of Dragonborn you like the most. The Dragonborn’s breath attacks work well with the Monk’s melee playstyle. |
Wood Elf
![]()
Wood Elves are a great choice for most build types in BG3, thanks to their superior movement speed. Natural Proficiency in Perception is always useful, and immunity to magical Sleep will help you out a lot, especially in the early game, where enemy mages love to spam this spell.
- Proficiency in
 Stealth and Perception
 - Extra Weapon Proficiencies:
- Shortswords
- Longswords
- Shortbows
- Longbows
- Fey Ancestry
 Advantage against Charmed
- Immune to Magical Sleep
- Darkvision
- Fleet of Foot – 1.5 metres of extra Movement Speed
Githyanki
![]()
Githyanki have excellent mobility thanks to Enhance Leap and Misty Step, allowing you to relentlessly pursue ranged enemies.
- Can wear Light Armour & Medium Armour
- Extra Weapon Proficiencies:
- Shortswords
- Longswords
- Greatswords
- Astral Knowledge
- Gain Proficiency with all Skills belonging to a selected ability, once per Long Rest.
- Githyanki Psionics
- Mage Hand (Level 1)
- Enhance Leap (Level 3)
- Misty Step (Level 5)
Human
![]()
The Human race is useful because you get an extra Skill pick and additional Carrying Capacity.
- Can wear Light Armour and Shields
- Extra Weapon Proficiencies:
- Spears
- Pikes
- Halberds
- Glaives
- Human Versatility
- One unrestricted Skill choice
- Increases Carrying Capacity by 25%
Duergar
![]()
With their wide choice of armour and weapon proficiencies, and resistances to poison, charm, and paralysis, Duergar are one of the strongest races in BG3.
The only downside of Duergar is their small stature, which reduces their base Movement Speed to 7.5 metres per turn (most races get 9 metres).
- Can wear Medium Armour
- Can wield axes and hammers
- Dwarven Resilience
- Advantage against Poisoned
- Resistance to Poison Damage
- Superior Darkvision
- Duergar Resilience
- Advantage on Saving Throws against illusions
- Advantage against Charmed and Paralysed
- Duergar Magic
- Enlarge (Level 3)
- Invisibility (Level 5)
Dragonborn, Any
![]()
Dragonborns get access to a special Breath attack they can use once per Short Rest, which deals elemental damage in a directional AoE. They also get 50% Resistance to the same element. The damage element in question depends on which Dragonborn variant you choose.
The Fire and Poison variants are slightly better because many enemies attack with these damage types, making resistance to them more valuable. But don’t let this stop you from using whichever type of Dragonborn you like the most.
The Dragonborn’s breath attacks work well with the Monk’s melee playstyle.
- Draconic Ancestry – Depending on which Dragonborn variant you choose, you’ll gain:
- Resistance to an elemental damage type
- A special AoE elemental breath attack
If you don’t know what we mean by terms like Advantage, Proficiency or Saving Throw, or want to find out how systems like Stealth work, you will find our BG3 Hidden Mechanics Guide very useful.
Background & Skills
For your Mighty Brawler Multiclass Background, we recommend choosing Outlander.
The Outlander background gives us the following Skill Proficiencies:
You can manually choose two other Skills in addition to those granted by your Background. The best options are ![]() Stealth and
Stealth and ![]() Insight, because these are the only good fits for our Ability distribution (see below).
Insight, because these are the only good fits for our Ability distribution (see below).
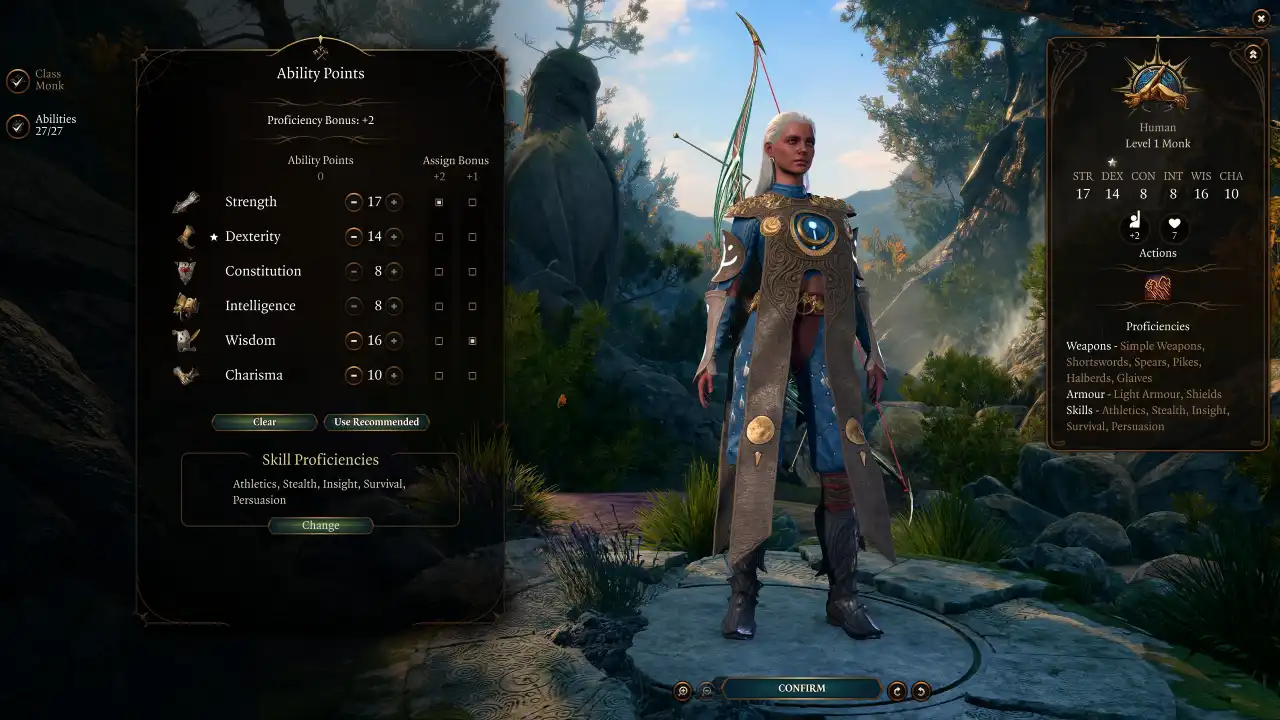
Ability Points

We need to focus on several Ability scores for this Monk and Rogue Multiclass Build.
We’ll be using Strength for our attack rolls, so that is the most important ability. But we also need points in Constitution to ensure you have enough HP. In addition, the Monk uses both Dexterity and Wisdom to increase its base Armour Class (as long as you don’t wear Armour), so we’ll be investing in both of these.
Much later in the build’s progression, we’ll do a respec (if you get the Amulet of Greater Health in Act III), but for now we recommend this Ability distribution:
![]() Strength – 17 Points
Strength – 17 Points
- Improves the damage and accuracy of your attacks.
- Also boosts carry weight, push and throw strength and jump range.
![]() Dexterity – 14 Points
Dexterity – 14 Points
- Boosts Armour Class (AC) and Initiative.
- Helps you act sooner in combat.
![]() Constitution – 14 Points
Constitution – 14 Points
- Increases Max HP.
- Also used for some Saving Throws against debuffs, especially those involving poisons or disease.
![]() Intelligence – 8 Points
Intelligence – 8 Points
- Not relevant for our build.
![]() Wisdom – 12 Points
Wisdom – 12 Points
- Boosts the Monk’s base Armour Class.
- Used in some Saving Throws.
![]() Charisma – 10 Points
Charisma – 10 Points
- Low priority for our build.
- Putting 10 points here ensures you won’t get a penalty when attempting to persuade NPCs. But ideally, a different character in your party should do the talking.
| Ability | Points | Why it matters |
|---|---|---|
| 17 | Improves the damage and accuracy of your attacks, as well as carry weight, pushing, throwing, and jumping. | |
| 14 | Gives you a higher Armour Class and improves initiative. | |
| 14 | Increases HP and helps with some Saving Throws. | |
| 8 | Not relevant for our build. | |
| 12 | Boosts Armour Class. Helps with some Saving Throws. | |
| 10 | Low priority. Switch to a different character for dialogue when possible. |
BG3 Mighty Brawler Multiclass Build Levelling Guide (2-12)
Now, we are going to look at how to level up your Mighty Brawler Build for Baldur’s Gate 3.
Early-Game Levelling (2-4)
In this section, we’ll cover the first four levels.
Level 2
We’ll be levelling up the Monk class for the first few levels; multiclassing will be added later on.
The Monk gains several new features at Level 2:
Level 3

We will add another Monk Level to the build here, granting access to a subclass. The Open Hand Monk is strongly recommended because it has a good synergy with the Thief subclass, which we’ll unlock later on.
Level 4
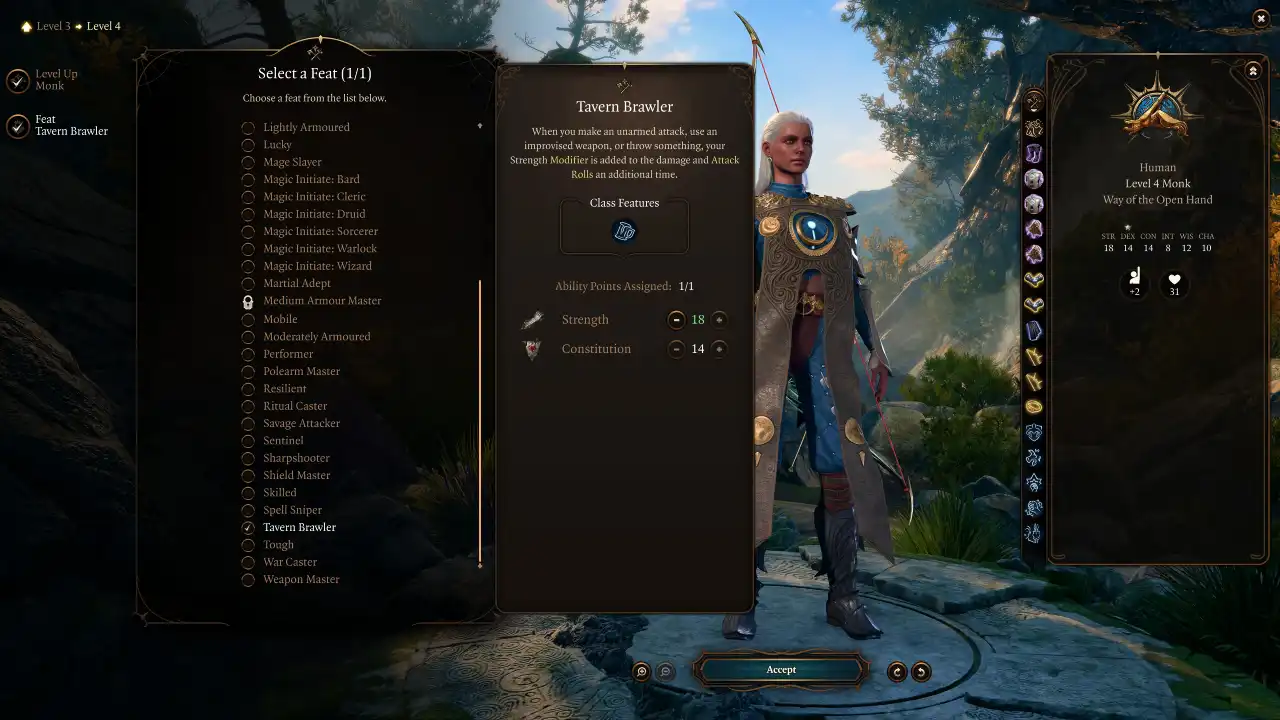
We will add another Monk level. You don’t gain many new features at this level, but you can unlock a Feat which will be vital for our build.
Mid-Game Levelling (5-8)
In this section, we’ll cover the mid-game. During these levels, the Mighty Brawler Build will become much more powerful, unlocking features that will allow you to make several more attacks every turn.
Level 5
We’ll add another Monk level. This one is very important because it gives you an additional attack on every turn.
Level 6
We will add one more Monk level before we switch to the Rogue for a while. You get quite a lot of new features at this level.
Remember to toggle on the appropriate Manifestation for your situation. Right-click on enemies and examine them to see which damage types they are resistant to or vulnerable to.
Wholeness of Body is a very powerful action. It can either be used to keep your character going if you’ve exhausted all of your Ki, or to sustain an intense burst of activity against a powerful foe, since you’ll be able to use an additional Flurry of Blows on the next three turns.
Level 7

It’s finally time to add the first Rogue level to the build. Check the image above if you don’t know how to add a new class.
Level 8
We’ll add a second Rogue level to the Mighty Brawler. This gives you some new Bonus Actions which are very similar to the Step of the Wind actions we unlocked earlier, except they don’t require a Ki Point.
Late-Game Levelling (9-12)
We will now complete the Mighty Brawler Build by adding the Thief subclass and then levelling up the Monk some more.
Level 9

We will add a third Rogue level here. Make sure you pick the Thief subclass – it is vital to get the extra Bonus Action.
Level 10

We will now return to the Monk class and level it up a few more times.
Level 11

We’ll add the eighth Monk level, gaining a second Feat to further boost your Monk and Rogue Multiclass Build.
Level 12
This is the maximum level for the Mighty Brawler Multiclass Build. We will add one last Monk level.
Endgame Respec
When you have collected the ![]() Amulet of Greater Health (see the Equipment section below for details), you should respec and reallocate all of your Constitution points to Wisdom. This will grant you a higher Armour Class.
Amulet of Greater Health (see the Equipment section below for details), you should respec and reallocate all of your Constitution points to Wisdom. This will grant you a higher Armour Class.
After the respec, your base Ability Scores should be STR 17, DEX 14, CON 8, INT 8, WIS 16, CHA 10. Then level up again with the same Feat and subclass selections mentioned above.
BG3 Mighty Brawler Build Equipment
Now, let us take a look at some of the equipment choices you can make for your BG3 Mighty Brawler Build.
Don’t worry if you miss out on some of the items. Just enjoy your playthrough and try to view this as a wishlist rather than a precise blueprint.
Some of the items are quite expensive – you may be interested in our BG3 Infinite Gold Guide to help you afford them all.
Early Game Equipment
This is the early-game gear setup that you can use for your Mighty Brawler Build. You don’t need to get all the items, but the build will perform better if you find most or all of them. You can find these items in Act 1 or early Act 2. Essential items are written in Bold Italic.
| Slot | Icon | Item | Effects | Location |
|---|---|---|---|---|
| Head |  |
Haste Helm |
|
Can be found inside a Wooden chest, next to a cart, near the Blighted Village Waypoint. |
| Cloak |  |
Cloak of Protection |
|
Purchased from Quartermaster Talli in Last Light Inn |
| Chest |  |
The Graceful Cloth |
|
Buy from Lady Esther on the Rosymorn Monastery Trail |
| Gloves |  |
Bracers of Defence |
|
In the hidden Necromancer’s Lair in a gilded chest, beneath the Blighted Village |
| Gloves (Risky) | The Sparkle Hands |
|
In a wooden chest near the giant tree stump in Decrepit Sanctuary, Sunlit Wetlands. | |
| Boots |  |
Disintegrating Night Walkers |
|
Loot from True Soul Nere in Underdark: Grimforge |
| Necklace | Sentient Amulet |
|
Near the lava elemental in Underdark: Grymforge | |
| Ring 1 |  |
Ring of Protection |
|
Steal the Sacred Idol in Druid Grove (quest) |
| Ring 2 |  |
Crusher’s Ring |
|
Loot from Novice Crusher in the Goblin Camp. |
| Main Weapon | Unarmed |
|
N/A | |
| Second Weapon |  |
Darkfire Shortbow |
|
From Dammon at Last Light Inn, Act II |
Endgame Equipment
The endgame gear for the Mighty Brawler Build can be obtained either in late Act 2 or Act 3 of Baldur’s Gate 3. If you manage to complete all the items below, you will be an unstoppable force of power. Essential items are written in Bold Italic.
| Slot | Icon | Item | Effects | Location |
|---|---|---|---|---|
| Head | Horns of the Berserker |
|
Buy from Danthelion’s Dancing Axe in Act III. | |
| Cloak | Cloak of Displacement |
|
Buy from Danthelion’s Dancing Axe in Act III. | |
| Chest |  |
Vest of Soul Rejuvenation |
|
Sold by either Rolan or Lorroakan’s Projection in Sorcerous Sundries. If Lorroakan is dead, pickpocket from Rolan in Ramazith’s Tower |
| Gloves |  |
Gloves of Soul Catching |
|
Reward for completing the quest Save Hope in the House of Hope |
| Boots |  |
Boots of Uninhibited Kushigo |
|
Dropped by Prelate Lir’i’c in the Astral Plane, in the transition sequence between Act II and Act III. |
| Necklace |  |
Amulet of Greater Health |
|
Steal from the left-most pedestal in the Archive in House of Hope |
| Ring 1 | |
Ring of Protection |
|
Steal the Sacred Idol in Druid Grove (quest) |
| Ring 2 | Shadow-Cloaked Ring |
|
Dropped by the Shadow Mastiff Alpha on the Ruined Battlefield. | |
| Main Weapon | Unarmed |
|
N/A | |
| Ranged Weapon |  |
The Dead Shot |
|
Sold by Fytz in Stormshore Armoury |
Here is a summary of how these items work together to boost this Mighty Brawler Build for Baldur’s Gate 3:
Mighty Brawler Build Extra Info
Here is some extra information that will help you to get the most out of this Mighty Brawler Build in Baldur’s Gate 3.
How to Play this Mighty Brawler Build
The Mighty Brawler Build plays the same as a standard Open Hand Monk, except you have an extra Bonus Action, allowing you to use your Flurries more often.
Use up your main attacks, then use your Bonus Actions to activate the flurry attacks. These also cost Ki Points, to keep looking out for ways to restore them besides resting. We’ve included a couple in the build’s equipment, such as the Sentient Amulet.
While the build is focused on your Bonus Actions, remember to boost your standard attacks, too. Get the Haste buff (either with the spell or a Potion of Speed) when you’re about to have a tough fight.
You can also drink the Elixir of Bloodlust to gain an extra Action after you kill an enemy, or the Elixir of Hill Giant Strength to give you a strength boost, making your attacks more accurate and deadly.
In Act III, you can obtain the Elixir of Cloud Giant Strength to increase your Strength to a whopping 27, but these are very rare, so it’s best saved for the hardest fights in the game.
Mirror of Loss
If you successfully acquire a buff from the Mirror of Loss during your playthrough, you should put the extra points into Strength. This will improve your melee damage and accuracy.
If you don’t know what the Mirror of Loss is or how to use it, you may be interested in our Mirror of Loss Guide. The Mirror can give up to three additional Ability Points to all members of your party, making it very strong.
Mighty Brawler Build Illithid Powers (optional)

Illithid Powers are unlocked later in BG3 when you learn more about Mind Flayers and Tadpoles. By eating Jars of Mind Flayer Parasites you gain one point. This is another optional skill tree that you can get access to if you want. Here are some of the best Illithid Powers for the BG3 Mighty Brawler Build:
Mighty Brawler Build FAQs
Here are some frequently asked questions related to the BG3 Mighty Brawler Multiclass Build. Most of these questions have already been answered in the guide itself.
- What’s the best race for the Mighty Brawler Build?
- What roles can the Mighty Brawler fill in my party?
- What abilities are most important for the Mighty Brawler?
- Which subclasses should I use?
FAQ: What’s the best race for the Mighty Brawler Build?
While any race will work just fine for this build, the best options are:
- Wood Elf – Very high mobility, resistance to effects like magical sleep and Charm, innate Darkvision. The extra Movement Speed is an underrated bonus that allows you to outrun foes.
- Duergar – Gives you innate Superior Darkvision. Allows you to wear Medium Armour. Gives you Resistance to Poison Damage and Advantage against the Poisoned, Charmed and Paralysed effects. This wide range of bonuses makes the Duergar very tough.
- Githyanki – Grants you the Enhance Leap and Misty Step spells, helping you to outmanoeuvre foes.
For more info about the best races, see the Best Race section above.
FAQ: What roles can the Mighty Brawler fill in my party?
The Mighty Brawler is a melee heavy hitter. Get them stuck into the thick of the fighting, and they’ll deal lots of damage. Just keep an eye on their healthbar and what’s going on around them – in the toughest fights, they may need a bit of timely intervention from a Cleric to keep them in good shape.
This build is not great at group support, but it can knock enemies Prone which will help any other melee damage dealers in your party.
FAQ: What Abilities are most important for the Mighty Brawler?
- Strength is the most important ability for your Mighty Brawler build. It determines the accuracy and damage of your weapon attacks and throws. It also allows you to throw heavier objects.
- Dexterity is also very important. It boosts your Armour Class and Initiative, allowing you to move earlier in the turn.
- Constitution should always be at least 14 for any build in Baldur’s Gate 3, and this one is no different. This gives you a necessary baseline of HP and helps you to resist a wide range of hostile effects with Constitution Saving Throws.
- Wisdom is important for this build too, because Monks use both Dexterity and Wisdom to increase their Armour Class. Since it’s not really feasible to prioritise four abilities at once, we have a bit less Wisdom at the start, then respec to add more once you have the Amulet of Greater Health to push your Constitution up to a guaranteed score of 23.
FAQ: Which subclasses should I use?
- For the Monk, you should use the Way of the Open Hand subclass. This comes with several special Flurry attacks that can be used with your Bonus Action – a vital component of this build.
- For the Rogue, you need the Thief subclass. This provides you with an extra Bonus Action, which synergises with the aforementioned flurry attacks.