Welcome to The First Descendant Bunny Build Guide for Season 3 Episode 3.
In this guide, I’ll show you how to unleash the full potential of Bunny, the fastest Descendant known to mankind. From mastering her perfect speedy setup to selecting the perfect weapons, stats, and modules, this guide covers everything you need to create a powerhouse of a Bunny Build.
Table of Contents:
- How to play Bunny: A Deep Dive
- Bunny Builds Overview
- Bunny Trigger Module
- Bunny Ancestor Module
- Arche Tuning for Bunny
- Bunny Equipment Overview
- Bunny Basics
- Bunny’s Story
For builds on other Descendants, visit our The First Descendant Builds Database, or check out the Character Tier List or the Weapon Tier List.
TFD Wiki: We have expanded Alcasthq with tfd.gameslantern.com, a Wiki & Database for anything related to The First Descendant. Use the Character Editor or the Weapon Editor to theorycraft and create builds yourself. Browse Descendants, Weapons, Leaderboard Loadouts or use the Compare Tool. There are plenty of other features you can check out, too!
Here is a quick list of the strengths and weaknesses of the Bunny Build for The First Descendant.
Bunny’s Strengths
Bunny Weaknesses
How to Play Bunny in the First Descendant

In this section, we are going to take a look at how Bunny works in The First Descendant. Bunny specializes in dealing electric lightning damage to enemies, particularly in an AOE. Bunny can get very high DPS output by hitting many enemies with lightning at once. She likes to run fast! Learn about her skills in detail in the Bunny’s Skill Explanation section. Bunny’s Transcendent Modules are also exceptional!
What Weapon You Use Matters (Kinda). Because Bunny only deals damage with her skills, it doesn’t matter what weapon you use, kind of. You still want a weapon that gives you certain things, like increased Sprint Speed and Grapple Hook recharge through weapon cores. Some weapons also provide more movement speed than others! More about this in the Best Weapons for Bunny section.
Bunny’s AoE Capabilities: Electric Chain Reaction!
Bunny’s combo of Speed of Light (2nd skill) and Lightning Emission (3rd skill) synergizes well together. Speed of Light allows you to run at a much faster speed compared to any other Descendant and Lightning Emissions deals AoE damage around you. With the correct mods shown in the build below, your AoE radius will become huge, hitting every enemy in a room at once.
- Check out the Bunny Mobbing Build for maximizing damage and range against enemies in dungeons, Sigma Sector, Void Erosion Purge and more! Basically anything where you want maximum AoE damage.
Bunny’s Single Target Damage: Weapons Matter!
For Single-Target with Bunny, we want to focus on her fourth skill Maximum Power. This allows us to beam pretty much any Colossus to death. However, our movement is reduced while we are beaming.
- The Bunny Bossing Build offers solid survivability, sustain and good great damage with a focus on her fourth skill.
Bunny’s Equipment: Make Or Break It!
To unlock Bunny’s full potential, you need the right Weapons, Reactors, and External Components:
- Weapons: Because Bunny only deals damage with her skills, it doesn’t matter what weapon you use, kind of. You still want a weapon that gives you certain things, like increased Sprint Speed and Grapple Hook recharge through weapon cores. Some weapons also provide more movement speed than others! More about this in the Best Weapons for Bunny section.
- Reactors: Selecting the right reactor can drastically boost your damage. Check out the Best Reactors for Bunny section.
- External Components: These are critical for survivability. Properly configured, they double or tripple your HP or DEF. Learn more in the Best External Components for Bunny section.
Building a top-tier The First Descendant Bunny Build requires not only the right modules but also optimized weapons, reactors, and components.
Best Bunny Builds Overview for The First Descendant


 Crystallization Catalysts: To unlock the necessary socket slots.
- Energy Activator: To increase overall module capacity.
- Gold & Kuiper: Best Gold Farming Method – Best Kuiper Shard Farming Method.
Equipment: I will cover Weapons, Reactors, External Components, Inversion Reinforcements, and Transcendent Modules in the Bunny Equipment section. To maximize the power of any build, you must get the correct items!
| Name | Description |
|---|---|
| Bunny Mobbing Build Non-Crit | Best for 400% Infiltrations – Easy to play |
| Bunny Bossing Build | Used against Colossus fights & Wall Crasher |
| N/A | N/A |
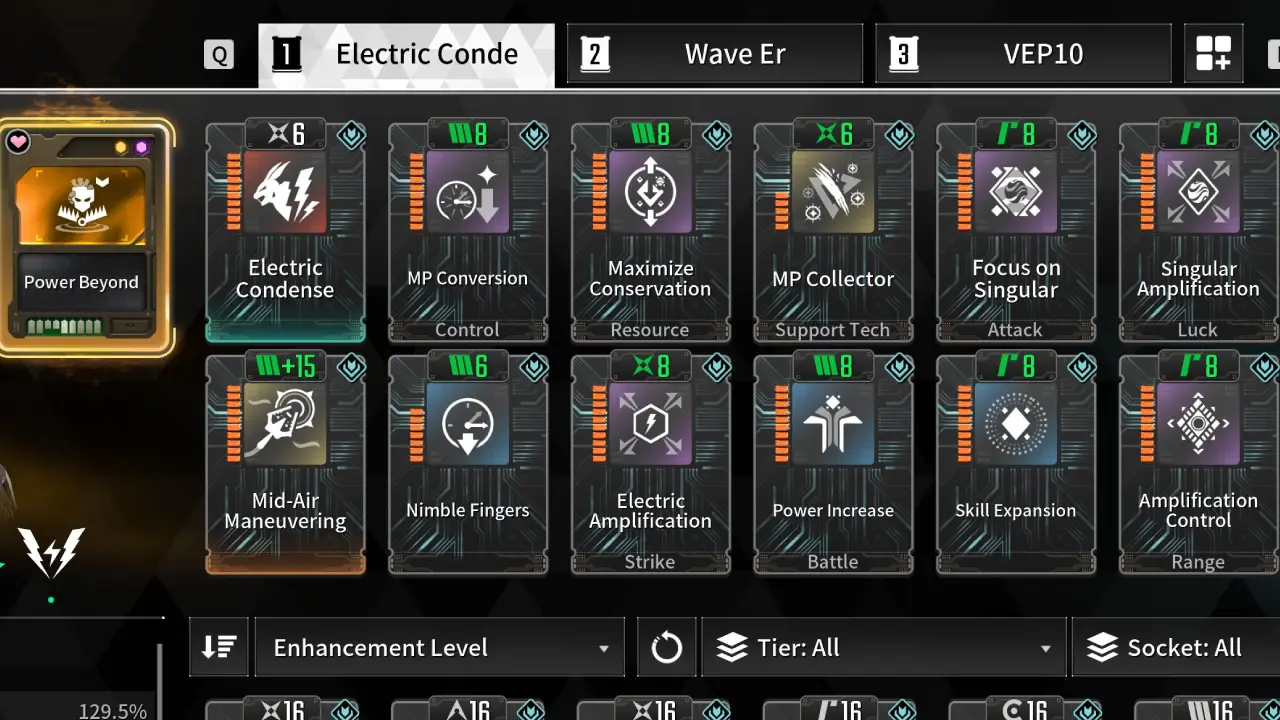
Bunny Mobbing Build – Non-Crit
- Dungeon Build Type: Any content that requires AoE damage.
- Dungeon Build Focus: High survivability, great range, damage and sustain.
- Playable on: Normal Bunny and Ultimate Bunny.
This build uses the Bunny-exclusive Electric Condense Transcendent Module that changes Maximum Power (4th Skill) into Electric Condense. This deals AoE damage around Bunny and also increases her running speed. After that, we amp up our damage and range as much as possible for maximum damage against tough monsters with the remaining modules.
Speeding around with your 3rd skill will kill off most targets. Yellow monsters that usually have higher HP can be dealt with Electric Condense 4th skill.
- Ancestor Module: Fusion/Electric Skill Power Boost, Skill Cooldown (replace Nimble Fingers), Skill Effect Range (Replace Amplification Control).
- More details in the Ancestor Module section of the build.
| Module Slot | Module Name |
|---|---|
| 0 (Trigger Module) | Power Beyond |
| 1 (Skill Module) | Electric Condense |
| 2 | MP Conversion |
| 3 | Maximize Conservation |
| 4 | MP Collector |
| 5 | Focus on Singular |
| 6 | Singular Amplification |
| 7 (Sub Module) | Mid-Air Maneuvering |
| 8 | Nimble Fingers |
| 9 | Electric Amplification |
| 10 | Focus on Electric |
| 11 | Skill Expansion |
| 12 | Amplification Control |
You can also check out Crit-based Bunny Mobbing Builds here.
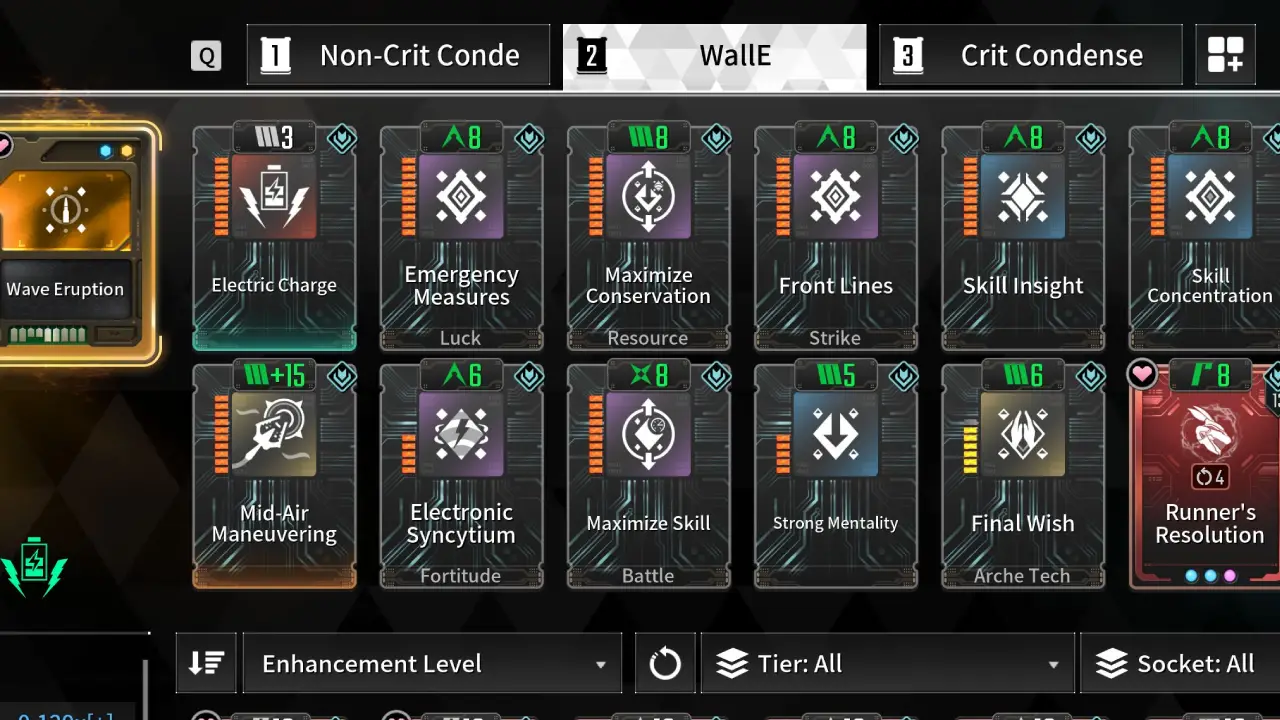
Bunny Bossing Build for The First Descendant
- Bossing Build Type: Colossus fights & Wall Crasher
- Bossing Build Focus: Maximum Damage
- Playable on: Normal Bunny and Ultimate Bunny.
This Bunny Bossing Build focuses on using your fourth skill, having unlimited time (almost). So all you have to do is use your 4th skill and bunny hop around the boss trying not to get hit by something.
Important: Only level up Final Wish Module to 6, not 7!
- Ancestor Module: Skill Critical Hit Rate, Skill Critical Hit Damage, Fusion/Electric Skill Power Boost Ratio
- More details in the Ancestor Module section of the build.
- No Ancestor Module? Slot Spear & Shield Module instead.
| Module Slot | Module Name |
|---|---|
| 0 (Trigger Module) | Wave Eruption |
| 1 (Skill Module) | Electric Charge |
| 2 | Emergency Measures |
| 3 | Maximize Conservation |
| 4 | Electric AmplificationFront Lines |
| 5 | Skill Insight |
| 6 | Skill Concentration |
| 7 (Sub Module) | Mid-Air Maneuvering |
| 8 | Electronic Synctium |
| 9 | Maximize Skill |
| 10 | Strong Mentality (Level 6, not 7) |
| 11 | Final Wish |
| 12 | Runner’s Resolution |
Bunny Trigger Module
Trigger Modules need to be unlocked first. Learn how to unlock Trigger Modules in The First Descendant. Trigger Modules go into a special slot. Unlock special buffs and unique effects.
- Mobbing: Power Beyond
- Bossing: Wave Eruption
Bunny Ancestor Module

Ancestor Modules can be slotted once you have acquired them. However, they are only worth it once you have an Ancestor module with good stat rolls on them.
- Bunny Ancestor Module: Runner’s Resolution
- Superconductive Cooling Units (Needed to Reroll perks): How to farm
- Must Read: How Ancestor Modules Scale & Examples
It is only worth slotting an Ancestor Module if you have good rolls on it; otherwise, it isn’t worth it.
Mobbing Build Non-Crit Setup
- Ideal Positive Rolls
- Fusion
- Skill Cooldown
- Skill Effect Range
- Electric
- Ideal Negative Rolls
- Max Shield
Mobbing Build Crit Setup
- Ideal Positive Rolls
- Skill Critical Hit Rate
- Skill Crit Damage
- Skill Cooldown
- Skill Effect Range
- Ideal Negative Rolls
- Max Shield
Bossing Build Crit Setup
- Ideal Positive Rolls
- Skill Critical Hit Rate
- Skill Crit Damage
- Fusion Skill Power Boost Ratio
- Electric Skill Power Boost Ratio
- Ideal Negative Rolls
- Max Shield
- Any non-harmful perk
Ancestor Module: What to Replace and Why
To slot an Ancestor Module effectively, identify existing modules that share the same primary stat. By replacing a standard module with an Ancestor version that offers similar values, you maintain your core build while gaining its additional unique perks as a ‘free’ bonus.
- How to: Replace a standard module with an Ancestor Module that mirrors its main perk.
- The values should be close; you preferably don’t want to replace a 100% with a 30% value.
- Example 1: If your Ancestor Module provides Skill Critical Hit Rate, replace Skill Insight.
- Example 2: If your Ancestor Module provides Max HP, replace Increased HP.
- Example 3: If your Ancestor Module provides Skill Effect Range, replace Skill Expansion.
- Result: All other perks from the Ancestor Module will basically be a “freebie” and improve your build!
- Helpful Links:
As long as the Ancestor Module reaches a similar value to the one you’re removing, every additional stat on that Ancestor Module becomes a “free” bonus for your build.
Arche Tuning for Bunny
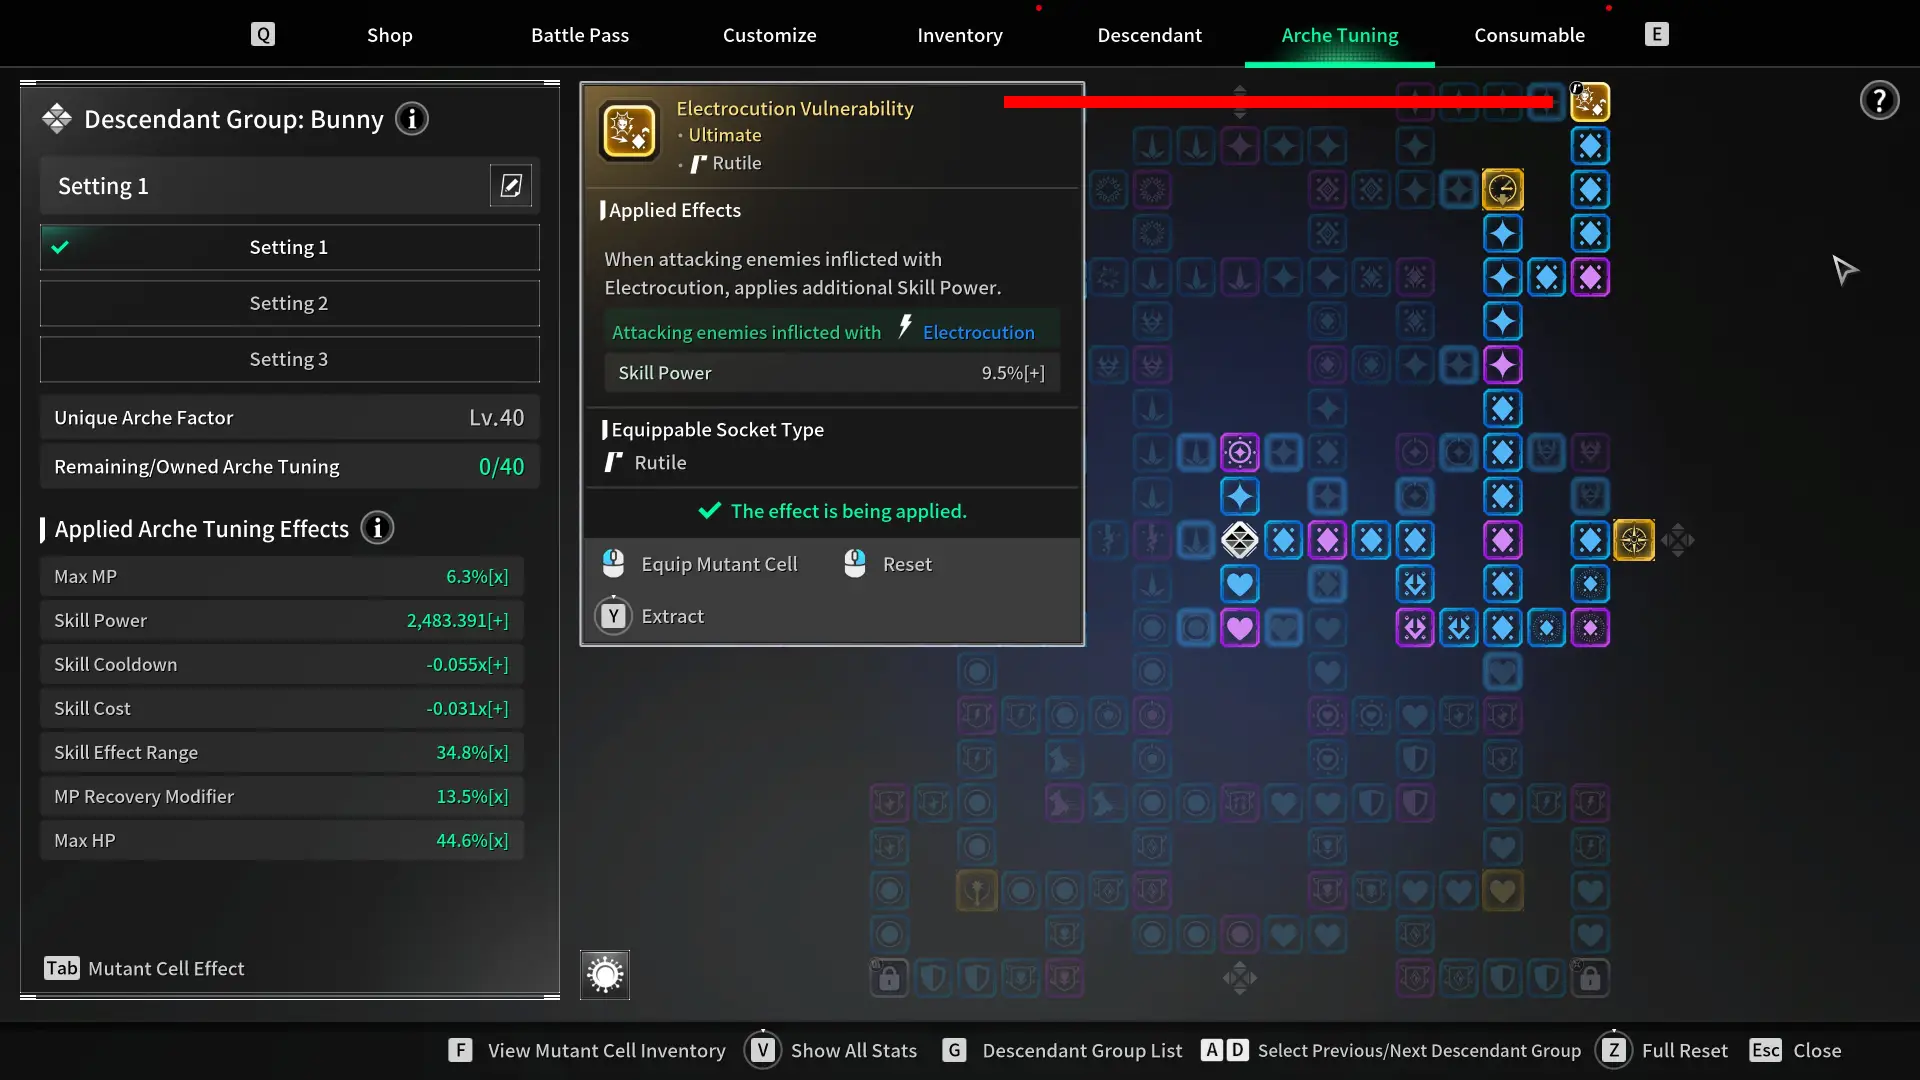
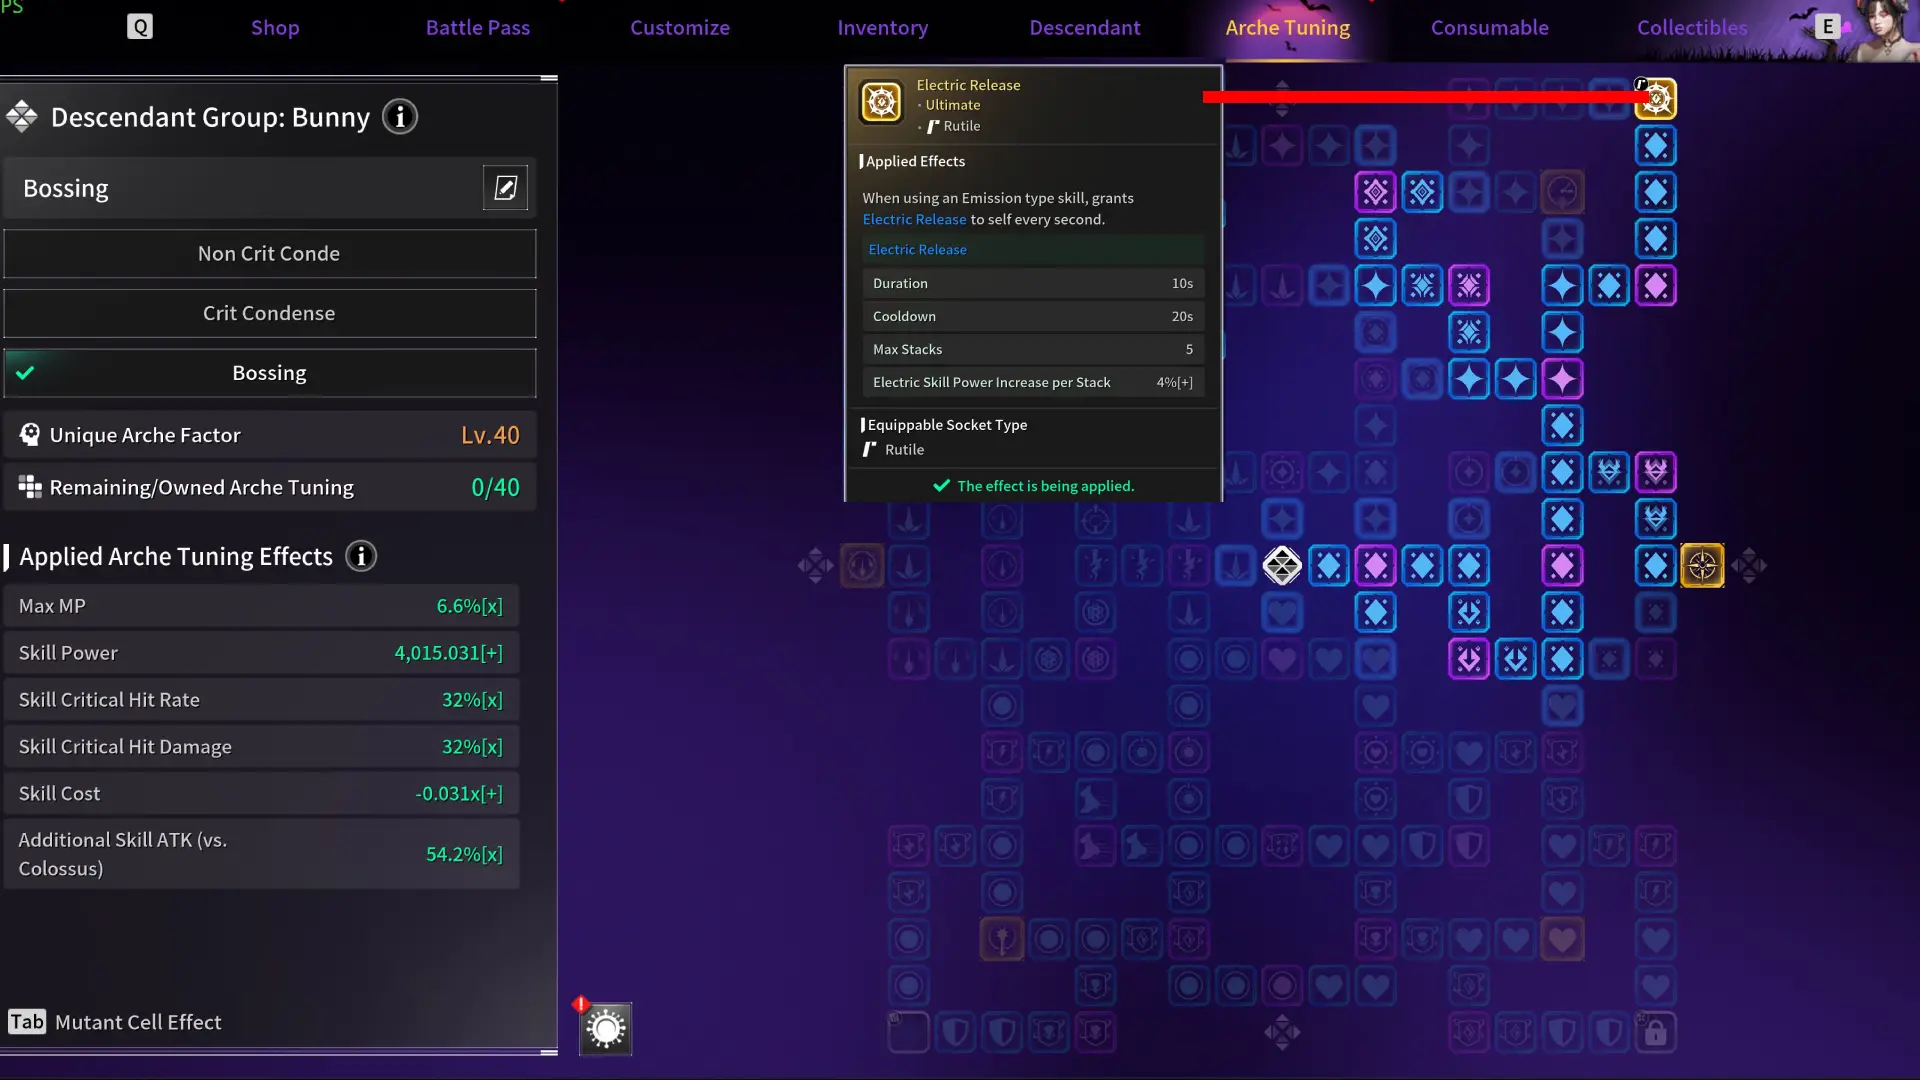
- Left Image: Mobbing Spec with Electrocution Vulnerability
- Right Image: Bossing Spec with Electric Release
The Arche Tuning System in The First Descendant is important for every Character; it buffs your stats by a good amount.
You level up Arche Tuning in the Sigma Sector Dropoff Operation. Mutant Cells also drop there with a small chance.
Bunny Equipment Overview in The First Descendant
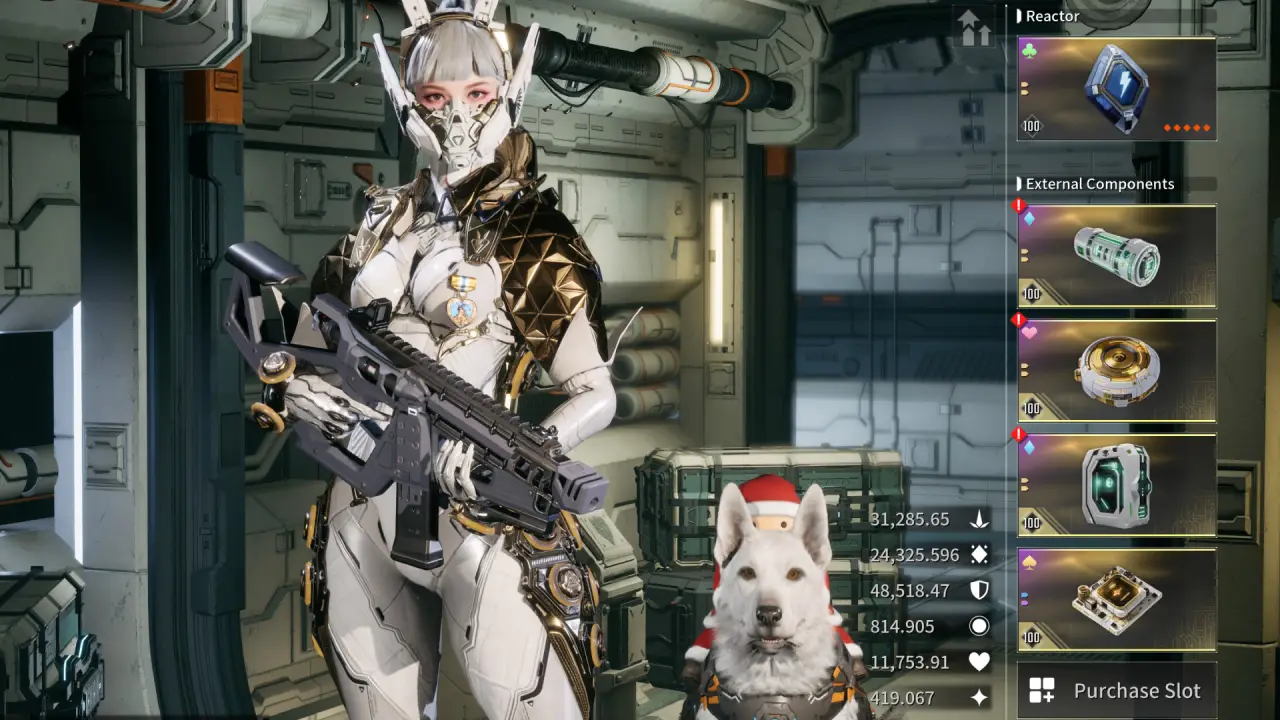
Equipment is the cornerstone of any successful The First Descendant Build. For Bunny, it is important to get the right equipment to get the necessary stats and damage. This section breaks down the essential equipment types: Weapons, Reactors, External Components, and Transcendent Modules, and explains how they maximize her power.
| Equipment Type | Importance | Key Benefits |
|---|---|---|
|
|
|
|
|
|
|
|
|
|
|
|
|
|
Best Weapon for the Bunny Builds in The First Descendant
Here you will find the Top 3 Weapons for Bunny in The First Descendant that I love to run among some alternative weapons that you can also test out if you want.
Important: You want to pick a weapon with a high movement speed stat and ![]() (Precision Augmentation) to get 1x Sprint Speed and 1x Grapple Hook Recharge.
(Precision Augmentation) to get 1x Sprint Speed and 1x Grapple Hook Recharge.
Grapple Hook Recharge allows you to grapple around a room without ever touching the floor again!
| Weapon | Movement Speed | Key Features | Why It’s Great for Bunny |
|---|---|---|---|

|
630 | Highest Movement Speed in the game | Highest Movement Speed Weapon and and 2x |
| 600 |
|
|
|
| 520 |
|
|
|
| 600 |
|
|
You want the following Weapon Cores:
- Grapple Hook Recharge (Free Augmentation) (Optional)
- Grapple Hook Recharge (Precision Augmentation)
- Sprint Speed (Precision Augmentation)
Here is an example that I use on the Thunder Cage weapon.
Video showcase below is from “The Shelter” Infiltration Operation on 400% difficulty. I used the Thunder Cage with 1x Sprint Speed and 1x Grappling Hook Recharge. Remember, Bunny electricity ticks faster when you grapple because of your increased speed in the air!
Other Useful Weapons
| Weapon | Category | Key Features | Why It’s Great for Bunny |
|---|---|---|---|
| Rocket Launcher |
|
|
|
| Sword |
|
|
|
| N/A | N/A | N/A | N/A |
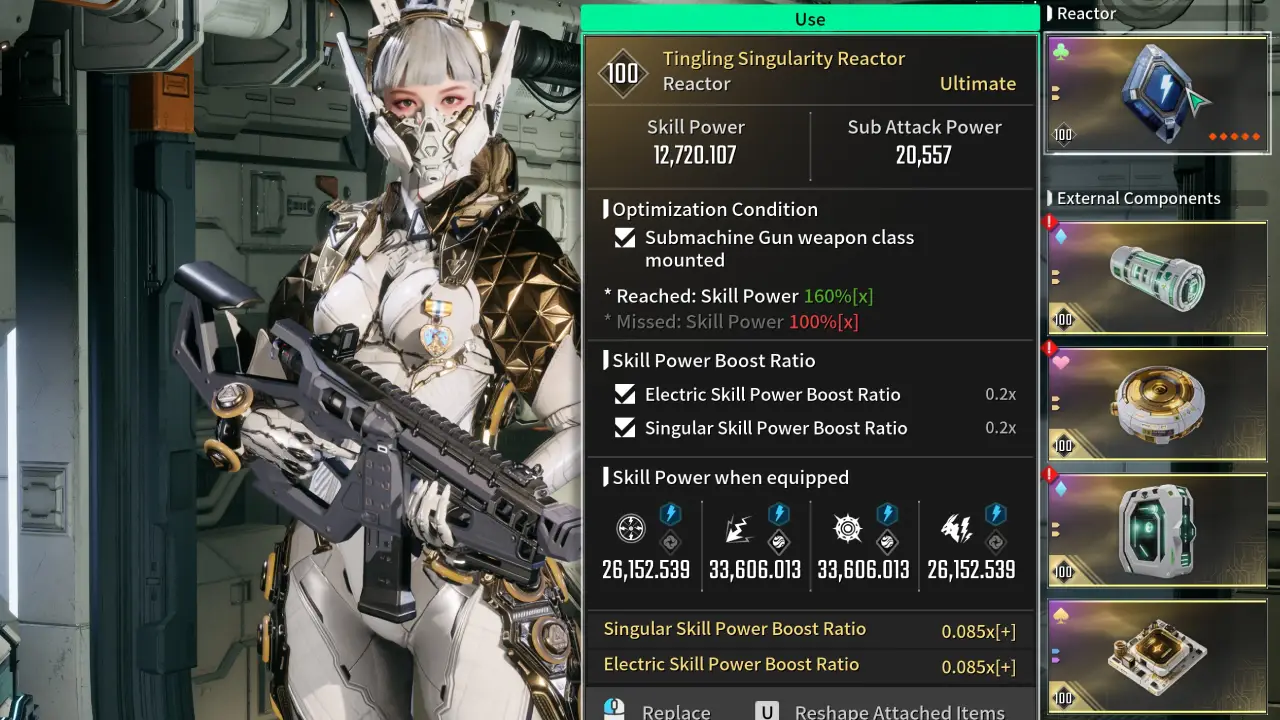
Best Reactor for Bunny in The First Descendant
Selecting the best reactor for Bunny in The First Descendant can significantly enhance her abilities, allowing you to maximize her effectiveness in various scenarios. Not only does the reactor determine your skill damage, but it also gives additional secondary benefits through modifiers. These are often hard to get and take time to grind out!
All of Bunny’s skills are Electric. Skill 1 & 4 are Fusion and Skill 2 & 3 are Singular. That means we will need two different reactors for when we use the Bunny Mobbing Build (Singular mostly) and Bunny Bossing Build (Fusion only)
Additionally, you want to make sure to get the correct mounting (Optimization Condition) to benefit from the 160% skill boost.
| Best Reactor | Specs | Key Benefits | Best Builds |
|---|---|---|---|
|
Overall best damage for AOE farming. | ||
|
Best damage against Colossus. |
Below is the reactor I use for the Bunny Mobbing Build.
How to find the Location of Reactors
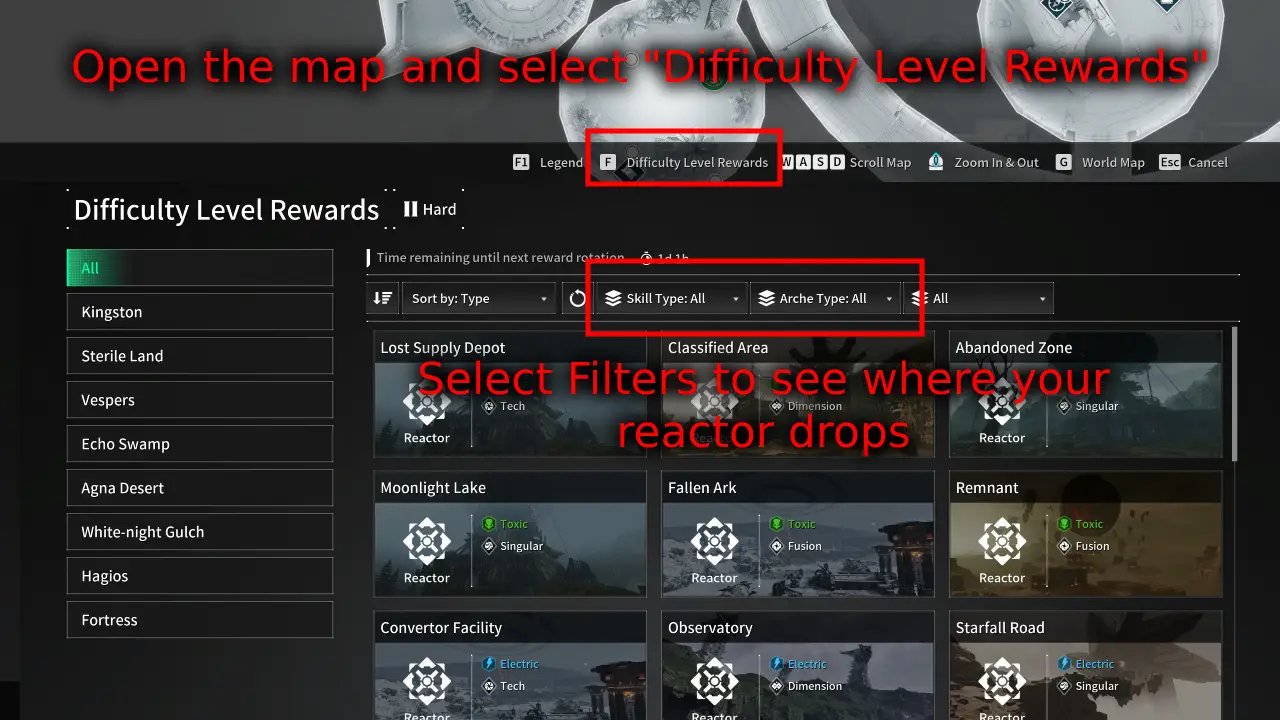
Reactor drop locations change every day. Not many players know this and get confused. Now, there is a reactor search function in-game. Go to the map and press on Difficulty Level Rewards. In here, you can see where all the reactors currently drop.
Note: It is possible that not all reactor types are currently dropping. You have to come back and recheck every day.
If your specified reactor drops in an area, you go there and farm any missions and monsters (Preferably missions with lots of monster spawns). There will be plenty of reactors dropping from monsters all over the place, any monster works. It will take a while to get a good reactor!
Best External Components for the Bunny Build
Here are the best External Components for Bunny.
External Component Cores: Always use Max HP & DEF.
Bunny Mobbing Build: 2x Plague, 2x Ascending Armory
-
 Plague Auxiliary Power: Max HP & MP Recovery Out of Combat
  Ascending Armory Sensor: Max MP & MP Recovery in Combat
- Plague Memory: MP Recovery Modifier & DEF
- Ascending Armory Processor: Max Shield & Shield Recovery Modifier
Bunny Bossing Build: 2x Enlightened Mage, 2x Ascending Armory
- Enlightened Mage Auxiliary Power: Max HP & MP Recovery Out of Combat
- Ascending Armory Sensor: Max MP & MP Recovery in Combat
- Enlightened Mage Memory: MP Recovery Modifier & DEF
- Ascending Armory Processor: Max Shield & Shield Recovery Modifier
Other choices you can consider:
- 4x Slayer for bossing if you want a full nuke setup, but will reduce skill duration by a lot.
- 4x Sprint Acceleration for Mobbing.
Inversion Reinforcements Setup for Bunny
You can find the Inversion Reinforcements in the inventory, located on the bottom left side. This changes with every new season and needs to be leveled up again. You level up Inversion Reinforcements by doing any activity. However, the fastest way to advance it is by completing Disrupt Invasion (max 4 daily) in the dungeon terminal with the red dungeons.
At max level, you have unlocked everything. While the last perk is always active in each row, you can only slot three additional perks at the bottom. Here is what you want to prioritize:
- Hunting:
- Spatial Dominance, if you aren’t at max range yet (Skill 3 Lightning Emission)
- Arche Circulation, if you are at max range already.
- Elemental: None.
- Recovery: Selective Neurostimulation.
- Survival: Deploy Hardened Shell.
- Season: None.
All Bunny Transcendent Modules Explained
First, we look at the full list of all Transcendent Modules for Bunny in The First Descendant. It is important to note that not all of the modules will be used. Some are more effective than others!
| Module Name | Module Description | Best In Slot |
|---|---|---|

|
Changes Maximum Power (4th Skill) into a form that causes damage around Bunny. | |

|
Decreases Electricity Charge amount during Speed of Light, but recovers Shield continuously in proportion to the distance traveled. |
|

|
Adds an effect that reduces the enemy’s ATK to the Electrocution effect that Bunny inflicts. |
|

|
Decreases speed of Speed of Light, but consumes HP instead of MP. Unlimited sprinting. |
|

|
Increases the landing damage after Rabbit Foot’s Double Jump. Double Jump deals significantly increased damage after hitting enemies with the skill a certain number of times. |
|

|
Reduces the number of enemies that Thrill Bomb and Lightning Emission can strike. Increases range and damage instead. |
|
Electric Condense Transcendent Module
Electric Condense is a Bunny-exclusive Transcendent Module. Changes Maximum Power into a form that causes damage around Bunny. This is a great module that deals extra AoE damage, and it is especially useful in harder content with Bunny.
How to get Bunny’s Electric Condense Module:
- Vespers zone: Sepulcher Mission Dungeon Normal/Hard
Bunny’s Electric Transition Transcendent Module
Electric Transition is a Bunny-exclusive Transcendent Module. It decreases Electricity Charge amount during Speed of Light, but recovers Shield continuously in proportion to the distance traveled.
How to get Bunny’s Electric Transition Module:
- Sterile Land Zone Missions
Bunny’s Superconductor Module
Superconductor is a Bunny-exclusive Transcendent Module. It adds an effect that reduces the enemy’s ATK to the Electrocution effect that Bunny inflicts.
How to get Bunny’s Superconductor Module:
- Kingston zone: Slumber Valley Mission Dungeon Hard
Bunny‘s Bionic Fuel Module
Bionic Fuel is a Bunny-exclusive Transcendent Module in The First Descendant. It decreases speed of Speed of Light, but consumes HP instead of MP. This is often used for an endless speedy Bunny setup but requires constant HP refilling usually through a HP Collector Mod.
How to get Bunny’s Bionic Fuel Module:
- Fortress zone: Quarantine Zone Mission Dungeon Hard
Ultimate Bunny‘s Electric Charge Transcendent Module
Electric Charge is an Ultimate Bunny exclusive Transcendent Module. It increases the landing damage after Rabbit Foot’s Double Jump. Double Jump deals significantly increased damage after hitting enemies with the skill a certain number of times.
How to get Ultimate Bunny’s Electric Charge Module:
- Intercept Battle: Colossus Executioner and Gluttony on Hard
Ultimate Bunny‘s High-Voltage Transcendent Module
The High-Voltage Transcendent Module is an Ultimate Bunny exclusive. It reduces the number of enemies that Thrill Bomb and Lightning Emission can strike. Increases range and damage instead. This is one of the strongest mods for Ultimate Bunny.
How to get Ultimate Bunny’s High-Voltage Module:
- Intercept Battle: Pyromaniac Colossus Hard
Bunny Basics in The First Descendant

If it is your first time playing Bunny in The First Descendant, here are some useful things you should know.
- How to unlock Bunny
- Skills Explanation – Master Bunny’s Abilities
- Module Basics Explained!
- Best Grapple Hook for Bunny
How to Unlock Bunny in The First Descendant
Let’s take a quick look at how to unlock Bunny in The First Descendant. To unlock Bunny you need to complete the Obtain Bunny Suit Basic Materials quest. You will receive the following items during the quest:
- 1x Bunny Enhanced Cells
- 1x Bunny Stabilizer
- 1x Bunny Spiral Catalyst
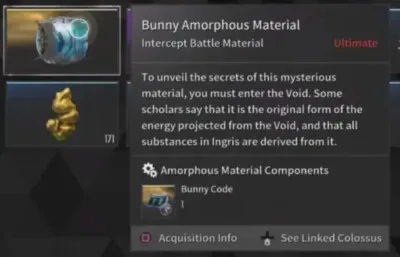
- 1x Bunny Code
Once you have collected all these items you can visit Magisters Anais and craft Bunny for 400000 credits.
Ultimate Bunny: How to unlock Ultimate Bunny in The First Descendant (Best Farm Locations)
Obtain Bunny Suit Basic Materials Quest
The Obtain Bunny Suit Basic Materials quest is part of the introduction of the game (2nd zone of Kingston when you talk to Bunny), so you can’t miss it. The quest has a total of five stages. If you complete the whole Kingston area you will automatically have three out of the four needed items.
To get the Bunny Enhanced Cells you have to complete “Move to the Fallen Theater” quest in Kingston. For the Bunny Stabilizer, you need to complete the “Infiltrate the Magister Lab Operation” quest in Kingston. And the Bunny Spiral Catalyst drops from the “Search for Hidden Data” quest in Kingston.
After finishing the Kingston area you will unlock the Albani Mountains. Now you still need the Bunny Code. By completing Kingston you already have the Bunny Amorphous Material that contains the Bunny Code. Now you need to crack this open. To open any Amorphous Materials you need to defeat a boss in The First Descendant. These are so-called Void Intercept Battles. The quest tells you to defeat the GraveWalkers on normal. After the boss is defeated, you have unlocked the last piece of the puzzle the Bunny Code.
Next, you must visit the Magisters Anais and initiate the Bunny Research, which will cost you 400,000 credits.
Obtain Bunny Suit Basic Materials Quest Stages:
- Stage 1
- Obtain Bunny Enhanced Cells
- Obtain Bunny Stabilizer
- Obtain Bunny Spiral Catalyst
- Stage 2
- Obtain Bunny Amorphous Material
- Stage 3
- Defeat Normal GraveWalkers and unlock Bunny Amorphous Material
- Note: You need to click on the Reconstruct Device below the dead boss to open the Amorphous Material.
- Stage 4
- Make a Bunny Research Request of Anais and complete it
- Stage 5
- Collect Bunny
You can view a more in-depth guide here on How to unlock Bunny in The First Descendant. We also have a guide on how to unlock Ultimate Bunny.
The First Descendant Bunny Skills Explained
In this section, we will explain the skills available to our Bunny Build in the First Descendant, how each skill works, and the best ways for you to use them.
Bunny’s skill loadout is themed around electric damage. Bunny works best as a great farming AoE damage character. She is the fastest Descendant in the game.
| Skill Name | Type | Effect | Best Use Case |
|---|---|---|---|

|
AoE | Summons an Electro Orb to attack nearby enemies and inflict them with Electrocute effect. | Not used |
| Utility | Increases sprint speed and the amount of Electricity obtained. (Toggle) | Movement Speed | |

|
AoE | Moving around deals damage to nearby enemies and inflicts them with Electrocute effect. | AoE Damage |
| Single-Target | Shoots out electricity forward to inflict damage. Damage increases in proportion to skill duration. | Not used | |

Rabbit Foot (Passive) |
Utility | Charges electricity by moving around. Landing on the ground after double jump inflicts damage to nearby enemies. | Charges Electricity |
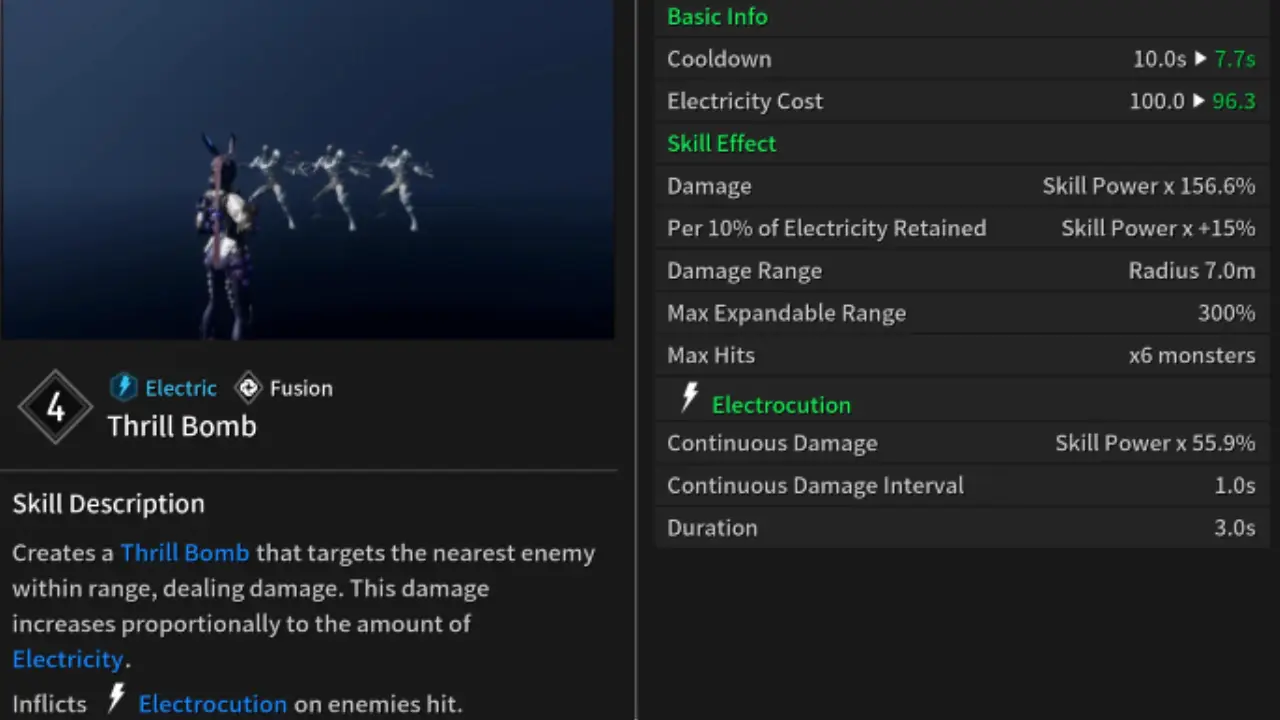
Thrill Bomb
Summons an Electro Orb to attack nearby enemies and inflict them with Electrocute effect.
Thrill Bomb Skill Description:
- Electric – Fusion
- Creates a Thrill Bomb to deal damage to the nearest enemy in range. This damage increases proportionally to the amount of owned Electricity.
- Inflicts Electrocution on enemies that are hit. Electrocution deals continuous damage at fixed intervals.
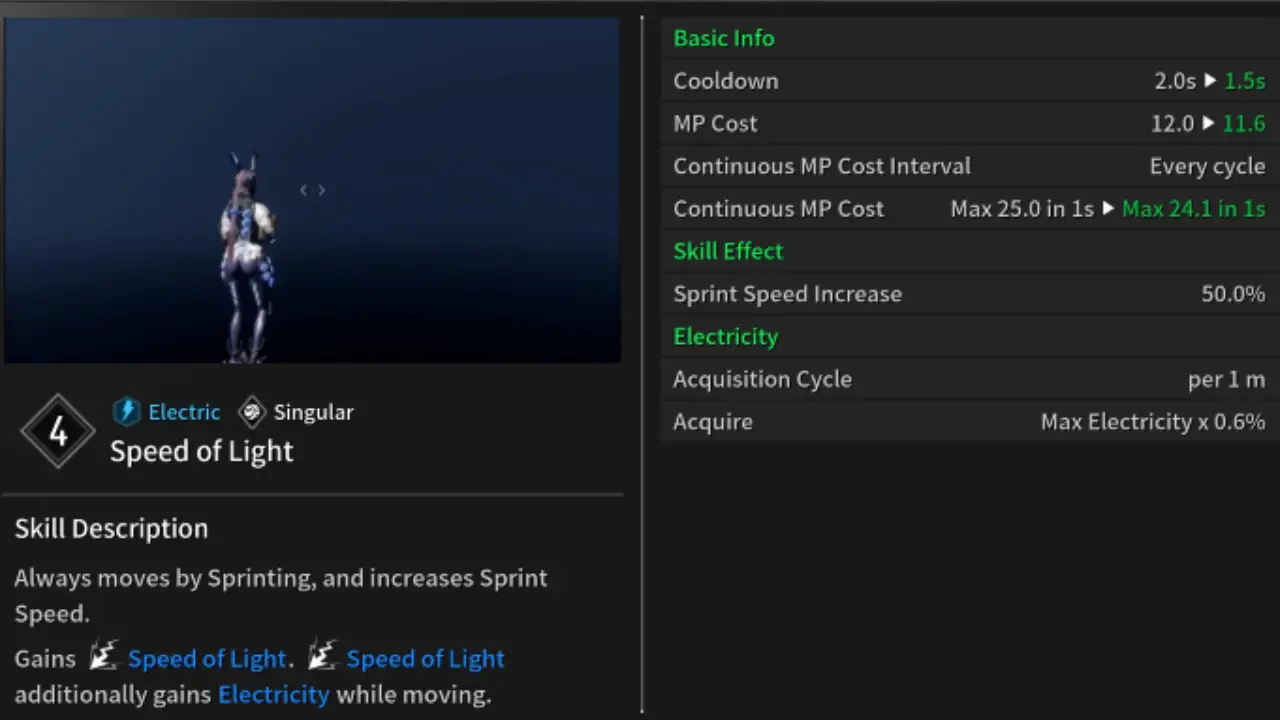
Speed of Light
![]()
Increases sprint speed and the amount of Electricity obtained. We recommend using this as often as possible to maximise the amount of Electricity you gain.
Speed of Light Description:
- Electric – Singular
- Always moves by Sprinting, and increases Sprint Speed.
- Gains Speed of Light.
- Speed of Light additionally gains Electricity while moving.
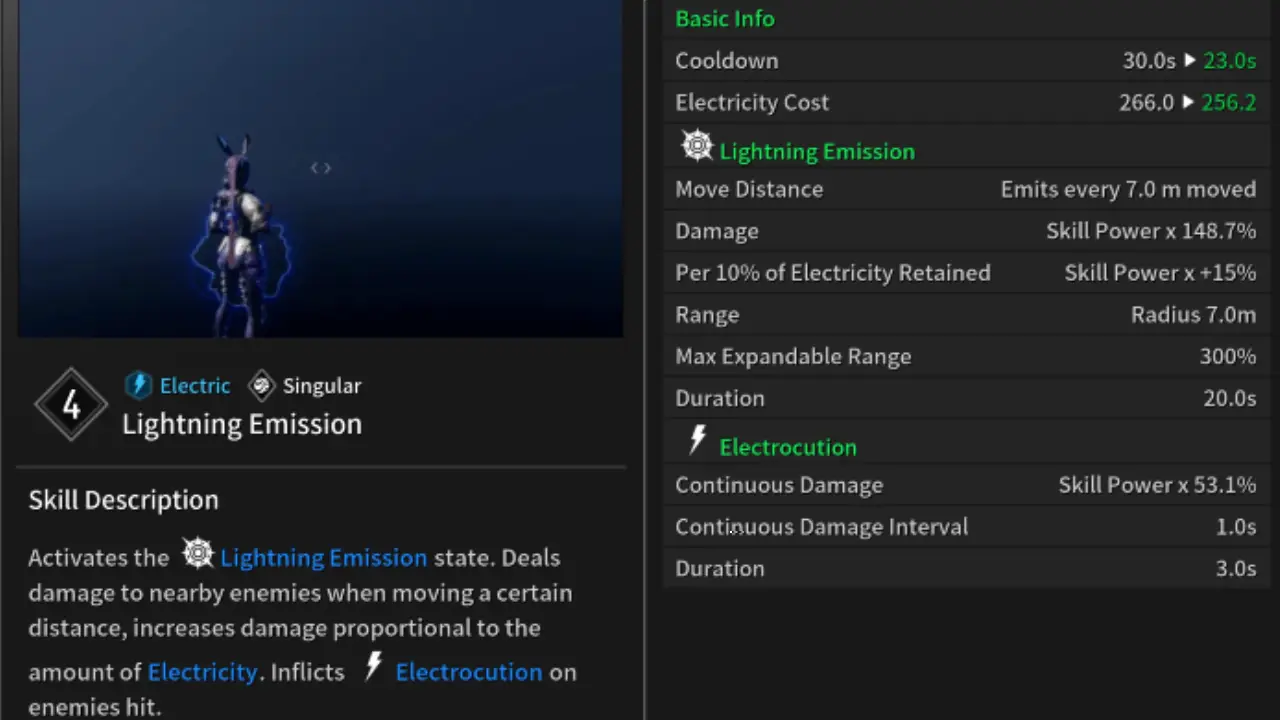
Lightning Emission
Moving around deals damage to nearby enemies and inflicts them with Electrocute effect.
Lightning Emission Description:
- Electric – Singular
- Activates Lightning Emission for a certain period of time.
- Deals damage to nearby enemies whenever moving a certain distance. This damage increases proportionally to the amount of Electricity owned.
- Inflicts Electrocution on enemies that are hit. Electrocution deals continuous damage at fixed intervals.
Maximum Power
![]()
Shoots out electricity forward to inflict damage. Damage increases in proportion to skill duration.
Maximum Power Description:
- Electric – Fusion
- Discharges electricity forward.
- Deals damage to enemies that come into contact with the electricity, with the damage increasing gradually based on the discharge time.
- Ends when electricity runs out.

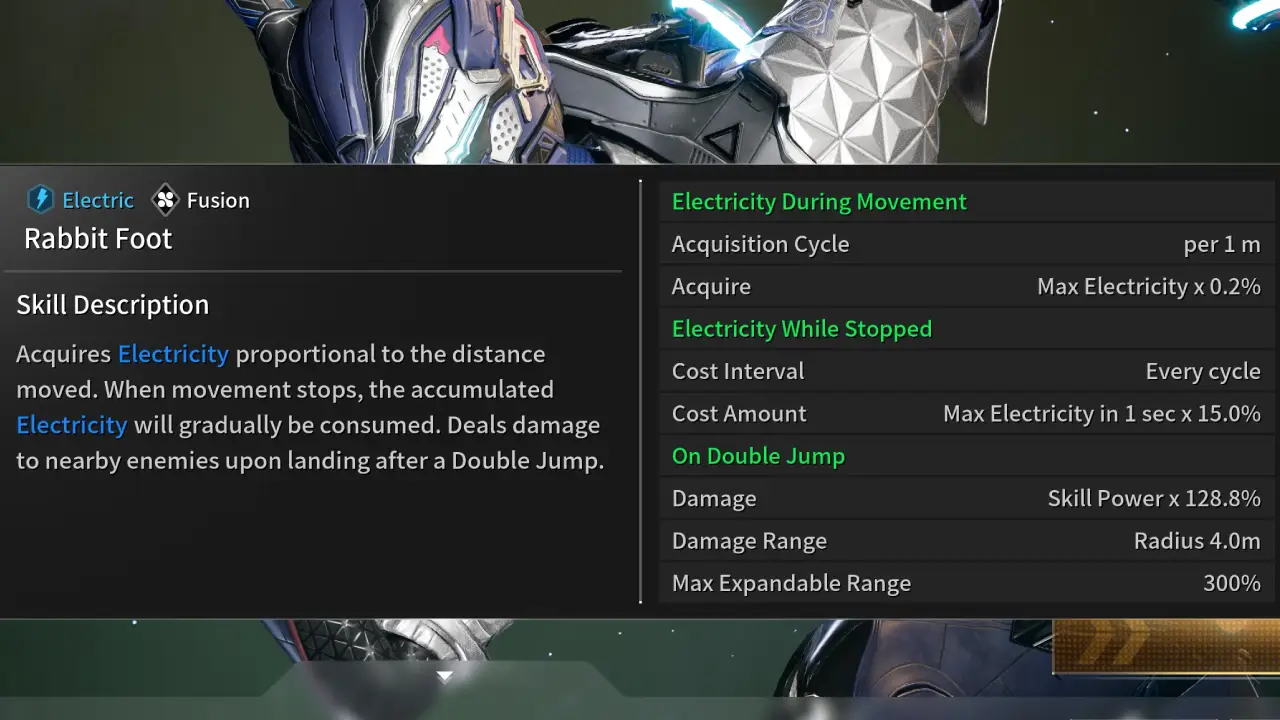
Rabbit Foot (Passive)
Charges electricity by moving around. Landing on the ground after a double jump inflicts damage to nearby enemies.
Rabbit Foot Passive Description:
- Electric – Fusion
- Acquires Electricity proportional to the distance moved. When movement stops, the accumulated Electricity will gradually be consumed.
- Deals damage to nearby enemies upon landing after a Double Jump.
How Modules Work in The First Descendant
Modules are the bread and butter of all The First Descendant Builds. There are a few important things to remember about modules. This is for both Descendant and Weapon Modules.
While most builds require you to increase Module Capacity with an Energy Activator (you get two for free), they won’t require you to reduce the Module cost with Crystallization Catalyst. However, if you want to truly min-max a build, you will need plenty of these Catalysts.
- How to increase your Module Capacity
- Module Levels and Cost
- Reduce the cost of Modules
- How to farm Modules
How to Increase Module Capacity
You get a base of 45 Modules for every Descendant character. And you can increase this up to 85 currently. First off, always slot a Sub Attack Module (Slot 7). When you increase this to the max level you will get an additional 10 Module Capacity. if you use a Crystallization Catalyst on the Sub Attack Module, you even get 15 extra slots. You will see this in the setup below.
Additionally, you can use an Energy Activator to increase your Module Capacity by another 20. However, these are fairly hard to farm, only use them on your best Descendants.
Lastly, increasing your Mastery Rank will also increase Module Capacity. Rank 1 gives you 25 Module Capacity, Rank 20 gives you 50 Module Capacity. That is how we reach the 80 Module Capacity that you see on most builds.
- Slot a Sub Attack Module (and max it out to get +10 capacity, crystallize it for +15)
- Use an Energy Activator (2o extra capacity)
- Increase Mastery Rank (25 base capacity, max 50)
Weapons: Basically the same, but because you don’t have Subattack Modules, the Energy Activator gives you 30 instead of just 20 extra capacity.
You can also read my in-depth guide on how to increase Module Capacity in The First Descendant if you need more information. Or my Best Energy Activator Farm Spots and our Best Crystallization Catalyst Farm Spots. I tested all of the grind spots by myself and have already farmed plenty of these items with this method.
Module Levels and Cost
Modules can be enhanced (leveled up) with Kuiper Shards in The First Descendant. Enhancing Modules increases their power. At higher levels, the power will increase way more than at lower levels. Therefore it is always recommended to max out the most important Module first.
Here is an example of a must-have Module called Increased HP for our Descendant. You will notice that we start at 22%, but at the max level, we get a whopping 218.5% increase in health!
| Level | Capacity Cost | Power |
|---|---|---|
| 0 – Base | 6 | 22% |
| 1 | 7 | 31.2% |
| 2 | 8 | 41.4% |
| 3 | 9 | 54.4% |
| 4 | 10 | 69.8% |
| 5 | 11 | 87.2% |
| 6 | 12 | 108.2% |
| 7 | 13 | 130.2% |
| 8 | 14 | 155.2% |
| 9 | 15 | 184.5% |
| 10 | 16 | 218.5% |
Transcendent Modules are the exception; they decrease Capacity Cost with higher levels!
For an in-depth overview, please visit our How to Level Up Modules in The First Descendant guide.
How to Farm Kuiper Shards
Kuiper Shards are used to level up Modules. We have a guide on the Top 3 Kuiper Shard Farming Locations in the First Descendant. We explain how to most efficiently farm Kuiper Shards (300-500k/hour) and show the amount you need to level up mods. As a summary, to max out a Module you need:
- Normal Modules: 103’100 Kuiper Shards
- Rare Modules: 206’200 Kuiper Shards
- Ultimate Modules: 309’300 Kuiper Shards
- Transcendent Modules: 515’500 Kuiper Shards
Always max out the most important Modules first, we will showcase the order below.
How to Reduce the Cost of Modules
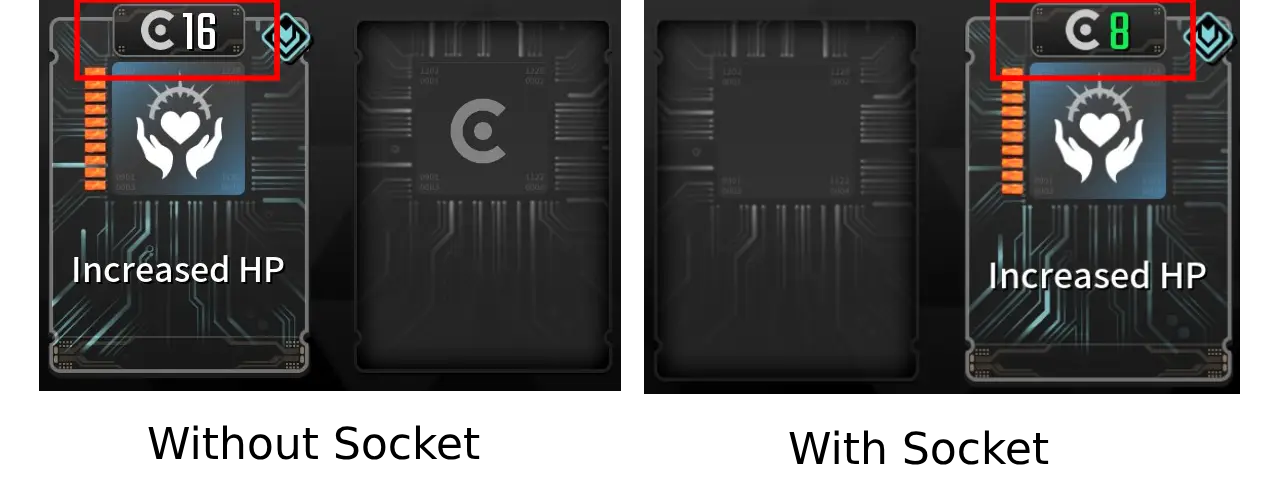
To reduce the cost of Modules you need Crystallization Catalysts in The First Descendant. These require a lot of time investment, most builds won’t require you to get many if any at all (Budget Setup). But if you want to completely min-max you need to get plenty of them as technically, every slot can have a specific socket type to half the cost.
Modules have Socket Types. Our Increased HP Module has the Cerulean Socket Type.
- Module: Increased HP
- Socket Type: Cerulean
This is important because if we place our Increased HP Module in the fitting Socket Type, it will half the cost of the Module!
How to farm Modules in The First Descendant
Most The First Descendant Modules can be acquired fairly easily, but the higher-quality ones (Ultimate, Transcendent) are more tedious to obtain. Here is the easiest process to farm Modules quickly.
Open Map > Swap to Access Info > Select Modules
Here, you can find all Modules and their drop locations. If a module drops from several locations, it is recommended to select drop locations with higher drop chances.
There isn’t really much more to this. Simply check the location and go farm. Normal and Rare quality Modules have 30-50% drop chances in most cases. Ultimate ones range around the 5% mark and Transcendent ones can be a tough cookie with around 2% drop chance.
We will list the best farming location of modules in the next step of the guide.
Smooth Grapple Hook for your Bunny Build
Using the standard Grapple Hook in The First Descendant can be a pain, and it feels kinda frustrating at times. Don’t worry, there is a way better alternative that will make it a joy to use the grappling hook!
It is called the Mid-Air Maneuvering Sub Module. I use this on all my The First Descendant Builds because it improves grappling by so much.
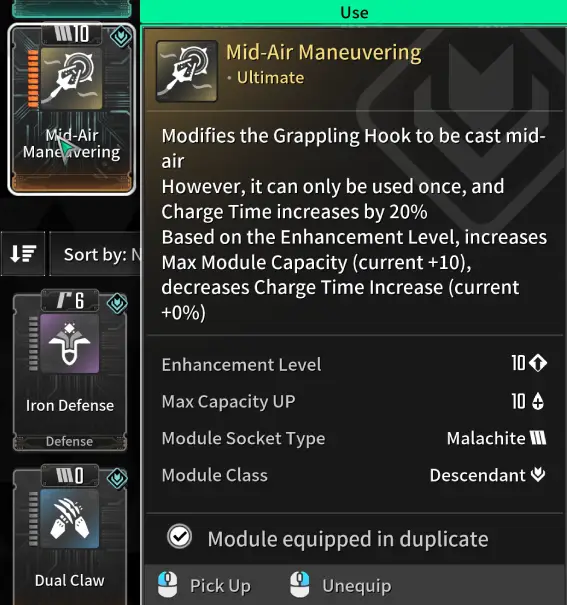
With this Module, you can attach your Grapple Hook to anything, even air! That means you can simply aim towards the sky and Hook up your grapple hook there for guaranteed fast movement!
Here is a guide on how to get the Mid-Air Maneuvering Sub Module in The First Descendant. It won’t take a lot of effort, but it will improve your build and overall gameplay in The First Descendant.
Bunny’s Story in The First Descendant

If you want to know the locations of the records for Bunny’s Quest, you can check out the guides here:
- Follow Their Traces – Bunny Quest
- The Traces Continue – Bunny Quest
- In Search of the Relic – Bunny Quest
In Albion, there were as many orphans as there were casualties of war. But Bunny, even as an adult, harbored an unresolved question:
“My parents weren’t even soldiers… so why did they abandon me?”
Her parents, who only occasionally showed their faces and disappeared after her sixth birthday, left Bunny waiting and waiting. The never-ending war did not provide the answers she sought. Eventually bunny came to her own conclusion:
“It’s clear my parents ran away. Grandma and were left behind.”
Left alone with her grandmother, Bunny seemed to channel her inner turmoil into causing major incidents. Notably swift on her feet, she had dodged the police multiple times, earning the moniker of Albion’s Greatest Troublemaker. She even believed she was out of the soldiers’ reach. Bunny had stolen soldiers’ weapons and sold them on the black market, using the proceeds to dutifully support her grandmother amidst the darkness. At that time, Bunny’s life goal was to secure a room in Albion’s finest retirement district to ensure a comfortable dusk for her grandmother. Bunny, carrying on the mission of her absent parents, needed a lot of money, but nothing was too challenging for this quick-witted Rabbit. As long as she could steal and run, no one could catch her. Even on the day she stole a bunch of expensive miltary grenades, she had no worries… except that she had fled to a fuel depot with a faulty circuit breaker.
The news of Bunny’s tussle with the police and rescue team, as they tried to prevent major disaster, and Bunny’s determination not to get caught, reached her grandmother. Her grandmother urged Bunny to stop causing trouble and to surrender peacefully, but fate has a way of creating coincidental events in such situations. The military electronic grenade stolen from the armory was malfunctioning due to electric leakage and was about to explode. As the timer neared zero, Bunny thought of her grandmother outside the silo, realizing she was in danger. Her grandmother was the only one who had looked after her, the abandoned one, and was her only remaining family. Bunny’s immature yet genuine desire to live with her grandmother, even if it meant stealing, sparked a miracle as the timer hit zero.
Time seemed to slow down, and a familiar tingling sensation enveloped Bunny’s entire body. Her desperate wish to stop the bomb awakened a dormant power within her. A powerful electrical force burst forth from Bunn<y, filling the silo. A powerful shock swept through the silo, but fortunately, all surrounding systems halted, preventing the grenade from causing a catastrophe. Her grandmother was slightly startled but unharmed, which was a tremendous relief.
As if paying for the major accident, Bunny was paralyzed due to the overuse of her Arche abilities. Unable to move, Bunny was hospitalized for a long time. Once Bunny’s Arche factor was confirmed, Headquarters offered her a chance to become Descendant and serve in exchange for overlooking her past misdemeanors, and Bunny readily agreed. After all, they promised not to hold her past accidents against her and assured her of a regular salary. How could this not be a stroke of luck? Bunny was actually pleased. By working hard and earning money, she could enjoy a delicious dinner with her grandmother.
And maybe… she might even find out whether her parents were alive or dead.
This concludes the story of the character Bunny in The First Descendant.
Related Guides for The First Descendant
You can also check out our Ultimate Weapons Database for The First Descendant or the Builds Database for The First Descendant.