


Welcome to our Lee Bora Build Guide for Solo Leveling: ARISE OVERDRIVE.
In this guide, we will explain how each one of Lee Bora’s skills work and how best to use them. We will provide more general tips for how to get the most out of Lee Bora.
We will also include a build guide for Lee Bora. While Hunter builds aren’t as widely customisable as Sung Jinwoo, you can still customise your equipment and level up your skills. We’ll walk you through these so you can find the best items and prioritise the best skill upgrades first.
ARISE OVERDRIVE Lee Bora Guide Table of Contents:
Lee Bora Strengths
Lee Bora Weaknesses
Lee Bora Skill Overview – SL Arise Overdrive

Here is an overview of Lee Bora’s skills in Solo Leveling: ARISE OVERDRIVE, and how to use them.
Basic Skills
Darkness Emission
Bora swings her staff and unleashes the power of darkness.
While it’s not a melee skill, the range of Darkness Emission is quite limited which can make it tricky to use sometimes. Still, it is decent for damaging enemies in front of you if you aren’t too far away from them.
Tracking Charm
Heavy Attack. Bora attacks the enemy by throwing numerous explosive charms.
Press C to activate Tracking Charm. These projectiles will home in on the target, but it seems to suffer from the same short range problem as Darkness Emission.
Waning Seal
Bora throws a charm and creates a Waning Seal that weakens enemies.
Attack Decrease is inflicted on targets affected by Waning Seal. If there are targets on the field affected by Waning Seal, the cooldown of her Summoned Beast Charm decreases by double the normal rate.
Press Q to activate your Waning Seal. You should have this active as much as possible, because it weakens all enemies within and makes your Beast Charm (one of Lee Bora’s most important skills) recharge faster.
Summoned Charm Beast
Bora summons Phantom Foxes. Her fourth summon summons the Phantom Fox Leader.
Phantom Foxes fire magic arrows. Phantom Fox Leader fires a giant magic arrow that penetrates enemies. Summoned beasts become stronger in proportion to Lee Bora’s stats.
Press E to activate Summoned Charm Beast. These Phantom Foxes are fairly short-lived minions who shoot projectiles at enemies. They increase your DPS and are a great way of chipping away at a boss’ HP bar even if you’re forced to play defensively.
Special Skills
Quick Attack: Tempest
Bora summons a binding divination circle and pulls enemies into its center. Damage Taken Increase is inflicted on enemies within the divination circle.
This is Bora’s support skill, which means it’s only used when she is supporting Sung Jinwoo. It can’t be used when you are playing as Lee Bora in a Hunter Party. The skill can be activated when there are 3 or more enemies near Sung Jinwoo, or when an Elemental Status Effect is active on nearby enemies.
Tempest
QTE Skill. Bora summons a binding divination circle and pulls enemies into its center. She inflicts the Cumulative Element Efficiency Received effect on his enemies for a set duration.
QTE Skills are activated when you switch to a character with Left Shift when prompted. Make sure you are in a suitable position to hit enemies with the Tempest when you make the switch.
Phantom Order
Synchro Chain. Bora throws a charm to deploy several magical effects and triggers a powerful explosion.
Synchro Chains are activated when you press T when prompted. All Hunters in the party will use their Synchro Chain ability at the same time.
Dark Charm: Meg
Ultimate Skill. Bora uses the sealed Dark Charm to free the giant summoned beast, Meg. An effect that dramatically Increases Damage Taken is inflicted on hit targets.
Press R when your Ultimate is fully charged to summon Meg. This will debuff all enemies hit by Meg, increasing their damage taken. This is especially good against multiple enemies but it’s worthwhile against one strong target (i.e. a boss) too.
Unique Skills
Dash Combo Attack
When tapping the Basic Attack Button after performing Dash, the user can use Dash Combo Attack.
Back Dash Combo Attack
When tapping the Basic Attack Button after performing Back Dash, the user can use Back Dash Combo Attack.
Deflect Combo Attack
When tapping the Basic Attack Button after performing Deflect, the user can use Deflect Combo Attack.
How to Play Lee Bora
Lee Bora is excellent at fighting off hordes of weak enemies, applying her debuffs over a wide area and then using her AoE spells to defeat many enemies at once.
She has a harder time fighting bosses with a large HP pool – although her skills can debuff the boss to reduce their damage output and increase damage dealt to them, you are typically better off doing the bulk of boss fighting with a different Hunter in your party who is more suited to it.
One vital thing to learn early on is that aiming ranged attacks in Arise Overdrive is a bit awkward – the spells will go in the direction your character is facing, not the direction you are looking in. This is especially important to remember if you are casting spells while kiting – you must turn to face the enemies for a moment before using your spell, your character will not turn around for you, they will just cast it in whatever direction they are moving in.
Lee Bora’s Overdrive will debuff the targeted enemy with Haunt, increasing their damage taken. A small version of Meg will also appear to attack them. You will also summon Phantom Foxes and a Phantom Fox Leader to unleash a barrage of arrows. Summoning Phantom Foxes with the Summoned Beast Charm skill recharges your Overcharge Gauge. This is a much simpler Overcharge mechanic than some of the other Hunters in Arise Overdrive, making Lee Bora quite easy to play once you’ve got used to using her spells.
Lee Bora Skill Upgrade Priorities – SL Arise Overdrive
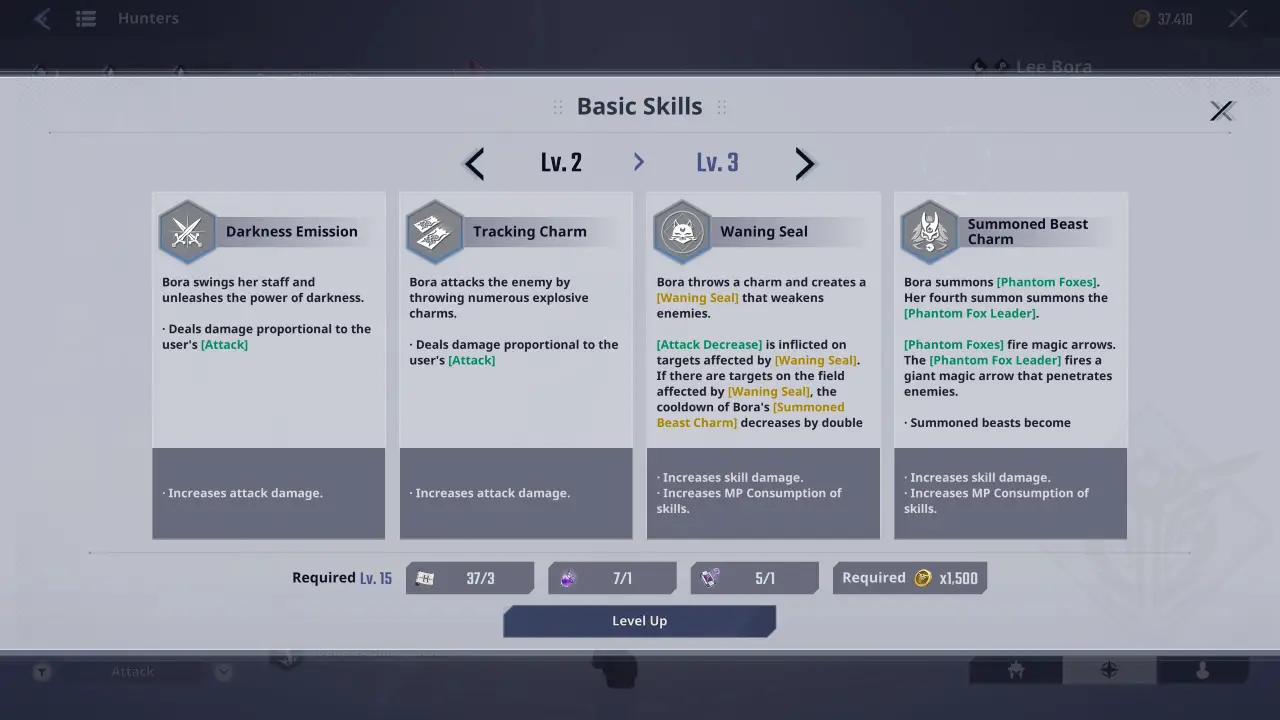
As mentioned above, Hunter skills in Solo Leveling: ARISE OVERDRIVE are split up into Basic Skills, Special Skills and Unique Skills. Of these, only Basic and Special Skills can be upgraded. The upgrades are done in groups – for example, you upgrade all Basic Skills at once, rather than upgrading the skills individually.
It is generally more important to upgrade the Basic Skills rather than the Special Skills, because the Basic Skills are used much more often (this group includes your Basic Attack, Heavy Attack and the skills activated by pressing Q or E). So if you have to make a choice between the two, always go for Basic Skills.
In practice, however, it is usually easier to upgrade them in a balanced manner, upgrading both groups to rank 2, then upgrading them both to rank 3, and so forth. This is because each tier is significantly more expensive than the last, so rushing a full set of Basic Skill upgrades usually isn’t possible unless you’ve played through the whole game without doing any upgrades.
Lee Bora Best Equipment – SL Arise Overdrive
We will now review the best equipment available for Lee Bora in Solo Leveling: ARISE OVERDRIVE, including the best weapons and the best armour & artefacts. To help you progress through the lengthy level up and equipment grind, we have included setups for the early, mid and endgame.
Lee Bora Best Weapons
The table below shows you the best weapon progression from early, mid and endgame. We have not included every upgrade tier along the journey, just the most important milestones so you can see which path to take and what benefits the most important weapons offer for Lee Bora.
| Weapon | Description |
|---|---|

Staff (D) |
To get the D-Tier Staff, start with the basic E-Tier Staff and upgrade it twice to reach D-Tier.
This weapon provides no special effects, but gives a small boost to Bora’s Attack and HP stats. |

Solid Logic (C) |
After crafting the D-Tier Staff, use it to craft the Steel Staff. Upgrade this once to C-Tier. You can now craft Solid Logic at C-Tier.
This buffs Bora’s Attack. Waning Seal will now decrease enemies’ Attack, and Tempest has a chance to inflict Haunt on the target. |

Solid Logic (S) |
Upgrade Solid Logic three times to reach S-Tier.
This weapon gives a massive boost to Lee Bora’s Attack stat. The bonuses from the previous tiers are now much stronger. This is by far the best weapon available for Lee Bora in Solo Leveling: ARISE OVERDRIVE. |
Lee Bora Best Armour & Artefact Sets
Early Game Best Sets
In the early game, there aren’t many strong sets, so we just take whatever items we can get that will boost damage output. The Apprentice Mage set gives us a modest boost to Attack and Critical Damage, which makes for a decent DPS boost. The Obsidian set synergises very slightly with Bora’s attacking spells.
- Armor Set: Apprentice Mage
- [2 Items] Slightly Increases Attack
- [4 Items] Increases Critical Hit Damage
- Jewelry Set: Obsidian
- [2 Items] Very slightly increases Dark Damage
- [4 Items] When you deal Dark damage, there is a very small chance to apply the Haunt effect.
Mid Game Best Sets
High-Ranking Demon is a well-rounded set that boosts your attack and defense. This should help you out with the rather tricky bosses you’ll encounter around this time. Viridescent gives more damage boosts and slightly reduces your skill cooldowns, which is especially helpful for Lee Bora because summoning two foxes with Summon Charmed Beast is all that is required to recharge her Overdrive.
- Armour Set: High-Ranking Demon
- [2 Items] Increases Attack and Defense
- [4 Items] Using a Basic Skill triggers a moderate chance to grant Super Armor, and will increase the user’s Basic Skill damage for a certain amount of time.
- Jewelry Set: Viridescent
- [2 Items] Very slightly reduces the user’s Basic Skill cooldown, but slightly increases their MP Consumption.
- [4 Items] Using the Basic Skill very slightly increases the user’s Basic Skill Damage Increase effect for a certain amount of time, stacking up to 10 times.
Late Game Best Sets
We’re using Sharpshooter because it gives you an Attack buff that quickly ramps up over the course of 10 seconds, as long as you don’t get hit. Since Lee Bora is a summoner, she has an easier time avoiding enemy attacks, making Sharpshooter more viable. But if you struggle to avoid getting hit then you can swap to another set. The Beast set helps your overall DPS by ramping up your Critical Hit chance over the course of the battle.
- Armour Set: Sharpshooter
- [2 Items] Increases Attack and Precision
- [4 Items] Every second you don’t get hit by an enemy during the battle, slightly increases your Attack, stacking up to 10 times. When you are hit, the Attack Increase stacks are removed and can’t be triggered again for a certain amount of time.
- Jewelry Set: Beast
- [2 Items] Increases Critical Hit Damage
- [4 Items] If a Critical Hit isn’t activated, the chance of the next attack landing as a Critical Hit increases very slightly, stacking up to 30 times.
Related Guides for Solo Leveling: ARISE OVERDRIVE:
Best Song Chiyul Build Guide – Solo Leveling: ARISE OVERDRIVE
Welcome to our Song Chiyul Build Guide for Solo Leveling: ARISE OVERDRIVE. In this guide, we will explain how each one of Song Chiyul's skills [...]

Best Woo Jinchul Build Guide – Solo Leveling: ARISE OVERDRIVE
Welcome to our Woo Jinchul Build Guide for Solo Leveling: ARISE OVERDRIVE. In this guide, we will explain how each one of Woo Jinchul's skills [...]

Best Emma Laurent Build Guide – Solo Leveling: ARISE OVERDRIVE
Welcome to our Emma Laurent Build Guide for Solo Leveling: ARISE OVERDRIVE. In this guide, we will explain how each one of Emma Laurent's skills [...]

Best Lee Joohee Build Guide – Solo Leveling: ARISE OVERDRIVE
Welcome to our Lee Joohee Build Guide for Solo Leveling: ARISE OVERDRIVE. In this guide, we will explain how each one of Lee Joohee's skills [...]
Best Alicia Blanche Build Guide – Solo Leveling: ARISE OVERDRIVE
Welcome to our Alicia Blanche Build Guide for Solo Leveling: ARISE OVERDRIVE. In this guide, we will explain how each one of Alicia Blanche's skills [...]

Best Lim Tae-Gyu Build Guide – Solo Leveling: ARISE OVERDRIVE
Welcome to our Lim Tae-Gyu Build Guide for Solo Leveling: ARISE OVERDRIVE. In this guide, we will explain how each one of Lim Tae-Gyu's skills [...]