

Welcome to the ESO Sanity’s Edge Guide. The Sanity’s Edge Trial is located in the Telvanni Peninsula Zone (requires access to the Necrom chapter) and can be played in normal and veteran mode. I will walk you through with this guide and explain all the mechanics in detail. The Sanity’s Edge Trial has three boss encounters and two mini-boss encounters. The main three boss encounters have their own individual hardmodes (previous boss encounter must be completed in hard mode in order to activate the next boss’ hard mode). The Sanity’s Edge trial is also often referred to as SE while the added ‘v’ indicates veteran difficulty.
Difficulty: The veteran mode of the ESO Sanity’s trial is easier than veteran Dreadsail Reef without hardmode. The difficulty really spikes once you activate the hard modes for each boss, most notable difficulty spike being the final boss encounter.
Guide written by SGTsanttu.
Table of Contents
- Loot & Rewards – ESO Sanity’s Edge Guide
- Quick Tips for Sanity’s Edge
- Group Setup Tips for Sanity’s Edge
- Trash Fights in Sanity’s Edge
- Boss 1 – Exarchanic Yaseyla
- Boss 2 – Archwizard Twelvane and Chimera
- Boss 3 – Ansuul the Tormentor
Loot & Rewards – ESO Sanity’s Edge Guide
There are several sets and achievements that you can complete in this trial.
New Sets in Sanity’s Edge
In the ESO Sanity’s Edge trial you can find a perfected and an imperfect version of each set.
- Perfected Ansuul’s Torment & Ansuul’s Torment
- Perfected Peace and Serenity & Peace and Serenity
- Perfected Test of Resolve & Test of Resolve
- Perfected Transformative Hope & Transformative Hope
Rewards in Sanity’s Edge
- New Title
- Sanity’s Scourge– obtained by completing the Sanity’s Edge Vanquisher achievement.
- Sanity’s Warrior – obtained by completing the Sanity’s Edge Conqueror achievement.
- Tenacious Dreamer – obtained by completing the Tenacious Dreamer achievement.
- Mind Master – obtained by completing the Master of the Mind achievement.
- Mindmender – obtained by completing the Sane and Clearheaded achievement.
- New Face Marking
- Whorls of the Dark Dream Visage – obtained by completing the Tenacious Dreamer achievement.
- New Body Marking
- Whorls of the Dark Dream Marks – obtained by completing the Sanity’s Edge Conqueror achievement.
- New Mount
- Ram of Dark Dreams – obtained by completing the Sane and Clearheaded achievement.
Quick Tips for Sanity’s Edge
Here are a few quick tips that you can use in the ESO Sanity’s Edge trial. These should help you to survive the varied encounters inside the trial.
Mechanics
- Health thresholds – All of the three main bosses have a lot of mechanics that trigger when certain health percentages are reached; if your team is overwhelmed, try to artificially slow down damage and handle mechanics one by one.
- Communication – All three bosses have mechanics that are easier to handle with voice communication:
- Exarchanic Yaseyla
- Call to slow down damage while players are dealing with the Horrors.
- Warn about Wamasu charges.
- Archwizard Twelvane and Chimera
- Call to switch taunts on Chimera.
- Silence during Control Pathways to help players concentrate on memorizing the order of Crystals. Call when the last Pathway is about to be completed for the best start for the fight.
- Ansuul the Tormentor
- Call the taunt switches.
- Call the focus on certain targets.
- Exarchanic Yaseyla
Helpful Addons
Here you can find a list of some helpful addons for ESO Sanity’s Edge Trial.
- Alternative Boss Bar – Helpful addon for tracking mechanics based on boss health thresholds
- Code’s Combat Alerts – Alerts the user of various mechanics and threats.
- Combat Metrics – Addon for tracking damage, debuffs and buffs of the fight encounters.
- Hodor Reflexes – Addon for sharing ultimate and DPS data between players.
- Sanity’s Edge Helper – Displays and alerts the user of different ESO Sanity’s Edge trial mechanics.
- OdySupportIcons – Provides more functionality to addons like Sanity’s Edge Helper. Provides many useful ways of tracking player positions.
Sanity’s Edge Boss List
Here you can find the full list of bosses and their health in Sanity’s Edge Trial in ESO.
| Boss | Health | Adds |
|---|---|---|
| Spiral Descender (Mini-Boss) | Normal: 10.2 M Veteran & Hard Mode: 17.5 M |
Spiral Incarnate, Spiral Shalk |
| Exarchanic Yaseyla | Normal: 21.8 M Veteran: 65.2 M Hard Mode: 97.8 M |
Archer, Horror, Wamasu |
| Archwizard Twelvane and Chimera | Normal: 5.1 M Veteran: 17.5 M Hard Mode: 34.9 M Normal: 16.4 M Veteran: 46.6 M Hard Mode: 93.1 M |
Ascendant Gryphon, Ascendant Lion, Ascendant Wamasu, Lion, Simulacrum |
| Ansuul the Tormentor | Normal: 40.9 M Veteran: 69.9 M Hard Mode: 160.7 M |
Enraged Fragment, Essence Manifestation, Memory Fragment, Warlock Vanton |
Group Setup for Sanity’s Edge Trial
Here are some useful sets to use in Sanity’s Edge. Some sets are placed in the lower tier based on their general usefulness in the trial. Lower tier doesn’t automatically mean the sets aren’t that useful and in fact they are quite often used in very optimized raid compositions where sets are switched between every combat encounter.
In short:
S-tier = Sets that players can wear throughout the raid without any issue. These sets might not be the meta for every encounter, but they will serve the wearer well enough.
A-tier = Sets that excel in specific encounters. These sets will beat the S-tier in parts of the raid but lose out in others.
B-tier and lower = These sets are usually used in min-maxing the encounters. These sets are usually equipped for one specific encounter and then quickly switched to something else.
Useful Arena, Monster and Mythic Sets = Good Arena, Monster and Mythics set that you can use in Sanity’s Edge Trial.
Tank Tips Useful Sets – ESO Sanity’s Edge Guide
Here are good tank sets that you can use.
S-tier 5 Piece Sets
- Master Architect & War Machine – Provides Major Slayer to 6 closest players to the wearer. 6 player limit means the trial group needs to have two players wearing these sets and the players needs to group up in two separate stacks for even application of the buff.
- Pearlescent Ward – Passive damage boost for the whole group. Passive damage reduction for the whole group when things don’t go according to the plan.
- Powerful Assault – A stable damage boosting set for a support role to use. Used by Tanks and Healers alike.
- Roar of Alkosh – One of the most used support sets in ESO. Quite often used by the Tank or Support Damage Dealer roles.
- Saxhleel Champion – A set that provides Major Force when the group needs to use some other ultimate e.g. Colossus or Barrier.
- Turning Tide – A set that provides Major Vulnerability.
A-tier 5 Piece Sets
- Brands of Imperium – Provides shields for the group. The final boss has many dangerous mechanics that this set can provide protection against. Good for no death attempts where the group might have difficulties in surviving the damage. With the introduction of the Scribing skill, players can replace sets that provide shields with Scribing skills like the Warding Burst.
- Claw of Yolnahkriin – Has been one of the most used Tank sets in ESO. With the release of the Arcanist class this set can be replaced by Arcanist(s) using Arcanist’s Domain skill and its morphs. Provides Minor Courage.
- Crimson Oath’s Rive – Easy to use set for reducing the armor of enemies.
- Elemental Catalyst – Mostly used by the Necromancer class. Quite often used by Necromancer Support Damage Dealers.
- Lunar Bastion – Provides shields for the group. The final boss has many dangerous mechanics that this set can provide protection against. Good for no death attempts where the group might have difficulties in surviving the damage. With the introduction of the Scribing skill, players can replace sets that provide shields with Scribing skills like the Warding Burst.
- Pillager’s Profit – Provides the trial group (excluding the wearer) a way to gain ultimate. Often used by the Healer role.
- Way of Martial Knowledge – Increases the damage enemies take by 8 %. This set is often used by the Healer or Support Damage Dealer roles.
B- and Lower Tier 5 Piece Sets
- Arkasis’s Genius – Provides more ultimate for 4 players including the wearer. Can be used in very optimized situations but for general use it is not worth it.
- Drake’s Rush – Provides more ultimate for 4 players including the wearer. Can be used in very optimized situations but for general use it is not worth it.
- Elf Bane – A set that extends the duration of Flame Damage over time abilities by 5 seconds. This set is often used to extend the duration of Dragonknight’s Magma Shell ultimate.
- Jorvuld’s Guidance – A set that increases the duration of Major buffs, Minor buffs and damage shields. Quite often used by the Healer role paired with the set Roaring Opportunist. Jorvuld’s is used in some optimized situations.
- The Morag Tong – Dealing direct damage to enemies causes them to take 10 % more damage from Poison and Disease attacks. Requires constant upkeep as the duration of the set is short.
- Vestment of Olorime – Quite often used by a Healer in the trial. However, Tanks can make quite good use of it in dungeons where the group consists of three Damage Dealers and the Tank. In Trials Tanks can use Olorime if there are mechanics that force Healers to be away from the group for a long duration.
Useful Arena, Monster and Mythic Sets
- Archdruid Devyric – A monster set that provides Major Vulnerability.
- Baron Zaudrus – Monster set that provides ultimate gain. Elemental Susceptibility skill provides easy uptime for the set effect when applied to several enemies.
- Bloodlord’s Embrace – A useful set when using double ice staves.
- Crushing Wall – A stable set for increasing the wearer’s damage.
- Cryptcanon Vestments – Provides more ultimate for the group at the cost of the wearer’s ultimate ability. Wearing the Cryptcanon prevents the activation of ultimate based sets and passive such as Dragonknight’s Battle Roar passive.
- Destructive Impact – Provides an easy way to increase your Weapon and Spell damage by 600.
- Encratis’s Behemoth – Enemies inside the Encratis’s aura take 5 % more Flame Damage while group members inside the aura take 5 % less Flame Damage.
- Magma Incarnate – Quite often used as one piece monster set for the recovery it provides.
- Nazaray – Extends all Major debuffs and Minor Debuffs applied to the enemies.
- Nunatak– Only source of Major Brittle in The Elder Scrolls: Online as of the launch of Sanity’s Edge.
- Puncturing Remedy – Provides a cheap and easy way for the Tank to gain self healing.
- Ring of the Wild Hunt – An easy way to increase movement speed.
- Spaulder of Ruin – Provides damage buff for up to 6 players with the cost of resource recovery for the wearer. Quite often used by Tanks, Healers and Support Damage Dealers.
- Tremorscale – Easy to use Monster set for reducing the Armor of enemies.
Healer Tips Useful Sets – ESO Sanity’s Edge Guide
Here are good healer sets that you can use.
S-tier 5 Piece Sets
- Master Architect & War Machine – Provides Major Slayer to 6 closest players to the wearer. 6 player limit means the trial group needs to have two players wearing these sets and the players needs to group up in two separate stacks for even application of the buff.
- Pillager’s Profit – Provides the trial group (excluding the wearer) a way to gain ultimate. Often used by the Healer role.
- Powerful Assault – A stable damage boosting set for a support role to use. Used by Tanks and Healers alike.
- Spell Power Cure – A stable Healer set for proving Major Courage for the group.
A-tier 5 Piece Sets
- Combat Physician – Provides shields for the group. The final boss has many dangerous mechanics that this set can provide protection against. Good for no death attempts where the group might have difficulties in surviving the damage. With the introduction of the Scribing skill, players can replace sets that provide shields with Scribing skills like the Warding Burst.
- Elemental Catalyst – Mostly used by the Necromancer class. Quite often used by Necromancer Support Damage Dealers. Worn by Damage Dealer Healer during trash fights where the group only runs with one Healer. With the introduction of the set Lucent Echoes, the usage of Elemental Catalyst has lessened.
- Jorvuld’s Guidance – A set that increases the duration of Major buffs, Minor buffs and damage shields. Quite often used by the Healer role paired with the set Roaring Opportunist. Jorvuld’s is used in some optimized situations.
- Roaring Opportunist – Provides Major Slayer. Usually paired with Jorvuld’s Guidance.
- Saxhleel Champion – A set that provides Major Force when the group needs to use some other ultimate e.g. Colossus or Barrier.
- Vestment of Olorime – Provides Major Courage. In Lucent Citadel Spell Power Cure is used in most encounters. However, Olorime can enable the Healer to be quite flexible with setups as Olorime can easily be “one barred” aka having the set be active in only one action bar.
- Way of Martial Knowledge – Increases the damage enemies take by 8 %. This set is often used by the Healer or Support Damage Dealer roles.
B- and Lower Tier 5 Piece Sets
- Arkasis’s Genius – Provides more ultimate for 4 players including the wearer. Can be used in very optimized situations but for general use it is not worth it. Usually slotted during trash fights for increased ultimate recovery.
- Drake’s Rush – Provides more ultimate for 4 players including the wearer. Can be used in very optimized situations but for general use it is not worth it.
- Lunar Bastion – Provides shields for the group. The final boss has many dangerous mechanics that this set can provide protection against. Good for no death attempts where the group might have difficulties in surviving the damage. With the introduction of the Scribing skill, players can replace sets that provide shields with Scribing skills like the Warding Burst.
- The Morag Tong – Dealing direct damage to enemies causes them to take 10 % more damage from Poison and Disease attacks. Requires constant upkeep as the duration of the set is short.
Useful Arena, Monster and Mythic Sets
- Archdruid Devyric – A monster set that provides Major Vulnerability.
- Cryptcanon Vestments – Provides more ultimate for the group at the cost of the wearer’s ultimate ability. Wearing the Cryptcanon prevents the activation of ultimate based sets and passive such as Dragonknight’s Battle Roar passive.
- Encratis’s Behemoth – Enemies inside the Encratis’s aura take 5 % more Flame Damage while group members inside the aura take 5 % less Flame Damage.
- Grand Rejuvenation – Provides the group resource gain.
- Nazaray – Extends all Major debuffs and Minor Debuffs applied to the enemies.
- Nunatak– Only source of Major Brittle in The Elder Scrolls: Online as of the launch of Lucent Citadel.
- Ozezan the Inferno – Provides the group with Armor. The final boss has many dangerous mechanics that this set can provide protection against. Good for no death attempts where the group might have difficulties in surviving the damage.
- Pearls of Ehlnofey – Increases ultimate gain of the wearer at the cost of resource management.
- Spaulder of Ruin – Provides damage buff for up to 6 players with the cost of resource recovery for the wearer. Quite often used by Tanks, Healers and Support Damage Dealers. The most used Support Damage Dealer class to pair this Mythic set with is the Necromancer class.
- Symphony of Blades – Provides the group resource gain.
Support Damage Dealer Tips Useful Sets – ESO Sanity’s Edge Guide
Here are good support damage dealer sets that you can use.
S-tier 5 Piece Sets
- Elemental Catalyst – Mostly used by the Necromancer class. Quite often used by Necromancer Support Damage Dealers. Worn by Damage Dealer Healer during trash fights where the group only runs with one Healer.
- Master Architect & War Machine – Provides Major Slayer to 6 closest players to the wearer. 6 player limit means the trial group needs to have two players wearing these sets and the players needs to group up in two separate stacks for even application of the buff.
- Roar of Alkosh – One of the most used support sets in ESO. Quite often used by the Tank or Support Damage Dealer roles. Roar of Alkosh is often paired with Z’en’s Redress and these sets are mostly used by Dragonknight Support Damage Dealers.
- Way of Martial Knowledge – Increases the damage enemies take by 8 %. This set is often used by the Healer or Support Damage Dealer roles. The most used class to use this set with is the Sorcerer class. Way of Martial Knowledge is sometimes paired with Elemental Catalyst and in these cases the most used class to pair these sets with is the Necromancer class.
- Z’en’s Redress – Easy to use support set that is quite often used by a Dragonknight Support Damage Dealer. Z’en’s Redress is often paired with Roar of Alkosh in a combination known as “Zenkosh DK ”.
A-tier 5 Piece Sets
- The Morag Tong – Dealing direct damage to enemies causes them to take 10 % more damage from Poison and Disease attacks. Requires constant upkeep as the duration of the set is short.
B- and Lower Tier 5 Piece Sets
- Arkasis’s Genius – Provides more ultimate for 4 players including the wearer. Can be used in very optimized situations but for general use it is not worth it. Usually slotted during trash fights for increased ultimate recovery.
Useful Arena, Monster and Mythic Sets
- Archdruid Devyric – A monster set that provides Major Vulnerability.
- Cryptcanon Vestments – Provides more ultimate for the group at the cost of the wearer’s ultimate ability. Wearing the Cryptcanon prevents the activation of ultimate based sets and passive such as Dragonknight’s Battle Roar passive.
- Encratis’s Behemoth – Enemies inside the Encratis’s aura take 5 % more Flame Damage while group members inside the aura take 5 % less Flame Damage.
- Spaulder of Ruin – Provides damage buff for up to 6 players with the cost of resource recovery for the wearer. Quite often used by Tanks, Healers and Support Damage Dealers. The most used Support Damage Dealer class to pair this Mythic set with is the Necromancer class.
Damage Dealer Tips Useful Sets – ESO Sanity’s Edge Guide
Here are good damage dealer sets that you can use.
S-tier 5 Piece Sets
- Coral Riptide – Increases the wearer’s Weapon and Spell damage up to 740 based on their missing Stamina. Coral Riptide is a widely used, strong set that pairs well with Stamina Arcanist Damage Dealer. The Sorcerer wearing Way of Martial Knowledge benefits from Coral Riptide as Martial Knowledge requires the wearer to be low on Stamina.
- Deadly Strike – Strong set often used by the Arcanist and the Templar classes. Deadly Strike is a tradeable set which makes it relatively easy to acquire.
- Whorl of the Depths – Easy to use, strong and versatile Damage Dealer set.
A-tier 5 Piece Sets
- Aegis Caller – A strong and relatively versatile Area of Effect set. The biggest downside to this set are encounters where the target might move away from the set’s Lesser Aegis. The set functions well against single target and multiple target fights alike.
- Ansuul’s Torment – Strong set that passively increases the wearer’s damage. Activating the secondary effect provides a significant boost in damage. Ansuul’s is an easy set to recommend for newer players and the only hurdle for using the set is obtaining it.
- Arms of Relequen – The king of single target parsing. However, Relequen’s constant need for Light Attacks for its short set effect duration means that the Arcanist class is ill-suited for the set. The need for Light Attacks means that newer players may struggle keeping the set effect up for the whole duration of the fight.
- Azureblight Reaper – One of the strongest Damage Dealer sets in The Elder Scrolls: Online. However, it requires an enemy encounter where there are multiple targets that last long enough for the set to activate. For example, while the set benefits from multiple targets, it is generally not used in trash encounters as the enemies die before the set can fully activate. This set shines in Dreadsail Reef’s Reef Guardian encounter and in Rockgrove’s Flame-Herald Bahsei encounter when burning the boss down and not playing safe. In Sanity’s Edge Azureblight Reaper is quite often used in Exarchanic Yaseyla and Ansuul the Tormentor boss encounters. In Normal difficulty Azureblight Reaper might not be the best option for previously mentioned encounters.
- Briarheart – A good back bar Trash encounter set. Burning Spellweave is a similar set that is used in Trash encounters.
- Burning Spellweave – A good back bar Trash encounter set. Briarheart is a similar set that is used in Trash encounters.
- Pillar of Nirn – A good and versatile Damage Over Time (DoT) set.
- Sul-Xan’s Torment – One of the most used Trash encounter sets in The Elder Scrolls: Online. Sul-Xan’s is a strong set in Boss encounters where there are enough minions to activate the set from. However, during Boss encounters searching for the Vengeful Soul effect can get annoying or can cause the player to lose concentration and take unnecessary damage.
B- and Lower Tier 5 Piece Sets
- Berserking Warrior– Also known as Advancing Yokeda. A stable set for increasing Critical Chance. Despite the set’s age, Advancing Yokeda is still used in some boss encounters. A set worthy to add to your collection if you aren’t playing as Arcanist. However, Advancing Yokeda sees little to no use in the Sanity’s Edge.
- Elf Bane – Set used for extending the duration of Fiery Rage ultimate. Elf Bane is usually paired with Balorgh and Mechanical Acuity.
- Flame Blossom – Flame Blossom requires a big target to fully benefit from its set effect. In Sanity’s Edge Chimera is a boss where Flame Blossom can be used to great effect.
- Mantle of Siroria – A strong set but with a drawback of having to stand in a small ring for the set effect. In encounters where players move a lot, Siroria will struggle against more versatile sets.
- Mechanical Acuity – Set used when trying to maximize damage per second in a short encounter. Usually paired with Balorgh and Elf Bane.
Useful Arena, Monster and Mythic Sets
- Balorgh – Usually paired with sets like Mechanical Acuity and/or Elf Bane for quick and strong burn. Elf Bane is used to extend the duration of Fiery Rage ultimate.
- Caustic Arrow – Strong Arena set used in single target encounters. Caustic Arrow is often used against Archwizard Twelvane and the Chimera in the Sanity’s Edge. Caustic Arrow, Crushing Wall and Merciless Charge are all very popular back bar Arena Weapons. In some setups Caustic Arrow is wielded in the front bar while wearing Thunderous Volley in the back bar.
- Chaotic Whirlwind – A good front bar Trash encounter Arena Weapon set.
- Crushing Wall – Also known as the Maelstrom’s Destruction Staff set. A stable set that is still used in many encounters even after the rework for the set’s effect. Caustic Arrow, Crushing Wall and Merciless Charge are all very popular back bar Arena Weapons.
- Harpooner’s Wading Kilt – A strong Mythic set option to use. Nowadays Velothi Ur-Mage’s Amulet has taken a significant amount of spotlight from the Kilt. This is mostly caused by the Arcanist class greatly benefiting from the Velothi Ur-Mage’s Amulet Mythic set.
- Maw of the Infernal – A strong Monster set that pairs well with the Sorcerer class.
- Merciless Charge – While Crushing Wall is the set that has seen the most use as the back bar Arena Weapon, Merciless Charge is often seen as the go to set for Target Dummy parsing. The great benefit of Merciless Charge is the Two-Handed skill-line. Stampede, Carve and Executioner are all strong skills to use in a Trial encounter.
- Prior Thierric – A good Monster set for Trash encounters.
- Selene – A strong Monster set that thematically fits the Warden Class. While Selene is not the most used Monster set, it still packs a punch and has been seen in few top Warden parses during Scions of Ithelia patch.
- Slimecraw – One of the best one piece Monster sets in The Elder Scrolls: Online. The first item set effect provides more Critical Chance than a normal set piece would (771 vs. 657 Critical Chance).
- Spectral Cloak – A good and easy to use Arena set.
- Stormfist– A strong and versatile Monster set that can be used in Trash encounters and Boss encounters. However, it can lose out to some other Monster sets if the targeted enemy moves a lot, causing Stormfist to miss the final damage portion of the set effect.
- Thunderous Volley – Bow version of the Crushing Wall. Also commonly referred to as the Maelstrom’s Bow.
- Velothi Ur-Mage’s Amulet – Strong and versatile Mythic set for the amulet slot. Can be used by any class but fits particularly well for the Arcanist class.
- Virulent Shot – A strong set against Taleria boss encounter in the Dreadsail Reef trial. In the Sanity’s Edge Virulent Shot sees little to no use.
- Zaan– The Monster set king of Target Dummy parsing. When single target damage is all that matters, Zaan shines bright.
Trash Fights in Sanity’s Edge
Here is a list and a short description of all the notable enemies in Trash encounters in the Sanity’s Edge trial.
Useful Tips
Trash encounters in Sanity’s Edge are generally easier than a few previous trials’. However, there are few notable things to be aware of:
★ Disruptor – Disruptors are Elite enemies that appear throughout the Trash encounters in Sanity’s Edge. Disruptors have an ability where they create a Vehement Preservation aura around themselves. This forementioned aura protects Disruptor’s allies, reducing their damage taken significantly. There are usually two main methods to deal with Disruptors:
- Kill the Disruptor(s) before they manage to create a Vehement Preservation aura. In Veteran difficulty this can be quite hard to do if the group’s damage per second is on the lower side.
- Pull the Disruptor(s) to the side. Off-tank can taunt the Disruptors and pull them aside until the rest of the trash pack has been dealt with.
★ Wamasu – At the start of the combat encounter Wamasu targets a random player and charges at them. A good way to save some time in these trash packs is for the whole group to be near a wall or an obstacle that will stop the Wamasu’s charge in its tracks.
★ Spiral Descender – A mini-boss. Spiral Descender appears twice in Sanity’s Edge; before the first boss and before the second boss. The spawn location is randomized in every Trial instance. However, there are only a few locations where the Spiral Descender can spawn at.
Elite Enemies
Elite enemies appear throughout the Trial’s Trash encounters. However, the naming scheme of the enemies changes after every boss. Before the first boss, enemies often have the title “Contramagis”. After the first boss enemies have the title “Dynamagis” and after the second boss enemies are referred as “Ansuul’s”.
Butcher
Butcher is a melee based Elite enemy. Butcher hits hard with its light attacks and should be taunted as fast as possible.
Attacks:
- Bleeding – Attacks from the Butcher apply bleed.
- Butcher – A winding attack that the tank must block. Roll dodging the attack will enrage the Butcher.
- Fiery Totem – Butcher summons a fire spewing totem.
- Weeping Slash – One of Butcher’s basic attacks.
★Disruptor
Disruptors are Elite enemies that should be the priority target for the whole group. Disruptors need to be dealt with immediately before they manage to create the Vehement Preservation aura or to be pulled aside and dealt with after everything else is killed.
Attacks:
- Vehement Preservation – Disruptor creates an aura around him, protecting himself and his allies in the aura. This aura reduces damage taken significantly.
Enforcer
Enforcer is a range based Elite enemy. Enforcer hits with strong bow light attacks and should be taunted immediately. It is recommended for non-tank players to block for a few seconds until the Enforcer is taunted.
Attacks:
- Arrow Spray – A frontal cleave attack.
- Eagle Eye Shot – Enforcer aims at a random player and readies a strong shot. The targeted player should roll dodge it to avoid taking damage. Tank can block it.
- Quick shot – Enforcer’s basic attack. Dangerous against non-tank roles.
- Static Rain – Enforcer kneels down and begins to rain down arrows. Players should try to avoid stacking with each other as the damage hits everyone in a small radius.
Gryphon
Gryphon is a melee based Elite enemy that closes the distance by pouncing at the players.
Attacks:
- Peck – Gryphon’s basic Light Attack.
- Riposte – A frontal cone cleave attack.
- Slashing Talon – Gryphon pounces at a target and slashes at them
- Talon Slice – Gryphon’s basic attack.
Paranoxia
Paranoxia is a melee / range hybrid Elite enemy. Paranoxia should never face towards the group nor should anybody other than a tank be in front of it. Paranoxia’s attacks might not be the hardest hitting but its capability to stun and perform area of effect attacks can cause the group to lose vitality to it.
Attacks:
- Doom-Truth’s Gaze – Strong frontal cleave attack that stuns players if not blocked.
- Gaze – Paranoxia’s basic attack that hits all players in front of his gaze.
- Shockwave – Paranoxia spins around, cleaving everybody around it and snares players for 8 seconds.
- Tentacle Burst – Paranoxia summons bursting tentacles from the ground under the player it is engaging with. Tank can stand in it and block the damage.
Summoner
Summoner is a melee based / summoner hybrid Elite enemy. Summoner summons minions to aid it in battle. Note that when Summoner summons minions, it is unable to move which can cause it to stay out of the main trash pack for an extended period of time.
Attacks:
- Demented Brood – Summoner summons a Spider Daedra to help her.
- Fetid Flesh – Summoner summons a Flesh Atronach to help her.
Voidmaster
Voidmaster is a melee based / summoner hybrid Elite enemy. Voidmaster summons hounds to aid it in battle and casts big area of effect attacks.
Attacks:
- Bludgeon – A winding attack that the tank must block. Roll dodging the attack will enrage the Voidmaster
- Reaper Hounds – Voidmaster summons hounds that charge at players and explode.
- Void Bolt – Voidmaster’s basic attack.
- Void Crash – Voidmaster creates a big area of effect that explodes.
★Wamasu
Wamasu are melee based Elite enemies that charge at random players. Wamasu also appears in the fight against the first boss Exarchanic Yaseyla. In a Hard Mode encounter against Exarchanic Yaseyla, the Wamasu’s charge is strong enough to even kill the tanks.
Attacks:
- Bite – Wamasu’s basic attack.
- Charged Headbutt – A winding attack that the tank must block. Roll dodging the attack will enrage the Wamasu.
- Charge – Wamasu targets a random player and charges at them. Anyone in its path will be hit for a significant amount of damage and knocked back.
Mini-Boss in Sanity’s Edge Trial
The ESO Sanity’s Edge Trial has a unique Mini-Boss mechanic during Trash fights. Spiral Descender Mini-Boss spawns two times in the Trial’s Trash encounters; before the first boss and before the second boss. Spiral Descender’s spawn locations are randomized but it only has a few set spots where it can spawn.
★Spiral Descender
Attacks:
- Frightening Grasp – Spiral Descender pulls everyone around it, instantly draining 75% of players’ total Health Points and applying a strong snare. A big area of effect begins to fill around the Spiral Descender. Players standing in it should be healed to full and block the incoming damage. Players don’t need to roll or run out of the explosion.
- Raze – A winding attack that the tank must block. Roll dodging the attack will enrage the Spiral Descender
- Solitary Frenzy – A buff Spiral Descender gains whenever it is fighting alone. This buff enables Spiral Descender to use its Frightening Grasp.
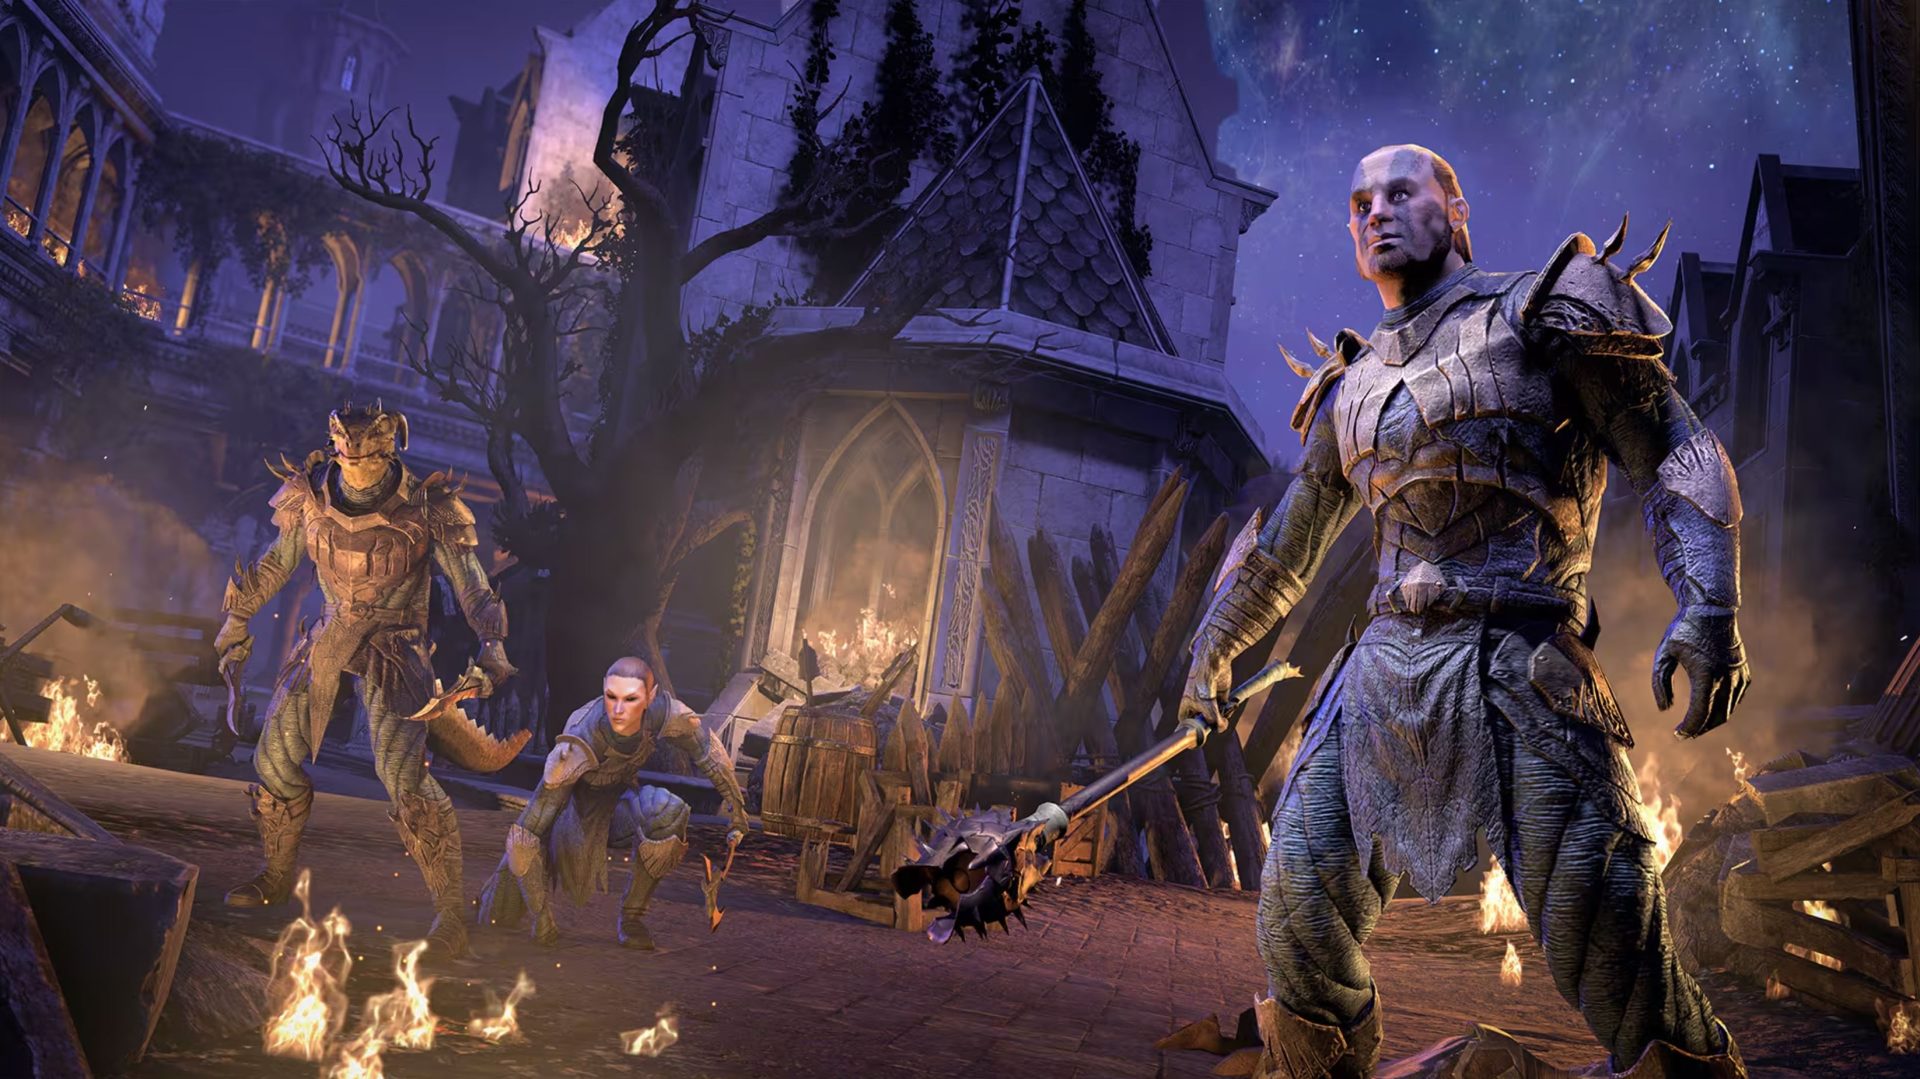
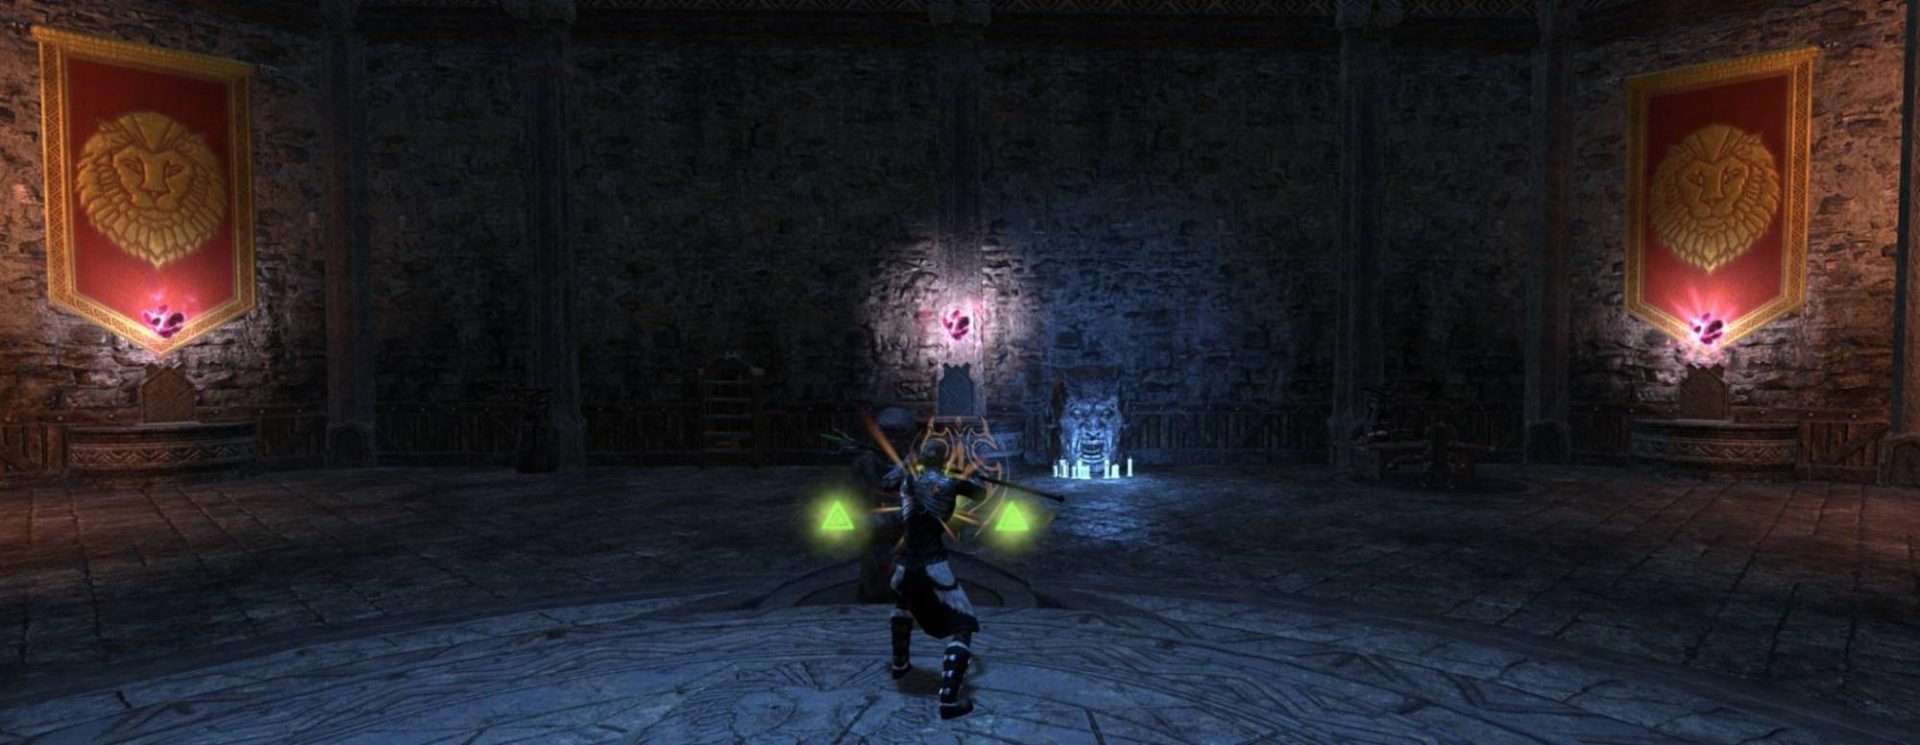
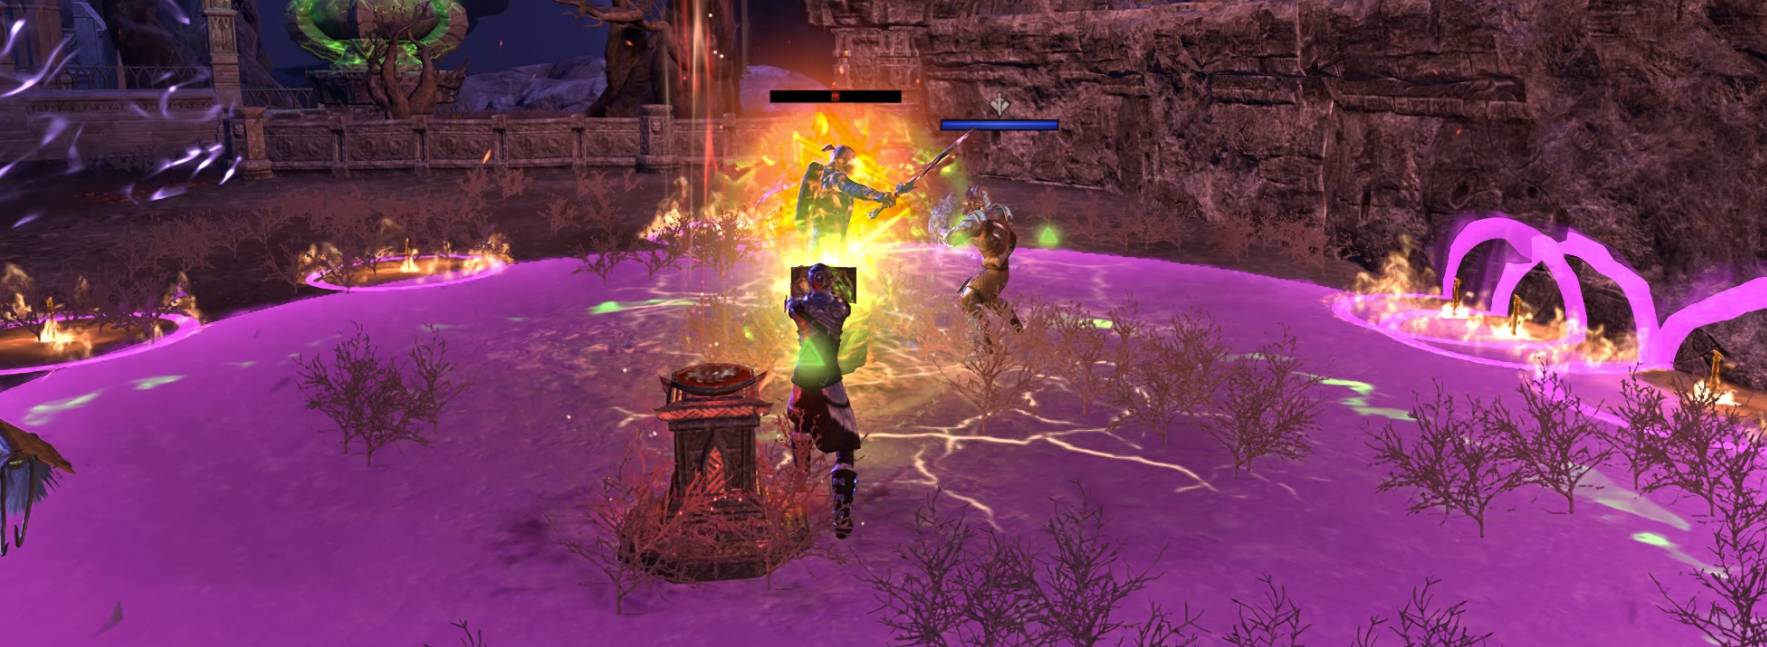
Boss 1 – Exarchanic Yaseyla
Exarchanic Yaseyla and her Wamasu friend.
Boss Mechanics
Most of Exarchanic Yaseyla’s attacks happen with a timer while the main fight mechanics happen with Yaseyla’s health percentage thresholds. The fight against Exarchanic Yaseyla punishes the group for focusing on her too much and the group will quickly get overwhelmed by the stacking mechanics. Exarchanic Yaseyla’s melee based attacks apply Hemorrhage to players.
Health Threshold Mechanics
Contramagis Wamasu – Exarchanic Yaseyla calls a Wamasu and 5 Archers to aid her in battle with health thresholds of:
- Normal and Veteran: 90-, 70-, 50-, 30-, 20-, and 10 %
- Hard Mode: 90-, 70-, 60-, 50-, 35-, 30-, 20-, and 10 %.
Horrors protecting Contramagis Archers viewed by a player with Vanton’s Clarity active.
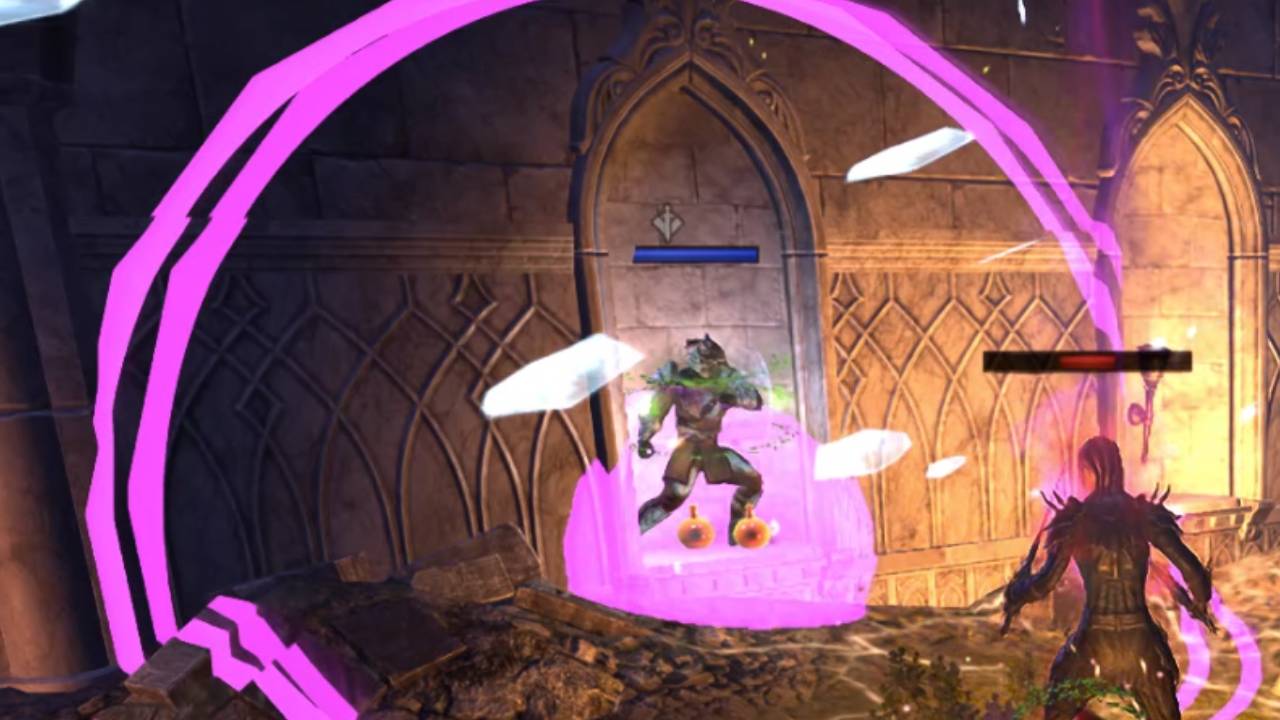
Horrors – Yaseyla summons Horrors to aid her Archers at health percentages of 60– and 35 % in all difficulties. These Horrors are invisible and invincible to players without Vanton’s Clarity. Players can gain Vanton’s Clarity by locating 4 green circles scattered around the arena. While standing on one of them, a prompt for synergy appears. While Vanton’s Clarity is active, the player’s vision turns red and the invisible Horrors turn visible. Vanton’s Clarity stays active until the player finishes off one of the Horrors.
- Normal: 1 player is able to use all of the Vanton’s Clarities one by one with only downside being the time it takes.
- Veteran and Hard Mode: After Vanton’s Clarity fades away from the player, Agony is applied that lasts 2 minutes. Player activating another Vanton’s Clarity while Agony is active will kill the player.
Common tactic for killing Horrors is to deal damage to all of the Horrors and not just focus on one. This will speed up the completion of the mechanic.
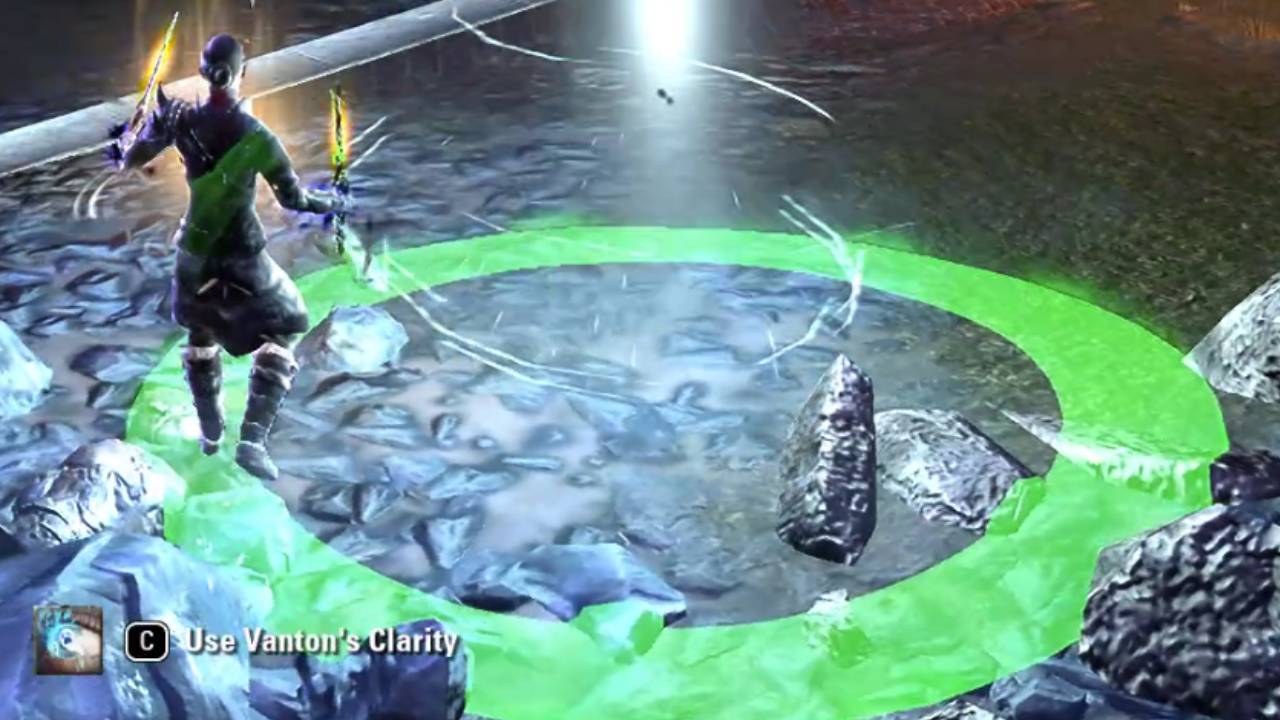
A player standing at a green circle that gives a synergy prompt for using Vanton’s Clarity.
Shrapnel – Shrapnel is Hard Mode only mechanic. Shrapnel is cast at Boss health percentages of 81-, 55-, 25 % and at around every 52 seconds after the 25 % threshold. During the Shrapnel Yaseyla gains a status called “Deflect”. Shrapnel lasts for 11 seconds. Shrapnel deals a significant amount of damage and the players are advised to group up for healing.
Time Based Mechanics
Fire Bomb Toss – Fire bombs are cast at around every 24 seconds before execute phase. During execute the timer halves to around 12 seconds. At 25 % health threshold Yaseyla will immediately throw Fire bombs regardless of the timer. The first Fire bombs can be thrown after around 7.5 seconds from starting the combat encounter. The Fire bombs will stay on the ground until the next bombs are thrown. The bombs create a large area of effect around them and if touched by a player, the player gets inflicted Ignite.
- Ignite – A strong damage over time effect that spreads to other nearby players. In Hard Mode this is to be avoided or risk losing Vitality.
Frostbomb – Frostbomb is cast at around every 30 seconds. First Frostbombs can be cast after around 17 seconds from starting the combat encounter. Yaseyla’s Frostbomb targets the closest player to her excluding the tank taunting her. Frostbomb freezes the targeted player while also causing the player to lose 75 % of their health. An 8 second timer will begin and if the player is not healed back to full in this time limit, the frozen player meets an Icy Collapse.
- Veteran and Hard Mode: At a health percentage of 50 %, Yasela will target two closest players to her with Frostbombs
Chain Pull – Chain Pull is cast at around every 32 seconds. Yasela chains players in front of her line of sight. Chain Pull will stun players and players have only a few seconds to break free from the stun or they will be pulled to her.
Hamstrung Strike – Frontal cone cleave attack that applies a debuff called Armor Shred which as the name implies, shreds players’ armor.
Knife Blast – Strong area of effect ability where Yaseyla throws daggers around her. Non-tank players are advised to move out of it or roll dodge, especially if the mechanic is stacked alongside with Frostbomb. Applies Hemorrhage to players.
Vengeful Strike – Applies Hindered and Rattled to the target when blocked. Roll dodging the attack will enrage Yaseyla.
Slash – Yaseyla’s basic light attack.
Other Enemies in the Encounter
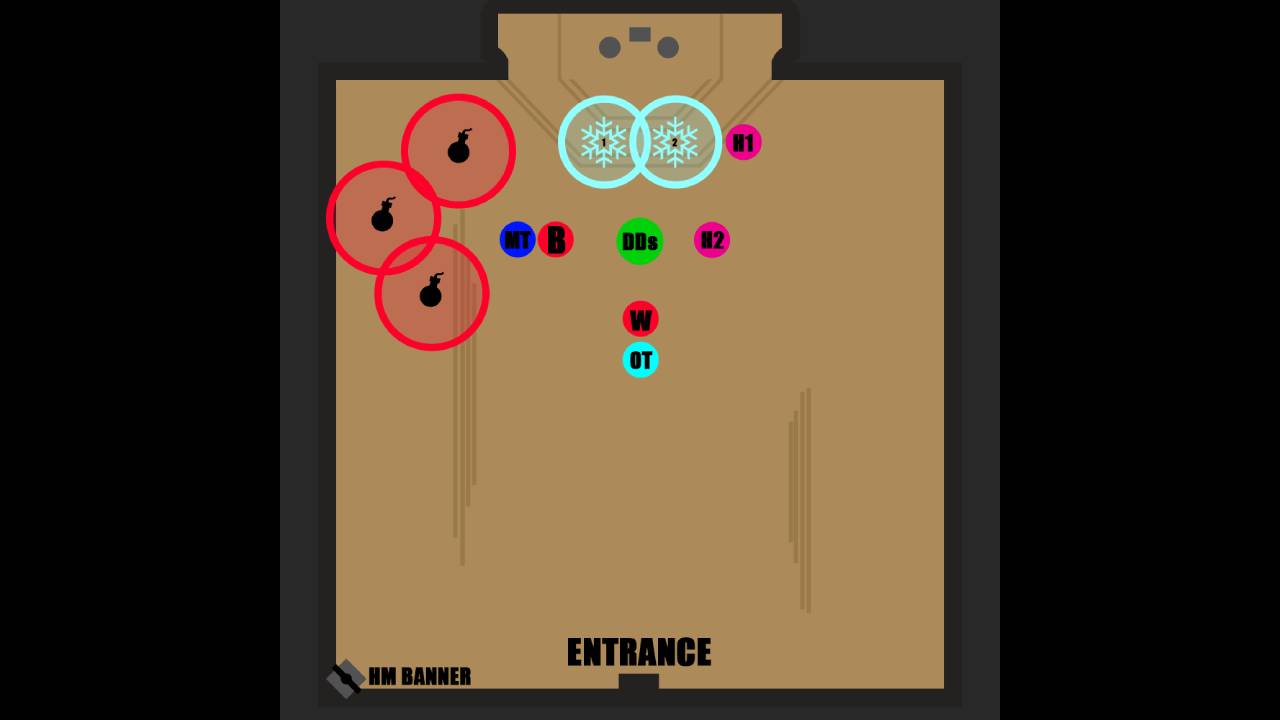
Example positions for Hard Mode difficulty where Healer 1 is healing the Frostbomb mechanic, Off-tank is tanking the Wamasu and Main-tank has kited the Fire Bomb Toss away from the group.
Wamasu
Exarchanic Yaseyla calls Contramagis Wamasu and 5 -Archers to aid her in battle with health thresholds of:
- Normal and Veteran: 90-, 70-, 50-, 30-, 20-, and 10 %
- Hard Mode: 90-, 70-, 60-, 50-, 35-, 30-, 20-, and 10 %.
Attacks:
Charged Headbutt – A winding attack that the tank must block. Roll dodging the attack will enrage the Wamasu. Blocking the attack applies Hindered and Rattled to the target.
Overwhelming Lightning – A huge frontal cone cleave attack. During this attack smaller but strong spherical variants spew out of the Wamasu. These can be quite dangerous to players if unblocked.
Charge – Wamasu targets a random player and charges at them. Anyone in its path will be hit for a significant amount of damage and knocked back. This attack will instantly kill anyone in its path on Hard mode.
Contramagis Archer
Contramagis Archers accompany the summoned Wamasu. Despite their appearance these Archers pose significant threat to the group.
Attacks:
True Shot – Archer targets a random player and begins to channel an interruptible attack. If the attack is not interrupted in time, the Archer’s True Shot will down even the mightiest Tank.
Overview of the Encounter
Controlling the health thresholds of Exarchanic Yaseyla is the main focus of the encounter. The group needs to focus on killing the Wamasu before continuing to damage the boss or else the group will be facing more Archers and Wamasu they are able to deal with.
Main-tank needs to learn how to kite the Fire Bomb Toss mechanic. On PC players can download addons for helping the tracking of time- and health based mechanics. Breaking Yaseyla’s line of sight or using elevation / small spaces can be used to kite the Fire bombs to one spot. However, this is usually unnecessary as just running away with the bomb is sufficient enough. Tanks can also utilize movement abilities like Apocryphal Gate, Streak and Mist form to kite the Fire bombs.
Main-tank using an alcove to kite all of the Fire bombs into one spot.
Throughout the encounter Contramagis Archers will spawn in and eventually they begin to prepare their interruptible attack called True Shot. In Veteran and Hard Mode difficulties True Shot will kill even the Tanks, so interrupting these Archers is a must. Interrupting duty can be assigned for Off-tank and a Healer. It is recommended to slot a range based interrupt skill like Crushing Shock or Venom Arrow. Both the Tank and the Healer can also slot a chaining skill for pulling the Archers near the Boss or the Wamasu.
Frostbombs should be placed always on either the same spot or same side of the group. Moving around with Frostbombs might cause other players to get trapped in the ice and it can make healing the mechanic away more difficult. In Veteran and Hard Mode difficulties at 50 % Exarchanic Yaseyla will begin to cast two Frostbombs instead of one.
Shrapnel is a Hard Mode only mechanic that adds a significant layer of difficulty to the fight. Many groups have opted in using defensive ultimates such as Barrier, Gibbering Shelter and Glyphics to counter the damage received during Shrapnel. At 25 % Yaseyla begins to cast Shrapnel on a timer, around every 52 seconds.
Exarchanic Yaseyla will summon Horrors with health thresholds of 60– and 35 %. When this happens it is advised to stop damaging the boss and deal with any other enemy left in the encounter. Players dealing with the Horrors should deal damage to all of the Horrors instead of burning down one. Players not dealing with the Horrors can assist with the mechanic by providing synergies and healing.
Common tactic, especially on Hard Mode, is to go all out on damage on the boss at 25 % health threshold. This is to kill the boss before she casts another Shrapnel on ~52 second timer. Wamasu will spawn at health thresholds of 20– and 10 %. The group avoids the Wamasu charges and kills the boss while ignoring the Wamasu. However, if the group struggles with damage it might be easier to take it slow even after 25 %.
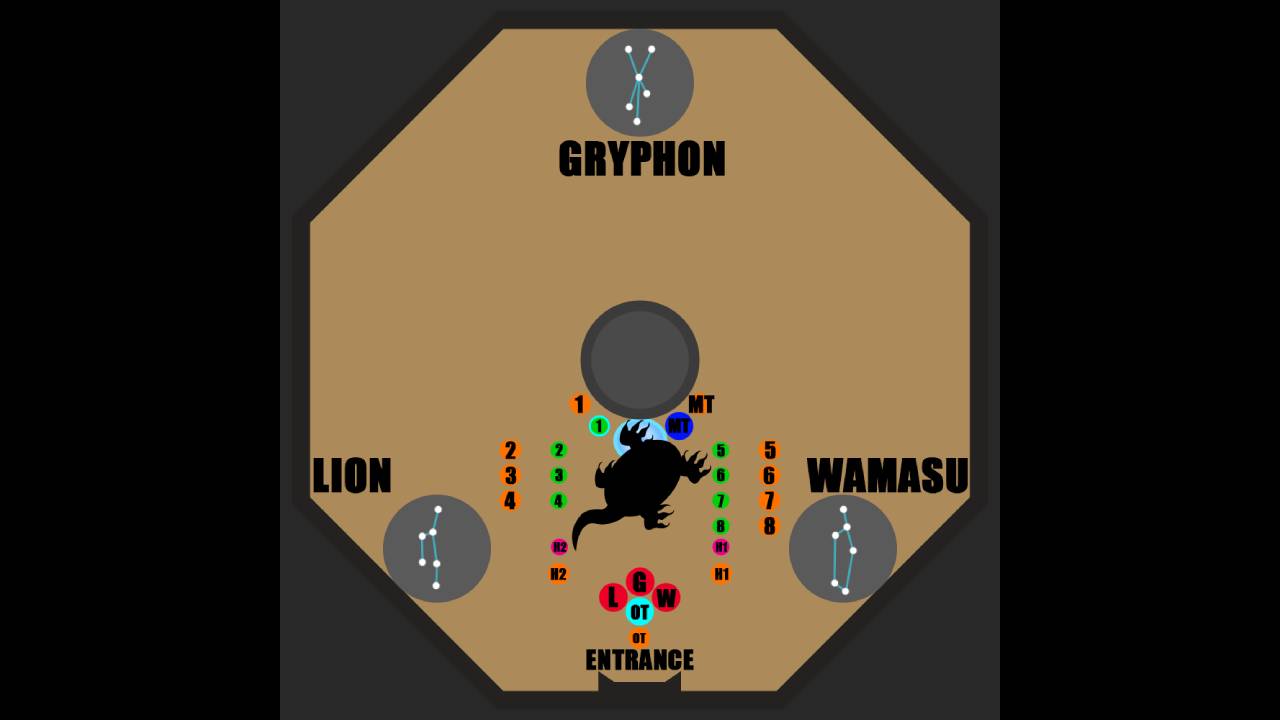
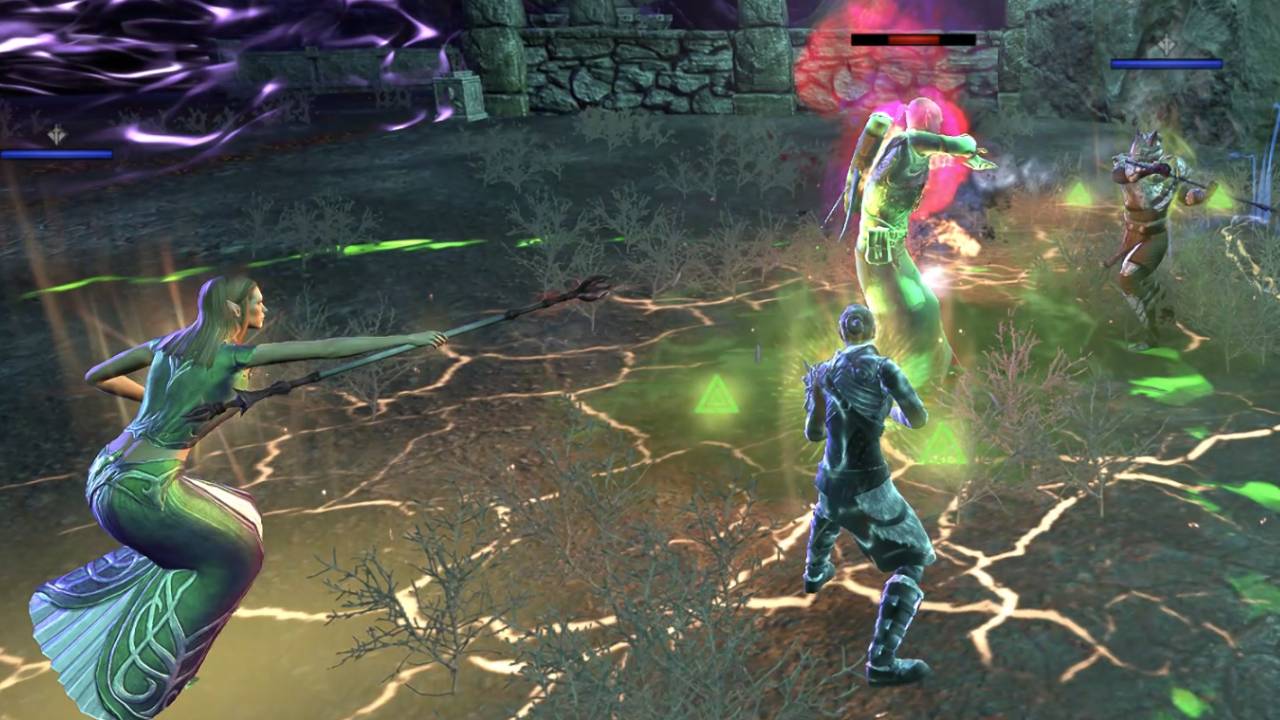
Boss 2 – Archwizard Twelvane and Chimera
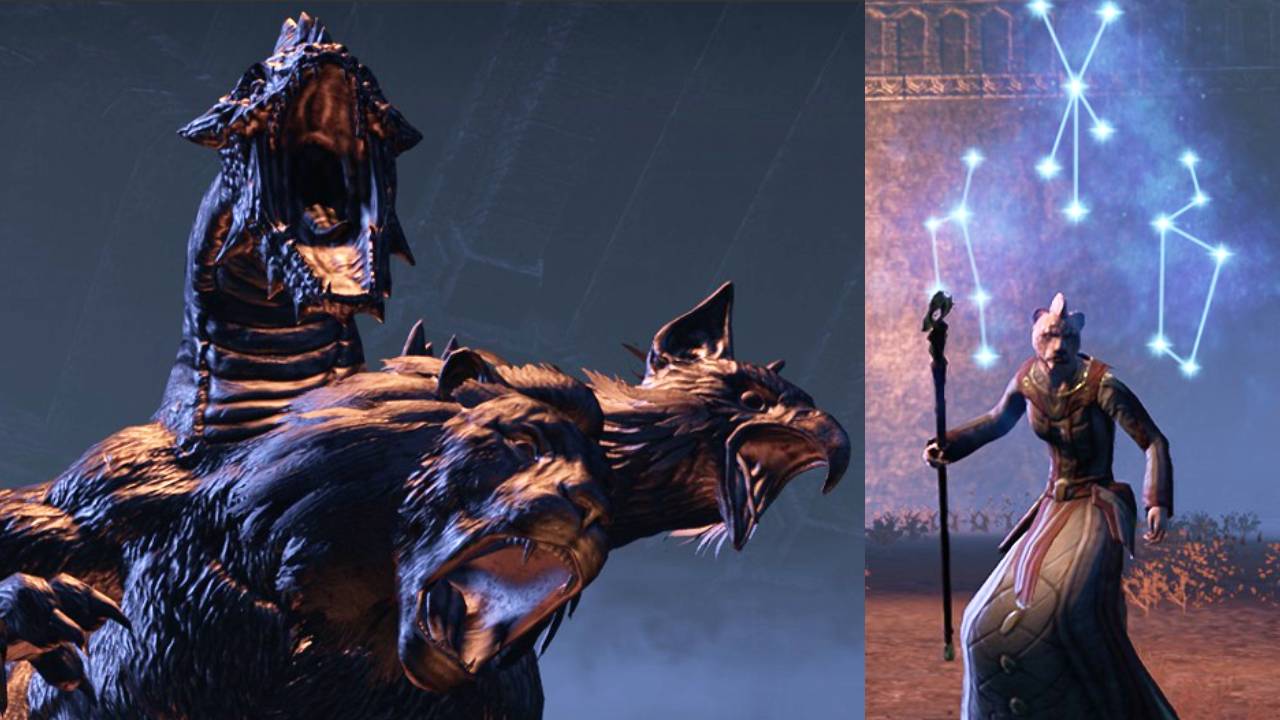
Archwizard Twelvane showing the three star signs of Lion, Gryphon and Wamasu. Next to her resides a Chimera statue.
Now we are going to take a look at the second boss fight in Sanity’s Edge Trial in ESO.
Boss Mechanics – Archwizard Twelvane
First part of the encounter is a fight against the Archwizard Twelvane. Her mechanics are timer based, meaning that there is no need to slow down damage to avoid stacking mechanics. Archwizard Twelvane attacks players with a combination of range and melee based attacks.
Time Based Mechanics
Blizzard – Twelvane shoots out several quick moving circles all around her. Getting hit by these circles freezes the players to the ground for 4 seconds, snaring them in place. Players can free themselves by Roll dodging out of them if necessary.
Clobber – Twelvane’s basic Light Attack.
Coruscating Field – Twelvane summons electric fields under the closest players to her. Forementioned fields then start following the closest player to them. The damage from standing in the fields ramps up quickly in Veteran and Hard Mode difficulties.
Entropic Flare – Twelvane’s ranged multitarget Light Attack that hits multiple players in front of her.
Ice Cage – Twelvane summons a hollow ice circle around her. This circle forces players to be either right against Twelvane or to keep their distance.
Lightning Rod Slam – Twelvane’s Heavy Attack where she slams her staff on her target. After connecting her slam with the player, a small circle appears under the player that quickly explodes causing all nearby players to take damage from Attracted Arc.
Racing Flames – Twelvane casts quick moving flame trails on the ground. Forementioned flames eventually turn into fiery simulacrums.
Firestorm Simulacrums – Simulacrums raise their staves above their heads and attack players with Firestorm. Firestorm acts as a weak multitarget fire staff light attack. In a group this can easily be outhealed, but in a Control Pathway without a healer this can cause issues in survivability. Simulacrums are only summoned by Twelvane at the start of the fight and in the Lion Control Room.
Strike – Twelvane’s basic Heavy Attack.
Boss Mechanics – Control Pathways
After the Archwizard Twelvane is dealt with, players are faced with a new threat in a form of status known as Radiance. All three platforms seen around the arena are lit up with their corresponding star signs whilst players have received Radiance.Radiance – Once Archwizard Twelvane disappears or an Ascendant Avatar dies, players receive a debuff called Radiance that lasts for 15 seconds. With Radiance, players receive a star sign above their heads that indicates which Control Pathway belongs to them. Players have 15 seconds to enter their corresponding Control Pathway before they die.
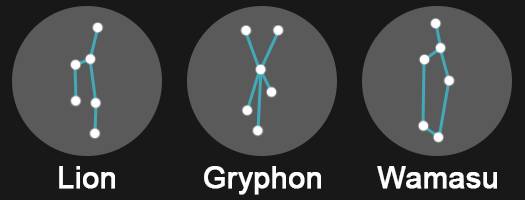
Lion, Gryphon & Wamasu Star Signs
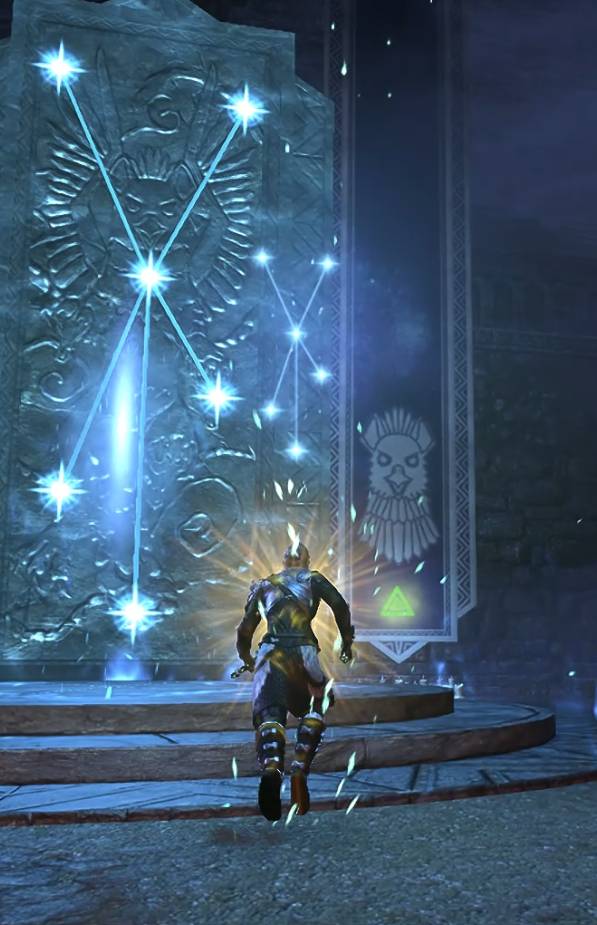
Crystal – Inside the Control Pathway players are required to align the corresponding asterism by destroying the Crystals in correct order. The amount of Crystals inside the room depends on the raid difficulty:
- 3 on Normal. All three Crystals are aligned against one wall.
- 4 on Veteran. One Crystal per wall.
- 5 on Hard Mode. One Crystal at each corner of the room and one extra at the front wall.
The order of Crystals to be destroyed is shown to players when the first player enters the room. The Crystals light up and emit a sound one after another. Once all Crystals have activated, they go dormant for a few seconds only to all come back up again. Players are now required to destroy the Crystals in the same order they first activated. It is recommended to destroy these crystals using ranged Light Attacks. Players are able to destroy the Crystals even with the damage reduction from Velothi Ur-Mage’s Amulet. Once the Crystals are destroyed the following message appears:
“X* asterism aligned. Control sequence complete.”
*X is the name of the last Control Room to be completed e.g. “Gryphon asterism aligned. Control sequence complete”.
Lion Control Pathway on Normal Difficulty with 3 Crystals active.
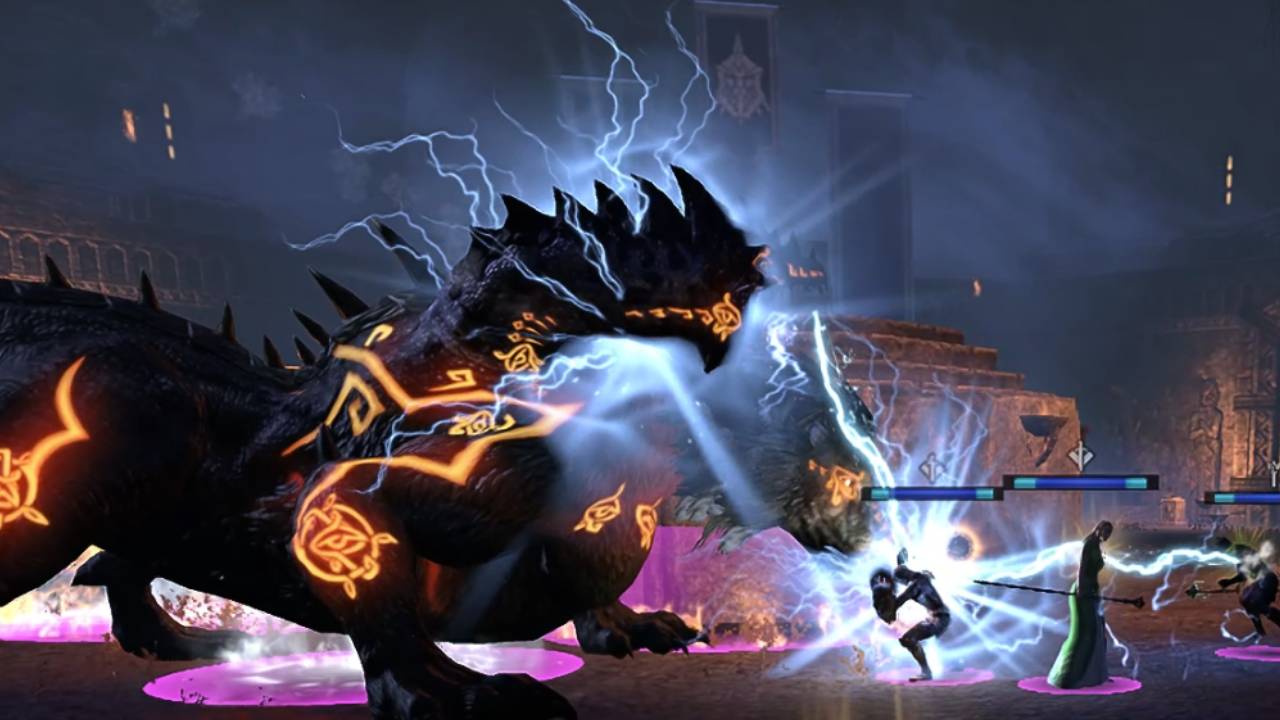
Boss Mechanics – Chimera
Once all three asterisms are aligned players are notified by a message stating:
“Chimera vivification complete.”
This frees the Chimera from its stony prison and the fight against the new foe begins.
Chimera’s mechanics are timer based, meaning that there is no need to slow down damage to avoid stacking mechanics.
Time Based Mechanics
The order of Chimera’s main mechanics are:
Chain Circuit > Arctic Blast > Lightning Bolt > Arctic Blast > Inferno.
The Chimera stays active for 90 seconds before turning back into stone.
Arctic Blast – Chimera hits the tank with Arctic Blast that creates a small, but dangerous pool of ice under the tank. Standing in the pool of ice applies the Arctic Shred status effect for 10 seconds. Players with this status effect take significantly more damage from enemy attacks.
Bite – One of Chimera’s basic Light Attacks.
Chain Circuit – Chimera targets the tank with Chain Circuit attack that leaps from player to player. The Chain Circuit’s leap targets the players with the shortest distance from the previous target. Same player can’t be hit twice in one Chain Circuit.
- In Normal difficulty the Chain Circuit only hits three players in total.
- In Veteran and Veteran Hard Mode the Chain Circuit targets six players.
In Normal difficulty the damage received from Chain Circuit can often be ignored as it only hits three players. However, it is still capable of doing lethal damage if players aren’t fully healed. Once the Chain Circuit completes, the players connected with the chain will have small Chain Burst appear around them. Some of the damage from this portion of the mechanic can be mitigated by keeping a safe distance from other players.
- Hard Mode Only: Players hit by the Chain Burst will gain a status called Circuit Charge for 30 seconds. Players with this status active will take massively increased damage from the next Chain Circuit. Players not connected in the initial Chain Circuit are advised to keep their distance until the Chain Burst disappears in order to avoid gaining the Circuit Charge status.
Inferno – Chimera’s Inferno attack has three different components:
- Inferno: During the mechanic Chimera breathes fire towards the tank. This flamy breath isn’t too dangerous to tanks if blocked but other players behind the tank should be vary of it.
- Sunburst: When Chimera begins to breathe fire towards the tank it also shoots out fiery Sunbursts on every player. Players have a few seconds to move around before the Sunburst hits them. Players can either block or roll dodge the impact.
- Sizzling Crater: Once the Sunburst has hit the players, a Sizzling Crater is created under them. This pool of heat is quite dangerous as the damage from it ramps up the longer the player stands on it. It is advised to quickly run away from the boss during Sunburst, so that the area near the boss isn’t filled with Sizzling Craters after the mechanic.
Lightning Bolt – Bolts of lightning fall down from the sky on every player, creating a small dangerous aura around every player. After around two seconds from the lightning appearing, the aura around the players explodes. Players are advised to keep a safe distance from others in order to not stack the damage with each other.
Maul – Chimera’s basic Heavy Attack.
Peck – One of Chimera’s basic Light Attacks.
Quick Strike – One of Chimera’s basic Light Attacks.
Stab – One of Chimera’s basic Light Attacks.
Control Avatars
Three different Control Avatars are released into the arena while fighting against the Chimera; Ascendant Gryphon, Ascendant Lion and Ascendant Wamasu. Killing a Control Avatar opens its corresponding Control Pathway and applies Radiance to four closest players to it. The Control Avatars should be kept alive until Chimera returns to stone or the players will have to enter Control Pathways prematurely. This is the main reason why many groups in harder difficulties opt to have a Damage Dealer with a Taunt skill while Off-tank is on the side, keeping the Control Avatars out of harm’s way. The Control Avatars appear in random order every 30 seconds which means that the last Control Avatar appears when Chimera returns to stone.
Ascendant Gryphon
Attacks:
- Eviscerate – The Ascendant Gryphon’s frontal cone cleave attack.
- Wind Lance – The Ascendant Gryphon begins to flap its wings, causing currents of damaging winds to fly forward.
Ascendant Lion
Attacks:
- Pride’s Call – The Ascendant Lion summons fiery lions to aid it in battle.
Ascendant Wamasu
Attacks:
- Shed Lightning – The Ascendant Wamasu hits all the players with small strikes of lightning.
- Impending Storm – The Ascendant Wamasu releases multiple slow moving balls of lightning.
- Repulsion Shock – The Ascendant Wamasu breathes lightning in a frontal cone cleave attack.
Overview of the Encounter Boss 2
Example positions for Hard Mode difficulty where Player 1 uses taunt on the boss to connect the Chain Circuit to their side. Off-tank moves to Player 1’s group for the Chain Circuit and then returns to their normal position. Orange icons indicate locations where players can drop their Sizzling Craters from the Inferno mechanic. Light blue area under the boss is a spot reserved for Main-tank to drop Arctic Blast pools.
The encounter against Archwizard Twelvane and Chimera begins with just Twelvane standing in the arena. There is around eight seconds of preparation time before Twelvane turns hostile. This means it is quite a common tactic to pre-buff(1) against her by placing skills like Scalding Rune, Endless Hail and some class specific skills like Daedric Tomb on her.
Once the encounter starts players have around 5 seconds to damage her before Twelvane casts Coruscating Fields under players. These sparkling areas follow the closest player to them and they are quite dangerous in higher difficulties as the damage from said mechanic can ramp up very quickly. Therefore, the beginning of the fight is recommended to start as close to her as possible so that all of the Coruscating Fields are placed near her. After this the boss is quickly moved away from the Coruscating Fields. The group should decide a predetermined place where Twelvane will be moved to, so that players are able to quickly run to the new position and place ground based attacks there. While most of the group have run off with the boss to the new location, Off-tank and sometimes Healer(s) will stay behind, kiting the Coruscating Fields so that they won’t threaten the rest of the group. Rest of the mechanics for Twelvane is about avoiding standing in red circles and damaging her. If the fight against her lasts long enough, the cycle begins anew with more Coruscating Fields appearing under players.
Once the Archwizard Twelvane is defeated all of the players will receive a status called Radiance that lasts for 15 seconds. With Radiance, players receive a star sign above their heads that indicates which Control Pathway belongs to them. Players have 15 seconds to enter their corresponding Control Pathway before they die. There is no known way of controlling which star sign players get when defeating the Archwizard Twelvane.
(1) – Pre-buffing is the act of preparing for the encounter with skills and items that won’t be used in the encounter once it has started. With pre-buffing players are able to do more damage at the start of the fight than what they would normally be able to do without pre-buffing. In order to scale down the impact of pre-buffing, ZeniMax Online Studios have placed conditions to many of the previously common pre-buffing sets that require the wearer to be in combat-state before the set effect can be activated. An example of this is a set Elf Bane that now requires the wearer to be in combat before the set’s duration extension effect applies to Flame Damage over Time abilities.
A player with the Gryphon Star Sign above their head about to enter the Gryphon Control Pathway.
Inside the Control Pathways players are tasked to destroy the Crystals in correct order. The order is shown to the players with the Crystals activating one after another accompanied by a sound effect for activation. The most reliable way to destroy forementioned Crystals is to hit them with ranged Light Attacks from either staves or bows. The damage reduction from the Velothi Ur-Mage’s Amulet won’t prevent players from destroying the Crystals with one attack (fixed during a PTS cycle). If the Crystals aren’t destroyed in time, they will reset and activate in a new pattern.
After the Crystals are destroyed and the Pathways’ Asterisms are aligned, Chimera will enter the fight starting the second phase of the encounter. Chimera just like the Archwizard Twelvane function in a time based manner. This means the fight against Chimera will always follow a certain order:
Chain Circuit > Arctic Blast > Lightning Bolt > Arctic Blast > Inferno.
Chain Circuit is the main mechanic of the fight against Chimera. While the mechanic is relatively easy to manage in normal difficulty, it will require some practice with positioning in Hard Mode. In Normal difficulty the Circuit will only connect to three players while in Veteran and Hard Mode difficulties the Circuit will connect to six players. In addition to the Circuit connecting six players, in Hard Mode difficulty the mechanic will leave the targeted players with a status called Circuit Charge. This status effect is the reason for dividing the group into two stacks of six players on opposite sides of the Chimera. Players possessing this status effect can’t be hit with Chain circuit again for 30 seconds or they will be instantly killed by the mechanic. Chimera’s basic Light Attacks are relatively harmless and only the Heavy Attack will be a threat to players. This is one of the reasons for why in a Hard Mode difficulty Damage Dealer is often tasked in slotting a Taunt skill for Chimera. The other reason is that the Off-tank is tanking the Ascendant Avatars and protecting them from taking unnecessary damage. However, the Damage Dealer with Taunt skill shouldn’t take any damage from Chimera if the taunt swap is done right. Once Chimera begins its Chain Circuit attack on the Main tank, the Damage Dealer can taunt the boss and cause the Circuit to connect to them instead. Even if the Chimera doesn’t visually turn to face the Damage Dealer, as long as the taunt has been swapped in time the Chain Circuit will connect to the Damage Dealer. After the Chain Circuit has hit the six players, the Main tank will re-taunt the Chimera.
Chimera targets the tank with Chain Circuit that leaps to two other players in Normal difficulty. A pool of Arctic Shred is under the Chimera while the edges of the middle platform are surrounded by Sizzling Craters.
Arctic Blast is the most dangerous attack for the Main tank. After the Arctic Blast hits the Tank, a pool of ice drops under the Tank. Standing in the pool applies the Arctic Shred status effect for 10 seconds. Players with this status effect take significantly more damage from enemy attacks. The combination of Arctic Shred and Chimera’s other mechanics can inflict a significant amount of damage against the Tank. Once the Main-tank learns the timing of the Arctic Blast, the Tank can safely drop the pools of ice under the Chimera.
Lightning Bolts is a mechanic that hits every player in the encounter. This mechanic is one of the most dangerous mechanics for Damage Dealers as the damage can stack. In order to mitigate the damage received from the Bolts, players are advised to keep a safe distance from each other.
Inferno just like the Lightning Bolts mechanic will target every player in the encounter. During Inferno, Sunbursts fall from the sky on every player, leaving Sizzling Craters at the point of impact. Sunbursts can be blocked or roll dodged. Failing to perform either of the aforementioned actions results in the player getting stunned. Sizzling Crater’s damage ramps up the longer the player stays on it, therefore it is advised to keep the contact time as short as possible. Before the encounter against the Archwizard Twelvane and the Chimera, the group should discuss where the Sizzling Craters should be placed. Players can’t stand still near the Chimera while the mechanic is happening because the area would soon be filled with the Craters.
While all of the previously mentioned mechanics have been happening, every 30 seconds an Ascendant Avatar will be released into the arena. The order of the Ascendant Avatars appearing is randomized. The Off-tank taunts the approaching Ascendant Avatars and keeps them away from the Chimera. This is to reduce the damage the Avatars take during the fight. Killing an Avatar causes four closest players to receive the Radiance status, meaning these players have to leave the arena and go inside a Control Pathway. Chimera stays active for 90 seconds before turning back into stone, meaning that the last Ascendant Avatar gets released when Chimera disappears. However, killing Chimera before the 90 seconds have lapsed is possible if the group has enough damage. Once the Chimera has left the encounter, players should go near their Ascendant Avatar. Selecting which one to go to should be discussed before starting the encounter. Both tanks will select their own Avatar and then the third avatar goes to the Damage Dealer with taunt. In the Control Pathway Room an elemental aspect of the Archwizard Twelvane will target and chase the first player to enter the room. Therefore, taunting the elemental Twelvane is not necessary if she is targeting the appropriate player. The Control Pathway Room with most incoming damage is the Lion room as the fiery aspect of Twelvane summons Firestorm Simulacrums to aid her. These Simulacrums can be killed but they will be resummoned shortly thereafter. After all three Asterisms are once again aligned the Chimera reappears and the fight against it continues repeating until the group wipes or the Chimera dies.
Boss 3 – Ansuul the Tormentor
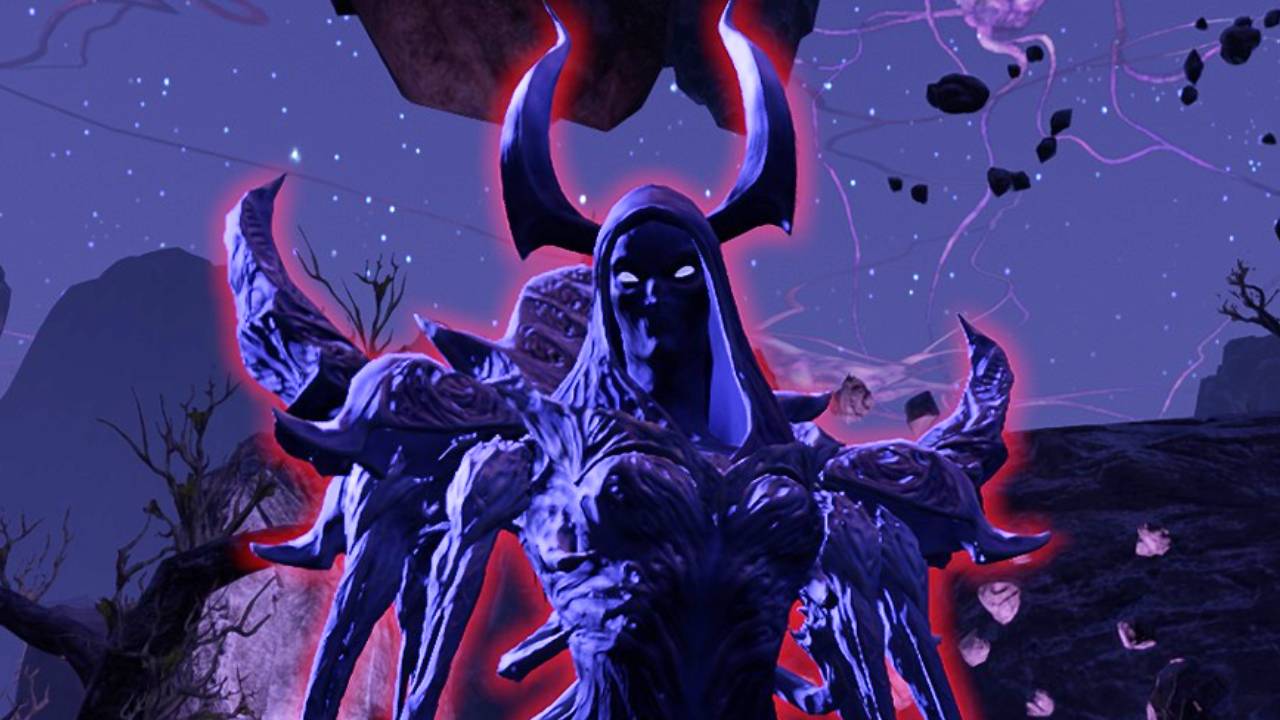
Ansuul the Tormentor waiting for the group of Undaunted to approach her.
Boss Mechanics
The encounter against Ansuul the Tormentor gets progressively harder as the fight advances. Ansuul gains more mechanics every time the group of players successfully run through her mazes. Ansuul has a combination of health threshold based mechanics alongside timer based mechanics. Health thresholds dictate the phase of the encounter while the amount of timer based mechanics increase with every notable health threshold.
Health Threshold Mechanics
Breakdown – At health threshold of 20 % Ansuul casts Breakdown, creating three elemental copies of herself. These three copies embody the three different elements seen in the encounter thus far. The elemental copies can’t be killed individually. Once all of the three copies reach 0 % health, the copies will vanish and the real Ansuul the Tormentor reappears in the arena.
Flush – Ansuul casts Flush to clear the arena from any remaining Enraged Fragments at health thresholds of 60 % and 40 % Ansuul doesn’t cast Flush at 80 % because at that point in the encounter there aren’t any Enraged Fragments to flush out.
Manic Phobia – This mechanic requires some coordination and is based on Ansuul’s health thresholds.
- Normal and Veteran: 90-, 70-, 50-, and 30 %
- Hard Mode: 90-, 70-, 50-, 30-, 20 % (immediately after killing the copies created from Breakdown) and after 20 % around every 25 seconds.
Ansuul targets the player taunting her and inflicts Manic Phobia on them which in turn in Hard Mode difficulty applies a status called Manic Trauma. The player is stunned for a few seconds and then sent to an edge of the arena. Right next to the player an Essence of Manifestation has been summoned in and Ansuul itself is surrounded by an aura only the player with Manic Phobia can see. If the player with Manic Phobia walks into the Ansuul’s aura, they will be hit with Avulse which will instantly kill the player. The only way to remove Manic Phobia is to kill the Essence Manifestation. To prevent the Main-tank from being hit by Manic Phobia, a Healer or Off-tank will taunt Ansuul near the health threshold so that they will receive Manic Phobia instead of the Main-tank.
The Ritual – Ansuul begins The Ritual at health thresholds of 80-, 60- and 40 %. In The Ritual Ansuul creates a huge red area that players have to run out of or they will die. Once the area fills up an elemental maze is created. The element in question is randomized but it is one of three available: Fire, Poison or Shock. With every completed Ritual, Ansuul gains more mechanics.
- Mental Barrier – In Hard Mode during The Ritual players are chased by a big area of effect known as the Mental Barrier. This mechanic will instantly kill anybody touching it. Therefore, in Hard Mode every player needs to run the maze through unlike in Normal or Veteran difficulties. However, the Mental Barrier still exists in front of all players in all difficulties. Players are unable to run through the maze before the Mental Barrier blocking the way has vanished from the arena.
- Ritual Blast – Ansuul casts Ritual Blast if no player has entered the battle against Warlock Vanton in time, killing everybody in the process.
Time Based Mechanics
Anxiety’s Grip – Anxiety’s Grips are mines placed down by Ansuul. These mines combined with Wrack and Wrathstorm are the main reason for the group losing vitality. Tanks and Healers should defuse as many mines as possible so that the Damage Dealers will be protected from harm. These mines also apply a snare for 10 seconds that stacks with itself. A player defusing these mines in quick succession will eventually be reduced to slow walking speed.
Calamity – A strong cleave attack that happens on a timer.
Execute – An interruptible channel attack that does heavy damage and in harder difficulties will one shot players if not interrupted.
Phobic Bolts – Ansuul’s basic ranged Light Attack.
Phobic Claws – Ansuul’s basic melee Light Attack.
Poisoned Mind – Ansuul targets a random player with her Poisoned Mind mechanic. The player receives a growing poison circle around them for 10 seconds. The player with Poisoned Mind should stay in the group with other players and Healers will out heal the damage received. The difficult part of the mechanic comes from when there are two players at the same time with Poisoned Minds in Hard Mode difficulty. These two players need to stand away from each other while still staying in the group with others. Players with a Poisoned Mind are advised to stand still as much as possible. This makes it easier for Healers to heal and other Damage Dealers to predict how much damage they will be taking.
Spray – A spray of poison in frontal cone cleave attack.
Sunburst – Ansuul drops a singular Sunburst down from the sky on a player. This mechanic functions the same as Chimera’s Sunburst with the difference being the impact crater left behind and that player’s can’t avoid it with roll dodge. While Chimera’s Sunburst leaves a Sizzling Crater, Ansuul’s Sunburst leaves Afterburn crater that shoots out balls of fire. This means that it is very important to take the Sunburst far away from the group to mitigate as much damage as possible from the Afterburn. In Hard Mode Ansuul is able to cast Sunburst right from the beginning of the encounter while in Veteran she gains the ability from Vanton’s Rage. In Normal difficulty Ansuul isn’t able to cast Sunburst.
Wrack – Ansuul summons big lightning from the sky that stuns players standing in it. Wrack’s stun enables Ansuul’s other mechanics to finish off any unfortunate players. Wrack alongside Anxiety’s Grip and Wrathstorm are the main mechanics for players to learn as the combination of these mechanics cause most of the vitality losses in the encounter. Ansuul is able to use Wrack right from the beginning of the encounter.
Wrathstorm – Ansuul places a ring of fiery mines around her and soon after creates an explosion around her. The mines if touched Ignites players, causing heavy damage. In Hard Mode players need to keep in mind where the mines will appear in order to avoid them or risk losing vitality. The explosion part of the attack can be roll dodged to avoid taking damage from it. The combination of getting stunned by Wrack and then hit by Wrathstorm is almost always a guaranteed loss of vitality in Hard Mode.
Other Enemies in the Encounter
Enraged Fragment
Enraged Fragments are fire atronachs that spawn in around the arena during the encounter against Ansuul the Tormentor. Enraged Fragments can’t be pulled with chains but they can be taunted. Ignoring Enraged Fragments in higher difficulties is not advised. While Enraged Fragments aren’t too threatening all by themselves, their attacks can cause issues when combined with Ansuul’s attacks. Furthermore, Enraged Fragments’ spawn is timer based. This can lead to the arena getting filled with Enraged Fragments if not dealt with. Enraged Fragments will disappear from the arena when Ansuul casts Flush on the arena and soon thereafter Ansuul creates a maze known as The Ritual.
Attacks:
- Flare – Basic ranged Light Attack. Alone Enraged Fragments’ Light Attacks won’t kill players, but combined with other damage sources they can quickly pose a significant threat.
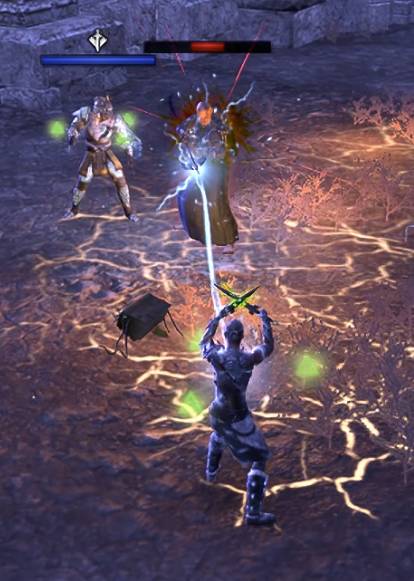
- Inferno – Interruptible channeling attack where Enraged Fragment shoots out its’ Light Attacks in rapid succession. It is recommended to have at least one player capable of interrupting Enraged Fragment with range based interrupt skills like Crushing Shock or Venom Arrow. Tanks can temporarily interrupt the Enraged Fragments by using a pull skill like Silver Leash or Unrelenting Grip on the Enraged Fragments. Enraged Fragments can’t be pulled in. However, they can be stunned with chains which in turn interrupts the channel.
Essence Manifestation
Essence Manifestation is a priority target for the group once it appears in the encounter. Essence Manifestations appear when a player gets teleported to an edge of the arena by a mechanic called Manic Phobia. In Hard Mode difficulty the player with Manic Phobia also gains a status called Manic Trauma which reduces the healing received significantly. The player with Manic Phobia can’t get too close to Ansuul as Ansuul is surrounded by the Avulse aura. The Avulse aura surrounding Ansuul will not fade away until Essence Manifestation is dealt with. The player who receives Manic Phobia is advised to quickly run away from Essence Manifestation so that they won’t get damaged by it. Essence Manifestation should be led closer to the Main-tank tanking Ansuul so that the Main-tank can taunt the Essence Manifestation and keep it close to Ansuul. However, if Off-tank gets Manic Phobia, they can take Essence Manifestation closer to the Main-tank without too much worry from its attacks.
Attacks:
- Pummel – Essence Manifestation’s basic Heavy Attack.
- Talons – Essence Manifestation’s basic Light Attack.
- Voidwave – A strong frontal cleave attack.
Memory Fragment
Memory fragments are gray flying imps summoned by Ansuul. Unlike Enraged Fragments, Memory Fragments can be pulled with skills like Silver Leash or Unrelenting Grip. Main-tank, Off-tank and a Healer can slot a pull skill to help with controlling the Memory Fragment population. Furthermore, unlike Enraged Fragments, Memory Fragments won’t disappear when Ansuul casts Flush.
Attacks:
- Bolt – Memory Fragment’s basic ranged Light Attack.
- Zap – Memory Fragment’s basic melee Light Attack.
Warlock Vanton
Warlock Vanton has three different elemental forms: Fire, Poison and Shock. Warlock Vanton resides in a side room that is only accessible via running through The Ritual maze and using a synergy prompt called Attunement to open a portal to Vanton’s Ambition (Shock), -Rage (Fire) or -Weakness (Poison). Only up to four players can enter the portal. If nobody enters the portal, Ansuul will cast Ritual Blast, killing everybody.
Attacks:
- Blight Burst – Vanton’s throws a burst of blight at a player.
- Conduit – Warlock Vanton casts a Conduit around one player. The player with Conduit should avoid unnecessary movement, so that the Conduit won’t hit other players near it.
- Execute – An interruptible channel attack that does heavy damage and knocks back the targeted player. In harder difficulties Execute will one shot players if not interrupted.
- Hack – Vanton’s basic Light Attack.
- Sparks – Every melee hit from Shock Warlock Vanton hits with additional Sparks damage. Players standing too close to the player (usually the Off-tank) getting hit by Vanton will also get shocked by Sparks. Therefore, players not tanking the Warlock are advised to stay behind Vanton.
- Spray – A spray of poison in frontal cone cleave attack.
- Sunburst – Fire Warlock Vanton casts a meteor from the sky that falls on a player.
- Uppercut – Warlock Vanton’s basic Heavy Attack.
- Wrathstorm – Warlock Vanton places a ring of fiery mines around him and soon after creates an explosion around him. The mines if touched Ignites players, causing heavy damage.
The Ritual and Attunement
Ansuul casts The Ritual three times during the fight against her. The Ritual creates an elemental maze that players need to run through in order to activate Attunement synergy prompt and then enter the portal into Vanton’s Ambition, -Rage or -Weakness.The element in question is randomized but it is one of three available: Shock, Fire or Poison. With every completed Ritual, Ansuul gains more mechanics based on the completed elemental maze.
The portals to Vanton’s Ambition, -Rage and -Weakness lead to side rooms in the encounter where up to four players need to face an elemental aspect of Warlock Vanton. Furthermore, if players ignore the mechanic, Ansuul will cast Ritual Blast, killing everybody in the process.
The Fire Maze
Furios Rage – The fire maze is filled with moving circles called Furios Rage that if touched sets players on fire, creating a damage source called Ignite and applying Brittle for 5 seconds. Ignite can spread from player to player if players touch the area surrounding players suffering from Ignite. However, even in Hard Mode Ignite can easily be out-healed by Healers.
The Poison Maze
Toxic Impression – The poison maze is filled with unmoving globs of poison. Touching these globs inflicts Toxic Impression of players which reduces the players’ movement speed. This reduction in speed can stack with itself. Therefore, eventually players’ movement speed can be reduced to a crawl.
The Shock Maze
Chilling Thought – The shock maze is filled with moving circles known as the Chilling Thought. These moving circles, if touched, will explode stunning everybody nearby. Roll dodging or blocking while touching the Chilling Thought will stop them from moving.
Vanton’s Ambition, Rage and Weakness
Warlock Vanton waits for the players at the end of Ansuul’s maze. Near the Warlock players will get a synergy prompt for Attunement. Activating Attunement opens a portal that pulls Vanton into it. Up to four players can enter the portal after Vanton. The portal leads to a fight against Vanton who has been imbued with an aspect of himself. Players are tasked to subdue Warlock Vanton which in turn will open a portal back to the main fight against Ansuul the Tormentor. The players fighting against Vanton aren’t safe from the Mental Barrier cast by Ansuul. Therefore, the players fighting against Ansuul have to make sure Ansuul’s health doesn’t cross the threshold for the next Ritual.
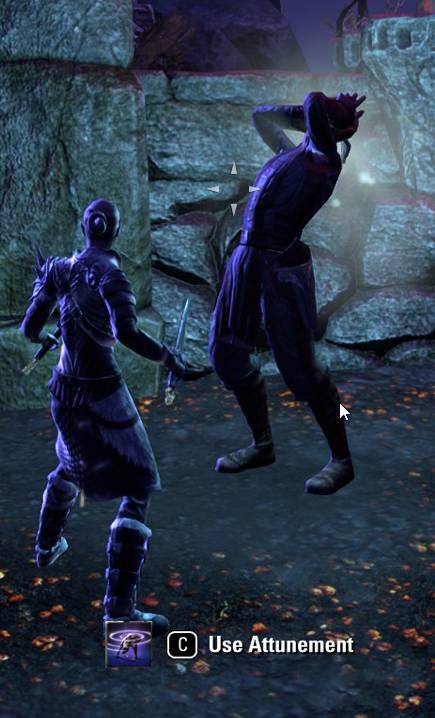
A player getting prompted to use Attunement to open a portal.
Warlock Vanton’s aspects:
- Ambition imbues Warlock Vanton with Shock.
- Rage imbues Warlock Vanton with Fire.
- Weakness imbues Warlock Vanton with Poison.
Players fighting against Warlock Vanton who has been imbued with an aspect of Weakness (Poison). Vanton is in the process of casting Blight Burst.
Warlock Vanton casting an Execute on a player. If not interrupted it will do heavy damage and knock the executed player back. In harder difficulties the mechanic will one shot a player.
Warlock Vanton casting Wrathstorm. The outer circle is covered in fiery mines that will apply Ignited if touched while the center has filled up with the Wrathstorm explosion that the players have to roll dodge.
Overview of the Third Boss Encounter
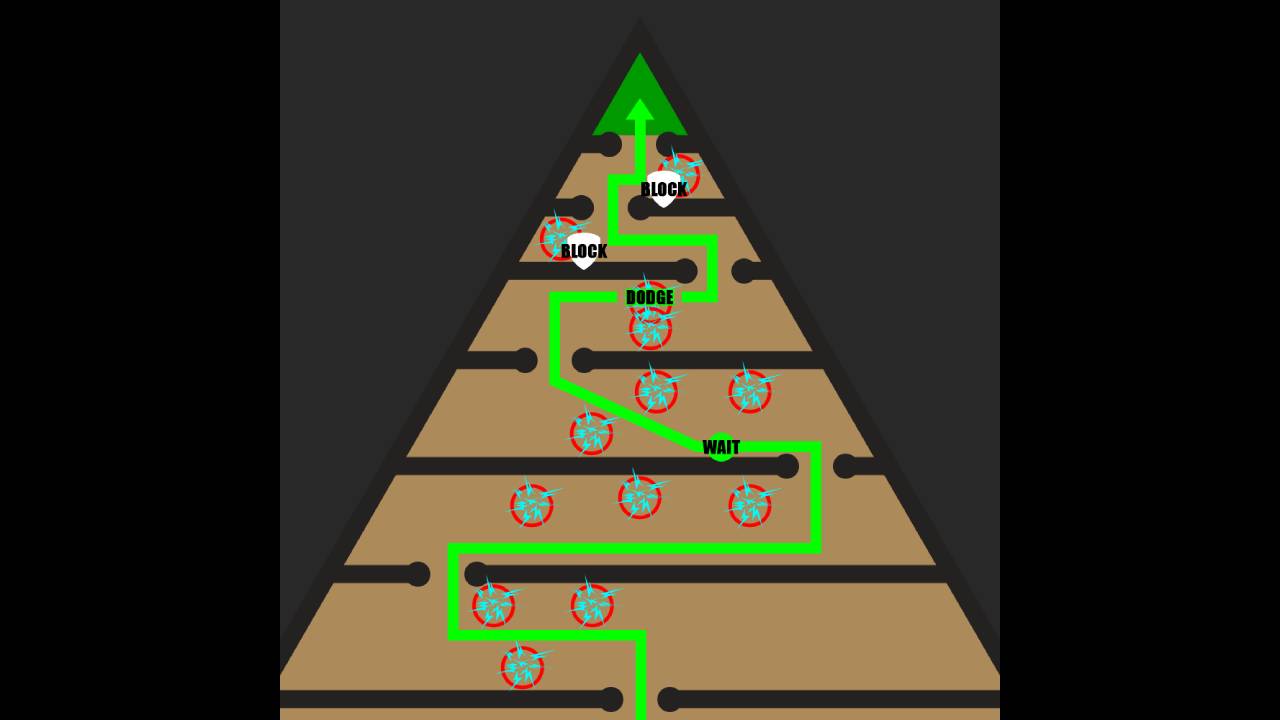
Example path for lightning maze during the fight against Ansuul the Tormentor. Block icons indicate spots where the fastest player can stop the moving obstacles by blocking, helping the rest of the group clear the maze with ease.
The final encounter against Ansuul the Tormentor sees the players enter a triangle-shaped arena. One of the most common tactics with Ansuul is to keep her in the middle of the arena where all of the sides of the arena are equally far away from her. This will help players damage, interrupt and chain enemies that spawn in during the encounter. In Hard Mode Ansuul’s first mechanic is Sunburst while in Normal and Veteran Ansuul’s first mechanic is Wrack. Wrack causes several big areas of lightning to rain down from the sky, stunning anybody standing in them. Wrack by itself is relatively harmless but in combination with other mechanics it poses a significant threat to the group. Learning to avoid getting stunned by Wrack is mandatory for any trifecta(2) attempts.
(2) – Trifecta means to achieve No Death, Speed Run and Hard Mode all at the same time in the activity.
Important health thresholds to learn for Ansuul the Tormentor encounter:
Manic Phobia:
- Normal and Veteran: 90-, 70-, 50-, and 30 %
- Hard Mode: 90-, 70-, 50-, 30-, 20 % (immediately after killing the copies created from Breakdown) and after 20 % around every 25 seconds.
The Ritual:
- All difficulties: 80-, 60- and 40 %
Breakdown:
- All difficulties: 20 %
Once Ansuul the Tormentor reaches a health threshold of 90 % the first health based mechanic begins. Ansuul casts Manic Phobia on the player who she is aggressive to (most likely the Main-tank). Manic Phobia teleports the player to a corner of the arena and in Hard Mode difficulty applies Manic Trauma which reduces healing received significantly. Manic Phobia turns into a very problematic mechanic once Off-tank is in the sideroom fighting against Warlock Vanton as there is only one tank available in the main encounter. Therefore, if Main-tank receives Manic Phobia, Ansuul will soon roam free causing havoc wherever she goes. To prevent the Main-tank from receiving Manic Phobia is to have a Healer taunt Ansuul just before the mechanic begins. Once the Healer gets teleported to the edge of the arena, it is recommended for said Healer to run closer to the main group so that the Main-tank can taunt the Essence Manifestation which has appeared right next to the Healer. In Hard Mode difficulty the Healer should avoid getting hit by Essence Manifestation as the Manic Trauma reduces the amount of healing received significantly and Essence Manifestation’s talons can cause dangerous amounts of damage. Targeting Essence Manifestation should be prioritized in order to remove the dangerous Avulse aura from Ansuul. Another important thing to note is that if Essence Manifestation is still alive when Ansuul goes to cast The Ritual, the Avulse aura gets moved to the center of the arena where it stays until either Ansuul is back to fight the group or the Essence Manifestation is killed.
When Ansuul reaches the health threshold of 80 % the first Ritual begins. The aspect of the maze created from The Ritual is random but it will always be one of the three elements: Shock, Fire or Poison.
- Fire maze is filled with moving circles known as Furious Rage. When touched these circles apply Ignite and Brittle to players. Furthermore, the Ignite status creates a small circle around the player that when touched spreads to other players. While Ignite is a dangerous looking mechanic, Healers are still able to outheal it even in Hard Mode difficulty, but it is still not advised to play with the fire.
- Shock maze is most commonly referred to as the most dangerous of the mazes. Shock maze has moving circles known as Chilling Thought. Touching these circles causes an explosion that stuns everybody near it. In Hard Mode difficulty where the Mental Barrier is following the group, this stun can cause players to get caught in the Mental Barrier, causing a loss in vitality. However, as the mazes are always arranged the same way, players are able to memorize specific paths to take to avoid most of the danger.
- Poison maze is filled with static but exploding circles known as Toxic Impressions. These areas, if touched, reduce the players’ movement speed significantly. The reduction in speed can stack with itself if players keep touching the Toxic Impressions. This can eventually lead to a loss in vitality in Hard Mode when the Mental Barrier catches up to the slowed down group.
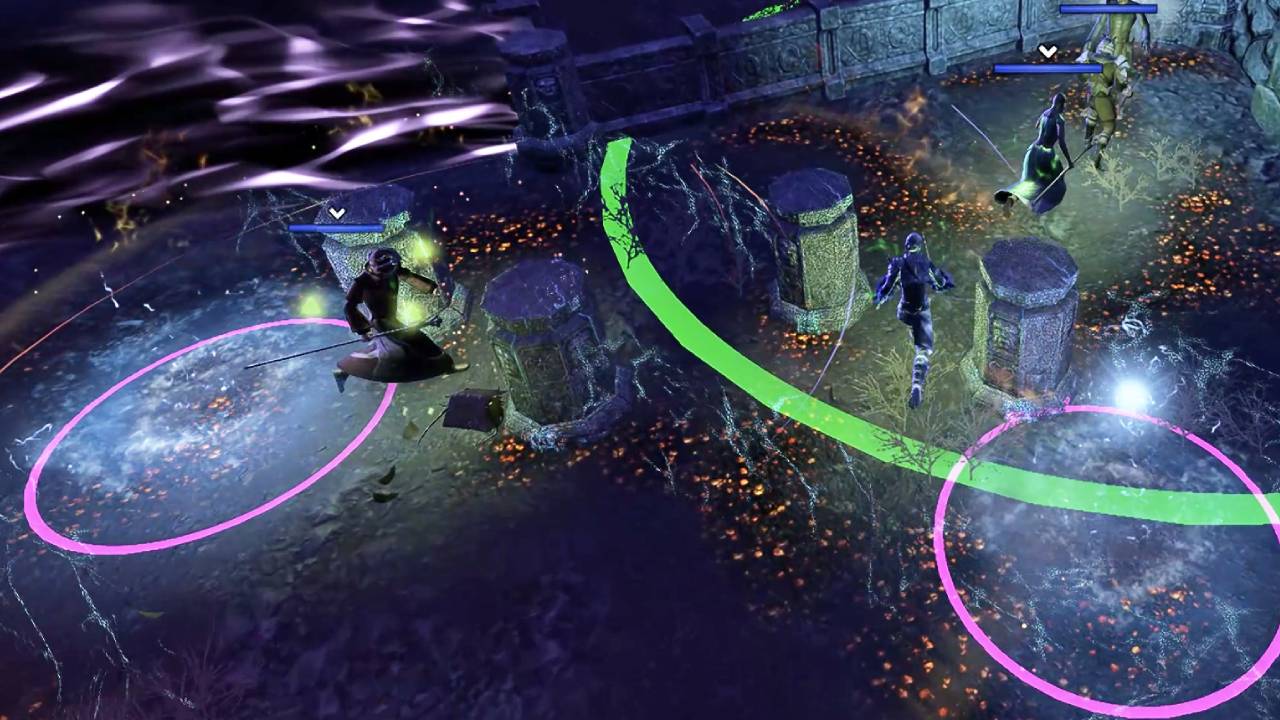
Last two moving Chilling Thought circles have been safely stopped by the fastest player running ahead and touching them while blocking.
Once the players reach the end of the maze a synergy prompt for Attunement awaits them that opens up a portal to fight an aspect of Warlock Vanton. Activating the Attunement also causes the maze to disappear and Ansuul to reemerge in the middle of the arena, now imbued with new mechanics from the aspect of Vanton.
- From the Fire aspect Ansuul gains Wrathstorm and the ability to summon Enraged Fragments. In Veteran difficulty Ansuul also gains the ability to summon Sunburst while in Hard Mode this mechanic has been active since the start of the fight. Enraged Fragments have an interruptible attack called Inferno where they will shoot out fireballs at a rapid pace. While Enraged Fragments can’t be pulled, they can be stunned with a pull ability which in turn interrupts the Inferno. In Hard Mode difficulty Enraged Fragments pose a significant threat to the group with their relatively hard hitting light attacks and Inferno channel. A player or two are quite commonly tasked to prioritize killing Enraged Fragments to prevent them from overwhelming the group. Using skills like Crushing Shock or Venom Arrow is recommended for interrupting Enraged Fragments’ Inferno.
- From the Poison aspect Ansuul gains the Spray and Poisoned Mind. Spray is a big frontal cone cleave attack while Poisoned Mind is a growing area of effect that surrounds the targeted player. In Normal and Veteran difficulty there is only one Poisoned Mind active at a time as the previous Poisoned Mind begins to fade when the new one appears. In Hard Mode Poisoned Mind gets applied to two players at the same time, causing a constant source of damage to the group. While two Poisoned Minds are active in Hard Mode, the two players with said mechanic have to stay in the main group but not overlap with each other. Damage Dealers are unlikely to survive the Hard Mode version of the Poisoned Mind outside the group where most of the Healers’ ground healing abilities reside. Healers as well as Tanks are able to survive Poisoned Mind alone outside of the group. However, Tanks might sometimes struggle with the damage if they are being damaged by some other mechanic at the same time. While the player has a Poisoned Mind, they should try to move as little as possible. Erratic movement around the group can cause unexpected damage and a loss in vitality.
- From the Shock aspect Ansuul gains Execute and the ability to summon Memory Fragments. Execute is an interruptible mechanic where Ansuul targets one player to be executed. Memory Fragments are gray flying imps that can be pulled using pull abilities. The Main-tank or a Healer should pull Memory Fragments to Ansuul so that they will die to cleave damage. While Memory Fragments seem unthreatening, their damage can cause significant harm when combined with other mechanics.
Up to four players can enter through the portal at the end of the maze. The most common tactic is to send the Off-tank with three Damage Dealers to deal with Warlock Vanton. In Normal and Veteran difficulty the damage received can be outhealed by using skills like Echoing Vigor. In Hard Mode the damage received is increased to a point where Damage Dealers all using Echoing Vigors won’t be enough. For Hard Mode it is advised for the Off-tank to slot a few healing skills like Budding Seeds, Cinder Storm, Enduring Undeath, Extended Ritual, Reconstructive Domain, Refreshing Path, or Vibrant Shroud (depending on the Off-tank’s class). With these aforementioned healing abilities Off-tank can support the main group in the fight against Ansuul. In the portal the four players should keep a safe distance to each other. It is recommended for the Damage Dealers to agree on which side of the boss belongs to them so that the players won’t stack damaging mechanics on top of each other. The mechanics Warlock Vanton uses will also be used by Ansuul once the corresponding maze completes.
The Hard Mode Ansuul the Tormentor encounter has many mechanics and enemies whose damage overlap with each other. Sometimes no amount of healing will save Damage Dealers from the stacked damage. Therefore, many groups have opted in using damage shield sets to protect the group from losing vitality. Sets like Brands of Imperium, Lunar Bastion, Combat Physician and Ozezan the Inferno have all seen use in the fight against Ansuul. On top of using damage shield sets, it is not unusual to see damage shield- and healing ultimates like Barrier, Gibbering Shelter and Glyphics. With the introduction of the Scribing skill, players can replace sets that provide shields with Scribing skills like the Warding Burst. Even with all of these protections in place, some groups opt to have a third Healer in the fight against Ansuul. It is not unusual to see the Elemental Catalyst using Support Damage Dealer necromancer swap to a restoration staff for the encounter.
Support roles should be tasked to clear Anxiety’s Grip mines from the arena near the group. Damage Dealers touching the mines while Poisoned Mind is active and getting hit by a Light Attack from a Fragment will almost always result in a loss of vitality in Hard Mode. If the group has a third Healer for the encounter, they can be tasked with clearing the mines.
Once Ansuul the Tormentor’s health reaches 20 %, Ansuul will cast Breakdown. Ansuul splits into three different copies of herself which all embody one of the aspects seen in the encounter thus far; Fire, Poison and Shock with all of their corresponding mechanics. These copies of Ansuul can’t be slain individually. If one of the copies’ health reaches 0 %, the copy in question will still keep fighting as if nothing has happened. Only once all three reach 0 % will they vanish and the original Ansuul reappears in the arena. An additional layer of difficulty comes from the Poison and Shock copies being range based enemies who will flee from their target at melee distance. A tactic to mitigate this is to have one of the tanks taunt the Fire copy and keep it in the middle of the arena. In the meanwhile the other tank quickly taunts Poison and Shock copies and runs away from them. If the copies manage to run away from the middle of the arena the tank can pull the copies back into the group by walking out of their attack range, forcing the copies to move closer.
In Hard Mode difficulty Ansuul will almost immediately cast Manic Phobia on her target once she reappears in the arena. Therefore, it is recommended for a Healer or Off-tank to taunt Ansuul after the copies have vanished. Furthermore, in Hard Mode after this point Ansuul will cast Manic Phobia around every 25 seconds, increasing the difficulty of the execution phase significantly. It is up to the group to decide how they will deal with this timed casting of Manic Phobia. The group can either focus on Ansuul, slaying her before she inflicts Manic Phobia on all supports or focus on killing the Essence Manifestations so that the supports will be free to taunt Ansuul again. Do note that Enraged Fragments will keep spawning around the arena while all of the previously mentioned is happening. At this point it might be too difficult to focus Enraged Fragments down and instead Off-tank and Healers who have received Manic Phobia should focus on interrupting the Inferno casts of Enraged Fragments.