


Welcome to the ESO Kyne’s Aegis Guide. The Kyne’s Aegis Trial is located in the Greymoor Zone and can be played in normal and veteran mode. I will walk you through with this guide and explain all the mechanics in detail. The Kyne’s Aegis Trial has three bosses and each boss has its individual hardmode! It is also often referred to as KA.
Story: Defend the island bastion of Kyne’s Aegis in a massive 12-player trial and protect the besieged villagers from invading Sea Giants. Battle hordes of monstrous raiders and three challenging bosses in this new PvE group challenge.
I highly recommend using Code’s Combat Alerts for the Trial, since it announces all dangerous mechanics beforehand!
Table of Contents
- Loot & Rewards
- Trash Fights
- Boss 1 – Yandir the Butcher
- Boss 2 – Captain Vrol
- Boss 3 – Lord Falgravn
- Gameplay
Loot & Rewards in Kyne’s Aegis
There are several sets and achievements that you can complete in this trial.
New Sets in Kyne’s Aegis
You can always find an imperfect and a perfect version of each set in Kyne’s Aegis.
- Perfected Kyne’s Wind & Kyne’s Wind
- Perfected Roaring Opportunist & Roaring Opportunist
- Perfected Vrol’s Command & Vrol’s Command
- Perfected Yandir’s Might & Yandir’s Might
Rewards in Kyne’s Aegis
- New Title – Kyne’s Chosen
- Complete the Kyne’s Aegis Achievement – Defeat all 3 bosses.
- New Title – Kyne’s Will
- Complete the Kyne’s Aegis Conqueror Achievement – Defeat all 3 bosses in veteran mode.
- New Skin – Seaborn Silver
- Complete the Kyne’s Aegis Conqueror Achievement – Defeat all 3 bosses in veteran mode.
- New Title – Shield of the North
- Complete the Kyne’s Aegis Vanquisher Achievement – Defeat all 3 bosses with hardmode enabled.
- New Title – Dawnbringer
- Complete the Kyne’s Deliverance Achievement – Complete ALL achievements in Kyne’s Aegis.
- New Momento – Ritual Circle Totem
- Complete the Kyne’s Deliverance Achievement – Complete ALL achievements in Kyne’s Aegis.
- New Title – Kyne’s Wrath
- Complete the Stainless Siege-breaker Achievement – Do a Speedrun, Hardmode and No-Death in 1 run.
Dangerous Trash Mechanics
In trash fights throughout the trial, there are several dangerous mechanics. Note that these adds also spawn in boss fights as sidekick adds, so their mechanics often apply to those fights as well.
Half-Giant Bulwark

These are dangerous due to two mechanics they do, one being offensive and one being defensive. The offensive one is an AoE Shield Bash that kills all non-blocking players in their conal area. Be sure to face these away from the group as the tank to prevent that from happening.
The second is a gold-ish circle around them that makes all other enemies inside it invulnerable, but not the bulwarks themselves (see image above). This also applies to bosses, so beware of stacking these onto other adds you have to focus!
Half-Giant Tidebreaker
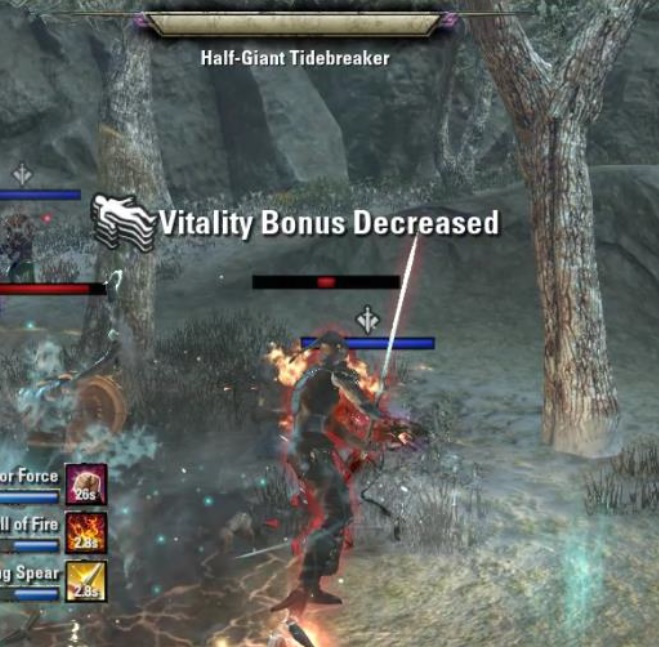
These are dangerous because of their Crashing Wave mechanic, where they kneel down and summon a circular outward-moving wave around them after 4 seconds that one-shots everyone who isn’t either blocking or dodging. This AoE is very large, so outranging it is not really an option.

Half-Giant Stormcaller

These mobs cast the call lightning mechanic (Lightning Bolt) that targets random players for as long as it is alive. Getting rid of these guys early makes trashpacks easier, but they are not that dangerous since the damage they deal with each hit is mediocre.
Vampire Knights

There are three different vampire knights that occur first on different trash fights (one each) and then return on the final boss fight when the boss reaches 70% health; Bloodknight, Crimson Knight and Bitter Knight. These deal heavy damage with their basic attacks, but also cast deadly mechanics. The first one done by the Bitter Knight is the Sanguine Prison, which stuns a player and kills them after eight seconds if it is not destroyed by damaging it, so make sure this is focused asap.
The Crimson Knight deals heavy single target damage through Venomous Claws, a poison-based dot that stacks up on the tank. The last mechanics done by the Bloodknight is the Blood Fountain, a ground-based AoE that deals heavy damage in four directions, cross-shaped from where he is positioned. These mechanics are explained in the final boss section in more detail.
Vampire Infuser

These have the very same mechanics as in Blackrose Prison. After a while, they start channeling a red glowing aura around them that empowers everything in their range. You do not want them to get this ability through, otherwise it is a pretty certain wipe because the other mobs will hit really hard then.
Boss 1 – Yandir the Butcher
[Non-Hardmode HP: 64,7 Mio. Hardmode HP: 80,8 Mio.]
The Boss here has several mechanics that groups have to deal with, and it is best if you assign certain roles to players.

Hard Mode Only: First and most important mechanic is the fire mage’s (Butcher’s Fire Shaman) meteor. It is done by the mage adds that the boss spawns based on a timer on several fixed location on the map. They start channeling with a large orange aura on them, and then when they crouch down launch meteors at random players in the group.
In isolation they are not that dangerous, but can kill people quickly if they aren’t blocked. It is best if you have someone call them out (or rely on addons to do so for the group). The mage spawns seem to be fixed, but not always the same. The first three are always clockwise, starting with the one left to the initial boss position.
Second important mechanic is the spawn of Gryphon and Sea Adder adds that spawn until the boss reaches 50% health.

They spawn right next to the main boss. These enrage with the boss if they are alive for so long that another gryphon or sea adder spawns, which is something you don’t want to get obviously. The mechanics that the adds do themselves aren’t really that dangerous (both have an AoE knockback that should be blocked though), but positioning the boss right is important.
Every now and then (probably based on a cooldown with consideration of his current actions, so it’s not always the same timer), the boss will heal those adds back up. Since you need the adds to die quickly, it is best to burst them with high single-target damage AFTER the boss healed them up. If you struggle getting them down in one go after boss healed, you need to take the boss out of range so that he cannot heal the adds anymore (stack boss on upcoming fire mages in that case).
Lack of dps can spiral up on this one: The boss himself and the gryphon or sea adder gains a frost shield every once in a while, when the adds are up. If the respective shield isn’t destroyed within 15 seconds, it will burst, killing everyone. It cannot be blocked or dodged, so make sure to destroy both of them in time. If you do stack the boss on the mage adds you need to kill, he doesn’t take any damage, so the shield bursts often. You can assign a boss parser for this who destroys the shield (it doesn’t have much health).
Further, the boss spawns’ totems across the room. These totems have different effects based on the glow Yandir’s hand; there are four different totems:
1. Dragon Totems: always 2 spawning, blow out fire waves in straight lines in two directions that deal a lot of damage. Look where the heads are facing on the totem and avoid standing in that line.
2. Gargoyle Totems: These encase people into stone, stunning them (this is blockable). Break free from this effect asap.
3. Harpy Totems: Spawn a lightning aura that radiates outwards, similar to vAS lightning pools.
4. Chaurus Totems: These cause several people in the group to be poisoned. Similar to Sanctum Ophidia, but more dangerous with higher damage. Don’t stack when these totems are up. Ideally, you’d make a positioning scheme similar to Zhaj’hassa the Forgotten in vMoL so that players are far enough away from each other, only that this scheme has to move with the boss and players have to move into scheme quickly when Yandir casts the Chaurus Totems.
These totems need to be killed, so designate two or three people for doing that (dragon totems have much lower health and seem to die after a short while either way). The boss himself has a heavy attack that needs to be dodged or blocked and a poison cleave that kills players, so face him away from the group. After 50% health, the boss stops summoning the gryphon and sea adder adds. He then starts leaping across the room and enrages over time, the leap is always on the tank who taunted him. Pretty straightforward execute after that. The only thing that is added in execute is a call lightning mechanics that randomly strikes players.
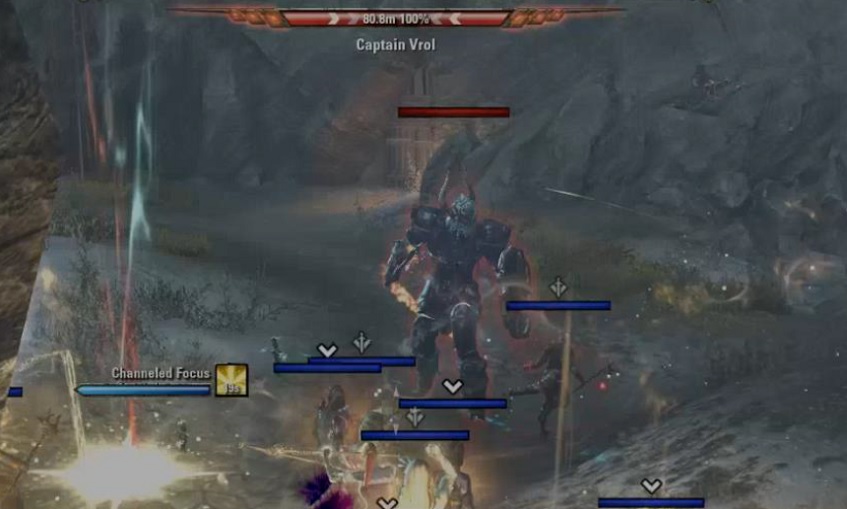
Boss 2 – Captain Vrol
[Non-Hardmode HP: 64,7 Mio. Hardmode HP: 80,8 Mio.]
This boss has some fresh mechanics that we haven’t seen before, in particular the siege mechanic is quite fun (for a while at least). In the room, there are sieges on the left and right-hand side up the hills. Players have to use these sieges to kill adds on the boat that anchors down the cliff. In order to use the sieges, players have to fetch ballista repair parts from the back of the area.

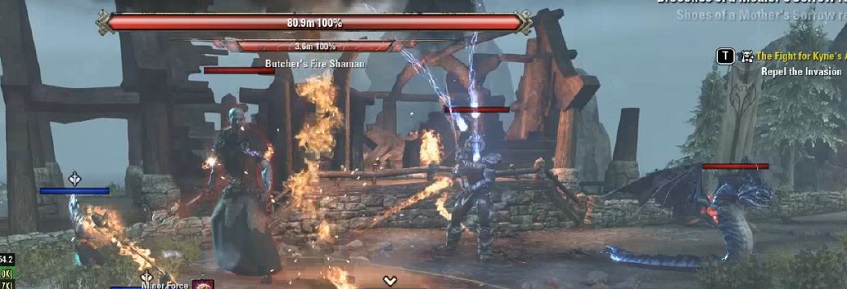
Before 50% based on a 45 second timer, there will be a conjuror (Vrolsworn Conjurer) spawning on the boat.

This conjuror spawns with a first wave of adds (Half-Giant Bulwark, Apothecary and Harpooner) and channels a summoning ability occasionally that spawns additional add waves.
One person in the group has to use a portal synergy and go on the boat to kill the conjurer and interrupt that summon. Siege weapons deal ~30% of his health, but with two sieges available, having one person go down there is necessary because the sieges cannot be loaded up quickly enough to stop adds from spawning. The boat can also be solo’ed by a single damage dealer, which is actually the easiest way, since it also avoids conduits from spawning on random players that want to use sieges. If you fail to solo it, you can have one dedicated ballista-person and one person on the boat as well.

Be careful: it is tempting to click the synergy pre-execute, it happens frequently that people who shouldn’t be down there go by accident if the group stacks close to the synergy spawn location. On this Boss, you want to take the boss slightly away from the add spawn location (we put him in the right corner close to the add spawn, but you can also take him to the middle of the room). The reason for that is that the adds heal the boss if they are not bashed (apothecary add) and make him invulnerable (the bulwark add) if stacked on the boss. There’s also a harpooner add that needs to be interrupted (otherwise one-shots someone with a javelin called Heavy Strike) and often runs away to cast it.
You can also have the boss right on top of the spawn if you have the dps to burn the adds down before they do their respective mechanic, but that hinges on the group dps.
Also, the boss spawns lightning spears similar to the Pinnacle Factotum (Shocking Harpoon) on a random group member that drain health and chain players in their proximity (if not enough players are in their proximity, they chain them in) every 45 seconds. Their damage increases fast and they snare to hell, so make sure these die as fast as possible. If you get a conduit on a siege user, they pretty much die after a few seconds, so wait until a conduit spawned before you go shoot the siege.


In execute (after 50%), the boat mechanic changes; two mage adds (Vrolsworn Fire Mage) will spawn that cast meteors on the group, similar to the first boss.

These take two ballista shots to die, so you can either have two people run twice or four people one time. Since the conjurors stop spawning, the synergy is also gone and no one can go on the boat to help in execute. Thus, you have to rely on the ballista shots to kill the mages. The boss wall also summons a twin of himself (Storm Twin) that needs to be bashed.
The boss himself is not that dangerous, he has light attacks that deal moderate damage and a heavy attack (Thunderous Bash) that creates random lightning strikes in the group. On top, he also has an ability called Frigid Fog that spawns an AoE beneath him if I remember correctly, which stuns players that stand in it for too long and damages them more and more and gives the boss a refreshing damage shield as long as it stands in the AoE, so take the boss out of it quickly.
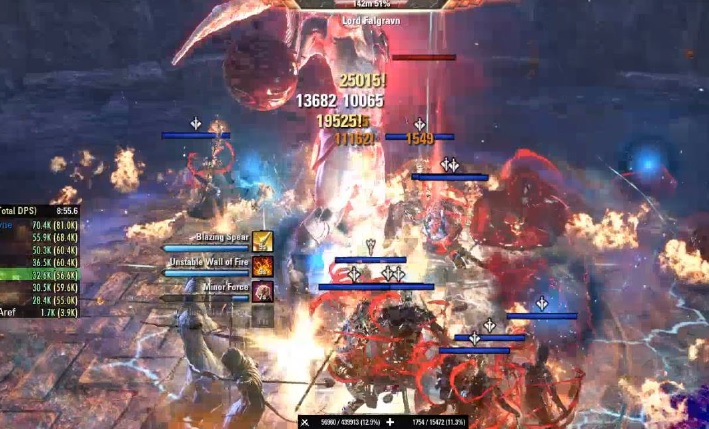
Boss 3 – Lord Falgravn
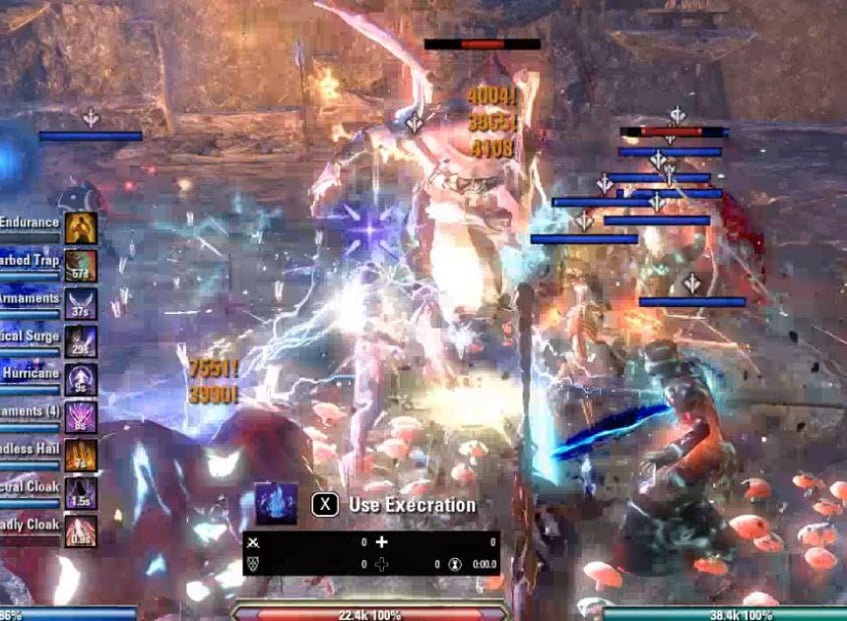
This is a long fight, the boss has 276m health on hardmode. There’s a lot to unpack here in terms of mechanics so I’ll go through the fight chronologically.
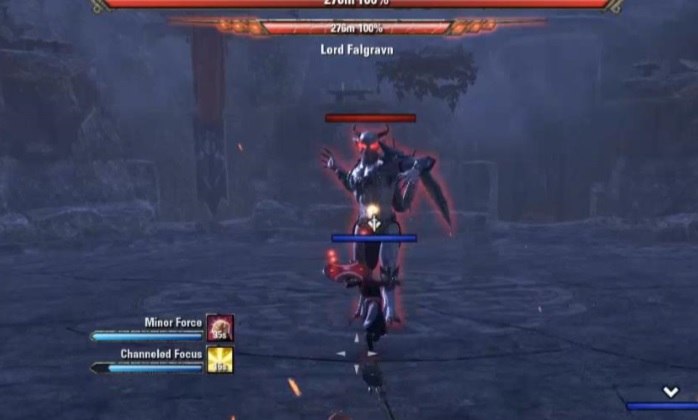
Stage 1 – 100-70% Boss Health
This is actually the hardest part of the fight because of Batman’s sidekick, Lieutenant Njordal:
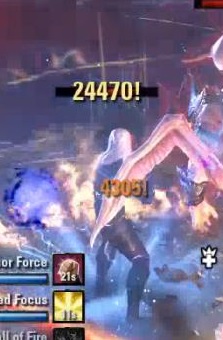
He hits really hard, so we had the main tank guard the offtank to withstand the high incoming damage from the miniboss. Besides a cleave that kills players (Blood Cleave, face him away), the guy does insane damage with his light attacks (Quick Strike) and has a heavy attack (looks like uppercut) that should be dodged. The active mechanic is called Sanguine’s Grasp and summons hands from the ground that kill you when you do not avoid them.
They are indicated by a small, pulsing pool of blood on the ground, so keep an eye on the ground when he starts doing it. Njordal kneels down when he channels the mechanic, so there’s a clear clue for it. Furthermore, Njordal chains the offtank back in when you move too far away and stuns them shortly after, so kiting is not an option.
Clues on the ground:

Hands coming out:
During this mechanic, you need to move, otherwise you die. Also, try not to cross the ways of others because then you might spawn hands in their ways. It is similar to “call lightning” in other trials (stage 6 vMA for example), only that here, the damage comes from beneath you. On top, the main boss will do a lightning mechanic (Instability) on 6 players in Hardmode (3 in non-HM) where he casts circles beneath the players. These burst after 5 seconds and kill players if you stack them. So, you want to spread out as fast as possible when he does it. This mechanic persists until 35% boss health.
Clue for Instability:
Explosion:

The most difficult mechanic at this stage is the Proximity Lightning mechanic that happens twice; once at 90% and once at 80% of boss health. When it happens, players have to chain lightning to a wall. To do so, they need to line up in a way such that the distance between them is not too long, so the chain lightning hits the wall. You need to do so four times; once in each of the four directions of the room. For that, you can assign numbers to 5 damage dealers, where the first number starts on the sconce and they stand in approximately the same distance from each other in around 5 meters (social distancing matters), up to the last number who stands close to the boss.
The next wall is random, so just have one person call out which one it is. If you fail to connect the lightning, the boss will deal more and more damage the group with the channel he does during the mechanic. Especially on Hardmode, this damage ramps up quickly and you have to very swift in movement between the walls. That’s a matter of practice and may take a little while to get down.
Boss charging the first sconce:

Charged up lightning sconce:

You can see whether the lightning chain completes on your character, because the lightning gets connected once the line is created. Since there is no DPS check here, you can also just face the wall to see whether it worked.
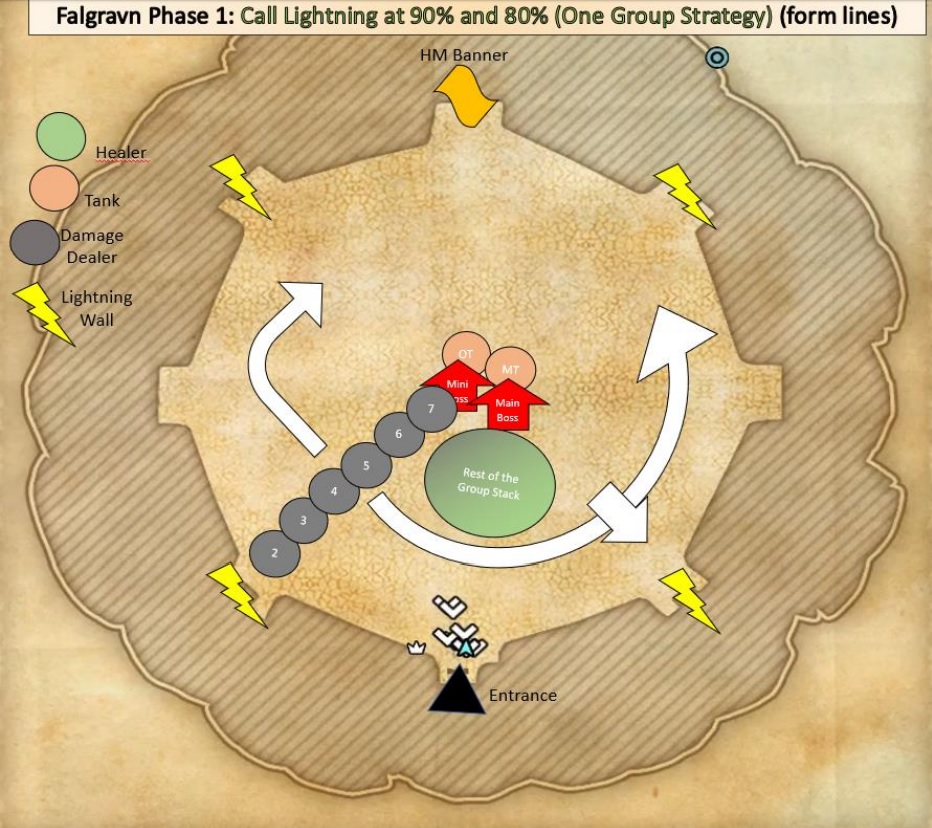
The Off-tank places the miniboss (if it is still alive) to face the banner, because that is the only place where other players do not have to run past when they do the lightning chains if you do the two groups this way. Otherwise, you will have the miniboss do its cleave into the group, killing players that do not dodge at the time.
Hardmode Only: In this fight, any player who resurrects another gets send downstairs to the final room and has to find a portal to get back up. In this room, there is a shadow (Death Seeker) that chases and kills players if they do not dodge his attacks.
The portal vanishes and spawns to different points in the room frequently, so be aware of that when you get send down.
Note: If you kill the miniboss, he will not respawn. So, the sooner he is gone, the easier the rest of the fight will be. For safety, you can even kill him before you deal any damage to the actual boss.
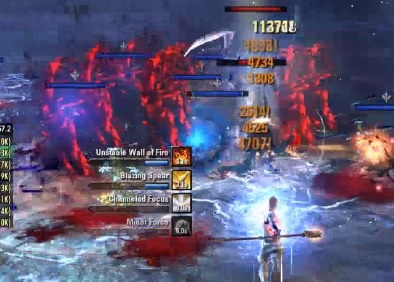
Stage 2: 70-35% Boss Health
At 70%, the floor crashes and players land on the next “deck” of the arena. Now, some mechanics are gone (miniboss mechanics if he died already) and new ones come in. Firstly, the boss summons three vampire knights that you need to kill. They’re actually pretty dangerous, so try to avoid their mechanics, especially the Blood Fountain has a short clue time and hits hard in a line in four directions. Also, these adds regularly put players in a “Sanguine Prison”, which kills players affected after eight seconds, so these need to be destroyed asap!


Some of the mechanics that the three knights do will also persist after the knights died, because shades of the knights come in and cast e.g. the prisons.
When the three adds are dead, the main boss comes back. In this phase, he summons a ball of blood above his head and then blood coagulants start sliding across the room towards him. After 30 seconds, the ball explodes (Ichor Eruption), damaging players for every coagulant that reaches the middle.
Especially the big coagulants add a lot of size to the ball, so the bigger the ball, the bigger the damage.

In this mechanic, do not move! Any player that moves damages the whole group around, so stand still entirely if possible. Making a loose stack is good here again, because then you have an easier time avoiding Instability. Only players affected by instability should move if necessary, but generally you can loosely stack with a 5m difference between players and not move at all. It is easier if you assign positions that are close, but not stacked for everyone (see image above). If you are unsure whether you can move or not, look at your character and see whether you are enveloped by red vines.
After the mechanic is done, he summons a coagulant that deals AoE damage to the group around it, but usually does just die in cleave. Aside from this mechanic, this stage is pretty straightforward. The only other mechanic that happens is a synergy prompt for execration.
Do not use this synergy! At the current state, it grants you a significant damage boost, but reflects a share of your own damage back to you, with the share increasing over time. If you notice it happening, stop all damage and relocate your AoEs. Otherwise, you will die, if not from the reflected damage, then from the fall damage when dropping to the cellar at 35%.
Nothing else happens, so if you can deal with that mechanic through enough AoE damage and don’t activate the execration synergy, you are good.
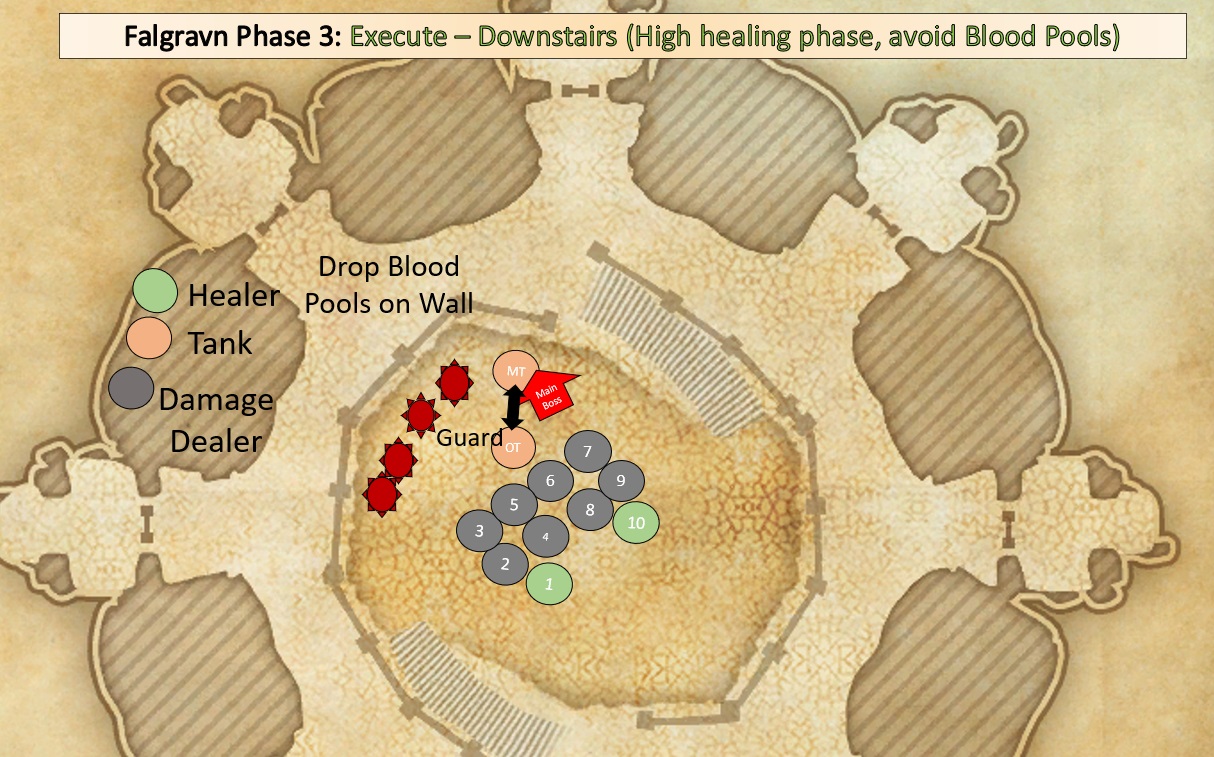
Stage 3: 35-0% Boss Health (Execute)
At 35% Health, the second floor crashes and the players land in the cellar where the players that resurrect others landed in earlier. Now, the boss will heal up to 40% again and do a different mechanic:
Based on a 50 second timer, he will summon two torturer adds that try and kill prisoners in the cells on the upper gallery of the room. If you kill the torturers fast enough to save prisoners, they grant different buffs to the group, depending on which add you save!
List of Buffs:
- Aevar: Increased Damage Done
- Ama: Meteor Shower
- Brekalda: Protective Bubble
- Irhtrig: Unknown
- Skormgondar – Increased Critical Chance
- Sislea: Increased Mitigation
- Thjorlak: Increased Ultimate Gain
- Triveta: Unknown
If you fail to kill them, they spawn in the middle and start channeling a one-shotting ability after a little while and basically act similar to the mini boss, with the same abilities. Killing one empowered torturer add is doable (and actually faster with sufficient damage), but two is very hard to deal with and likely wipes the group, especially when stacked on the high incoming execute damage. So, you want to two (non-HM) or four DDs (HM) up for each one to try and find the open cells and kill the torturers in there.
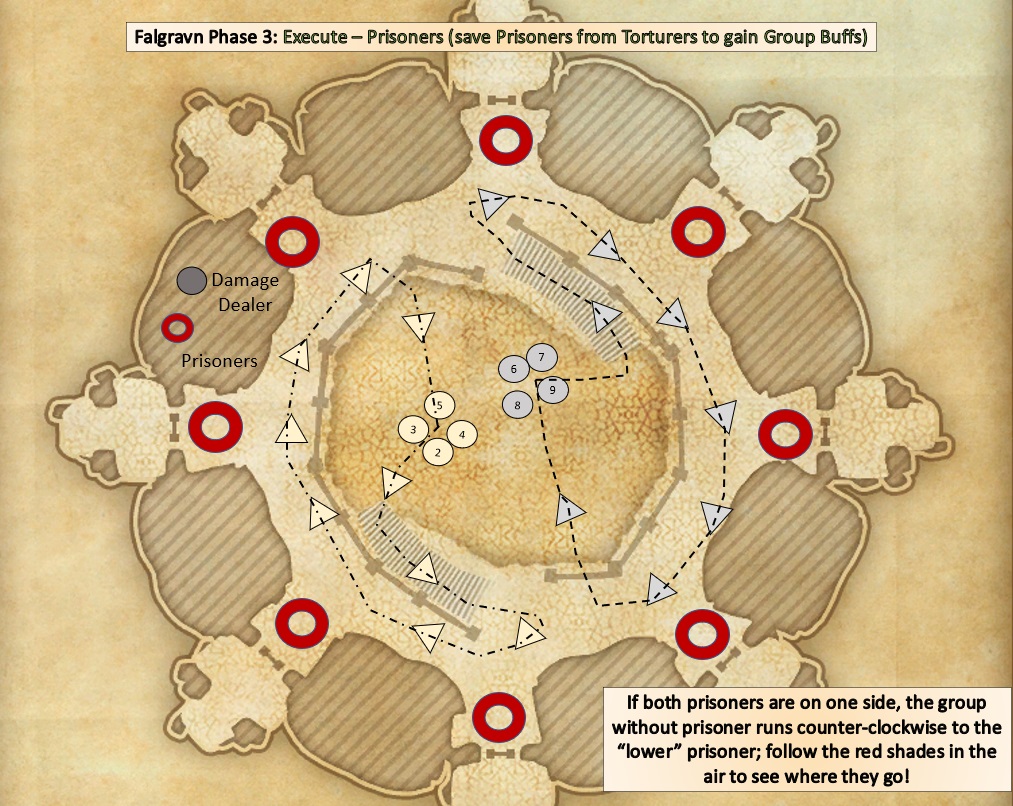
To find the cells, you can follow the red shady projectiles that the boss sends out when he lifts in the air:
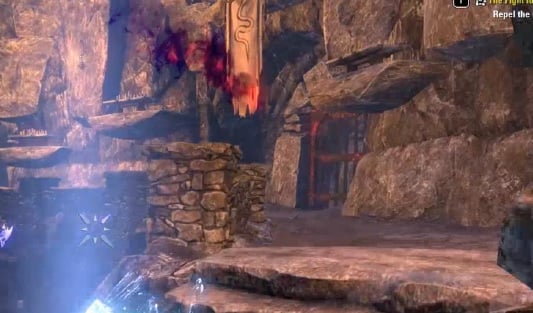
In those cells, kill the torturer and you are good to go:

Aside from that, the boss does persistent damage over time to the group through Apostheosis; he deals increasing damage per second to the group on Hardmode, on non-HM the damage stays the same. He is also continuously empowered in this phase, so having guard on the main tank, blocking constantly and dodging his heavy attacks is key to success here.
Also, there will be pools of corrupted ichor spawning on the ground that damage players standing inside them, which you have to avoid to prevent deaths. These spawn on the boss position (underneath him). To reduce their impact, it is helpful to have the main tank keep the boss on a wall and just slowly move along the wall with the boss to keep the room and stairways free of the pools. The group can be stacked here, but everyone should know their group for upstairs once the prisoner mechanic appear.
If you follow these mechanics, then there is nothing standing in the way of clearing Kyne’s Aegis (with Hardmode enabled)!
Cheers,
Masel
Gameplay
Kyne’s Aegis full Trifecta Achievement Run