

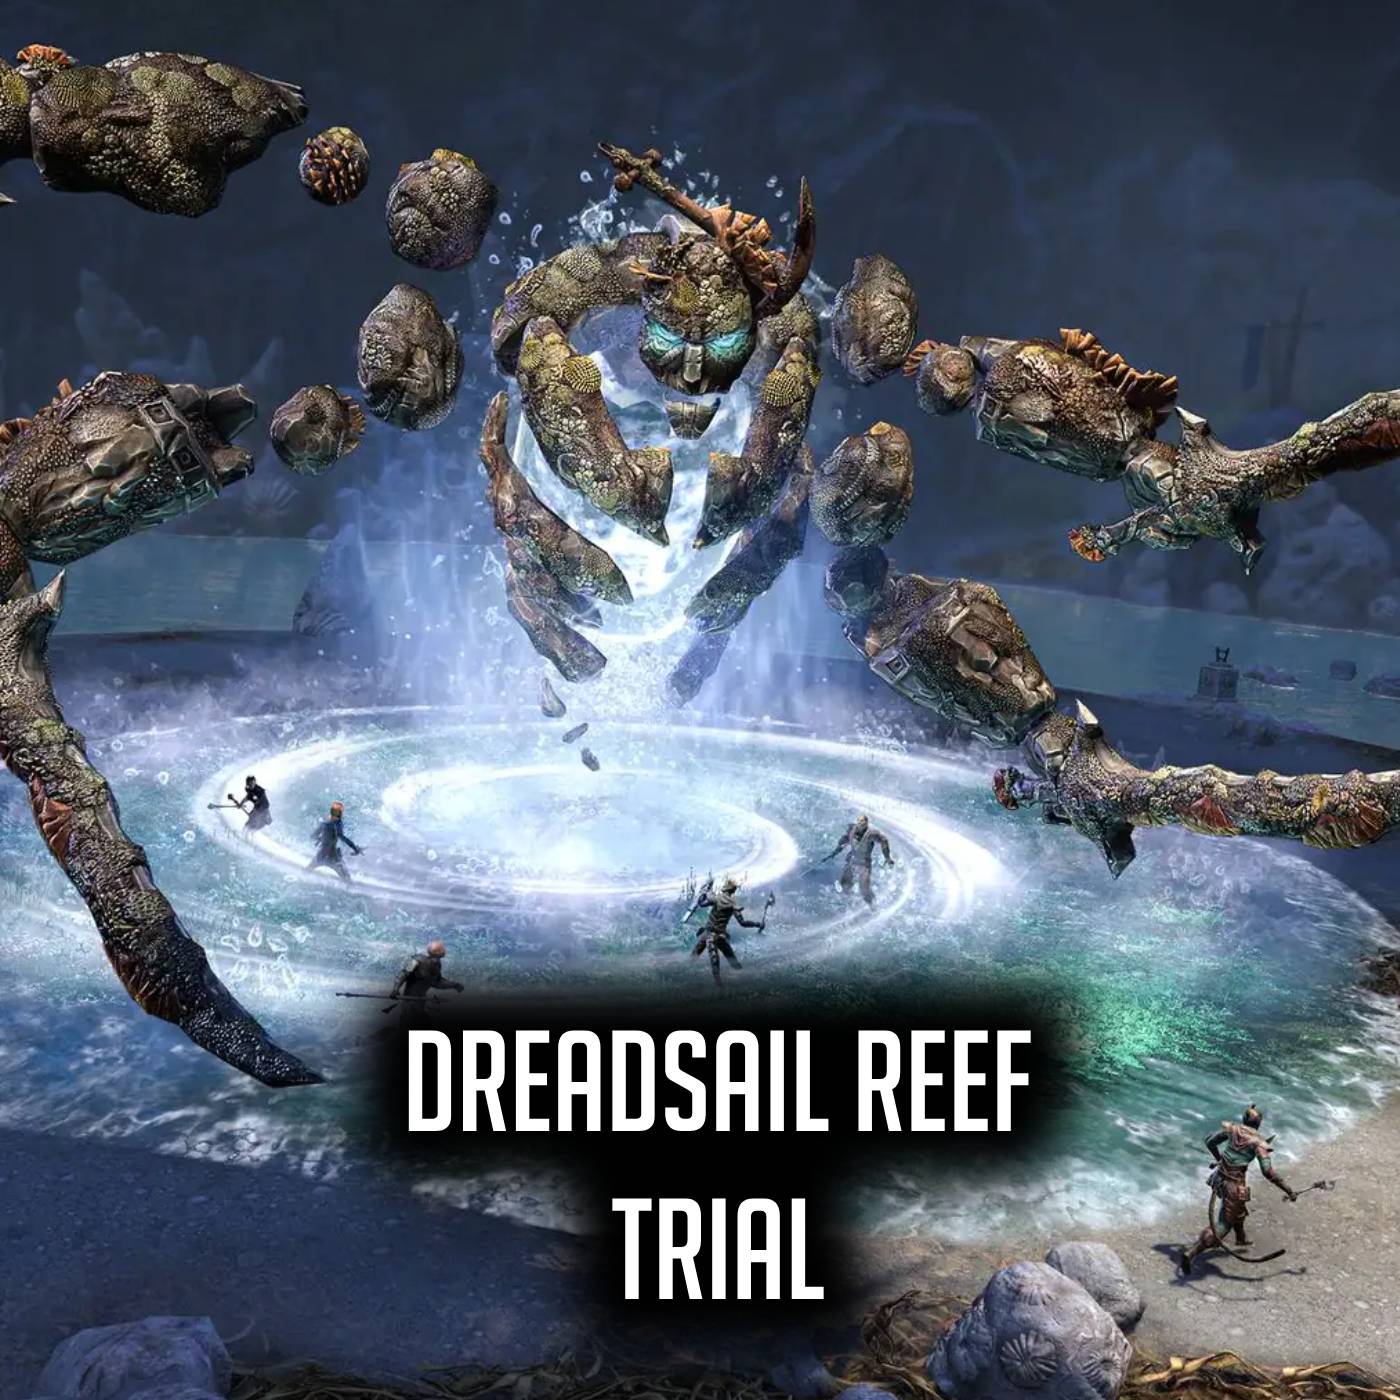
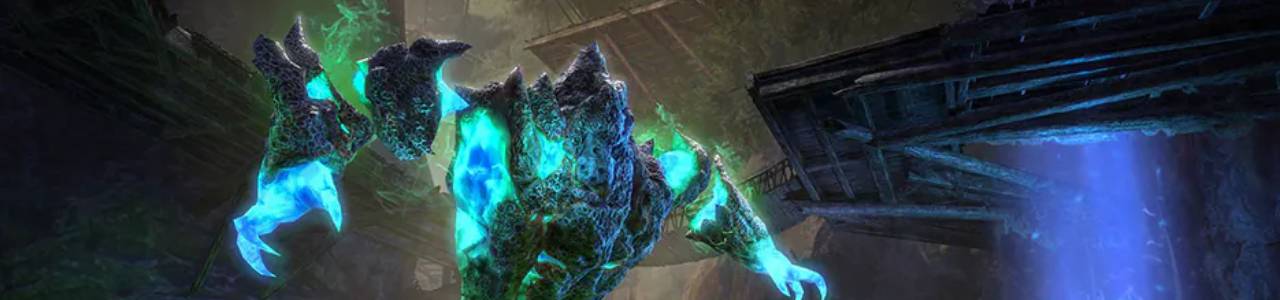
Welcome to the ESO Dreadsail Reef Trial Guide. The Dreadsail Reef Trial is located in the High Isle Zone and can be played in normal and veteran mode. We will walk you through with this guide and explain all the mechanics in detail. The Dreadsail Reef Trial has 3 main bosses – each with its own hardmode – and 2 extra side bosses. The Dreadsail Reef trial is also often referred to as DR.
Guide written by Qcell: – Qcell Youtube – Qcell Twitch – Qcell’s Dreadsail Reef Helper Addon
Difficulty: Normal mode can be cleared with an inexperienced group. Veteran mode of The Dreadsail Reef Trial is harder than normal Dreadsail Reef. And the hardmode versions are about on the same level as the Rockgrove Hardmodes.
Table of Contents
- Loot & Rewards
- Boss List
- Quick Tips
- Boss 1 Lylanar and Turlassil
- Boss 2 Reef Guardian
- Boss 3 Tideborn Taleria
- Trash Fights
- Full Run Video
Loot & Rewards – ESO Dreadsail Reef Guide
There are several sets and achievements that you can complete in the Dreadsail Reef Trial.
New Sets in Dreadsail Reef
In the ESO Dreadsail Reef Trial you can find a perfected and an imperfected version of each set.
- Light Armor: Whorl of Depths – Perfect Whorl of Depths
- Light Armor: Pillager’s Profit – Perfect Pillager’s Profit
- Medium Armor: Coral Riptide – Perfect Coral Riptide
- Heavy Armor: Pearlescent Ward – Perfect Pearlescent Ward
Rewards in Dreadsail Reef
- New Title
- Dreadsails’ Scourge – Complete the Dreadsail Reef Vanquisher achievement
- Seaborn Slayer – Complete the Dreadsail Reef Conqueror achievement
- Swashbuckler Supreme – Complete the Swashbuckler Supreme achievement
- Hurricane Herald – Complete the Master Marine achievement
- Soul of the Squall – Complete the Fleet Queen’s Foil achievement
- New Markings
- Stormsurge Body Markings – Complete the Dreadsail Reef Conqueror achievement
- Stormsurge Face Markings – Complete the Master Marine achievement
- New Mount
- Stormsurge Howler – Complete the Swashbuckler Supreme achievement
- New Dye
- Pyandonean Purple – Complete the Dreadsail Reef Vanquisher achievement
Dread Sail Reef Trial Boss List
Here you can find a list of all the bosses that appear in the ESO Dread Sail Reef Trial and you can also see how much health they have.
| Boss | Health | Adds |
|---|---|---|
| Lylanar & Turlassil | 62M (2x 31M) / HM: 124M (2x 62M) | Flame Hound, Frost Hound, Frost Atronach, Iron Atronach / HM: Incendiary Axe, Calamitous Sword |
| Reef Guardian | 103M (L=31M, M=20M, 2x S=15M) / HM: 206M | Coral Drift Bear, Coral Drift Horse, Coral Drift Senche, Reef Heart, Volatile Plant, Coral Crab Broodlord, Coral Crab Broodmother / HM: Dreadsail Incendiary |
| Mini Boss: Bow Breaker | 33M | Coral Drift Haj Mota, Coral Crab |
| Mini Boss: Sail Ripper | 33M | Harpy Windcaller, Harpy Stormweaver |
| Tideborn Taleria | 112M / HM: 201M | Sea Behemoth, Enthralling Matron, Dreadsail Venom Evoker, Dreadsail Sea Boiler, Dreadsail Tidal Mage |
Quick Tips for Dread Sail Reef
- Addon: I recommend using Qcell’s Dreadsail Reef Helper and Code’s Combat Alerts to get good readings on mechanics.
- DPS stops: Dreadsail Reef is a trial with a lot of mechanics that trigger when certain health percentages are reached – if your team is overwhelmed, try to artificially slow down damage and handle mechanics one by one.
Boss 1 – Lylanar and Turlassil – Dreadsail Reef Trial
Boss 1 Table of Contents
QUICK TIPS
Quick Dreadsail Reef Trial info, raid is starting in 5min!
Tank
- Taunt the boss looking away from the group, and block its attacks.
- Scroll down to the “Tank swap” mechanic – it is important you understand this well!
- If you’re using Qcell’s Dreadsail Reef Helper, tanks need to swap bosses when one tank gets a fragility.
- Once you gain Fire Fragility, any fire elemental damage will deal massively increased damage to you – avoid everything or you will die to 1-shots. The analogous goes for Ice Fragility.
Healer
- Focus healing on the tank especially after heavy attacks from the boss or atronachs, since they will have a healing absorption (the first 40k healing will be negated!)
- There are a lot of DoTs (damage over time) on the tank, if you see their health moving up and down, focus-heal them for a few seconds – typically they are short phases or no more than 10s.
Damage Dealer DD
- Take the fire dome if you see ice enemies, and vice versa. Your raid-lead will call it.
- Stop damaging the boss when atronachs are alive – they are the first priority.
The fight begins with only six Hounds, while the bosses Lylanar and Turlassil are sitting high up teasing and mocking you. There are three Flame Hounds and three Frost Hounds.
Although they can be killed directly, they take reduced damage (10% received damage) unless the correct domes are used. The dome mechanics are used through the boss fight and require more clarification:
Dome Mechanics
- There are two spheres, an ice one on the left and a fire one on the right, that can be activated by a player looking at them and interacting with them (press E).
- A player interacting with the ice sphere takes increasing damage from “Piercing Hailstone” and holds a dome centered on the player.
- A player interacting with the fire sphere takes increasing damage from “Destructive Ember” and holds a dome centered on the player.
- How to take, steal and drop the domes?
- Look at the corresponding sphere (ice or fire) on the side and press interact. If someone else is holding the dome, it will be stolen from the current carrier.
- You can interact with the same sphere again to drop your own dome 3s after picking it up.
- After you drop a dome (because you deposited it, or someone stole it from you), you can’t take it again for 15s (HM 20s).
- If two domes touch each other, they explode dealing damage to everyone in the area (Ember Overload/Hailstone Overload).
- In the whole fight, each enemy belongs to one element: Fire (Lylanar, Iron Atronach, Flame Hound) or Ice (Turlassil, Frost Atronach, Frost Hound). Those can be referred to as “red” for fire and “blue” for ice. (i.e. take blue atros).
- Enemies of an element take reduced damage unless they’re inside a dome of the opposite element, and the person dealing damage to them also is inside. For example, you will want to keep fire enemies inside the ice dome.
- If the enemy is inside the correct dome but you are not, you will deal reduced damage to it.
- If you are inside the correct dome, but the enemy isn’t, you will deal reduced damage to it.
Strategy tip: Since the dome holder takes increased damage, it is recommended that you have several players taking turns on holding the correct dome. Be careful – taking the ice dome inside or too close to the fire dome (or vice versa) will result in a massive explosion and a likely group wipe.
The fight consists of three phases:
- One boss fights alone
- The other boss fights alone
- Both bosses fight together
1 and 2 can happen in any order, as in the first can be either Lylanar or Turlassil, and the second one will be the other enemy.
During all phases, Frost Hounds and Flame Hounds will be present which will deal small damage, but they will vomit (Flame Retch/Raw Chunder) in AoEs that deal medium elemental (fire or ice) damage. If not dealt with, they will eventually heal each other.
1 – First phase
Fire and Ice phases can happen in any order. For example:
Lylanar (fire boss) comes down. The boss has a frontal cleave and the tank has to aim it away from the group. At different health thresholds, the boss will call to spawn atronachs:
Atronach spawn
The boss will spawn atronachs as certain health percentages are reached. The atronachs will spawn on random corners of the room – and there will be an animation for a few seconds so the tanks are able to taunt them before they activate. atronach health: 4.3M / HM 5.6M
- 90% boss health: same color atronach spawns
- (HM only) 85%: wrong color atronach spawns
- 80%: same color atronach spawns
- (HM only) 75%: wrong color atronach spawns
At 65% health, the boss will start its teleport mechanics.
Note: for the second phase, this threshold is slightly different, the second one jumps at 70%
Atronach mechanics
- After a few seconds alive, tornadoes of the matching element will start spinning centered around atronachs if they are not dealt with quickly.
- Frozen Blockade
- Fiery Blockade
- Note this is elemental damage (fire or ice) and highly amplified by the fragilities.
- Atronachs’ light attacks apply Bleed – a 6s damage over time on any target they hit.
- Atronach’s heavy attacks act the same way as the bosses heavy attacks – applying one of several debuffs. See the section Heavy attack below.
2 – Second phase
Fire and Ice Phase can happen in any order. In our example:
Turlassil (ice boss) comes down alone. This phase is identical to the first phase, with reversed elements and colors.
One difference: the boss will begin its teleport mechanic at 70% health, rather than at 65% like in the first phase.
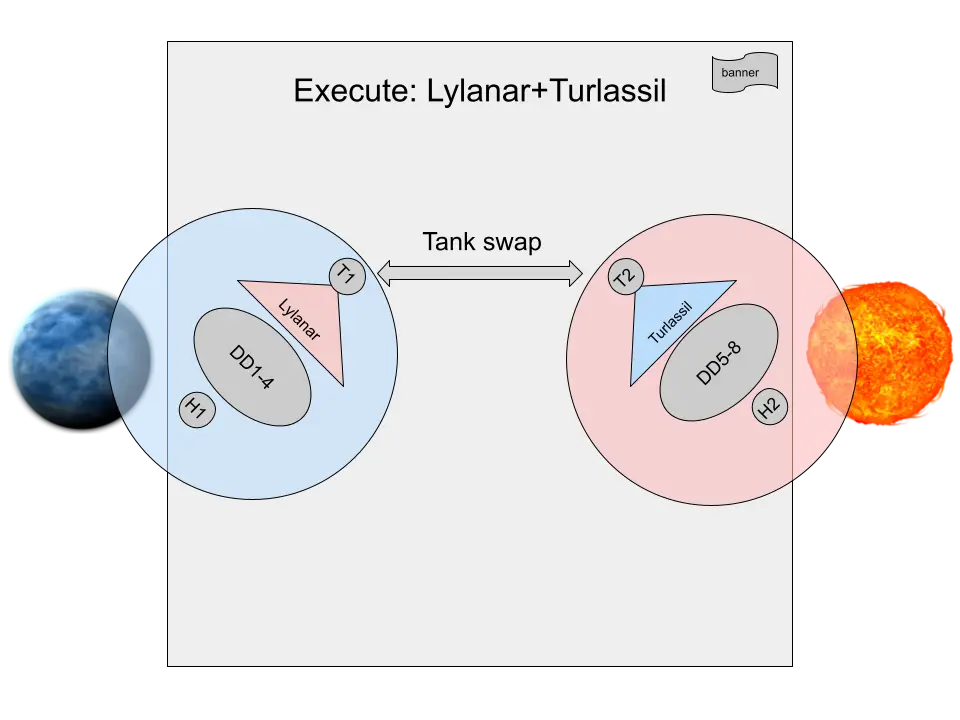
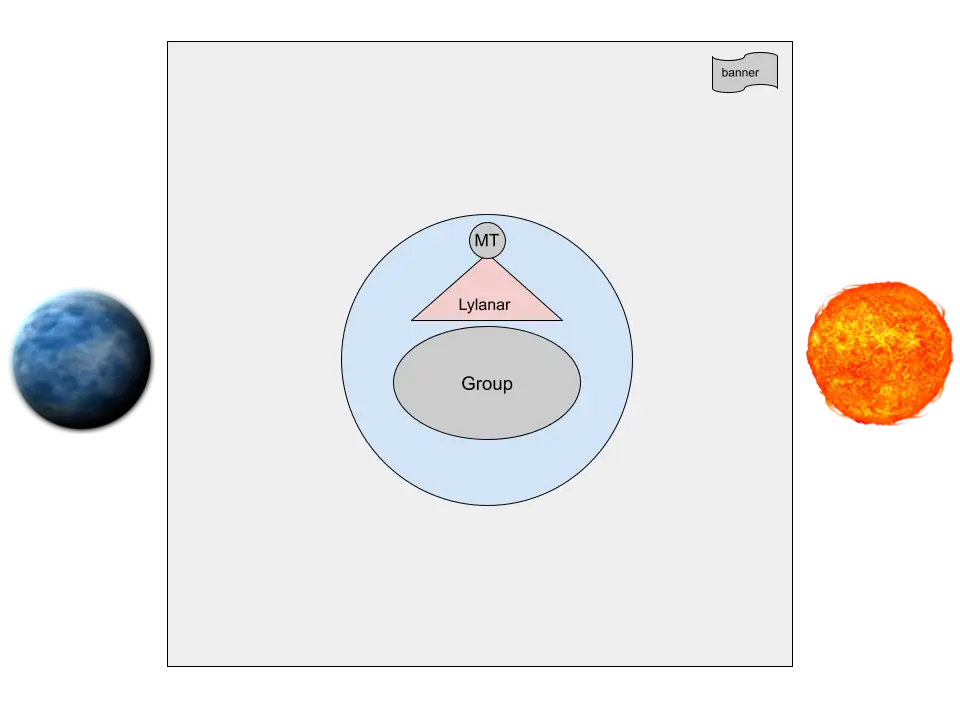
3 – Third phase – Lylanar AND Turlassil
Both bosses will be present, the first boss that has gone away is coming back at 65% HP.
- Lylanar has to stay in the ice dome
- Turlassil has to stay in the fire dome
- The domes can’t overlap.
- Split the bosses, so the domes do not overlap.
Hardmode: they will begin the Frigidarium and Charred Constriction mechanic (see picture below on how to handle it).
4 – Execute – killing the bosses
This is not a phase per se, but it is important to know that both bosses need to die at the same time – or it will end up in the whole group dying and having to restart.
After killing the first boss, you have 15s (7.5s in Hardmode) to kill the other boss before the domes that are being held are dispelled, and the spheres on the sides get deactivated. After that happens, the boss will try to do the jump mechanic that needs to be interrupted – except you won’t have a dome to interrupt it and everyone will die.
Boss mechanics
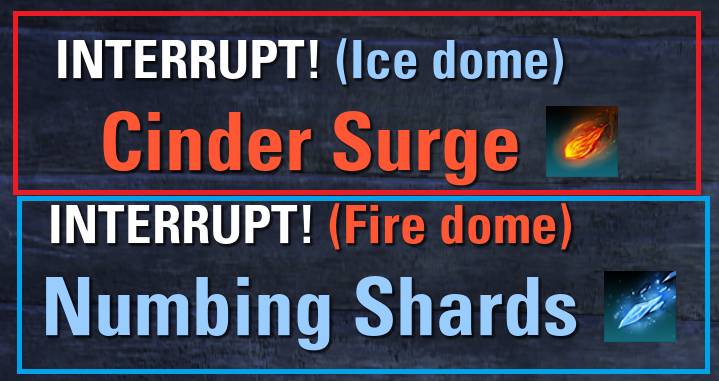
Interrupt (Numbing Shards / Cinder Surge)
The boss will periodically start channeling. If not interrupted, it will start throwing projectiles at all players. If interrupted, this mechanic is completely skipped. A boss can only be interrupted if the boss is inside a dome of opposite color (Lylanar in the ice dome and Turlassil in the fire dome).
- Lylanar (fire): Cinder Surge
- Turlassil (ice): Numbing Shards
Heavy attack (Stinging Shear / Broiling Hew)
Heavy attacks from the bosses, the atronachs or even the trash between bosses will apply several debuffs to the tank depending on the conditions:
- If the heavy attack is dodged
- Seethe: Overwhelmed by anger from a missed attack. For 12 seconds damage done by the enemy increased by 60%.
- If the heavy attack is blocked (and not fully shielded)
- Hindered: Healing your missing health is prevented for 12 seconds or until 39760 points of healing are received. (Trauma / Healing Absorption)
- Hindered is immune to skills that remove negative effects.
- Qcell’s Dreadsail Reef Helper (addon) will show healers a broken heart on top of the tanks, indicating the healing absorption needs to be outhealed.


-
- Rattled: You are shaken up for 12 seconds.
- Damage done decreased by 70%.
- Damage taken increased by 40%
- Rattled is immune to skills that remove negative effects.
- Rattled: You are shaken up for 12 seconds.
- If the heavy attack is not blocked or is fully shielded
- Devitalized: You are weakened for 8 seconds.
- Physical Resistance and Spell Resistance decreased by 60%
- Damage taken increased by 30%
- Damage shields are decreased by 30%
- Devitalized is immune to skills that remove negative effects.
- Devitalized: You are weakened for 8 seconds.
The skills are identical but named differently depending on the boss:
- Lylanar (fire): Broiling Hew
- Turlassil (ice): Stinging Shear
Damage over time on tanks (Glaciate/Blacken)
After a tank has received several instances of damage from a boss, they will gain a strong damage over time, followed by them dropping 5 pools (damaging areas of effect) on the floor that will negate space. When this effect begins, tanks need to move around so they can position the 5 areas safely for the other players and themselves.
The skills are identical but named differently depending on the boss:
- Lylanar (fire): Blacken
- Turlassil (ice): Glaciate
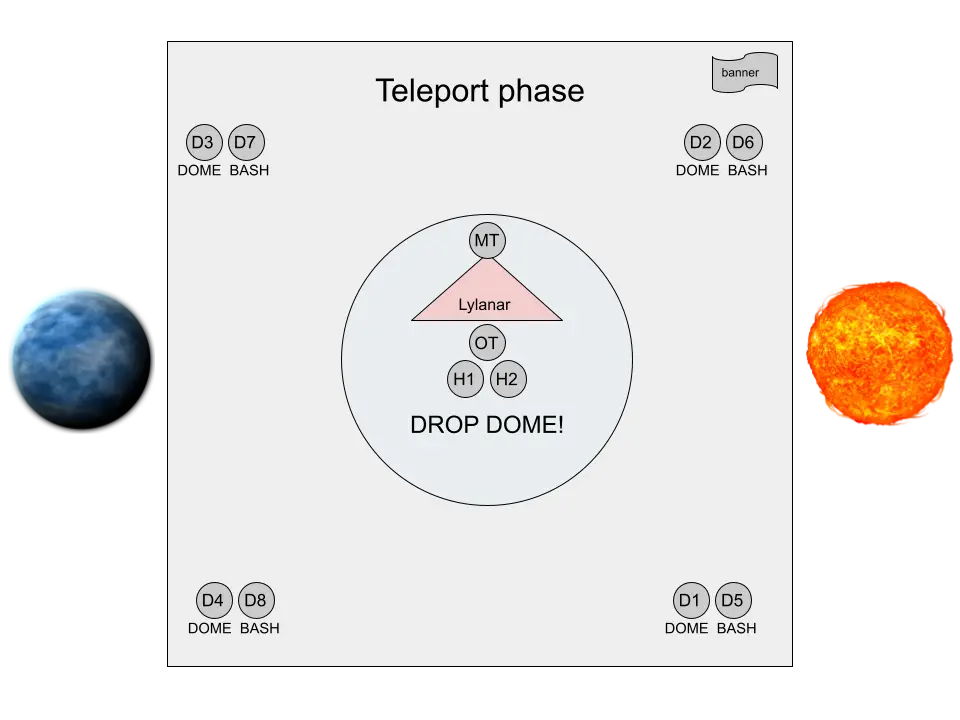
Teleport (MultiLoc)
The boss will turn and look at one of the sides of the arena four times, each time casting a visible orb, red for Lylanar and blue for Turlassil. Those are the locations where the boss will jump – in the same order the boss will jump.
When the boss jumps to one of the locations, it will start casting the Interrupt (see mechanic above). You will need the opposite color dome to interrupt it. It’s recommended players start heading to the jump positions in advance, and as soon as the boss jumps to their position, they take the dome and instantly bash the boss.
Note that players that were recently holding the dome will be unable to do this, since there’s a 15s (20s in Hardmode) cooldown to take a dome after dropping it.
Tip: Qcell’s Dreadsail Reef Helper (addon) will (optionally – there’s a setting) add these arrows during the jump so the raid lead can call the positions of the jump if needed.
Tank Swap (Fragility)
Mechanic name: Fragility (Imminent Chill + Chilling Fragility / Imminent Blister + Blistering Fragility), also known as Ice Fragility or Fire Fragility.
Lylanar will give the player holding aggro a 10s debuff called “Imminent Blister”. 10s after gaining Imminent Blister, the debuff will disappear and the player will instead get “Blistering Fragility” (also known as Fire Fragility) for 20s. During the first 10s, that player receives regular damage, but during the 20s of the fragility, fire damage will be massively increased – essentially any fire damage will be a one-shot.
Turlassil works the same way, with Imminent Chill and Chilling Fragility.
This mechanic is the tank-killer or group-killer that many referred to as the gate-keeper of the whole Dreadsail Reef trial. As soon as any of the tanks gets an imminent fragility, aggro needs to be swapped. That means:
- if there’s one boss: the other tank taunts it. The tank with fragility will need to be careful to not step in the corresponding elemental damage.
- if there are two bosses: tanks will need to do the famous “Tank Swap”, switching who is taunting which boss.
You have 10 seconds to do the swap, or a bit more if you notice the cast animation of the boss for the debuff early – do not rush the swap and make sure the team is leaving space for the tanks to coordinate
Rune stacking (Firebrand/Frostbrand)
During phase 3 when both bosses are present, players will need to deal with a stacking mechanic similar to Foreman Braddigan’s from Shipwright’s Regret or Siroria’s flare.
- One player will receive a firebrand and another player will receive a frostbrand – make sure to stack by the time they detonate or you will both die.
- The detonation needs to happen outside the domes, otherwise the player with the rune will explode everyone inside.
- Hardmode: Two players get Frostbrand, and two players get Firebrand. You need to stack in pairs, always ONE Firebrand with ONE Frostbrand together to cancel them out.
The skills are identical but named differently depending on the boss:
- Lylanar (fire): Firebrand
- Turlassil (ice): Frostbrand
Crisp Flurry / Pyretic Wake
After stacking with the brands, a line of fire or ice respectively is shot away (Crisp Flurry / Pyretic Wake) and will damage everyone in line. As you’re stacking for the runes, you can aim the line away from the group.
Boss 1 Hardmode
Hardmode interrupts (MultiLoc)
It works the same way, but the player taking the dome gets Frigidarium / Charring constriction and can’t bash. It’s recommended to send players in pairs (one takes the dome, the other bashes) or have a player in the middle using a ranged interrupt skill such as Crushing Shock.
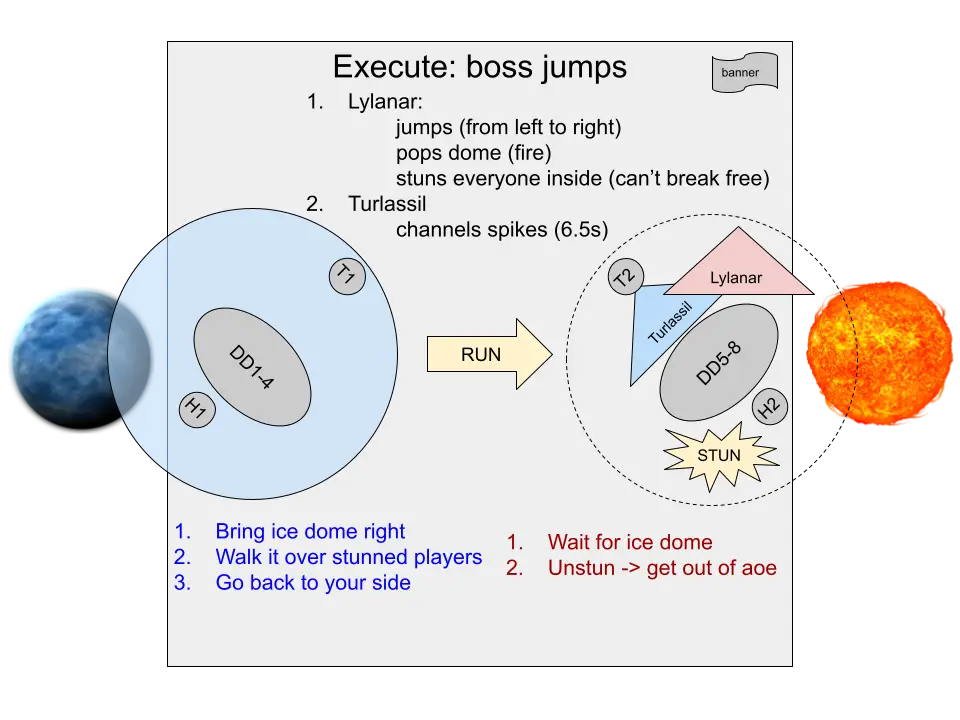
Hardmode execute jumps Frigidarium + Charring Constriction mechanics
A boss jumps to the other side to stun everyone in the dome of their matching color, the bosses scream “That’s teamwork!” and the second one casts Glacial/Magma Spikes below the stunned players that will one-shot them in 6 seconds.
While one side is stunned, the group on the opposite side needs to come with their dome, move it over stunned players and free them before 6 seconds have passed – or their allies will be one shot by Glacial Spikes (Turlassil) or Magma Spikes (Lylanar). Players that are freed need to move away from the Spikes’ AoE on the floor that will still detonate and can kill you if you stay on it.
Hardmode Video
Boss 1 Lylanar & Turlassil Hardmode HM clear
Boss 2 Reef Guardian
Boss 2 Table of Contents
Environmental Damage
There are two types of stacking environmental damage:
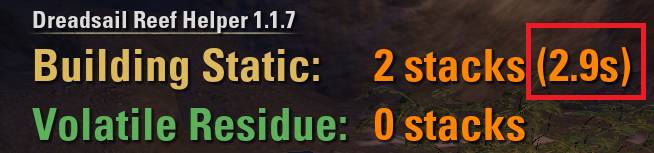
- 🌩️ – Building Static (lightning) by being outside the safe areas
- 🌱 – Volatile Residue (poison) by getting hit by the plants on the safe areas (oblivion damage – not shieldable nor mitigatable)
They gain stacks making each subsequent hit of the same type of damage deal more damage. After 5s of not receiving this damage, it expires – completely resetting the stacks.
There’s a Coral Drift Horse walking in circles around the area that will knock you down when walking around you.
Growth/Plant Safe Area Mechanics
As long as someone stays in the safe shelters (you recognize them visually by the wooden roofs above and the electricity or green outlines on the floor), more and more plants will be created until the central plant will start spitting at players. Use the spaces sparingly or rotate around the map to another safe area if one becomes overwhelmed with plants
- Every 4 seconds there is a plant explosion
- Every 7 plants, 1 extra plant is added (or roughly every 30seconds)
- When the area reaches 6 plants the center plant instead starts shooting out projectiles
- Every 6 seconds you’re outside the safe area the plant loses a stack
Video: Reef Guardian Plant growth and shrink
Boss Mechanics
Acid Reflux
Reef Guardians will cast a cone that follows the player with aggro (ideally the tank) for 10s and drops a poison pool on the circle every 2s – for a total of 5. If more players are in the cone, additional poison pools will be dropped, creating additional areas of denial.
Staying in the poison pool deals damage, and applies stacks of Acidic Vulnerability, with each consequent one making the player take more damage from poison.
Replication
There are three different sizes of Reef Guardians, each size with a different amount of health. When a Reef Guardian reaches a certain health percentage, it replicates into a smaller one.
- Large
- The initial boss you engage.
- Health: 31 million
- Quantity: 1
- Replication
- At 80% HP, it will create a medium copy
- At 50% HP, it will create a medium copy
- Hardmode: creates medium copies at 100% and 80%
- Medium
- Health: 20 million
- Quantity: 2
- Replication
- At 50% HP, it will create a small copy
- Hardmode: creates a small copy at 80%
- Small
- Health: 15 million
- Quantity: 2
- Replication:
- Does not replicate.
The health values are doubled in hardmode.
Reef Heart
After a certain time or when reaching certain HP thresholds each Reef Guardian will charge towards an open hole and start casting Heartburn for 60s on a Reef Heart. A Coral Drift Bear and a Coral Drift Senche will spawn near that hole. If the Reef Heart is destroyed in the meantime, nothing happens. If the group fails to destroy the corresponding Reef Heart, the Reef Guardian will enrage and if it’s not killed within 10s “Rocks fall, everybody dies” – it will cause a group wipe.
In Hardmode, when the Heartburn is stopped (either after 60s or the Reef heart is killed), a Dreadsail Incendiary mage will spawn next to the corresponding hole upstairs.
See the section “Portals” for more details.
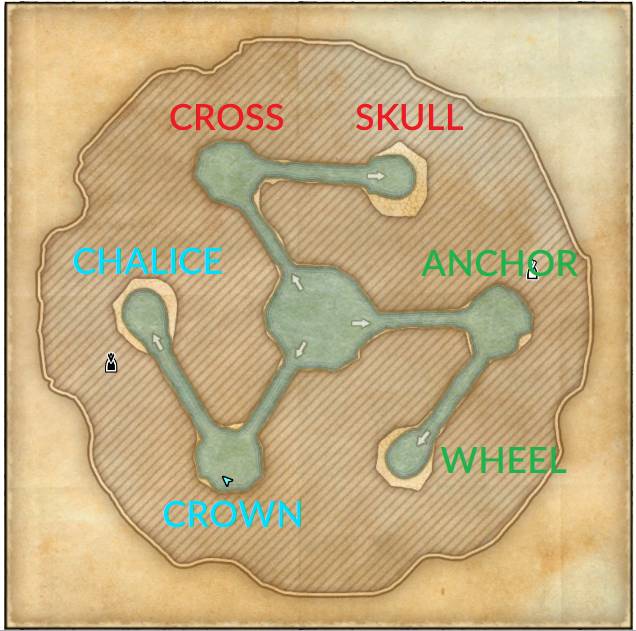
Map views
Upstairs
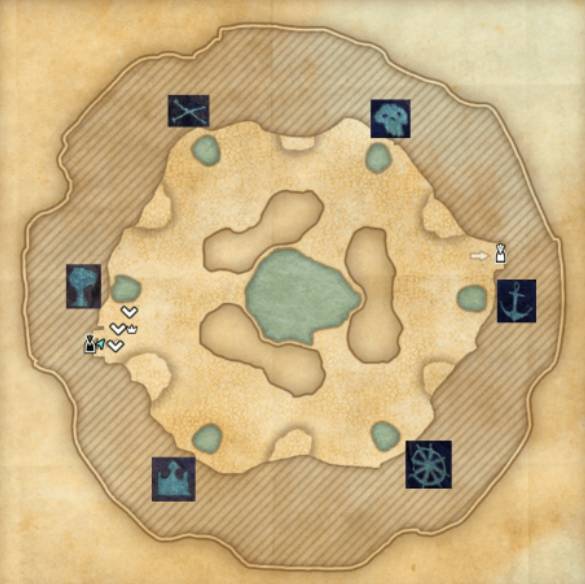
Downstairs
Note that players can traverse from crown to chalice, from cross to skull and from anchor to wheel but not the other way.
Boss 2 Portals
- Jump in the water from one of the 3 entrances in the middle, and land in a whirlpool on the bottom. There are three entrances to the Reef Hearts that you can take. See which symbol is activated and take the corresponding entrance (either through communication, seeing the symbol upstairs or the symbol will light up in the center downstairs).
- Press the synergy (default: X) to take one of the three entrances and swim to the correct position.
- Kill the Reef Heart (800k HP in vet, 2.6M HP in Hardmode) and avoid the damage from the Coral Crab (you don’t have to kill the crab).
- After you’re done, press the synergy on the water spout to go up.
- When returning upstairs, a debuff (“you have been infested with a parasite”) of 40s will start that will kill you if you attempt to go do a Reef (or portal) in the meantime.
Reef Guardian Hardmode
In hardmode, the lightning strikes falling on players are AOE, so if you stack your lightning, stacks from Building Static will go up much faster. Additionally, the Dreadsail Incendiary (mage) spawns after completing a Reef (portal) applying a healing debuff.
Boss 2 Reef Guardian Hardmode HM clear (live)
Boss 3 – Tideborn Taleria Endboss
Table of Contents
Tideborn Taleria will attack the player with aggro (the tank, ideally) and rotate a series of mechanics that are on timers and health thresholds. Details on each of the mechanics can be found below.
- At 50% health, portal 1 opens.
- A random channeler will appear on one of the three locations, and a stone bridge connecting the middle atoll (island with a hole) with the outer areas will appear. (see “Channelers debuffs (mages)” below)
- At 35% health, portal 2 opens.
- At 20% health, portal 3 opens.
When Taleria opens a portal, if there is any Winter Storm (see mechanic below) active, Taleria will dispel it to allow players to reach the bridges.
Players will have 60s to bring the Channeler mage in the portal down to 50% of its health before it casts Dreadsail Ascension and wipes the group. In veteran, there’s no limit to the number of players you can send and typically anywhere between 2-4 is recommended.
Note that you don’t need to necessarily finish all portals if you have enough DPS to kill the boss before Dreadsail Ascension happens.
Boss Mechanics
Arcing Slash
Light attacks from Tideborn Taleria. They hit twice, with physical and cold damage. Everyone in the frontal cone will take part of the damage. There’s a faint visual cue when the attack happens to show how wide the cone is.
This attack places a dot Soaked Wound on the target and every attack refreshes its duration.
Coral Slam
Heavy attack from Tideborn Taleria. It hits twice, with cold and physical damage. If roll-dodged, it creates a water spout that deals low damage.
Rapid Deluge
Rapid Deluge will place a detonating bomb of 19m radius on the 5 closest players to the boss that detonate after 6s, dealing damage in area.
It can be blocked and shielded, but the correct way to deal with it is to dilute it!
How to survive Deluge: Right before it detonates, dip in water (you need to be swimming, dipping your toes is not enough!) and let it explode in the water. You will take no damage. But stay too long, and the Slaughterfish will kill you.
Rapid Deluges that explode on the land also damage players that are swimming.
In Hardmode, 8 players get Rapid Deluge instead of 5.
🐟Slaughterfish damage🐟 It is oblivion health-scaled damage. Staying in water for 4.4s deals more than 100% of your max health. Note that you also take some damage from Diluted Deluge. It deals 2.5% of max health per stack, with stacks increasing every 550ms.
Sea Behemoth
The Sea Behemoth will spawn every 60 seconds – several of them can be up simultaneously if they are not dealt with. They spawn on top of the main tank – the player with aggro from Tideborn Taleria. In hardmode, it spawns every 45 seconds instead.
Health: They have 5.7M health, and 8.3M in Hardmode.
The Sea Behemoth will do a series of light and heavy attacks on the off-tank, but most importantly it will cast Arctic Annihilation, an area of denial slam that deals damage at the beginning and afterwards when staying in it. All the areas created by a Sea Behemoth will disappear when that enemy is defeated – as opposed to the abomination slams in Flame Herald Bahsei – for example.
Sirens
Sirens, Leimenids, Lemonades, witches or however you call them. Two will appear around the atoll, attacking players at range (Frost Bolt) and periodically casting “Lure of the Sea” on a player. That player will be feared and drawn to the water in the center – that deals damage. If you lose control of your character – break free. Make sure you have enough stamina to break free before the mechanic happens.
Maelstrom
Every 30s, the boss will stop attacking and it will spin its blades for 6 seconds dealing damage over time to everyone within the atoll at around 3 ticks per second. The ticks of damage can be blocked and/or dodged, but they will drain your resources.
Stack, and let the healers out-heal it. Make sure you do not leave the group to go to the portals as this mechanic is about to happen.
Winter Storm
A wall of tornadoes appears centered on the hardmode banner location and spins clockwise or counterclockwise. During the first few seconds after spawning, the wall deals no damage, but afterwards, crossing it or even dodging through it will be lethal. At the same time, there’s a smaller damage over time on the whole party.
In hardmode, two walls of tornadoes on opposite sides (180 degrees from each other) will rotate – reducing the space you have.
Crashing Wave
Three waves will appear fixed on the map, and an additional one that tracks and follows the main tank. After a given time, everyone in the area takes damage. They are dodgeable and blockable.
In Hardmode, there will be an additional tracking wave following the off-tank.
Channelers debuffs (mages)
Each channeler comes with a dome centered on them of a specific color that applies a debuff on players inside it. While the portal is active, its corresponding debuff affects everyone on the atoll and in the portal.
Venom Evoker (green)
- Aura debuff: Nematocyst cloud
- Effect: Mangle. Reduces max health, health regen, max magicka, magicka regen, max stamina, stamina regen.
- – Location: North
- – Color: green
Sea Boiler (yellow)
- Aura debuff: Sweltering Heat
- Effect: Snare. Movement speed reduction
- Location: South-east
- Color: yellow
- Casts a skull projectile that applies fear (Aspect of Terror)
Tidal Mage (purple)
- Aura debuff: Suffocating Waves
- Effect: Defile. {Healing reduction}
- Location: South-west
- Color: purple
Channelers health: 3.88M.
Tideborn Taleria Hardmode
Work in progress
Trash Fights in Dreadsail Reef Trial
Now lets take a look at all the trash fights that you are going to encounter in the Dreadsail Reef Trial in ESO (Elder Scrolls Online).
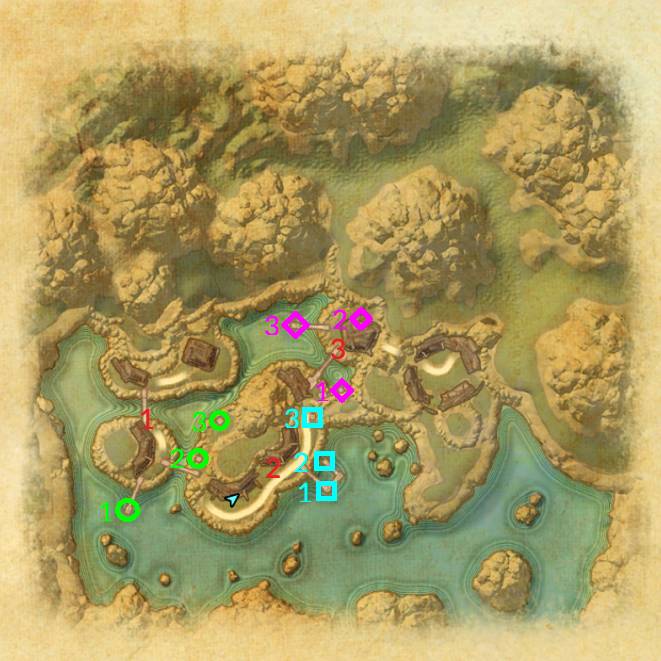
Trash before Boss 1
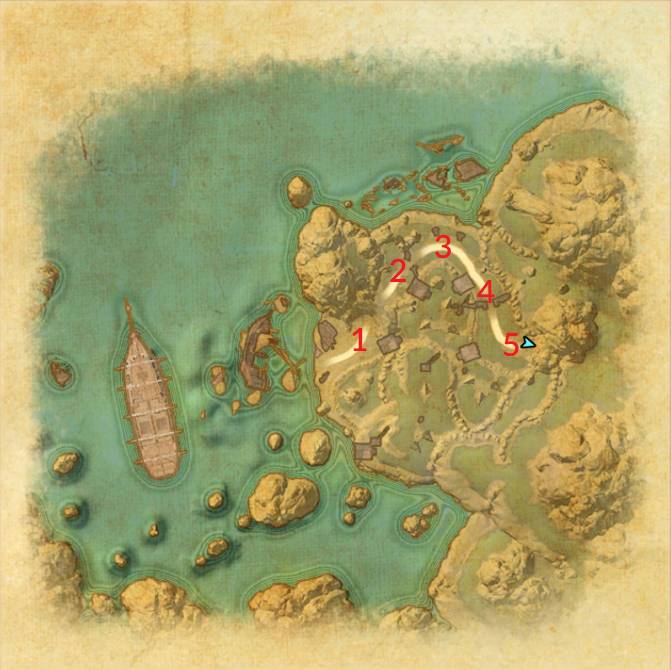
Pack 1
Beach entrance
- Keelcutter
- Swashbuckler
Pack 2
First wooden arch
- Keelcutter
- Swashbuckler
- Reef Viper
Pack 3
Left, on siege engines
- Swashbuckler
- Serpent Caller
Pack 4
Second wooden arch
- Swashbuckler
- Swashbuckler
- Reef Viper
Pack 5
Upstairs plateau
- Ranger (same as Sharpshooter) (left)
- Ranger (same as Sharpshooter) (right)
Trash before Boss 2
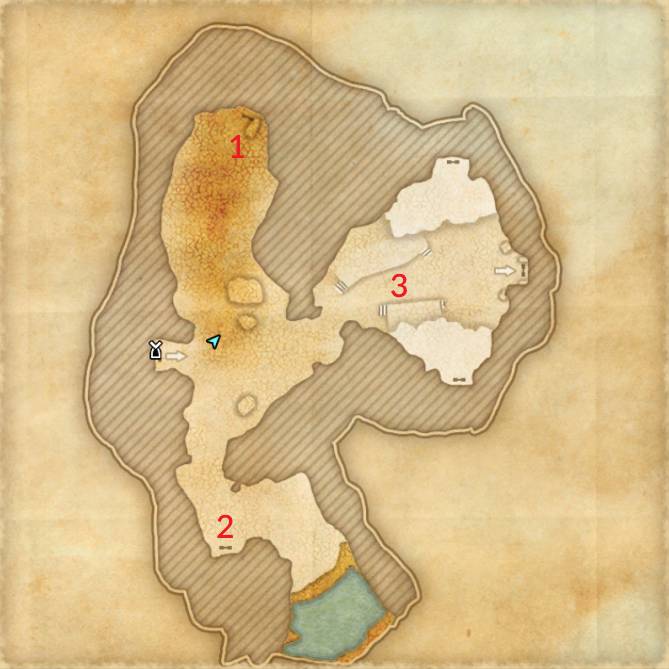
- Path to the Poison side
- Brewmaster
- Coral Drift Bear
- Path to the Lightning side
- Keelcutter
- Harpies
- Neutral enemies
- These enemies will not aggro unless someone attacks them.
- There’s an NPC next to a device near the door to the second boss that will grant you the Secret buffs if you have collected the 5 hidden runestones.
Secret Buffs
On both the poison and lightning side, you will find earth mounds similar to the ones encountered when excavating. Once you dig, they can be either empty or contain a runestone that can be destroyed by interacting with it.
Find the 5 hidden runestones, and the NPC on area 3 will give you a set of rotating Secret buffs.
Poison Side
Symbols on the map are sets of 3 levers.
Pack 1a
- Serpent Caller
- Coral Crab Broodlord
- Coral Crab Broodmother
Pack 1b
- small adds
Pack 2a
- small adds
Pack 2b
- Serpent Caller
- Brewmaster
- Coral Drift Bear
Pack 3a
- small adds
Pack 3b
- Brewmaster
- Serpent Caller
- Sharpshooter
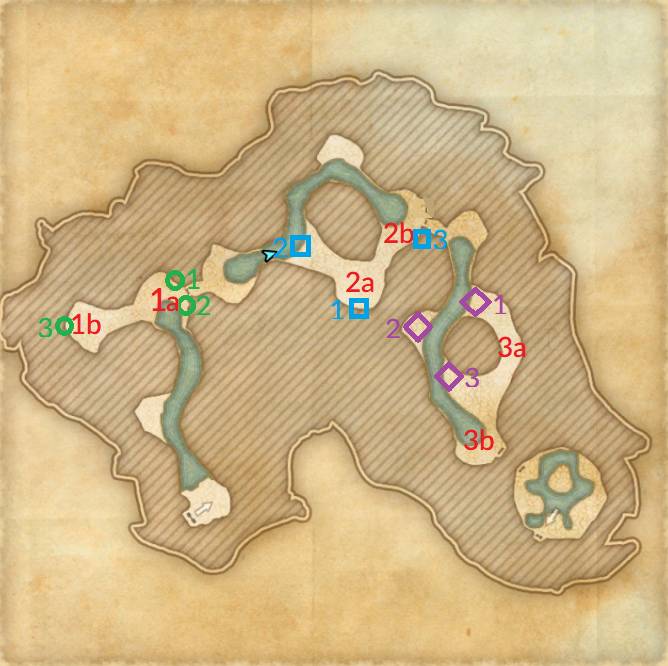
Mini Boss: Bow Breaker
Health: 33M
This boss has no Hardmode.
At the end of the poison side trash, you’ll encounter a Coral Haj Mota. The fight is quite straightforward:
The boss will have a frontal cleave (Horn Strike) that needs to be aimed away from the group by the tank, and eventually it will bury itself underground and traverse the arena. In some circumstances, if it hits a bump Bow Breaker may not traverse during the whole fight.
There are 3 small Coral Drift Haj Mota enemies at the start, and additional ones spawn over time that can simply be stacked on Bow Breaker.
There are waves of several Coral Crabs that will also spawn over time. They will walk to the group and die of area damage.
During the fight, spawning plants will apply stacks of Volatile Residue that act in the same way as described in Boss 2 – Reef Guardian.
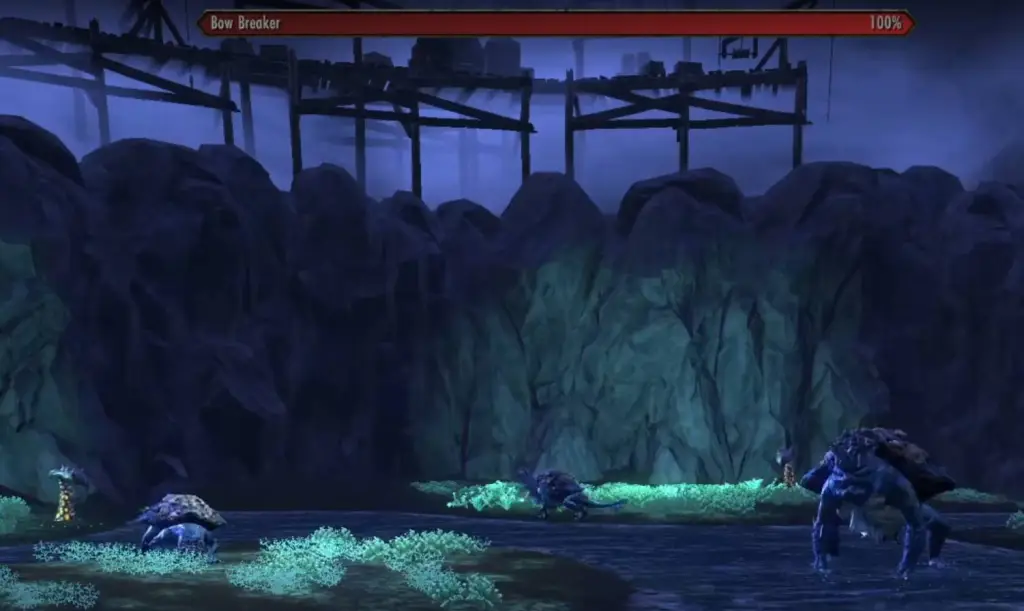
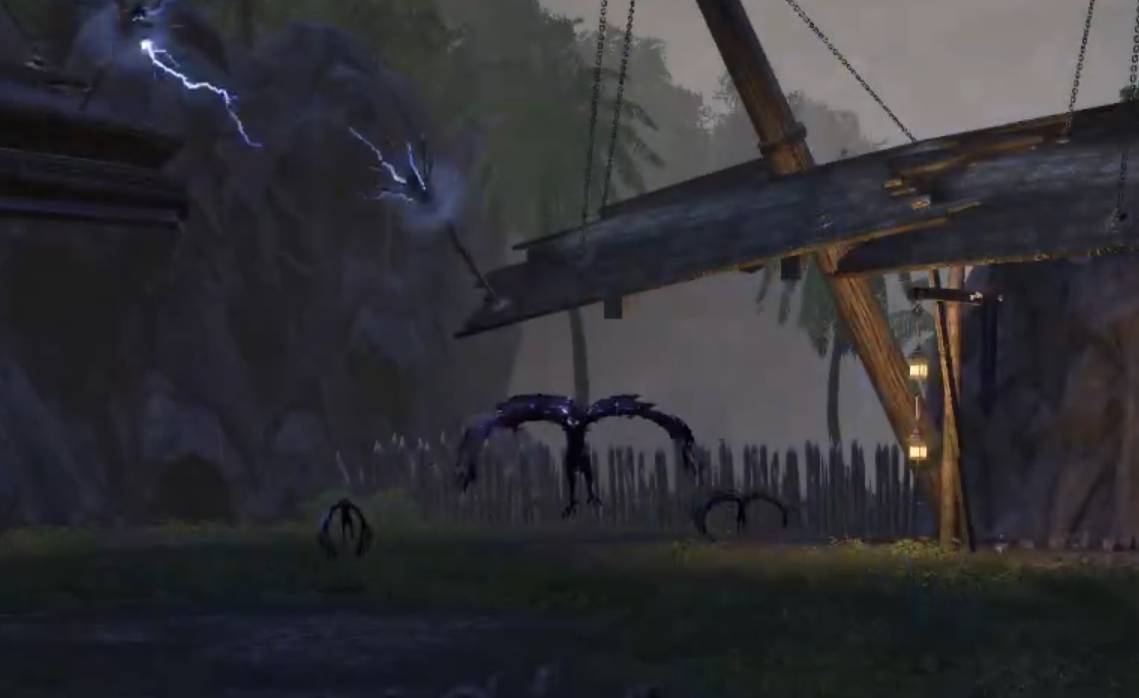
Mini Boss: Sail Ripper
Health: 33M
This boss has no Hardmode.
During the fight there will be additional enemies: Harpy Stormweavers and Harpy Windcallers that attack at range. They should be taunted and ideally stacked on the Sail Ripper.
Sail Ripper will periodically fly around the arena, and right after the flight it will start channeling a lightning attack that needs to be interrupted as soon as the boss is reached before it damages the whole team.
On a timer, a random player will receive Storm Cell, and a lightning aoe will be centered on the player until they deposit it on a hollow circular area (this is commonly known as donut mechanic). Note that players in the lightning around the player affected by Storm Cell will take increased damage from the lightning.
During the fight, everyone needs to stay under the shelters to avoid gaining stacks of lightning (Building Static). They act the same way as described in Boss 2 – Reef Guardian.
Lightning Side
Harpies on this side have a heavy attack that kills DDs.
Pack 1
- Serpent Caller
Pack 2
- Brewmaster
- Serpent Caller
Pack 3
- Serpent Caller (front)
- Brewmaster (right, corner bridge)
- Swashbuckler (far left)
Trash before boss 3
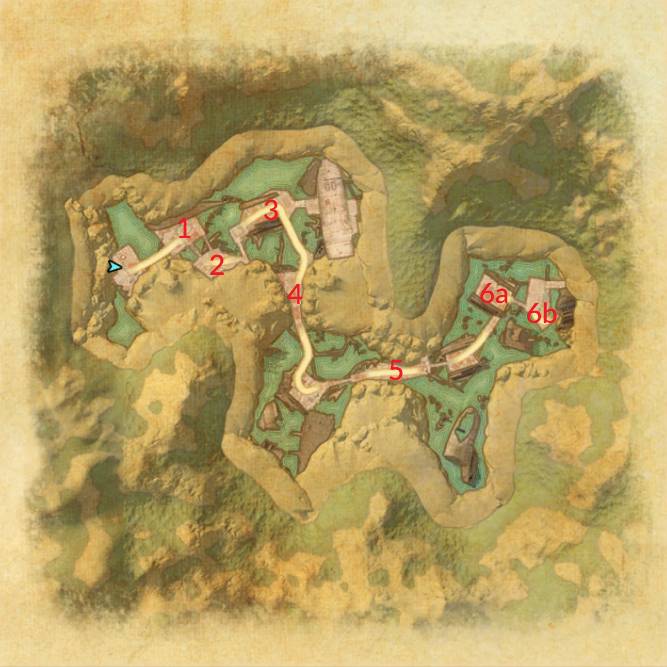
Pack 1
- Brewmaster
- Overseer
Pack 2
- Brewmaster (roams to pack 1?)
- Swashbuckler (roams to pack 1?)
- Keelcutter (drops from the sky)
Note: Depending on the small adds roaming, Pack 2 may be automatically pulled with Pack 1 automatically – watch out!
Pack 3
- Keelcutter
- Overseer
- Sharpshooter (can cast before pull: interrupt)
Pack 4
- Serpent Caller
- Serpent Caller
- Serpent Caller (left)
Pack 5
- Swashbuckler
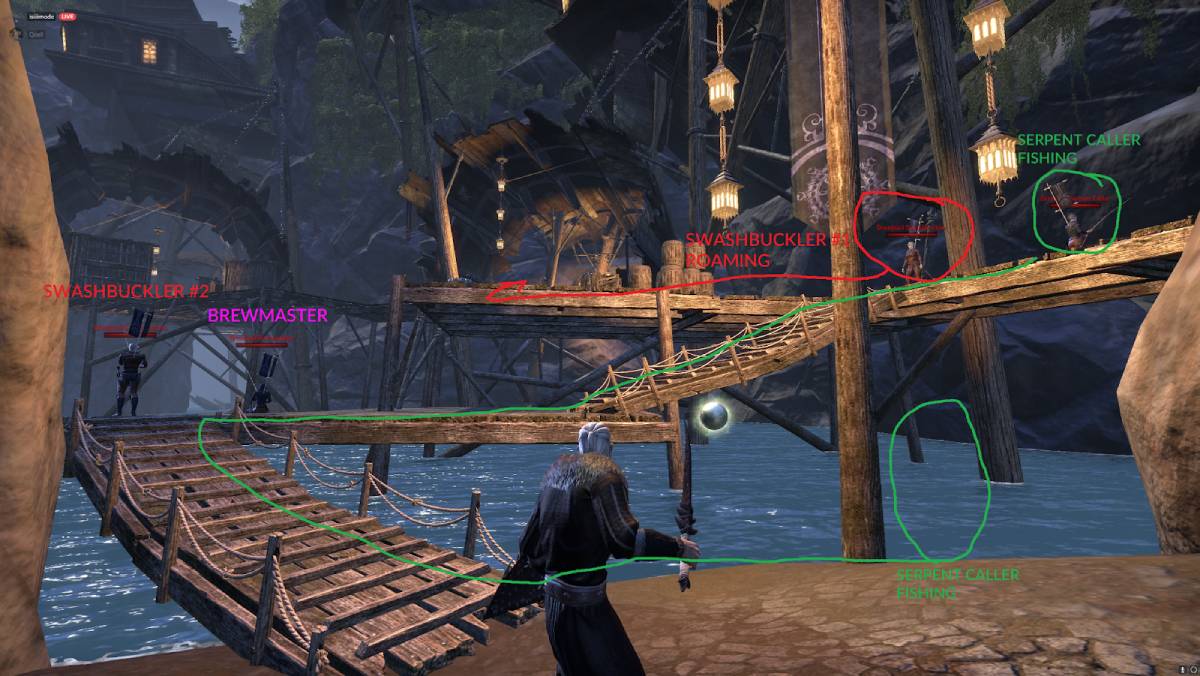
Pack 6a
Pulls together 6a+6b
- Overseer
- Keelcutter
- Swashbuckler #1 (roams)/ (depending on roaming position)
- Sharpshooter pulls as going down, taunts at circular carpet
Pack 6b:
- Serpent Caller
- Brewmaster
- Swashbuckler 2
Last pack 6b), point of view from the door before Tideborn Taleria to know how the right side behaves for the difficult trash pull.
Trash enemies explained
Trash enemies are non-boss enemies encountered in-between the bosses. Mechanics of notable enemies, the ones holding a banner, are explained below. Basic skills such as light attacks are not covered as they are not worth planning for.
General tip: on Settings>Nameplates enable “enemy health bars” and “enemy nameplates” to be able to see which enemies you’re dealing with and react accordingly based on the explanations below.
Coral Drift Bears, (Spirit) Crabs and other small non-elite enemies have differently named heavy attacks not covered below – they are simply raw damage and should be avoided or blocked.
There are two types of Harpies:
- Harpy Stormweaver throws a frontal damaging AOE
- Harpy Windcaller has a high damage heavy attack.
Dreadsail Swashbuckler
- Aperture: the Swashbuckler stays locked in position for 6.5s and throws daggers that remain as circles on the floor following the furthest target. Kite them away from the group, because they explode and deal a lot of damage.
- The AOEs disappear when the Swashbuckler dies.
- Targeted (jump): the Swashbuckler jumps to the furthest player and keeps attacking them for 6s, becoming not tauntable for the duration.
- Assassinate (ouch!): this hurts, seriously. Swashbucklers try to finish-off players that turn their back on them (imagine they only cast it if they got backstabber on you).
- Only cast on players below 50% health. It deals a LOT of damage, and it’s probably a guaranteed death since they deal highly increased damage when attacking players from behind.
Dreadsail Brewmaster
- Restorative Panacea: heals enemies for 350k-450k.
- Augmentation (enemy buff, 15s): makes enemies grow, take less damage and deal more damage.
- Enemies deal 25% increased damage and take 25% reduced damage.
- Diminishing (player debuff, 15s): purple AOEs with rotating potions are cast on the floor. When a player stays on them, that player’s model is diminished, reducing their damage done and increasing damage taken. Enemies are not affected.
- The player gets stunned for 1.8s both when becoming small and when going back to normal. Note this will make you unable to block as a tank in the meantime!
- Player deals 25% reduced damage and takes 25% increased damage.
Dreadsail Serpent Caller
Ice damage dealt by the Serpent Caller applies the Chilled debuff to players. All the casts and summons disappear when the Serpent Caller dies and can be ignored.
- Summon Spirit: they create a ghostly viper or a crab.
- Frost Armor: gives a shield to enemies
- Dragon Totem: spawns a totem that spits a frost cone.
Dreadsail Sharpshooter (or Ranger)
The archer type ranged enemy. They’re named Ranger before the first boss, and Sharpshooters afterwards. They’re identical.
- Marksman’s Gaze: a very slow winded-up heavy attack that can be interrupted, similar to other archers.
- Cinder Shot: 4 players are targeted with long lines that track them, and after a delay it shoots damaging fire. If they overlap, players can take multiple instances of this damage. Don’t overlap and don’t move too much so other players can stand out of the way.
Dreadsail Keelcutter
Two-hander type enemy.
[!] Dreadsail Keelcutters apply the mentioned buffs/debuffs when doing a heavy attack, see Lylanar&Turlassil for more details (Seethe, Hindered, Rattled, Devitalized).
- Expelled Fire: a fiery cone that tracks a player, it deals damage to them and applies a ring around them that makes the player take damage over time (DoT). If other players stay in the ring, it spreads similar to poison in Sanctum Ophidia.
- Incineration: an expanding large-radius fire AOE centered on the Keelcutter that deals damage to everyone inside it. You want to make this a target priority and defeat it before it casts this skill.
Dreadsail Overseer
Sword and shield type enemy.
[!] Dreadsail Overseers apply the mentioned buffs/debuffs when doing a heavy attack, see Lylanar&Turlassil for more details (Seethe, Hindered, Rattled, Devitalized).
- Spell Wall + Barricade: they take 25% reduced damage and reflect projectiles dealing damage back to the attacker for 10s. They give the corresponding buffs Protected + Intercept to other enemies.
- Cascading Boot (aka ice kick): places the target (typically the tank) in an ice tomb, throwing them away causing them to potentially fall off platforms.
- If you have your back against a wall, ramp or obstacle, it will stop you from sliding off to the depths. There are some rare cases where you may get glitched inside a piece of furniture, probably just take a screenshot and laugh it off.
More Videos of Dreadsail Reef Trial
Full veteran clear in Public Test Server (PTS)
Stream: PC EU Raid group streaming Dreadsail Reef hardmodes working on the Swashbuckler Supreme trifecta 3 times a week until we get it on https://twitch.tv/qcelleso
Youtube: https://www.youtube.com/qcell