


Welcome to the ESO Cloudrest Guide. The Cloudrest Mini-Trial is located in the Summerset Zone and can be played in normal and veteran mode. I will walk you through the basics with this guide and explain all the mechanics in detail. The Cloudrest trial is also often referred to as CR.
Table of Contents:
Portal Mechanic for Mini Boss Fights
Before starting the fight, you should form two teams of three DDs each. During the fight, a portal will spawn in the middle of the room. As soon as this happens, one of the teams you formed before goes in that portal together and gets ported to a “Shadow Realm”. The teams have to do that in turns, because you can’t go into the portal twice in a row.
In the Shadow Realm, there are three crystals. Those crystals have to be destroyed. They contain an Malevolent Core orb, which shoots damage at the three players in the shadow realm, so shields and selfheals are important.
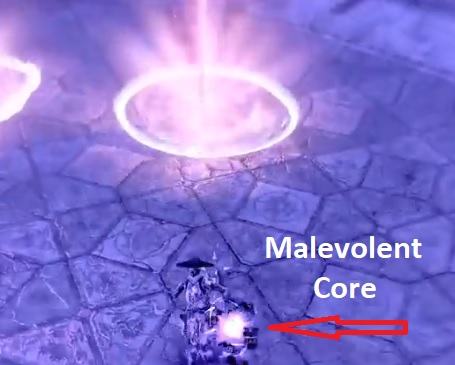
When a crystal is destroyed, a golden glowing shard spawns in the “normal world” where the rest of the group is. The other players have to send these shards into the shadow realm by pressing the synergy button. As soon as all three shards are in the Shadow Realm, the players there need to pick up the orbs from the crystals with a synergy and run to one a golden shard with them. As soon as an orb is picked up, the player carrying it gets a very hefty DoT. That DoT is Oblivion Damage, so shields do not work. So make sure to pick up the orb only when the shards are already in the Shadown Realm and run fast!
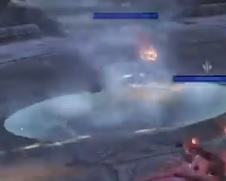
In the Shadown Realm, you will also see Adds slowly walking towards the portal. Those cannot be killed (but can be rooted) in the Shadow Realm and once they reach the portal, they will get into the normal world and your group has to kill them there. The longer it takes, the more adds will spawn, and if your group is too slow to play the portal mechanic, you will have to deal with the most dangerous adds, so called “Yaghra Monstrosities” who look like giant spiders. If you have two of those roaming around, you will probably wipe.
Once you went into the portal, you will get a debuff. This is easy to see because there will be a black swirl around your character. While you have this debuff, you can’t go into the portal, if you try to press the synergy, you will just die. The debuff will vanish after around two minutes, that’s why we made two portal-teams earlier. If you die, the debuff will also go away. (If you have done the Rakkhat fight in Maw of Lorkhaj, this works similar to the debuff you get from running in the backyard there).
Mini Bosses
All three minibosses are Welkynars with a Gryphon at their side. The human and the Gryphon can’t be close to each other because that empowers them and they do more damage. (Easy to recognize at a bright red glow). The Gryphon’s also place a very strong bleed on the tank, which has to be dodged or outhealed if applied on the tank. You have to kill them at the same time, because if only one lives, creeper tentacles will spawn and do damage to your group. Those are very annoying, because they do damage to your group and target players with a ground effect that stuns. You can’t break free of it, you have to do a dodge roll, and you can’t use any abilities for several seconds after that.
Name of Bosses:
- Shade of Galenwe – Ice Damage
- Shade of Relequen – Shock Damage
- Shade of Siroria – Fire Damage
- Z’Maja – Magic Damage

The Ice-Boss
Welkynar Galenwe & Gryphon Falarielle
Hoarfrost Mechanic
When the Gryphon gets up on his hind legs and blinks white once, this mechanic will spawn on a random player. It’s easy to recognize because the character will glow white. The hoarfrost will slow you down and put a DoT on you, and a bit of AoE-Damage to the players close to you. If you have the hoarfrost on you, after 6 seconds, a synergy will pop up. This synergy let’s you drop the hoarfrost, and you should press it as soon as possible, because the Ice DoT will kill you otherwise. Once you pressed the synergy it will also do AoE damage in a 5 meter radius.
The hoarfrost is now lieing on the ground and another player has to pick it up as soon as possible. If the ice isn’t picked up, it shoots damage at the whole group and this damage gets higher the longer the ice isn’t picked up by a player. After the third player picked up the ice and used the synergy to drop it again, it vanishes for some time and will respawn on a random player again. Every ice that spawns has to be picked up by three different players.
Make sure to NEVER go into the portal while you have the Hoarfrost on you, otherwise you will take the ice into the shadow realm with you and make it impossible for your team to play the mechanics there. If it’s your turn to go into the portal and you have the ice on you, just wait the 6 seconds until you can drop it before going into the portal.
Ice Explosion
This mechanic will always hit three players at the same time. You will see a big circle below your feet that slowly fills up from the inside. Once it’s full, an Ice Comet will hit you. The Comet hits like a truck, so you need to make sure to block it, if not blocked you will get a lot of damage and also be knocked down. Don’t stack with the other players affected by this mechanic, if the circles overlap, you will die. (If you have done Falkreath Hold, you basically know this mechanic from the skeleton boss there).

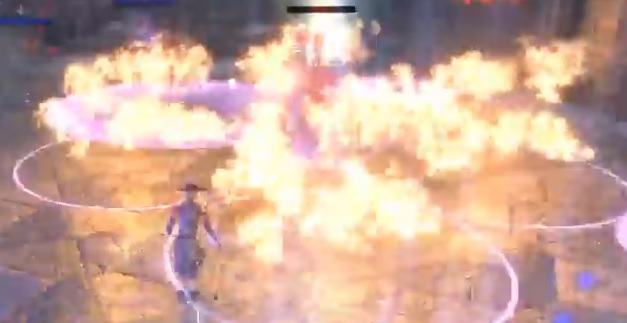
The Fire-Boss
Welkynar Siroria & Gryphon Silaeda
Fire Comet
The Gryphon gets up on his hind legs and blinks orange. He then launches a fire comet in the air. This comet will land on a random player. The targeted player will have a yellow AoE around him. The impact damage of the comet explosion has to be shared by at least three people (two for normal), otherwise the targeted player will die. (If only two players are standing inside the circle, they both will die in veteran).
It’s therefore important to stay close together as a group and don’t scatter too far. If you get targeted with the comet, stay calm and don’t run around panicking, otherwise it’ll be difficult to get inside the circle for your group mates. I’d recommend to always stack together as a group behind the Gryphon’s tail if someone is targeted by the comet. The threshold for dealing with this mechanic is to stack 3 players total, increasing the player stack count does not decrease the comet explosion damage.
Fire Circles
Starting at 50% the Welkynar will jump into the air, land somewhere and fire three fire AoE circles around, those are quite slow and can be easily avoided. If you get hit by them you need to make sure to shield and block it or get out of there fast, usually two ticks are enough to kill a player.

The Schock-Boss
Welkynar Relequen & Gryphon Belanaril
Voltatic Overload
The Gryphon gets up on his hind legs, screeches and blinks grey. Every time this happens, two players are targeted with the Voltaic Overload, this means your active weapon gets cursed and will do a LOT of damage to your groupmates. You’ll get a warning that you are targeted with this mechanic, so you have a short moment to change weapons, so you can choose which skill bar you want to get unusable for the next 10 seconds.
Once the time is up, your character will get a blue lighting beam above him and you will see a very, very large blue AoE around your character. You now have to immediately weapon swap and stay on that other bar for 10 seconds. If you don’t do this or swap back to your overcharged weapon too early, you will shoot lightning bolts at your group mates which do very high damage and you will kill your group mates and yourself within seconds. After 10 seconds, your character will stop glowing and you can swap back to your other ability bar. Even though you have a short moment to choose the skill bar that gets overloaded, especially for healers, I’d recommend slotting an emergency healing skill on your offbar, just in case you accidentally get your healing staff bar locked with this debuff.
Shock Beam Stun
At 50% the boss will start targeting a few players, when not interrupted it will shoot a Shock Beam to the players and stun them, the tank has to make sure to interrupt this mechanic, otherwise it could cause deaths in the group due to the stuns which are usually a death sentence in combination with other incoming damage.

Main Boss
Z’Maja
Portal Mechanic (Main Boss)
Like in the miniboss fights, there is a portal mechanic in the fight againgst Z’Maja. The base mechanic remains the same, you have to form two teams, have to destroy crystals and carry three Malevolent Core orbs to golden shards which your group mates sent to the Shadow Realm via synergies. In this fight however, you will see more than three crystals in the shadow realm and not all contain an orb. You have to destroy the crystals until you found all three orbs.
In the Shadown Realm, you will see a very big AoE circle starting to spread out from the portal. Once it expanded and covers the whole room, there will be an explosion that oneshots everyone standing inside the AoE. To avoid this, you have to run to one of the corners of the room and use a synergy named “Wind of the Welkynars” there. It looks like a glowing whirlwind of leaves and feathers. Don’t confuse this with one of the glowing shards you have to carry an orb to! This synergy will make you fly to a platform above you and you can avoid the explosion in the room down below. Once the explosion is over, just jump down from the platform and continue with the crystals and orbs. Don’t stand on the platform for too long, as the same explosion will happen there as well.
Every portal-team needs a tank to go inside the portal with them, as there is a shadow image of Z’Maja in the Shadow Realm. This shadow image does the same damage and the same attacks as the real one, so it has to be tanked. The tank needs to go inside the portal first, taunt the Shadow Image and make it face away from the portal. The tank needs to survive alone in there so make sure to have self healing slotted. Especially the big Orb that Z’Maja shoots at you deals an insane amount of damage and Z’Maja will also place a DoT on you which deals decent damage. Once he’s done with that, the DDs can go into the portal and start to destroy the crystals.
Once all three orbs have been carried to a shard, you’ll get teleported back to the normal world and adds will spawn. The most dangerous one is the Yaghra Spider which does a heal debuff and deals a lot of damage. The tank who was inside the portal should tank the spider and once it’s dead, he needs to take over the main boss, so the other tank can go inside the next portal with the other team.
Nocturnal’s Favor
This is a oneshot mechanic. The boss charges a huge ball and shoots it at someone. As long as the tank has taunt it is not a problem, the tank will survive but everyone else would die. That is also the reason why the offtank has to go into the portal, the Shadow of Z’Maja does the same attack.
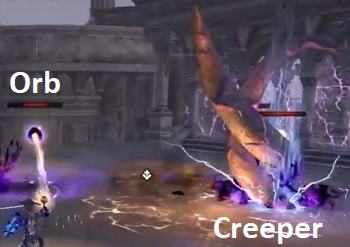
Orbs
During the fight, purple orbs will spawn and slowly fly towards the group. You have to destroy them before they reach the group, as they will otherwise explode and stun players if they hit someone. If you kill the Orbs they will shoot 3 small Orbs at random players, placing a hefty DoT on the players which has to be outhealed, you can dodgeroll this.
Laserbeam
Z’Maja sends out two laserbeams from the top of her head, those have to be kited. They look a bit like the beams you see in several fights in Scalecaller peak. They follow two different players, you have to kite them outside of the group, as everyone inside the beam AoE gets a lot of damage and also a healdebuff will be applied. I recommend having one player standing outside of the group to keep kiting this, so it does not spawn in the group.
Teleporting Cone
Starting at 60% boss health, there will be a cone coming from the portal in both the normal world and the Shadow Realm. If you get hit by that cone while you are in the shadow realm, you will get teleported back to the real world and vice versa. If you are in the normal world and still have the debuff on you that prevents you from going into the portal, you will die if the cone hits you.
Shades (Spawn if someone dies)
If a player dies, a dark shadow image will spawn from his body. This shade has to be killed before the player can be resurrected. The shade is standing above the dead body for a few second and then teleports through the room. If the shade of a player is not killed, it will kill everyone who tries to rez this player. If the shade is still alive, the dead body will have a black swirl around it.
Creeper Tentacles
Starting at 40%, Creeper Tentacles will spawn somewhere in the room. These tentacles need to be focused down, because they do a ground attack which targets players, stuns them and silences them for several seconds, so you aren’t able to use any abilities.
Execute Phase
Once Z’Maja is dead, her Shadow Image will spawn in the middle of the room. This is the real execute phase. During this face, Creeper Tentacles and the purple orbs will continue to spawn. And you have to focus them down. You will also have to continue kiting the laserbeam which targets two players so make sure to have someone still kiting outside. The people who are kiting the laserbeams should either have great selfheals or try to kite the beam as close to the group as possible without harming anyone so they still get enough heals while kiting.
Heal Debuff in Execute Phase
Some group members get high damage when Z’Maja raises her hands in combination with a healing debuff. This healdebuff has to be outhealed once it is applied to a player. The healdebuff will only go away when you are back to full health. So you need a lot of healing per second during that phase and you need to know where people stand.
Z’Maja Mainboss +1
As soon as you start with playing Z’Maja Mainboss +1 you will need to change your group setup slightly. Now you want to make sure to have:
- 2 Healers
- 3 Tanks (1 Maintank and 2 Offtanks)
- 7 Damage Dealers (Preferably with self healing)
The reason why we change it is, now that you have a mini boss in the main room, you need to constantly have two tanks in the main room and one additional tank that goes into the portal room, once he comes out tanks the ugly spider.
The mini Boss spawns when Z’Maja hits 50% health.
Z’Maja Mainboss +2
You want to have the same group setup as in +1. The first mini Boss spawns at 65% and the second mini Boss spawns at 35%. Remembed at 40% the Tentacles start spawning, so you have to fight them and the mini Boss.
In terms of Prioritization, always focus first:
- Orbs
- Tentacles
- Spider Monstrosity
- Mini Boss
Z’Maja Mainboss +3 Hardmode
You want to have the same group setup as in +1. With 3 Tanks this is way easier to complete, because when the Spider Monstrosity comes back once you finished the portal phase, one off tank keeps tanking the mini Boss and the other off tank takes the Spider.
The first mini Boss spawns at 75%, the second at 50% and the third one at 25%. Once the bosses are shackled on the ground, you will not have to fight them anymore as they stay there for the full duration. Always make sure to kill the mini bosses before the next one spawns and make sure to kill the Shock Boss before 40%, because then Tentacles start spawning.
- 75% Fire Boss
- 50% Shock Boss
- 25% Ice Boss
In terms of Prioritization, always focus first:
- Orbs
- Tentacles
- Spider Monstrosity
- Mini Boss
The orbs are very important, if you do not kill them, they will charge right into the group and stun people and most likely cause deaths, a lot of deaths. Therefore always make sure to focus them as soon as they spawn. The Tentacles are the second target you should kill as fast as possible because of their root and silence. The Spider can be tanked by one of the tanks in the meanwhile and it should be your 3rd target. Last the Mini Boss that is not really that dangerous and therefore should be focused last.
What Gear drops where & Welkynar Motif
Here you can find the drop table for the Gear in Cloudrest. I also made a video talking about where you can get what.
Perfect and Imperfect Gear
- Imperfect Gear = Normal Mode, Veteran Mode Side Bosses
- Perfect Gear = Veteran Main Boss +0, +1, +2, +3
Imperfect Gear Pieces in Normal Mode
- Z’Maja +0 = Imperfect Weapons
- Z’Maja +1 = Imperfect Weapons & Body Pieces
- Z’Maja +2 = Imperfect Weapons & Body Pieces & Blue Jewelry
- Z’Maja +3 = Imperfect Body Pieces & Weapons & Purple Jewelry
Perfect Gear Pieces in Veteran Mode
- Z’Maja +0 = Perfect Weapons
- Z’Maja +1 = Perfect Weapons & Body Pieces
- Z’Maja +2 = Perfect Weapons & Body Pieces & Purple Jewelry
- Z’Maja +3 = Perfect Body Pieces & Weapons & Gold Jewelry
Welkynar Motif Drops
| Normal Mode | Veteran Mode | |
|---|---|---|
| Z’Maja +0 | 0 | 2 |
| Z’Maja +1 | 0 | 4 |
| Z’Maja +2 | 0 | 6 |
| Z’Maja +3 | 1 | 10 |
Video Explaining Gear Drops
Gameplay
Below you can find some Cloudrest Trial gameplay.
Full Gryphon Heart run in vet Cloudrest +3.