


Welcome to the ESO Aetherian Archive Guide. The Aetherian Archive Trial Guide will teach you all the basic mechanics of the trial to prepare you for all the fights! The Aetherian Archive trial is also often referred to as AA.
Location of Aetherian Archive
Aetherian Archive can be found in Craglorn, at the south eastern part, it is part of the base game.

Platforms
After beating the first boss, there will be 4x4x4 platforms for your group. You will have to split your 12-man group into three teams of 4 players. Players which chose platforms on the right and left side have to deal with some trash groups, whereas the team with the platforms in the middle will be able to avoid a combat with the monsters, when they enter their platform in stealth modus. It is a huge time saver if you divide your teams into 3 groups before you start your trial!
- Right Platform: 1 Healer, 1 Tank, 2 Damage Dealers
- Middle Platform: 4 Damage Dealers (Enter new area in stealth)
- Left Platform: 1 Healer, 1 Tank, 2 Damage Dealers
First Adds
Make sure every team member is ready to rumble and knows in which group and on which platform that he has to be. As soon as you enter the door to the AA, the timer for your trial points will start!
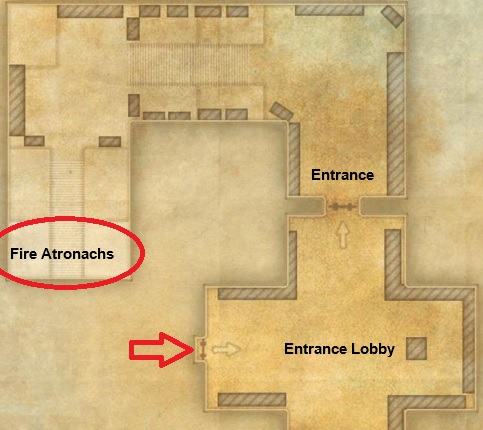
You and your teammates will have to run through the first rooms and upstairs to finally find the first rivals. This is quite a way and if you are up to complete AA as fast as possible, one teammate should use Rapid Maneuvers, so you can run quickly through the first rooms. Upstairs there are some Fire Atronachs waiting for you. Let your tank go in first and pull them together, make sure to shield up before you engage. After they die they will leave a small fire explosion beneath them, make sure to avoid the damage.
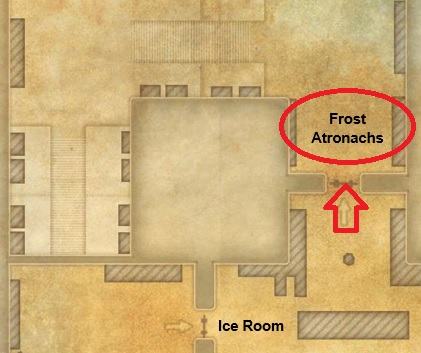
After your meeting with the Fire Atronachs you can cool your head in the Ice Room. Beware of the moving little ice cyclones on the ground, they will freeze you for a short period. You can easily run around them but if you run into one it doesn’t matter that much, it does not deal any damage, you just need to use stamina to break free. You can avoid being rooted if you have Rapid Maneuvers on you. After the Ice Room wait for all team members to get together and open the door. Two big Frost Atronachs will engage your group. The Tank has to turn these away from the group, because they use a frontal cone attack that deals damage. Also, take care of their red circle AoE that can spike you.
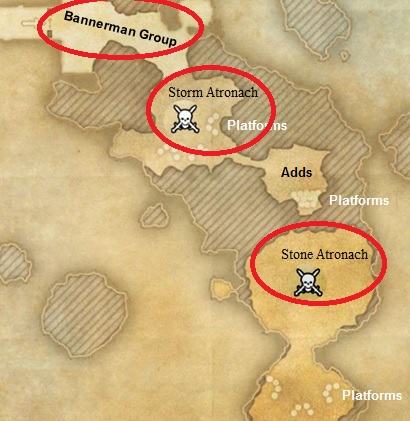
Enough with those elemental rivals, next up there is a big Bannerman Group with some nasty Chainspinners in it, those will put a round AoE under a random player which will explode after some time that deals a lot of damage. Those players need to get away from the other players to avoid splash damage. The Damage Dealers can use AoE damage skills to nuke the Bannermann group into Nirvana. Tanks have just to make sure they pull all the mobs into the AoE damage skills from the other players.
After beating those three Add groups, you are ready for your first boss in Aetherian Archive!
First Boss – Lightning Storm Atronach [HP: 52 Mio.]
This big boy is actually pretty easy once you do understand the mechanics of the boss. Make sure your group is prepared and your healers have the Barrier Ultimate (Alliance War Skill Line) ready. This ultimate is a big live saver if you are new to this boss and / or are not used to react really fast depending on the boss signals.
The Atronach awaits you on a big round platform. The tank can pull him on this platform, facing him towards the bridge and away from the group. The rest of the group just stacks behind the Atronach on the platform.
Boss mechanics:
- Impending Storm
- This is a typical Storm Atronach attack. It is a big AoE pulse, the range is really wide on this one. When the Atronach arches his back, the lightning sparks will gather up in his body and with one big hit he will unleash it with a red AoE circle around him.
- You can either run out of this circle or if everyone knows how to block, just stand in it, block it, and your healers will heal you through it. This AoE does not hit very hard, but if you forget to block, it can one hit you.
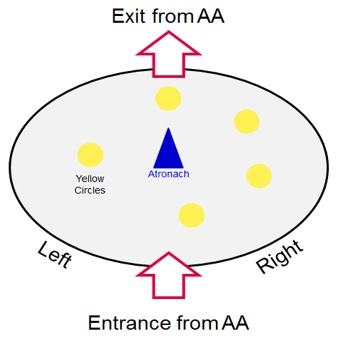
- Lightning Strikes (Yellow Circles)

- This mechanic demands fast reaction. One or two players have to have an eye on the Atronach and when he raises his hand up in the
- sky, it is time to move! As soon as the sky gets a little bit darker and his lightning strikes will come down, there should spawn a single yellow circle in the area around him. There are five possible spawn points of the yellow circles. The players, that are watching out for his hand raise have to callout where the yellow circle is located, so that your group can move towards it.
- To survive this attack, you all have to stand in the yellow circle, otherwise you will die. So, if your group is not moving fast enough to the circle during this attack, you will wipe. If movement is lacking, one of your healers can use Barrier Ultimate in the second his attack begins, so that your members are safe for their way to the yellow circle. There are three players with Barrier Ultimate needed, if you want to have an all-time uptime, every time he does his Lightning Strikes.
- After the Atronach finishes his attack, he will come running to the Tank, who is also inside the yellow circle with you. The Tank has to friendly guide him back to the center of the platform.
- After the Atronach finished with his lightning strikes, it is key for the rest of the group to reposition on the platform behind him, so the distance to all the circles stays about the same.
- It is also very important, that you either give the circles numbers or make everyone clear how you position or name them. Because when the mentioned players announce them, everyone needs to know in which direction he has to run. To make it a bit easier for you guys, you will find a map, where the five circles can spawn here.
This two are the only mechanics from this boss. And to make it even easier, he will always alternate between these two mechanics, so you are able to predict which attack he will be using next.
Group Split / Adds / Group Merge / Adds
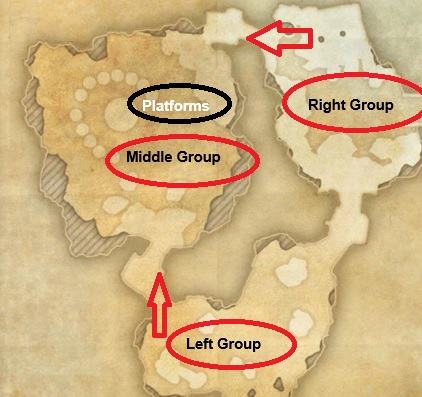
Until this point your squad team was always together, but now it is time to say goodbye and split up in these three groups we discussed at the beginning. In the area where you killed the Atronach, you can see 12 platforms grouped in 3 sections, on the left, the right and in the middle. Every team member has to stand on the platform, so that the beam-me up port to the next area is activated. Each group will be ported to the next area, where you will have to fight against an add group before you can regroup.
- Middle Group
- This group can avoid fighting the following mobs by just simple go into stealth / crouch modus on the platforms before you teleport and just stay at the exact place where you will spawn.
- When your teammates from left and right have dealt with their mobs, you can altogether kill the mobs in the middle
- This technic is the best one, cause in the middle the mobs will re-spawn as long as the other teams are not finish with their add groups.
- Left and Right Group
- Those groups have to deal with some mobs. There is no way to avoid them.
- Your Tank can pull the Chainspinner while the two DDs should kill the healer mobs first. Kill Healers first, then Chainspinners, then Mages.
- Make sure to interrupt the healers and avoid the AoE damage.
- As soon as your group is finished with the mobs, go to the center and kill the mobs in the middle together with the other groups.
When the center is clear, all members can once again stand on the pads. You can just take any of the pads, it is not necessary to split into groups at this point. You will be ported back to the area where you killed the Lightning Storm Atronach. A bridge will form in front of you. Run halfway across it and make sure everyone is ready to meet the next add group.
A big group of Bannersman Adds will spawn. Your group has to stack on the rock which you see in front of you, to make healers life easier. Your tanks have to pull all the mobs that are out of range into your AoE damage. As usual, kill Healers first, then Chainspinners, then other Adds. Once you cleared this group, you can stand on any of the platforms to get ported to the next boss.
Second Boss – Foundation Stone Atronach [HP: 42 Mio.]
This fight will test your group co-ordination and your healers skills. You will find this fight much harder than the Lightning Storm Atronach fight. It’s not uncommon for raids that are new to trials to get stuck on this boss.
You will need two to three Templars that use the Templars Ultimate Solar Prison in rotation so make sure your healers have equipped this ultimate and know which one will use it first and second and so on.
The Tank will start this fight by pulling the boss towards the group on the platform. The Tank is the one player besides the Stone Atronach, that’s why he should announce every Boss Attack because it is easy to see the moves from the Stone Atronach at his position.
Boss mechanics:
- Big Quake
- The boss will pound the ground when he stands up.
- This is a massive AoE over a span of about six seconds. He will pound 5 times at each attack.
- As soon as the Stone Atronach stands up, one healer has to use his Solar Prison Ultimate. It is important, that the rotation is clear and if one healer has his Ultimate not ready, announce it to the group. One of the two others have then to use theirs. This will throw the rotation off but you won’t have a group wipe.
- You healers will need to heal through it with Healing Springs. Make sure your group stacks together and everyone is in the healing circle from your healers.
- If your healers can not deal with the incoming damage, it is also possible to use those damage mitigation skills here:
- Bone Wall synergies from Undaunted skill line
- Barrier Ultimate from Support tree of Alliance War skill line
- Ring of Preservation from Fighter’s Guild skill line
- Boulder Throw
- You can see this attack is incoming, when the Stone Atronach “kneels” down. He will then throw boulders to random players in the group.
- You will have to deal with this attack when the Atronach is below 80% to 75% health. He will do this attack between every Big Quake attack.
- Every time the Tanks announce the Boulder Throws your group spreads out as soon as possible and comes together after this attack is finished. This needs some movement skill but it is a must, otherwise the damage from the boulder throws will stack (splash damage!) on each other in your group. And you will die.
- Adds
- Two type of adds will spawn during this fight, Chainspinners and Nullifiers.
- Chainspinners
- Chainspinners is the more worrisome of the two adds, because it will throw an AoE attack (Fury Unleashed) on the ground. It is a red circle with white spinning graphics in the middle. This attack starts when the boss is below 80% health. It will continue every 5-10 seconds for the rest of the fight.
- As soon as this attack goes down, one person will call for the group to move. Move to the left (clockwise). You want to move just enough so that you are out of the attack, so that once a full rotation around the boss is done, the original area is clear.
- If there is a Sorc in your group, he can use his Negate Ultimate to erase the spinning AoE. This will eliminate the need to move around the circles and you can just stand at the same place during the whole fight.
- The Chainspinners have not much HP, so they die rather fast. You can either focus them and kill them or just ignore them during the fight and hope they will get killed by the AoE damage from your team.
- Nullifiers
- This guys will shoot at random players, so make sure your Off Tank pulls them during the fight.
- You can kill them or just let them die in your AoE damage.
Group Split / Adds / Group Merge
After you finished the Stone Atronach, it is time again to split your raid into three groups and use the platforms after the bridge on the top.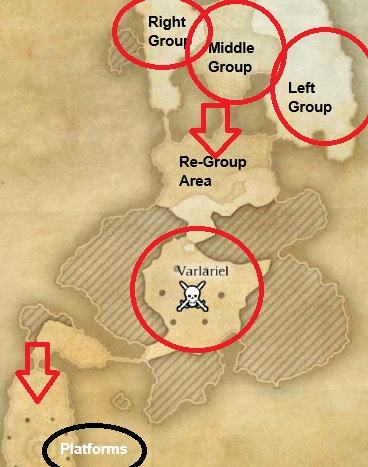
- Middle Group
- This group can avoid fighting the following mobs by just simply stealth / crouch modus on the platforms and just stay at the exact place where you will spawn.
- When your teammates from left and right have dealt with their mobs, you can altogether kill the mobs in the middle.
- Left Group
- You need to kill three mender adds on the cliffs before engaging the Chainspinner and Nullifier add.
- Remember, Healers first, then Chainspinners, then Mage.
- After you finished, help the group in the middle to deal with their adds.
- Right Group
- This group has to deal with some bat mobs, they are easy to kill. Make sure your Tank pulls them one by one, so you don’t get overwhelmed by them.
- After you finished, help the group in the middle to deal with their adds.
Third Boss – Varlariel [HP: 62 Mio.]
This fight is going to be a DPS test for your trial group. If you struggle with your DPS this boss will be very difficult and maybe you have to first work on your DPS outputs before you can handle Varlariel.
You will need to split your 8 DDs in groups of two DDs (so that’s 4×2 groups, right). One group can also be made of the Off Tank and one healer, so that at the end, 5 groups of two players are available. Off-Tank and one Healer should have DPS skills on their backbar for this fight if possible. The other healer can stand in the middle and cast healing skills.
When Varlariel will split herself into her lookalike adds, you will have to burn those adds down as fast as possible. We will get into detail by how to do that under boss mechanics. Before the boss fights starts, you just have to make sure, every group of two players is covering one of the big pillars around Varlariel and they know at which pillar they have to stand and once the add spawns kill the add at the right pillar.
Boss mechanics:
- Raindrops
- Varlariel will constantly drop some small AoE circles on the ground during the whole fight. They will expand to a bigger circle after they hit the ground, so make sure you stand out of them. They also deal very much damage and if you stand in them and you are not shielding/ blocking, you can get oneshot.
- Frozen Breath
- She has also an AoE Attack around her feet and in front of her, which hits really hard and is a one hit if you are not the Tank.
- It is important that the Tank begins the fight, and makes sure, he always has the aggro from Varlariel. Also during the split-up phase, he has to make sure, no one is getting killed cause of her auto attack Frozen Breath.
- Melee DPS have to make sure, they don’t stand in her AoE around her. If possible they can switch to ranged DPS for this fight.
- Lookalike Adds (Split-up)
- During the fight Varlariel will split herself into identical lookalike adds. This adds will be close to the pillars around Varlariel.
- During the first phase Varlariel will split herself into 3 Adds, in the second phase into 4 Adds, in the third phase into 5 Adds and after that she will always split herself into 6 Adds.
- If you can’t kill the Adds fast enough, Varlariel will explode (Combustion) after about 20 seconds after the adds spawned and your group will most likely wipe.
- As we mentioned before, the group of two players have to know, which pillar and which add they have to focus on. As soon as they killed their add, they have to help the other groups to nuke down their add.
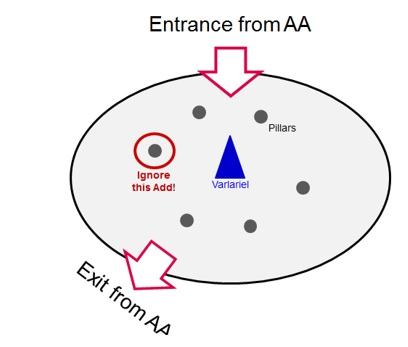
- In the first two phases it is quite easy to kill all Adds. When she will split up to 5 or 6 Adds, this can be a DPS race. So make sure when you are in the third or ongoing phase, there is one pillar (and one Add) your group just completely ignores and will do zero damage to it! When there is only one Add (with full HP) alive, Varlariel will explode, but you can shield / block during the explosion and will not wipe. This allows your group to focus more on the other adds and kill them.
- I provided you with an image (see below), of the six pillars and which pillar / add you can ignore and let alive. You can choose any pillar / add to be ignored, just make sure everyone in your raid knows very well which pillar this is.
- When Valarie’s HP is low enough, you can also ignore the last split-up (below 15%) phase and just focus on the boss and nuke her down. Usually your raid leader will announce when it is time to just focus on Varlariel and ignore the adds.
There will be a last set up of platforms after you finished Varlariel. Use them to be ported to the last boss, The Mage. When you are at the last stage of the Aetherian Archive tower, there will be two small trash groups with some Chainspinners in it. Kill Healers first, then Chainspinners, then others. And there you are, ready to finish the last boss!
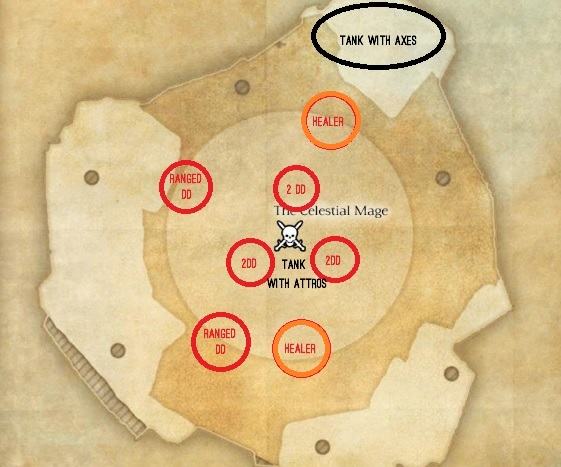
Last Boss – The Celestial Mage [HP: 69 Mio.]
So, this is the last boss of this trial, and she has some insane group coordination and healing check-up for your group at the end of this fight. The Mage will immediately spawn after you killed the add groups, so be prepared! If you have to regain resources, you can also let one add alive until your group is ready for this boss.
Your Tanks don’t have to deal with the Mage, because they will have to tank the purple Axes that will spawn, as explained further under boss mechanics. The Mage will be in the center of the room and the rest of the group has to stand around her, it is very important that you spread out!
Boss mechanics:
- Chain Lightning
- This attack from The Mage is applied to a random player from your raid. Anyone near that player will also take the splash damage.
- That is why your group has to spread out around the mage. Make sure you keep enough space between you and the player next to you. Do not stack more than two players on one position.
- If your group is well positioned, this attack will not do that much damage.
- Daedric Corruption Mines
- The Mage will drop mines all around on her in the fighting area.
- They shine purple with a red circle around them. Do avoid them if possible.
- You can disarm them by running through them. They will deal damage but if you shield yourself before you run over them, then it is possible to survive it.
- Axes
- The Mage will spawn conjured Axes, usually two at a time.
- You don’t have to kill those axes. Your Tanks have to taunt them and tanking them on one of the platforms beside, with some space to the fighting area. Tab targeting works best for taunting them.
- The Axes do deal a lot of damage, so make sure your Tank grabs them as soon as they spawn. The Tanks have to be in block all the time, otherwise they will also get oneshot by the uppercut from these pink fluffs.
- Your healers have to look after your Tanks and support and heal them through the whole fight, throw them Spears so they can recover stamina.
- At the end phase of the boss it is important for the Tanks, that they dodge roll into the middle, cause the Axes will not disappear until the second knockdown from The Mage and they can one-shot you while you are knocked down from the first knockdown of The Mage.
- Conjured Reflection Adds
- This Add will spawn past 50% HP of The Mage. The Add attacks with an AoE that consumes the life of random players.
- As soon as the Add spawns, announce it and your DDs have to focus on her, because she has to be killed as soon as possible. If the add survives too long, it can wipe the group.
- When the HP of The Mage is near the end phase at 15% you can also ignore the add and focus on the boss, the add will die from the stops of the mage.
- End phase after 15% HP
- Once The Mage reaches 15% health, she will do 4 stage wide knockdowns, this will also kill the remaining adds and the Axes.
- Everyone will need to run to the middle for the last DPS test in this trial. Just give everything you have and nuke her down. It is a good advice for your DDs to use their ultimate in this phase, not shortly before.
- The Mage will spam an intense AoE attack called the Arcane Vortex. Your healers have to be prepared for this phase and have to use Solar Prison Ultimate in rotation and spam healing skills to keep your group alive. The damage of this AoE is getting stronger the longer The Mage lives, so make sure to execute the boss as fast as possible!
Last Boss – The Celestial Mage [HARDMODE] [HP: 87 Mio.]
Additional to the mechanics from normal veteran mode from the The Celestial Mage, the following ones will have to be considered as soon as you destroy the crystal glasses at the last platforms and start Hardmode!
- Meteors
- Meteors are raining down from Heaven. Make sure to block the Meteor AoE as it deals insane high damage. If you do not block it you most likely die. The biggest difficulty here is, that you have enough stamina to actually block the hit. In case you do not block it, you will get stunned and you have to break free afterwards.
- Storm Attronachs
- From time to time Storm Attronarchs will drop on the players. The tank has to make sure to take them into the middle where people damage the Mage.
- Once the Atronachs are positionined close to the middle AoE damage will hit them automatically. When they drop low they will start “exploding”. When this happens instantly start executing them, because the explosion does crazy damage to all group members.
- Execute Range
- When the executre phase begins, the boss will heal for about 2% of her HP for every stomp she does.
Once again, it is very important that you have good positioning here, because there is so much incoming damage from Chain Lightning and meteors. One small mistake and you will wipe the whole group. Also make sure that the ranged Damage Dealers are in healing range! Use Harness Magicka before a Meteor drops on you to ensure you do not die!