Welcome to the best Lorecerer Build for BG3 (Bard Sorcerer Multiclass Build). The “Lorecerer” is one of the most popular multiclass spellcaster combinations in the game.
This build combines the control-focused College of Lore Bard with the Sorcerer’s unmatched spellcasting power, excelling at battlefield control while remaining highly adaptable.
Table of Contents:
- Bard Sorcerer Build Overview
- Character Creation – Level 1
- Lorecerer Leveling Guide (2-12)
- Lorecerer Best Equipment
- Lorecerer Extra Info
- Lorecerer Build FAQ
BG3 Bard & Sorcerer Multiclass Build Strengths & Weaknesses:
LORECERER PROS
LORECERER CONS
Bard & Sorcerer Multiclass Build Overview
For our Lorecerer Build, we are combining the Sorcerer class with the College of Lore Bard. The Sorcerer class allows you to boost your spells with powerful Metamagic features, and the Draconic Bloodline subclass boosts your elemental damage.
In contrast, Bard brings additional proficiencies, buffs and superior crowd-control options that Sorcerer not offer otherwise. These classes work well together because they both favour Charisma as their most important ability.
This means that we have to be sure that the payoff of adding new classes to your build is worth it, because every level of a secondary class reduces the highest level we can reach with our primary class.
In this Bard and Sorcerer Multiclass Build, we’ll be combining the following classes:
Here is a quick overview of which class we pick when, this is important!
Lorecerer Character Creation (Level 1)

In this section, we will guide you through the best starting choices for creating your BG3 Lore Bard & Sorcerer Multiclass Build.
Starting Class (Bard)
We’ll start off by choosing the Bard class. The Sorcerer elements of the build will be added later.
The Bard starts the game with the following features, which we’ll build on over the course of this guide:
Best Race
While this build will work fine with any race in the game, there are a few choices that stand out above the rest and can be chosen if you want to optimize the build as much as possible. Here are the five best race choices for the Lorecerer Build:
| Race | Strengths | Info |
|---|---|---|
Wood Elf |
|
Wood Elves are one of the best races in BG3, thanks to their increased Movement Speed which can give you an upper hand in many situations.
Their immunity to Sleep is especially useful in the early-game, where your low HP will cause you to fall victim to enemy mages who love to cast the Sleep spell. You can also choose Wood Half-Elf, which comes with many of the same benefits and gives you proficiency with Shields. |
|
High Elf |
|
Very similar to Wood Elf, but missing the Stealth Proficiency and doesn’t get extra Movement Speed. You can choose an extra Cantrip to learn, which is handy but not super important. |
Duergar |
|
With their wide choice of armour and weapon proficiencies, and resistances to poison, charm, and paralysis, Duergar are one of the strongest races in BG3.
The only downside of Duergar is their small stature – this reduces their base Movement Speed to 7.5 metres per turn (most races get 9 metres). |
Drow |
|
Drow have similar bonuses to other Elves, but also come with a couple of extra Spells and Superior Darkvision. |
Human |
|
The Human race is useful because you get an extra Skill pick and additional Carrying Capacity.
You also get Shield Proficiency, which is useful if you want to equip a Shield for extra armour. |
Wood Elf
![]()
Wood Elves are one of the best races in BG3, thanks to their increased Movement Speed which can give you an upper hand in many situations.
Their immunity to Sleep is especially useful in the early-game, where your low HP will cause you to fall victim to enemy mages who love to cast the Sleep spell.
You can also choose Wood Half-Elf, which comes with many of the same benefits and gives you proficiency with Shields.
- Proficiency in
 Stealth and Perception
 - Extra Weapon Proficiencies:
- Shortswords
- Longswords
- Shortbows
- Longbows
- Fey Ancestry
 Advantage against Charmed
- Immune to Magical Sleep
- Darkvision
- Fleet of Foot – 1.5 metres of extra Movement Speed
High Elf
![]()
Very similar to Wood Elf, but missing the Stealth Proficiency and doesn’t get extra Movement Speed.
You can choose an extra Cantrip to learn, which is handy but not super important.
- Proficiency in and Perception
- Extra Weapon Proficiencies:
- Shortswords
- Longswords
- Shortbows
- Longbows
- Fey Ancestry
- Advantage against Charmed
- Immune to Magical Sleep
- Darkvision
- Choose an extra Cantrip (cast with Intelligence)
Duergar
![]()
With their wide choice of armour and weapon proficiencies, and resistances to poison, charm, and paralysis, Duergar are one of the strongest races in BG3.
The only downside of Duergar is their small stature – this reduces their base Movement Speed to 7.5 metres per turn (most races get 9 metres).
- Can wear Medium Armour
- Can wield axes and hammers
- Dwarven Resilience
- Advantage against Poisoned
- Resistance to Poison Damage
- Superior Darkvision
- Duergar Resilience
- Advantage on Saving Throws against illusions
- Advantage against Charmed and Paralysed
- Duergar Magic
- Enlarge (Level 3)
- Invisibility (Level 5)
Drow
![]()
Drow have similar bonuses to other Elves, but also come with a couple of extra Spells and Superior Darkvision.
- Perception Proficiency
- Fey Ancestry
- Advantage against Charmed
- Immune to Magical Sleep
- Superior Darkvision
- Drow Magic
- Dancing Lights (Level 1)
- Faerie Fire (Level 3)
- Darkness (Level 5)
Human
![]()
The Human race is useful because you get an extra Skill pick and additional Carrying Capacity.
You also get Shield Proficiency, which is useful if you want to equip a Shield for extra armour.
- Can wear Light Armour and Shields
- Extra Weapon Proficiencies:
- Spears
- Pikes
- Halberds
- Glaives
- Human Versatility
- One unrestricted Skill choice
- Increases Carrying Capacity by 25%
Background & Skills
For your Bard/Sorcerer Multiclass Background, we recommend choosing Entertainer. Not only does this feel like a good fit for a Bard from a backstory perspective, it also works really well with this build.
The Entertainer background gives us the following Skill Proficiencies:
Choose any Skills that are based on Charisma or Dexterity. We went with ![]() Deception,
Deception, ![]() Intimidation and
Intimidation and ![]() Persuasion, which will give you an easier time in most dialogue rolls.
Persuasion, which will give you an easier time in most dialogue rolls.
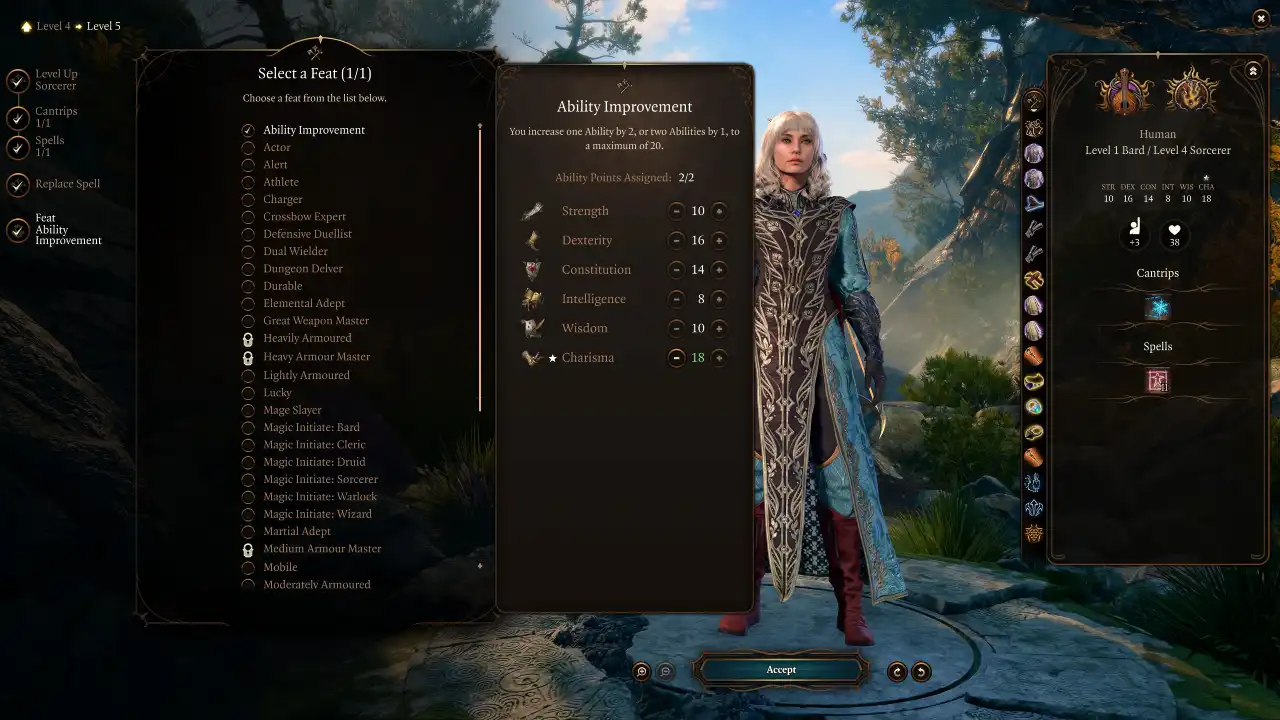
Ability Points

For both the Bard and the Sorcerer class, the most important ability is Charisma, which is used to determine the effectiveness of our spellcasting. We will be focusing on this ability above all others.
Other important abilities are Dexterity, which boosts our Armour Class, and Constitution, which increases our Hitpoints and improves our Concentration Checks.
![]() Strength – 10 Points
Strength – 10 Points
- Improves jump distance and carry weight.
- Low priority for this build.
![]() Dexterity – 16 Points
Dexterity – 16 Points
- Boosts Armour Class (AC) and Initiative.
- Helps you act sooner in combat.
![]() Constitution – 14 Points
Constitution – 14 Points
- Increases Max HP.
- Vital for Concentration Checks to keep spells active.
![]() Intelligence – 8 Points
Intelligence – 8 Points
- Not relevant for our build.
![]() Wisdom – 10 Points
Wisdom – 10 Points
- Used in some Saving Throws.
- Low priority.
![]() Charisma – 16 Points
Charisma – 16 Points
- Primary stat.
- Boosts our Cantrips, Spells and dialogue checks.
| Ability | Points | Why it matters |
|---|---|---|
| 10 | Mostly for jump distance and carry weight. Low priority for this build. | |
| 16 | Important: Gives you a higher Armour Class and improves initiative. | |
| 14 | Important: Increases HP and helps Concentration checks for spells. | |
| 8 | Not relevant for our build. | |
| 10 | Helps with some Saving Throws. Low importance for this build. | |
| 16 | Our primary stat. Boosts Cantrips, Spells and dialogue checks. |
Spells
To start with, you’ll need to select four first-level Spells for your character to learn. We recommend going with the following options for our Lorecerer Build:
Cantrips
In addition to the Spells, you’ll need to choose two Cantrips. These are less powerful spells that do not consume a Spell Slot when cast, meaning you can generally cast them every turn if you want to, with no limitations.
We recommend choosing the following Cantrips for your Lorecerer build:
BG3 Bard Sorcerer Multiclass Build Levelling Guide (2-12)
Now, we are going to look at how to level up your Lorecerer Build for Baldur’s Gate 3.
Early-Game Leveling (2-4)
In this section, we’ll cover the first four levels.
Level 2
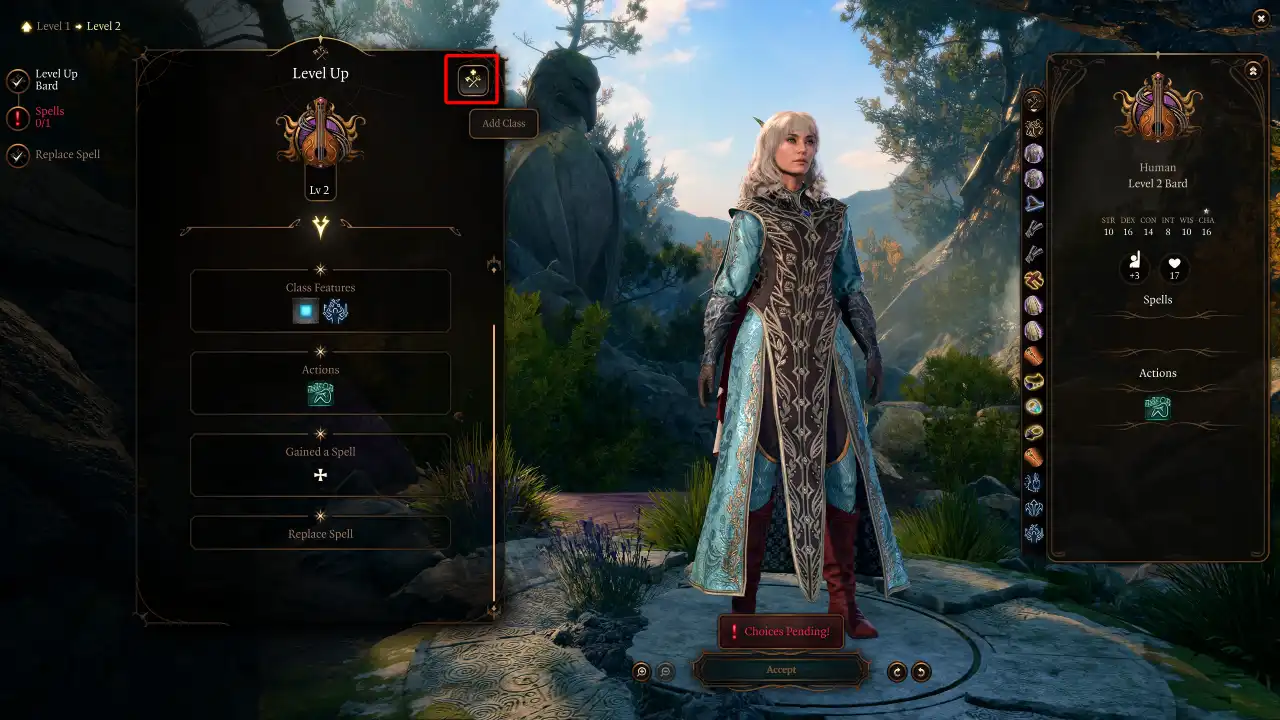
For this level, we will already add the Sorcerer class to the build. The image above shows where you need to click to add a new class.
Adding the Sorcerer to our build gives us the following benefits:
Subclass – Draconic Bloodline
As mentioned above, you must choose your Sorcerer subclass immediately. We opted for Draconic Bloodline because you’ll get extra defenses and an elemental damage boost later in the game, but you can change this if you want.
Level 3
We’ll add another Sorcerer level here, so that we can begin using one of the strongest Sorcerer features, Metamagic.
You unlock a new resource called Sorcery Points. These are spent to activate Metamagic powers, and can be replenished by Long Resting. You’ll also gain +1 Sorcery Point at every Sorcerer Level up.
Metamagic – Choose 2:
You can also unlock a new spell. We recommend:
Level 4
We’re adding another Sorcerer Level, Giving you a total of Bard Level 1, Sorcerer Level 3 so far.
This gives you access to better Sorcerer spells, and an additional Metamagic power.
You can choose another Sorcerer spell to learn:
Mid-Game Leveling (5-8)
In this section, we’ll cover the mid-game. During these levels, the Bard Sorcerer Multiclass Build will become much more powerful, accessing a wider array of spells.
Level 5
We’re adding our fourth Sorcerer level here.
This will give you access to a Feat to improve your Lorecerer’s stats, and another new spell.
First, let’s choose a new spell:
Level 6
We’ll now add the fifth level of the Sorcerer class to our Lorecerer Build.
This is quite a simple level in terms of what you unlock. As usual you get a new Sorcery Point, but besides that you just get one more spell.
Level 7
We’re adding the sixth Sorcerer Level to our Lorecerer, taking the total to 1 Bard, 6 Sorcerer. This will be the final Sorcerer level we add to the build.
This level is important, particularly if you chose the recommended Draconic Bloodline subclass, because you gain a selection of new features from your Sorcerer subclass.
Level 8

We’ll now add the second Bard level to the Lorecerer Build. Remember to click on the Bard icon so you don’t accidentally add another Sorcerer level! See the image above if you’re unsure where to click.
Adding the second level of the Bard class gives you the following benefits:
You can choose another First Level Bard Spell to unlock. Our recommendation:
Late-Game Leveling (9-12)
As we move into the final few levels for the Bard and Sorcerer Multiclass Build, you’ll continue to gain new spells and features that ramp up your character’s power.
Level 9
We will now unlock the next level of the Bard class.
You’ll need to choose your Bard subclass. Choose College of Lore – This is essential, you will miss out on a vital feature of the Bard otherwise.
Here are the full list of choices for this level:
You can now access second-level Bard spells.
Level 10
Once again, we’ll add another Bard level.
This gives the following new features:
You can unlock another spell from the Bard list. We recommend:
Level 11
Add another Bard Level, taking you to Bard Level 5 and Sorcerer Level 6.
At this level, you get a bunch of upgrades to your Bard class features:
You can now access Third Level Bard Spells, and can choose one more spell to unlock. We recommend:
Level 12

You’ve now reached the maximum level of this BG3 Bard & Sorcerer Multiclass Build!
We’ll now add one final level of the Bard class, giving the following features:
You also get to select a new Bard spell.
Learn two non-Bard spells (up to third level) from the ![]() Magical Secrets list. We recommend the following options:
Magical Secrets list. We recommend the following options:
Note: If you don’t like the Command & Hunger of Hadar combo and want some spells that are easier to use, you can respec and replace them with ![]() Call Lightning and
Call Lightning and ![]() Spirit Guardians. There are many ways to play this build – it’s up to you.
Spirit Guardians. There are many ways to play this build – it’s up to you.
BG3 Lorecerer Build Equipment

Now, let us take a look at some of the equipment choices you can make for your BG3 Bard & Sorcerer Multiclass Build.
Don’t worry if you miss out on some of the items. Just enjoy your playthrough and try to view this as a wishlist rather than a precise blueprint. The names of the most essential, build-defining items are written in Bold Italic.
Early Game Equipment
This is the early-game gear setup that you can use for your Bard/Sorcerer Multiclass Build. You don’t need to get all the items, but the build will perform better if you find some of them. You can find these items in Act 1 or early Act 2. Essential items are written in Bold Italic.
| Slot | Icon | Item | Effects | Location |
|---|---|---|---|---|
| Head |  |
The Shadespell Circlet |
|
Sold by Omeluum in the Underdark, after helping him to investigate the Parasite |
| Cloak |  |
Cloak of Protection |
|
Purchased from Quartermaster Talli in Last Light Inn |
| Chest |  |
The Protecty Sparkswall |
|
Looted from a gilded chest at the far end of the trapped bridge in Grymforge |
| Gloves |  |
Bracers of Defence |
|
Looted from a gilded chest in the secret area of the Apothecary’s Cellar |
| Boots | Boots of Stormy Clamour |
|
Sold by Omeluum in the Underdark, after helping him to investigate the Parasite | |
| Necklace |  |
Pearl of Power Amulet |
|
Sold by Omeluum in the Myconid Colony |
| Ring 1 |  |
Ring of Protection |
|
Steal the Sacred Idol in Druid Grove (quest) |
| Ring 2 |  |
Crusher’s Ring |
|
Dropped by Crusher in the Goblin Camp |
| Main Weapon |  |
The Spellsparkler |
|
Rescue Counsellor Florrick from the fire in Waukeen’s Rest |
| Second Weapon | Any |
|
N/A |
We aren’t using a Ranged weapon because it isn’t required – you can use your Sorcerer Cantrips to deal ranged damage.
Endgame Equipment
The endgame gear for the Lorecerer can be obtained either in late Act 2 or Act 3 of Baldur’s Gate 3. If you manage to complete all the items below, you will be an unstoppable force of power. Essential items are written in Bold Italic.
| Slot | Icon | Item | Effects | Location |
|---|---|---|---|---|
| Head |  |
Hat of Fire Acuity |
|
Looted from the Strange Ox in Act II or Act III (Do NOT kill the Ox in Act I!) |
| Cloak |  |
Cloak of the Weave |
|
Sold by Helsik at the Devil’s Fee, once her special stock is unlocked |
| Chest |  |
Potent Robe |
|
Given as a reward by Alfira for completing the Rescue the Tieflings quest in Act II |
| Gloves |  |
Helldusk Gloves |
|
Dropped by Haarlep in the House of Hope. |
| Boots | Boots of Stormy Clamour |
|
Sold by Omeluum in the Underdark, after helping him to investigate the Parasite | |
| Necklace |  |
Spineshudder Amulet |
|
In the Mimic Chest in Isobel’s Room, Moonrise Towers. |
| Ring 1 |  |
Ring of Mental Inhibition |
|
In a locked chest in the House in Deep Shadows, east of the Shadowed Battlefield Waypoint. |
| Ring 2 | Eversight Ring |
|
House of Healing Morgue – in the locked opulent chest in the morgue lab. | |
| Main Weapon |  |
Markoheshkir |
|
Found inside a Globe of Invulnerability in Ramazith’s Tower |
| Second Weapon |  |
Darkfire Shortbow |
|
Buy or steal from Dammon in Last Light Inn. |
Here’s a summary of how these items work together to boost this Lorecerer Build for Baldur’s Gate 3:
Lorecerer Build Extra Info

Here is some extra information that will help you to get the most out of this Bard & Sorcerer Multiclass Build in Baldur’s Gate 3.
How to Play this Lorecerer Build
In the Early-Game
In this stage of the game, the Lorecerer is focused on being a useful all-rounder, but doesn’t yet have any complicated synergies to speak of.
Playing the build in the Late-Game
By far the most important item for this build is the ![]() Hat of Fire Acuity. Once you obtain it, the build comes alive. You can get it by defeating the Strange Ox in Act II or Act III. Do not do it in Act I, because the Strange Ox drops a different item if you do that.
Hat of Fire Acuity. Once you obtain it, the build comes alive. You can get it by defeating the Strange Ox in Act II or Act III. Do not do it in Act I, because the Strange Ox drops a different item if you do that.
Here’s how to best use it:
At max level, you unlock the Command spell. This is usually a modest early-game control spell, but with this build its insanely strong:
This combo can be a bit tricky to pull off, but when it works out you can neutralize multiple enemies with ease.
Alternatively, you can just use Command on its own to stun enemies for as long as you need.
Lorecerer Best Potions
Using the right Potions for your Lorecerer Build will make it much easier to play, especially later in the game when you have complicated synergies between the Hat of Fire Acuity and various spells.
There are two potions I want to draw your attention to – they were mentioned above but here I will explain how to find the ingredients and craft them.
Tip: You can only have one Elixir active at a time, be careful not to accidentally replace it. You can safely combine it with the ![]() Potion of Speed and anything else called a Potion, though.
Potion of Speed and anything else called a Potion, though.
Lorecerer Build Illithid Powers (optional)

Illithid Powers are unlocked later in BG3 when you learn more about Mind Flayers and Tadpoles. By eating Jars of Mind Flayer Parasites you gain one point. This is another optional skill tree that you can get access to if you want. Here are some of the best Illithid Powers for the BG3 Lorecerer Build:
Lorecerer Build FAQs
Here are some frequently asked questions related to the BG3 Lore Bard & Sorcerer Multiclass Build. Most of these questions have already been answered in the guide itself.
- What’s the best race for a Bard Sorcerer Multiclass Build?
- What roles can the Lorecerer fill in my party?
- What abilities are most important for the Lorecerer?
- Which Bard and Sorcerer subclasses should I use?
FAQ: What’s the best race for a Bard Sorcerer Multiclass Build?
While any race will work just fine for this build, the best options are:
- Wood Elf – Very high mobility, resistance to effects like magical sleep and Charm, innate Darkvision. The extra Movement Speed is an underrated bonus that allows you to outrun foes.
- Duergar – Gives you innate Superior Darkvision. Allows you to wear Medium Armour. Gives you Resistance to Poison Damage and Advantage against the Poisoned, Charmed and Paralysed effects. This wide range of bonuses makes the Duergar very tough.
- Drow – Similar bonuses to the Wood Elf, but doesn’t have the extra Movement Speed. However, you do get Superior Darkvision and can debuff enemies with Faerie Fire.
For more info about the best races, see the Best Race section above.
FAQ: What roles can the Lorecerer fill in my party?
The most natural role of the Lorecerer is that of a “support damage dealer”. It deals good damage with its Cantrips, and can use their Bard spells for a range of purposes; your spells are particularly good at AoE damage, buffing allies and debuffing or stunning enemies. Later in the game, once you have obtained the Hat of Fire Acuity, your Lorecerer becomes extremely good at locking down enemies with debuffs and stun spells.
The Lorecerer can also act as a healer in an emergency, but you should not use them as your party’s dedicated healer because it’d be a waste of their potential, and other builds like the Life Domain Cleric do a much better job.
While they can fight in melee in a pinch, you should not try to use the Lorecerer as a tank. They are not durable enough for that, and they will be much more effective staying at a distance from enemies and causing havoc with their cantrips and spells.
FAQ: What Abilities are most important for the Lorecerer?
- Charisma is the most important ability for your Lorecererbuild, because it determines the efficacy of your spells and cantrips and will also boost many of your Skills, such as Persuasion, Performance and Intimidation. Put 16 points in Charisma at the start and increase it later in the game.
- Dexterity is also very important. It boosts your Armour Class and Initiative, allowing you to move earlier in the turn. Put 16 points in this.
- Constitution should always be at least 14 for any build in Baldur’s Gate 3, and this one is no different. This gives you a neccessary baseline of HP, and helps you to resist a wide range of hostile effects with Constitution Saving Throws. It also helps you to keep Concentration on spells when you take damage.
FAQ: Which Bard and Sorcerer subclasses should I use?
- For the Bard, I strongly recommend the College of Lore subclass for this build. It will give you 3 extra Skill Proficiencies, but more importantly allows you to unlock two non-Bard spells with the Magical Secrets feature, such as Command and Hunger of Hadar which are both important spells for this build.
- For the Sorcerer, the Draconic Bloodline subclass works very well. You get extra Armour Class to help you through the early game. Later on, you’ll gain affinity with your chosen element, allowing you to deal extra spell damage and gain Resistance against that element.