
Welcome to the best Bardadin Build for BG3 (Bard Paladin Multiclass Build). This multiclass build excels in both spellcasting and melee combat, and can attack enemies multiple times and stun them on the same turn.
The Bardadin can acheive almost 100% success chance on its stun spells. Combined with its high melee damage, this makes it a real handful for enemies.
This build is up to date with the latest version of BG3 (Patch 8). Visit our BG3 Builds Database page for more builds. You can find out how this build measures up to other Multiclass Builds on our BG3 Multiclass Builds Tier List.
Table of Contents:
- Bard Paladin Build Overview
- Character Creation – Level 1
- Bardadin Levelling Guide (2-12)
- Bardadin Best Equipment
- Bardadin Extra Info
- Bardadin Build FAQ
BG3 Bard & Paladin Multiclass Build Strengths & Weaknesses:
BARDADIN PROS
BARDADIN CONS
Bard & Paladin Multiclass Build Overview
For our Bardadin Build, we are combining the Bard class with the Paladin. The Bard class gives you access to a wide range of supportive magic and debuffs, giving your party an edge over enemies.
The Paladin gives you prowess with melee weapons and allows you to wear heavy armour. You will also unlock powerful Smite spells to boost your damage with weapons.
This means we have to be sure that the payoff of adding new classes to your build is worth it, because every level of a secondary class reduces the highest level we can reach with our primary class.
In this Bardadin Multiclass Build, we’ll be combining the following classes:
Here is a quick overview of which class we pick when, this is important!
Bardadin Character Creation (Level 1)

In this section, we will guide you through the best starting choices for creating your BG3 Bard & Paladin Multiclass Build.
Starting Class (Paladin)
We’ll start by choosing the Paladin class. The Bard elements of the build will be added later.
The Paladin starts the game with the following features:
Best Race
While this build will work fine with any race in the game, there are a few choices that stand out above the rest and can be chosen if you want to optimize the build as much as possible. Here are the five best race choices for the Bardadin Build:
| Race | Strengths | Info |
|---|---|---|
Half Orc
|
|
Gets an additional damage die when landing a Critical Hit with a melee weapon (3 dice instead of the usual 2). This makes for a nice boost to your melee damage potential.
You also get Darkvision, Intimidation Proficiency (a good fit since we have high Charisma) and can resist being downed once per Long Rest. |
Duergar |
|
With their wide choice of armour and weapon proficiencies, and resistances to poison, charm, and paralysis, Duergar are one of the strongest races in BG3.
The only downside of Duergar is their small stature – this reduces their base Movement Speed to 7.5 metres per turn (most races get 9 metres). |
Wood Elf |
|
Wood Elves are a great choice for most build types in BG3, thanks to their superior movement speed. Natural Proficiency in Perception is always useful, and immunity to magical Sleep will help you out a lot, especially in the early game when enemy mages love to spam this spell. |
|
Zariel Tiefling |
|
Gets Resistance to Fire Damage, Darkvision, and unlocks the Searing Smite and Branding Smite spells after a few levels up. |
|
Dragonborn, Any |
|
Dragonborns get access to a special Breath attack they can use once per Short Rest, which deals elemental damage in a directional AoE. They also get 50% Resistance to the same element. The damage element in question depends on which Dragonborn variant you choose.
The Fire and Poison variants are slightly better because many enemies attack with these damage types, making resistance to them more valuable. But don’t let this stop you from using whichever type of Dragonborn you like the most. Since we’ll be spending a lot of time in melee, the Dragonborn Breath attacks can fit in quite nicely with the Bardadin’s playstyle. |
Half-Orc
![]()
Gets an additional damage die when landing a Critical Hit with a melee weapon (3 dice instead of the usual 2). This makes for a nice boost to your melee damage potential.
You also get Darkvision, Intimidation Proficiency (a good fit since we have high Charisma) and can resist being downed once per Long Rest.
 Intimidation Proficiency
- Darkvision
- Savage Attacks
- You roll an extra damage dice when you crit
- Relentless Endurance
- Once per Long Rest, restore to 1 HP instead of being Downed
- Once per Long Rest, restore to 1 HP instead of being
Duergar
![]()
With their wide choice of armour and weapon proficiencies, and resistances to poison, charm, and paralysis, Duergar are one of the strongest races in BG3.
The only downside of Duergar is their small stature – this reduces their base Movement Speed to 7.5 metres per turn (most races get 9 metres).
- Can wear Medium Armour
- Can wield axes and hammers
- Dwarven Resilience
 Advantage against Poisoned
- Resistance to Poison Damage
- Superior Darkvision
- Duergar Resilience
- Advantage on Saving Throws against illusions
- Advantage against Charmed and Paralysed
- Duergar Magic
- Enlarge (Level 3)
- Invisibility (Level 5)
Wood Elf
![]()
Wood Elves are a great choice for most build types in BG3, thanks to their superior movement speed. Natural Proficiency in Perception is always useful, and immunity to magical Sleep will help you out a lot, especially in the early game when enemy mages love to spam this spell.
- Proficiency in Stealth and Perception
- Extra Weapon Proficiencies:
- Shortswords
- Longswords
- Shortbows
- Longbows
- Fey Ancestry
- Advantage against Charmed
- Immune to Magical Sleep
- Darkvision
- Fleet of Foot – 1.5 metres of extra Movement Speed
Zariel Tiefling
![]()
Gets Resistance to Fire Damage, Darkvision, and unlocks the Searing Smite and Branding Smite spells after a few levels up.
- Resistance to Fire Damage
- Darkvision
- Tiefling Magic
- Thaumaturgy (Level 1)
- Searing Smite (Level 3)
- Branding Smite (Level 5)
Dragonborn, Any
![]()
Dragonborns get access to a special Breath attack they can use once per Short Rest, which deals elemental damage in a directional AoE. They also get 50% Resistance to the same element. The damage element in question depends on which Dragonborn variant you choose.
The Fire and Poison variants are slightly better because many enemies attack with these damage types, making resistance to them more valuable. But don’t let this stop you from using whichever type of Dragonborn you like the most.
Since we’ll be spending a lot of time in melee, the Dragonborn Breath attacks can fit in quite nicely with the Bardadin’s playstyle.
- Draconic Ancestry – Depending on which Dragonborn variant you choose, you’ll gain:
- Resistance to an elemental damage type
- A special AoE elemental breath attack
If you don’t know what we mean by terms like Advantage, Proficiency or Saving Throw, or want to find out how systems like Stealth work, you will find our BG3 Hidden Mechanics Guide very useful.
Background & Skills
For your Bard/Paladin Multiclass Background, we recommend choosing Soldier.
The Soldier background gives us the following Skill Proficiencies:
You can manually choose two other Skills in addition to those granted by your Background. These choices are restricted to the Paladin Skill list.
We ideally want to focus on Strength and Charisma skills, but there aren’t many available. We went with ![]() Persuasion and
Persuasion and ![]() Insight.
Insight.
If you’re a Human, you’ll get one extra unrestricted Skill Choice, which you should put in any remaining Charisma Skill.
Ability Points
Dexterity will be our most important ability for the Bardadin Build, because it’s used to determine the accuracy and damage of your melee attacks.
This is closely followed by Charisma, which is used to determine the effectiveness of our spellcasting.
The final important ability is Constitution, which increases our Hitpoints and improves our Concentration Checks.
Later in the game, we’ll also get a higher Strength score, but this will be done with potions and equipment rather than by assigning the points.
![]() Strength – 10 Points
Strength – 10 Points
- Improves jump distance and carry weight.
- Unimportant for now. Later in the game, we’ll boost it with equipment.
![]() Dexterity – 16 Points
Dexterity – 16 Points
- Improves your attack damage and accuracy (requires a weapon with the Finesse property)
- Affects your Initiative (how early you move in the turn compared to other characters).
- Boosts Armour Class, unless you are wearing Heavy Armour.
![]() Constitution – 14 Points
Constitution – 14 Points
- Increases Max HP.
- Helps you to maintain Concentration Spells when you take damage.
- Provides some resistance to a wide range of debilitating debuffs.
![]() Intelligence – 8 Points
Intelligence – 8 Points
- Not relevant for our build.
![]() Wisdom – 10 Points
Wisdom – 10 Points
- Used in some Saving Throws.
- Low priority.
![]() Charisma – 16 Points
Charisma – 16 Points
- Boosts our Cantrips, Spells and dialogue checks.
| Ability | Points | Why it matters |
|---|---|---|
| 10 | Unimportant for now. Will be buffed later on with equipment. | |
| 16 | Increases weapon damage (requires a Finesse weapon). Boosts Armour Class and Initiative. | |
| 14 | Increases HP and helps Concentration checks for spells. | |
| 8 | Not relevant for our build. | |
| 10 | Helps with some Saving Throws. Low importance for this build. | |
| 16 | Boosts Cantrips, Spells and dialogue checks. |
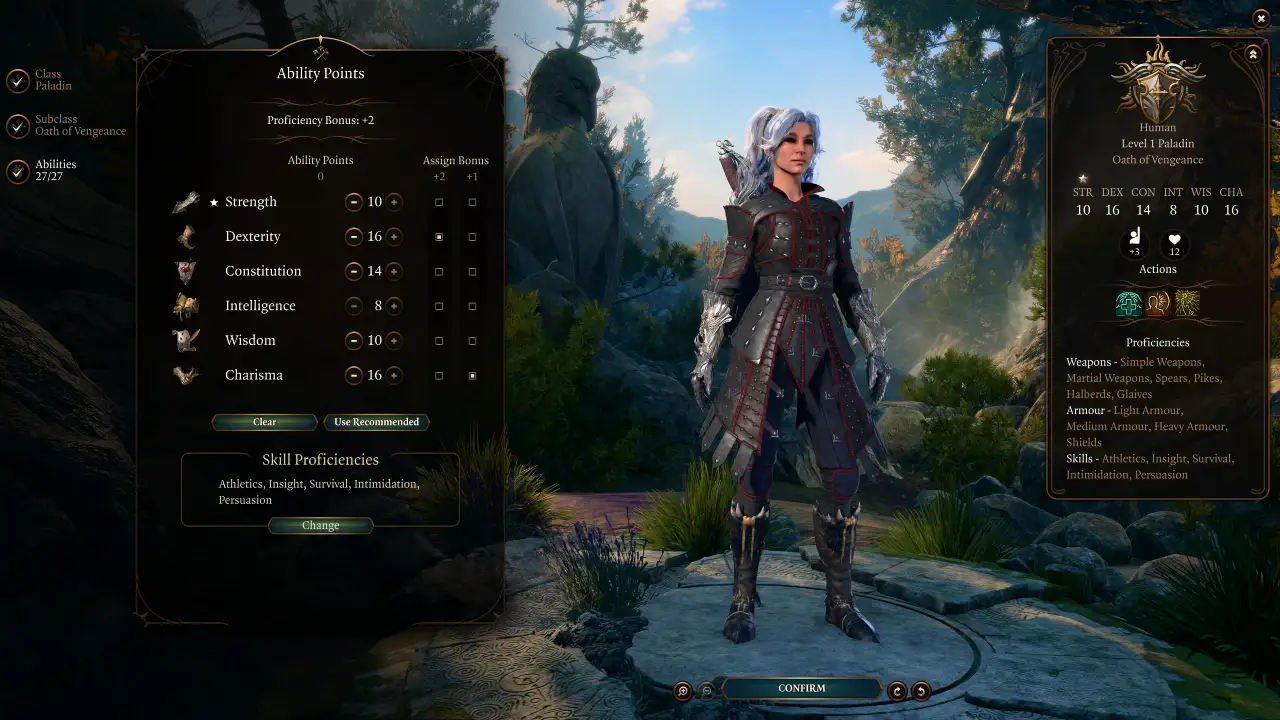
Subclass – Oath of Vengeance
You must choose your Paladin subclass immediately. The recommended choice is Oath of Vengeance, because you’ll get automatic access to a couple of useful spells. You can also use the powerful Abjure Enemy feature to make a foe easier to hit.
However, the build will still work fine if you decide to use a different Paladin subclass.
BG3 Paladin Bard Multiclass Build Levelling Guide (2-12)
Now, we are going to look at how to level up your Bardadin Build for Baldur’s Gate 3.
Early-Game Levelling (2-4)
In this section, we’ll cover the first four levels.
Level 2

The Paladin class unlocks quite a lot of additional features at Level 2:
Level 3

At level 3, we will add the first level of the Bard class. Check the image above if you don’t know how to add a new class to your build.
Level 4
We will continue adding Bard levels for the rest of the game. At level 4 (second Bard level), you unlock the following:
Mid-Game Levelling (5-8)
In this section, we’ll cover the mid-game. During these levels, the Bard Paladin Multiclass Build will become much more powerful, accessing a wider array of spells.
Level 5

At Level 5, we get quite a few new features and can access second-level spells.
Level 6

The next Bard level allows you to choose a Feat for your Bardadin Multiclass Build.
Level 7
The next Bard level improves your Bardic Inspiration and unlocks more powerful spells.
Level 8
We’ll continue to add Bard levels to the Bard Paladin Multiclass Build, unlocking more important features.
You can also unlock a new spell. We recommend:
Late-Game Levelling (9-12)
As we move into the final few levels for the Bard and Paladin Multiclass Build, you’ll continue to gain new spells and features that ramp up your character’s power.
Level 9
We’ll continue adding more Bard levels to the build. At Level 9 (Bard level 7), you gain access to higher-level magic.
Level 10

At this level, you will get another Feat to improve your Bardadin’s stats, and another new spell.
First, let’s choose a new spell:
Level 11
You’ll unlock even stronger spells at Level 11.
Level 12

For the final level, we will add another Bard level. This will give you an additional improvement to your Bardic Inspiration abilities and allow you to unlock three new spells.
BG3 Bardadin Build Equipment

Now, let us take a look at some of the equipment choices you can make for your BG3 Bard & Paladin Multiclass Build.
Don’t worry if you miss out on some of the items. Just enjoy your playthrough and try to view this as a wishlist rather than a precise blueprint. The names of the most essential, build-defining items are written in Bold Italic.
Some of the items are quite expensive – you may be interested in our BG3 Infinite Gold Guide to help you afford them all.
Early Game Equipment
This is the early-game gear setup that you can use for your Bard/Paladin Multiclass Build. You don’t need to get all the items, but the build will perform better if you find most or all of them. You can find these items in Act 1 or early Act 2. Essential items are written in Bold Italic.
| Slot | Icon | Item | Effects | Location |
|---|---|---|---|---|
| Head | Diadem of Arcane Synergy |
|
Carried by Ardent Jhe’rezath in the Inquisitor’s Chamber, Githyanki Creche. | |
| Cloak | Any/None |
|
N/A | |
| Chest |  |
Adamantine Splint Armour |
|
Must be crafted at the Adamantine Forge. |
| Gloves | Gloves of the Growling Underdog |
|
In Dror Ragzlin’s treasure stash, behind the locked gate in Shattered Sanctum | |
| Boots |  |
Disintegrating Night Walkers |
|
Looted from True Soul Nere in Underdark – Grymforge |
| Necklace | Broodmother’s Revenge |
|
Looted from Kagha in the Druid Grove. | |
| Ring 1 |  |
Caustic Band |
|
Sold by Derryth Bonecloak in the Underdark |
| Ring 2 | Strange Conduit Ring |
|
In an elegant chest in the Inquisitor’s Chamber of Creche Y’llek | |
| Mainhand Weapon | Knife of the Undermountain King |
|
Sold by Jeera in the Githyanki Creche | |
| Offhand Weapon |  |
Hunter’s Dagger |
|
Sold by Roah Moonglow in Shattered Sanctum |
| Ranged Weapon | Bow of Awareness |
|
Sold by Roah Moonglow in Shattered Sanctum |
While the most powerful items in BG3 are mostly found in late Act II and Act III, there are still some really good options to be found earlier in the game. We have focused on items that boost your attack damage and defenses.
Most notably, the ![]() Gloves of the Growling Underdog make your attacks much more accurate in most fights.
Gloves of the Growling Underdog make your attacks much more accurate in most fights.
This extra accuracy, combined with the additional damage from ![]() Caustic Band,
Caustic Band, ![]() Strange Conduit Ring, and
Strange Conduit Ring, and ![]() Broodmother’s Revenge, gives you excellent early-game damage.
Broodmother’s Revenge, gives you excellent early-game damage.
The ![]() Adamantine Splint Armour and
Adamantine Splint Armour and ![]() Disintegrating Night Walkers work together to make your Bardadin very tanky and mobile – these items are so good that they’ll remain viable for the whole game.
Disintegrating Night Walkers work together to make your Bardadin very tanky and mobile – these items are so good that they’ll remain viable for the whole game.
One final note about the ![]() Broodmother’s Revenge – at this stage of the game, it is tricky to reliably activate the item’s bonus damage. You may want to temporarily replace it for that reason. But don’t sell it, because later in the game, we can combine it with another item that will activate it every turn.
Broodmother’s Revenge – at this stage of the game, it is tricky to reliably activate the item’s bonus damage. You may want to temporarily replace it for that reason. But don’t sell it, because later in the game, we can combine it with another item that will activate it every turn.
Endgame Equipment
The endgame gear for the Bardadin can be obtained either in late Act 2 or Act 3 of Baldur’s Gate 3. If you manage to complete all the items below, you will be an unstoppable force of power. Essential items are written in Bold Italic.
| Slot | Icon | Item | Effects | Location |
|---|---|---|---|---|
| Head | Helmet of Arcane Acuity |
|
In a trapped and locked chest in the hidden basement of the Masons’ Guild in Act II. | |
| Cloak | Cloak of Displacement |
|
Sold at Danthelon’s Dancing Axe in Wyrm’s Crossing. | |
| Chest |  |
Bhaalist Armour |
|
Sold by Echo of Abazigal |
| Gloves |  |
Gauntlets of Hill Giant Strength |
|
Taken from a pedestal in the archive of the House of Hope. |
| Boots |  |
Helldusk Boots |
|
Found in Gortash’s personal chest at the top of Wyrm’s Rock Fortress |
| Necklace | Broodmother’s Revenge |
|
Looted from Kagha in the Druid Grove. | |
| Ring 1 |  |
Ring of Regeneration |
|
Sold by either Rolan or Lorroakan’s Projection in Sorcerous Sundries |
| Ring 2 | Band of the Mystic Scoundrel |
|
In a backpack in the Jungle, accessed by beating Akabi’s game in the Rivington Circus. | |
| Melee Mainhand |  |
Duellist’s Prerogative |
|
Awarded by Lora Bergauz for completing the Save Vanra quest |
| Melee Offhand | Empty |
|
N/A | |
| Ranged Weapon | Hellrider Longbow |
|
Sold by Ferg Drogher in Rivington. He will not sell you anything if Shadowheart is in the party, unless she sided with Shar. |
Here is a summary of how these items work together to boost this Bardadin Build for Baldur’s Gate 3:
Bardadin Build Extra Info
Here is some extra information that will help you to get the most out of this Bard & Paladin Multiclass Build in Baldur’s Gate 3.
How to Play this Bardadin Build
Early-Game
To begin with, you will struggle with a low spell success rate. This is unavoidable because there just aren’t many items to boost your Spell Save DC until later in the game. Therefore, for the start of the game you should focus on dealing damage with your dual-wielded shortsword/dagger.
Keep an eye out for opportunities where your spell success rate is decent – anything about 75% may be worth using, especially when you’ve obtained the Diadem of Arcane Synergy.
Despite these early limitations, once you’ve collected all of the items in the early-game table (or at least most of them), you will nevertheless be a formidable melee combatant with accurate and deadly attacks.
Late-Game
The more gear you find from the late-game table, the more the Bardadin Build will come alive.
Once you have the Hemlet of Arcane Acuity, make a few attacks at the beginning of combat (using the Haste buff if possible so you can make more attacks per turn). Once you have racked up a few stacks of Arcane Acuity, your spells will have a very high success chance. With the Band of the Mystic Scoundrel, you can cast Hold Person with a Bonus Action. Upcast it to use it against several targets when needed.
Speaking of Hold Person, remember that you get guaranteed melee critical hits against anyone stunned by this spell.
The combo of Bhaalist Armour and Duelist Prerogative is the final cherry on top of this build, because you will get insanely good weapon damage from this.
If you don’t get the Bhaalist Armour in your playthrough, you can choose to run a dual-wield or great weapon setup instead – just remember to respec and change your Fighting Style if needed.
Mirror of Loss
If you successfully acquire a buff from the Mirror of Loss during your playthrough, you should put the extra points into either Dexterity (gives extra melee damage and accuracy, Armour Class and Initiative) or Charisma (improves your spellcasting).
If you don’t know what the Mirror of Loss is or how to use it, you may be interested in our Mirror of Loss Guide. The Mirror can give up to three additional Ability Points to all members of your party, making it very strong.
Bardadin Build Illithid Powers (optional)

Illithid Powers are unlocked later in BG3 when you learn more about Mind Flayers and Tadpoles. By eating Jars of Mind Flayer Parasites you gain one point. This is another optional skill tree that you can get access to if you want. Here are some of the best Illithid Powers for the BG3 Bardadin Build:
Bardadin Build FAQs
Here are some frequently asked questions related to the BG3 Bard & Paladin Multiclass Build. Most of these questions have already been answered in the guide itself.
- What’s the best race for a Bard Paladin Multiclass Build?
- What roles can the Bardadin fill in my party?
- What abilities are most important for the Bardadin?
- Which Bard and Paladin subclasses should I use?
FAQ: What’s the best race for a Bard Paladin Multiclass Build?
While any race will work just fine for this build, the best options are:
- Half-Orc – Deals more damage when you land a Critical Hit, making the Half-Orc the best race in the game for a melee heavy-hitter.
- Wood Elf – Very high mobility, resistance to effects like magical sleep and Charm, innate Darkvision. The extra Movement Speed is an underrated bonus that allows you to outrun foes.
- Duergar – Gives you innate Superior Darkvision. Gives you Resistance to Poison Damage and Advantage against the Poisoned, Charmed and Paralysed effects. This wide range of bonuses makes the Duergar very tough.
For more info about the best races, see the Best Race section above.
FAQ: What roles can the Bardadin fill in my party?
The Bardadin is primarily a melee heavy-hitter who can also use spells to buff their own damage or lock down enemies with stuns and debuffs.
It can also do a decent job of healing allies when needed, but ideally, this job should be done by a Cleric or Druid.
FAQ: What Abilities are most important for the Bardadin?
- Dexterity is the most important ability for the Bardadin. It boosts the damage and accuracy of your melee weapon attacks, as well as your Armour Class and Initiative.
- Charisma is also very important. It is used to determine the success rate of your spells and helps in dialogue checks.
- Constitution should always be at least 14 for any build in Baldur’s Gate 3, and this one is no different. This gives you a necessary baseline of HP, and helps you to resist a wide range of hostile effects with Constitution Saving Throws. It also helps you to keep Concentration on spells when you take damage.
FAQ: Which Bard and Paladin subclasses should I use?
- For the Bard, I recommend the College of Swords subclass for this build. The special Flourish attacks synergise nicely with our melee playstyle.
- For the Paladin, I opted for the Oath of Vengeance, but it’s not super important because we’re only taking a couple of Paladin levels for this build.