
Welcome to the best Sorlock Build for BG3 (Sorcerer Warlock Multiclass Build). It combines two spellcasting classes, giving full access to Sorcerer features like Draconic Bloodline and Metamagic, while Warlock contributes Eldritch Blast, Eldritch Invocations, and potent control spells. Making it a completely overpowered multiclass combo.
The Sorlock Build devastates enemies with massive single-target damage output. At high levels, it controls the battlefield with potent stun spells.
Table of Contents:
- Sorcerer Warlock Build Overview
- Character Creation – Level 1
- Sorlock Levelling Guide (2-12)
- Sorlock Best Equipment
- Sorlock Extra Info
- Sorlock Build FAQ
BG3 Sorcerer & Warlock Multiclass Build Strengths & Weaknesses:
SORLOCK PROS
SORLOCK CONS
Sorcerer & Warlock Multiclass Build Overview
For our Sorlock Build, we are combining the Sorcerer class with the Warlock. The Sorcerer class allows you to boost your spells with powerful Metamagic features, and the Draconic Bloodline subclass boosts your elemental damage.
In contrast, Warlock gives you access to the ![]() Eldritch Blast,
Eldritch Blast, ![]() Eldritch Invocations and
Eldritch Invocations and ![]() Hex combo, which is probably the strongest Cantrip setup in the game and gives you a powerful and reliable source of consistent damage. These classes work well together because they both favour Charisma as their most important ability.
Hex combo, which is probably the strongest Cantrip setup in the game and gives you a powerful and reliable source of consistent damage. These classes work well together because they both favour Charisma as their most important ability.
This means that we have to be sure that the payoff of adding new classes to your build is worth it, because every level of a secondary class reduces the highest level we can reach with our primary class.
In this Sorcerer and Warlock Multiclass Build, we’ll be combining the following classes:
Here is a quick overview of which class we pick when, this is important!
Sorlock Character Creation (Level 1)

In this section, we will guide you through the best starting choices for creating your BG3 Sorcerer & Warlock Multiclass Build.
Starting Class (Sorcerer)
We’ll start by choosing the Sorcerer class. The Warlock elements of the build will be added later.
The Sorcerer starts the game with the following features, which we’ll build on over the course of this guide:
Best Race
While this build will work fine with any race in the game, there are a few choices that stand out above the rest and can be chosen if you want to optimize the build as much as possible. Here are the five best race choices for the Sorlock Build:
| Race | Strengths | Info |
|---|---|---|
Wood Elf |
|
Wood Elves are one of the best races in BG3 thanks to their increased Movement Speed, which can give you an edge in many situations.
Their immunity to Sleep is especially useful in the early-game, where your low HP will cause you to fall victim to enemy mages who love to cast the Sleep spell. You can also choose Wood Half-Elf, which comes with many of the same benefits and gives you proficiency with Shields. |
|
High Elf |
|
Very similar to Wood Elf, but missing the Stealth Proficiency and doesn’t get extra Movement Speed. You can choose an extra Cantrip to learn, which is handy but not super important. |
Duergar |
|
With their wide choice of armour and weapon proficiencies, and resistances to poison, charm, and paralysis, Duergar are one of the strongest races in BG3.
The only downside of Duergar is their small stature – this reduces their base Movement Speed to 7.5 metres per turn (most races get 9 metres). |
Drow |
|
Drow have similar bonuses to other Elves, but also come with a couple of extra Spells and Superior Darkvision. |
Human |
|
The Human race is useful because you get an extra Skill pick and additional Carrying Capacity.
You also get Shield Proficiency, which is useful if you want to equip a Shield for extra armour. |
Wood Elf
![]()
Wood Elves are one of the best races in BG3, thanks to their increased Movement Speed which can give you an edge in many situations.
Their immunity to Sleep is especially useful in the early-game, where your low HP will cause you to fall victim to enemy mages who love to cast the Sleep spell.
You can also choose Wood Half-Elf, which comes with many of the same benefits and gives you proficiency with Shields.
- Proficiency in
 Stealth and Perception
 - Extra Weapon Proficiencies:
- Shortswords
- Longswords
- Shortbows
- Longbows
- Fey Ancestry
 Advantage against Charmed
- Immune to Magical Sleep
- Darkvision
- Fleet of Foot – 1.5 metres of extra Movement Speed
High Elf
![]()
Very similar to Wood Elf, but missing the Stealth Proficiency and doesn’t get extra Movement Speed.
You can choose an extra Cantrip to learn, which is handy but not super important.
- Proficiency in and Perception
- Extra Weapon Proficiencies:
- Shortswords
- Longswords
- Shortbows
- Longbows
- Fey Ancestry
- Advantage against Charmed
- Immune to Magical Sleep
- Darkvision
- Choose an extra Cantrip (cast with Intelligence)
Duergar
![]()
With their wide choice of armour and weapon proficiencies, and resistances to poison, charm, and paralysis, Duergar are one of the strongest races in BG3.
The only downside of Duergar is their small stature – this reduces their base Movement Speed to 7.5 metres per turn (most races get 9 metres).
- Can wear Medium Armour
- Can wield axes and hammers
- Dwarven Resilience
- Advantage against Poisoned
- Resistance to Poison Damage
- Superior Darkvision
- Duergar Resilience
- Advantage on Saving Throws against illusions
- Advantage against Charmed and Paralysed
- Duergar Magic
- Enlarge (Level 3)
- Invisibility (Level 5)
Drow
![]()
Drow have similar bonuses to other Elves, but also come with a couple of extra Spells and Superior Darkvision.
- Perception Proficiency
- Fey Ancestry
- Advantage against Charmed
- Immune to Magical Sleep
- Superior Darkvision
- Drow Magic
- Dancing Lights (Level 1)
- Faerie Fire (Level 3)
- Darkness (Level 5)
Human
![]()
The Human race is useful because you get an extra Skill pick and additional Carrying Capacity.
You also get Shield Proficiency, which is useful if you want to equip a Shield for extra armour.
- Can wear Light Armour and Shields
- Extra Weapon Proficiencies:
- Spears
- Pikes
- Halberds
- Glaives
- Human Versatility
- One unrestricted Skill choice
- Increases Carrying Capacity by 25%
Background & Skills
For your Sorcerer/Warlock Multiclass Background, we recommend choosing Entertainer.
The Entertainer background gives us the following Skill Proficiencies:
You can manually choose three other Skills in addition to those granted by your Background.
Choose any Skills that are based on Charisma or Dexterity. We went with ![]() Intimidation and
Intimidation and ![]() Persuasion, which will give you an easier time in many dialogue rolls.
Persuasion, which will give you an easier time in many dialogue rolls.
If you’re a Human, you’ll get one extra unrestricted Skill Choice, which you should put in any remaining DEX or CHA skill.
Ability Points

For both the Sorcerer and Warlock classes, the most important ability is Charisma, used to determine the effectiveness of our spellcasting. We will be focusing on this ability above all others.
Other important abilities are Dexterity, which boosts our Armour Class, and Constitution, which increases our Hitpoints and improves our Concentration Checks.
![]() Strength – 10 Points
Strength – 10 Points
- Improves jump distance and carry weight.
- Low priority for this build.
![]() Dexterity – 16 Points
Dexterity – 16 Points
- Boosts Armour Class (AC) and Initiative.
- Helps you act sooner in combat.
![]() Constitution – 14 Points
Constitution – 14 Points
- Increases Max HP.
- Vital for Concentration Checks to keep spells active.
![]() Intelligence – 8 Points
Intelligence – 8 Points
- Not relevant for our build.
![]() Wisdom – 10 Points
Wisdom – 10 Points
- Used in some Saving Throws.
- Low priority.
![]() Charisma – 16 Points
Charisma – 16 Points
- Primary stat.
- Boosts our Cantrips, Spells and dialogue checks.
| Ability | Points | Why it matters |
|---|---|---|
| 10 | Mostly for jump distance and carry weight. Low priority for this build. | |
| 16 | Important: Gives you a higher Armour Class and improves initiative. | |
| 14 | Important: Increases HP and helps Concentration checks for spells. | |
| 8 | Not relevant for our build. | |
| 10 | Helps with some Saving Throws. Low importance for this build. | |
| 16 | Our primary stat. Boosts Cantrips, Spells and dialogue checks. |
Spells
To start with, you’ll need to select two first-level Spells for your character to learn. We recommend going with the following options for our Sorlock Build:
Cantrips
In addition to the Spells, you’ll need to choose four Cantrips. These are less powerful spells that do not consume a Spell Slot when cast, meaning you can generally cast them every turn if you want to, with no limitations.
We recommend choosing the following Cantrips for your Sorlock build:
Subclass – Draconic Bloodline
You must choose your Sorcerer subclass immediately. I strongly recommend choosing Draconic Bloodline because you’ll get extra defences and an elemental damage boost later in the game.
BG3 Sorcerer Warlock Multiclass Build Levelling Guide (2-12)
Now, we are going to look at how to level up your Sorlock Build for Baldur’s Gate 3.
Early-Game Levelling (2-4)
In this section, we’ll cover the first four levels.
Level 2

For this level, we will already add the Warlock class to the build. The image above shows where you need to click to add a new class.
Adding the Warlock class to your build gives the following benefits:
You can choose 2 Warlock Cantrips to unlock. It is imperative to choose ![]() Eldritch Blast, as this will be a vital part of this build:
Eldritch Blast, as this will be a vital part of this build:
You can unlock two Warlock Spells, which will be cast using your new Warlock Spell Slot:
You can now spam ![]() Eldritch Blast, which allows you to deal reliable damage from range without spending Spell Slots.
Eldritch Blast, which allows you to deal reliable damage from range without spending Spell Slots.
To get the best out of the build, remember to combo ![]() Eldritch Blast with your new
Eldritch Blast with your new ![]() Hex spell.
Hex spell.
Level 3
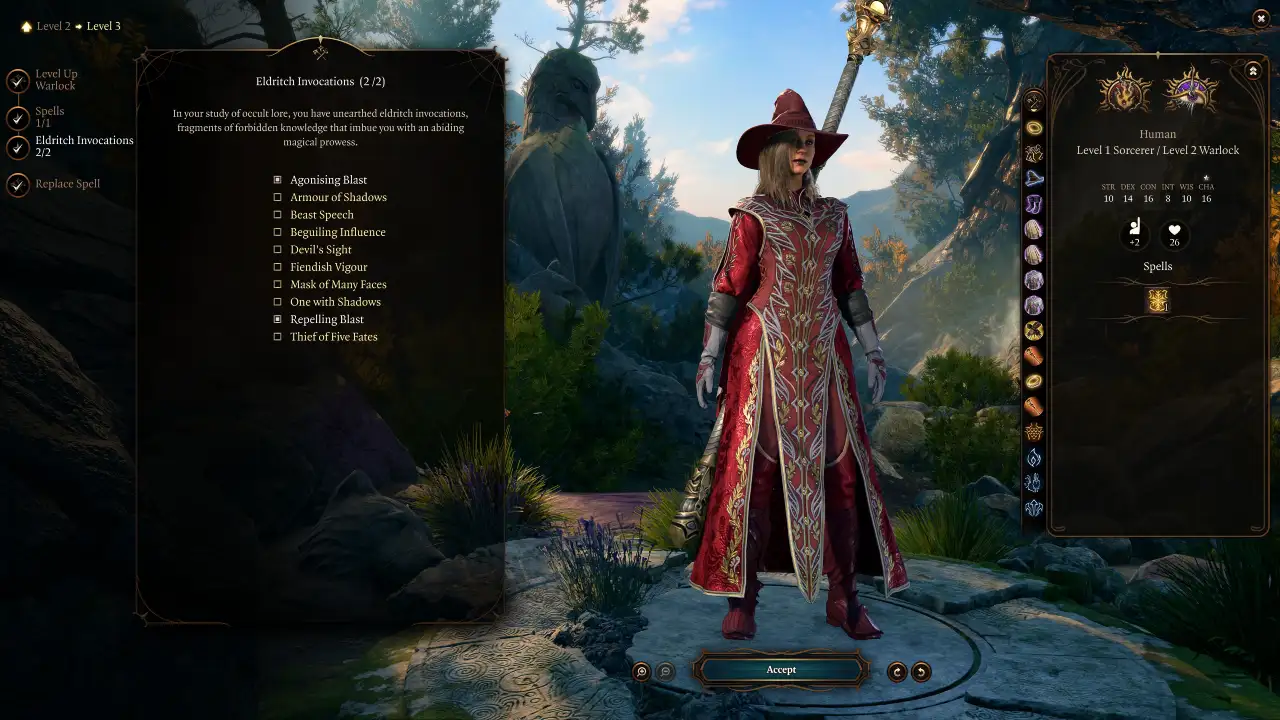
We will add another Warlock Level to the build here, allowing us to quickly rack up a lot of extra power from ![]() Eldritch Blast.
Eldritch Blast.
Taking two Warlock levels so early gives you a strong, reliable tool to fight with in the early-game, and one that scales up very nicely over the course of your playthrough.
You’ll need to choose two ![]() Eldritch Invocations. These are special abilities that let you further customise your Sorlock build.
Eldritch Invocations. These are special abilities that let you further customise your Sorlock build.
We strongly recommend choosing the following two options:
Level 4
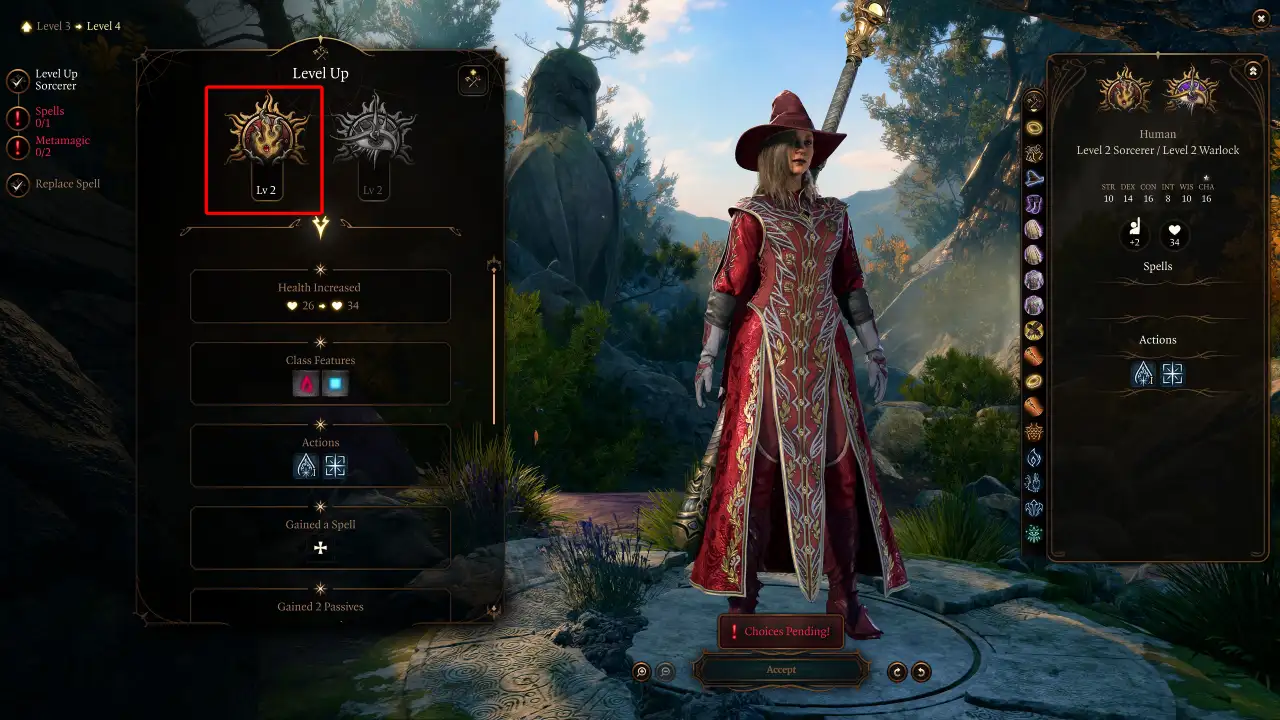
We will now return to the Sorcerer class. From this point onwards, we’ll be adding Sorcerer levels every time we level up. You will now get access to the Sorcerer’s powerful Metamagic feature.
Make sure you switch back to the Sorcerer class before confirming your level up! See the image above if you don’t know where to click.
You unlock a new resource called Sorcery Points. These are spent to activate Metamagic powers, and can be replenished by Long Resting. You’ll also gain +1 Sorcery Point at every Sorcerer Level up.
Metamagic – Choose 2:
You can also unlock a new spell. We recommend:
Mid-Game Levelling (5-8)
In this section, we’ll cover the mid-game. During these levels, the Sorcerer Warlock Multiclass Build will become much more powerful, accessing a wider array of spells.
Level 5
We’re adding another Sorcerer Level, giving you a total of Sorcerer Level 3 and Warlock Level 2 so far.
You’ll now unlock some better Sorcerer spells and an additional Metamagic power.
You can choose another Sorcerer spell to learn:
Level 6

We’re adding our fourth Sorcerer level here.
This will give you access to a Feat to improve your Sorlock’s stats, and another new spell.
First, let’s choose a new spell:
Level 7
We’ll now add the fifth level of the Sorcerer class to our Sorlock Build.
This is quite a simple level in terms of what you unlock. As usual, you get a new Sorcery Point. Besides that, you get one more spell.
Level 8
We’re adding the sixth Sorcerer Level to our Sorlock, taking the total to 6 Sorcerer, 2 Warlock.
This level is important, particularly if you chose the recommended Draconic Bloodline subclass, because you gain a selection of new features from your Sorcerer subclass.
Late-Game Levelling (9-12)
As we move into the final few levels for the Sorcerer and Warlock Multiclass Build, you’ll continue to gain new spells and features that ramp up your character’s power.
Level 9
We will now add the seventh Sorcerer level to the Sorlock Build.
At this level, you unlock one new spell. You can now choose from fourth-level spells.
Level 10

We will now add the eighth Sorcerer level to the Sorlock Build.
This time, we get one new spell and another Feat to boost your character.
Level 11
We’ll now add the ninth Sorcerer Level to your Sorlock Build.
As usual, you get an additional Sorcery Point. You can also choose one new spell to unlock, and you can now choose from fifth-level spells.
Level 12
This is the maximum level for the Sorlock Build. As usual, we’ll add another Sorcerer level, giving you a final total of 10 Sorcerer levels and 2 Warlock Levels.
Here, you can choose one new Metamagic feature to unlock, as well as a new Sorcerer Spell.
You can choose another Sorcerer spell to learn:
BG3 Sorlock Build Equipment
Now, let us take a look at some of the equipment choices you can make for your BG3 Sorcerer & Warlock Multiclass Build.
Don’t worry if you miss out on some of the items. Just enjoy your playthrough and try to view this as a wishlist rather than a precise blueprint. The names of the most essential, build-defining items are written in Bold Italic.
Early Game Equipment
This is the early-game gear setup that you can use for your Sorcerer/Warlock Multiclass Build. You don’t need to get all the items, but the build will perform better if you find most or all of them. You can find these items in Act 1 or early Act 2. Essential items are written in Bold Italic.
| Slot | Icon | Item | Effects | Location |
|---|---|---|---|---|
| Head |  |
The Lifebringer |
|
Sold by Blurg in the Myconid Colony. |
| Cloak |  |
Cloak of Protection |
|
Purchased from Quartermaster Talli in Last Light Inn |
| Chest |  |
The Protecty Sparkswall |
|
Looted from a gilded chest at the far end of the trapped bridge in Grymforge |
| Gloves |  |
Daredevil Gloves |
|
Sold by Ajaknir Jeera in the Githyanki Creche |
| Boots |  |
Disintegrating Night Walkers |
|
Looted from True Soul Nere in Underdark – Grymforge |
| Necklace | Any | N/A | ||
| Ring 1 |  |
Ring of Protection |
|
Steal the Sacred Idol in Druid Grove (quest) |
| Ring 2 |  |
Crusher’s Ring |
|
Dropped by Crusher in the Goblin Camp |
| Melee Weapon |  |
The Spellsparkler |
|
Rescue Counsellor Florrick from the fire in Waukeen’s Rest |
| Ranged Weapon | Any |
|
N/A |
We aren’t using a Ranged weapon because it isn’t required – you can use your Cantrips (especially Eldritch Blast) to deal ranged damage.
The most important item to grab here is the ![]() The Spellsparkler. This allows you to very easily amass Lightning Charges by spamming your
The Spellsparkler. This allows you to very easily amass Lightning Charges by spamming your ![]() Eldritch Blast (the
Eldritch Blast (the ![]() Scorching Ray spell also works great for this).
Scorching Ray spell also works great for this).
Once you’re creating Lightning Charges, you can equip the ![]() The Lifebringer and the
The Lifebringer and the ![]() The Protecty Sparkswall to get additional bonuses.
The Protecty Sparkswall to get additional bonuses.
The ![]() Daredevil Gloves make your spells a little more accurate and allow you to use ranged attacks in melee without any penalties.
Daredevil Gloves make your spells a little more accurate and allow you to use ranged attacks in melee without any penalties.
The ![]() Disintegrating Night Walkers significantly boost your mobility by granting the Misty Step spell, and give you resistance to many hindering effects.
Disintegrating Night Walkers significantly boost your mobility by granting the Misty Step spell, and give you resistance to many hindering effects.
The other items are less important and give all-round buffs that will be only slightly useful, essentially acting as placeholders until we can obtain better items.
Endgame Equipment
The endgame gear for the Sorlock can be obtained either in late Act 2 or Act 3 of Baldur’s Gate 3. If you manage to complete all the items below, you will be an unstoppable force of power. Essential items are written in Bold Italic.
| Slot | Icon | Item | Effects | Location |
|---|---|---|---|---|
| Head |  |
Hat of Fire Acuity |
|
Looted from the Strange Ox in Act II or Act III (Do NOT kill the Ox in Act I!) |
| Cloak |  |
Cloak of the Weave |
|
Sold by Helsik at the Devil’s Fee once you unlock her “special stock”. |
| Chest |  |
Potent Robe |
|
Awarded by Alfira in Last Light Inn for Rescuing the Tieflings. You must ensure that Alfira survives to this point in the game to get the reward. |
| Gloves |  |
Quickspell Gloves |
|
Sold by either Rolan or Lorroakan’s Projection in Sorcerous Sundries. |
| Boots | |
Disintegrating Night Walkers |
|
Looted from True Soul Nere in Underdark – Grymforge |
| Necklace |  |
Amulet of Greater Health |
|
Found on a display in the House of Hope |
| Ring 1 |  |
Callous Glow Ring |
|
In an opulent chest in the vault room of the Gauntlet of Shar |
| Ring 2 |  |
Coruscation Ring |
|
In a chest hidden in the cellar of Last Light Inn |
| Melee Mainhand |  |
Markoheshkir |
|
Inside Sorcerous Sundries |
| Melee Offhand | Rhapsody |
|
Loot from Cazador Szarr in Act III | |
| Ranged Weapon |  |
Darkfire Shortbow |
|
Sold by Fytz in Stormshore Armoury |
Here is a summary of how these items work together to boost this Sorlock Build for Baldur’s Gate 3:
Sorlock Build Extra Info
Here is some extra information that will help you to get the most out of this Sorcerer & Warlock Multiclass Build in Baldur’s Gate 3.
How to Play this Sorlock Build
Early-Game Basics
We only need two Warlock levels for this multiclass build, and we opted to add them very early in the game because you get quick access to the ![]() Eldritch Blast &
Eldritch Blast & ![]() Hex combo, further buffed by the
Hex combo, further buffed by the ![]() Agonising Blast and
Agonising Blast and ![]() Repelling Blast Invocations.
Repelling Blast Invocations.
From Level 2 and above, you can cast ![]() Hex on an opponent and then keep hitting them with
Hex on an opponent and then keep hitting them with ![]() Eldritch Blast to deal consistent damage. If you maintain Concentration, you can recast
Eldritch Blast to deal consistent damage. If you maintain Concentration, you can recast ![]() Hex on a new target later on, without spending another Spell Slot.
Hex on a new target later on, without spending another Spell Slot.
This simple combo will be your bread and butter for most encounters. The Sorcerer class gives you a wider range of spells than what the Warlock alone would have, including buff spells, debuffs for enemies, and some good AoE spells. Keep in mind that other spells requiring Concentration cannot be used at the same time as ![]() Hex.
Hex.
Another important Sorcerer spell is ![]() Scorching Ray, which works similarly to
Scorching Ray, which works similarly to ![]() Eldritch Blast, firing multiple rays of fire at enemies. This spell will become vital later in the game, but for the time being it’s just a strong single-target burst spell.
Eldritch Blast, firing multiple rays of fire at enemies. This spell will become vital later in the game, but for the time being it’s just a strong single-target burst spell.
Finally, note the differences between regular Spell Slots and Warlock Spell Slots:
Maximising the Build for Mid-Late Game
Our Sorlock Build for BG3 is mainly centred around the ![]() Eldritch Blast Cantrip. We are aiming to buff this Cantrip as much as possible, since it can be used every turn and can deal up to 78 points of non-crit damage with perfect damage rolls, assuming you’ve Hexed the target, your character is Level 10+, and you managed to obtain all items recommended in the guide.
Eldritch Blast Cantrip. We are aiming to buff this Cantrip as much as possible, since it can be used every turn and can deal up to 78 points of non-crit damage with perfect damage rolls, assuming you’ve Hexed the target, your character is Level 10+, and you managed to obtain all items recommended in the guide.
The damage range would be 36-78 if all three blasts hit the target, or 12-26 on each individual blast:
This amount of damage from only a Cantrip, in combination with a level 1 debuff spell, makes this Bard & Warlock build a late-game powerhouse.
Another vital interaction you need to utilise is the combination of ![]() Scorching Ray and the
Scorching Ray and the ![]() Hat of Fire Acuity. At the start of combat, upcast your Scorching Ray to get a huge boost to your Spell Save DC, giving you a very high chance to apply any spell-based debuff you want. To get the most out of this combo, utilise effects like
Hat of Fire Acuity. At the start of combat, upcast your Scorching Ray to get a huge boost to your Spell Save DC, giving you a very high chance to apply any spell-based debuff you want. To get the most out of this combo, utilise effects like ![]() Haste and
Haste and ![]() Quickened Spell so you can buff up and then cast control spells on the same turn.
Quickened Spell so you can buff up and then cast control spells on the same turn.
An easily overlooked spell to use with this is ![]() Command. It doesn’t require Concentration, and it allows you to force an enemy to perform a detrimental action on their turn, such as staying put, running away or dropping to the ground. With the Scorching Ray and Fire Acuity combo, you can get a 95% success rate on this spell against most run-of-the-mill enemies. Upcast the spell to command several enemies at once.
Command. It doesn’t require Concentration, and it allows you to force an enemy to perform a detrimental action on their turn, such as staying put, running away or dropping to the ground. With the Scorching Ray and Fire Acuity combo, you can get a 95% success rate on this spell against most run-of-the-mill enemies. Upcast the spell to command several enemies at once.
Sorlock Build Illithid Powers (optional)

Illithid Powers are unlocked later in BG3 when you learn more about Mind Flayers and Tadpoles. By eating Jars of Mind Flayer Parasites you gain one point. This is another optional skill tree that you can get access to if you want. Here are some of the best Illithid Powers for the BG3 Sorlock Build:
Sorlock Build FAQs
Here are some frequently asked questions related to the BG3 Sorcerer & Warlock Multiclass Build. Most of these questions have already been answered in the guide itself.
- What’s the best race for a Sorcerer Warlock Multiclass Build?
- What roles can the Sorlock fill in my party?
- What abilities are most important for the Sorlock?
- Which Sorcerer and Warlock subclasses should I use?
FAQ: What’s the best race for a Sorcerer Warlock Multiclass Build?
While any race will work just fine for this build, the best options are:
- Wood Elf – Very high mobility, resistance to effects like magical sleep and Charm, innate Darkvision. The extra Movement Speed is an underrated bonus that allows you to outrun foes.
- Duergar – Gives you innate Superior Darkvision. Allows you to wear Medium Armour. Gives you Resistance to Poison Damage and Advantage against the Poisoned, Charmed and Paralysed effects. This wide range of bonuses makes the Duergar very tough.
- Drow – Similar bonuses to the Wood Elf, but doesn’t have the extra Movement Speed. However, you do get Superior Darkvision and can debuff enemies with Faerie Fire.
For more info about the best races, see the Best Race section above.
FAQ: What roles can the Sorlock fill in my party?
The Sorlock is a strong damage dealer who also possesses strong debuff and crowd control potential.
Most of the time you can deal massive single-target damage by using your Hex and Eldritch Blast Combo, sometimes using Scorching Ray for extra damage. You also have several strong AoE spells you can use when needed, such as Fireball and Cone of Cold.
When you unlock the Hat of Fire Acuity, you can combo it with Scorching Ray at the beginning of combat to get a huge boost to the success chance of your spells. This makes your Sorlock excellent at debuffing and stunning enemies with their magic.
FAQ: What Abilities are most important for the Sorlock?
- Charisma is the most important ability for your Sorlock build, because it determines the efficacy of your spells and cantrips and will also boost many of your Skills, such as Persuasion, Performance and Intimidation. Put 16 points in Charisma at the start and increase it later in the game.
- Dexterity is also very important. It boosts your Armour Class and Initiative, allowing you to move earlier in the turn. Put 16 points in this.
- Constitution should always be at least 14 for any build in Baldur’s Gate 3, and this one is no different. This gives you a necessary baseline of HP, and helps you to resist a wide range of hostile effects with Constitution Saving Throws. It also helps you to keep Concentration on spells when you take damage.
FAQ: Which Sorcerer and Warlock subclasses should I use?
- For the Sorcerer, I strongly recommend the Draconic Bloodline subclass for this build. You get extra Armour Class to help you through the early game. Later on, you’ll gain affinity with your chosen element, allowing you to deal extra spell damage and gain Resistance against that element.
- For the Warlock, I prefer The Fiend because it gives you some Temporary HP when you kill an enemy. But since we only take a couple of Warlock levels, we don’t reach the higher level effects of the Warlock subclasses and the impact of your subclass choice is quite small.