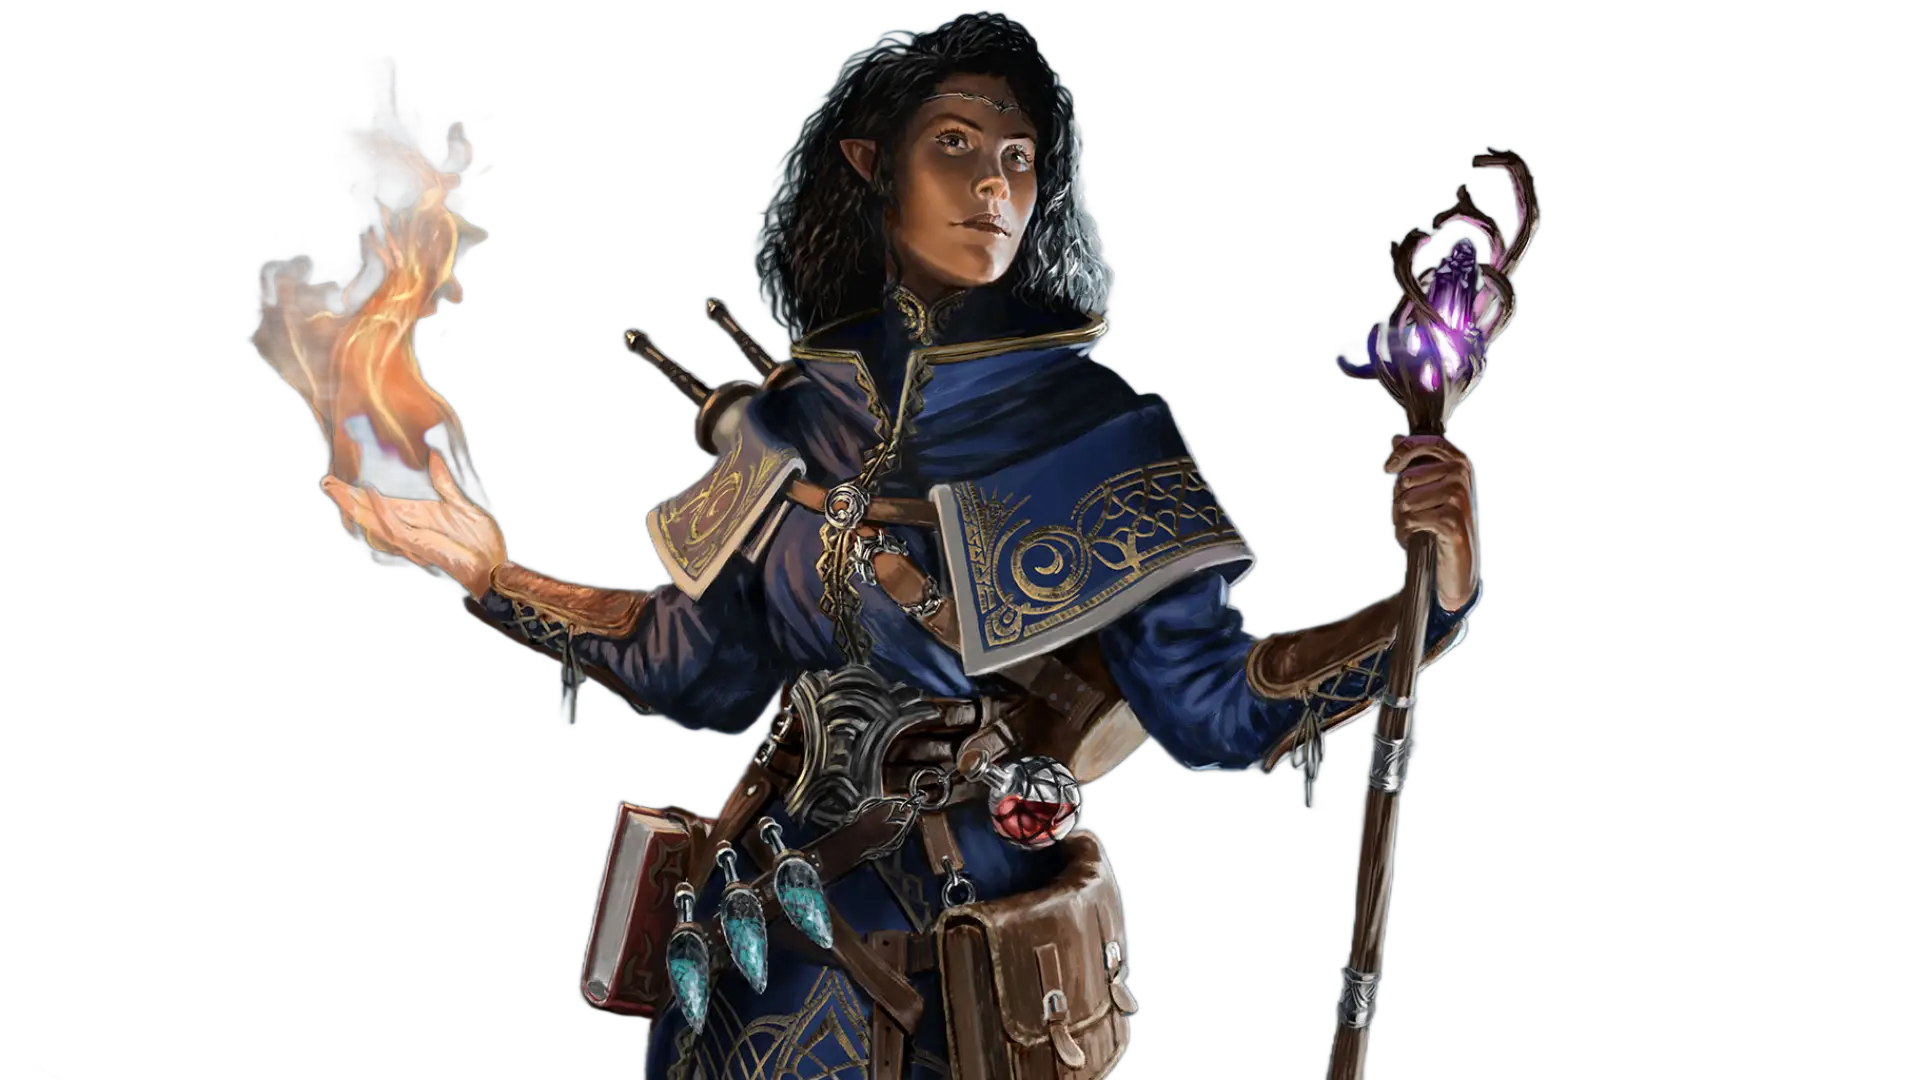
Welcome to our School of Ruin Wizard Build for Solasta 2.

The School of Ruin is a Wizard subclass in Solasta II. This guide will explain how to create a powerful School of Ruin Wizard build, including the best weapons, armour, spells, ability distribution, skills, and more.

The School of Ruin Wizard can learn additional damage spells and deals bonus damage on all attacking magic. It is the ideal choice for players who prefer a glass cannon playstyle.

For more Wizard builds and information, check our Wizard overview page. You can find builds for all Solasta II classes from our main Solasta II page.

Table of Contents:


Wizard Class Overview – Solasta 2

Wizards spend their lives studying magic, learning more and more powerful and wondrous spells. Despite their weakness in physical combat, their magical abilities make them dangerous foes.

Please note that, for now, the info in this section is a Work in Progress and partially speculative. It will be refined when Solasta II’s early access launches.

Here is what your Wizard will start with at Level 1 in Solasta II:

  • Weapon Proficiencies – Daggers, Darts, Quarterstaves, Light Crossbows
  • Armour Proficiencies – None
  • Saving Throw Proficiencies – Intelligence & Wisdom
  • Skill Proficiencies – Choose 2 from Arcana, History, Insight, Investigation, Medicine, Religion
  • Spellcasting – You can cast spells and cantrips from the Wizard spell list. You will unlock more powerful spells as you level up.
  • Ritual Casting – You can cast a spell as a ritual if it has the ritual tag and you have it in your spellbook. The spell doesn’t need to be prepared.
  • Magical Crafting – You can scribe magic scrolls and use enchanting equipment.

Why Choose the School of Ruin Wizard?

The School of Ruin is the most attack-minded Wizard subclass in Solasta 2. When you deal damage with a spell, you get bonus damage for every damage die that you roll.

If you want to maximise damage, the School of Ruin is the ideal Wizard subclass.


School of Ruin Wizard Build Starting Point – Solasta 2

This section will explain which options you should choose in character creation, including the best ancestry/race, ability distribution and skills.

Best Ancestry

The best Ancestry for the School of Ruin Wizard is the Human:

  • Resourceful (Heroic Inspiration) – Once per Long Rest, you can reroll a failed roll.
  • Versatile – Choose an Origin Feat:
    • Magic Initiate (Cleric) – This allows you to learn 2 Cleric Cantrips and 1 Cleric Spell, in addition to your Wizard options.
    • Skilled – Alternatively, you can choose this for an extra three Skill Proficiencies.

Another decent option is to be an Elf. They can slot an extra Wizard Cantrip and get passive Darkvision at all times, which is useful because Wizards will make a lot of ranged attacks.


Best Background

The best Background for the School of Ruin Wizard Build is Solasta 2 Background Academic Academic. It gives you the following bonuses:

  • Allows you to further improve Dexterity, Constitution and Intelligence scores.
  • Proficiency with the Arcana and History Skills.
  • You can use the Crafting Workshop to craft items.
  • You get the Magic Initiate: Wizard Origin Feat, which unlocks two additional Cantrips from the Wizard list.

If you choose a different background, it’s vital to pick one that can boost Intelligence!


Ability Distribution

Solasta 2 School of Ruin Wizard Build Character Creation

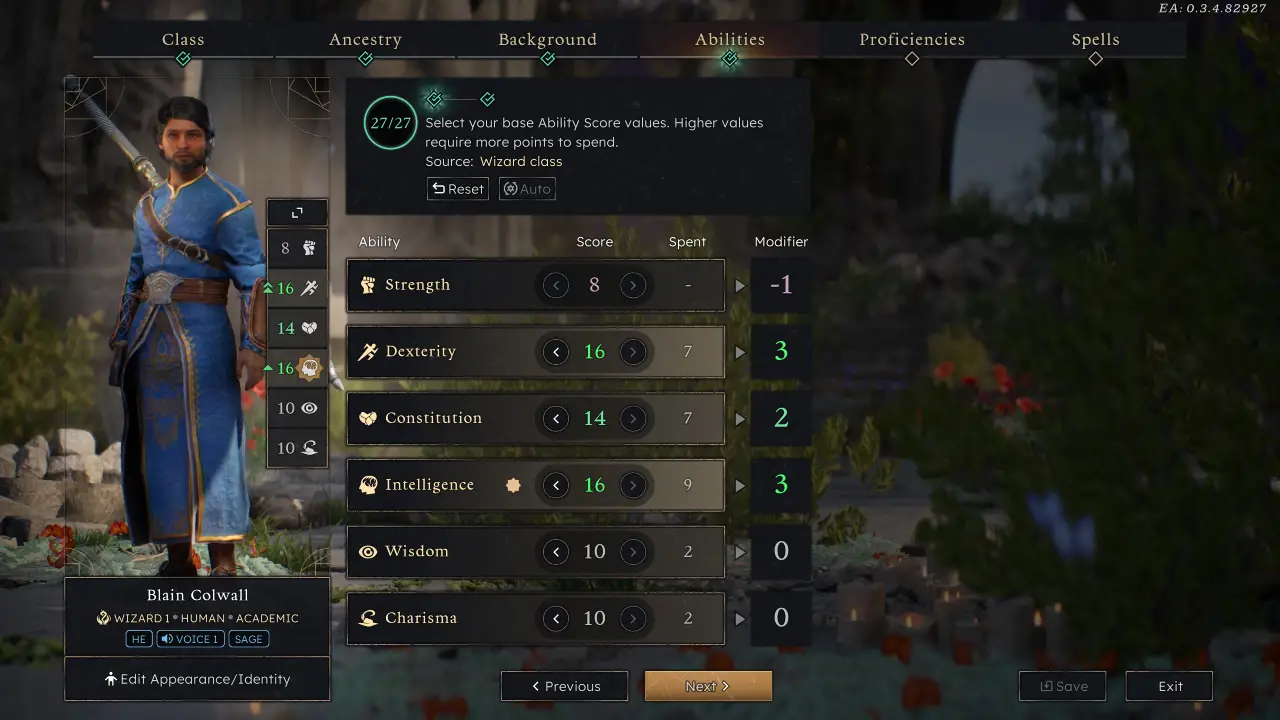
The best Ability Distribution for your School of Ruin Wizard Build is:

Strength – 8

Strength is not required for the Wizard class.

Dexterity – 16

Dexterity is used to increase your Armour Class, which is vital because Wizards cannot wear armour. It also helps with a variety of Saving Throws.

Attain 16 DEX by putting 14 of your base points, then 2 points from the Academic background.

Constitution – 14

Putting 14 points in Constitution ensures you have enough HP to survive tougher combat encounters in Solasta 2. It also helps you to succeed on Constitution Saving Throws and shake off some debilitating debuffs.

Intelligence – 16

Intelligence is the Wizard’s spellcasting ability. Increasing it improves the damage and accuracy of your spells. It also helps you with Intelligence-based Skills, such as Arcana.

Attain 16 INT by putting in 15 of your base points, then 1 point from the Academic background.

Wisdom – 10

Wisdom is unimportant for the Wizard.

Charisma – 10

Wizards don’t need any extra points in Charisma. You should ensure you have at least one Charisma-focused party member like a Sorcerer or Paladin, however. That way, you will have someone who is good at dialogue checks.

Solasta 2 warning icon Important: The Even Number Rule:

  • Every second point in an ability score over 10 adds +1 to that ability modifier, which is what actually improves your dice rolls.
  • This means that increasing a score from 10 to 11 makes no difference, but increasing it to 12 will add a +1 buff to any rolls made with that ability.
  • Therefore, we will usually avoid leaving any abilities on an odd number.
    • Exception: You can leave one ability on an odd number in character creation if you are planning to bump it up by 1 with your first Feat unlock at Level 4.

Best Skills

Assign the following Skill Proficiencies:

Skills: Wizard Class

  • Investigation – Look around for clues and make deductions.
  • Nature – Recall lore about terrain, plants and animals, the weather, and natural cycles.

Skills: Human Ancestry

  • Acrobatics – Helps you to stay on your feet in various challenging situations, like when walking on ice.

If you chose the Skilled Origin Feat, you’ll have some extra choices here. For those, just choose any Skills that already have a green number.

Languages

The choice here depends on what the rest of your party will take. Try to cover as many of the options as possible.


Cantrips

Thanks to the combination of the Wizard class and the two Magic Initiate Feats we picked up, we can choose seven Cantrips here. Five of them are Wizard Cantrips, and two are Cleric Cantrips. The recommended picks are below.

Wizard Cantrips:

Solasta 2 light icon Light

  • Allows you to Solasta 2 light source icon illuminate dark areas without holding a lantern.
  • Your Wizard will automatically cast it when it’s dark.
  • If everyone in your party has Darkvision, you don’t need to take this.

Solasta 2 firebolt icon Fire Bolt

  • Deals 1d10 Solasta 2 fire damage icon Fire Damage.
  • This is the go-to Cantrip for most situations.
  • High Elves will already have this, so if you are a High Elf you should choose something else.

Solasta 2 poison spray icon Poison Spray

  • Deals 1d12 Solasta 2 poison damage icon Poison Damage
  • Has a fairly limited range

Solasta 2 Shocking Grasp Icon Shocking Grasp

  • Deals  Solasta 2 lightning icon Lightning Damage and prevents the target from taking Opportunity Attacks this turn.
  • Good for escaping from a melee enemy who has caught up to your Wizard.

Solasta 2 chill touch icon Chill Touch

  • Deals 1d10 Solasta 2 Necrotic Damage Necrotic Damage and prevents the target from healing this turn.
  • Melee-only range, so it’s a bit risky to use.
  • Best used when fighting against an enemy with an annoying healing mechanic.

Cleric Cantrips:

Solasta 2 guidance icon Guidance

  • You can activate Guidance during dialogue skill check prompts to boost the success chance of any option by adding a bonus 1d4 dice to the skill check.

Solasta 2 Spare the Dying Icon Spare the Dying

  • Stabilise a Solasta 2 dying condition Dying target.
  • They will remain Unconscious with 0HP, but no longer have to make Death Saving Throws.

If you can’t unlock all of these Cantrips right away, return to this list later in the game when you unlock more slots.


Spells

We can learn eight spells at the start of the game. Seven of them are Wizard spells, and one is a Cleric spell. If you chose different options from ours earlier, you might have one or two fewer choices.

Recommended Wizard Spells:

Solasta 2 mage armour icon Mage Armour

  • This spell is essential, increasing your base armour class from 10 to 13.
  • You should cast this after every Long Rest. Without it, your School of Ruin Wizard will be far too easy to hit.

Solasta 2 Shield Icon Shield

  • Can be activated as a Solasta 2 Reaction icon Reaction when you are about to take a hit.
  • Increases your Armour Class by 5 for 1 turn.
  • Can also block Magic Missile.

Solasta 2 identify icon Identify

  • Identify all unidentified items carried by your party, revealing their full effects.
  • Can be cast as a Ritual outside of combat, so it doesn’t cost any Spell Slots.
  • Having a party member with this spell means you can use rare items as soon as you find them.

Solasta 2 magic missile icon Magic Missile

  • Creates 3 darts of magical force.
  • Each dart deals 1d4 + 1 Solasta 2 force damage icon Force Damage.
  • The darts home in on their target and cannot miss.
  • Each dart can have a different target.
  • You can upcast the spell to add more darts.

Solasta 2 chromatic orb icon Chromatic Orb

  • On hit, deals 3d8 damage of a chosen elemental type.
  • Has a small chance to jump to a secondary target within 9m.

Solasta 2 ice knife icon Ice Knife

  • On hit, deals 1d10 Solasta 2 Piercing Damage Piercing Damage to the target.
  • On a hit or a miss, the ice knife explodes and deals 2d6 Solasta 2 cold damage icon Cold Damage to the target and nearby creatures.
  • The Cold Damage may be negated with a Dexterity Saving Throw.

Solasta 2 Thunderwave Icon Thunderwave

  • Deals 2d8 Solasta 2 thunder damage icon Thunder Damage to targets in the chosen direction.
  • Pushes targets away from you, potentially knocking them off a ledge.
  • Targets can roll a Strength Saving Throw to halve the damage and resist the push effect.

Recommended Cleric Spell:

Solasta 2 guiding bolt icon Guiding Bolt

  • On hit, deals 4d6 Solasta 2 radiant damage icon Radiant Damage.
  • Gives Advantage to the next attack roll made against the target before the end of your next turn.
  • The target also sheds dim light for 3 rounds.

Alternatively, you can choose a healing spell:

  • Solasta 2 cure wounds icon Cure Wounds heals for more, but costs a full Solasta 2 action icon Action and can only heal targets standing next to your Wizard.
  • Solasta 2 healing word icon Healing Word only uses a Solasta 2 bonus action icon Bonus Action and can heal at long range, but heals for a smaller amount.

School of Ruin Wizard Build Levelling Up Guide – Solasta 2

In this section, we’ll explain what your School of Ruin Wizard will unlock at each level and the best choices to make when levelling up.

Level 2

 Arcane Recovery

  • When you complete a Short Rest, recover expended spell slots numbering half your Wizard Level (rounded up), up to Sixth Level Spell Slots.
  • Only once per Long Rest.

Scholar

  • Gain Expertise in Arcana, History, Investigation, Medicine, Nature, or Religion.
  • Doubles your Proficiency Bonus for the chosen Skill.

Level 3

At Level 3, you must choose your Wizard subclass. For this build, we are using the School of Ruin subclass.

New School of Ruin Subclass Features

Destructive Magic

  • When you roll damage for a spell you cast, you deal additional damage for every die you roll.
  • If the spell creates multiple projectiles, it applies to each projectile separately.

Ruination Savant

  • Choose 2 Wizard spells that deal damage and add them to your spellbook.
  • Whenever you gain access to a new level of Spell Slots, you can choose one damaging spell to add to your spellbook.

New Wizard Spells

Solasta 2 Scorching Ray Icon Scorching Ray

  • Create 3 rays of fire. Each ray deals 2d6 Solasta 2 fire damage icon Fire Damage on hit.
  • Each ray can be aimed at a different target.
  • Each upcast level adds an additional ray.

Solasta 2 Shatter Icon Shatter

  • Deals 3d8 Solasta 2 thunder damage icon Thunder Damage in the target area.

Level 4

At Level 4, you can choose a new Feat:

Ability Improvement

  • Put both points into Intelligence, bringing it up to 18.
  • This will improve your spellcasting accuracy and damage.

Solasta 2 warning icon Early Access currently stops at Level 4; the rest of the levelling-up section is speculative and partially based on Solasta: Crown of the Magister.


Level 6

Mana Feedback

  • When you are hit by a spell, you can return a portion of the damage you received to its caster.
  • The target can reduce the reflected damage with a Constitution Saving Throw.
  • You can do this once per Short Rest.

Level 8

Feat

  • Select a Feat or improve an Ability.

Level 10

Deadly Resonance

  • When you inflict damage on a target with a spell, you can repeat a portion of the damage at the start of your next turn.
  • The victim can roll a Constitution Saving Throw to reduce the damage.

Level 12

Feat

  • Select a Feat or improve an Ability.

School of Ruin Build Best Equipment

In this section, we will list the best equipment for the School of Ruin Wizard Build in Solasta II, including how to obtain each item.

In the current early-access version, crafting hasn’t been implemented yet, and the amount of equipment you can loot is quite limited.


School of Ruin Tips & Tricks

Make sure you cast Mage Armour after every Long Rest; otherwise, you will struggle with a very low Armour Class.

The Wizard’s vast array of spells allows them to support your party in all sorts of ways, both in and out of combat. But be careful not to use up all your spell slots too quickly – in standard combat situations, you can use your Cantrips to deal damage without spending Spell Slots.


More Solasta II Guides

  • Scavenger Rogue Build Solasta II

Scavenger Rogue Build – Solasta 2

Welcome to our Scavenger Rogue Build for Solasta 2. The Scavenger is a Rogue subclass in Solasta II. This guide will explain how to create [...]