
Classes: 2x
Requirement: Sorcerer as base class because we use 2 Sorcerer skill lines.
Type: Heavy Attack DPS (PvE)
Welcome to the ESO Sorcerer Subclasses Build Guide! This page is your go-to resource for building and optimizing a Sorcerer focused on subclassing in ESO. Make sure to bookmark it. Like all my ESO Builds, it will be regularly updated to reflect balance changes, gear updates, and new content.
This ESO DPS Subclassing Build combines Sorcerer and Nightblade together.
Table of Contents for Sorcerer Subclassing Build:
- Sorcerer Subclassing Playstyle & Stats
- Gear Setups
- Skill Setups & Rotation
- Recommended Passives
- Scribing Skills (Optional)
- Mythic Set Options (Oakensoul, Pale Order, Rakkhat)
- Champion Points & Optimization
- Alternative Skill-Lines for Subclassing on Sorcerer
- Resource Management & Sustain Tips
- Outfit Style & Fashion Showcase
- Target Dummy Parse Setups
- Update Log
ESO Sorcerer Subclassing Build Playstyle & Stats
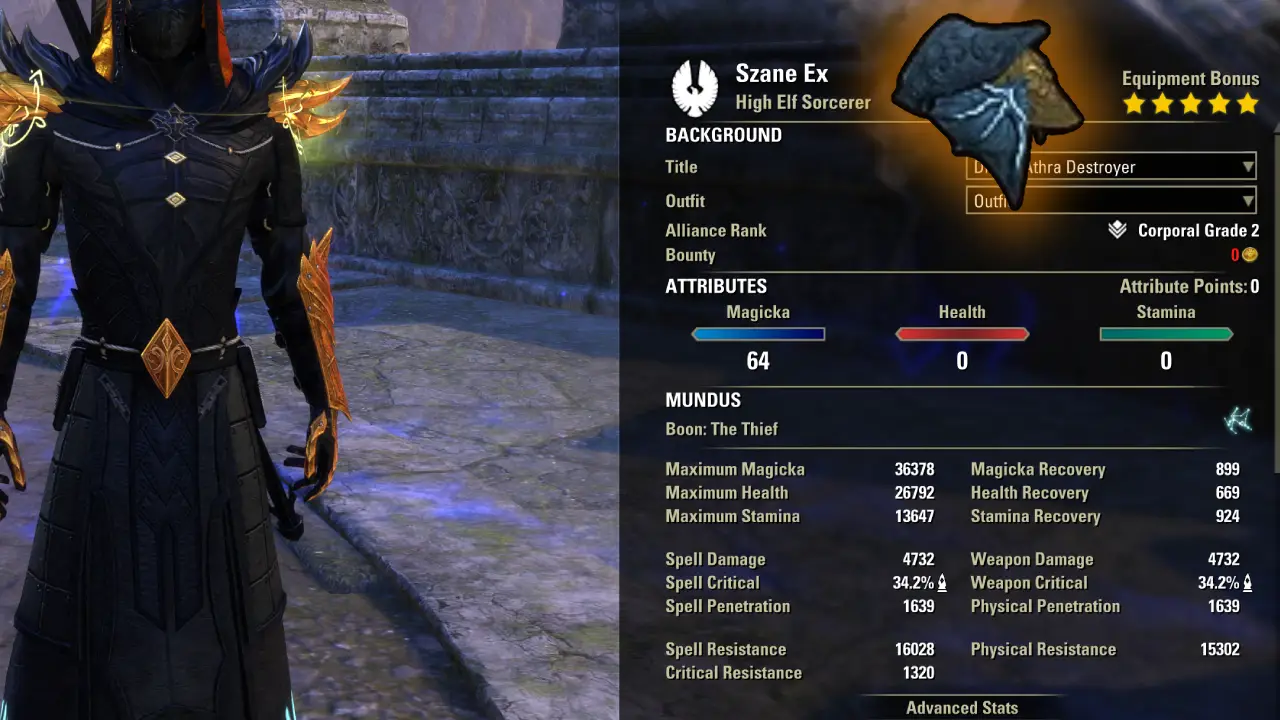

- Image 1 Stats: BiS Gear with Rakkhat’s Voidmantle Mythic + Main Skill Setup +
 Artaeum Pickled Fish Bowl + Pets active
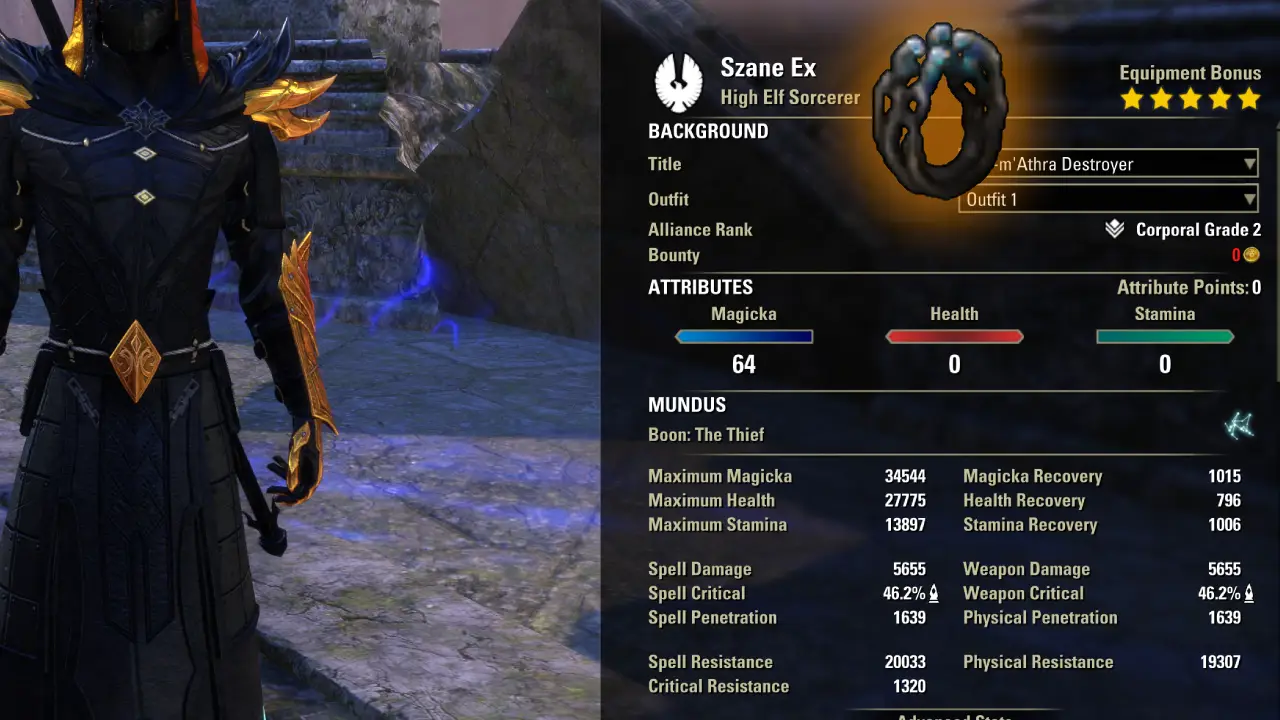
 - Image 2 Stats: BiS Gear with Pale Order Mythic + Main Skill Setup + Artaeum Pickled Fish Bowl + Pets active
- Image 3 Stats: BiS Gear with Oakensoul Mythic + Main Skill Setup + Artaeum Pickled Fish Bowl + Pets active
The ESO Sorcerer Subclassing Build is a dedicated Heavy Attack PvE DPS setup that combines the Sorcerer and Nightblade classes. It features an easy-to-use rotation and multiple playstyle variations, making it ideal for both beginners and experienced players. The Nightblade subclass brings strong passives and and skills that passively boost damage without activating them.
- Build Type: Heavy Attack DPS (PvE).
- Difficulty: Easy and simple rotation. One Bar only.
- Subclasses: Sorcerer + Nightblade.
- Skill-Lines: Daedric Summoning (Sorc), Storm Calling (Sorc), Assassination (NB).
- Gear Progression: Beginner, Advanced and Best in Slot Setups (Two variations)
- Skill Loadouts: Fake One Bar Setup and a True One Bar Setup
- Mythic Options: Oakensoul Ring, Ring of the Pale Order, or Rakkhat’s Voidmantle.
It’s crucial to understand that a build is only truly complete when paired with the right Consumables, Mundus Stone, and Champion Point setup. These elements significantly impact your overall performance and can make a major difference in both damage and survivability.
More Subclassing Guides:
- All Subclassing Builds and Guides
- How to unlock the Subclassing Quest in ESO
- The Ultimate Subclassing Guide – How It Works
- Subclassing Power Leveling Guide for ESO
Our 3 Skill-Lines for the ESO Sorcerer Subclasses Build
For this build, we are using Daedric Summoning, Storm Calling, and Assassination.
- Daedric Summoning – Strong Pets and pet-focused skills.
- Storm Calling – Powerful passives that increase our damage tremendously.
- Assassination – Strong passives that also boost our damage by a huge margin.
You can view the Alternative Skill-Line Options section for a few other good recommended combinations for the ESO Sorcerer Subclasses Build.
Why Nightblade as Subclassing Choice?
![]() Nightblades offer incredibly strong passive skills that greatly increase your damage potential:
Nightblades offer incredibly strong passive skills that greatly increase your damage potential:
- Hemorrhage – Boosts Critical Damage and grants Minor Savagery.
- Pressure Points – Increases Spell Critical for each Assassination skill slotted.
- Master Assassin – Increases your Critical Chance rating against enemies you are flanking by 1448, increasing your chance to critically strike by 6.6%.
Additionally, we can slot the following skills on the backbar passively (won’t have to active them) for bonuses:
- Relentless Focus on the backbar to gain a very high Spell Damage bonus without ever having to touch the skill.
 Concealed Weapon to increase movement speed and damage (If you have Scribing Skills)
- Killer’s Blade is only slotted for passive bonuses from the Assassination skill line.
Please view the Alternative Subclassing Options section of the build to see other Subclassing options.
Gear Setups

The ESO Sorcerer Subclassing Build comes with three gear setups. A beginner, advanced, and endgame gear setup. The beginner gear is all crafted gear, you can simply ask a guild member to craft these items for you to increase your power level as a new player. Also, see the ESO Grind Guide for tips on leveling up fast. The Advanced setup requires you to get some dungeon/world gear, and the endgame setup has items from all sources of the game!
- Beginner Gear (Craftable only)
- Advanced Gear
- Best-In-Slot Gear
Beginner Gear
The Beginner gear setup for the Sorc Subclass Build is easy to get, and everything can be crafted. I recommend joining a guild and asking someone to craft the gear pieces! For this setup we are using 5x Order’s Wrath, 5x Law of Julianos (weapon counts as two piece), and 2x New Moon Acolyte. All of these are easily craftable.
Trait: Instead of Divine, you could also use the Training trait if your main goal is to farm EXP with this spec.
| Gear | Set | Weight | Trait | Enchantment |
|---|---|---|---|---|
| Medium | ||||
| Medium | ||||
| Medium | ||||
| Medium | ||||
| Medium | ||||
| Light | ||||
| Medium | ||||
| Jewelry | ||||
| Jewelry | ||||
| Jewelry | ||||
| Shock | ||||
| Shock |
Where can I get the gear?
Order’s Wrath: Craftable
New Moon Acolyte: Craftable
Law of Julianos: Craftable
Advanced Gear
The advanced gear setup for the ESO Sorc Subclassing Build uses a craftable set Order’s Wrath from the beginner spec. Additionally, we use the Monster Set Maw of the Infernal to increase our damage. Lastly, 5x Sergeant’s Mail, which is the bread and butter of any Heavy Attack build in ESO. Nothing comes even close to this set; the only downside is its heavy armor. Therefore we need to run it on jewelry and weapons as much as possible.
Frontbaring Sergeant’s Mail: Sergeant’s Mail is only active on the frontbar, but it only triggers on Heavy Attacks anyway, we only do Heavy Attacks on the frontbar.
| Gear | Set | Weight | Trait | Enchantment |
|---|---|---|---|---|
| Medium | ||||
| Medium | ||||
| Medium | ||||
| Medium | ||||
| Medium | ||||
| Light | ||||
| Medium | ||||
| Jewelry | ||||
| Jewelry | ||||
| Jewelry | ||||
| Shock | ||||
| Shock |
Where can I get the gear?
Order’s Wrath: Craftable
Maw of the Infernal: Veteran The Banished Cells II
Sergeant’s Mail: Wayrest Sewers 1 and 2
Crushing Wall: Normal Maelstrom Arena
Best-in-Slot Gear
The Best-in-Slot gear setup for the ESO Sorcerer Subclasses Build has a few different variations because of different Mythic options. ![]() Sergeant’s Mail is a must-have set for any Heavy Attack build; it increases the damage tremendously. Additionally, most of our damage comes from damage over time, and therefore, we use the
Sergeant’s Mail is a must-have set for any Heavy Attack build; it increases the damage tremendously. Additionally, most of our damage comes from damage over time, and therefore, we use the ![]() Deadly Strikes set.
Deadly Strikes set.
Mythics: Read the Mythic Items Explained section to understand when to use the ![]() Oakensoul Ring,
Oakensoul Ring, ![]() Ring of the Pale Order or
Ring of the Pale Order or ![]() Rakkhat’s Voidmantle. Here is a quick summary:
Rakkhat’s Voidmantle. Here is a quick summary:
- Oakensoul Ring: Very beginner-friendly, easy to use, and you won’t have to think where to get buffs from.
- Ring of the Pale Order: Best option for veteran solo content for advanced players, because you get massive healing from the ring.
- Rakkhat’s Voidmantle: Best option for group content, more damage from Heavy Attacks, Light Attacks now restore resources.
1. Oakensoul Ring and Ring of the Pale Order Gear Variant
This table shows you how to build the perfect Heavy Attack Gear Setup with either ![]() Oakensoul Ring or
Oakensoul Ring or ![]() Ring of the Pale Order. If you are running the One-Bar Skill Setup you can simply ignore the backbar weapon.
Ring of the Pale Order. If you are running the One-Bar Skill Setup you can simply ignore the backbar weapon.
| Gear | Set | Weight | Trait | Enchantment |
|---|---|---|---|---|
| Heavy | ||||
| Medium | ||||
| Medium | ||||
| Medium | ||||
| Medium | ||||
| Light | ||||
| Medium | ||||
| Jewelry | ||||
| Jewelry | ||||
| Jewelry | ||||
| Shock | ||||
| Shock |
Where can I get the gear?
Deadly Strikes: Cyrodiil, Bruma Elite Gear Vendor
Maw of the Infernal: Veteran The Banished Cells II
Sergeant’s Mail: Wayrest Sewers 1 and 2
P. Crushing Wall: Veteran Maelstrom Arena
Oakensoul Ring: Oakensoul Lead Location
Ring of the Pale Order: Pale Order Lead Location
2. Rakkhat’s Voidmantle Gear Variant
This table shows you how to build the Heavy Attack Sorcerer Subclassing Build with ![]() Rakkhat’s Voidmantle. This Mythic item is a shoulder piece and therefore requires slight changes to our gear setup.
Rakkhat’s Voidmantle. This Mythic item is a shoulder piece and therefore requires slight changes to our gear setup.
| Gear | Set | Weight | Trait | Enchantment |
|---|---|---|---|---|
| Medium | ||||
| Medium | ||||
| Medium | ||||
| Medium | ||||
| Medium | ||||
| Light | ||||
| Medium | ||||
| Jewelry | ||||
| Jewelry | ||||
| Jewelry | ||||
| Shock | ||||
| Shock |
Where can I get the gear?
Deadly Strikes: Cyrodiil, Bruma Elite Gear Vendor
Maw of the Infernal: Veteran The Banished Cells II
Sergeant’s Mail: Wayrest Sewers 1 and 2
P. Crushing Wall : Veteran Maelstrom Arena
Rakkhat’s Voidmantle: Rakkhat’s Voidmantle Lead Location
Skill Setups & Rotation Tips for the Sorcerer Subclass Build

Skill-Lines used: Daedric Summoning (Sorc), Storm Calling (Sorc), Assassination (NB).
For our Skills for the ESO Sorcerer Subclassing Build, we have two setups. A main skill setup that utilizes both bars (kinda, we really only use one) and the secondary skill setup that is made for the![]() Oakensoul Ring. If you want to see viable Scribing skills, please view the Scribing section of the subclassing build.
Oakensoul Ring. If you want to see viable Scribing skills, please view the Scribing section of the subclassing build.
Depending on which skill setup you run, it is important to use the correct Mythic:
- Main Skill Setup – Fake One Bar: You can use either the Ring of the Pale Order or Rakkhat’s Voidmantle.
- Secondary Skill Setup – True One Bar: Best used with the Oakensoul Ring. But you can also use it with the Ring of the Pale Order, or Rakkhat’s Voidmantle.
For more clarity about Mythics, read the Mythic Set Options Explained section of the Sorc Subclasses Build for ESO.
Main Skill Setup – Fake One Bar
In this section, I am going to explain to you how the skills of the ESO Sorcerer Subclasses Build work and interact with each other.
FAKE ONE BAR: The BACKBAR isn’t actively used. The backbar only holds skills that give us extra bonuses for having them slotted!


| Frontbar | Backbar (Optional) |
|---|---|
| Slot 1: Scalding Rune | Slot 1: Concealed Weapon |
| Slot 2: Hardened Ward | Slot 2: Bound Aegis |
| Slot 3: Critical Surge | Slot 3: Relentless Focus |
| Slot 4: Summon Volatile Familiar | Slot 4: Summon Volatile Familiar |
| Slot 5: Summon Twilight Matriarch | Slot 5: Summon Twilight Matriarch |
| Ultimate: Power Overload (or Soul Harvest) | Ultimate: Summon Greater Storm Atronach |
Skills Rotation Explanation:
- Your main damage comes from simply using Heavy Attacks on the frontbar.
- The Summon Volatile Familiar and Summon Twilight Matriarch are always summoned and have to be slotted on both bars. They automatically attack the target. You can activate the Familiar for extra damage and the Matriarch when you need healing.
- Scalding Rune is another damage over time effect that you apply on the target every 10 seconds. When you activate the skill, it also procs the Might of the Guild passive that gives you Empower for 10 seconds, increasing your heavy attack by a lot. Additionally, from having this slotted, you also get a bit more max magicka and recovery through the Magicka Controller passive.
- Keep Critical Surge active, this will heal you a lot.
- Concealed Weapon, Bound Aegis and Relentless Focus don’t have to be activated. We only slot them to get additional bonuses.
- Hardened Ward is used to protect you from enemy damage, providing a huge shield to protect your health.
- Our main Ultimate is Power Overload. It deals massive Heavy Attack damage and deletes enemies off the map. Alternatively, you can also use:
- Soul Harvest Ultimate on the frontbar to gain Ultimate Points fast and then use the Greater Storm Atronach on the backbar for good damage.
Secondary Skill Setup – True One Bar Oakensoul
This setup only requires you to use one-bar. This makes the rotation easier for our ESO Sorcerer Subclassing Build.
- Important: Oakensoul Ring completely disables your backbar, locking you into a true one-bar setup. Therefore we won’t need to place anything on the backbar.
- Note 1: Because the Oakensoul Ring already applies Empower buff, we won’t need Scalding Rune. We will swap this with Daedric Prey to boost our pets damage.
- Note 2: Because we now use the Oakensoul Ring mythic, we can’t use Rakkhat’s Voidmantle, which boosts the damage of Power Overload. We instead use the Greater Storm Atronach ultimate.
Frontbar

| Frontbar | N/A |
|---|---|
| Slot 1: Daerdric Prey | Slot 1: N/A |
| Slot 2: Hardened Ward | Slot 2: N/A |
| Slot 3: Critical Surge | Slot 3: N/A |
| Slot 4: Summon Volatile Familiar | Slot 4: N/A |
| Slot 5: Summon Twilight Matriarch | Slot 5: N/A |
| Ultimate: Greater Storm Atronach | Ultimate: N/A |
Skills Rotation Explanation:
Skills Rotation Explanation:
- Your main damage comes from simply using Heavy Attacks on the frontbar.
- The Summon Volatile Familiar and Summon Twilight Matriarch are always summoned and have to be slotted on both bars. They automatically attack the target. You can activate the Familiar for extra damage and the Matriarch when you need healing.
- Daedric Prey deals massive damage and boosts all our pet damage: Summon Volatile Familiar, Summon Twilight Matriarch, and Greater Storm Atronach.
- Keep Critical Surge active, this will heal you a lot.
- Hardened Ward is used to protect you from enemy damage, providing a huge shield to protect your health.
- Our main Ultimate is the Greater Storm Atronach. This deals massive single target damage.
Recommended Passives
- Daedric Summoning: Rebate, Power Stone, Daedric Protection, Expert Summoner
- Storm Calling: Capacitor, Energized, Amplitude, Expert Mage
- Assassination: Master Assassin, Executioner, Pressure Points, Hemorrhage
- Destruction Staff: Tri Focus, Penetrating Magic, Elemental Force, Ancient Knowledge, Destruction Expert
- Light Armor: Grace, Evocation, Spell Warding, Prodigy, Concentration
- Medium Armor: Dexterity, Wind Walker, Improved Sneak, Agility, Athletics
- Mages Guild: Mage Adept, Everlasting Magic, Magicka Controller, Might of the Guild
- Undaunted: Undaunted Command, Undaunted Mettle
- Racial: All
- Alchemy: Medicinal Use
Scribing Skills – Optional Setup for the Subclassing Sorcerer
This is the optimal skill setup for the ESO Sorcerer Subclass Build for any combat. It includes damage and a healing skill for combat.
To unleash the full potential of the ESO Sorcerer Subclass Build, I recommend using two Scribing skills, which come with very powerful buffs. Improving the damage of the build tremendously. Scribing skills have to be modified to make them useful. Here is everything you need:


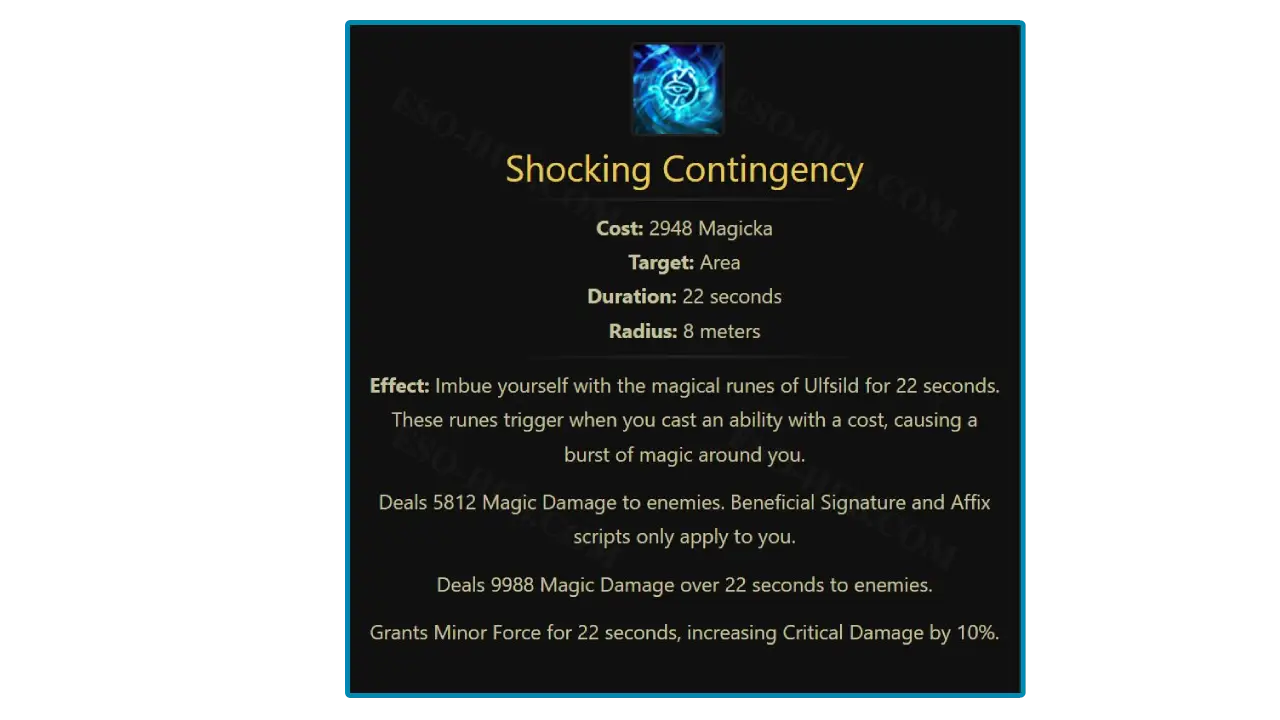
- Ulfsild’s Contingency (base)
- Modified Name: Shocking Contingency
- Focus: Shock Damage
- Signature: Lingering Torment
- Affix: Force
- Why it’s strong: Deals damage and applies Minor Force. It is a Mages Guild skill and procs the Might of the Guild passive that gives you Empower for 10 seconds, increasing Heavy Attack damage by a lot.
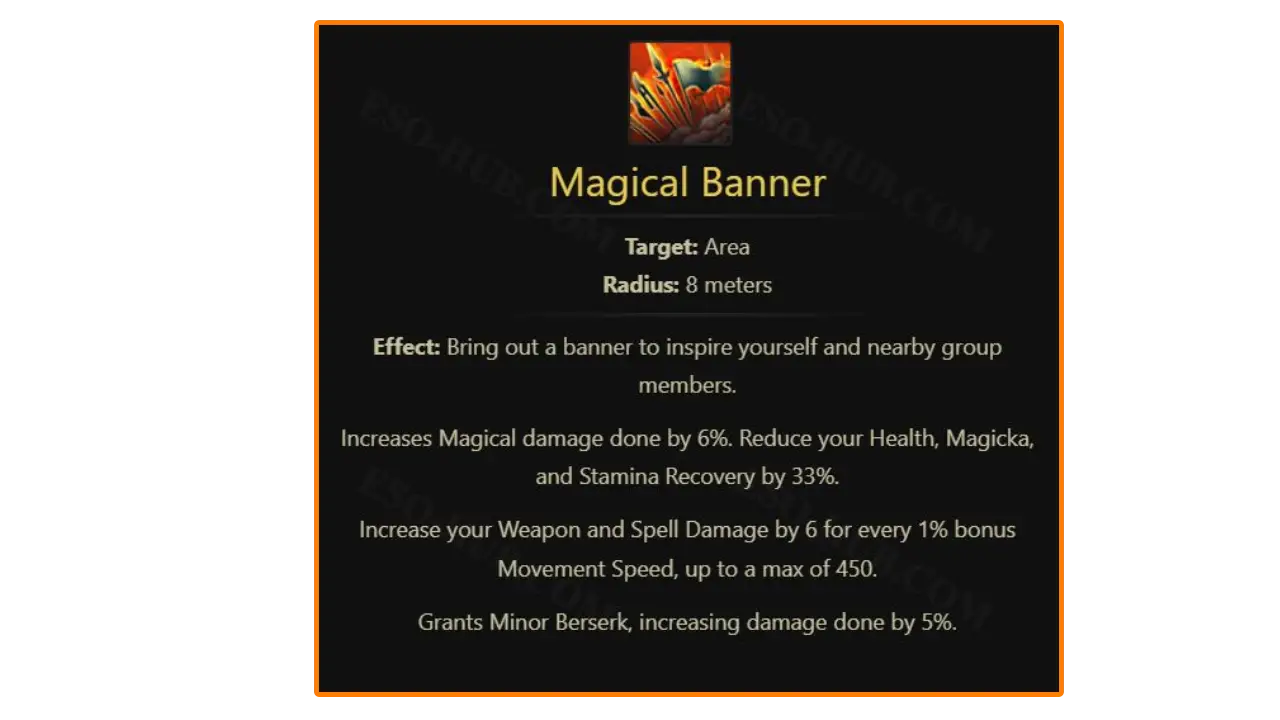
- Banner Bearer (base)
- Modified Name: Magical Banner
- Focus: Magical Damage
- Signature: Cavalier’s Charge
- Affix: Berserk
- Why it’s strong: Stays active all the time, increases your Magic Damage. Increases your Spell Damage and grants Minor Berserk.
Scribing Simulator: Use the ESO Scribing Simulator to test out different combinations.
Mythic Set Options

With the ESO Sorcerer Subclasses Build, you have a few good options on what Mythic item you can use, all have their strengths and weaknesses. Generally, when users hear “One Bar Build” they immediately think about the ![]() Oakensoul Ring. However, there are two other good picks depending on your gameplay knowledge,
Oakensoul Ring. However, there are two other good picks depending on your gameplay knowledge, ![]() Ring of the Pale Order and
Ring of the Pale Order and ![]() Rakkhat’s Voidmantle.
Rakkhat’s Voidmantle.
Here is a quick summary of the different pros and cons of each Mythic item for our build.
| Mythic | Pros | Cons | Best Use Case |
|---|---|---|---|
|
|
|
|
|
|
|
|
|
|
|
 Oakensoul Ring Mythic
The ![]() Oakensoul Ring is often the Mythic of choice for most One Bar Builds in ESO. Once you equip the ring, the second bar will be deactivated. The ring comes with a plethora of major and minor buffs. What most players don’t realize is that most of these buffs can be obtained easily from other sources like skills, gear, or potions. For example, drinking the correct potion already gives you Major Brutality/Sorcery, Major Savagery/Prophecy and Major Endurance/Intellect.
Oakensoul Ring is often the Mythic of choice for most One Bar Builds in ESO. Once you equip the ring, the second bar will be deactivated. The ring comes with a plethora of major and minor buffs. What most players don’t realize is that most of these buffs can be obtained easily from other sources like skills, gear, or potions. For example, drinking the correct potion already gives you Major Brutality/Sorcery, Major Savagery/Prophecy and Major Endurance/Intellect.
The![]() Oakensoul Ring is ideal for players seeking a simplified experience, removing the need for bar swapping or buff upkeep while keeping your damage rotation effective. The ring doesn’t provide any healing, therefore you need to slot healing skills yourself or have a healer with you for more difficult content.
Oakensoul Ring is ideal for players seeking a simplified experience, removing the need for bar swapping or buff upkeep while keeping your damage rotation effective. The ring doesn’t provide any healing, therefore you need to slot healing skills yourself or have a healer with you for more difficult content.
This is where the next Mythic comes into play.
Ring of the Pale Order Mythic
The ![]() Ring of the Pale Order is the best Mythic item for advanced players. It provides massive healing while you deal damage. You can focus on DPSing. Meanwhile, with the other mythics, you will have to go more often into a defensive playstyle. However, this ring gets less effective in bigger groups because the healing you receive decreases by the amount of players in your group.
Ring of the Pale Order is the best Mythic item for advanced players. It provides massive healing while you deal damage. You can focus on DPSing. Meanwhile, with the other mythics, you will have to go more often into a defensive playstyle. However, this ring gets less effective in bigger groups because the healing you receive decreases by the amount of players in your group.
The ![]() Ring of the Pale Order is one of the strongest Mythic items for advanced players, thanks to its auto healing effect that restores health as you deal damage. This powerful sustain tool allows experienced players to tackle even veteran hardmode dungeons solo, a testament to its strength.
Ring of the Pale Order is one of the strongest Mythic items for advanced players, thanks to its auto healing effect that restores health as you deal damage. This powerful sustain tool allows experienced players to tackle even veteran hardmode dungeons solo, a testament to its strength.
Unlike Oakensoul, advanced players typically gain key buffs from other sources through precise bar setups, group synergies, and active buff management. This makes Pale Order ideal for those who are comfortable with micromanaging their build for maximum efficiency.
Rakkhat’s Voidmantle Mythic
The ![]() Rakkhat’s Voidmantle is the best Mythic for group content. Basically, the counterpart to Pale Order. In groups you often receive heals from another group member, such as the healer or a tank. Therefore we can focus on maximum damage.
Rakkhat’s Voidmantle is the best Mythic for group content. Basically, the counterpart to Pale Order. In groups you often receive heals from another group member, such as the healer or a tank. Therefore we can focus on maximum damage. ![]() Rakkhat’s Voidmantle increases your Heavy Attacks damage output by a huge amount, making it perfect for group content.
Rakkhat’s Voidmantle increases your Heavy Attacks damage output by a huge amount, making it perfect for group content.
![]() Rakkhat’s Voidmantle is the best Mythic choice for group content, effectively serving as the counterpart to the Ring of the Pale Order.
Rakkhat’s Voidmantle is the best Mythic choice for group content, effectively serving as the counterpart to the Ring of the Pale Order.
In group environments, healing is typically provided by a dedicated healer or tank, which allows you to shift your focus entirely toward maximizing damage output. ![]() Rakkhat’s Voidmantle significantly boosts your Heavy Attack damage, making it an ideal choice for coordinated PvE group scenarios such as trials and dungeons.
Rakkhat’s Voidmantle significantly boosts your Heavy Attack damage, making it an ideal choice for coordinated PvE group scenarios such as trials and dungeons.
Champion Points & Optimization for the Sorc Subclassing Build

In this section of the ESO Sorcerer Subclasses Build we are going to take a look at important info for things that is often overlooked when replicating a build. Most often players forgot to use the correct Consumables. These can make or break a build because they provide immense buffs to the character.
- Champion Points Allocation
- Attribute Distribution
- Mundus Stone
- Optimal Races
- Consumables (Food & Potions)
Recommended Champion Points Allocation
Champion Points increase the power level of your build tremendously. Therefore, it is recommended to reach 918 Champion Points as fast as possible. Once you reach this level, you will be able to slot most of the important perks in all trees. It caps out at around 1656 though. You can read my ESO Powerleveling Guide to optimize farming Champion Points for the ESO Sorcerer Subclasses Build.
In the table below, you see all the slottable Champion Point perks that you have to run with this setup to optimize our damage.
View the full Champion Points spec:![]()
![]()
![]() Champion Points Setup for the Sorcerer Subclassing Build.
Champion Points Setup for the Sorcerer Subclassing Build.
| Craft | Warfare | Fitness |
|---|---|---|
| Free choice | ||
| Free choice | ||
| Free choice |
Explanation of each slotable Perk:
Craft
- Steed’s Blessing – Increases your out of combat Movement Speed by 20%.
Warfare
- Weapons Expert – Increases your damage done with Light and Heavy Attacks by 20%.
- Fighting Finesse – Increases your Critical Damage by 8%.
- Wrathful Strikes – Grants 205 Weapon and Spell Damage.
- Exploiter if you have access to Off-Balance.
- Deadly Aim – Increases your damage done with single-target attacks by 6%.
Fitness
- Boundless Vitality – Grants 1400 Max Health.
- Celerity – Increases your Movement Speed by 10%.
- Fortified – Grants 1731 Armor.
- Rejuvenation – Grants 90 Health, Magicka and Stamina Recovery.
Attribute Distribution
All points into the Magicka attribute to increase our magicka resource.
![]() 0 Points
0 Points
![]() 64 Points
64 Points
![]() 0 Points
0 Points
Best Mundus Stone for the Sorcerer Subclassing Build
For our Mundus Stone, we want to select The Thief. The Thief gives us plenty of valuable extra Critical Chance. This increases our overall damage the most. Please view the The Thief Mundus Stone Location page to see the map locations on the ESO map.
- The Thief Mundus Stone
- Increased Critical Chance
Best Races for the Sorcerer Subclassing Build (Magicka DPS)
The Build works with any race. However, choosing the right race can significantly boost your performance with this ESO Sorcerer Subclasses Build, especially when focusing on a Magicka-based Heavy Attack DPS Build. Below are the top races recommended for this build, each offering unique advantages. You can find a full breakdown on the ESO Racial Skills Overview page.
- High Elf (Altmer) – Best overall damage boost with bonus Max Magicka and Spell Damage.
- Dark Elf (Dunmer) – High Magicka and Stamina bonuses with strong offensive passives.
- Breton – Excellent sustain with reduced Magicka costs and high resistances.
- Argonian – High survivability and bonus healing, good for solo play.
- Khajiit – Balanced race with bonuses to critical chance and critical damage.
- Orc – Unconventional but viable; provides Weapon & Spell Damage, extra health and mobility, useful for survivability.
Consumables (Food & Potions)
Food and Potions are important for every build, they give insane stat boosts and valuable buffs. You can buy all of these from any of the Guild Stores or craft them yourself.
Food Options


- Best Food: Artaeum Pickled Fish Bowl (Check Price)- Increase Max Health by 5414 and Max Magicka by 4938 for 2 hours
- Cheap Alternative: Solitude Salmon-Millet Soup (Check Price)- Increase Max Health by 5395 and Max Magicka by 4936 for 1 hour.
- Target Dummy Parsing: Tomato Garlic Chutney (Check Price)- Increase Max Magicka by 6048 for 35 minutes.
Potions
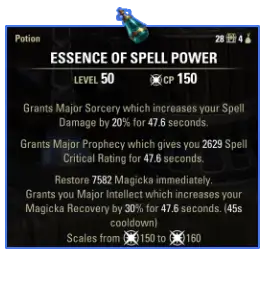


- Best Potion: Essence of Spell Power (Check Price)
- Combine Lady Smock, Namira’s Rot and Corn Flower.
- Cheap Alternative: Essence of Magicka
- Often found on defeated enemies.
- Cheap Alternative 2: Crown Tri-Restoration Potion
- You get these from daily login rewards and crown crates.
Potions are a powerful tool, Essence of Spell Power gives you Major Sorcery, Major Prophecy, and Major Intellect with a 100% uptime when you have the alchemy passive ![]() Medicinal Use active.
Medicinal Use active.
Alternative Skill-Lines for Subclassing on Sorcerer
Our current ESO Sorcerer Subclass Build utilizes two Sorcerer and one Nightblade skill-line: Daedric Summoning (Sorc), Storm Calling (Sorc), Assassination (NB).
Below you will find a few other variants that will work with this build, still mostly centered around pets and heavy attack.
| Build | Skill-line 1 | Skill-line 2 | Skill-line 3 |
|---|---|---|---|
| Current Build | |||
| Build Variant 1 | |||
| Build Variant 2 | |||
| Build Variant 3 |
Resource Management & Sustain Tips
This is a Heavy Attack Build. Heavy Attacks restore resources. Therefore, you will have unlimited sustain! Only if you use the ![]() Rakkhat’s Voidmantle Mythic, you will only restore Magicka with Light Attacks or through potions or Buff Food with Magicka Recovery.
Rakkhat’s Voidmantle Mythic, you will only restore Magicka with Light Attacks or through potions or Buff Food with Magicka Recovery.
Sorc Subclass Outfit Style & Fashion Showcase
If you would like to replicate the Outfit I used for this Sorcerer Subclassing Build, here is all the info you will need! I also added a blue version of the character, all items are the same except the chest is changed into Chaplain of the Worm Cuirass because it has a cool blue glow effect that matches great with the outfit.
| Slot | Name |
|---|---|
| Head | Breton Hat 3 |
| Shoulder | Fire Drake Pauldrons |
| Chest | Nibenese Court Wizard Jerkin |
| Hands | Thrassian Stranglers Mythic |
| Waist | Nibenese Court Wizard Sash |
| Legs | Chaplain of the Worm Greaves |
| Feet | Chaplain of the Worm Sabatons |
| Weapon | Hidden |
| Skin and Markings | Fractured Glory |
| Hair Style | Hidden |
| Dyes | Legate’s Black, Bloodroot Wine |


Target Dummy Parse Setups
If you want to target dummy hump you need to change your gear setup slightly to maximize damage. Do not use this setup against any other content, you don’t have any healing and shielding slotted! Use the normal Main Skill Setup.
- Use the following food for parsing: Tomato Garlic Chutney – Increase Max Magicka by 6048 for 35 minutes.
- For the target dummy, use Exploiter instead of Wrathful Strikes. The target dummy automatically procs off balance, which will get you a good damage boost.
Gear for Target Dummy
Here is the equipment I used for the parses you see below for the ESO Sorcerer Subclass Build. This is strictly for parsing against a Target Dummy, you have to stand still to get the full benefit from the Highland Sentinel Set. We also use the Mythic set ![]() Rakkhat’s Voidmantle.
Rakkhat’s Voidmantle.
| Gear | Set | Weight | Trait | Enchantment |
|---|---|---|---|---|
| Medium | ||||
| Medium | ||||
| Medium | ||||
| Medium | ||||
| Medium | ||||
| Light | ||||
| Medium | ||||
| Jewelry | ||||
| Jewelry | ||||
| Jewelry | ||||
| Shock | ||||
| N/A | N/A | N/A | N/A |
Where can I get the gear?
Highland Sentinel: Craftable
Maw of the Infernal: Veteran The Banished Cells II
Sergeant’s Mail: Wayrest Sewers 1 and 2
Perfected Crushing Wall: Veteran Maelstrom Arena
Rakkhat’s Voidmantle: Rakkhat’s Voidmantle Lead Location
139k One Bar Parse

This Target Dummy parse was achieved with a one-bar setup for the ESO Sorcerer Subclasses Build.
![]() Magical Banner can be turned on before the fight, it will stay active all the time.
Magical Banner can be turned on before the fight, it will stay active all the time.
- Optimal: Use Power Overload only when Off-Balance is active. You can track Off Balance (lasts 7 seconds) or Off Balance Immunity (lasts 14 seconds).
- No Tracking: Deplete Power Overload at the beginning of the fight and let it charge up until you are in execute and then deplete it again. That way you won’t have to track Off-Balance and only lose 2-3k DPS.
- IMPORTANT: Activating Shocking Contigency at least once every 10 seconds because it procs the Might of the Guild passive that gives you Empower for 10 seconds and boosts Heavy Attack damage like crazy.
- Keep activating the Summon Twilight Matriarch until the dummy reaches 50% HP.
- Keep activating Summon Volatile Familiar throughout the whole fight.


| Frontbar | Backbar |
|---|---|
| Slot 1: Shocking Contingency | Slot 1: Concealed Weapon |
| Slot 2: Magical Banner | Slot 2: Bound Aegis |
| Slot 3: Killer’s Blade | Slot 3: Relentless Focus |
| Slot 4: Summon Volatile Familiar | Slot 4: N/A |
| Slot 5: Summon Twilight Matriarch | Slot 5: N/A |
| Ultimate: Power Overload (or Soul Harvest) | Ultimate: N/A |
- Ulfsild’s Contingency (base)
- Modified Name: Shocking Contingency
- Focus: Shock Damage
- Signature: Lingering Torment
- Affix: Force
- Why it’s strong: Deals damage and applies Minor Force. It is a Mages Guild skill and procs the Might of the Guild passive that gives you Empower for 10 seconds, increasing Heavy Attack damage by a lot.
- Banner Bearer (base)
- Modified Name: Magical Banner
- Focus: Magical Damage
- Signature: Cavalier’s Charge
- Affix: Berserk
- Why it’s strong: Stays active all the time, increases your Magic Damage. Increases your Spell Damage and grants Minor Berserk.
117k One Button Parse

It won’t get much simpler than this parse with the ESO Sorcerer Subclasses Build. ![]() Magical Banner can be turned on before the fight, it will stay active all the time.
Magical Banner can be turned on before the fight, it will stay active all the time.
- Optimal: Use Power Overload only when Off-Balance is active.
- No Tracking: Deplete Power Overload at the beginning of the fight and let it charge up until you are in execute and then deplete it again. That way you won’t have to track Off-Balance and only lose 2-3k DPS.
- IMPORTANT: Activating Shocking Contigency at least once every 10 seconds because it procs the Might of the Guild passive that gives you Empower for 10 seconds and boosts Heavy Attack damage like crazy.
- Killer’s Blade and the two other Nightblade Skills are only slotted for passive bonuses from the Assassination skill-line. Explained in the How to play the ESO Sorcerer Subclassing Build section.
After that you just Heavy Attack weave your way to victory.


| Frontbar | N/A |
|---|---|
| Slot 1: Shocking Contingency | Slot 1: Concealed Weapon |
| Slot 2: Magical Banner | Slot 2: Bound Aegis |
| Slot 3: Killer’s Blade | Slot 3: Relentless Focus |
| Slot 4: Mark Target | N/A |
| Slot 5: Teleport Strike | N/A |
| Ultimate: Power Overload | N/A |
- Ulfsild’s Contingency (base)
- Modified Name: Shocking Contingency
- Focus: Shock Damage
- Signature: Lingering Torment
- Affix: Force
- Why it’s strong: Deals damage and applies Minor Force. It is a Mages Guild skill and procs the Might of the Guild passive that gives you Empower for 10 seconds, increasing Heavy Attack damage by a lot.
- Banner Bearer (base)
- Modified Name: Magical Banner
- Focus: Magical Damage
- Signature: Cavalier’s Charge
- Affix: Berserk
- Why it’s strong: Stays active all the time, increases your Magic Damage. Increases your Spell Damage and grants Minor Berserk.
117k DPS Video Parse
Update Log for the ESO Sorcerer Subclasses Build
The Update Log for the ESO Sorcerer Subclasses Build shows all major changes (updates) made to the build since its launch.
10.04.2025 Added the Template for the Build.
08.05.2025 Updated the ESO Sorcerer Subclasses Build for the Seasons of the Worm Cult Part 1 Update.
05.06.2025 Updated and optimized the Oakensoul setup of the Sorcerer Subclass build.
18.08.2025 Updated the Build for Update 47 Feast of Shadows DLC, Seasons of the Worm Cult.
27.10.2025 Updated the Build for Update 48 Seasons of the Worm Cult Part 2.
03.03.2026 Updated the Build for Update 49, Season 0.