

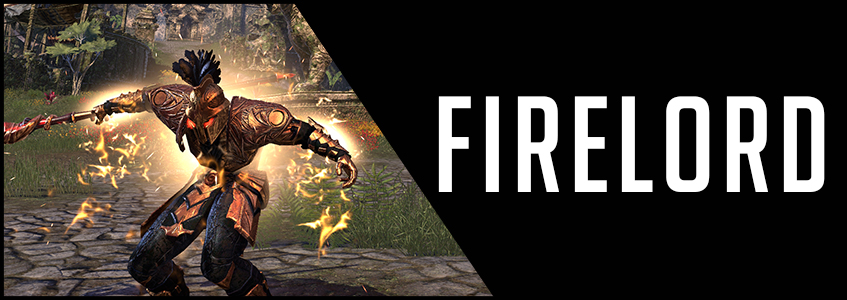
“Firelord”
Type: Group Cyrodiil 12 Players
Table of Contents
- Introduction
- Resource Management
- PVP Group Setup
- Gear
- Skills
- Rotation and Combos
- Champion Points (810, 600)
- Important Info (Food, Mundus, Race, Potions, Passives, Attributes)
- Update Log
Introduction
Welcome to the Magicka Dragonknight Support Cyrodiil Group Build “Firelord” for Elder Scrolls Online. Make sure to bookmark the link as I will keep updating the build for each new Update of ESO. The Firelord Build is optimized for Organized Group Play of 12 in Cyrodiil.
This build is Support Role oriented.
As a result, we make use of a variety of different sets to complete our Group Composition.
We use a 5-1-1 light Setup with :
- Willpower
- Snow Treaders
- Symphony of Blades
- Perfected Grand Rejuvenation (Master Resto)
- Perfected Mender’s Ward (Blackrose Resto)
And one of the following sets :
- Sanctuary
- Gossamer
- Hollowfang Thirst
- Hiti’s Hearth
- Meritorious Service
- The Worm’s Raiment
- Curse Eater
I am considering switching:
- Gossamer and Hollowfang Thirst on two Healer Setups
- Robes of Transmutation x2 on two Support Setups
As a result, Healers would benefit from stats like Max Magicka and Spell Damage to boost their Healing Potential while Supports would get Magicka Recovery bonuses to increase their Sustain and allow them to Purge more.
I just need to test if it’s possible to maintain a solid uptime on Olo and Trans on a Support Setup while bringing a solid amount of Purges when needed.
Consider using Curse Eater only if you don’t want to use the Snow Treaders or if you are low on Purges that night. Otherwise, you should be allright.
Since the Dragonhold update, the sustain for MagDK has never been that bad. This being said, MagDK is needed for the banner and the talons.
I strongly advise to cover the Support role unless you really know what you are doing and are an expert at sustaining in heavy lag. MagDK Damage Dealer offers one of the biggest challenge but is also very rewarding.
The Dragonknight can cover two different approaches as a Support role in a group environment. Offensive or Defensive. We will focus mainly on the offensive role for this build and this is why heavy armor makes perfect sense.
On the other end, the definition of the Defensive Support magDK role would be to focus heavily on purging over anything else and act as a backup for the offensive MagDK Support. In other words, you don’t want to include a defensive magDK unless you got the offensive one already. More details coming in the gear and skills section.
For the Offensive role, our goal is to anticipate the leader next movement’s decision and to move ahead toward the biggest pack of enemies during a push.
As we pass throught them, rotate between Chocking Talons, Mystic Orb and Shifting Standard providing 3 of the 6 damage synergies used in group play.
We also support the group with Overflowing Altar when the health of our group members fluctuates alot.
We provide Off Healing and Sustain with Radiating Regeneration and Illustrious Healing between engagements.
We apply Healing Ward with the Perfected Mender’s Ward which increase healing taken by 30% for 2 seconds.
We provide Siege Weapon Shield anytime our group stays stationary for a few seconds and backup Cleanse for kiting and heavy siege situations.
Last and not the least, we buff the entire raid with Major Sorcery / Brutality with Igneous Weapons which has its duration increased to 54 seconds in Dragonhold and a huge range of 36 meters.
This is just a quick introduction of how useful this Support role is in a group environment. We will cover the other skills in the Rotation and Combos section.
*** IMPORTANT *** : This build requires a Stam Support who provides an uptime of 90%+ on Major Expedition and Minor Expedition with Charging Maneuver.
- Optimized for Organized Group Play of 12 in Cyrodiil
- Double Resto Staves Setup
- Light Armor
- Amazing synergies
- Great Crowd Control
Resource Management
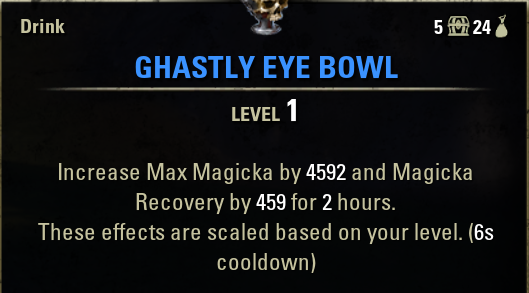
Ghastly Eye Bowl is the Food we use with this setup.
The Combustion Synergy from Energy Orb, The Worm’s Raiment buff always active, optimized uptime on Hollowfang Thirst and Symphony of Blades, between 6 to 10 layers of Illustrious Healing with the Perfected Grand Rejuvenation always active, Resto heavy attacks and potions are our major sources of sustain.
Using a Synergy Cooldown tracking addon such as RDK Group Tools helps to make good use of energy orbs.
Consider slotting Spell Symmetry for additional Magicka sustain.
- Energy Orbs
- Resto Heavy attacks
- Master Resto Staff
- Wormcult
- Hollowfang
- Symphony
- Potions
PvP Setup

This screenshot was taken with Sanctuary and our food buff.
Gear Setups
| Gear | Set | Type | Trait | Enchantment |
| Chest | Sanctuary | Light | Impenetrable | Tri-Stat |
| Belt | Sanctuary | Light | Impenetrable | Tri-Stat |
| Shoes | Snow Treaders | Medium | Impenetrable | Tri-Stat |
| Pants | Sanctuary | Light | Impenetrable | Tri-Stat |
| Hands | Sanctuary | Light | Impenetrable | Tri-Stat |
| Head | Symphony of Blades | Heavy | Impenetrable | Tri-Stat |
| Shoulder | Symphony of Blades | Light | Impenetrable | Tri-Stat |
| Necklace | Willpower | Jewelry | Arcane | Magicka Recovery |
| Ring | Willpower | Jewelry | Arcane | Magicka Recovery |
| Ring | Sanctuary | Jewelry | Arcane | Magicka Recovery |
| Weapon 1 | Perfected Grand Rejuvenation | Resto Staff | Powered | Absorb Magicka |
| Weapon 2 | Perfected Mender’s Ward | Resto Staff | Powered | Absorb Stamina |
| Gear | Set | Type | Trait | Enchantment |
| Chest | Gossamer | Light | Impenetrable | Tri-Stat |
| Belt | [Gossamer | Light | Impenetrable | Tri-Stat |
| Shoes | Snow Treaders | Medium | Impenetrable | Tri-Stat |
| Pants | Gossamer | Light | Impenetrable | Tri-Stat |
| Hands | Gossamer | Light | Impenetrable | Tri-Stat |
| Head | Symphony of Blades | Heavy | Impenetrable | Tri-Stat |
| Shoulder | Symphony of Blades | Light | Impenetrable | Tri-Stat |
| Necklace | Willpower | Jewelry | Arcane | Magicka Recovery |
| Ring | Willpower | Jewelry | Arcane | Magicka Recovery |
| Ring | Gossamer | Jewelry | Arcane | Magicka Recovery |
| Weapon 1 | Perfected Grand Rejuvenation | Resto Staff | Powered | Absorb Magicka |
| Weapon 2 | Perfected Mender’s Ward | Resto Staff | Powered | Absorb Stamina |
| Gear | Set | Type | Trait | Enchantment |
| Chest | Hiti’s Hearth | Light | Impenetrable | Tri-Stat |
| Belt | Hiti’s Hearth | Light | Impenetrable | Tri-Stat |
| Shoes | Snow Treaders | Medium | Impenetrable | Tri-Stat |
| Pants | Hiti’s Hearth | Light | Impenetrable | Tri-Stat |
| Hands | Hiti’s Hearth | Light | Impenetrable | Tri-Stat |
| Head | Symphony of Blades | Heavy | Impenetrable | Tri-Stat |
| Shoulder | Symphony of Blades | Light | Impenetrable | Tri-Stat |
| Necklace | Willpower | Jewelry | Arcane | Magicka Recovery |
| Ring | Willpower | Jewelry | Arcane | Magicka Recovery |
| Ring | Hiti’s Hearth | Jewelry | Arcane | Magicka Recovery |
| Weapon 1 | Perfected Grand Rejuvenation | Resto Staff | Powered | Absorb Magicka |
| Weapon 2 | Perfected Mender’s Ward | Resto Staff | Powered | Absorb Stamina |
| Gear | Set | Type | Trait | Enchantment |
| Chest | Hollowfang Thirst | Light | Impenetrable | Tri-Stat |
| Belt | Hollowfang Thirst | Light | Impenetrable | Tri-Stat |
| Shoes | Snow Treaders | Medium | Impenetrable | Tri-Stat |
| Pants | Hollowfang Thirst | Light | Impenetrable | Tri-Stat |
| Hands | Hollowfang Thirst | Light | Impenetrable | Tri-Stat |
| Head | Symphony of Blades | Heavy | Impenetrable | Tri-Stat |
| Shoulder | Symphony of Blades | Light | Impenetrable | Tri-Stat |
| Necklace | Willpower | Jewelry | Arcane | Magicka Recovery |
| Ring | Willpower | Jewelry | Arcane | Magicka Recovery |
| Ring | Hollowfang Thirst | Jewelry | Arcane | Magicka Recovery |
| Weapon 1 | Perfected Grand Rejuvenation | Resto Staff | Powered | Absorb Magicka |
| Weapon 2 | Perfected Mender’s Ward | Resto Staff | Powered | Absorb Stamina |
| Gear | Set | Type | Trait | Enchantment |
| Chest | Meritorious Service | Light | Impenetrable | Tri-Stat |
| Belt | Meritorious Service | Light | Impenetrable | Tri-Stat |
| Shoes | Snow Treaders | Medium | Impenetrable | Tri-Stat |
| Pants | Meritorious Service | Light | Impenetrable | Tri-Stat |
| Hands | Meritorious Service | Light | Impenetrable | Tri-Stat |
| Head | Symphony of Blades | Heavy | Impenetrable | Tri-Stat |
| Shoulder | Symphony of Blades | Light | Impenetrable | Tri-Stat |
| Necklace | Willpower | Jewelry | Arcane | Magicka Recovery |
| Ring | Willpower | Jewelry | Arcane | Magicka Recovery |
| Ring | Meritorious Service | Jewelry | Arcane | Magicka Recovery |
| Weapon 1 | Perfected Grand Rejuvenation | Resto Staff | Powered | Absorb Magicka |
| Weapon 2 | Perfected Mender’s Ward | Resto Staff | Powered | Absorb Stamina |
| Gear | Set | Type | Trait | Enchantment |
| Chest | The Worm’s Raiment | Light | Impenetrable | Tri-Stat |
| Belt | The Worm’s Raiment | Light | Impenetrable | Tri-Stat |
| Shoes | Snow Treaders | Medium | Impenetrable | Tri-Stat |
| Pants | The Worm’s Raiment | Light | Impenetrable | Tri-Stat |
| Hands | The Worm’s Raiment | Light | Impenetrable | Tri-Stat |
| Head | Symphony of Blades | Heavy | Impenetrable | Tri-Stat |
| Shoulder | Symphony of Blades | Light | Impenetrable | Tri-Stat |
| Necklace | Willpower | Jewelry | Arcane | Magicka Recovery |
| Ring | Willpower | Jewelry | Arcane | Magicka Recovery |
| Ring | The Worm’s Raiment | Jewelry | Arcane | Magicka Recovery |
| Weapon 1 | Perfected Grand Rejuvenation | Resto Staff | Powered | Absorb Magicka |
| Weapon 2 | Perfected Mender’s Ward | Resto Staff | Powered | Absorb Stamina |
| Gear | Set | Type | Trait | Enchantment |
| Chest | Curse Eater | Light | Impenetrable | Tri-Stat |
| Belt | Curse Eater | Light | Impenetrable | Tri-Stat |
| Shoes | Snow Treaders | Medium | Impenetrable | Tri-Stat |
| Pants | Curse Eater | Light | Impenetrable | Tri-Stat |
| Hands | Curse Eater | Light | Impenetrable | Tri-Stat |
| Head | Symphony of Blades | Heavy | Impenetrable | Tri-Stat |
| Shoulder | Symphony of Blades | Light | Impenetrable | Tri-Stat |
| Necklace | Willpower | Jewelry | Arcane | Magicka Recovery |
| Ring | Willpower | Jewelry | Arcane | Magicka Recovery |
| Ring | Curse Eater | Jewelry | Arcane | Magicka Recovery |
| Weapon 1 | Perfected Grand Rejuvenation | Resto Staff | Powered | Absorb Magicka |
| Weapon 2 | Perfected Mender’s Ward | Resto Staff | Powered | Absorb Stamina |
Where can I get the gear?
Sanctuary: The Banished Cells I, The Banished Cells II
Gossamer: Cradle of Shadows
Hiti’s Hearth: Icereach
Hollowfang Thirst: Moongrave Fane
Meritorious Service: Imperial City
The Worm’s Raiment: Vault of Madness
Curse Eater: Cyrodiil
Snow Treaders: Mythic Item, Antiquities, Scrying, Excavation
Willpower: Imperial City
Symphony of Blades: vDepths of Malatar
Perfected Grand Rejuvenation: Veteran Dragonstar Arena
Perfected Mender’s Ward: Veteran Blackrose Prison
Important : If you have issues keeping up with the raid even with the Steed Mundus, consider :
– Adding one or two Swift to your jewelry
– Going Vampire Stage 1 with Elusive Mist instead of Siege Shield or Altar
Skills


| Resto Staff Mainbar | Resto Staff Off Bar |
| Slot 1: Siege Weapon Shield | Slot 1: Overflowing Altar |
| Slot 2: Igneous Weapons | Slot 2: Choking Talons |
| Slot 3: Cleanse | Slot 3: Mystic Orb |
| Slot 4: Radiating Regeneration | Slot 4: Healing Ward |
| Slot 5: Illustrous Healing | Slot 5: Fossilize |
| Ultimate: Replenishing Barrier | Ultimate : Shifting Standard |
Skills Explanation
- Igneous Weapon: Major Sorcery and Brutality for the whole raid.
- Cleanse: Debuffs removal and Burst Heal.
- Radiating Regeneration: Healing Over Time per Target.
- Illustrous Healing: Healing Over Time Ground Effect.
- Overflowing Altar: Healing Synergy
- Choking Talons: Damage Synergy, Root and Minor Maim.
- Mystic Orb: Damage and Sustain Synergy.
- Healing Ward: Provides Major Vitality.
- Fossilize: Single Target Crowd Control.
- Replenishing Barrier: Group Shield for Emergencies.
- Shifting Standard: Damage Synergy, Root and Minor Defile.
Rotation and Combos
Prebuffing Phase
With a Warden casting Expansive Frost Cloak, you don’t need to run Hardened Armor.
Before any engagement, you want to make sure to maintain the following buffs and abilities:
- Major Sorcery: Igneous Weapons
- Minor Lifesteal: Overflowing Altar
- One cast ahead of the group: Illoustrious Healing
- One or two casts: Radiating Regeneration
Offensive window
In a magicka group focus, the leader will usually start an engagement by doing a countdown of Proximity Detonation. As you hear the countdown, cast Igneous Weapons and Overflowing Altar.
Cast Illoustrious Healing once and Radiating Regeneration a few times while you move toward the biggest pack of enemies before the leader even calls for it.
You have to anticipate the direction ahead of time so I recommend this role to be covered by somebody with experience who has played with the leader for quite some time and is used to his calls.
Move through the enemies ahead of them and alternate between Chocking Talons and Mystic Orb. The reason why you want to go ahead of them is because the Orbs will spawn behind you.
Ultimate
Anytime you see 4 enemies or more stacked together, drop your Shifting Standard ahead of them and alternate with Chocking Talons every global cooldown.
Kiting Phase
When the leader calls to move in a direction after an engagement, move back toward your group as fast as possible while spamming Cleanse.
During the kiting phase, when not under heavy pressure, reapply Overflowing Altar cast Illoustrious Healing ahead of your group, then use Radiating Regeneration a few times.
Also cast Siege Weapon Shield when stationary for a few seconds, especially inside a keep or an outpost.
Finally, when people call for help or when you see them in danger, cast Healing Ward to proc Major Vitality and increase their healing taken, combined with the burst healing from Healers.
Defensive Role
As pointed out earlier in the build, you can also play a MagDK Support defensively. The skills on your bars remain the same but some of them are used as a back up only. In case the Offensive DK dies or disconnects.
Skills like Chocking Talons, Igneous Weapons and Fossilize are slotted only as a backup.
Your main focus should be Cleanse, Siege Weapon Shield, Overflowing Altar, Ward Ally (different morphs of this skill stack together) and Mystic Orb for the sustain during the kiting phase.
If the other MagDK becomes unavailable, you take over his role on everything described above.
Champion Points [810]
The Ritual
31Thaumaturge
The Apprentice
100 Blessed, 100 Elfborn, 2 Spell Erosion, 37 Elemental Expert
The Shadow
39 Befoul, 51 Tumbling, 28 Shadow Ward
The Lover
75 Arcanist, 23 Tenacity
The Tower
51 Warlord, 1 Siphoner, 2 Sprinter
The Lord
11 Quick Recovery
The Lady
56 Hardy, 56 Elemental Defender, 56 Thick Skinned
The Steed
66 Ironclad, 25 Resistant
Champion Points [600]
The Ritual
31 Thaumaturge
The Apprentice
64 Blessed, 61 Elfborn, 12 Spell Erosion, 32 Elemental Expert
The Shadow
37 Befoul, 31 Tumbling, 31 Shadow Ward
The Lover
64 Arcanist
The Tower
31 Warlord, 6 Sprinter
The Lord
11 Quick Recovery
The Lady
43 Hardy, 43 Elemental Defender, 43 Thick Skinned
The Steed
40 Ironclad, 20 Resistant
Important Info
Buff-food
Ghastly Eye Bowl
Mundus Stone
The Steed (Increased Movement Speed by 10%)
Race
Breton
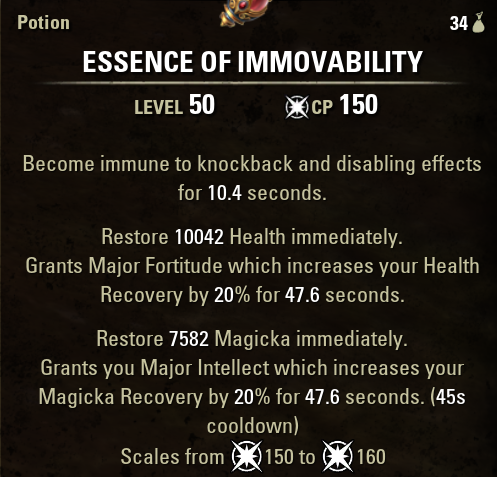
Potions
Immovability Potions
(CC Immunity, Health, Magicka)
(Bugloss, Namira’s Rot, Columbine)
Passives
- Ardent Flame: Combustion, Searing Heat, World in Ruin
- Draconic Power: Iron Skin, Burning Heart, Elder Dragon, Scaled Armor
- Earthen Heart: Eternal Mountain, Battle Roar, Mountain’s Blessing, Helping Hands
- Destruction Staff: Tri Focus, Penetrating Magic, Elemental Force, Ancient Knowledge, Destruction Expert
- Restoration Staff: Essence Drain, Restoration Expert, Cycle of Life, Absorb, Restoration Master
- Heavy Armor: Resolve, Constitution, Juggernaut, Revitalize, Rapid Mending
- Light Armor: Grace, Evocation, Spell Warding
- Medium Armor: Wind Walker Athletics
- Mages Guild: Magicka Controller
- Fighters Guild: Banish the Wicked
- Undaunted: Undaunted Command, Undaunted Mettle
- Assault: Continuous Attack, Reach, Combat Frenzy
- Support: Magicka Aid, Combat Medic, Battle Resurrection
- Racial: All
- Alchemy: Medicinal Use